radio controls BMW 550I SEDAN 2010 E60 User Guide
[x] Cancel search | Manufacturer: BMW, Model Year: 2010, Model line: 550I SEDAN, Model: BMW 550I SEDAN 2010 E60Pages: 271, PDF Size: 8.83 MB
Page 59 of 271
Controls
57Reference
At a glance
Driving tips
Communications
Navigation
Entertainment
Mobility
Driving
Ignition lock
Inserting remote control into ignition
lock
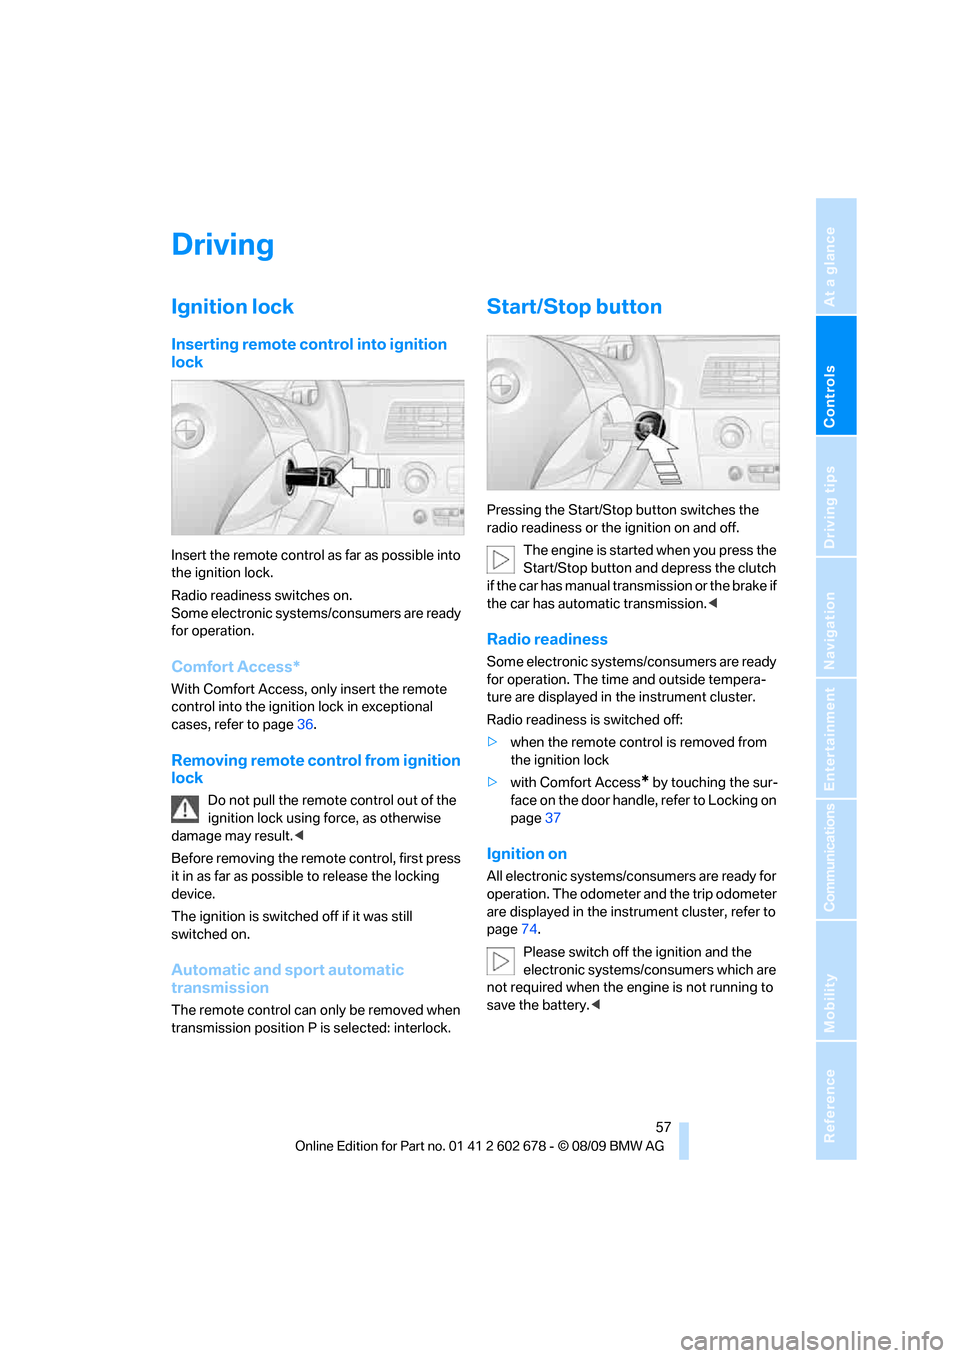
Insert the remote control as far as possible into
the ignition lock.
Radio readiness switches on.
Some electronic systems/consumers are ready
for operation.
Comfort Access*
With Comfort Access, only insert the remote
control into the ignition lock in exceptional
cases, refer to page36.
Removing remote control from ignition
lock
Do not pull the remote control out of the
ignition lock using force, as otherwise
damage may result.<
Before removing the remote control, first press
it in as far as possible to release the locking
device.
The ignition is switched off if it was still
switched on.
Automatic and sport automatic
transmission
The remote control can only be removed when
transmission position P is selected: interlock.
Start/Stop button
Pressing the Start/Stop button switches the
radio readiness or the ignition on and off.
The engine is started when you press the
Start/Stop button and depress the clutch
if the car has manual transmission or the brake if
the car has automatic transmission.<
Radio readiness
Some electronic systems/consumers are ready
for operation. The time and outside tempera-
ture are displayed in the instrument cluster.
Radio readiness is switched off:
>when the remote control is removed from
the ignition lock
>with Comfort Access
* by touching the sur-
face on the door handle, refer to Locking on
page37
Ignition on
All electronic systems/consumers are ready for
operation. The odometer and the trip odometer
are displayed in the instrument cluster, refer to
page74.
Please switch off the ignition and the
electronic systems/consumers which are
not required when the engine is not running to
save the battery.<
Page 73 of 271
Controls
71Reference
At a glance
Driving tips
Communications
Navigation
Entertainment
Mobility
Rules. Operation is subject to the following two
conditions:
>This device must not cause harmful inter-
ference, and>this device must accept any interference
received, including interference that may
cause undesired operation.
Any unauthorized modifications or
changes to these devices could void the
user’s authority to operate this equipment.<
System limitations
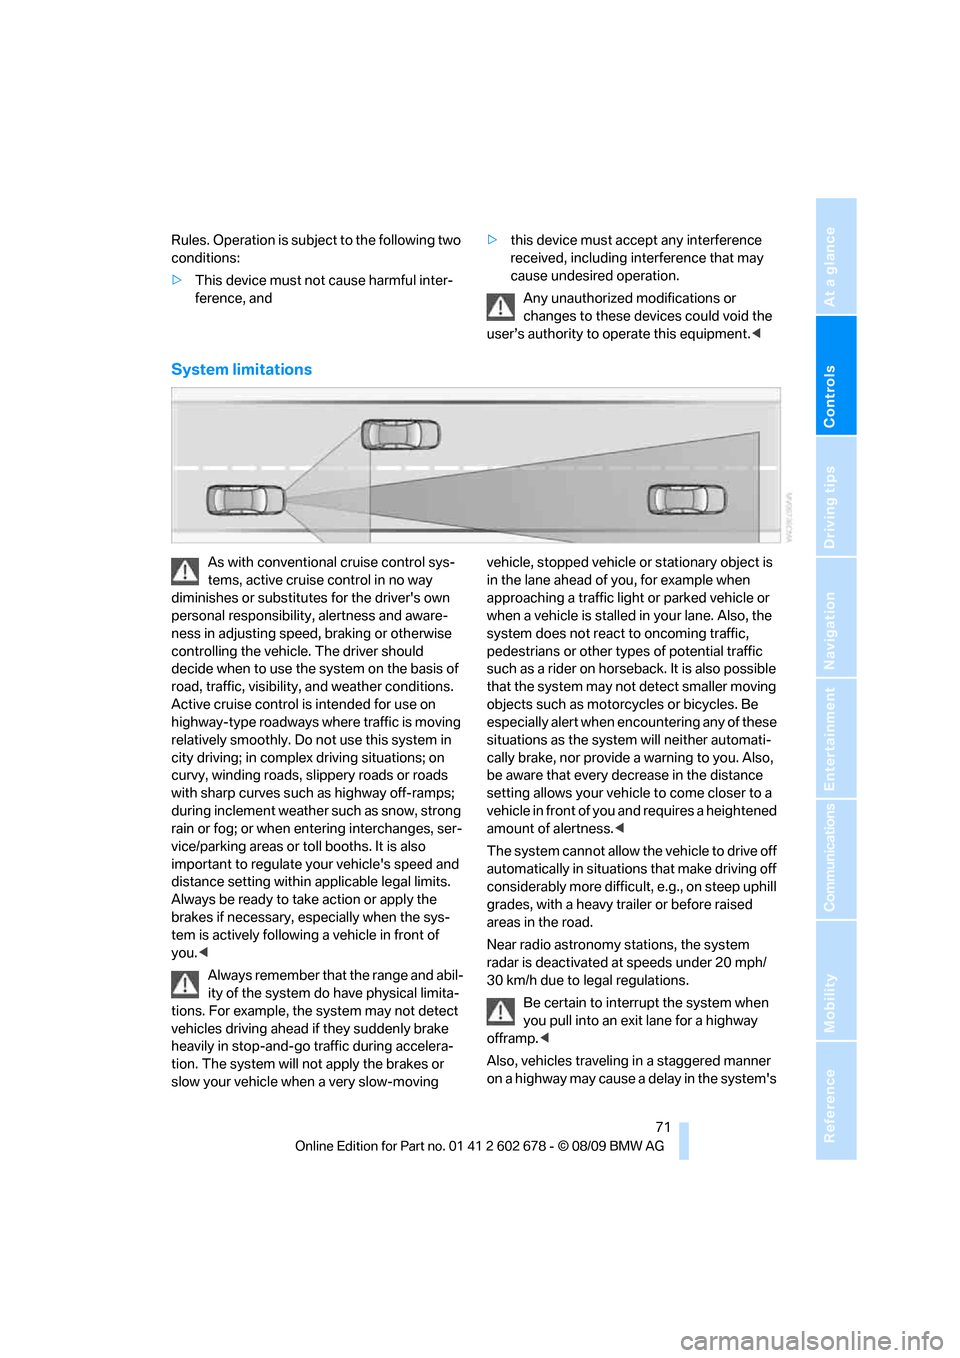
As with conventional cruise control sys-
tems, active cruise control in no way
diminishes or substitutes for the driver's own
personal responsibility, alertness and aware-
ness in adjusting speed, braking or otherwise
controlling the vehicle. The driver should
decide when to use the system on the basis of
road, traffic, visibility, and weather conditions.
Active cruise control is intended for use on
highway-type roadways where traffic is moving
relatively smoothly. Do not use this system in
city driving; in complex driving situations; on
curvy, winding roads, slippery roads or roads
with sharp curves such as highway off-ramps;
during inclement weather such as snow, strong
rain or fog; or when entering interchanges, ser-
vice/parking areas or toll booths. It is also
important to regulate your vehicle's speed and
distance setting within applicable legal limits.
Always be ready to take action or apply the
brakes if necessary, especially when the sys-
tem is actively following a vehicle in front of
you.<
Always remember that the range and abil-
ity of the system do have physical limita-
tions. For example, the system may not detect
vehicles driving ahead if they suddenly brake
heavily in stop-and-go traffic during accelera-
tion. The system will not apply the brakes or
slow your vehicle when a very slow-moving vehicle, stopped vehicle or stationary object is
in the lane ahead of you, for example when
approaching a traffic light or parked vehicle or
when a vehicle is stalled in your lane. Also, the
system does not react to oncoming traffic,
pedestrians or other types of potential traffic
such as a rider on horseback. It is also possible
that the system may not detect smaller moving
objects such as motorcycles or bicycles. Be
especially alert when encountering any of these
situations as the system will neither automati-
cally brake, nor provide a warning to you. Also,
be aware that every decrease in the distance
setting allows your vehicle to come closer to a
vehicle in front of you and requires a heightened
amount of alertness.<
The system cannot allow the vehicle to drive off
automatically in situations that make driving off
considerably more difficult, e.g., on steep uphill
grades, with a heavy trailer or before raised
areas in the road.
Near radio astronomy stations, the system
radar is deactivated at speeds under 20 mph/
30 km/h due to legal regulations.
Be certain to interrupt the system when
you pull into an exit lane for a highway
offramp.<
Also, vehicles traveling in a staggered manner
on a highway may cause a delay in the system's
Page 76 of 271
Controls Overview
74
Controls Overview
Odometer, outside
temperature display, clock,
date
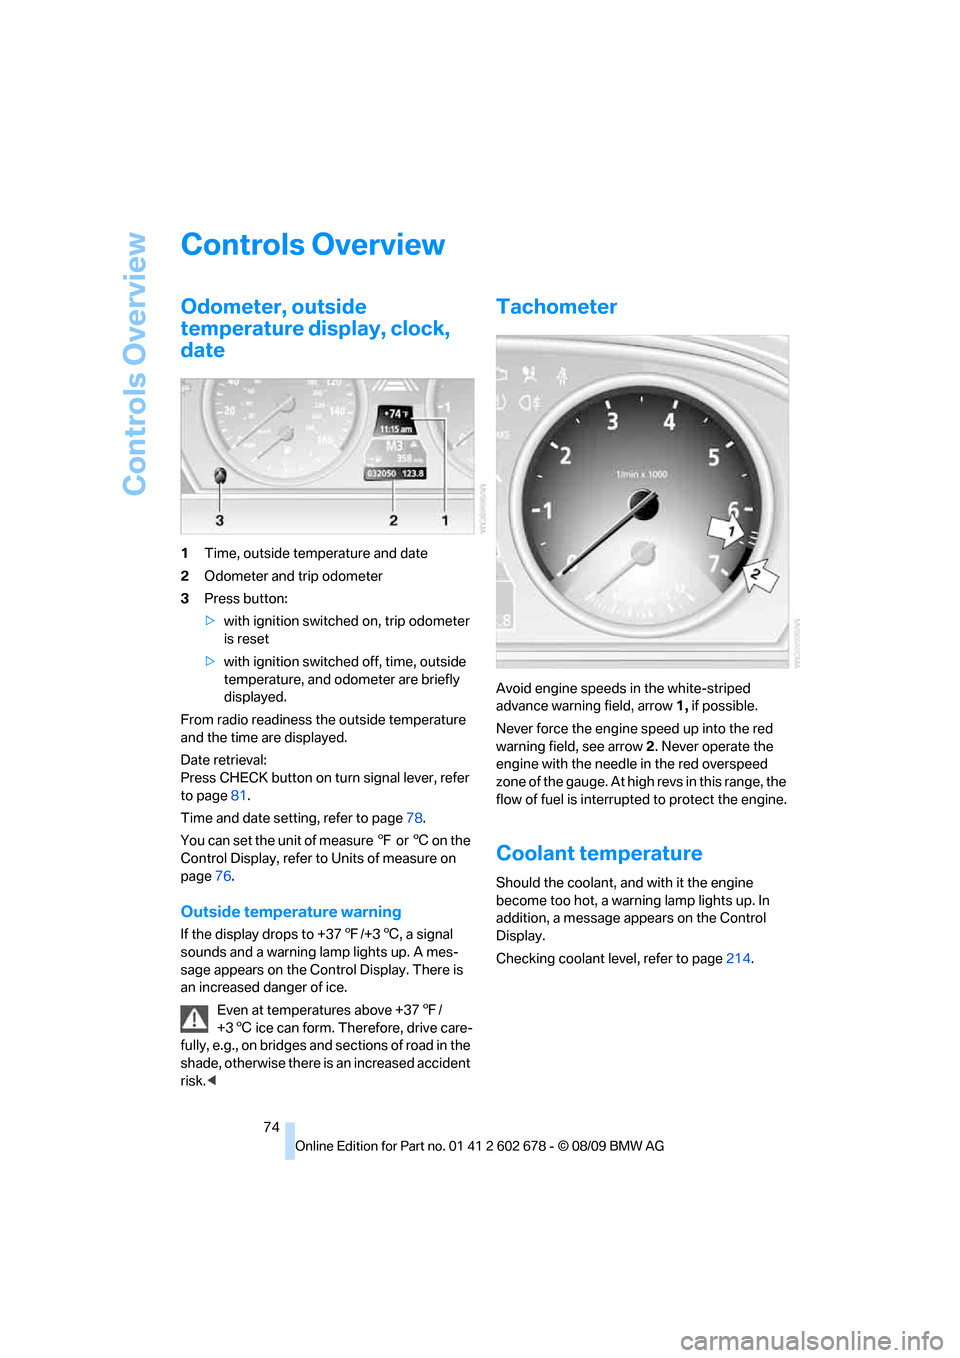
1Time, outside temperature and date
2Odometer and trip odometer
3Press button:
>with ignition switched on, trip odometer
is reset
>with ignition switched off, time, outside
temperature, and odometer are briefly
displayed.
From radio readiness the outside temperature
and the time are displayed.
Date retrieval:
Press CHECK button on turn signal lever, refer
to page81.
Time and date setting, refer to page78.
You can set the unit of measure 7 or 6 on the
Control Display, refer to Units of measure on
page76.
Outside temperature warning
If the display drops to +377/+36, a signal
sounds and a warning lamp lights up. A mes-
sage appears on the Control Display. There is
an increased danger of ice.
Even at temperatures above +377/
+36 ice can form. Therefore, drive care-
fully, e.g., on bridges and sections of road in the
shade, otherwise there is an increased accident
risk.<
Tachometer
Avoid engine speeds in the white-striped
advance warning field, arrow1, if possible.
Never force the engine speed up into the red
warning field, see arrow2. Never operate the
engine with the needle in the red overspeed
z o n e o f t h e g a u g e . A t h i g h r e v s i n t h i s r a n g e , t h e
flow of fuel is interrupted to protect the engine.
Coolant temperature
Should the coolant, and with it the engine
become too hot, a warning lamp lights up. In
addition, a message appears on the Control
Display.
Checking coolant level, refer to page214.
Page 97 of 271
Controls
95Reference
At a glance
Driving tips
Communications
Navigation
Entertainment
Mobility
purpose is properly detected on the seat.
The front and side airbags on the front pas-
senger side are not activated.
Most child seats are detected by the sys-
tem, especially the child seats required by
the NHTSA at the time the vehicle is manufac-
tured. After installing a child seat, make sure
that the indicator lamp for the front passenger
airbags lights up. This indicates that the child
seat has been detected and the front passenger
airbags are not activated.<
>The indicator lamp does not light up if, for
example, the system detects a person of
sufficient size seated correctly on the seat.
The front and side airbags on the front pas-
senger side are activated.
>The indicator lamp does not light up when
the seat is empty.
However, the front and side airbags on the
front passenger side are not activated.
Operational readiness of airbag system
From radio readiness, refer to page57, the
warning lamp lights up briefly, indicating the
operational readiness of the entire airbag sys-
tem and the safety belt tensioners.
Airbag system malfunction
>Warning lamp does not light up from radio
readiness.
>Warning lamp lights up continuously.
Have the airbag system checked immedi-
ately in case of a malfunction, otherwise
there is a danger that the airbag system may not
respond in the expected manner in an accident
despite an impact of corresponding intensity.<
Head-up Display*
The concept
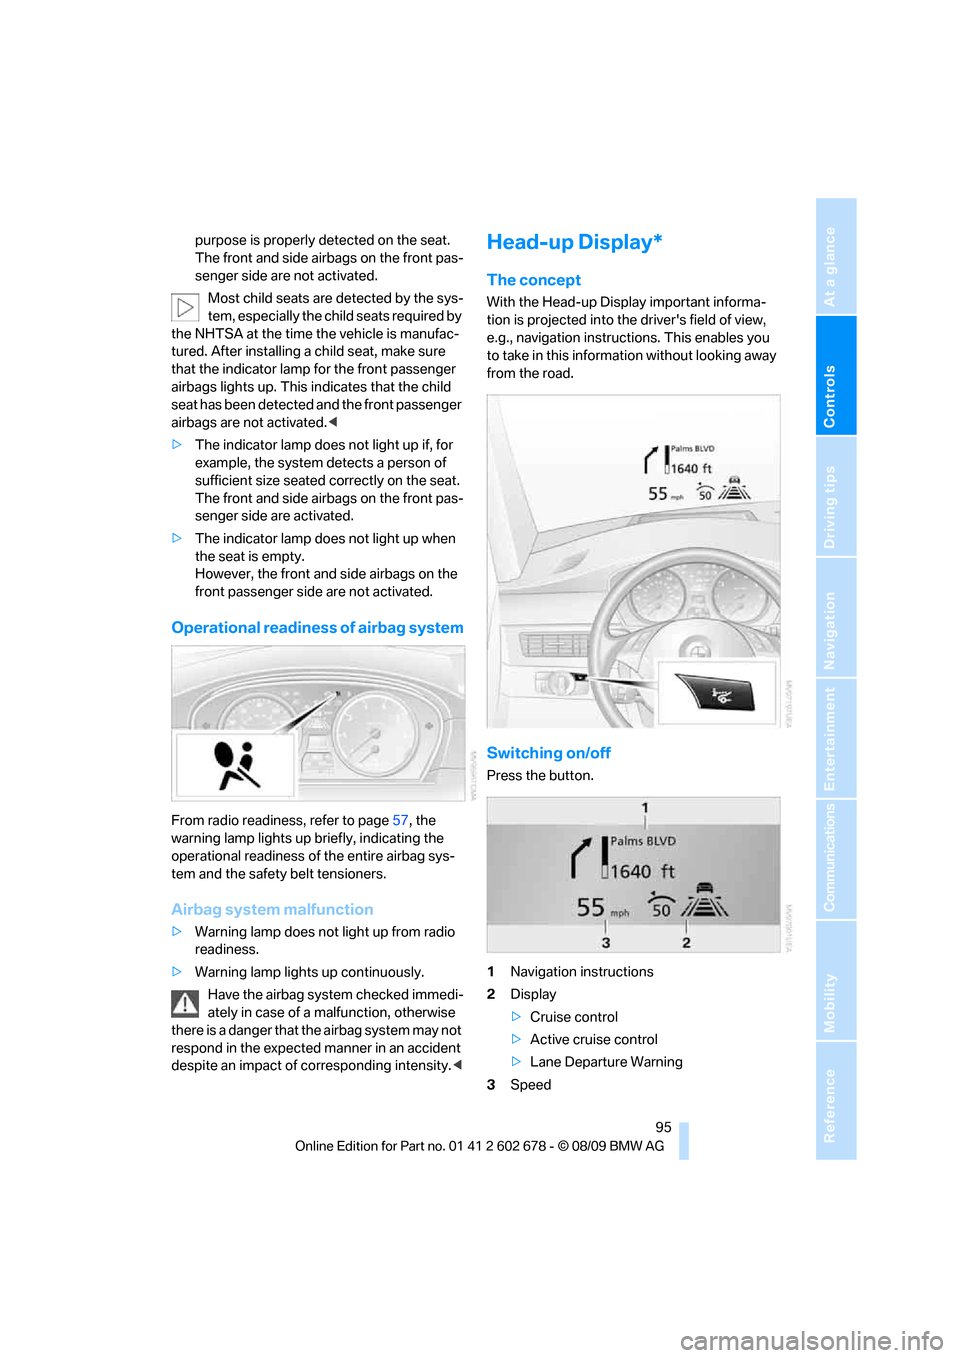
With the Head-up Display important informa-
tion is projected into the driver's field of view,
e.g., navigation instructions. This enables you
to take in this information without looking away
from the road.
Switching on/off
Press the button.
1Navigation instructions
2Display
>Cruise control
>Active cruise control
>Lane Departure Warning
3Speed
Page 147 of 271
Navigation
Driving tips
145Reference
At a glance
Controls
Communications
Entertainment
Mobility
3.Press the controller.
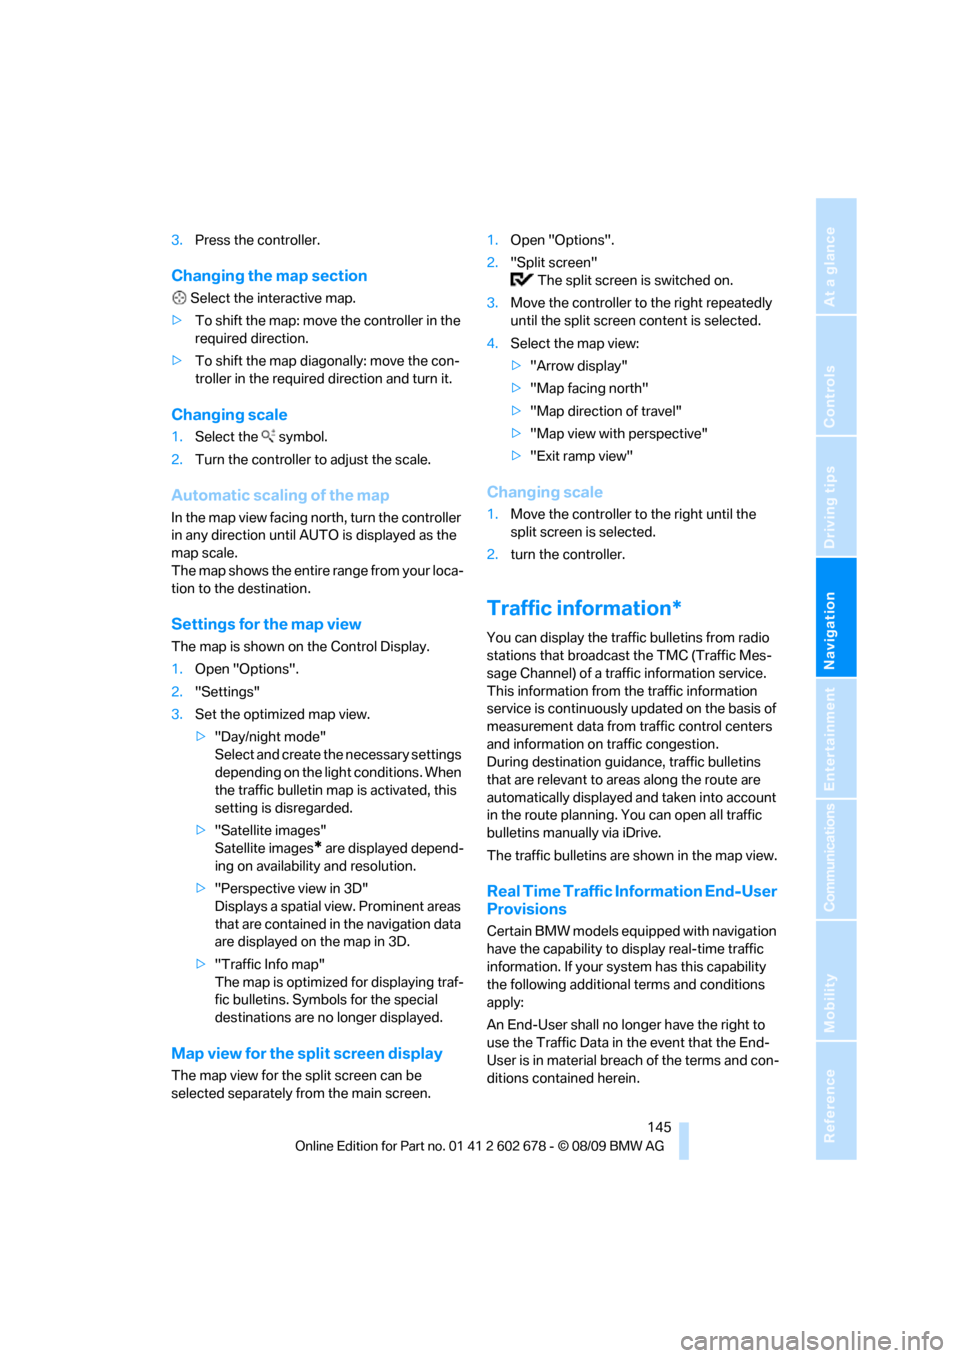
Changing the map section
Select the interactive map.
>To shift the map: move the controller in the
required direction.
>To shift the map diagonally: move the con-
troller in the required direction and turn it.
Changing scale
1.Select the symbol.
2.Turn the controller to adjust the scale.
Automatic scaling of the map
In the map view facing north, turn the controller
in any direction until AUTO is displayed as the
map scale.
The map shows the entire range from your loca-
tion to the destination.
Settings for the map view
The map is shown on the Control Display.
1.Open "Options".
2."Settings"
3.Set the optimized map view.
>"Day/night mode"
Select and create the necessary settings
depending on the light conditions. When
the traffic bulletin map is activated, this
setting is disregarded.
>"Satellite images"
Satellite images
* are displayed depend-
ing on availability and resolution.
>"Perspective view in 3D"
Displays a spatial view. Prominent areas
that are contained in the navigation data
are displayed on the map in 3D.
>"Traffic Info map"
The map is optimized for displaying traf-
fic bulletins. Symbols for the special
destinations are no longer displayed.
Map view for the split screen display
The map view for the split screen can be
selected separately from the main screen.1.Open "Options".
2."Split screen"
The split screen is switched on.
3.Move the controller to the right repeatedly
until the split screen content is selected.
4.Select the map view:
>"Arrow display"
>"Map facing north"
>"Map direction of travel"
>"Map view with perspective"
>"Exit ramp view"
Changing scale
1.Move the controller to the right until the
split screen is selected.
2.turn the controller.
Traffic information*
You can display the traffic bulletins from radio
stations that broadcast the TMC (Traffic Mes-
sage Channel) of a traffic information service.
This information from the traffic information
service is continuously updated on the basis of
measurement data from traffic control centers
and information on traffic congestion.
During destination guidance, traffic bulletins
that are relevant to areas along the route are
automatically displayed and taken into account
in the route planning. You can open all traffic
bulletins manually via iDrive.
The traffic bulletins are shown in the map view.
Real Time Traffic Information End-User
Provisions
Certain BMW models equipped with navigation
have the capability to display real-time traffic
information. If your system has this capability
the following additional terms and conditions
apply:
An End-User shall no longer have the right to
use the Traffic Data in the event that the End-
User is in material breach of the terms and con-
ditions contained herein.
Page 154 of 271
On/off and tone
152
On/off and tone
The following audio and video sources share
the same control elements and adjustments:
>Radio
>CD/DVD player
>CD changer
*
>Video*
>External devices, e.g., MP3 player
Controls
The audio and video sources can be controlled
using the:
>Buttons in the area of the CD/DVD player
>iDrive
>Buttons on the steering wheel; refer to
page11
>Programmable memory buttons, refer to
page20
>Voice activation system
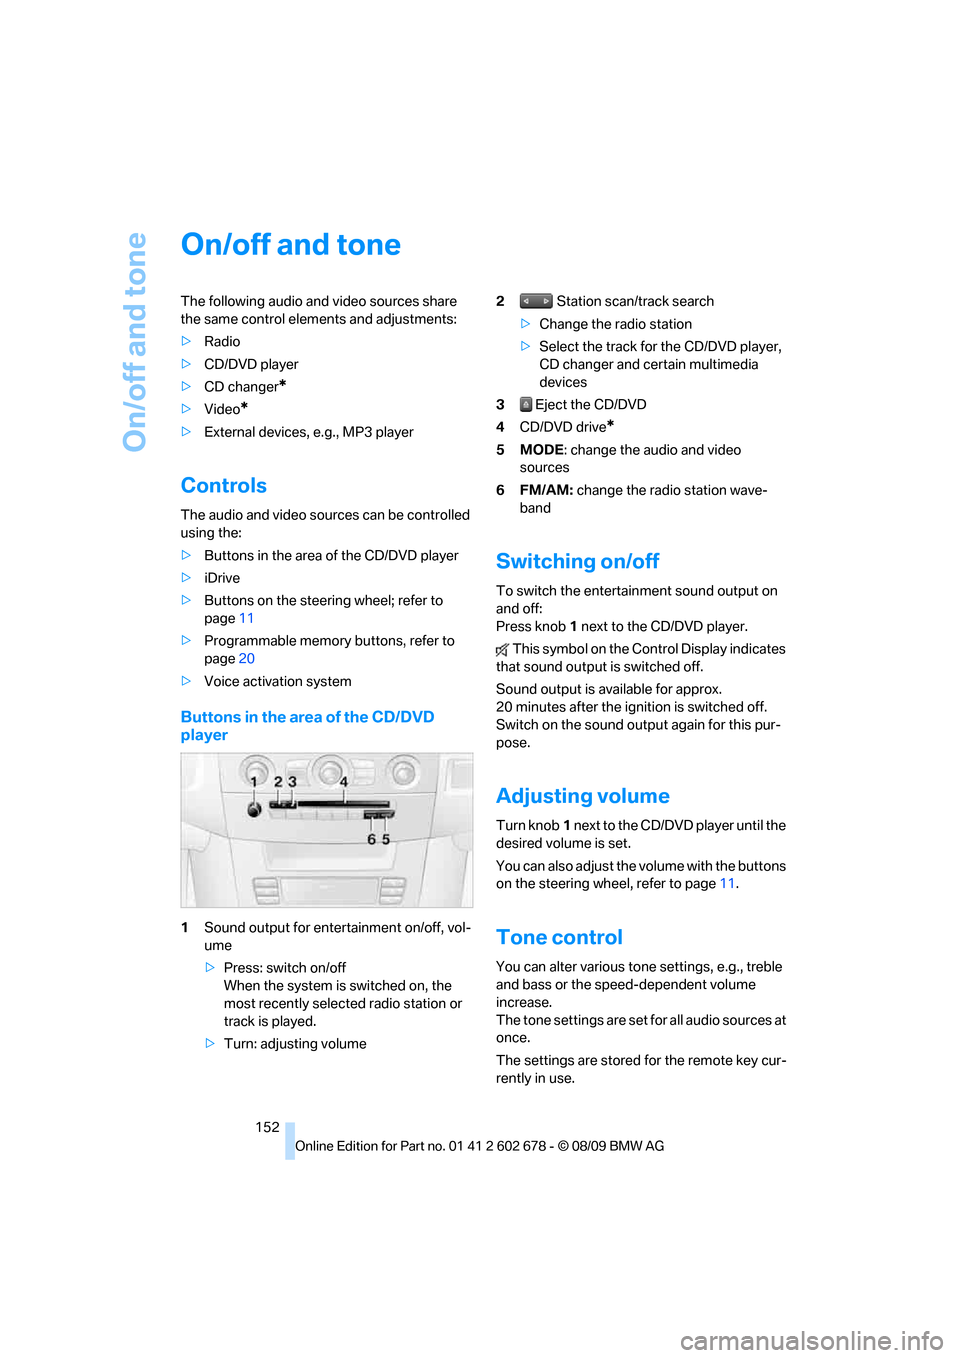
Buttons in the area of the CD/DVD
player
1Sound output for entertainment on/off, vol-
ume
>Press: switch on/off
When the system is switched on, the
most recently selected radio station or
track is played.
>Turn: adjusting volume2 Station scan/track search
>Change the radio station
>Select the track for the CD/DVD player,
CD changer and certain multimedia
devices
3 Eject the CD/DVD
4CD/DVD drive
*
5MODE: change the audio and video
sources
6FM/AM: change the radio station wave-
band
Switching on/off
To switch the entertainment sound output on
and off:
Press knob1 next to the CD/DVD player.
This symbol on the Control Display indicates
that sound output is switched off.
Sound output is available for approx.
20 minutes after the ignition is switched off.
Switch on the sound output again for this pur-
pose.
Adjusting volume
Turn knob1 next to the CD/DVD player until the
desired volume is set.
You can also adjust the volume with the buttons
on the steering wheel, refer to page11.
Tone control
You can alter various tone settings, e.g., treble
and bass or the speed-dependent volume
increase.
The tone settings are set for all audio sources at
once.
The settings are stored for the remote key cur-
rently in use.
Page 155 of 271
Navigation
Entertainment
Driving tips
153Reference
At a glance
Controls
Communications
Mobility
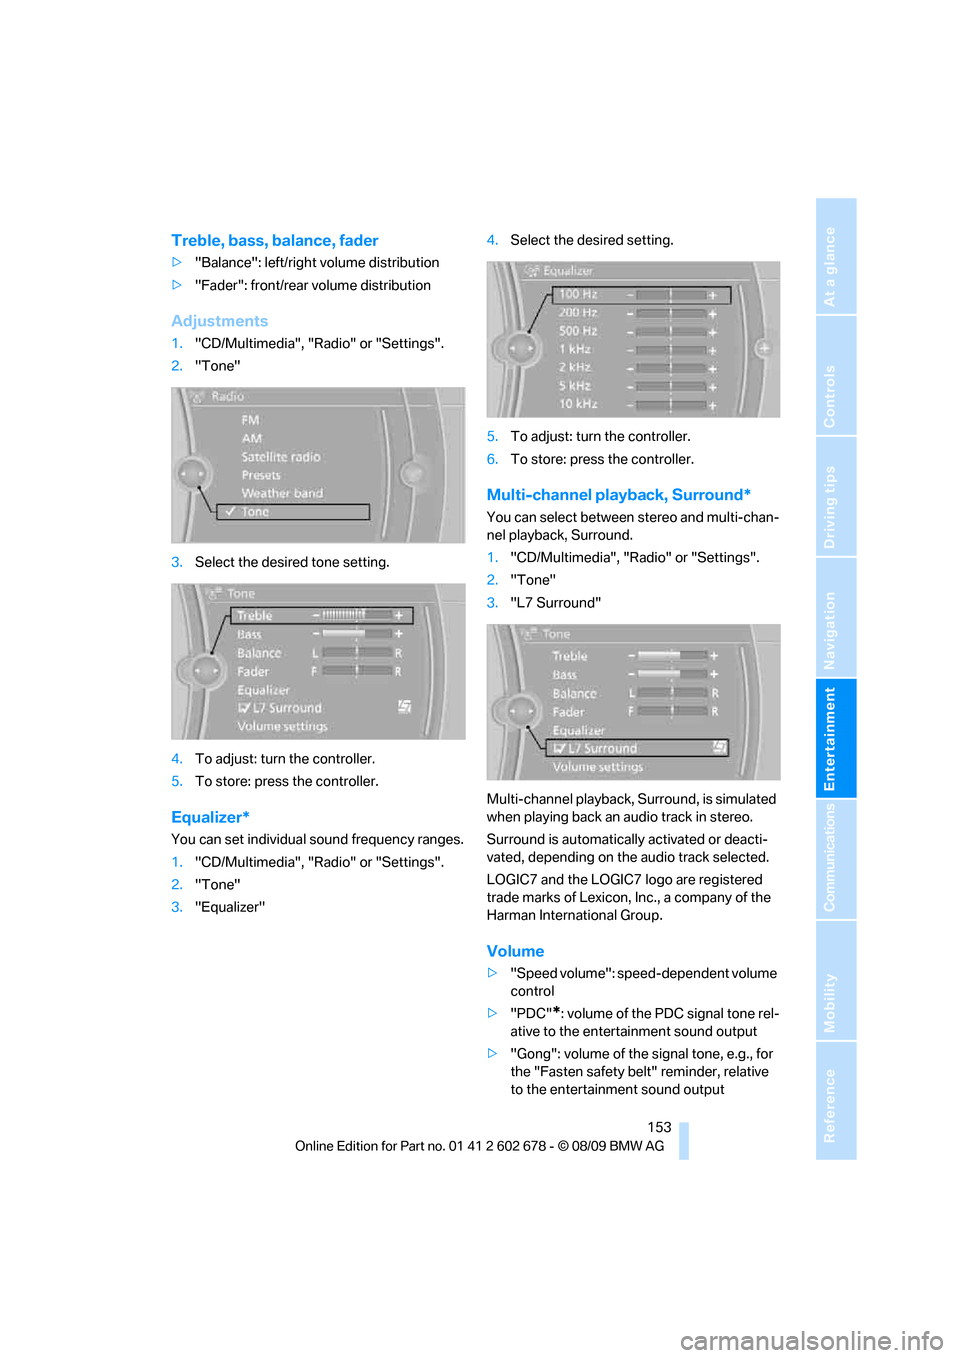
Treble, bass, balance, fader
>"Balance": left/right volume distribution
>"Fader": front/rear volume distribution
Adjustments
1."CD/Multimedia", "Radio" or "Settings".
2."Tone"
3.Select the desired tone setting.
4.To adjust: turn the controller.
5.To store: press the controller.
Equalizer*
You can set individual sound frequency ranges.
1."CD/Multimedia", "Radio" or "Settings".
2."Tone"
3."Equalizer"4.Select the desired setting.
5.To adjust: turn the controller.
6.To store: press the controller.
Multi-channel playback, Surround*
You can select between stereo and multi-chan-
nel playback, Surround.
1."CD/Multimedia", "Radio" or "Settings".
2."Tone"
3."L7 Surround"
Multi-channel playback, Surround, is simulated
when playing back an audio track in stereo.
Surround is automatically activated or deacti-
vated, depending on the audio track selected.
LOGIC7 and the LOGIC7 logo are registered
trade marks of Lexicon, Inc., a company of the
Harman International Group.
Volume
>"Speed volume": speed-dependent volume
control
>"PDC"
*: volume of the PDC signal tone rel-
ative to the entertainment sound output
>"Gong": volume of the signal tone, e.g., for
the "Fasten safety belt" reminder, relative
to the entertainment sound output
Page 157 of 271
Navigation
Entertainment
Driving tips
155Reference
At a glance
Controls
Communications
Mobility
Radio
Your radio is designed for reception of the fol-
lowing stations:
>FM and AM
>HD Radio
*
>Weather Band*
>Satellite radio*
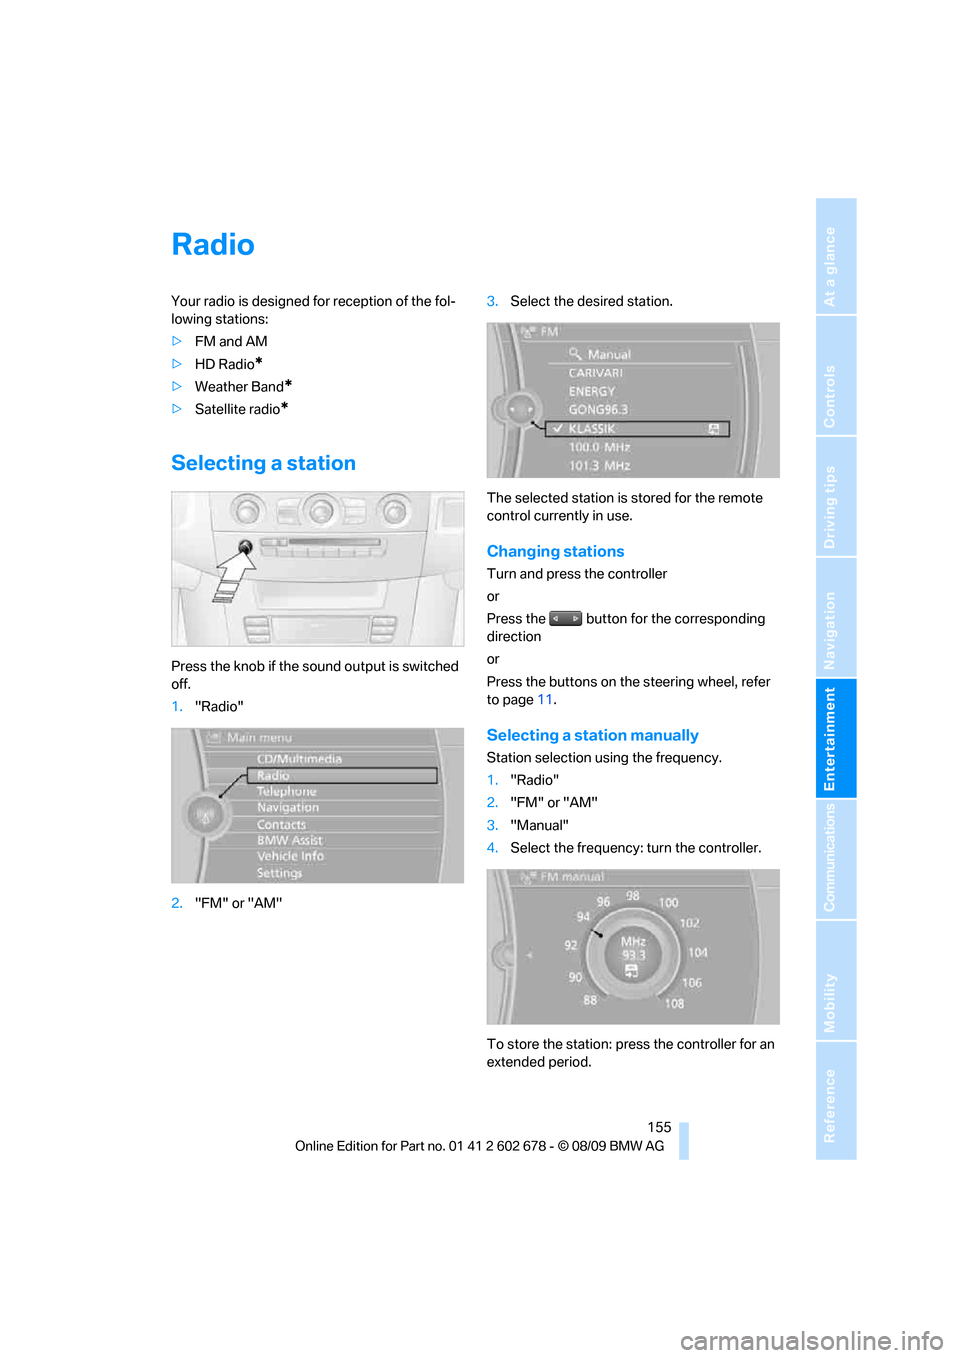
Selecting a station
Press the knob if the sound output is switched
off.
1."Radio"
2."FM" or "AM"3.Select the desired station.
The selected station is stored for the remote
control currently in use.
Changing stations
Turn and press the controller
or
Press the button for the corresponding
direction
or
Press the buttons on the steering wheel, refer
to page11.
Selecting a station manually
Station selection using the frequency.
1."Radio"
2."FM" or "AM"
3."Manual"
4.Select the frequency: turn the controller.
To store the station: press the controller for an
extended period.
Page 159 of 271
Navigation
Entertainment
Driving tips
157Reference
At a glance
Controls
Communications
Mobility
Displaying additional information
Some stations broadcast additional information
on the current track, such as the name of the
artist.
1.Select the desired station.
2.Open "Options".
3."Station info"
Selecting a substation
1.Select the desired station.
2.Press the controller.
3.Select the substation.
Presets
It is possible to store up to 40 stations.
Calling up a station
1."Radio"
2."Presets"
3.Select the desired station.
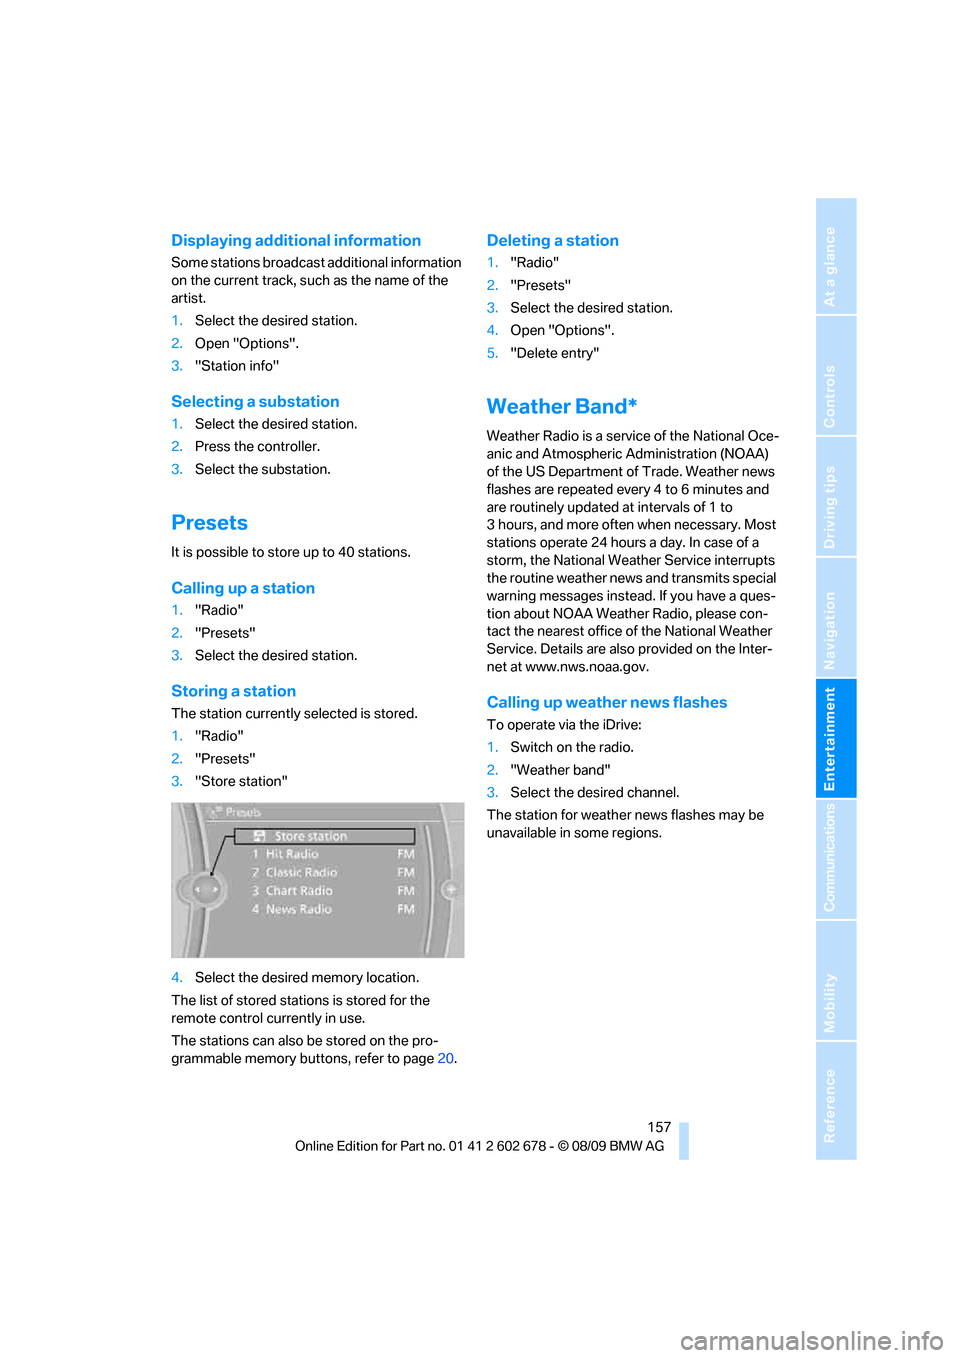
Storing a station
The station currently selected is stored.
1."Radio"
2."Presets"
3."Store station"
4.Select the desired memory location.
The list of stored stations is stored for the
remote control currently in use.
The stations can also be stored on the pro-
grammable memory buttons, refer to page20.
Deleting a station
1."Radio"
2."Presets"
3.Select the desired station.
4.Open "Options".
5."Delete entry"
Weather Band*
Weather Radio is a service of the National Oce-
anic and Atmospheric Administration (NOAA)
of the US Department of Trade. Weather news
flashes are repeated every 4 to 6 minutes and
are routinely updated at intervals of 1 to
3 hours, and more often when necessary. Most
stations operate 24 hours a day. In case of a
storm, the National Weather Service interrupts
the routine weather news and transmits special
warning messages instead. If you have a ques-
tion about NOAA Weather Radio, please con-
tact the nearest office of the National Weather
Service. Details are also provided on the Inter-
net at www.nws.noaa.gov.
Calling up weather news flashes
To operate via the iDrive:
1.Switch on the radio.
2."Weather band"
3.Select the desired channel.
The station for weather news flashes may be
unavailable in some regions.
Page 161 of 271
Navigation
Entertainment
Driving tips
159Reference
At a glance
Controls
Communications
Mobility
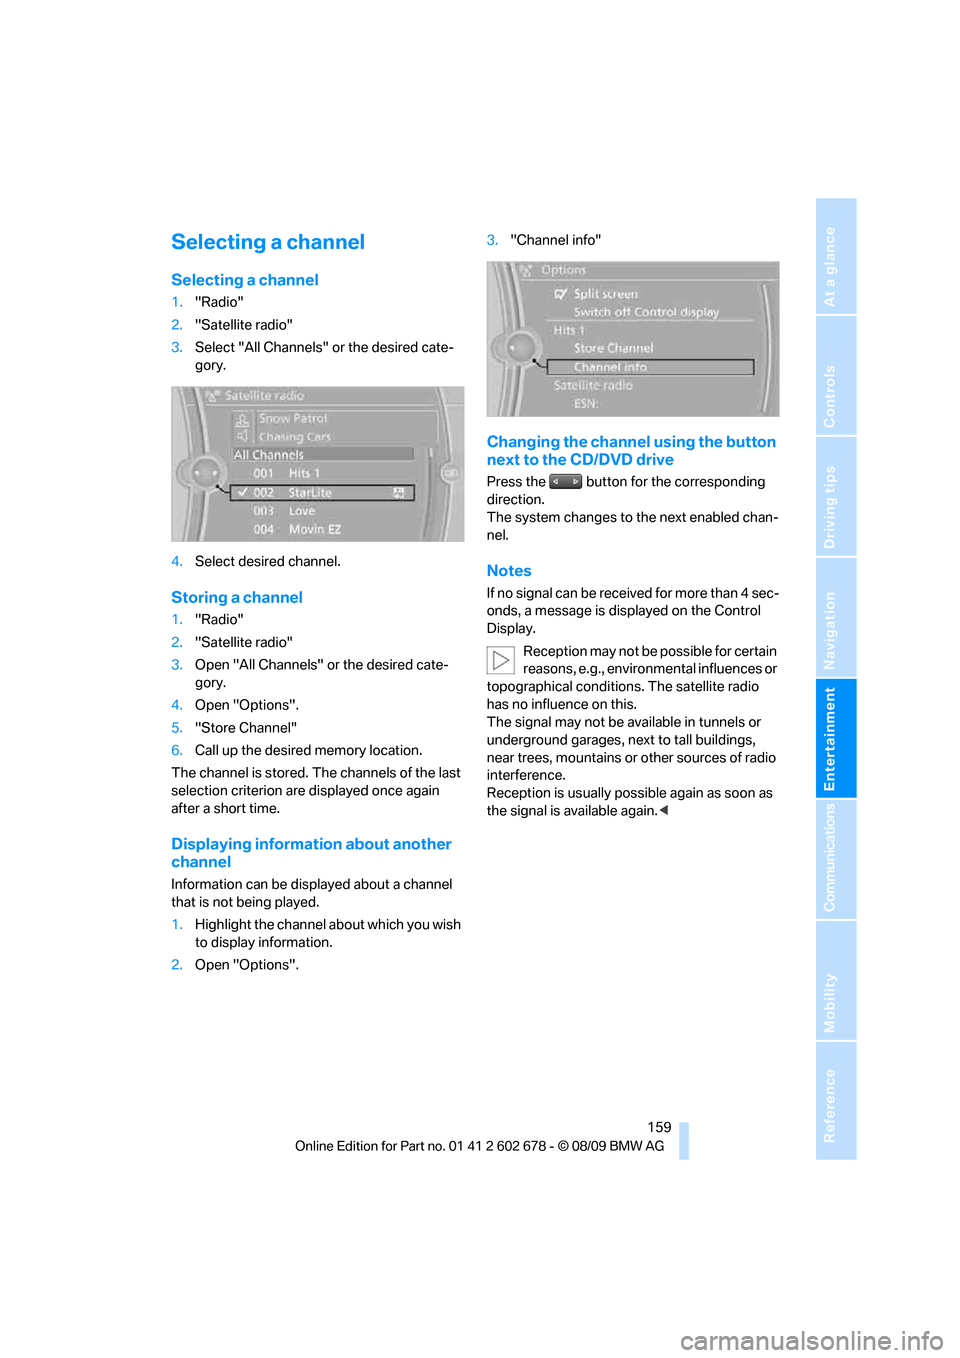
Selecting a channel
Selecting a channel
1."Radio"
2."Satellite radio"
3.Select "All Channels" or the desired cate-
gory.
4.Select desired channel.
Storing a channel
1."Radio"
2."Satellite radio"
3.Open "All Channels" or the desired cate-
gory.
4.Open "Options".
5."Store Channel"
6.Call up the desired memory location.
The channel is stored. The channels of the last
selection criterion are displayed once again
after a short time.
Displaying information about another
channel
Information can be displayed about a channel
that is not being played.
1.Highlight the channel about which you wish
to display information.
2.Open "Options".3."Channel info"
Changing the channel using the button
next to the CD/DVD drive
Press the button for the corresponding
direction.
The system changes to the next enabled chan-
nel.
Notes
If no signal can be received for more than 4 sec-
onds, a message is displayed on the Control
Display.
Reception may not be possible for certain
reasons, e.g., environmental influences or
topographical conditions. The satellite radio
has no influence on this.
The signal may not be available in tunnels or
underground garages, next to tall buildings,
near trees, mountains or other sources of radio
interference.
Reception is usually possible again as soon as
the signal is available again.<