ECU BMW 550I TOURING 2006 E61 User Guide
[x] Cancel search | Manufacturer: BMW, Model Year: 2006, Model line: 550I TOURING, Model: BMW 550I TOURING 2006 E61Pages: 259, PDF Size: 8.9 MB
Page 119 of 259
Controls
117Reference
At a glance
Driving tips
Communications
Navigation
Entertainment
Mobility
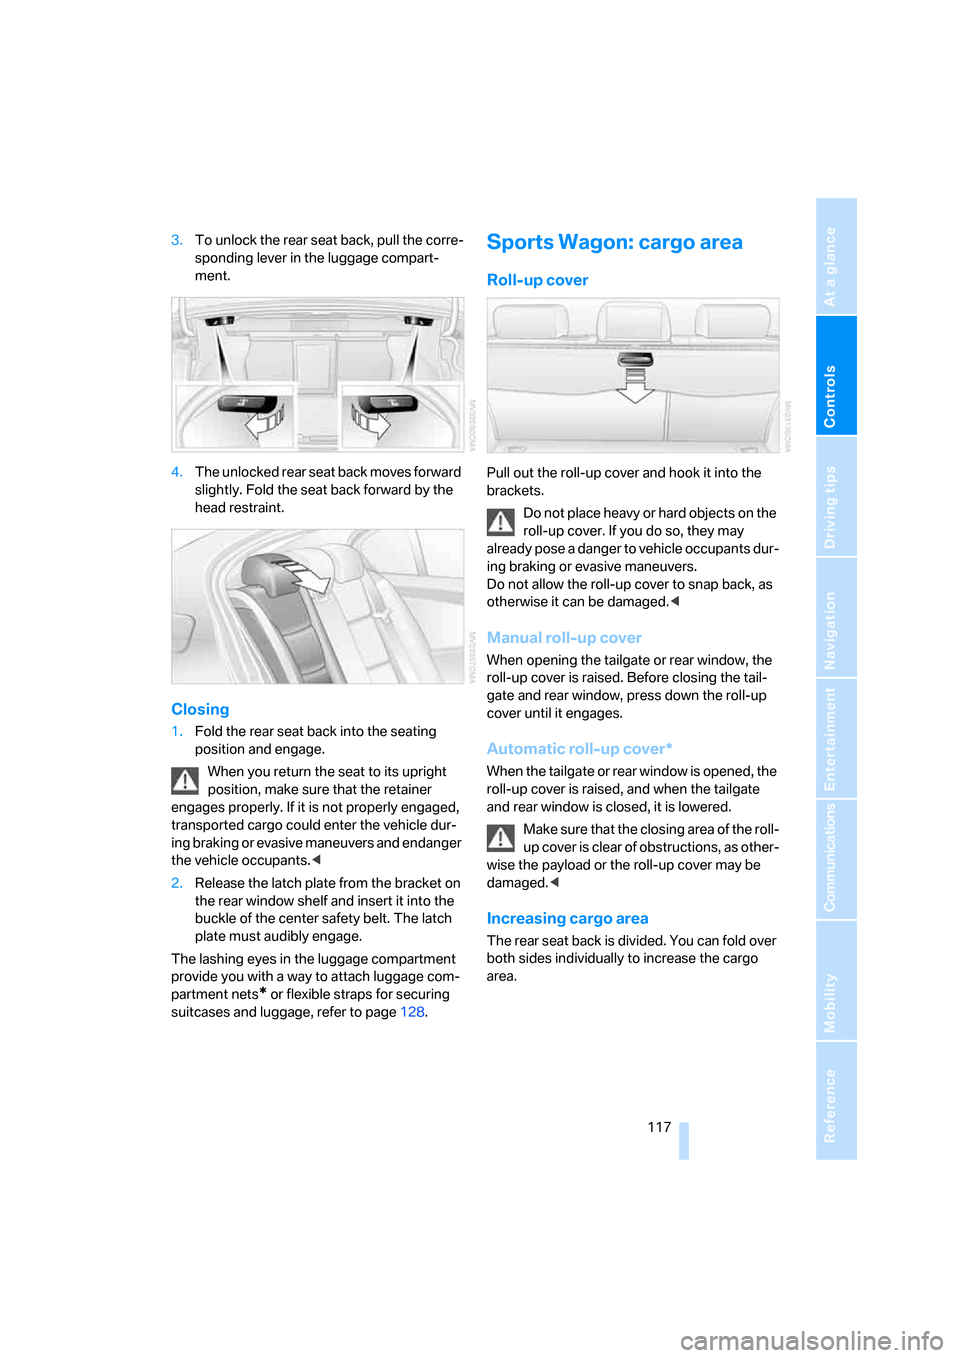
3.To unlock the rear seat back, pull the corre-
sponding lever in the luggage compart-
ment.
4.The unlocked rear seat back moves forward
slightly. Fold the seat back forward by the
head restraint.
Closing
1.Fold the rear seat back into the seating
position and engage.
When you return the seat to its upright
position, make sure that the retainer
engages properly. If it is not properly engaged,
transported cargo could enter the vehicle dur-
ing braking or evasive maneuvers and endanger
the vehicle occupants.<
2.Release the latch plate from the bracket on
the rear window shelf and insert it into the
buckle of the center safety belt. The latch
plate must audibly engage.
The lashing eyes in the luggage compartment
provide you with a way to attach luggage com-
partment nets
* or flexible straps for securing
suitcases and luggage, refer to page128.
Sports Wagon: cargo area
Roll-up cover
Pull out the roll-up cover and hook it into the
brackets.
Do not place heavy or hard objects on the
roll-up cover. If you do so, they may
already pose a danger to vehicle occupants dur-
ing braking or evasive maneuvers.
Do not allow the roll-up cover to snap back, as
otherwise it can be damaged.<
Manual roll-up cover
When opening the tailgate or rear window, the
roll-up cover is raised. Before closing the tail-
gate and rear window, press down the roll-up
cover until it engages.
Automatic roll-up cover*
When the tailgate or rear window is opened, the
roll-up cover is raised, and when the tailgate
and rear window is closed, it is lowered.
Make sure that the closing area of the roll-
up cover is clear of obstructions, as other-
wise the payload or the roll-up cover may be
damaged.<
Increasing cargo area
The rear seat back is divided. You can fold over
both sides individually to increase the cargo
area.
Page 120 of 259
Practical interior accessories
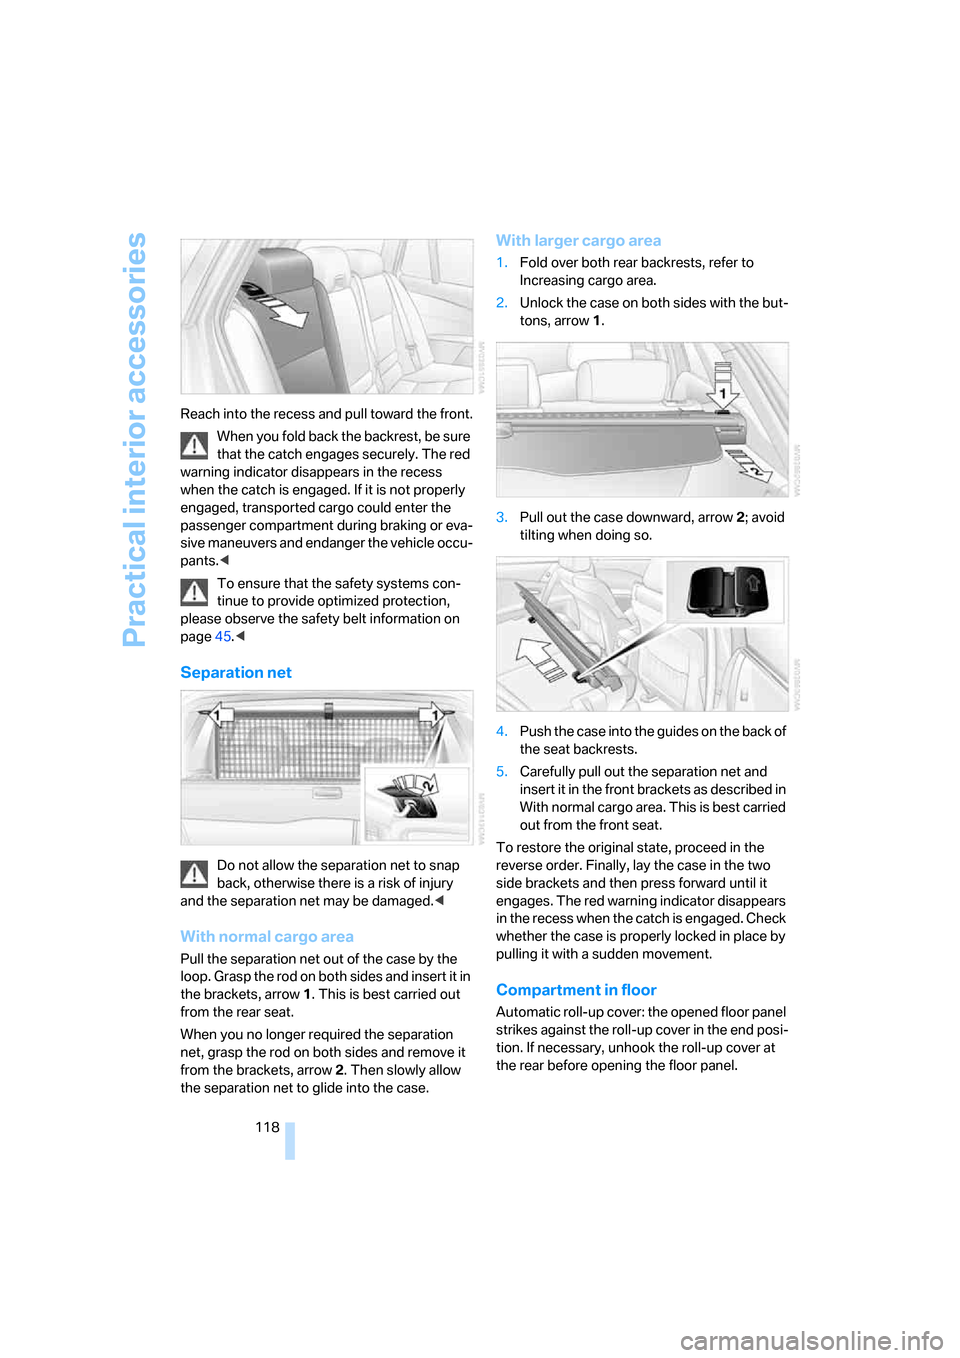
118 Reach into the recess and pull toward the front.
When you fold back the backrest, be sure
that the catch engages securely. The red
warning indicator disappears in the recess
when the catch is engaged. If it is not properly
engaged, transported cargo could enter the
passenger compartment during braking or eva-
sive maneuvers and endanger the vehicle occu-
pants.<
To ensure that the safety systems con-
tinue to provide optimized protection,
please observe the safety belt information on
page45.<
Separation net
Do not allow the separation net to snap
back, otherwise there is a risk of injury
and the separation net may be damaged.<
With normal cargo area
Pull the separation net out of the case by the
loop. Grasp the rod on both sides and insert it in
the brackets, arrow1. This is best carried out
from the rear seat.
When you no longer required the separation
net, grasp the rod on both sides and remove it
from the brackets, arrow2. Then slowly allow
the separation net to glide into the case.
With larger cargo area
1.Fold over both rear backrests, refer to
Increasing cargo area.
2.Unlock the case on both sides with the but-
tons, arrow1.
3.Pull out the case downward, arrow2; avoid
tilting when doing so.
4.Push the case into the guides on the back of
the seat backrests.
5.Carefully pull out the separation net and
insert it in the front brackets as described in
With normal cargo area. This is best carried
out from the front seat.
To restore the original state, proceed in the
reverse order. Finally, lay the case in the two
side brackets and then press forward until it
engages. The red warning indicator disappears
in the recess when the catch is engaged. Check
whether the case is properly locked in place by
pulling it with a sudden movement.
Compartment in floor
Automatic roll-up cover: the opened floor panel
strikes against the roll-up cover in the end posi-
tion. If necessary, unhook the roll-up cover at
the rear before opening the floor panel.
Page 121 of 259
Controls
119Reference
At a glance
Driving tips
Communications
Navigation
Entertainment
Mobility
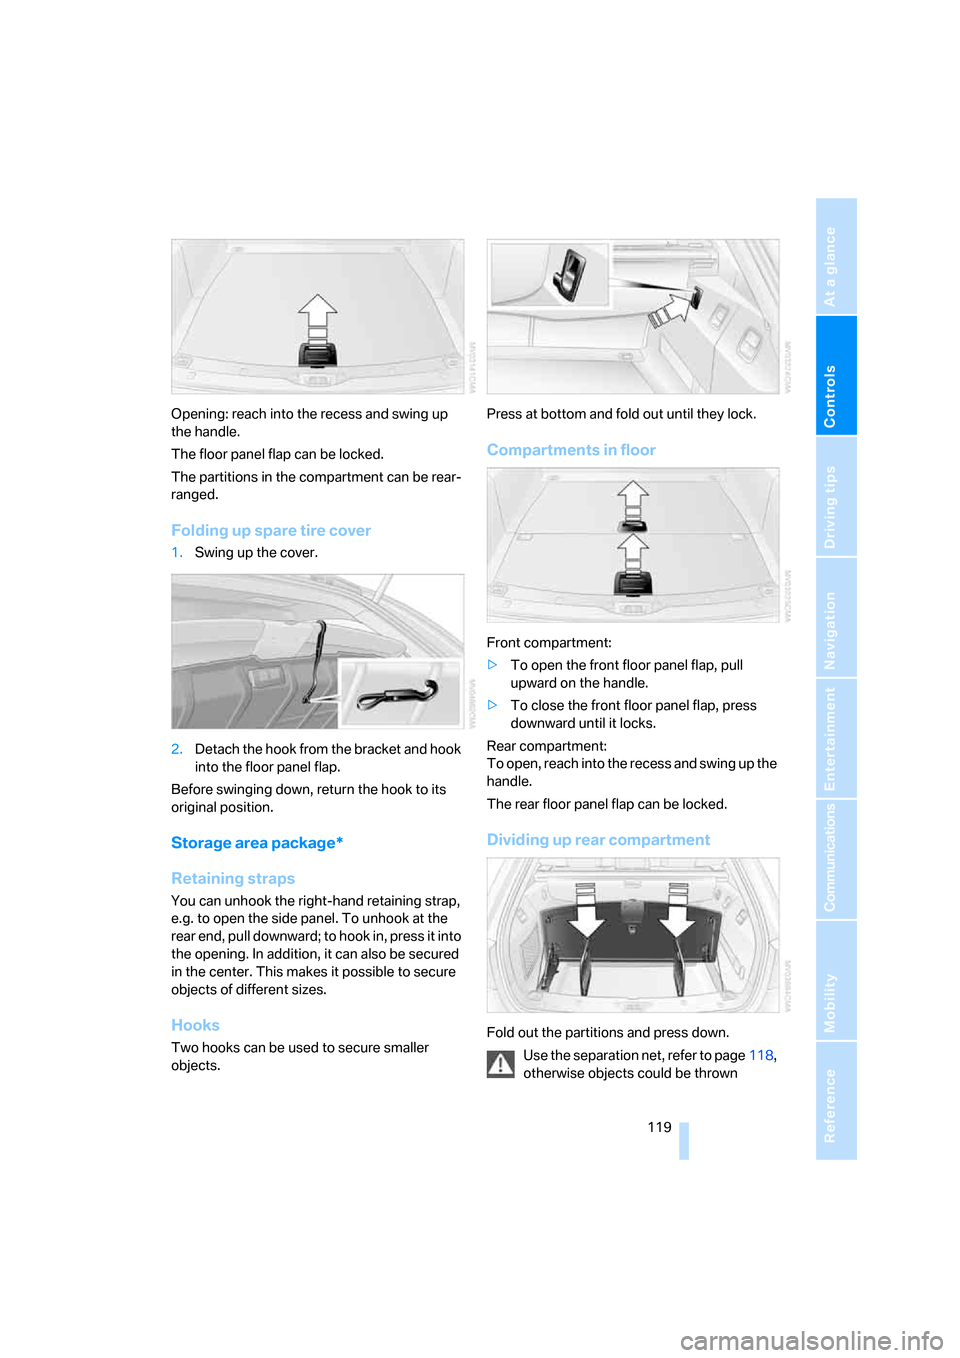
Opening: reach into the recess and swing up
the handle.
The floor panel flap can be locked.
The partitions in the compartment can be rear-
ranged.
Folding up spare tire cover
1.Swing up the cover.
2.Detach the hook from the bracket and hook
into the floor panel flap.
Before swinging down, return the hook to its
original position.
Storage area package*
Retaining straps
You can unhook the right-hand retaining strap,
e.g. to open the side panel. To unhook at the
rear end, pull downward; to hook in, press it into
the opening. In addition, it can also be secured
in the center. This makes it possible to secure
objects of different sizes.
Hooks
Two hooks can be used to secure smaller
objects.Press at bottom and fold out until they lock.
Compartments in floor
Front compartment:
>To open the front floor panel flap, pull
upward on the handle.
>To close the front floor panel flap, press
downward until it locks.
Rear compartment:
To open, reach into the recess and swing up the
handle.
The rear floor panel flap can be locked.
Dividing up rear compartment
Fold out the partitions and press down.
Use the separation net, refer to page118,
otherwise objects could be thrown
Page 122 of 259
Practical interior accessories
120 around and endanger occupants, e.g. during
braking or evasive maneuvers.<
Ski bag*
Designed for safe, clean transport of up to
4 pairs of standard skis or up to 2 snowboards.
With the ski bag you can stow skis with a length
o f u p t o 6 . 9 f t / 2 . 1 0 m . W h e n s k i s o f 6 . 9 f t / 2 . 1 0 m
in length are loaded, the ski bag will tend to con-
tract, reducing its overall capacity.
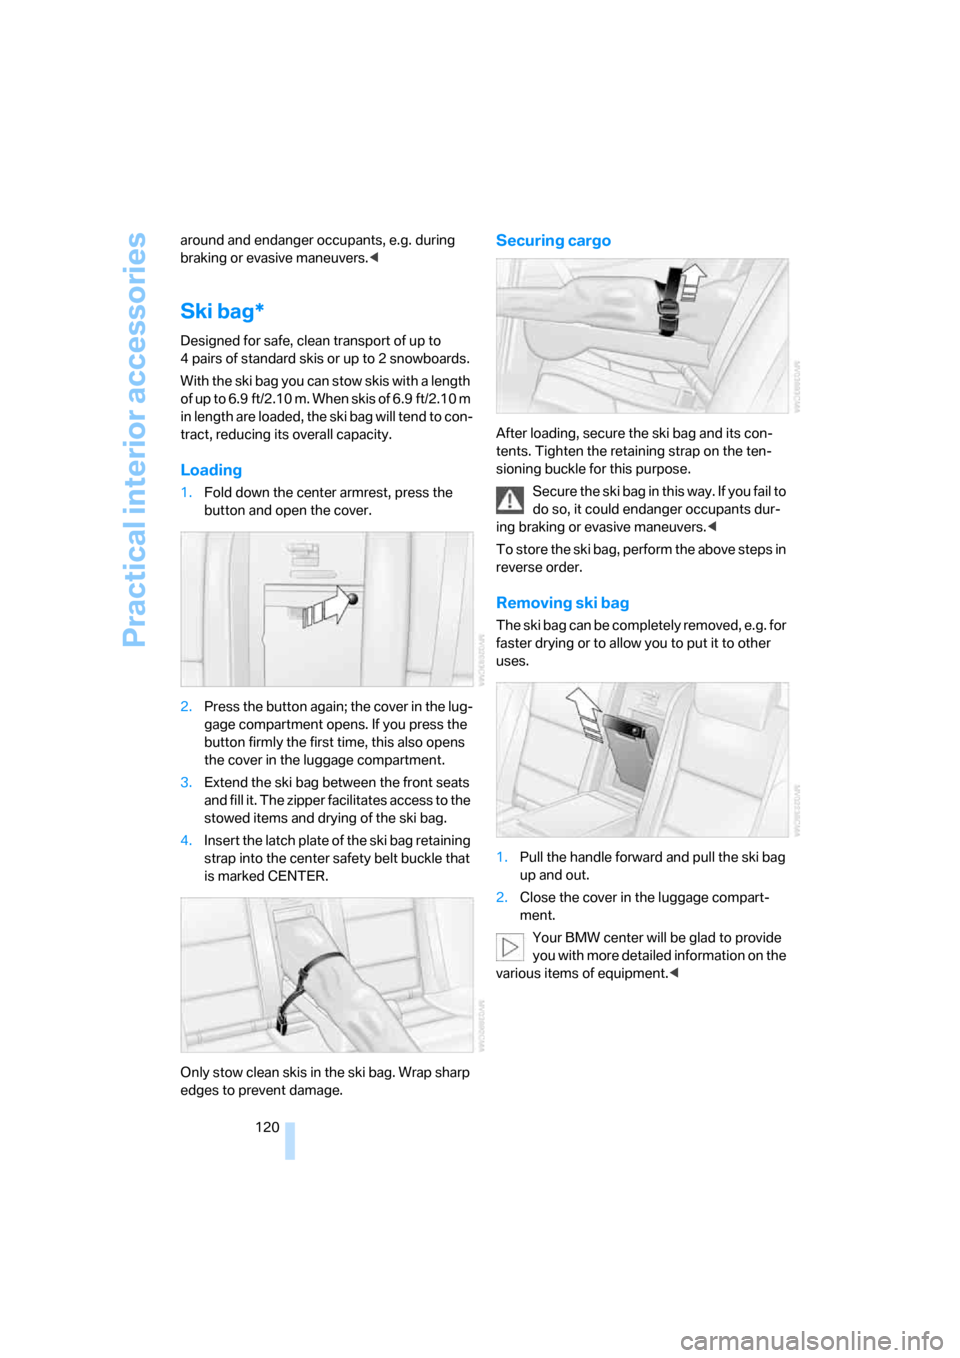
Loading
1.Fold down the center armrest, press the
button and open the cover.
2.Press the button again; the cover in the lug-
gage compartment opens. If you press the
button firmly the first time, this also opens
the cover in the luggage compartment.
3.Extend the ski bag between the front seats
and fill it. The zipper facilitates access to the
stowed items and drying of the ski bag.
4.Insert the latch plate of the ski bag retaining
strap into the center safety belt buckle that
is marked CENTER.
Only stow clean skis in the ski bag. Wrap sharp
edges to prevent damage.
Securing cargo
After loading, secure the ski bag and its con-
tents. Tighten the retaining strap on the ten-
sioning buckle for this purpose.
Secure the ski bag in this way. If you fail to
do so, it could endanger occupants dur-
ing braking or evasive maneuvers.<
To store the ski bag, perform the above steps in
reverse order.
Removing ski bag
The ski bag can be completely removed, e.g. for
faster drying or to allow you to put it to other
uses.
1.Pull the handle forward and pull the ski bag
up and out.
2.Close the cover in the luggage compart-
ment.
Your BMW center will be glad to provide
you with more detailed information on the
various items of equipment.<
Page 129 of 259
Driving tips
127Reference
At a glance
Controls
Communications
Navigation
Entertainment
Mobility
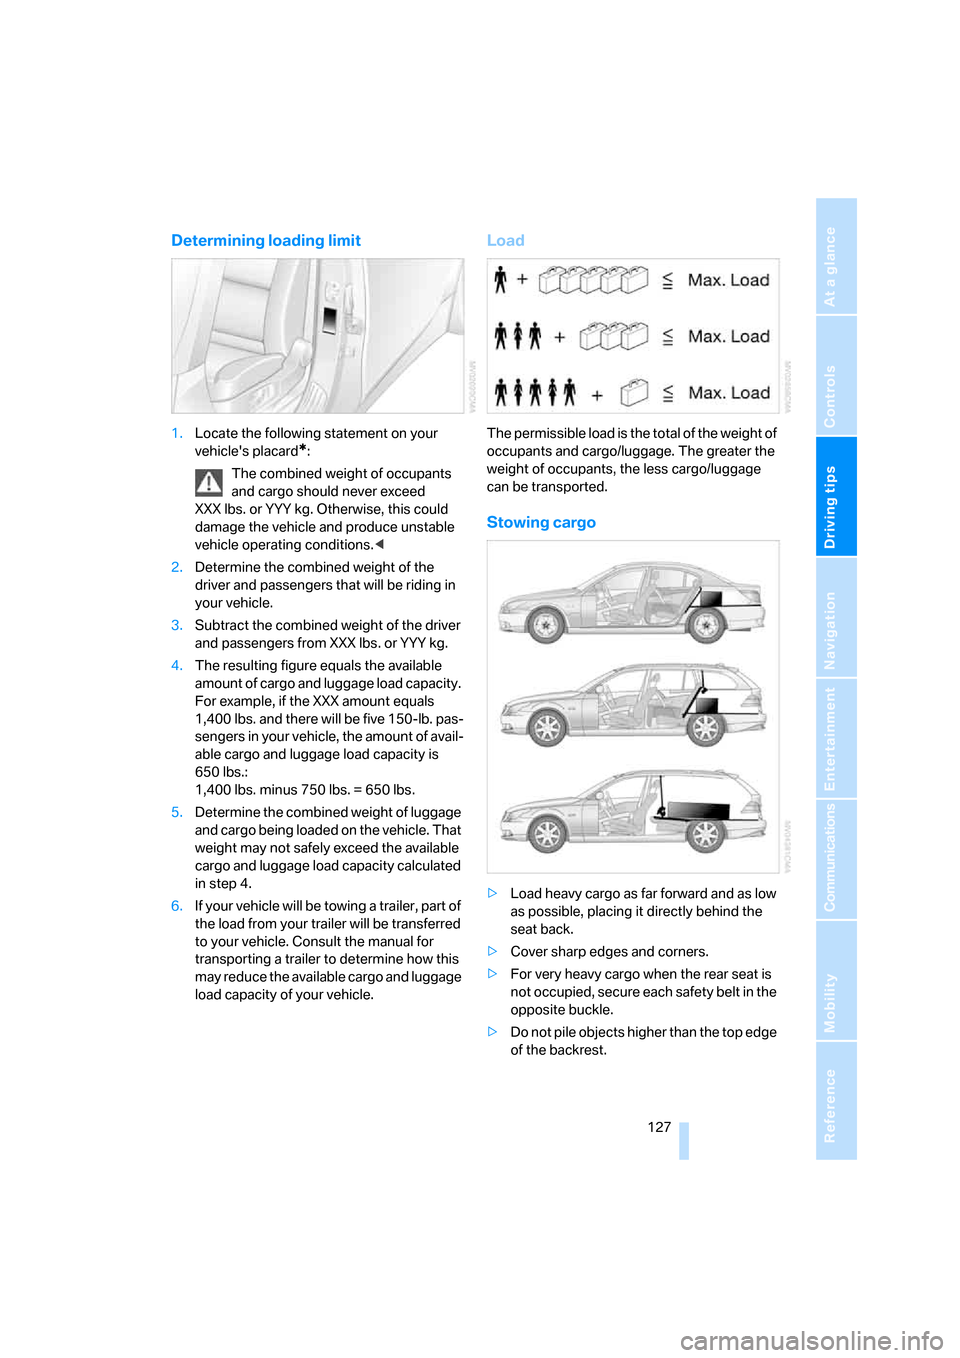
Determining loading limit
1.Locate the following statement on your
vehicle's placard
*:
The combined weight of occupants
and cargo should never exceed
XXX lbs. or YYY kg. Otherwise, this could
damage the vehicle and produce unstable
vehicle operating conditions.<
2.Determine the combined weight of the
driver and passengers that will be riding in
your vehicle.
3.Subtract the combined weight of the driver
and passengers from XXX lbs. or YYY kg.
4.The resulting figure equals the available
amount of cargo and luggage load capacity.
For example, if the XXX amount equals
1,400 lbs. and there will be five 150-lb. pas-
sengers in your vehicle, the amount of avail-
able cargo and luggage load capacity is
650 lbs.:
1,400 lbs. minus 750 lbs. = 650 lbs.
5.Determine the combined weight of luggage
and cargo being loaded on the vehicle. That
weight may not safely exceed the available
cargo and luggage load capacity calculated
in step 4.
6.If your vehicle will be towing a trailer, part of
the load from your trailer will be transferred
to your vehicle. Consult the manual for
transporting a trailer to determine how this
may reduce the available cargo and luggage
load capacity of your vehicle.
Load
The permissible load is the total of the weight of
occupants and cargo/luggage. The greater the
weight of occupants, the less cargo/luggage
can be transported.
Stowing cargo
>Load heavy cargo as far forward and as low
as possible, placing it directly behind the
seat back.
>Cover sharp edges and corners.
>For very heavy cargo when the rear seat is
not occupied, secure each safety belt in the
opposite buckle.
>Do not pile objects higher than the top edge
of the backrest.
Page 130 of 259
Things to remember when driving
128 >Sports Wagon:
Use the separation net to protect the occu-
pants, refer to page118. Make sure that
objects cannot penetrate through the sepa-
ration net.
Wrap sharp-edged or pointed objects
which could strike the rear window while
driving.
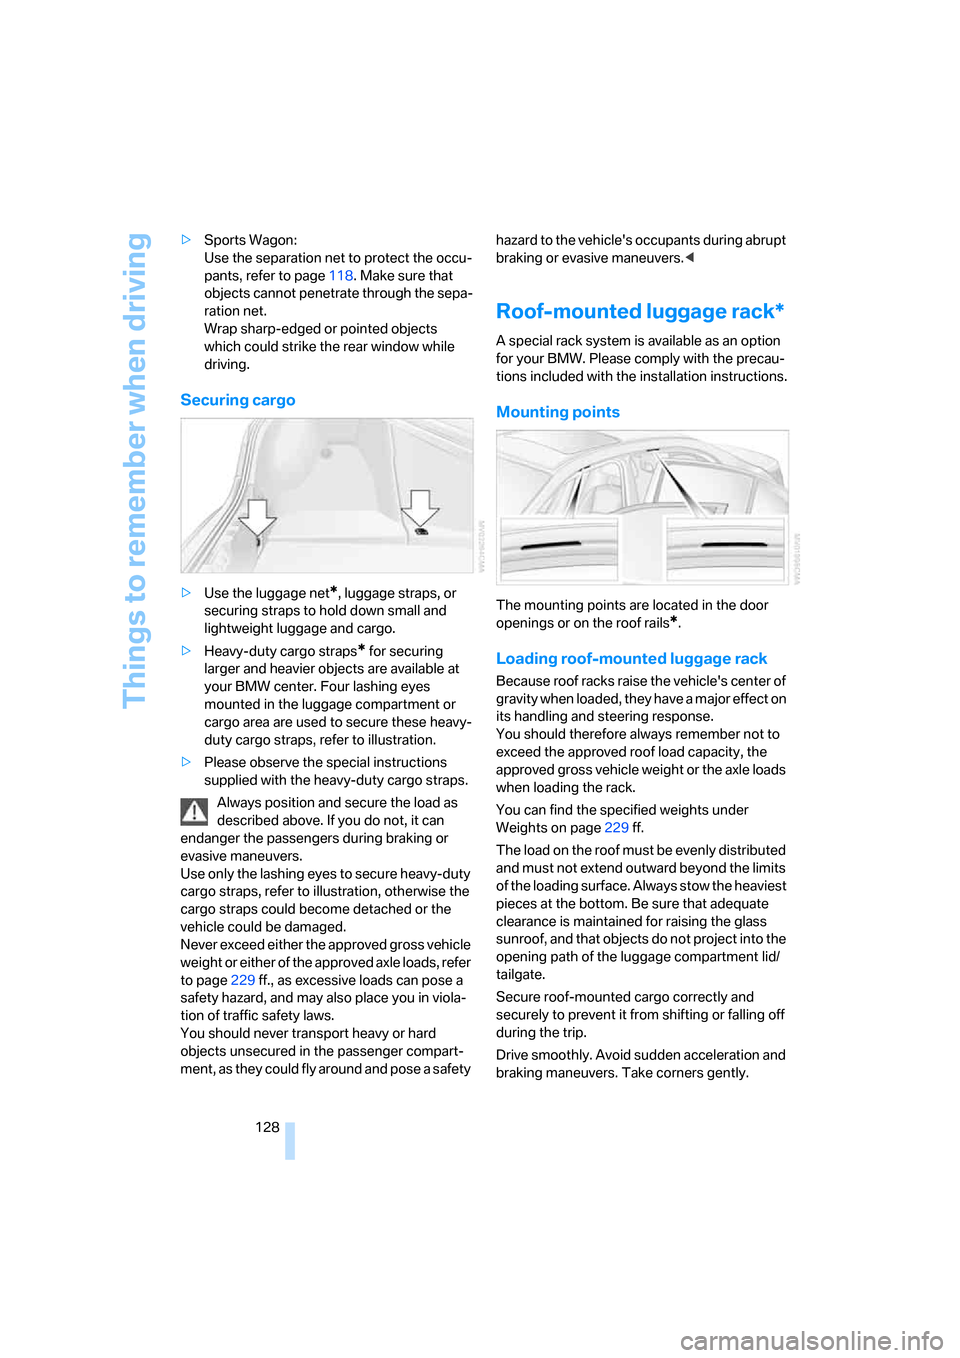
Securing cargo
>Use the luggage net*, luggage straps, or
securing straps to hold down small and
lightweight luggage and cargo.
>Heavy-duty cargo straps
* for securing
larger and heavier objects are available at
your BMW center. Four lashing eyes
mounted in the luggage compartment or
cargo area are used to secure these heavy-
duty cargo straps, refer to illustration.
>Please observe the special instructions
supplied with the heavy-duty cargo straps.
Always position and secure the load as
described above. If you do not, it can
endanger the passengers during braking or
evasive maneuvers.
Use only the lashing eyes to secure heavy-duty
cargo straps, refer to illustration, otherwise the
cargo straps could become detached or the
vehicle could be damaged.
Never exceed either the approved gross vehicle
weight or either of the approved axle loads, refer
to page229 ff., as excessive loads can pose a
safety hazard, and may also place you in viola-
tion of traffic safety laws.
You should never transport heavy or hard
objects unsecured in the passenger compart-
ment, as they could fly around and pose a safety hazard to the vehicle's occupants during abrupt
braking or evasive maneuvers.<
Roof-mounted luggage rack*
A special rack system is available as an option
for your BMW. Please comply with the precau-
tions included with the installation instructions.
Mounting points
The mounting points are located in the door
openings or on the roof rails
*.
Loading roof-mounted luggage rack
Because roof racks raise the vehicle's center of
gravity when loaded, they have a major effect on
its handling and steering response.
You should therefore always remember not to
exceed the approved roof load capacity, the
approved gross vehicle weight or the axle loads
when loading the rack.
You can find the specified weights under
Weights on page229 ff.
The load on the roof must be evenly distributed
and must not extend outward beyond the limits
of the loading surface. Always stow the heaviest
pieces at the bottom. Be sure that adequate
clearance is maintained for raising the glass
sunroof, and that objects do not project into the
opening path of the luggage compartment lid/
tailgate.
Secure roof-mounted cargo correctly and
securely to prevent it from shifting or falling off
during the trip.
Drive smoothly. Avoid sudden acceleration and
braking maneuvers. Take corners gently.
Page 178 of 259
Telephoning
176
Preparation with mobile phone
6.Additional operations must be carried out
on the mobile phone and differ depending
on the model, refer to the operating instruc-
tions of your mobile phone, e.g. find, con-
nect or link under Bluetooth device.
Logging on
Depending on your mobile phone, you will first
be requested consecutively via the display of
your mobile phone or the Control Display to
enter the Bluetooth passkey you specified.
Display on the Control Display if the Bluetooth
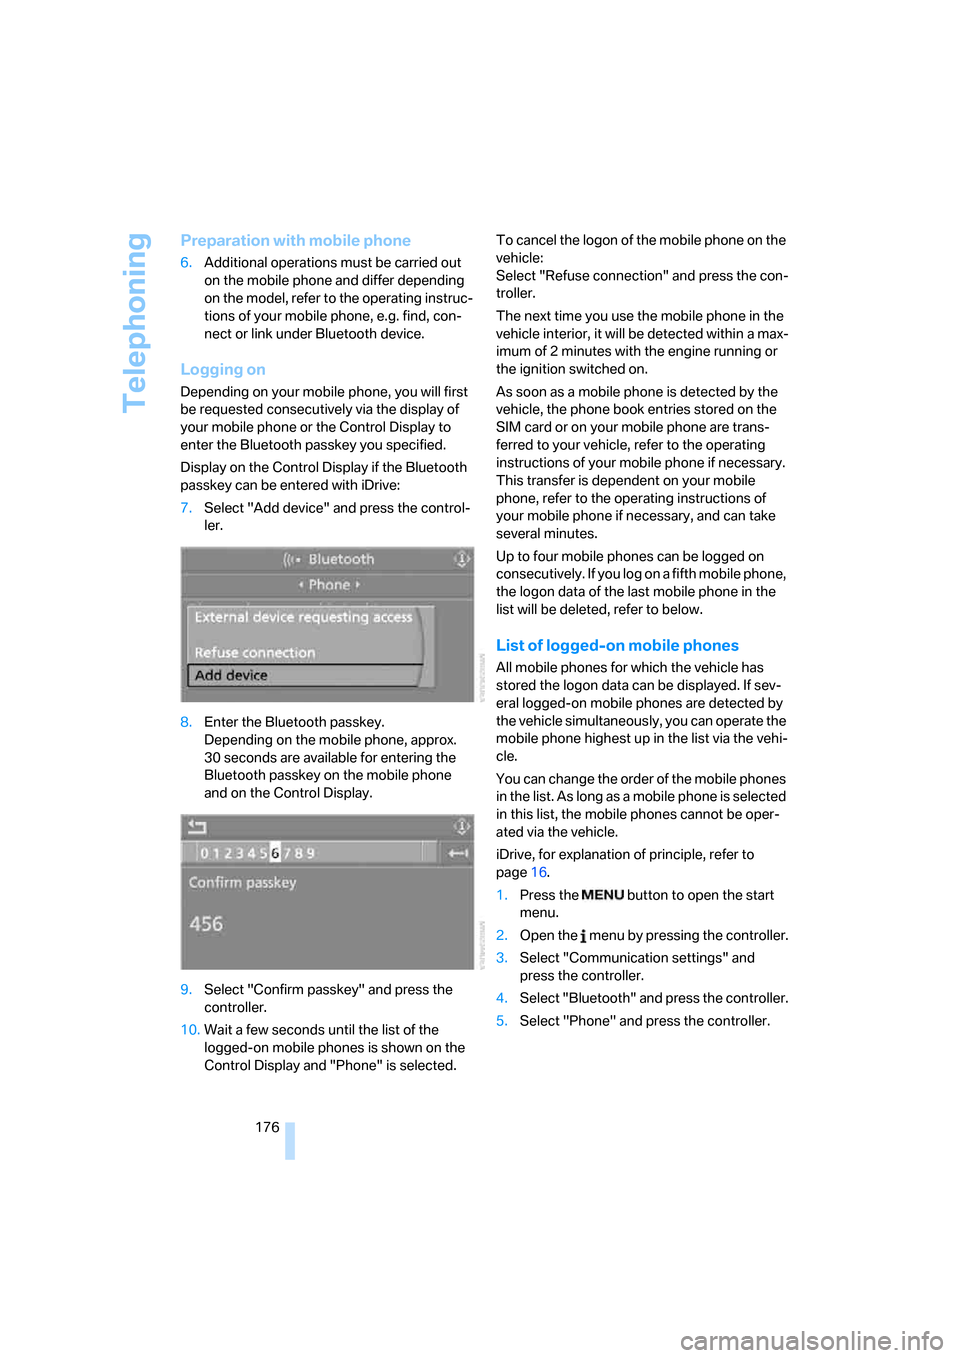
passkey can be entered with iDrive:
7.Select "Add device" and press the control-
ler.
8.Enter the Bluetooth passkey.
Depending on the mobile phone, approx.
30 seconds are available for entering the
Bluetooth passkey on the mobile phone
and on the Control Display.
9.Select "Confirm passkey" and press the
controller.
10.Wait a few seconds until the list of the
logged-on mobile phones is shown on the
Control Display and "Phone" is selected.To cancel the logon of the mobile phone on the
vehicle:
Select "Refuse connection" and press the con-
troller.
The next time you use the mobile phone in the
vehicle interior, it will be detected within a max-
imum of 2 minutes with the engine running or
the ignition switched on.
As soon as a mobile phone is detected by the
vehicle, the phone book entries stored on the
SIM card or on your mobile phone are trans-
ferred to your vehicle, refer to the operating
instructions of your mobile phone if necessary.
This transfer is dependent on your mobile
phone, refer to the operating instructions of
your mobile phone if necessary, and can take
several minutes.
Up to four mobile phones can be logged on
consecutively. If you log on a fifth mobile phone,
the logon data of the last mobile phone in the
list will be deleted, refer to below.
List of logged-on mobile phones
All mobile phones for which the vehicle has
stored the logon data can be displayed. If sev-
eral logged-on mobile phones are detected by
the vehicle simultaneously, you can operate the
mobile phone highest up in the list via the vehi-
cle.
You can change the order of the mobile phones
in the list. As long as a mobile phone is selected
in this list, the mobile phones cannot be oper-
ated via the vehicle.
iDrive, for explanation of principle, refer to
page16.
1.Press the button to open the start
menu.
2.Open the menu by pressing the controller.
3.Select "Communication settings" and
press the controller.
4.Select "Bluetooth" and press the controller.
5.Select "Phone" and press the controller.
Page 206 of 259
Under the hood
204
Under the hood
Never attempt to perform any service or
repair operations on your vehicle without
the required professional technical training.
If you do not know what repair procedures to
follow, have work on your vehicle done only by
your BMW center or a workshop that works
according to BMW repair procedures with cor-
respondingly trained personnel. If this work is
not carried out properly, there is a danger of
subsequent damage and related safety haz-
ards.<
Hood
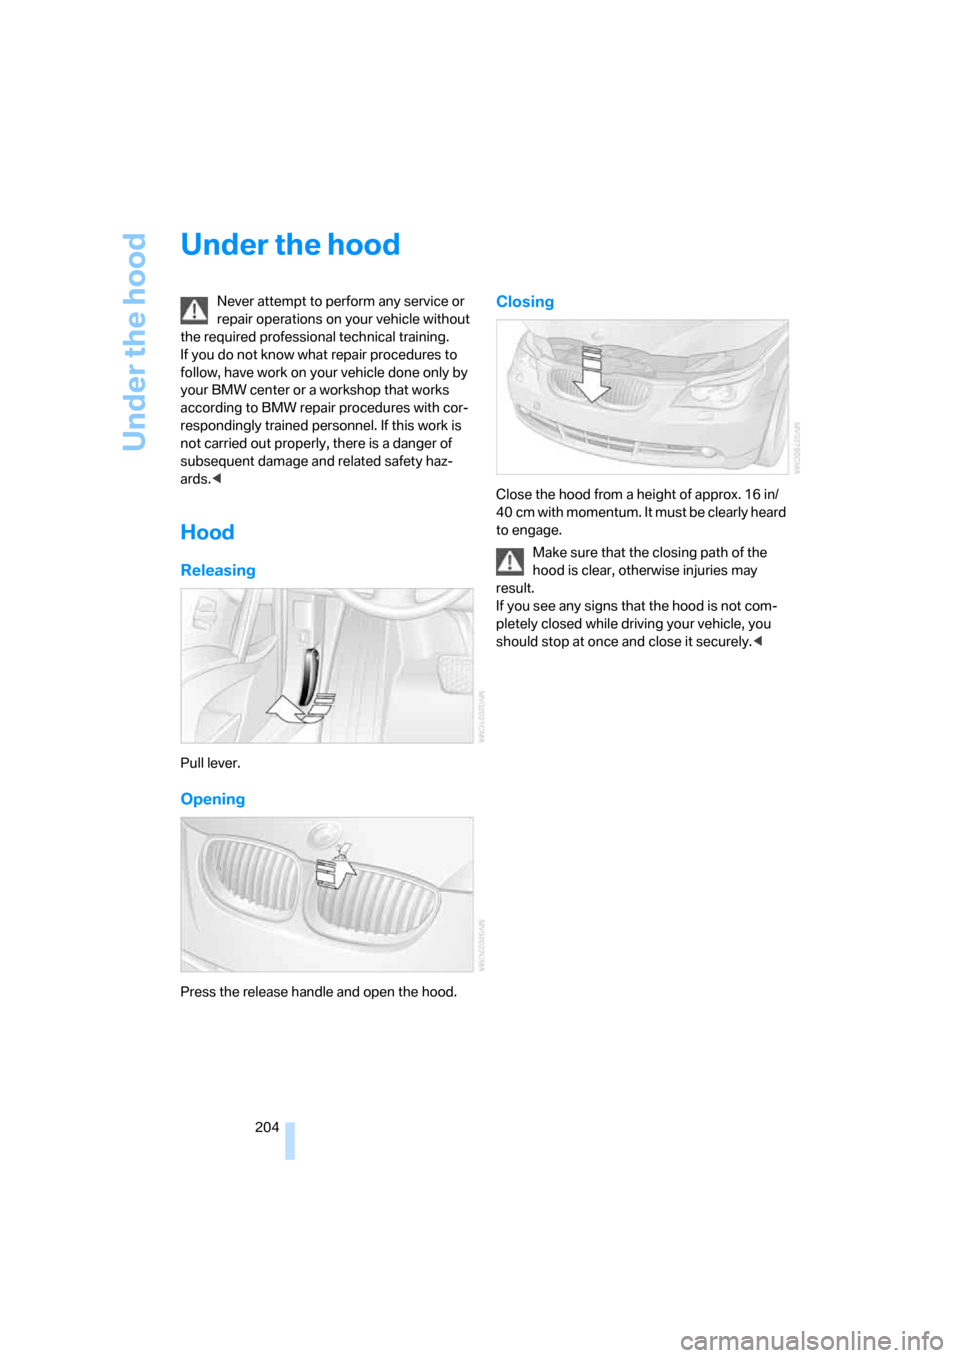
Releasing
Pull lever.
Opening
Press the release handle and open the hood.
Closing
Close the hood from a height of approx. 16 in/
40 cm with momentum. It must be clearly heard
to engage.
Make sure that the closing path of the
hood is clear, otherwise injuries may
result.
If you see any signs that the hood is not com-
pletely closed while driving your vehicle, you
should stop at once and close it securely.<
Page 219 of 259
Mobility
217Reference
At a glance
Controls
Driving tips
Communications
Navigation
Entertainment
face of the jack base rests on the ground
perpendicularly beneath the jacking point.
The vehicle jack is designed for
changing wheels only. Do not attempt
to raise another vehicle model with it or to
raise any load of any kind. To do so could
cause accidents and personal injury.<
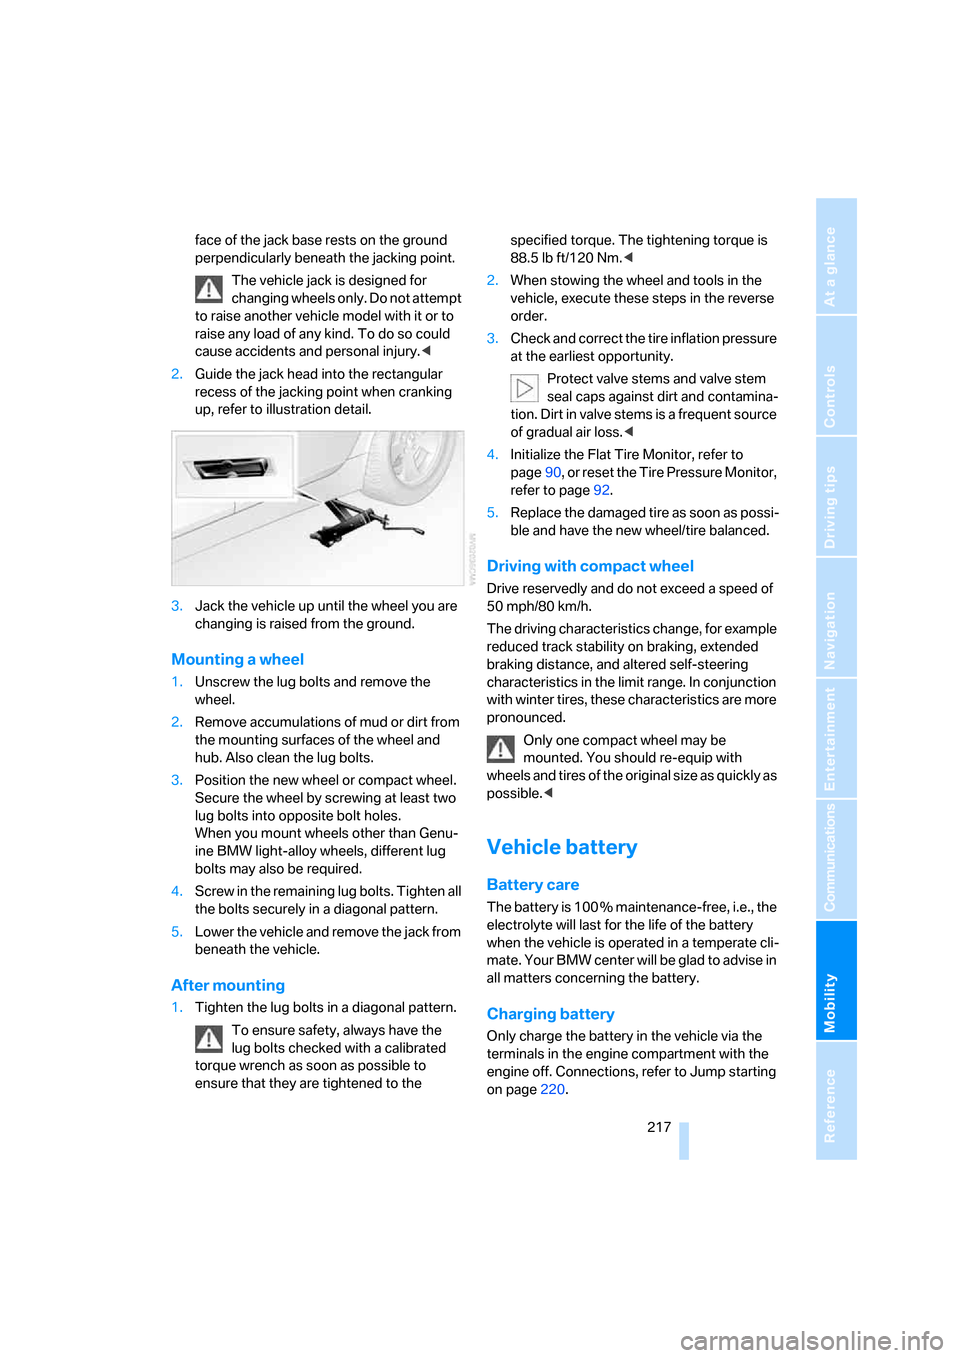
2.Guide the jack head into the rectangular
recess of the jacking point when cranking
up, refer to illustration detail.
3.Jack the vehicle up until the wheel you are
changing is raised from the ground.
Mounting a wheel
1.Unscrew the lug bolts and remove the
wheel.
2.Remove accumulations of mud or dirt from
the mounting surfaces of the wheel and
hub. Also clean the lug bolts.
3.Position the new wheel or compact wheel.
Secure the wheel by screwing at least two
lug bolts into opposite bolt holes.
When you mount wheels other than Genu-
ine BMW light-alloy wheels, different lug
bolts may also be required.
4.Screw in the remaining lug bolts. Tighten all
the bolts securely in a diagonal pattern.
5.Lower the vehicle and remove the jack from
beneath the vehicle.
After mounting
1.Tighten the lug bolts in a diagonal pattern.
To ensure safety, always have the
lug bolts checked with a calibrated
torque wrench as soon as possible to
ensure that they are tightened to the specified torque. The tightening torque is
88.5 lb ft/120 Nm.<
2.When stowing the wheel and tools in the
vehicle, execute these steps in the reverse
order.
3.Check and correct the tire inflation pressure
at the earliest opportunity.
Protect valve stems and valve stem
seal caps against dirt and contamina-
tion. Dirt in valve stems is a frequent source
of gradual air loss.<
4.Initialize the Flat Tire Monitor, refer to
page90, or reset the Tire Pressure Monitor,
refer to page92.
5.Replace the damaged tire as soon as possi-
ble and have the new wheel/tire balanced.
Driving with compact wheel
Drive reservedly and do not exceed a speed of
50 mph/80 km/h.
The driving characteristics change, for example
reduced track stability on braking, extended
braking distance, and altered self-steering
characteristics in the limit range. In conjunction
with winter tires, these characteristics are more
pronounced.
Only one compact wheel may be
mounted. You should re-equip with
wheels and tires of the original size as quickly as
possible.<
Vehicle battery
Battery care
The battery is 100 % maintenance-free, i.e., the
electrolyte will last for the life of the battery
when the vehicle is operated in a temperate cli-
mate. Your BMW center will be glad to advise in
all matters concerning the battery.
Charging battery
Only charge the battery in the vehicle via the
terminals in the engine compartment with the
engine off. Connections, refer to Jump starting
on page220.
Page 240 of 259
Everything from A to Z
238 BMW Assist187
– enabling187
– services offered188
"BMW Contact"182
"BMW Contact
Numbers"182
BMW homepage4
BMW maintenance
system209
BMW Night Vision98
– activating99
– cleaning camera100
– cleaning camera, refer to
Wiper system66
– deactivating99
– making settings99
"BMW Service"189
"BMW Service settings"188
BMW website4
Bottle holder, refer to Cup
holders114
Brake Assistant, refer to DBC
Dynamic Brake Control86
Brake fluid207
– warning lamp207
Brake force display94
Brake lamps
– brake force display94
– replacing bulbs213
Brake pads208
– breaking-in124
Brake rotors126
Brakes
– ABS Antilock Brake
System86
– brake fluid207
– brake force display94
– brake pads208
– breaking-in124
– handbrake60
– warning lamps13
Brake system124,207
– brake fluid level207
– brake pads124,208
– breaking-in124
– disk brakes126
– warning lamp207Braking
– CBC Cornering Brake
Control86
– DBC Dynamic Brake
Control86
– electronic brake-force
distribution86
– refer to Braking safely125
Braking safely125
Breakdown assistance189
Breakdown services, refer to
Roadside Assistance220
Breaking-in the clutch124
Breaking-in the
differential124
Break-in period124
"Brightness"83
– with BMW Night Vision100
Brightness of Control
Display83
Button for starting engine58
Buttons on steering wheel11
C
California Proposition 65
Warning6
"Call"180
Call
– accepting179
– displaying accepted180
– ending179
– in absence180
– starting179
Calling
– from phone book179
– from Top 8 list180
– redialing180
– refer to telephone operating
instructions
Can holder, refer to Cup
holders114
Capacities230
Capacity
– of cargo area229
– of luggage
compartment229
Car battery, refer to Vehicle
battery217Car care, refer to Caring for
your vehicle brochure
Car-care products, refer to
Caring for your vehicle
brochure
"Car Data"76
Care210
– refer to Caring for your
vehicle brochure
Cargo
– refer to Loading126
– securing128
– securing with ski bag120
Cargo area
– capacity229
– emergency operation, refer
to Opening manually36
– increasing117
– opening/closing, refer to
Tailgate35
– opening from inside35
– opening from outside35
– opening with remote
control31
Cargo area cover, refer to Roll-
up cover
Caring for artificial leather,
refer to Caring for your
vehicle brochure
Caring for leather, refer to
Caring for your vehicle
brochure
Caring for light-alloy wheels,
refer to Caring for your
vehicle brochure
Caring for the carpet, refer to
Caring for your vehicle
brochure
Caring for the vehicle finish,
refer to Caring for your
vehicle brochure
Car key, refer to Keys/remote
control28
Car phone174
– installation location, refer to
Center armrest113
– refer to Mobile phone174
– refer to separate operating
instructions