CD changer BMW 550I XDRIVE GRAN TURISMO 2012 Owners Manual
[x] Cancel search | Manufacturer: BMW, Model Year: 2012, Model line: 550I XDRIVE GRAN TURISMO, Model: BMW 550I XDRIVE GRAN TURISMO 2012Pages: 321, PDF Size: 12.7 MB
Page 196 of 321
CD/multimediaVehicle equipment
All standard, country-specific and optional
equipment that is offered in the model series is
described in this chapter. Therefore, equipment
is also described that is not available in a vehicle,
e. g., because of the selected optional equip‐
ment or country variant. This also applies for
safety-related functions and systems.
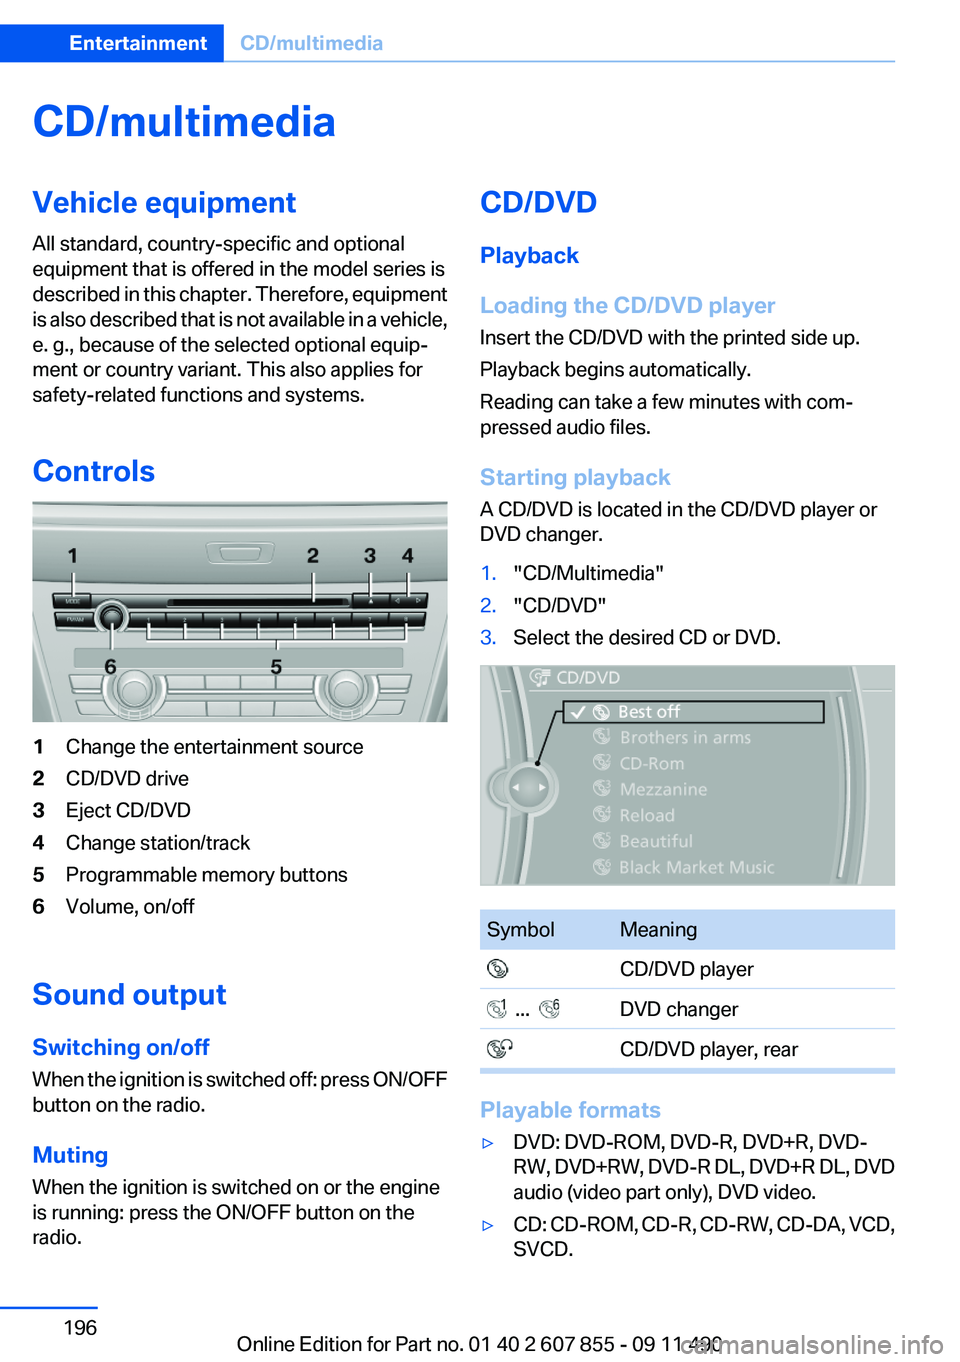
Controls1Change the entertainment source2CD/DVD drive3Eject CD/DVD4Change station/track5Programmable memory buttons6Volume, on/off
Sound output
Switching on/off
When the ignition is switched off: press ON/OFF
button on the radio.
Muting
When the ignition is switched on or the engine
is running: press the ON/OFF button on the
radio.
CD/DVD
Playback
Loading the CD/DVD player
Insert the CD/DVD with the printed side up.
Playback begins automatically.
Reading can take a few minutes with com‐
pressed audio files.
Starting playback
A CD/DVD is located in the CD/DVD player or
DVD changer.1."CD/Multimedia"2."CD/DVD"3.Select the desired CD or DVD.SymbolMeaning CD/DVD player ... DVD changer CD/DVD player, rear
Playable formats
▷DVD: DVD-ROM, DVD-R, DVD+R, DVD-
RW, DVD+RW, DVD-R DL, DVD+R DL, DVD
audio (video part only), DVD video.▷CD: CD-ROM, CD-R, CD-RW, CD-DA, VCD,
SVCD.Seite 196EntertainmentCD/multimedia196
Online Edition for Part no. 01 40 2 607 855 - 09 11 490
Page 200 of 321
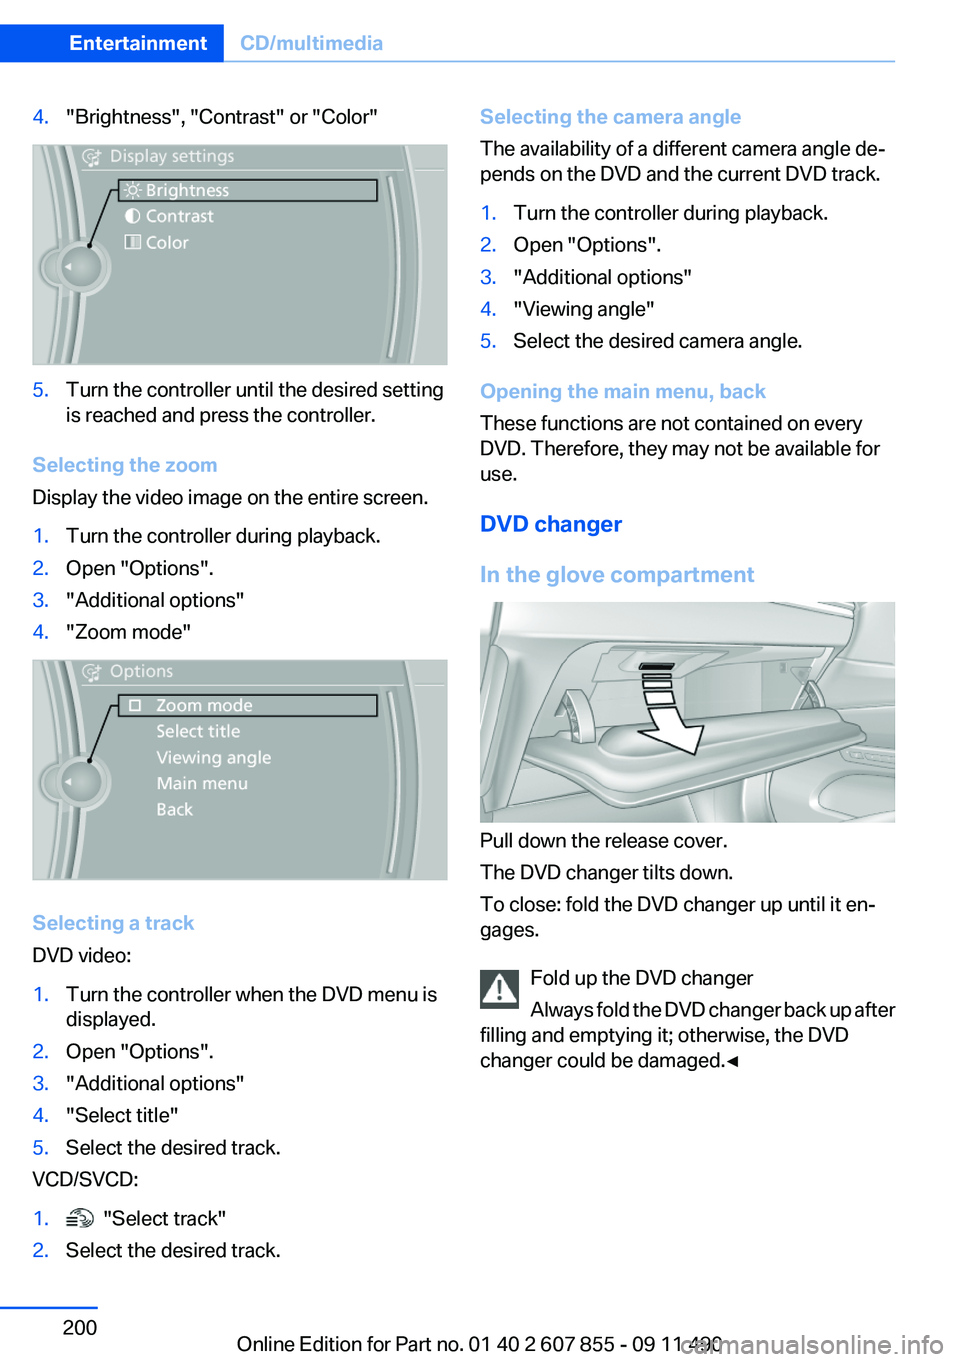
4."Brightness", "Contrast" or "Color"5.Turn the controller until the desired setting
is reached and press the controller.
Selecting the zoom
Display the video image on the entire screen.
1.Turn the controller during playback.2.Open "Options".3."Additional options"4."Zoom mode"
Selecting a track
DVD video:
1.Turn the controller when the DVD menu is
displayed.2.Open "Options".3."Additional options"4."Select title"5.Select the desired track.
VCD/SVCD:
1. "Select track"2.Select the desired track.Selecting the camera angle
The availability of a different camera angle de‐
pends on the DVD and the current DVD track.1.Turn the controller during playback.2.Open "Options".3."Additional options"4."Viewing angle"5.Select the desired camera angle.
Opening the main menu, back
These functions are not contained on every
DVD. Therefore, they may not be available for
use.
DVD changer
In the glove compartment
Pull down the release cover.
The DVD changer tilts down.
To close: fold the DVD changer up until it en‐
gages.
Fold up the DVD changer
Always fold the DVD changer back up after
filling and emptying it; otherwise, the DVD
changer could be damaged.◀
Seite 200EntertainmentCD/multimedia200
Online Edition for Part no. 01 40 2 607 855 - 09 11 490
Page 201 of 321
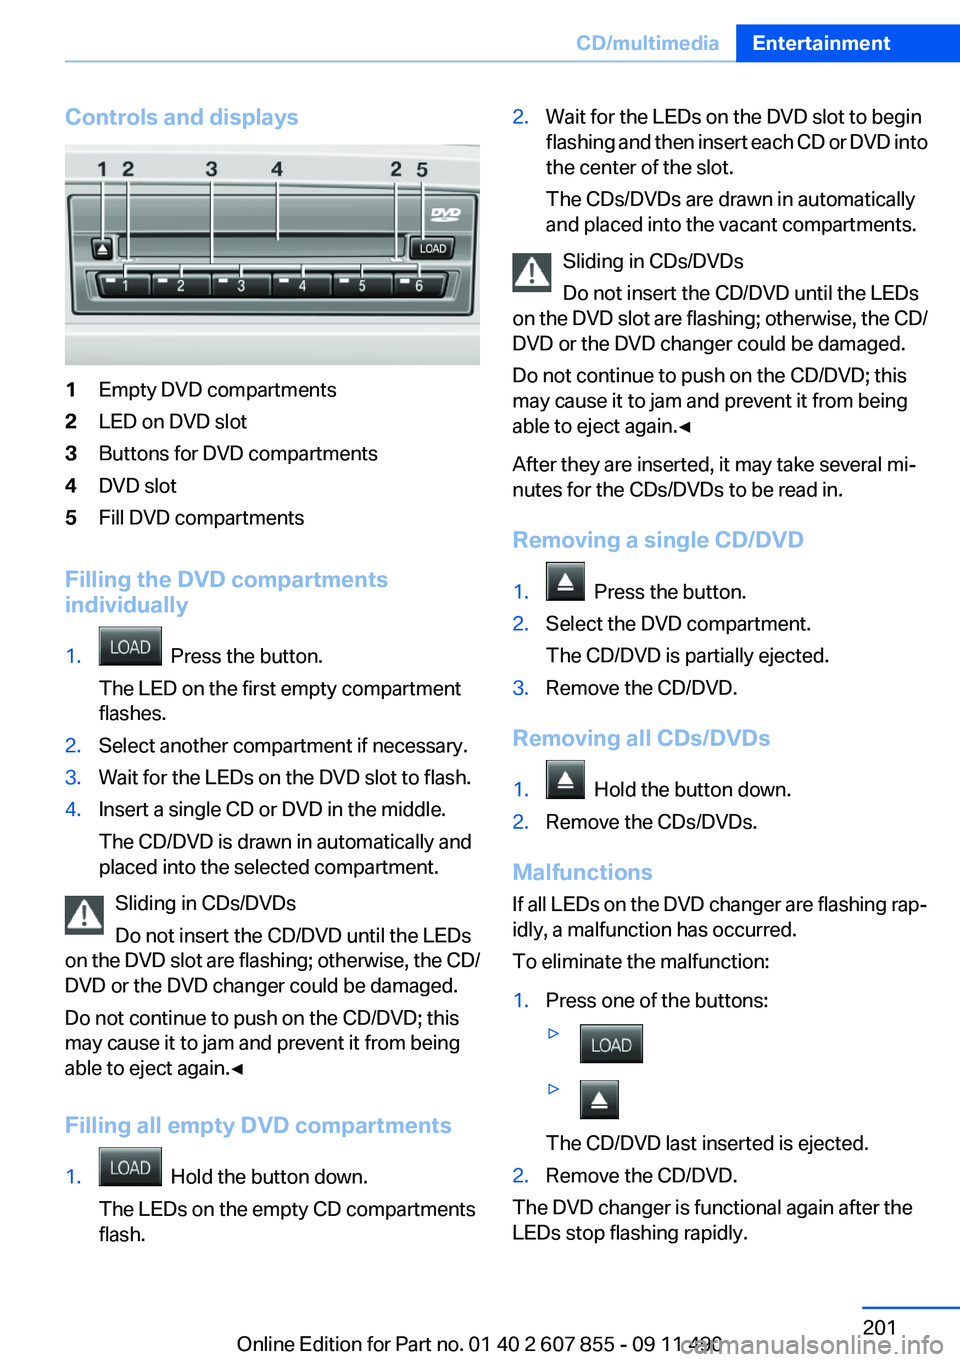
Controls and displays1Empty DVD compartments2LED on DVD slot3Buttons for DVD compartments4DVD slot5Fill DVD compartments
Filling the DVD compartments
individually
1. Press the button.
The LED on the first empty compartment
flashes.2.Select another compartment if necessary.3.Wait for the LEDs on the DVD slot to flash.4.Insert a single CD or DVD in the middle.
The CD/DVD is drawn in automatically and
placed into the selected compartment.
Sliding in CDs/DVDs
Do not insert the CD/DVD until the LEDs
on the DVD slot are flashing; otherwise, the CD/
DVD or the DVD changer could be damaged.
Do not continue to push on the CD/DVD; this
may cause it to jam and prevent it from being
able to eject again.◀
Filling all empty DVD compartments
1. Hold the button down.
The LEDs on the empty CD compartments
flash.2.Wait for the LEDs on the DVD slot to begin
flashing and then insert each CD or DVD into
the center of the slot.
The CDs/DVDs are drawn in automatically
and placed into the vacant compartments.
Sliding in CDs/DVDs
Do not insert the CD/DVD until the LEDs
on the DVD slot are flashing; otherwise, the CD/
DVD or the DVD changer could be damaged.
Do not continue to push on the CD/DVD; this
may cause it to jam and prevent it from being
able to eject again.◀
After they are inserted, it may take several mi‐
nutes for the CDs/DVDs to be read in.
Removing a single CD/DVD
1. Press the button.2.Select the DVD compartment.
The CD/DVD is partially ejected.3.Remove the CD/DVD.
Removing all CDs/DVDs
1. Hold the button down.2.Remove the CDs/DVDs.
Malfunctions
If all LEDs on the DVD changer are flashing rap‐
idly, a malfunction has occurred.
To eliminate the malfunction:
1.Press one of the buttons:▷▷
The CD/DVD last inserted is ejected.
2.Remove the CD/DVD.
The DVD changer is functional again after the
LEDs stop flashing rapidly.
Seite 201CD/multimediaEntertainment201
Online Edition for Part no. 01 40 2 607 855 - 09 11 490
Page 202 of 321
Audio playback
The audio track of a DVD can be played back
even if video playback is not possible in the ve‐
hicle.
Only the main film without the previews or extras
can be played back.
Starting playback
A DVD is located in the DVD changer.1."CD/Multimedia"2."CD/DVD"3.Select the desired DVD.
Selecting a chapter using the button
Press the button repeatedly until the
desired chapter is played.
Selecting a chapter using iDrive
1."CD/Multimedia"2."CD/DVD"3.Select the desired DVD.4.Select the desired chapter.
Fast forward/reverse Press and hold the button.
Selecting the language
The languages that are available depend on the
DVD.
1."CD/Multimedia"2."CD/DVD"3.Select the desired DVD.4.Open "Options".5."Audio/language"6.Select the desired language.Notes
CD/DVD player and changer Do not remove the cover
BMW CD/DVD players and changers are
officially designated Class 1 laser products. Do
not operate if the cover is damaged; otherwise,
severe eye damage may occur.◀
CDs and DVDs Use of CDs/DVDs▷Do not use self-recorded CDs/DVDs
with labels applied, as these can be‐
come detached during playback due
to heat buildup and can cause irrepar‐
able damage to the device.▷Only use round CDs/DVDs with a standard
diameter of 4.7 in/12 cm and do not play
CDs/DVDs with an adapter, e.g., single CDs;
otherwise, the CDs or the adapter may jam
and no longer eject.▷Do not use combined CDs/DVDs, e.g., DVD
Plus, as the CDs/DVDs can jam and will no
longer eject.◀
General malfunctions
▷CD/DVD changers and players have been
optimized for performance in vehicles. In
some instances they may be more sensitive
to faulty CDs/DVDs than stationary devices
would be.▷If a CD/DVD cannot be played, first check
whether it has been inserted correctly.
Humidity
High levels of humidity can lead to condensation
on the CD/DVD or the laser's scan lens, and
temporarily prevent playback.
Seite 202EntertainmentCD/multimedia202
Online Edition for Part no. 01 40 2 607 855 - 09 11 490
Page 219 of 321
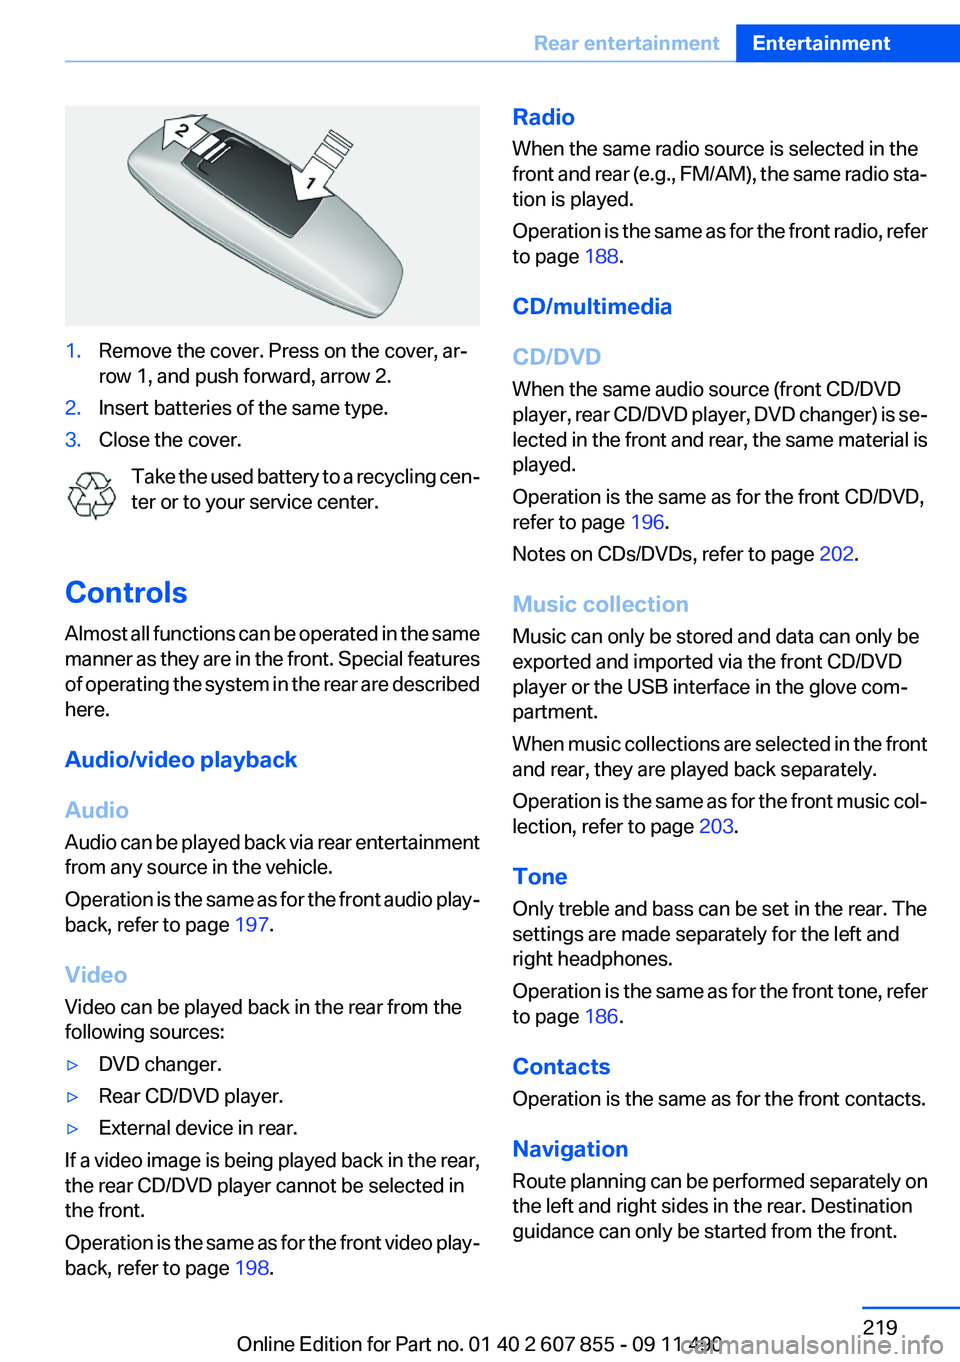
1.Remove the cover. Press on the cover, ar‐
row 1, and push forward, arrow 2.2.Insert batteries of the same type.3.Close the cover.
Take the used battery to a recycling cen‐
ter or to your service center.
Controls
Almost all functions can be operated in the same
manner as they are in the front. Special features
of operating the system in the rear are described
here.
Audio/video playback
Audio
Audio can be played back via rear entertainment
from any source in the vehicle.
Operation is the same as for the front audio play‐
back, refer to page 197.
Video
Video can be played back in the rear from the
following sources:
▷DVD changer.▷Rear CD/DVD player.▷External device in rear.
If a video image is being played back in the rear,
the rear CD/DVD player cannot be selected in
the front.
Operation is the same as for the front video play‐
back, refer to page 198.
Radio
When the same radio source is selected in the
front and rear (e.g., FM/AM), the same radio sta‐
tion is played.
Operation is the same as for the front radio, refer
to page 188.
CD/multimedia
CD/DVD
When the same audio source (front CD/DVD
player, rear CD/DVD player, DVD changer) is se‐
lected in the front and rear, the same material is
played.
Operation is the same as for the front CD/DVD,
refer to page 196.
Notes on CDs/DVDs, refer to page 202.
Music collection
Music can only be stored and data can only be
exported and imported via the front CD/DVD
player or the USB interface in the glove com‐
partment.
When music collections are selected in the front
and rear, they are played back separately.
Operation is the same as for the front music col‐
lection, refer to page 203.
Tone
Only treble and bass can be set in the rear. The
settings are made separately for the left and
right headphones.
Operation is the same as for the front tone, refer
to page 186.
Contacts
Operation is the same as for the front contacts.
Navigation
Route planning can be performed separately on
the left and right sides in the rear. Destination
guidance can only be started from the front.Seite 219Rear entertainmentEntertainment219
Online Edition for Part no. 01 40 2 607 855 - 09 11 490
Page 312 of 321
Concierge service 250
Condensation on win‐ dows 137
Condensation under the vehi‐ cle 160
Condition Based Service CBS 276
Confirmation signal 35
Contacts 239, 247
Control Display 16
Control Display, settings 87
Controller 16
Control systems, driving sta‐ bility 106
Convenient opening 34
Coolant 274
Coolant temperature 82
Cooling function 138
Cooling, maximum 138
Cooling system 274
Corrosion on brake discs 160
Cruise control 121
Cruise control, active with Stop & Go 114
Cruising range 82
Cupholder 152
Curb weight 298
Current fuel consumption 83
Current location, storing 170
Customer Relations 252
D
Damage, tires 266
Damping control, dy‐ namic 109
Data, technical 296
Date 82
Daytime running lights 90
Defrosting, refer to Windows, defrosting 137
Destination distance 85
Destination guidance 176
Destination guidance with in‐ termediate destinations 174 Destination input, naviga‐
tion 168
Digital clock 82
Digital radio 189
Dimensions 296
Dimmable exterior mirrors 61
Dimmable interior rearview mirror 61
Direction indicator, refer to Turn signals 72
Display in front wind‐ shield 134
Display lighting, refer to Instru‐ ment lighting 92
Displays 78
Displays, cleaning 292
Disposal, coolant 275
Disposal, vehicle battery 282
Distance control, refer to PDC 123
Distance, selecting for ACC 116
Distance to destination 85
Divided screen view, split screen 20
Door lock, refer to Remote control 30
Doors, Automatic Soft Clos‐ ing 38
Downhill control 108
Drive-off assistant 106
Drive-off assistant, refer to DSC 106
Driving Experience Switch 110
Driving instructions, breaking in 158
Driving notes, general 158
Driving stability control sys‐ tems 106
Driving tips 158
DSC Dynamic Stability Con‐ trol 106
DTC driving dynamics 107
DTC Dynamic Traction Con‐ trol 107 DVD/CD 196
DVD/CD notes 202
DVD/CD player, rear 217
DVD changer 200
DVD settings 199
DVDs, storing 203
DVD, video 198
Dynamic Damping Con‐ trol 109
Dynamic destination guid‐ ance 182
Dynamic Drive 109
Dynamic Stability Control DSC 106
Dynamic Traction Control DTC 107
E
Electronic displays, instru‐ ment cluster 79
Electronic Stability Program ESP, refer to DSC 106
Emergency detection, remote control 31
Emergency release, door lock 37
Emergency release, fuel filler flap 258
Emergency release, parking brake 69
Emergency Request 284
Emergency service, refer to Roadside Assistance 285
Emergency start function, en‐ gine start 31
Emergency unlocking, tail‐ gate 41
Energy Control 83
Energy recovery 83
Engine compartment 271
Engine compartment, working in 271
Engine coolant 274
Engine oil 273
Engine oil, adding 273 Seite 312ReferenceEverything from A to Z312
Online Edition for Part no. 01 40 2 607 855 - 09 11 490