ad blue BMW 550I XDRIVE GRAN TURISMO 2012 Owners Manual
[x] Cancel search | Manufacturer: BMW, Model Year: 2012, Model line: 550I XDRIVE GRAN TURISMO, Model: BMW 550I XDRIVE GRAN TURISMO 2012Pages: 321, PDF Size: 12.7 MB
Page 19 of 321
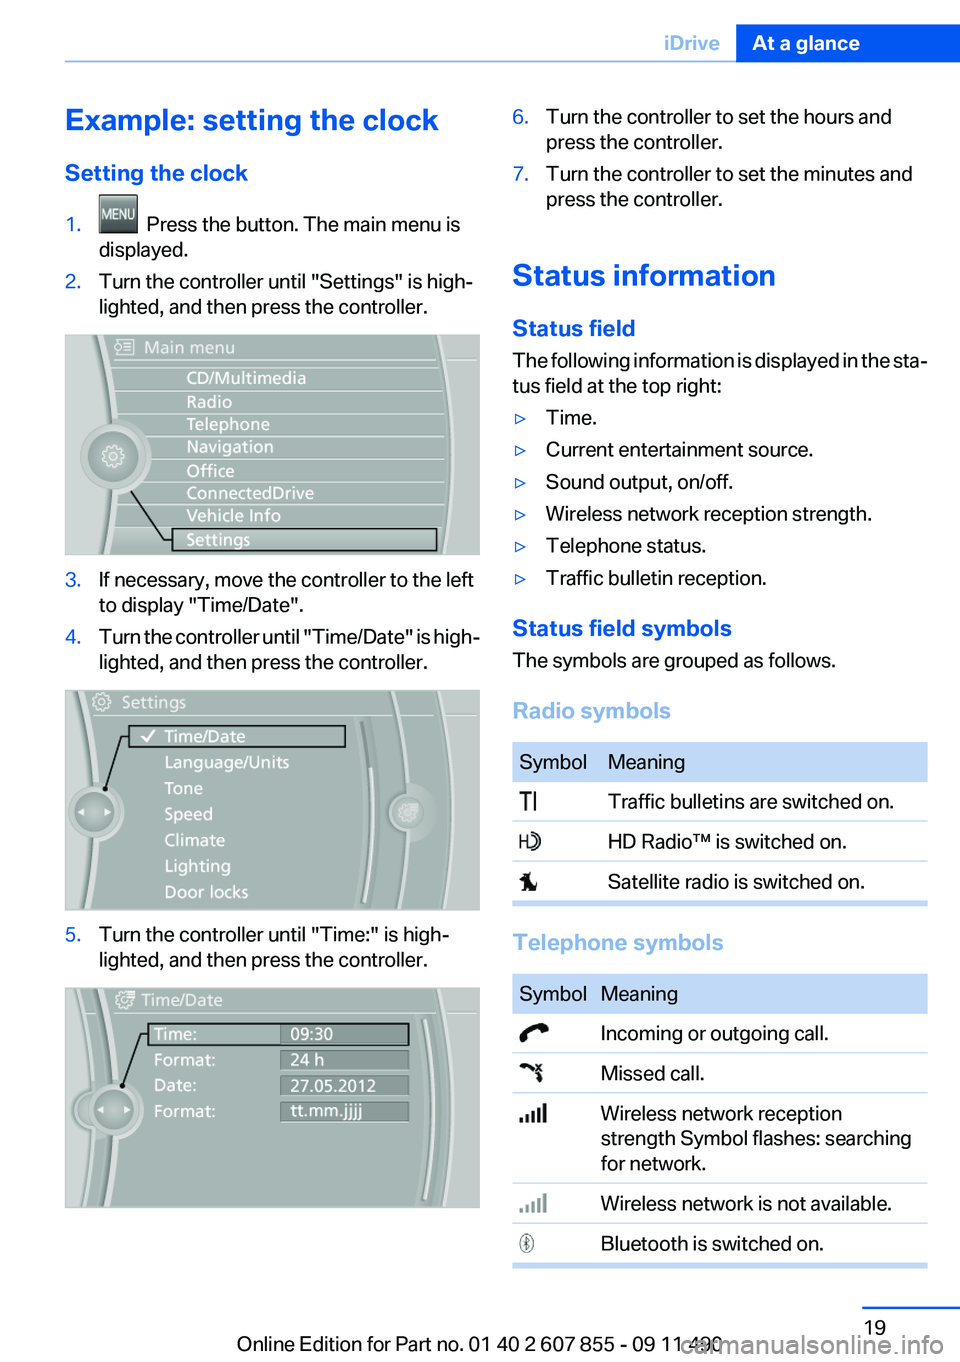
Example: setting the clock
Setting the clock1. Press the button. The main menu is
displayed.2.Turn the controller until "Settings" is high‐
lighted, and then press the controller.3.If necessary, move the controller to the left
to display "Time/Date".4.Turn the controller until "Time/Date" is high‐
lighted, and then press the controller.5.Turn the controller until "Time:" is high‐
lighted, and then press the controller.6.Turn the controller to set the hours and
press the controller.7.Turn the controller to set the minutes and
press the controller.
Status information
Status field
The following information is displayed in the sta‐
tus field at the top right:
▷Time.▷Current entertainment source.▷Sound output, on/off.▷Wireless network reception strength.▷Telephone status.▷Traffic bulletin reception.
Status field symbols
The symbols are grouped as follows.
Radio symbols
SymbolMeaning Traffic bulletins are switched on. HD Radio™ is switched on. Satellite radio is switched on.
Telephone symbols
SymbolMeaning Incoming or outgoing call. Missed call. Wireless network reception
strength Symbol flashes: searching
for network. Wireless network is not available. Bluetooth is switched on.Seite 19iDriveAt a glance19
Online Edition for Part no. 01 40 2 607 855 - 09 11 490
Page 90 of 321
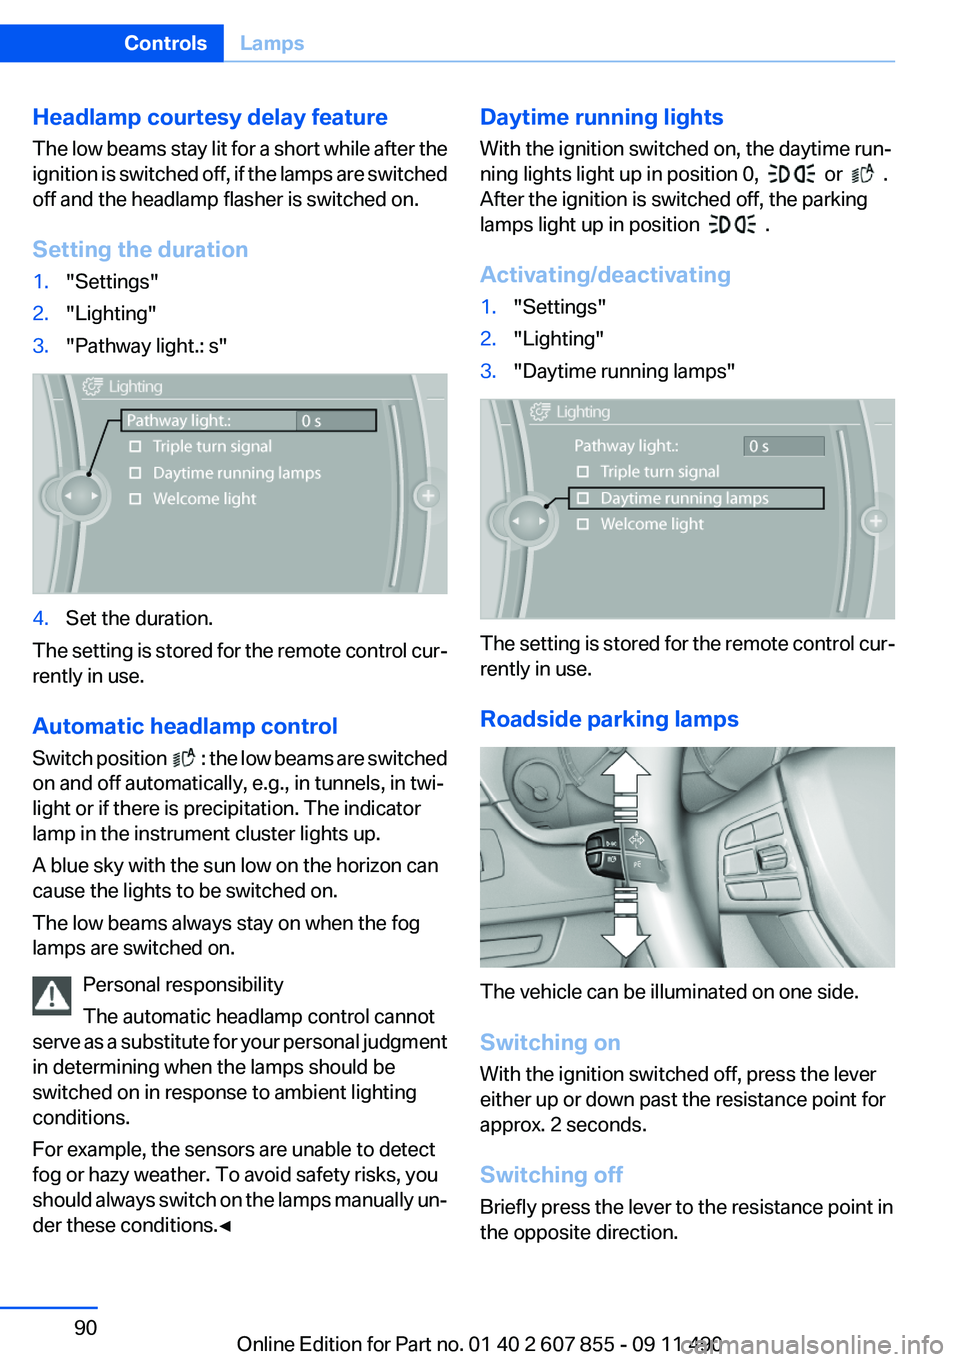
Headlamp courtesy delay feature
The low beams stay lit for a short while after the
ignition is switched off, if the lamps are switched
off and the headlamp flasher is switched on.
Setting the duration1."Settings"2."Lighting"3."Pathway light.: s"4.Set the duration.
The setting is stored for the remote control cur‐
rently in use.
Automatic headlamp control
Switch position
: the low beams are switched
on and off automatically, e.g., in tunnels, in twi‐
light or if there is precipitation. The indicator
lamp in the instrument cluster lights up.
A blue sky with the sun low on the horizon can
cause the lights to be switched on.
The low beams always stay on when the fog
lamps are switched on.
Personal responsibility
The automatic headlamp control cannot
serve as a substitute for your personal judgment
in determining when the lamps should be
switched on in response to ambient lighting
conditions.
For example, the sensors are unable to detect
fog or hazy weather. To avoid safety risks, you
should always switch on the lamps manually un‐
der these conditions.◀
Daytime running lights
With the ignition switched on, the daytime run‐
ning lights light up in position 0,
or .
After the ignition is switched off, the parking
lamps light up in position
.
Activating/deactivating
1."Settings"2."Lighting"3."Daytime running lamps"
The setting is stored for the remote control cur‐
rently in use.
Roadside parking lamps
The vehicle can be illuminated on one side.
Switching on
With the ignition switched off, press the lever
either up or down past the resistance point for
approx. 2 seconds.
Switching off
Briefly press the lever to the resistance point in
the opposite direction.
Seite 90ControlsLamps90
Online Edition for Part no. 01 40 2 607 855 - 09 11 490
Page 139 of 321
Switching on1.Switch off the ignition.2. Press the right side of the button on
the driver's side.
is shown on the display of the automatic cli‐
mate control.
The interior temperature, air volume and air dis‐
tribution can be adjusted with the ignition
switched on.
Switching off
At the lowest fan speed, press the left side of the
button on the driver's side.
on the display of the automatic climate control
goes out.
Switching the system on/off
Switching off
▷Complete system: At the lowest fan speed, press the
left side of the button on the driver's
side.▷On the front passenger side:
At the lowest fan speed, press the
left side of the button on the front
passenger side.
Switching on
Press any button.
Microfilter/activated-charcoal filter
The microfilter removes dust and pollen from
the incoming air.
The activated-charcoal filter removes gaseous
pollutants from the outside air that enters the
vehicle.
This combined filter should be replaced during
scheduled maintenance, refer to page 276, of
your vehicle.
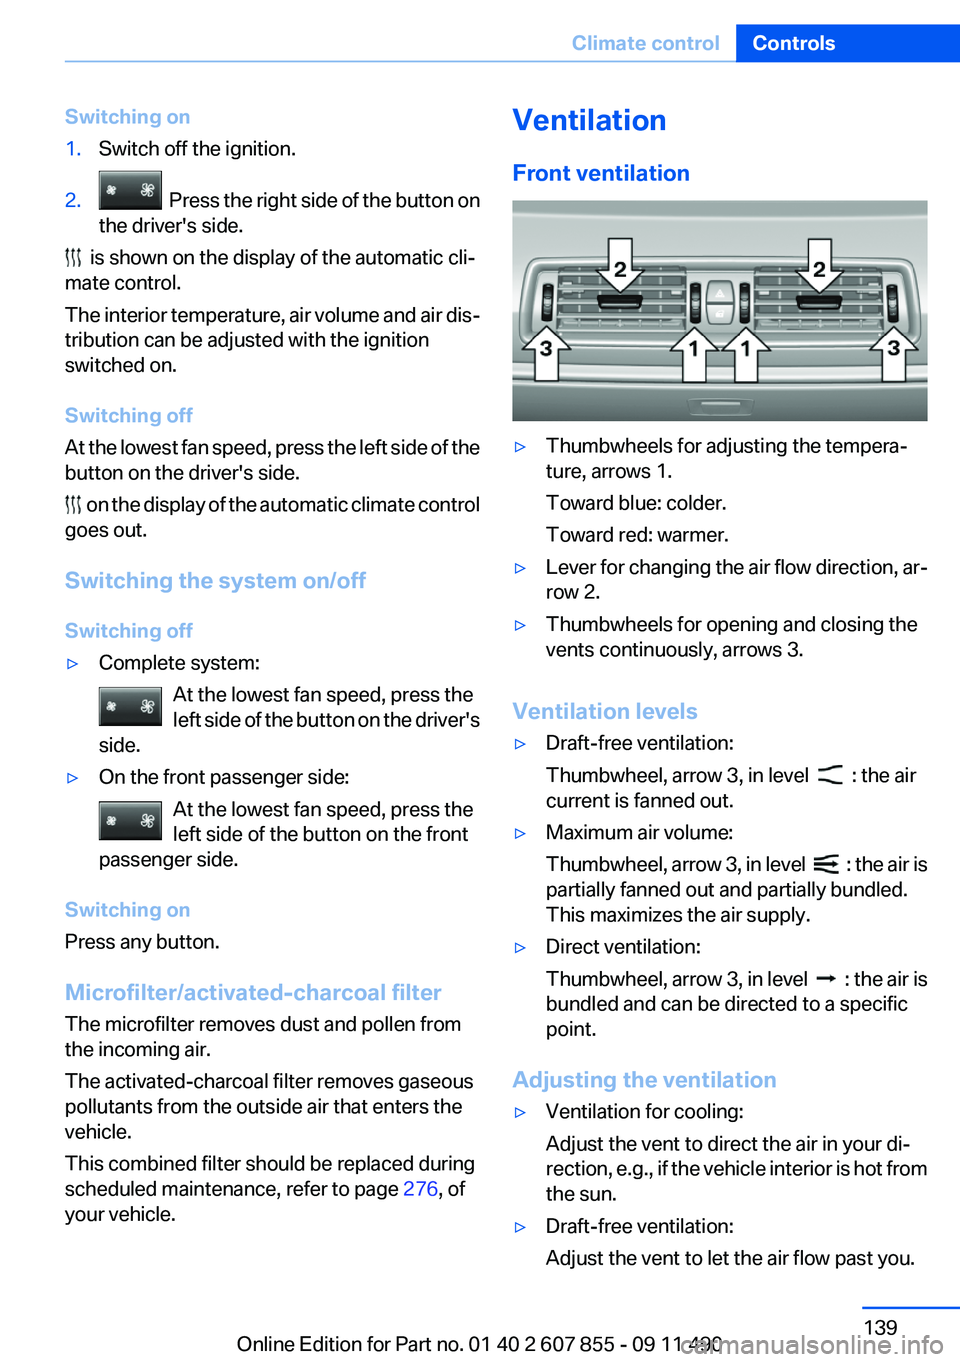
Ventilation
Front ventilation▷Thumbwheels for adjusting the tempera‐
ture, arrows 1.
Toward blue: colder.
Toward red: warmer.▷Lever for changing the air flow direction, ar‐
row 2.▷Thumbwheels for opening and closing the
vents continuously, arrows 3.
Ventilation levels
▷Draft-free ventilation:
Thumbwheel, arrow 3, in level
: the air
current is fanned out.
▷Maximum air volume:
Thumbwheel, arrow 3, in level
: the air is
partially fanned out and partially bundled.
This maximizes the air supply.
▷Direct ventilation:
Thumbwheel, arrow 3, in level
: the air is
bundled and can be directed to a specific
point.
Adjusting the ventilation
▷Ventilation for cooling:
Adjust the vent to direct the air in your di‐
rection, e.g., if the vehicle interior is hot from
the sun.▷Draft-free ventilation:
Adjust the vent to let the air flow past you.Seite 139Climate controlControls139
Online Edition for Part no. 01 40 2 607 855 - 09 11 490
Page 140 of 321
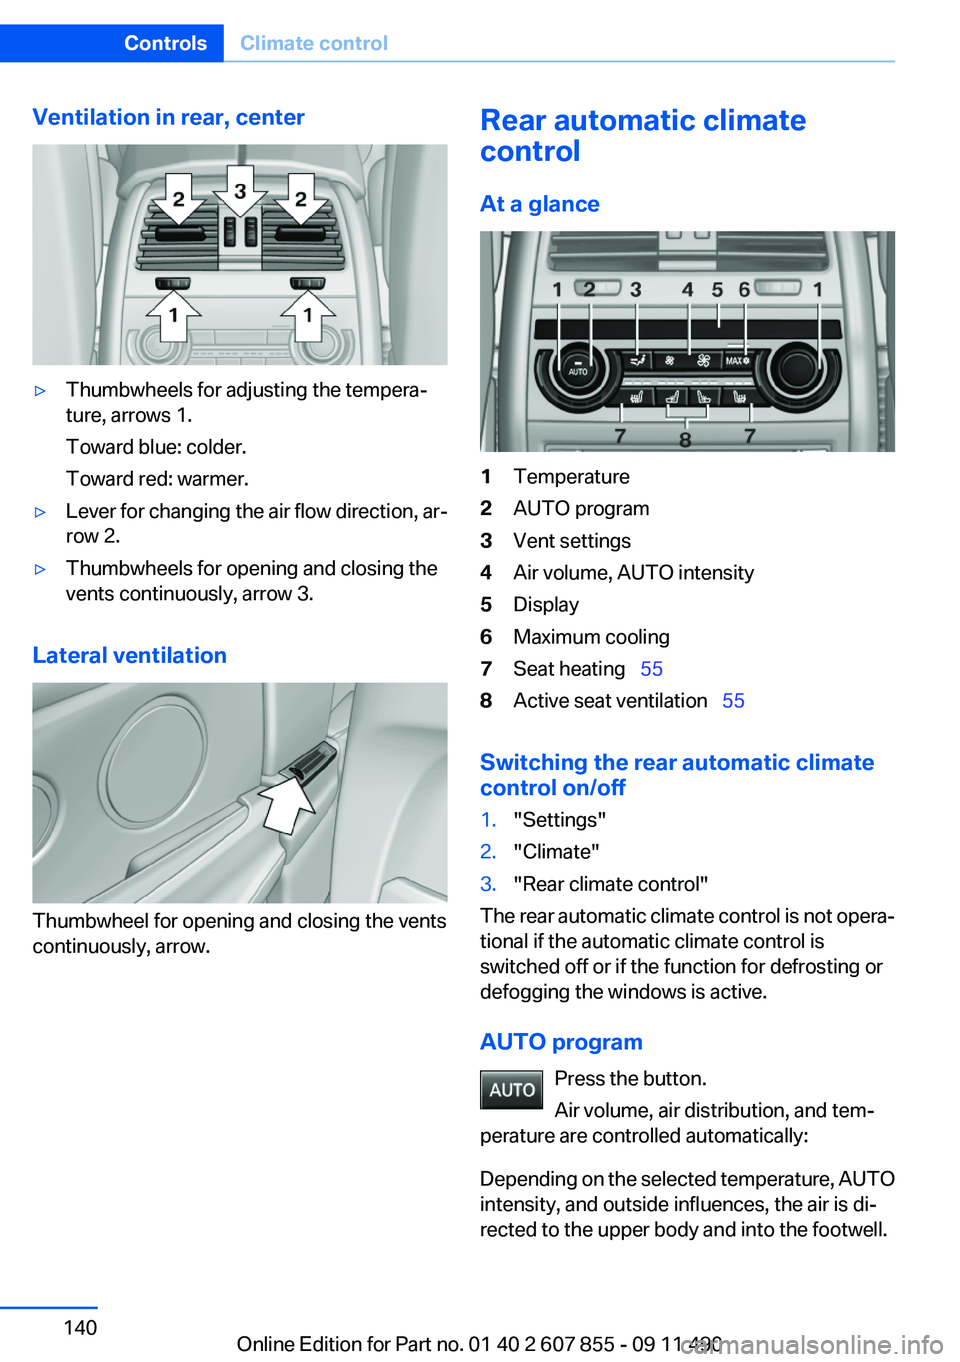
Ventilation in rear, center▷Thumbwheels for adjusting the tempera‐
ture, arrows 1.
Toward blue: colder.
Toward red: warmer.▷Lever for changing the air flow direction, ar‐
row 2.▷Thumbwheels for opening and closing the
vents continuously, arrow 3.
Lateral ventilation
Thumbwheel for opening and closing the vents
continuously, arrow.
Rear automatic climate
control
At a glance1Temperature2AUTO program3Vent settings4Air volume, AUTO intensity5Display6Maximum cooling7Seat heating 558Active seat ventilation 55
Switching the rear automatic climate
control on/off
1."Settings"2."Climate"3."Rear climate control"
The rear automatic climate control is not opera‐
tional if the automatic climate control is
switched off or if the function for defrosting or
defogging the windows is active.
AUTO program Press the button.
Air volume, air distribution, and tem‐
perature are controlled automatically:
Depending on the selected temperature, AUTO
intensity, and outside influences, the air is di‐
rected to the upper body and into the footwell.
Seite 140ControlsClimate control140
Online Edition for Part no. 01 40 2 607 855 - 09 11 490
Page 208 of 321
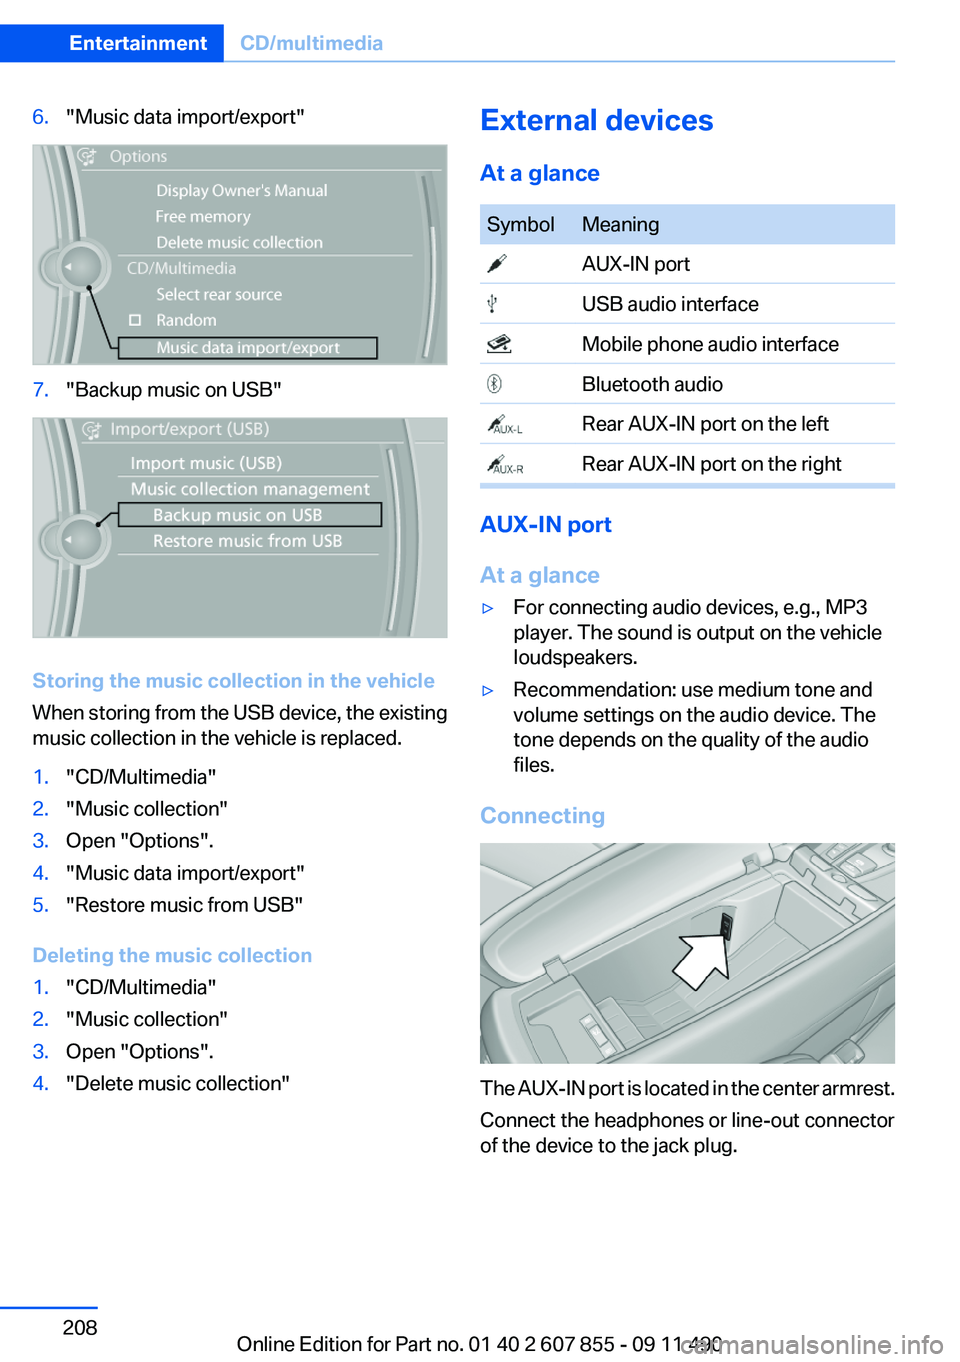
6."Music data import/export"7."Backup music on USB"
Storing the music collection in the vehicle
When storing from the USB device, the existing
music collection in the vehicle is replaced.
1."CD/Multimedia"2."Music collection"3.Open "Options".4."Music data import/export"5."Restore music from USB"
Deleting the music collection
1."CD/Multimedia"2."Music collection"3.Open "Options".4."Delete music collection"External devices
At a glanceSymbolMeaning AUX-IN port USB audio interface Mobile phone audio interface Bluetooth audio Rear AUX-IN port on the left Rear AUX-IN port on the right
AUX-IN port
At a glance
▷For connecting audio devices, e.g., MP3
player. The sound is output on the vehicle
loudspeakers.▷Recommendation: use medium tone and
volume settings on the audio device. The
tone depends on the quality of the audio
files.
Connecting
The AUX-IN port is located in the center armrest.
Connect the headphones or line-out connector
of the device to the jack plug.
Seite 208EntertainmentCD/multimedia208
Online Edition for Part no. 01 40 2 607 855 - 09 11 490
Page 212 of 321
peratures; refer to the audio device operating
instructions.
Depending on the configuration of the audio
files, e.g., bit rates greater than 256 kbit/s, the
files may not play back correctly in each case.
Information on connection▷The connected audio device is supplied with
a max. power of 500 mA if supported by the
device. Therefore, do not additionally con‐
nect the device to a socket in the vehicle;
otherwise, playback may be compromised.▷Do not use force when plugging the con‐
nector into the USB interface.▷Do not connect devices such as fans or
lamps to the USB audio interface.▷Do not connect USB hard drives.▷Do not use the USB audio interface to re‐
charge external devices.
Bluetooth audio
At a glance
▷Music files on external devices such as audio
devices or mobile phones can be played
back via Bluetooth.
Use of a mobile phone as an audio source,
refer to page 227.▷The sound is output on the vehicle loud‐
speakers.▷The volume of the sound output is depend‐
ent on the device. If necessary, adjust the
volume on the device.▷Up to four external devices can be paired
with the vehicle.
Requirements
▷The device is suitable. Information under
www.bmwusa.com/bluetooth.▷The device is ready for operation.▷The ignition is switched on.▷Bluetooth is activated on the vehicle, refer to
page 227, and on the device.▷Bluetooth presettings must be made on the
device, such as for a connection without
confirmation or visibility; refer to the device
operating instructions.▷A number with at least four and a maximum
of 16 digits is defined as the Bluetooth pass‐
key. It is only required once for pairing.
Pairing and connecting
Pairing a device
To avoid becoming distracted and posing
an unnecessary hazard both to your own vehi‐
cle's occupants and to other road users, only
pair the device while the vehicle is stationary.◀
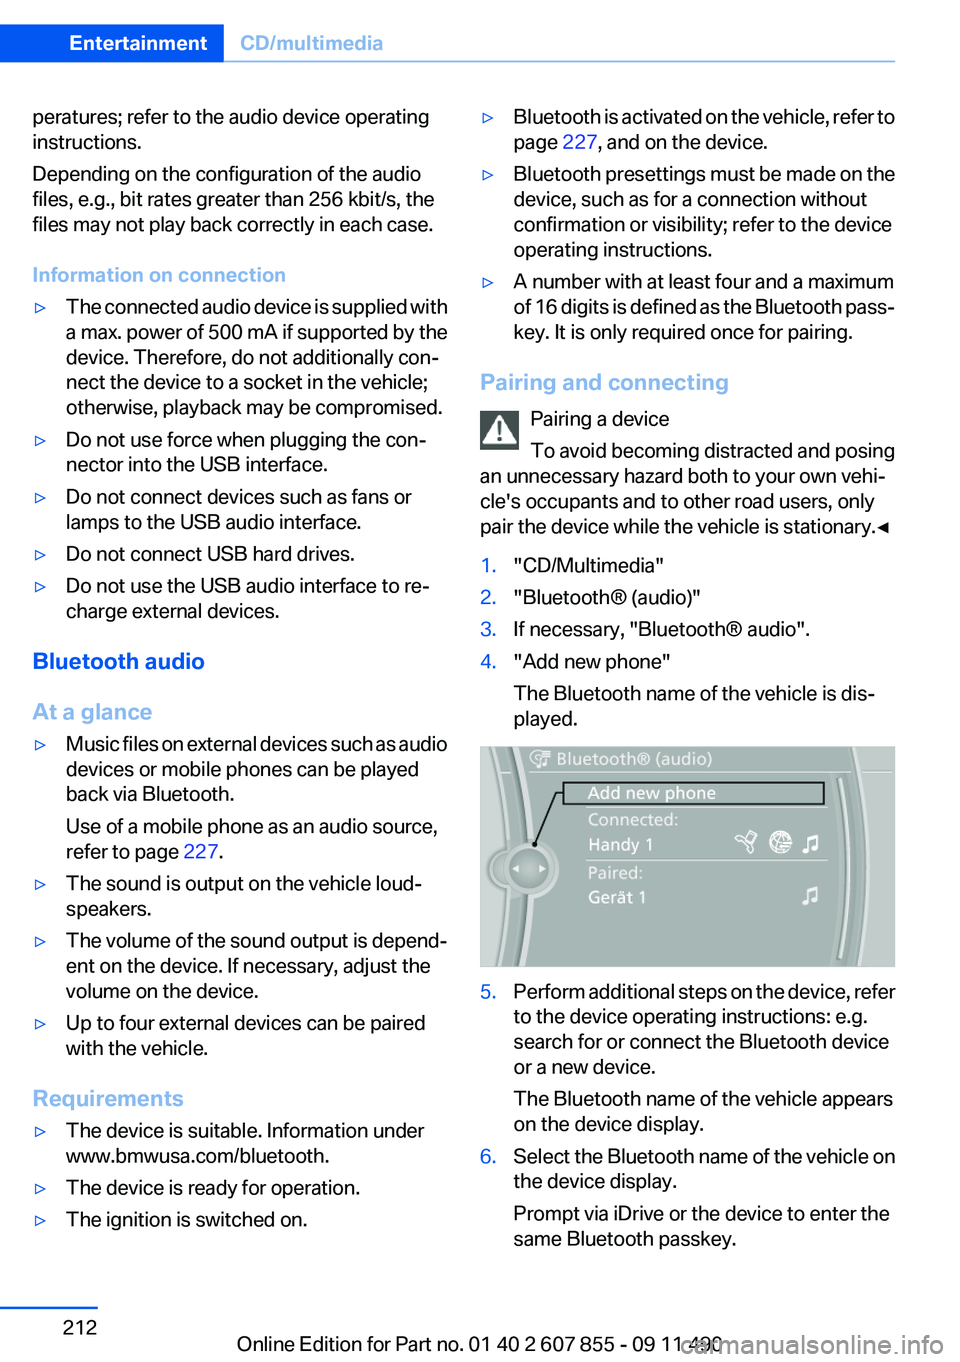
1."CD/Multimedia"2."Bluetooth® (audio)"3.If necessary, "Bluetooth® audio".4."Add new phone"
The Bluetooth name of the vehicle is dis‐
played.5.Perform additional steps on the device, refer
to the device operating instructions: e.g.
search for or connect the Bluetooth device
or a new device.
The Bluetooth name of the vehicle appears
on the device display.6.Select the Bluetooth name of the vehicle on
the device display.
Prompt via iDrive or the device to enter the
same Bluetooth passkey.Seite 212EntertainmentCD/multimedia212
Online Edition for Part no. 01 40 2 607 855 - 09 11 490
Page 213 of 321
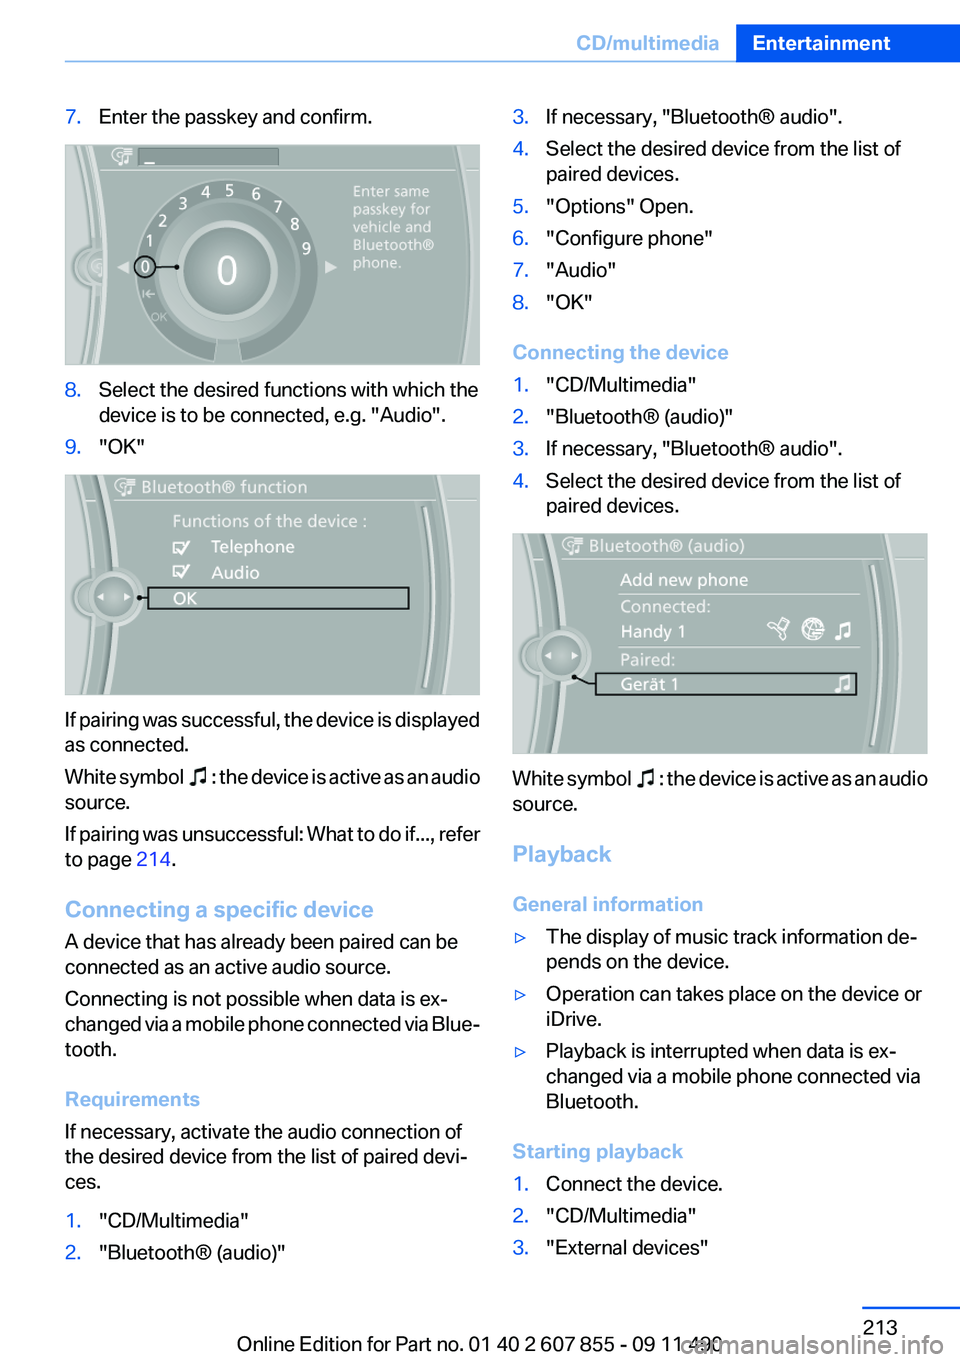
7.Enter the passkey and confirm.8.Select the desired functions with which the
device is to be connected, e.g. "Audio".9."OK"
If pairing was successful, the device is displayed
as connected.
White symbol
: the device is active as an audio
source.
If pairing was unsuccessful: What to do if..., refer
to page 214.
Connecting a specific device
A device that has already been paired can be
connected as an active audio source.
Connecting is not possible when data is ex‐
changed via a mobile phone connected via Blue‐
tooth.
Requirements
If necessary, activate the audio connection of
the desired device from the list of paired devi‐
ces.
1."CD/Multimedia"2."Bluetooth® (audio)"3.If necessary, "Bluetooth® audio".4.Select the desired device from the list of
paired devices.5."Options" Open.6."Configure phone"7."Audio"8."OK"
Connecting the device
1."CD/Multimedia"2."Bluetooth® (audio)"3.If necessary, "Bluetooth® audio".4.Select the desired device from the list of
paired devices.
White symbol : the device is active as an audio
source.
Playback
General information
▷The display of music track information de‐
pends on the device.▷Operation can takes place on the device or
iDrive.▷Playback is interrupted when data is ex‐
changed via a mobile phone connected via
Bluetooth.
Starting playback
1.Connect the device.2."CD/Multimedia"3."External devices"Seite 213CD/multimediaEntertainment213
Online Edition for Part no. 01 40 2 607 855 - 09 11 490
Page 214 of 321
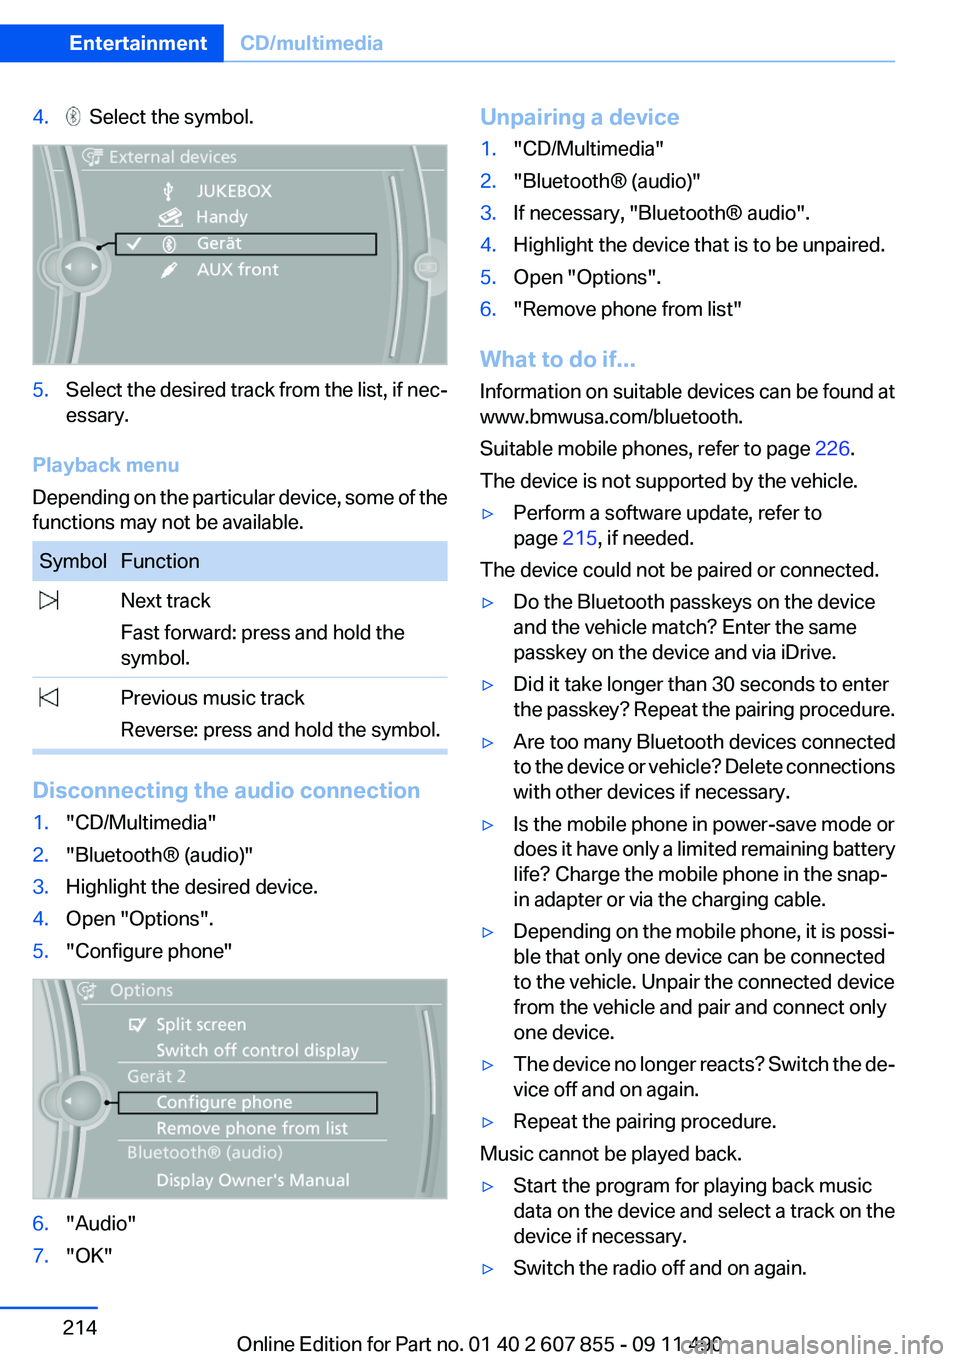
4. Select the symbol.5.Select the desired track from the list, if nec‐
essary.
Playback menu
Depending on the particular device, some of the
functions may not be available.
SymbolFunction Next track
Fast forward: press and hold the
symbol. Previous music track
Reverse: press and hold the symbol.
Disconnecting the audio connection
1."CD/Multimedia"2."Bluetooth® (audio)"3.Highlight the desired device.4.Open "Options".5."Configure phone"6."Audio"7."OK"Unpairing a device1."CD/Multimedia"2."Bluetooth® (audio)"3.If necessary, "Bluetooth® audio".4.Highlight the device that is to be unpaired.5.Open "Options".6."Remove phone from list"
What to do if...
Information on suitable devices can be found at
www.bmwusa.com/bluetooth.
Suitable mobile phones, refer to page 226.
The device is not supported by the vehicle.
▷Perform a software update, refer to
page 215, if needed.
The device could not be paired or connected.
▷Do the Bluetooth passkeys on the device
and the vehicle match? Enter the same
passkey on the device and via iDrive.▷Did it take longer than 30 seconds to enter
the passkey? Repeat the pairing procedure.▷Are too many Bluetooth devices connected
to the device or vehicle? Delete connections
with other devices if necessary.▷Is the mobile phone in power-save mode or
does it have only a limited remaining battery
life? Charge the mobile phone in the snap-
in adapter or via the charging cable.▷Depending on the mobile phone, it is possi‐
ble that only one device can be connected
to the vehicle. Unpair the connected device
from the vehicle and pair and connect only
one device.▷The device no longer reacts? Switch the de‐
vice off and on again.▷Repeat the pairing procedure.
Music cannot be played back.
▷Start the program for playing back music
data on the device and select a track on the
device if necessary.▷Switch the radio off and on again.Seite 214EntertainmentCD/multimedia214
Online Edition for Part no. 01 40 2 607 855 - 09 11 490
Page 215 of 321
Music files can only be played back softly.▷Adjust the volume settings on the device.
Playback is disturbed when buttons are pressed
or by other messages on the device.
▷Switch off the button tones and other signal
tones on the device.
Playback is interrupted by a telephone call or
traffic bulletin and is not resumed automatically.
▷Switch the radio off and on again.
Playback is not possible if the mobile phone is
connected both via Bluetooth Audio and via the
extended connectivity of the music player in the
mobile phone.
▷Disconnect one of the two connections; for
example, disconnect the audio connection,
refer to page 214, and restart playback.
If all points in this list have been checked and the
required function is still not available, please
contact the hotline or service center.
Software Update
The vehicle supports various external devices
depending on the current software version. With
a software update, the vehicle can support new
cell phones or new external devices.
The updating of the software is done via:
▷USB.
Updates and related current information is
available at www.bmw.com/update.
Displaying the current version
The currently installed software is displayed.
1."Settings"2."Software update"3."Show current version"
SelectDesired version to displayAdditional in‐
formation.
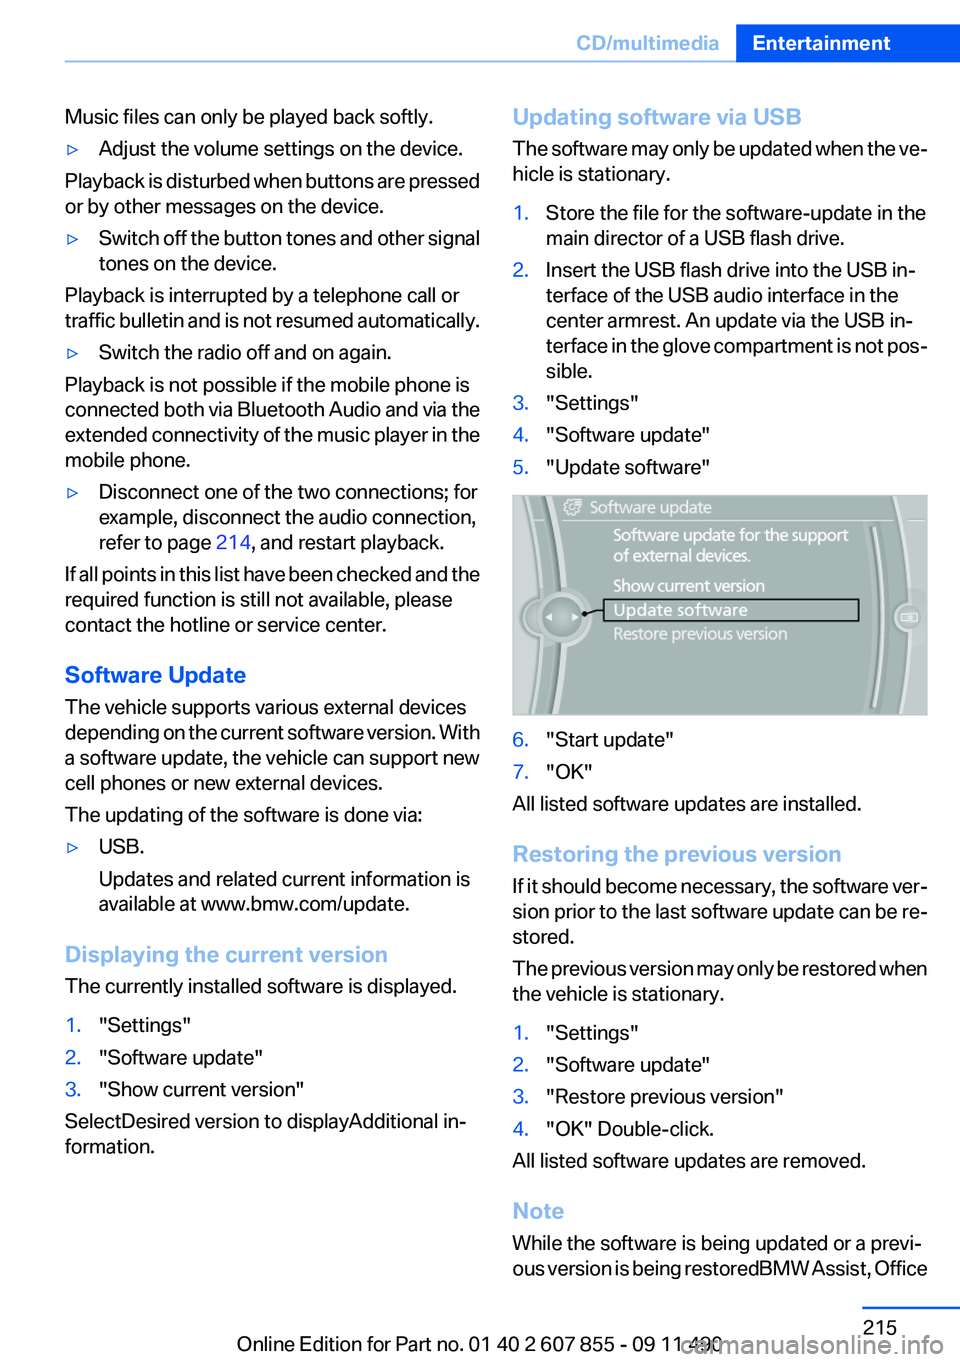
Updating software via USB
The software may only be updated when the ve‐
hicle is stationary.1.Store the file for the software-update in the
main director of a USB flash drive.2.Insert the USB flash drive into the USB in‐
terface of the USB audio interface in the
center armrest. An update via the USB in‐
terface in the glove compartment is not pos‐
sible.3."Settings"4."Software update"5."Update software"6."Start update"7."OK"
All listed software updates are installed.
Restoring the previous version
If it should become necessary, the software ver‐
sion prior to the last software update can be re‐
stored.
The previous version may only be restored when
the vehicle is stationary.
1."Settings"2."Software update"3."Restore previous version"4."OK" Double-click.
All listed software updates are removed.
Note
While the software is being updated or a previ‐
ous version is being restoredBMW Assist, Office
Seite 215CD/multimediaEntertainment215
Online Edition for Part no. 01 40 2 607 855 - 09 11 490
Page 226 of 321
TelephoneVehicle equipment
All standard, country-specific and optional
equipment that is offered in the model series is
described in this chapter. Therefore, equipment
is also described that is not available in a vehicle,
e. g., because of the selected optional equip‐
ment or country variant. This also applies for
safety-related functions and systems.
At a glance
The concept
Mobile phones or other external devices such as
audio players can be connected to the vehicle
via Bluetooth.
After these devices are paired once, they are
recognized automatically when the ignition is
switched on as soon as they are inside the ve‐
hicle and can be operated via iDrive, the buttons
on the steering wheel, and via voice activation.
Depending on their functionality, external devi‐
ces can be used via the vehicle as a telephone
or as an audio source.
The telephone functions are described in the
following. Operation of the audio functions, refer
to page 212.
Up to four external devices can be paired.
Certain functions may need to be enabled by the
mobile phone provider or service provider.
Using the mobile phone while driving
Make entries only when traffic and road
conditions allow. Do not hold the mobile phone
in your hand while you are driving; use the
hands-free system instead. If you do not ob‐
serve this precaution, you can endanger the ve‐
hicle occupants and other road users.◀Snap-in adapter
The snap-in adapter is used to:▷Hold the mobile phone.▷Recharge the battery.▷Connect the mobile phone to an outside an‐
tenna of the vehicle.
This provides for better network reception
and consistent sound quality.
Approved mobile phones
Details on which mobile phones and external
devices with a Bluetooth interface are sup‐
ported by the mobile phone preparation pack‐
age can be obtained at www.bmwusa.com/blue‐
tooth.
Displaying the vehicle identification
number and software part number
The vehicle identification number and software
part number are needed to determine which mo‐
bile phones are supported by the mobile phone
preparation package. The software version of
the mobile phone may also be required.
1."Telephone"2.Open "Options".3."Bluetooth® info"4."Display system information"
These approved mobile phones with a certain
software version, support the vehicle functions
described below.
Malfunctions may occur with other mobile
phones or software versions.
Do not operate a mobile phone that is connected
to the vehicle on the mobile phone keypad, as
this may lead to a malfunction.
A software update can be performed if neces‐
sary.
Seite 226CommunicationTelephone226
Online Edition for Part no. 01 40 2 607 855 - 09 11 490