coolant level BMW 6 SERIES GRAN COUPE 2017 Owners Manual
[x] Cancel search | Manufacturer: BMW, Model Year: 2017, Model line: 6 SERIES GRAN COUPE, Model: BMW 6 SERIES GRAN COUPE 2017Pages: 261, PDF Size: 5.24 MB
Page 89 of 261
▷Other Check Control messages are faded
automatically after approx. 20 seconds.
They are stored and can be displayed
again later.
Displaying stored Check Control
messages
On the Control Display:
1."Vehicle info"2."Vehicle status"3. "Check Control"4.Select the text message.
Messages after trip completion Special messages displayed while driving are
displayed again after the ignition is switched
off.
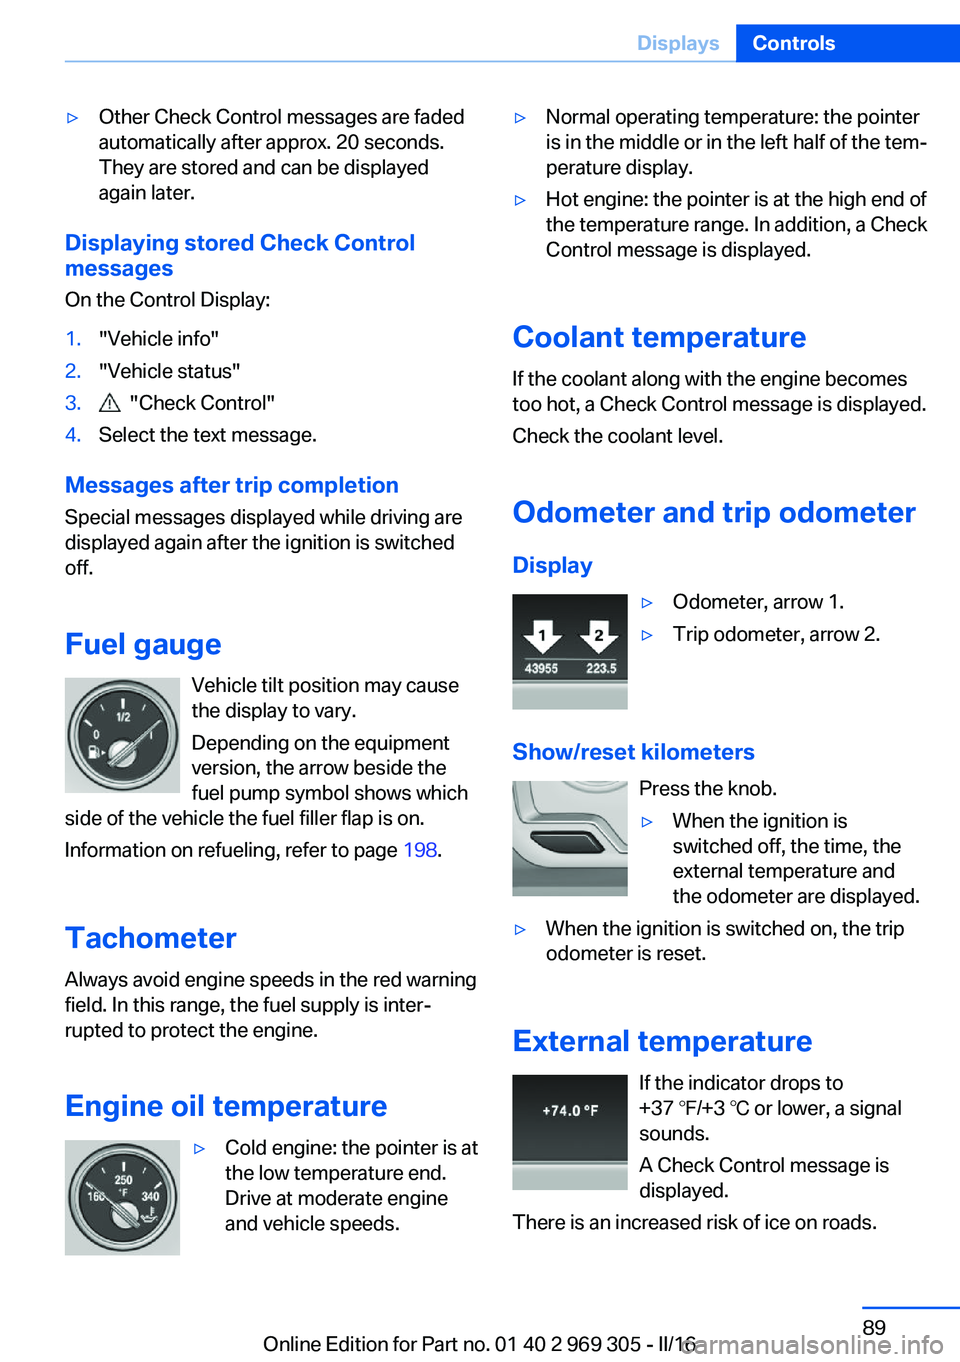
Fuel gauge Vehicle tilt position may cause
the display to vary.
Depending on the equipment
version, the arrow beside the
fuel pump symbol shows which
side of the vehicle the fuel filler flap is on.
Information on refueling, refer to page 198.
Tachometer
Always avoid engine speeds in the red warning
field. In this range, the fuel supply is inter‐
rupted to protect the engine.
Engine oil temperature
▷Cold engine: the pointer is at
the low temperature end.
Drive at moderate engine
and vehicle speeds.▷Normal operating temperature: the pointer
is in the middle or in the left half of the tem‐
perature display.▷Hot engine: the pointer is at the high end of
the temperature range. In addition, a Check
Control message is displayed.
Coolant temperature
If the coolant along with the engine becomes
too hot, a Check Control message is displayed.
Check the coolant level.
Odometer and trip odometer Display
▷Odometer, arrow 1.▷Trip odometer, arrow 2.
Show/reset kilometers Press the knob.
▷When the ignition is
switched off, the time, the
external temperature and
the odometer are displayed.▷When the ignition is switched on, the trip
odometer is reset.
External temperature
If the indicator drops to
+37 ℉/+3 ℃ or lower, a signal
sounds.
A Check Control message is displayed.
There is an increased risk of ice on roads.
Seite 89DisplaysControls89
Online Edition for Part no. 01 40 2 969 305 - II/16
Page 221 of 261
ATTENTION
Too much engine oil can damage the en‐
gine or the catalytic converter. There is a risk
of damage to property. Do not add too much
engine oil. When too much engine oil is added,
have oil level corrected by a dealer’s service
center or another qualified service center or re‐
pair shop.◀
Detailed measurement
The concept In the detailed measurement the engine oil
level is checked when the vehicle is stationary,
and displayed via a scale.
Gasoline engine:
If the engine oil level reaches the minimum
level, a check control message is displayed.
During the measurement, the idle speed is in‐
creased somewhat.
General information
A detailed measurement is only possible with
certain engines.
Requirements▷Vehicle is parked in a horizontal position.▷Steptronic transmission: selector lever in
selector lever position N or P and accelera‐
tor pedal not depressed.▷Engine is running and is at operating tem‐
perature.
Performing a detailed measurement
In order to perform a detailed measurement of
the engine oil level:
1."Vehicle info"2."Vehicle status"3. "Measure engine oil level"4."Start measurement"
The engine oil level is checked and displayed
via a scale.
Time: approx. 1 minute.
Adding engine oil Information WARNING
Operating materials, e.g., oils, greases,
coolants, fuels, can contain harmful ingredi‐
ents. There is a risk of injury or danger to life.
Observe the instructions on the containers.
Avoid the contact of articles of clothing, skin or
eyes with operating materials. Do not refill op‐
erating materials into different bottles. Store
operating materials out of reach of children.◀
ATTENTION
Too low of an engine oil level causes en‐
gine damage. There is a risk of damage to
property.
Add engine oil within the next
125 miles/200 km.◀
ATTENTION
Too much engine oil can damage the en‐
gine or the catalytic converter. There is a risk
of damage to property. Do not add too much
engine oil. When too much engine oil is added,
have oil level corrected by a dealer’s service
center or another qualified service center or re‐
pair shop.◀
General information Only add engine oil when the message is dis‐
played in the instrument cluster. The quantity
to be added is indicated in the message dis‐
played in the instrument cluster.
Switch off the ignition and safely park the vehi‐
cle before engine oil is added.
Take care not to add too much engine oil.
Overview The oil filler neck is located in the engine com‐
partment, refer to page 217.Seite 221Engine oilMobility221
Online Edition for Part no. 01 40 2 969 305 - II/16
Page 224 of 261
CoolantVehicle features and optionsThis chapter describes all standard, country-
specific and optional features offered with the
series. It also describes features that are not
necessarily available in your car, e. g., due to
the selected options or country versions. This
also applies to safety-related functions and
systems. The respectively applicable country
provisions must be observed when using the
respective features and systems.
Information WARNING
With the engine hot and the cooling sys‐
tem open, coolant can escape and lead to
scalding. There is a a risk of injury. Only open
the cooling system with the engine cooled
down.◀
WARNING
Additives are harmful and incorrect addi‐
tives can damage the engine. There is a risk of
injury and risk of property damage. Do not al‐
low additives to come into contact with skin,
eyes or articles of clothing. Use suitable addi‐
tives only.◀
Coolant consists of water and additives.
Not all commercially available additives are
suitable for the vehicle. Information about suit‐
able additives is available from a dealer’s serv‐
ice center or another qualified service center or
repair shop.
Coolant level
General information
If there is no Min. and Max. mark in the filler
neck of the coolant reservoir, have the coolantlevel checked if needed by a dealer’s service
center or another qualified service center or re‐
pair shop and add coolant as needed.
Overview
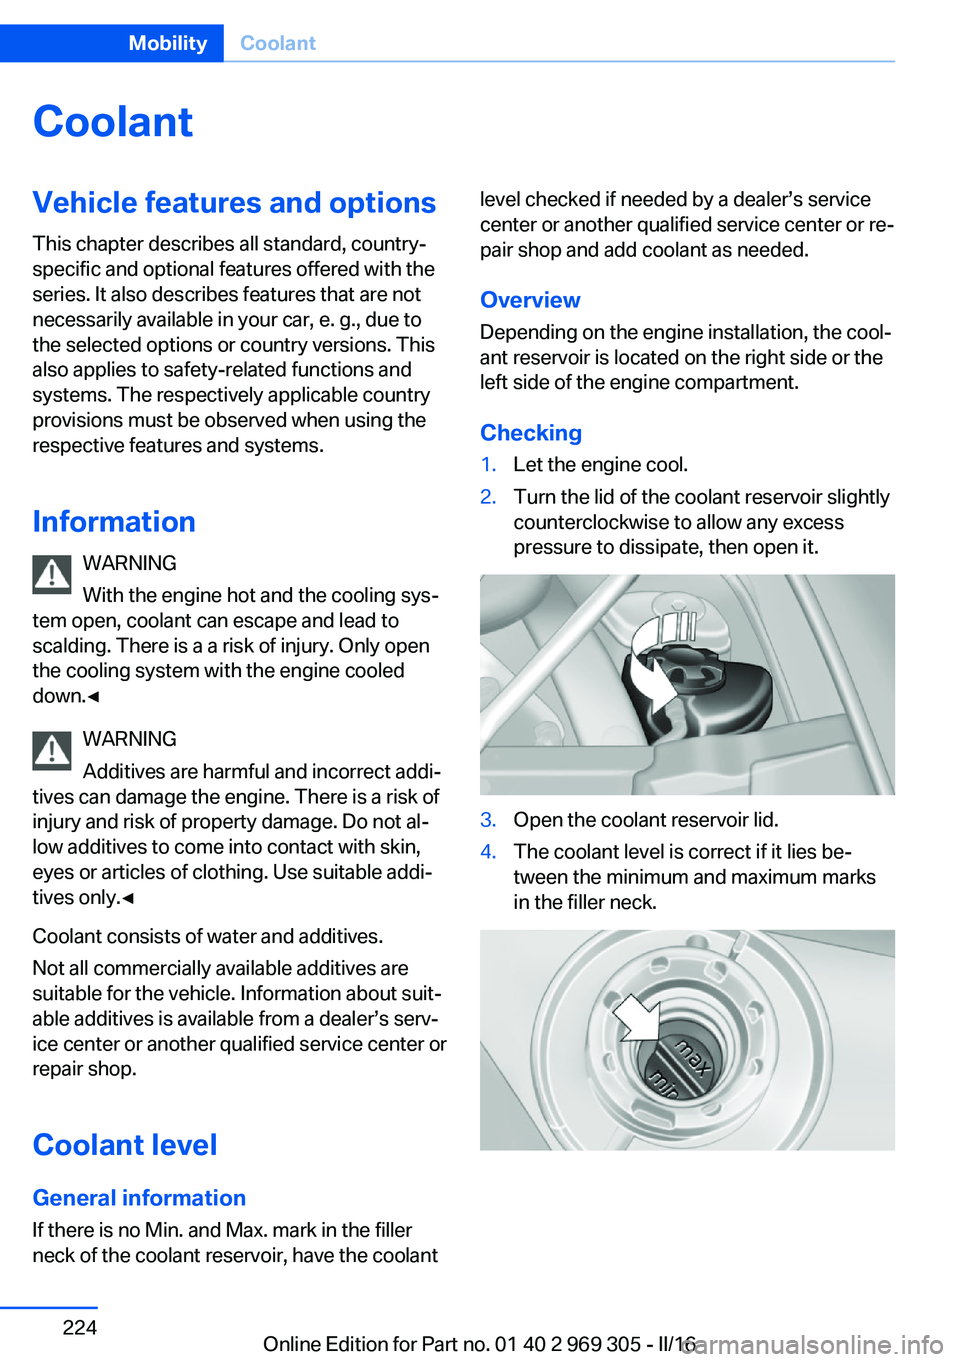
Depending on the engine installation, the cool‐
ant reservoir is located on the right side or the
left side of the engine compartment.
Checking1.Let the engine cool.2.Turn the lid of the coolant reservoir slightly
counterclockwise to allow any excess
pressure to dissipate, then open it.3.Open the coolant reservoir lid.4.The coolant level is correct if it lies be‐
tween the minimum and maximum marks
in the filler neck.Seite 224MobilityCoolant224
Online Edition for Part no. 01 40 2 969 305 - II/16
Page 225 of 261
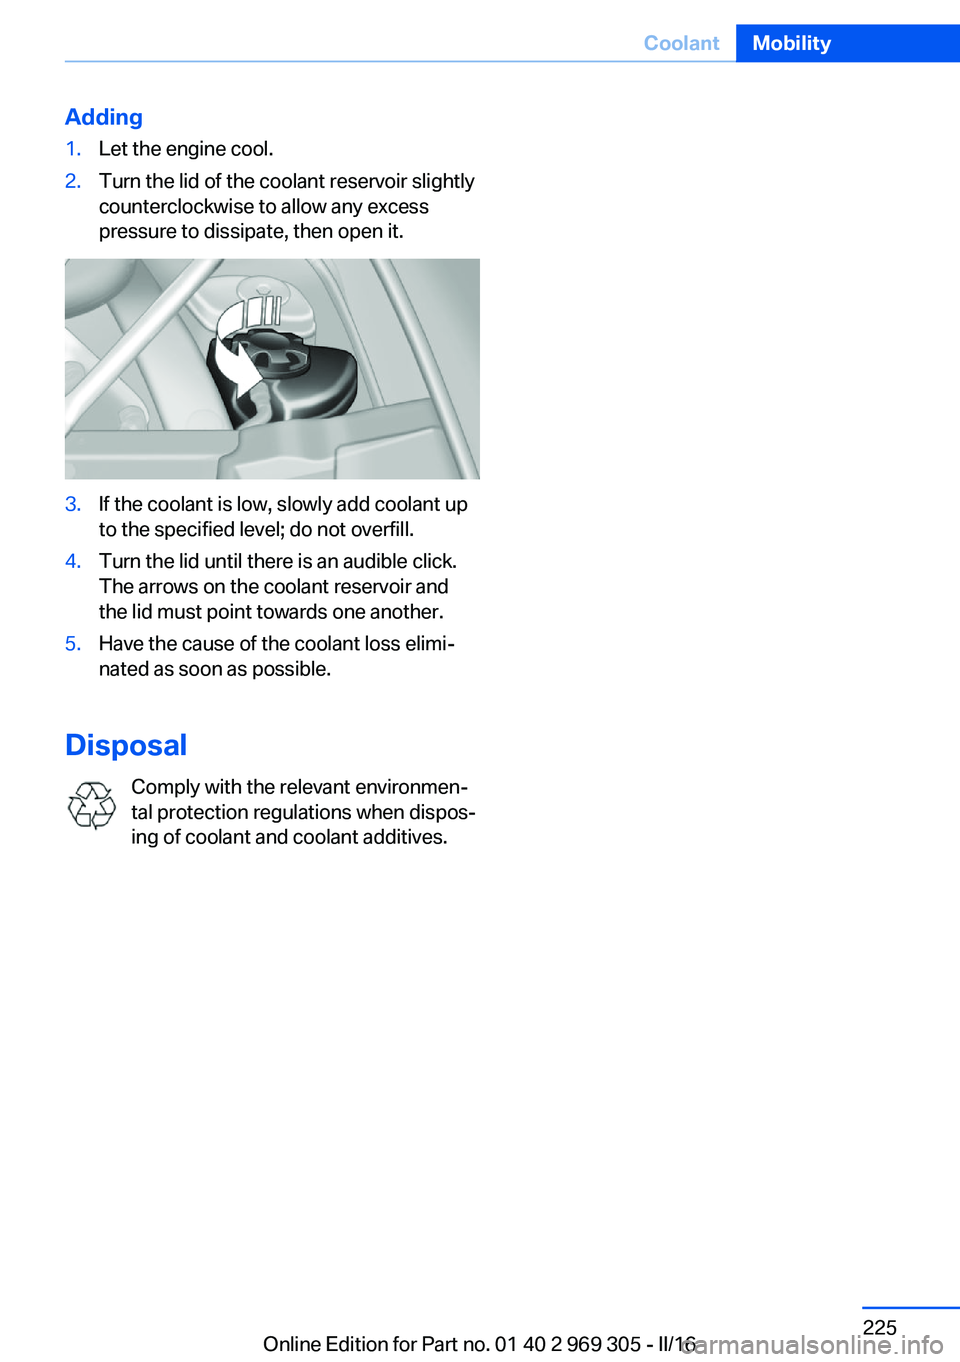
Adding1.Let the engine cool.2.Turn the lid of the coolant reservoir slightly
counterclockwise to allow any excess
pressure to dissipate, then open it.3.If the coolant is low, slowly add coolant up
to the specified level; do not overfill.4.Turn the lid until there is an audible click.
The arrows on the coolant reservoir and
the lid must point towards one another.5.Have the cause of the coolant loss elimi‐
nated as soon as possible.
Disposal
Comply with the relevant environmen‐
tal protection regulations when dispos‐
ing of coolant and coolant additives.
Seite 225CoolantMobility225
Online Edition for Part no. 01 40 2 969 305 - II/16
Page 252 of 261
COMFORT program, DrivingDynamics Control 139
Compressor 212
Condensation on win‐ dows 165
Condensation under the vehi‐ cle 187
Condition Based Service CBS 226
Configure driving mode 140
Confirmation signal 44
ConnectedDrive, see Owner's Manual for Navigation, En‐
tertainment and Communi‐
cation
ConnectedDrive Services
Container for washer fluid 76
Continued driving with a flat tire 110 , 113
Control Display 18
Control Display, settings 96
Controller 19
Control systems, driving sta‐ bility 133
Convenient opening with the remote control 38
Coolant 224
Coolant level 224
Coolant temperature 89
Cooling function 163
Cooling, maximum 163
Cooling system 224
Cornering light 102
Corrosion on brake discs 186
Cosmetic mirror 171
Courtesy lamps during un‐ locking 38
Courtesy lamps with the vehi‐ cle locked 38
Cruise control 147
Cruise control, active with Stop&Go function 141
Cruise control with distance control, see active cruise
control, ACC 141 Cruise control without dis‐
tance control, see cruise
control 147
Cruising range 90
Cup holder 179
Current fuel consumption 90
D
Damage, tires 210
Damping control, dy‐ namic 136
Data, technical 246
Date 90
Daytime running lights 102
Defrosting, see Windows, de‐ frosting 165
Dehumidifying, air 163
Deleting personal data 24
Deletion of personal data 24
Destination distance 95
Digital clock 90
Dimensions 246
Dimmable exterior mirrors 59
Dimmable interior mirror 60
Direction indicator, see Turn signals 73
Display, electronic, instru‐ ment cluster 81
Display in windshield 98
Display lighting, see Instru‐ ment lighting 104
Displays 82
Displays, cleaning 242
Disposal, coolant 225
Disposal, vehicle battery 232
Distance control, see PDC 150
Distance to destination 95
Divided screen view, split screen 23
Door lock 39
Door lock, see Remote con‐ trol 34
Doors, Automatic Soft Clos‐ ing 41 Downhill control 135
Drive mode 137
Drive-off assistant 133
Drive-off assistant, see DSC 133
Driver assistance, see Intelli‐ gent Safety 114
Driving Assistant, see Intelli‐ gent Safety 114
Driving Dynamics Con‐ trol 137
Driving instructions, break- in 184
Driving notes, general 184
Driving on racetracks 187
Driving stability control sys‐ tems 133
Driving tips 184
DSC Dynamic Stability Con‐ trol 133
DTC Dynamic Traction Con‐ trol 134
Dynamic Damping Con‐ trol 136
Dynamic Drive 136
Dynamic Stability Control DSC 133
Dynamic Traction Control DTC 134
E
ECO PRO 191
ECO PRO, bonus range 192
ECO PRO display 191
ECO PRO displays 83
ECO PRO driving mode 191
ECO PRO mode 191
ECO PRO Tip - driving in‐ struction 193
EfficientDynamics 193
Electronic displays, instru‐ ment cluster 81
Electronic oil measure‐ ment 220 Seite 252ReferenceEverything from A to Z252
Online Edition for Part no. 01 40 2 969 305 - II/16