window BMW 645CI COUPE&CONVERTIBLE 2005 User Guide
[x] Cancel search | Manufacturer: BMW, Model Year: 2005, Model line: 645CI COUPE&CONVERTIBLE, Model: BMW 645CI COUPE&CONVERTIBLE 2005Pages: 217, PDF Size: 7.92 MB
Page 38 of 217
Controls
37Reference
At a glance
Driving tips
Communications
Navigation
Entertainment
Mobility
Rear window
Ignition key in position 1 or greater, refer to
page54:
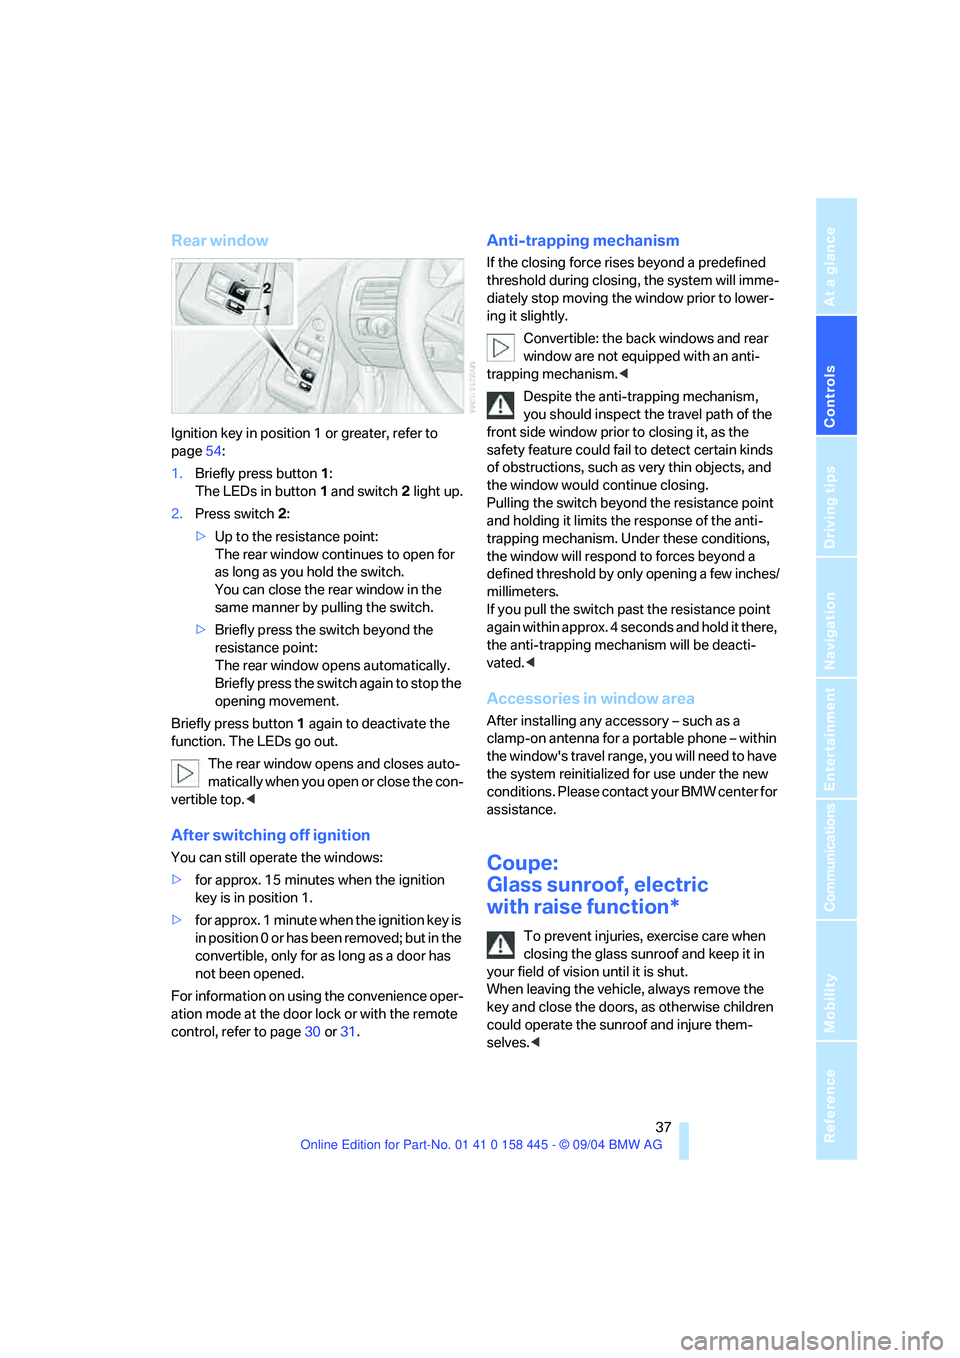
1.Briefly press button1:
The LEDs in button 1 and switch 2 light up.
2.Press switch 2:
>Up to the resistance point:
The rear window continues to open for
as long as you hold the switch.
You can close the rear window in the
same manner by pulling the switch.
>Briefly press the switch beyond the
resistance point:
The rear window opens automatically.
Briefly press the switch again to stop the
opening movement.
Briefly press button 1 again to deactivate the
function. The LEDs go out.
The rear window opens and closes auto-
matically when you open or close the con-
vertible top.<
After switching off ignition
You can still operate the windows:
>for approx. 15 minutes when the ignition
key is in position 1.
>for approx. 1 minute when the ignition key is
in position 0 or has been removed; but in the
convertible, only for as long as a door has
not been opened.
For information on using the convenience oper-
ation mode at the door lock or with the remote
control, refer to page30 or31.
Anti-trapping mechanism
If the closing force rises beyond a predefined
threshold during closing, the system will imme-
diately stop moving the window prior to lower-
ing it slightly.
Convertible: the back windows and rear
window are not equipped with an anti-
trapping mechanism.<
Despite the anti-trapping mechanism,
you should inspect the travel path of the
front side window prior to closing it, as the
safety feature could fail to detect certain kinds
of obstructions, such as very thin objects, and
the window would continue closing.
Pulling the switch beyond the resistance point
and holding it limits the response of the anti-
trapping mechanism. Under these conditions,
the window will respond to forces beyond a
defined threshold by only opening a few inches/
millimeters.
If you pull the switch past the resistance point
again within approx. 4 seconds and hold it there,
the anti-trapping mechanism will be deacti-
vated.<
Accessories in window area
After installing any accessory – such as a
clamp-on antenna for a portable phone – within
the window's travel range, you will need to have
the system reinitialized for use under the new
conditions. Please contact your BMW center for
assistance.
Coupe:
Glass sunroof, electric
with raise function*
To prevent injuries, exercise care when
closing the glass sunroof and keep it in
your field of vision until it is shut.
When leaving the vehicle, always remove the
key and close the doors, as otherwise children
could operate the sunroof and injure them-
selves.<
Page 39 of 217
Opening and closing
38
Raising and closing glass sunroof
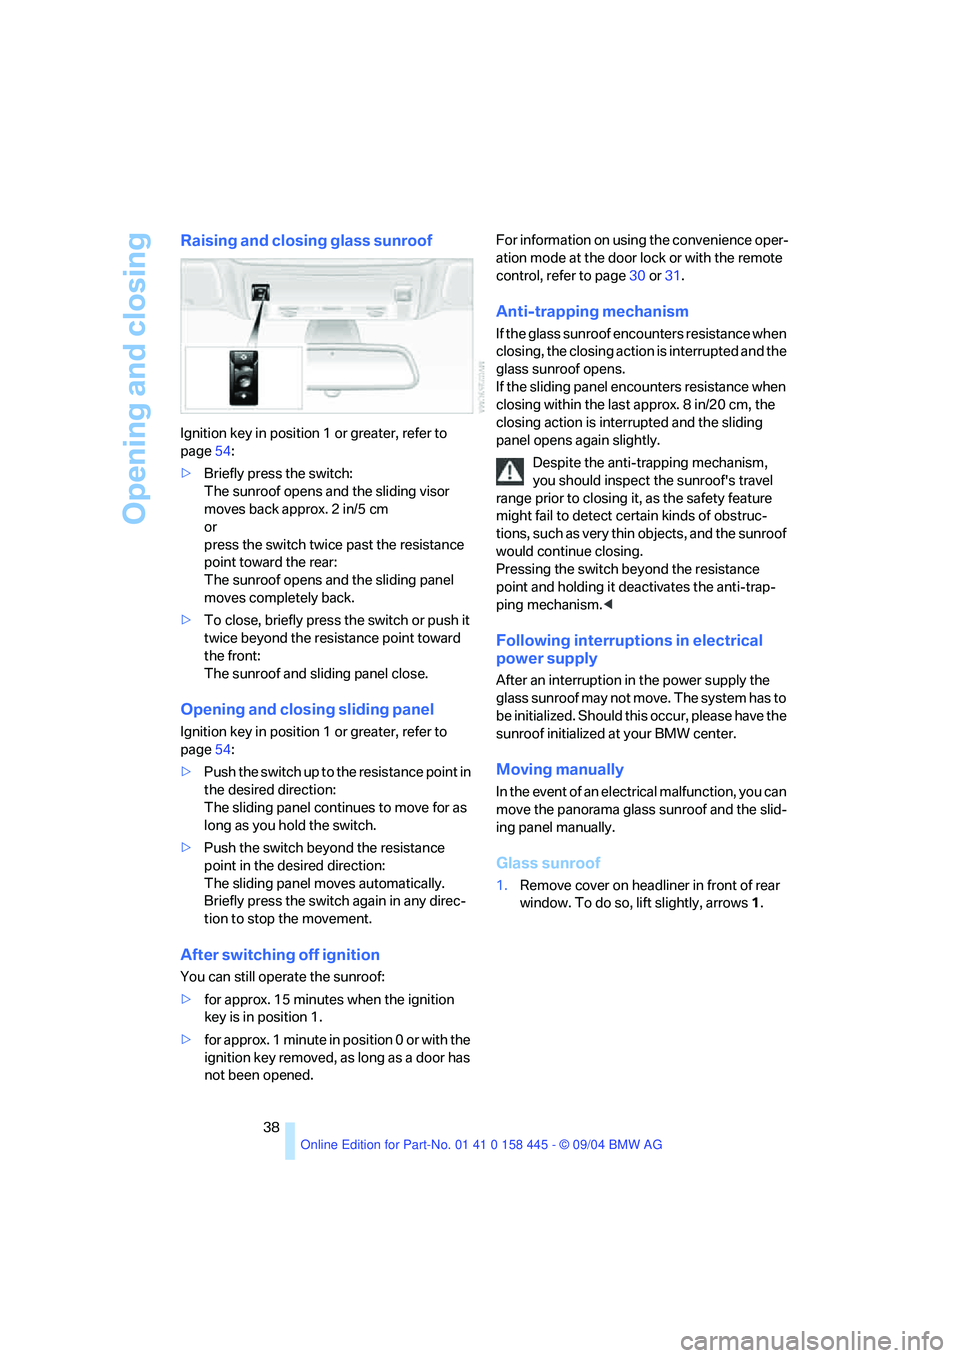
Ignition key in position 1 or greater, refer to
page54:
>Briefly press the switch:
The sunroof opens and the sliding visor
moves back approx. 2 in/5 cm
or
press the switch twice past the resistance
point toward the rear:
The sunroof opens and the sliding panel
moves completely back.
>To close, briefly press the switch or push it
twice beyond the resistance point toward
the front:
The sunroof and sliding panel close.
Opening and closing sliding panel
Ignition key in position 1 or greater, refer to
page54:
>Push the switch up to the resistance point in
the desired direction:
The sliding panel continues to move for as
long as you hold the switch.
>Push the switch beyond the resistance
point in the desired direction:
The sliding panel moves automatically.
Briefly press the switch again in any direc-
tion to stop the movement.
After switching off ignition
You can still operate the sunroof:
>for approx. 15 minutes when the ignition
key is in position 1.
>for approx. 1 minute in position 0 or with the
ignition key removed, as long as a door has
not been opened.For information on using the convenience oper-
ation mode at the door lock or with the remote
control, refer to page30 or31.
Anti-trapping mechanism
If the glass sunroof encounters resistance when
closing, the closing action is interrupted and the
glass sunroof opens.
If the sliding panel encounters resistance when
closing within the last approx. 8 in/20 cm, the
closing action is interrupted and the sliding
panel opens again slightly.
Despite the anti-trapping mechanism,
you should inspect the sunroof's travel
range prior to closing it, as the safety feature
might fail to detect certain kinds of obstruc-
tions, such as very thin objects, and the sunroof
would continue closing.
Pressing the switch beyond the resistance
point and holding it deactivates the anti-trap-
ping mechanism.<
Following interruptions in electrical
power supply
After an interruption in the power supply the
glass sunroof may not move. The system has to
b e i n i t i a l i z e d . S h o u l d t h i s o c c u r , p l e a s e h a v e t h e
sunroof initialized at your BMW center.
Moving manually
In the event of an electrical malfunction, you can
move the panorama glass sunroof and the slid-
ing panel manually.
Glass sunroof
1.Remove cover on headliner in front of rear
window. To do so, lift slightly, arrows1.
Page 41 of 217
Opening and closing
40 dren away from the travel path of the convert-
ible top.
For safety reasons, only operate the convertible
top when the vehicle is at a standstill.<
If you have initiated top operation with the
vehicle at a stop and then start to drive,
e.g. at a traffic light, you can continue the ini-
tiated operation up to a speed of 20 mph/
30 km/h:
To do so, press and hold the corresponding
button.<
Partial vacuums that occur at higher
speeds in the passenger compartment
can make the convertible top flap. Use the auto-
matic climate control to increase the air supply
so that a partial vacuum in the vehicle does not
occur.<
Prior to opening and closing
>Read carefully and comply with the safety
precautions that appear above.
>Ensure that the convertible top compart-
ment floor in the luggage compartment is
folded down, refer to page34, as otherwise
the convertible top cannot be opened.
>Ensure that the luggage compartment lid is
closed.
Opening and closing
With the ignition key in position 1 or greater,
refer to page54, and the vehicle stationary:
So as not to place an excessive load on
the battery, only operate the convertible
top with the engine running, if possible.
Before closing the convertible top, remove for-
eign bodies from the windshield frame, as these
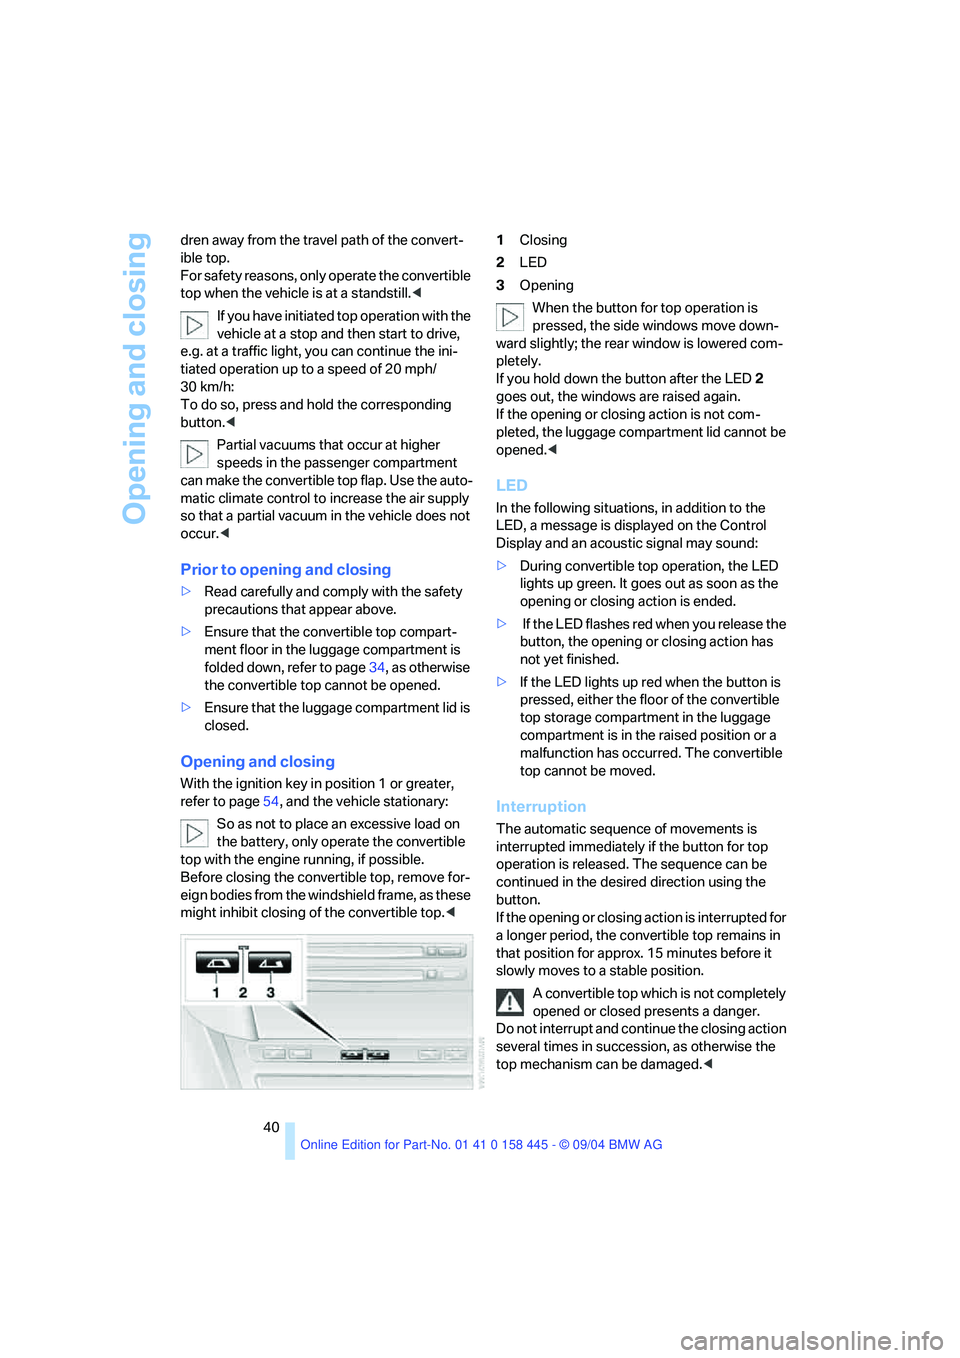
might inhibit closing of the convertible top.<1Closing
2LED
3Opening
When the button for top operation is
pressed, the side windows move down-
ward slightly; the rear window is lowered com-
pletely.
If you hold down the button after the LED2
goes out, the windows are raised again.
If the opening or closing action is not com-
pleted, the luggage compartment lid cannot be
opened.<
LED
In the following situations, in addition to the
LED, a message is displayed on the Control
Display and an acoustic signal may sound:
>During convertible top operation, the LED
lights up green. It goes out as soon as the
opening or closing action is ended.
> If the LED flashes red when you release the
button, the opening or closing action has
not yet finished.
>If the LED lights up red when the button is
pressed, either the floor of the convertible
top storage compartment in the luggage
compartment is in the raised position or a
malfunction has occurred. The convertible
top cannot be moved.
Interruption
The automatic sequence of movements is
interrupted immediately if the button for top
operation is released. The sequence can be
continued in the desired direction using the
button.
If the opening or closing action is interrupted for
a longer period, the convertible top remains in
that position for approx. 15 minutes before it
slowly moves to a stable position.
A convertible top which is not completely
opened or closed presents a danger.
Do not interrupt and continue the closing action
several times in succession, as otherwise the
top mechanism can be damaged.<
Page 42 of 217
Controls
41Reference
At a glance
Driving tips
Communications
Navigation
Entertainment
Mobility
If the opening or closing action is not
completed, the luggage compartment lid
cannot be opened.<
Convenience operation with the
remote control and via the door lock
Refer to pages30 and31.
Manual closing in the event of an
electrical malfunction
Only close the convertible top manually if
absolutely necessary; never open it man-
ually. The convertible top compartment lid can-
not be locked in the event of an electrical mal-
function and would open while the vehicle is
being driven.
Improper handling can lead to damage.<
Before closing
1.Open the luggage compartment lid.
2.Take the Allen wrench and the screwdriver
from the on-board tool kit, refer to
page180.
3.Lever out the two buttons in the luggage
compartment with the screwdriver and then
pull firmly. The convertible top compart-
ment lid is unlocked.
4.Close the luggage compartment lid.
During manual convertible top opera-
tion, the luggage compartment lid
cannot be opened.<
5.Completely open the side windows and the
rear window.
If the rear window cannot be opened using
the switch, it must be lowered manually.
Opening rear window manually
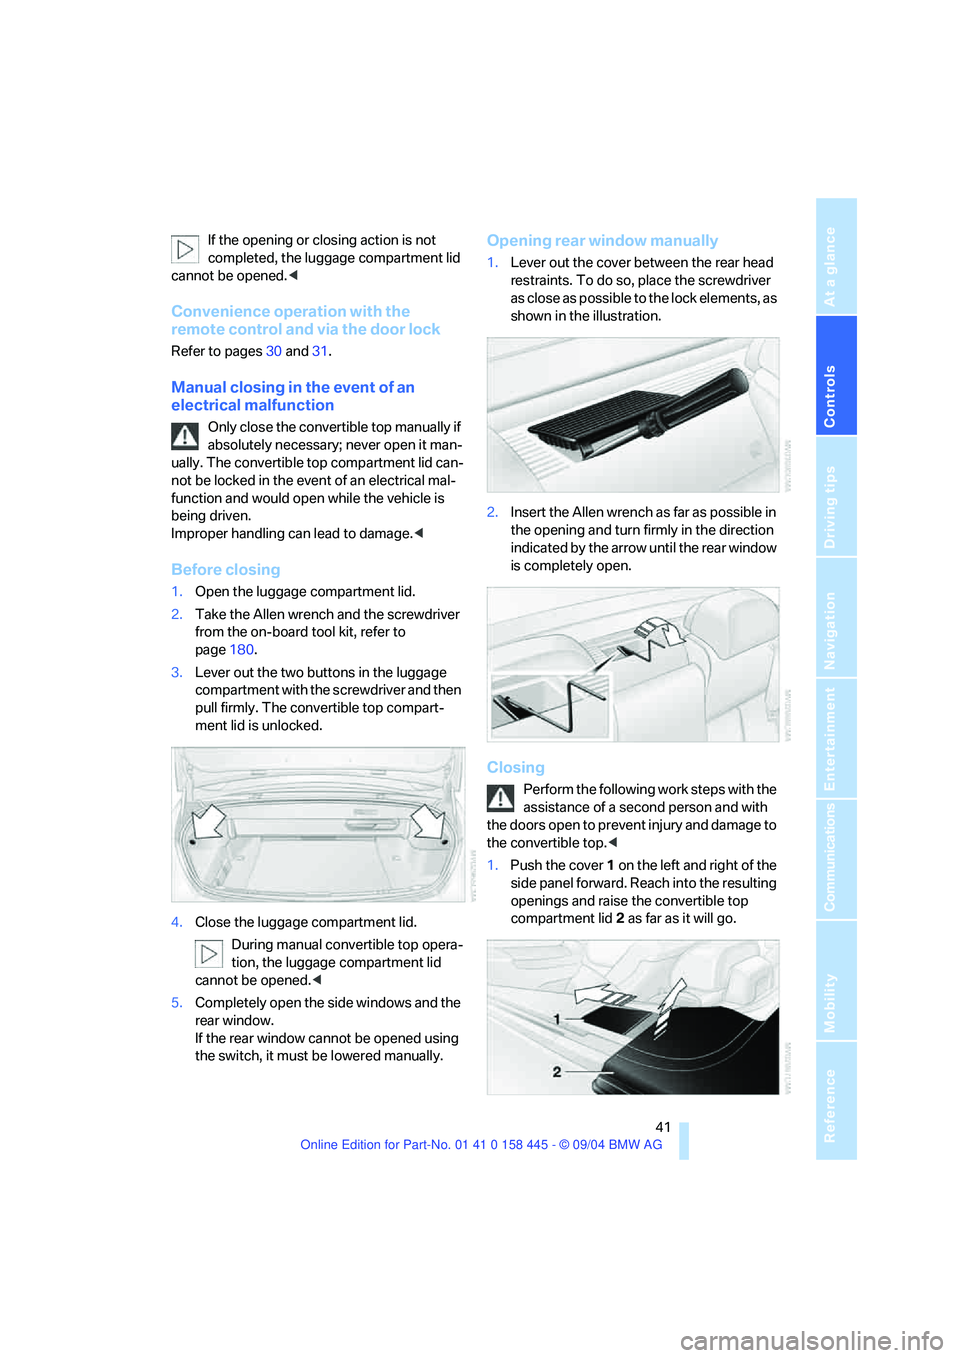
1.Lever out the cover between the rear head
restraints. To do so, place the screwdriver
as close as possible to the lock elements, as
shown in the illustration.
2.Insert the Allen wrench as far as possible in
the opening and turn firmly in the direction
indicated by the arrow until the rear window
is completely open.
Closing
Perform the following work steps with the
assistance of a second person and with
the doors open to prevent injury and damage to
the convertible top.<
1.Push the cover 1 on the left and right of the
side panel forward. Reach into the resulting
openings and raise the convertible top
compartment lid2 as far as it will go.
Page 43 of 217
Opening and closing
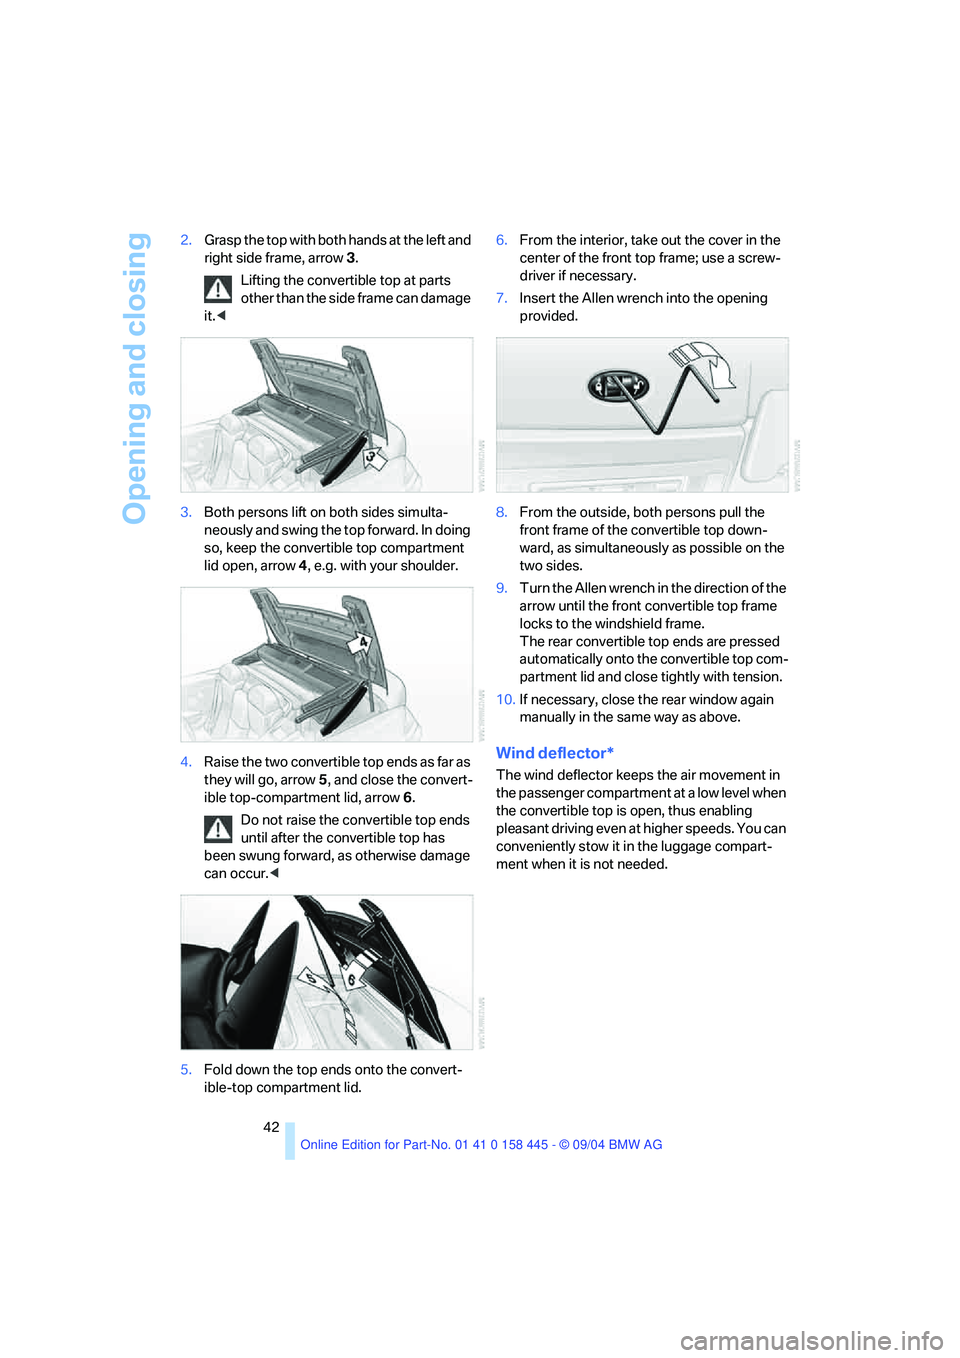
42 2.Grasp the top with both hands at the left and
right side frame, arrow3.
Lifting the convertible top at parts
other than the side frame can damage
it.<
3.Both persons lift on both sides simulta-
neously and swing the top forward. In doing
so, keep the convertible top compartment
lid open, arrow4, e.g. with your shoulder.
4.Raise the two convertible top ends as far as
they will go, arrow5, and close the convert-
ible top-compartment lid, arrow6.
Do not raise the convertible top ends
until after the convertible top has
been swung forward, as otherwise damage
can occur.<
5.Fold down the top ends onto the convert-
ible-top compartment lid.6.From the interior, take out the cover in the
center of the front top frame; use a screw-
driver if necessary.
7.Insert the Allen wrench into the opening
provided.
8.From the outside, both persons pull the
front frame of the convertible top down-
ward, as simultaneously as possible on the
two sides.
9.Turn the Allen wrench in the direction of the
arrow until the front convertible top frame
locks to the windshield frame.
The rear convertible top ends are pressed
automatically onto the convertible top com-
partment lid and close tightly with tension.
10.If necessary, close the rear window again
manually in the same way as above.
Wind deflector*
The wind deflector keeps the air movement in
the passenger compartment at a low level when
the convertible top is open, thus enabling
pleasant driving even at higher speeds. You can
conveniently stow it in the luggage compart-
ment when it is not needed.
Page 76 of 217
Controls
75Reference
At a glance
Driving tips
Communications
Navigation
Entertainment
Mobility
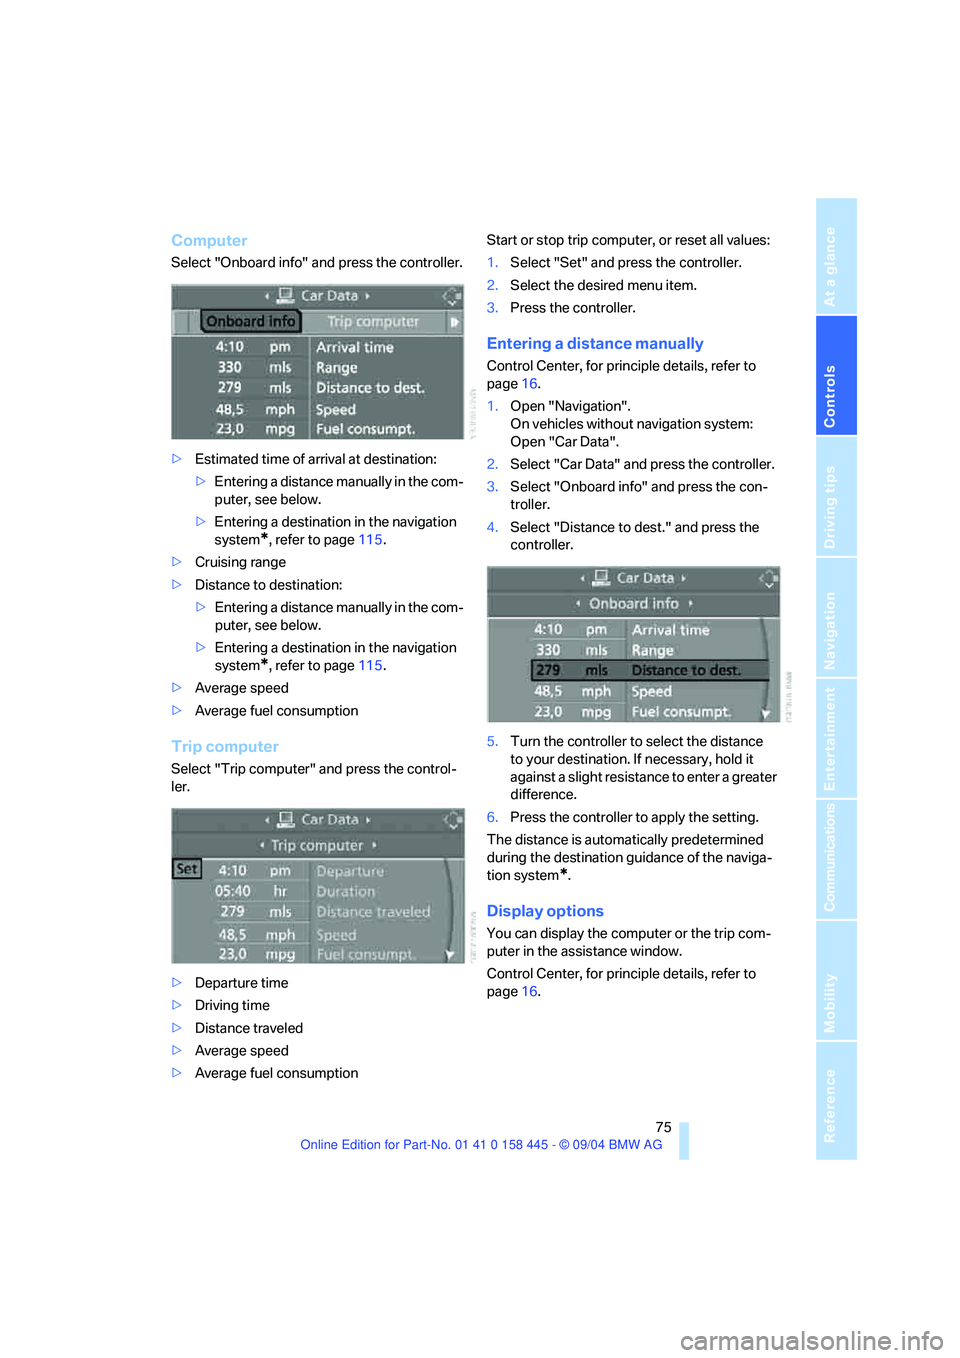
Computer
Select "Onboard info" and press the controller.
>Estimated time of arrival at destination:
>Entering a distance manually in the com-
puter, see below.
>Entering a destination in the navigation
system
*, refer to page115.
>Cruising range
>Distance to destination:
>Entering a distance manually in the com-
puter, see below.
>Entering a destination in the navigation
system
*, refer to page115.
>Average speed
>Average fuel consumption
Trip computer
Select "Trip computer" and press the control-
ler.
>Departure time
>Driving time
>Distance traveled
>Average speed
>Average fuel consumptionStart or stop trip computer, or reset all values:
1.Select "Set" and press the controller.
2.Select the desired menu item.
3.Press the controller.
Entering a distance manually
Control Center, for principle details, refer to
page16.
1.Open "Navigation".
On vehicles without navigation system:
Open "Car Data".
2.Select "Car Data" and press the controller.
3.Select "Onboard info" and press the con-
troller.
4.Select "Distance to dest." and press the
controller.
5.Turn the controller to select the distance
to your destination. If necessary, hold it
against a slight resistance to enter a greater
difference.
6.Press the controller to apply the setting.
The distance is automatically predetermined
during the destination guidance of the naviga-
tion system
*.
Display options
You can display the computer or the trip com-
puter in the assistance window.
Control Center, for principle details, refer to
page16.
Page 77 of 217
Everything under control
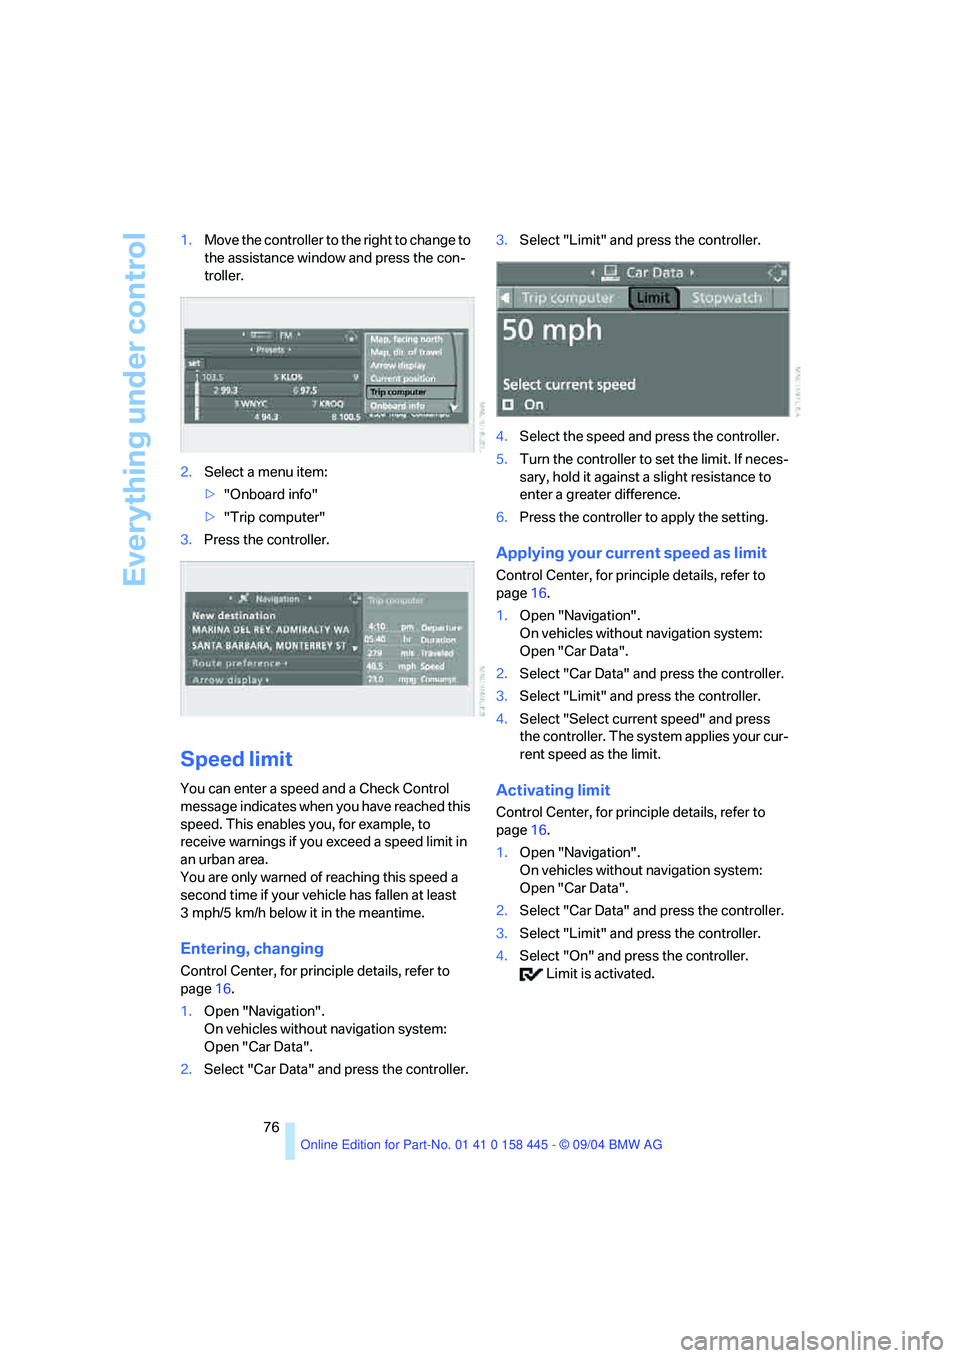
76 1.Move the controller to the right to change to
the assistance window and press the con-
troller.
2.Select a menu item:
>"Onboard info"
>"Trip computer"
3.Press the controller.
Speed limit
You can enter a speed and a Check Control
message indicates when you have reached this
speed. This enables you, for example, to
receive warnings if you exceed a speed limit in
an urban area.
You are only warned of reaching this speed a
second time if your vehicle has fallen at least
3 mph/5 km/h below it in the meantime.
Entering, changing
Control Center, for principle details, refer to
page16.
1.Open "Navigation".
On vehicles without navigation system:
Open "Car Data".
2.Select "Car Data" and press the controller.3.Select "Limit" and press the controller.
4.Select the speed and press the controller.
5.Turn the controller to set the limit. If neces-
sary, hold it against a slight resistance to
enter a greater difference.
6.Press the controller to apply the setting.
Applying your current speed as limit
Control Center, for principle details, refer to
page16.
1.Open "Navigation".
On vehicles without navigation system:
Open "Car Data".
2.Select "Car Data" and press the controller.
3.Select "Limit" and press the controller.
4.Select "Select current speed" and press
the controller. The system applies your cur-
rent speed as the limit.
Activating limit
Control Center, for principle details, refer to
page16.
1.Open "Navigation".
On vehicles without navigation system:
Open "Car Data".
2.Select "Car Data" and press the controller.
3.Select "Limit" and press the controller.
4.Select "On" and press the controller.
Limit is activated.
Page 95 of 217
A congenial climate
94
A congenial climate
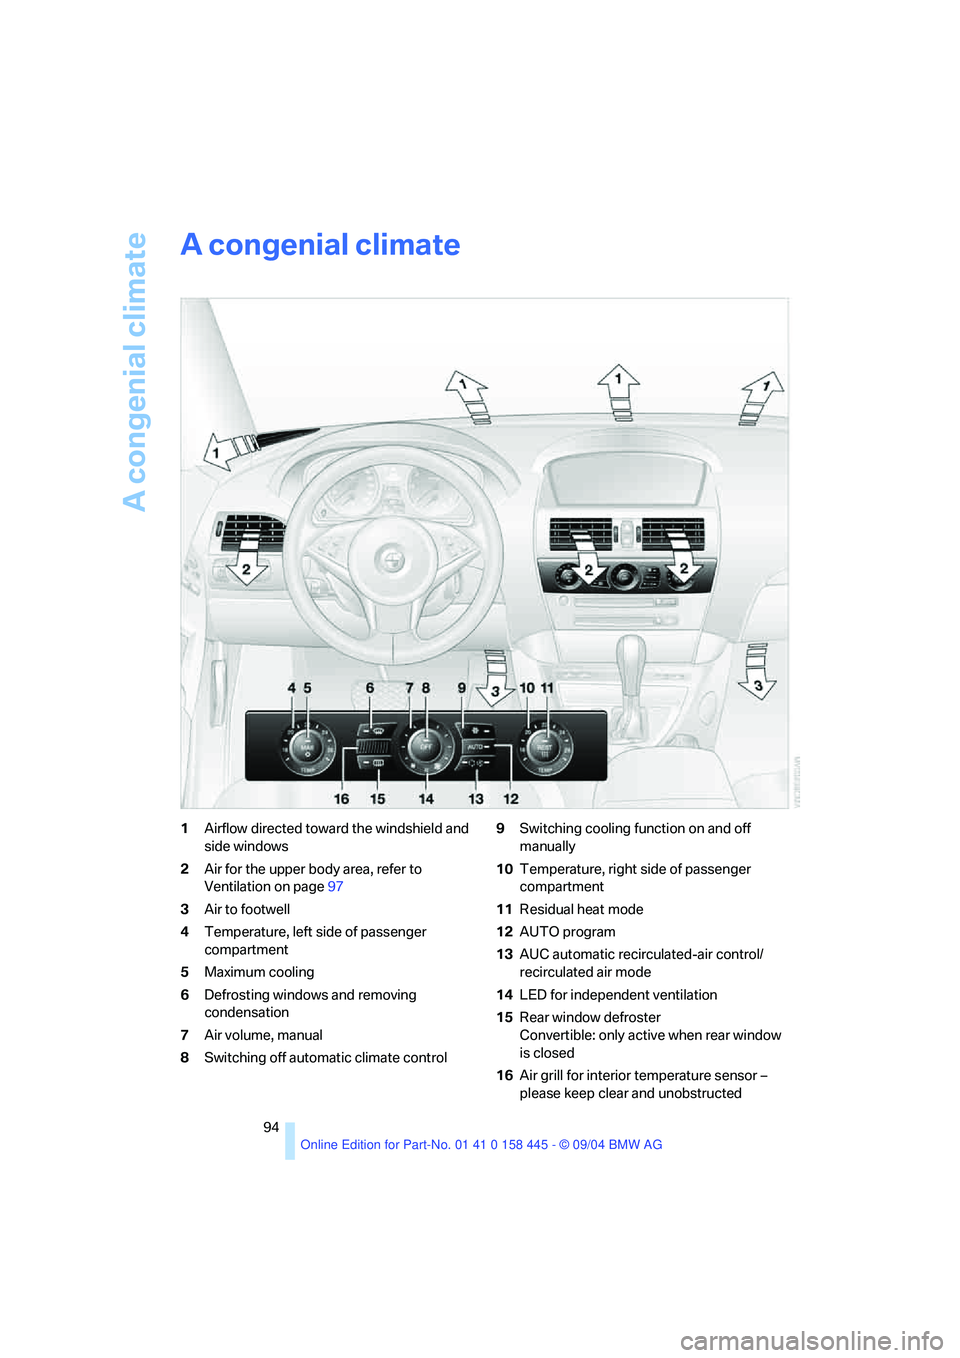
1Airflow directed toward the windshield and
side windows
2Air for the upper body area, refer to
Ventilation on page97
3Air to footwell
4Temperature, left side of passenger
compartment
5Maximum cooling
6Defrosting windows and removing
condensation
7Air volume, manual
8Switching off automatic climate control9Switching cooling function on and off
manually
10Temperature, right side of passenger
compartment
11Residual heat mode
12AUTO program
13AUC automatic recirculated-air control/
recirculated air mode
14LED for independent ventilation
15Rear window defroster
Convertible: only active when rear window
is closed
16Air grill for interior temperature sensor –
please keep clear and unobstructed
Page 96 of 217
Controls
95Reference
At a glance
Driving tips
Communications
Navigation
Entertainment
Mobility
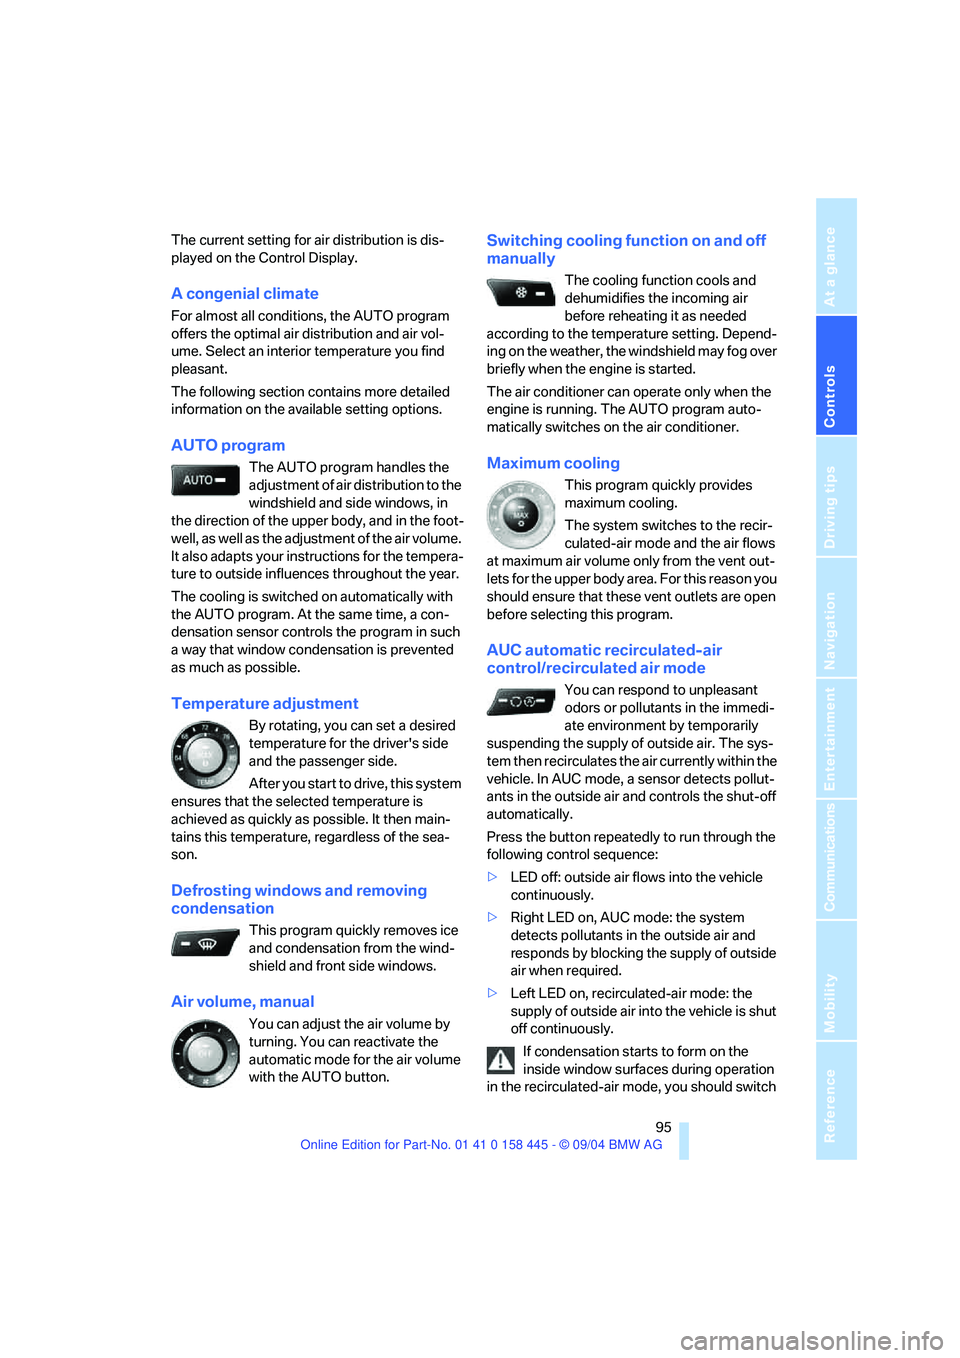
The current setting for air distribution is dis-
played on the Control Display.
A congenial climate
For almost all conditions, the AUTO program
offers the optimal air distribution and air vol-
ume. Select an interior temperature you find
pleasant.
The following section contains more detailed
information on the available setting options.
AUTO program
The AUTO program handles the
adjustment of air distribution to the
windshield and side windows, in
the direction of the upper body, and in the foot-
well, as well as the adjustment of the air volume.
It also adapts your instructions for the tempera-
ture to outside influences throughout the year.
The cooling is switched on automatically with
the AUTO program. At the same time, a con-
densation sensor controls the program in such
a way that window condensation is prevented
as much as possible.
Temperature adjustment
By rotating, you can set a desired
temperature for the driver's side
and the passenger side.
After you start to drive, this system
ensures that the selected temperature is
achieved as quickly as possible. It then main-
tains this temperature, regardless of the sea-
son.
Defrosting windows and removing
condensation
This program quickly removes ice
and condensation from the wind-
shield and front side windows.
Air volume, manual
You can adjust the air volume by
turning. You can reactivate the
automatic mode for the air volume
with the AUTO button.
Switching cooling function on and off
manually
The cooling function cools and
dehumidifies the incoming air
before reheating it as needed
according to the temperature setting. Depend-
ing on the weather, the windshield may fog over
briefly when the engine is started.
The air conditioner can operate only when the
engine is running. The AUTO program auto-
matically switches on the air conditioner.
Maximum cooling
This program quickly provides
maximum cooling.
The system switches to the recir-
culated-air mode and the air flows
at maximum air volume only from the vent out-
lets for the upper body area. For this reason you
should ensure that these vent outlets are open
before selecting this program.
AUC automatic recirculated-air
control/recirculated air mode
You can respond to unpleasant
odors or pollutants in the immedi-
ate environment by temporarily
suspending the supply of outside air. The sys-
tem then recirculates the air currently within the
vehicle. In AUC mode, a sensor detects pollut-
ants in the outside air and controls the shut-off
automatically.
Press the button repeatedly to run through the
following control sequence:
>LED off: outside air flows into the vehicle
continuously.
>Right LED on, AUC mode: the system
detects pollutants in the outside air and
responds by blocking the supply of outside
air when required.
>Left LED on, recirculated-air mode: the
supply of outside air into the vehicle is shut
off continuously.
If condensation starts to form on the
inside window surfaces during operation
in the recirculated-air mode, you should switch
Page 97 of 217
A congenial climate
96 it off while also increasing the air volume as
required.
The recirculated-air mode should not be used
over a longer period of time, as the air quality
inside the vehicle deteriorates continuously.<
Residual heat mode
Press the button when the motor is
switched off and warm.
The heat stored in the engine is
used to heat the passenger com-
partment, e.g. when stopped at a school to pick
up a child.
You can adjust the automatic climate control
settings as of ignition key position 1.
Provided that the engine has warmed to its nor-
mal operating temperature and the battery is
charged, you can use this function for up to
15 minutes after switching off the ignition. The
LED in the button lights up to confirm compli-
ance with both of these conditions.
Switching off automatic climate control
The air volume, the heater and the
cooling function are all switched
off.
You can restart the automatic cli-
mate control by pressing any of its buttons
except the REST button.
Settings using Control Center
Ignition key:
>In vehicles with separate drives for audio
CDs and navigation DVDs, ignition key in
position 2.
>In vehicles with one drive for audio CDs,
ignition key in position 1.
Control Center, for principle details, refer to
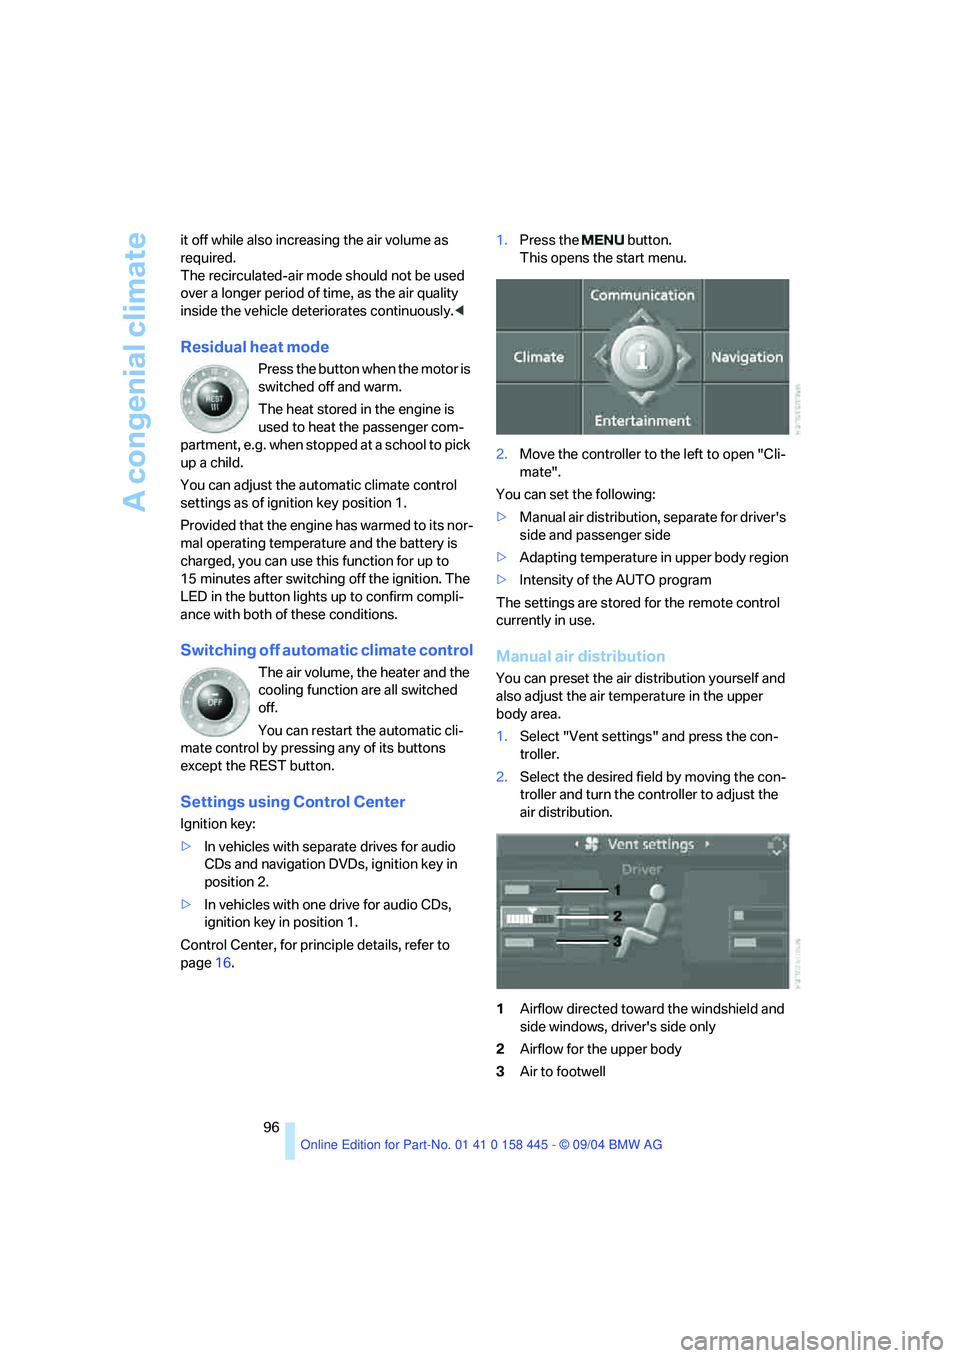
page16.1.Press the button.
This opens the start menu.
2.Move the controller to the left to open "Cli-
mate".
You can set the following:
>Manual air distribution, separate for driver's
side and passenger side
>Adapting temperature in upper body region
>Intensity of the AUTO program
The settings are stored for the remote control
currently in use.
Manual air distribution
You can preset the air distribution yourself and
also adjust the air temperature in the upper
body area.
1.Select "Vent settings" and press the con-
troller.
2.Select the desired field by moving the con-
troller and turn the controller to adjust the
air distribution.
1Airflow directed toward the windshield and
side windows, driver's side only
2Airflow for the upper body
3Air to footwell