Head light BMW 645I COUPE 2005 E63 Owner's Manual
[x] Cancel search | Manufacturer: BMW, Model Year: 2005, Model line: 645I COUPE, Model: BMW 645I COUPE 2005 E63Pages: 217, PDF Size: 7.92 MB
Page 12 of 217
At a glance
11Reference
Controls
Driving tips
Communications
Navigation
Entertainment
Mobility
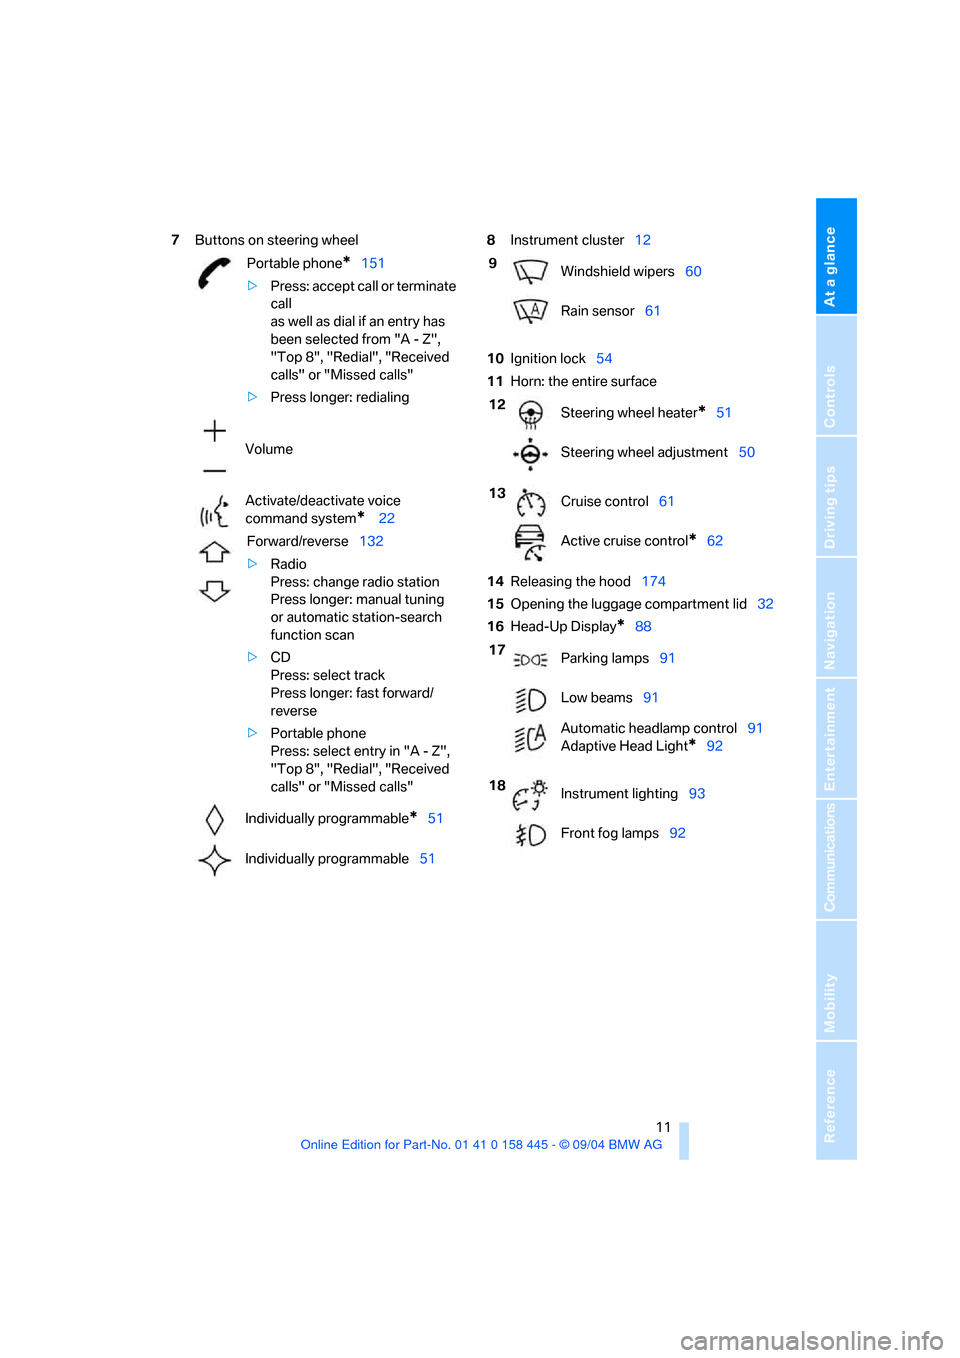
7Buttons on steering wheel8Instrument cluster12
10Ignition lock54
11Horn: the entire surface
14Releasing the hood174
15Opening the luggage compartment lid32
16Head-Up Display
*88 Portable phone
*151
>Press: accept call or terminate
call
as well as dial if an entry has
been selected from "A - Z",
"Top 8", "Redial", "Received
calls" or "Missed calls"
>Press longer: redialing
Volume
Activate/deactivate voice
command system
* 22
Forward/reverse132
>Radio
Press: change radio station
Press longer: manual tuning
or automatic station-search
function scan
>CD
Press: select track
Press longer: fast forward/
reverse
>Portable phone
Press: select entry in "A - Z",
"Top 8", "Redial", "Received
calls" or "Missed calls"
Individually programmable
*51
Individually programmable51
9
Windshield wipers60
Rain sensor61
12
Steering wheel heater
*51
Steering wheel adjustment50
13
Cruise control61
Active cruise control
*62
17
Parking lamps91
Low beams91
Automatic headlamp control91
Adaptive Head Light
*92
18
Instrument lighting93
Front fog lamps92
Page 14 of 217
At a glance
13Reference
Controls
Driving tips
Communications
Navigation
Entertainment
Mobility
Indicator and warning lamps
The concept
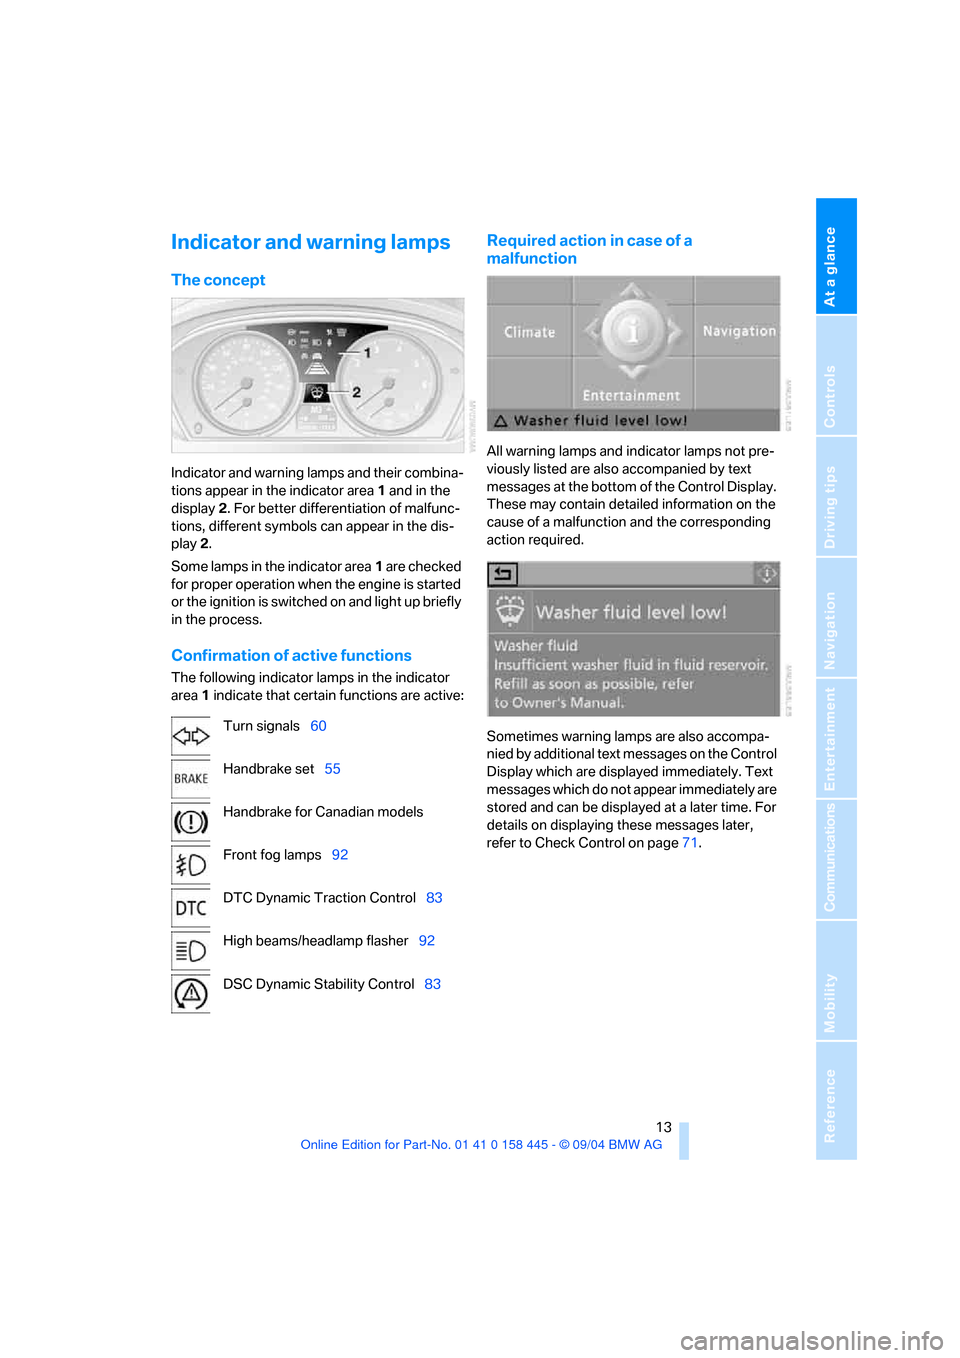
Indicator and warning lamps and their combina-
tions appear in the indicator area1 and in the
display2. For better differentiation of malfunc-
tions, different symbols can appear in the dis-
play 2.
Some lamps in the indicator area1 are checked
for proper operation when the engine is started
or the ignition is switched on and light up briefly
in the process.
Confirmation of active functions
The following indicator lamps in the indicator
area1 indicate that certain functions are active:
Required action in case of a
malfunction
All warning lamps and indicator lamps not pre-
viously listed are also accompanied by text
messages at the bottom of the Control Display.
These may contain detailed information on the
cause of a malfunction and the corresponding
action required.
Sometimes warning lamps are also accompa-
nied by additional text messages on the Control
Display which are displayed immediately. Text
messages which do not appear immediately are
stored and can be displayed at a later time. For
details on displaying these messages later,
refer to Check Control on page71. Turn signals60
Handbrake set55
Handbrake for Canadian models
Front fog lamps92
DTC Dynamic Traction Control83
High beams/headlamp flasher92
DSC Dynamic Stability Control83
Page 39 of 217
Opening and closing
38
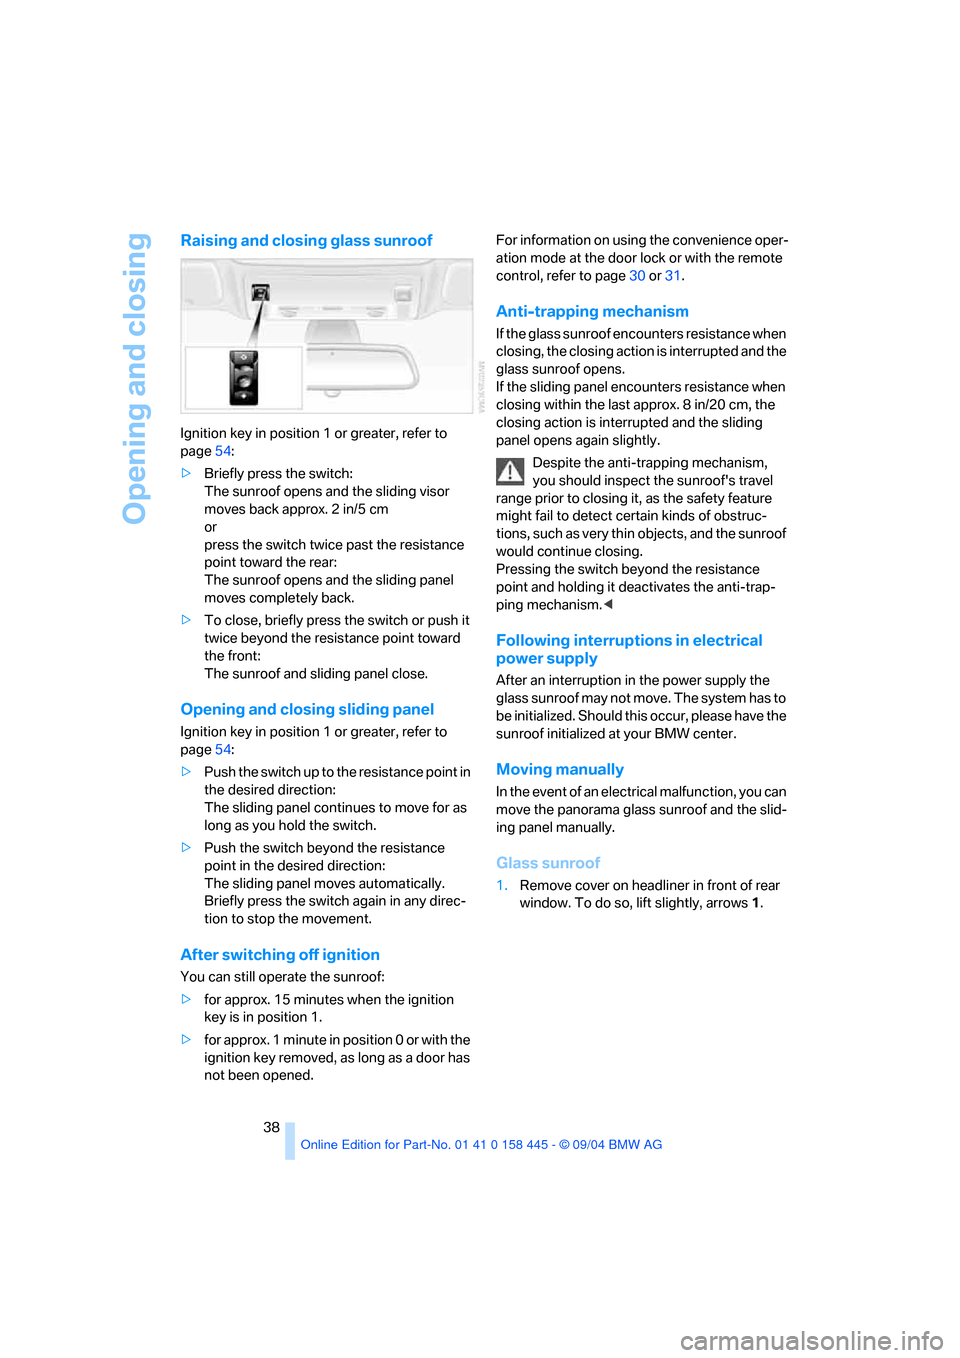
Raising and closing glass sunroof
Ignition key in position 1 or greater, refer to
page54:
>Briefly press the switch:
The sunroof opens and the sliding visor
moves back approx. 2 in/5 cm
or
press the switch twice past the resistance
point toward the rear:
The sunroof opens and the sliding panel
moves completely back.
>To close, briefly press the switch or push it
twice beyond the resistance point toward
the front:
The sunroof and sliding panel close.
Opening and closing sliding panel
Ignition key in position 1 or greater, refer to
page54:
>Push the switch up to the resistance point in
the desired direction:
The sliding panel continues to move for as
long as you hold the switch.
>Push the switch beyond the resistance
point in the desired direction:
The sliding panel moves automatically.
Briefly press the switch again in any direc-
tion to stop the movement.
After switching off ignition
You can still operate the sunroof:
>for approx. 15 minutes when the ignition
key is in position 1.
>for approx. 1 minute in position 0 or with the
ignition key removed, as long as a door has
not been opened.For information on using the convenience oper-
ation mode at the door lock or with the remote
control, refer to page30 or31.
Anti-trapping mechanism
If the glass sunroof encounters resistance when
closing, the closing action is interrupted and the
glass sunroof opens.
If the sliding panel encounters resistance when
closing within the last approx. 8 in/20 cm, the
closing action is interrupted and the sliding
panel opens again slightly.
Despite the anti-trapping mechanism,
you should inspect the sunroof's travel
range prior to closing it, as the safety feature
might fail to detect certain kinds of obstruc-
tions, such as very thin objects, and the sunroof
would continue closing.
Pressing the switch beyond the resistance
point and holding it deactivates the anti-trap-
ping mechanism.<
Following interruptions in electrical
power supply
After an interruption in the power supply the
glass sunroof may not move. The system has to
b e i n i t i a l i z e d . S h o u l d t h i s o c c u r , p l e a s e h a v e t h e
sunroof initialized at your BMW center.
Moving manually
In the event of an electrical malfunction, you can
move the panorama glass sunroof and the slid-
ing panel manually.
Glass sunroof
1.Remove cover on headliner in front of rear
window. To do so, lift slightly, arrows1.
Page 48 of 217
Controls
47Reference
At a glance
Driving tips
Communications
Navigation
Entertainment
Mobility
To cancel the request:
Select "Deactivated" and press the controller.
When using this function, always make
sure that the footwell behind the driver's
seat is empty and unobstructed. Failure to do
so could cause injury or damage to persons or
objects behind the seat as a result of a rearward
movement of the seat.<
Tilt function, passenger-side mirror
Automatic curb monitor
Activating
1.Slide mirror selector into the driver's side
mirror position.
2.When you engage reverse gear or selector-
lever position R, the exterior mirror glass on
the front passenger side tilts downward
slightly. This allows the driver to see the
area immediately adjacent to the vehicle –
such as a curb – when parking, etc.
Deactivating
Slide the mirror selection switch to the passen-
ger's side position.
Front head restraints
Head restraints reduce the risk of spinal
injury in the event of an accident. Adjust
the head restraints so that they are centered
roughly at the level of your ears.<
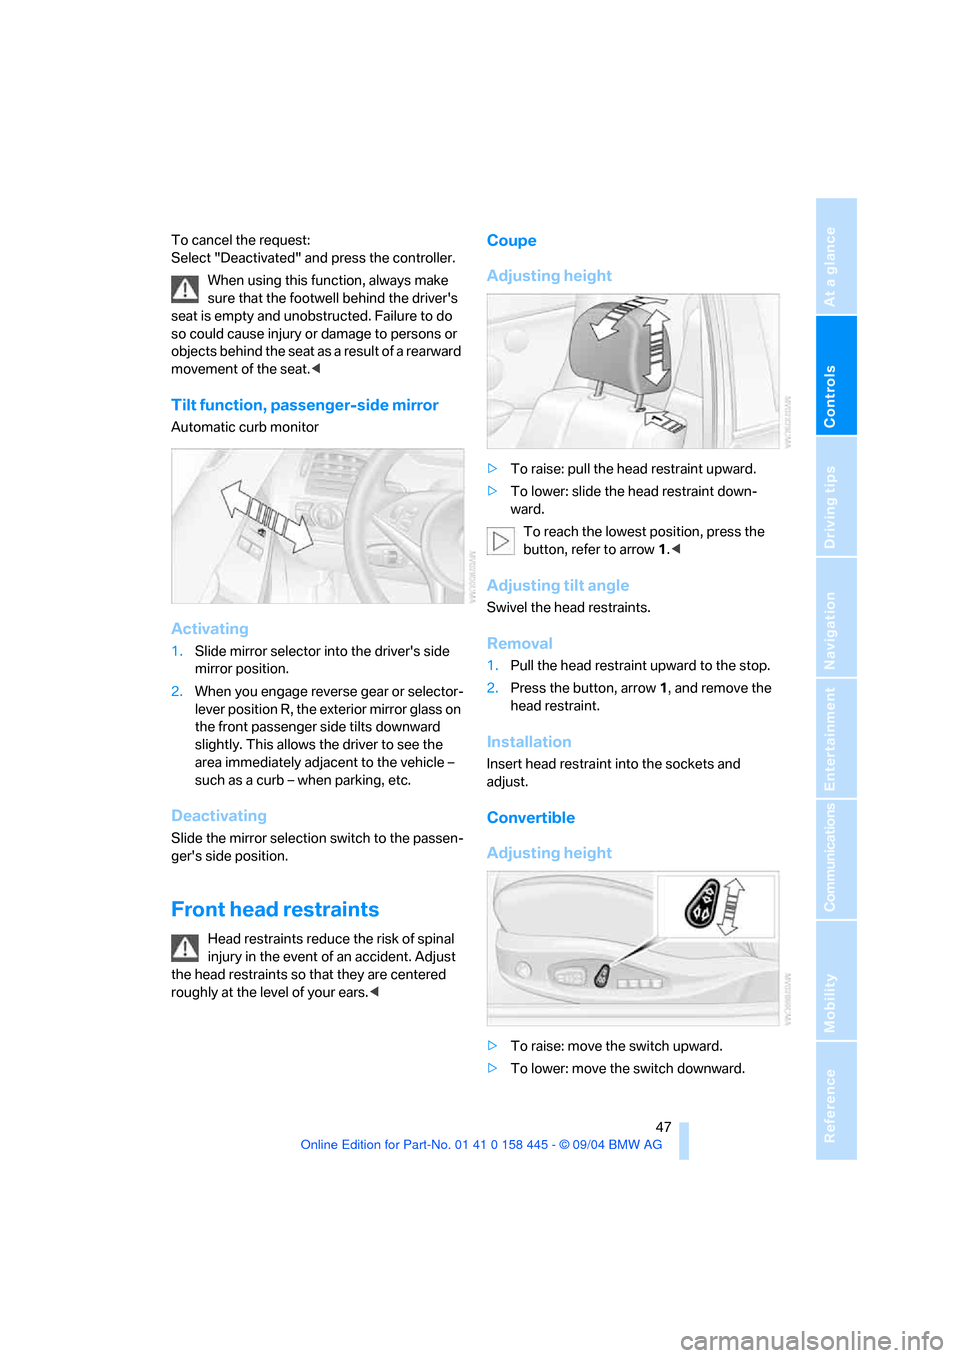
Coupe
Adjusting height
>To raise: pull the head restraint upward.
>To lower: slide the head restraint down-
ward.
To reach the lowest position, press the
button, refer to arrow 1.<
Adjusting tilt angle
Swivel the head restraints.
Removal
1.Pull the head restraint upward to the stop.
2.Press the button, arrow1, and remove the
head restraint.
Installation
Insert head restraint into the sockets and
adjust.
Convertible
Adjusting height
>To raise: move the switch upward.
>To lower: move the switch downward.
Page 49 of 217
Adjustments
48
Adjusting tilt angle
Swivel the head restraints.
Entry to the rear
Before starting to drive, fold backrests
back, otherwise there is the danger of
accident due to an unexpected movement of
the seat.<
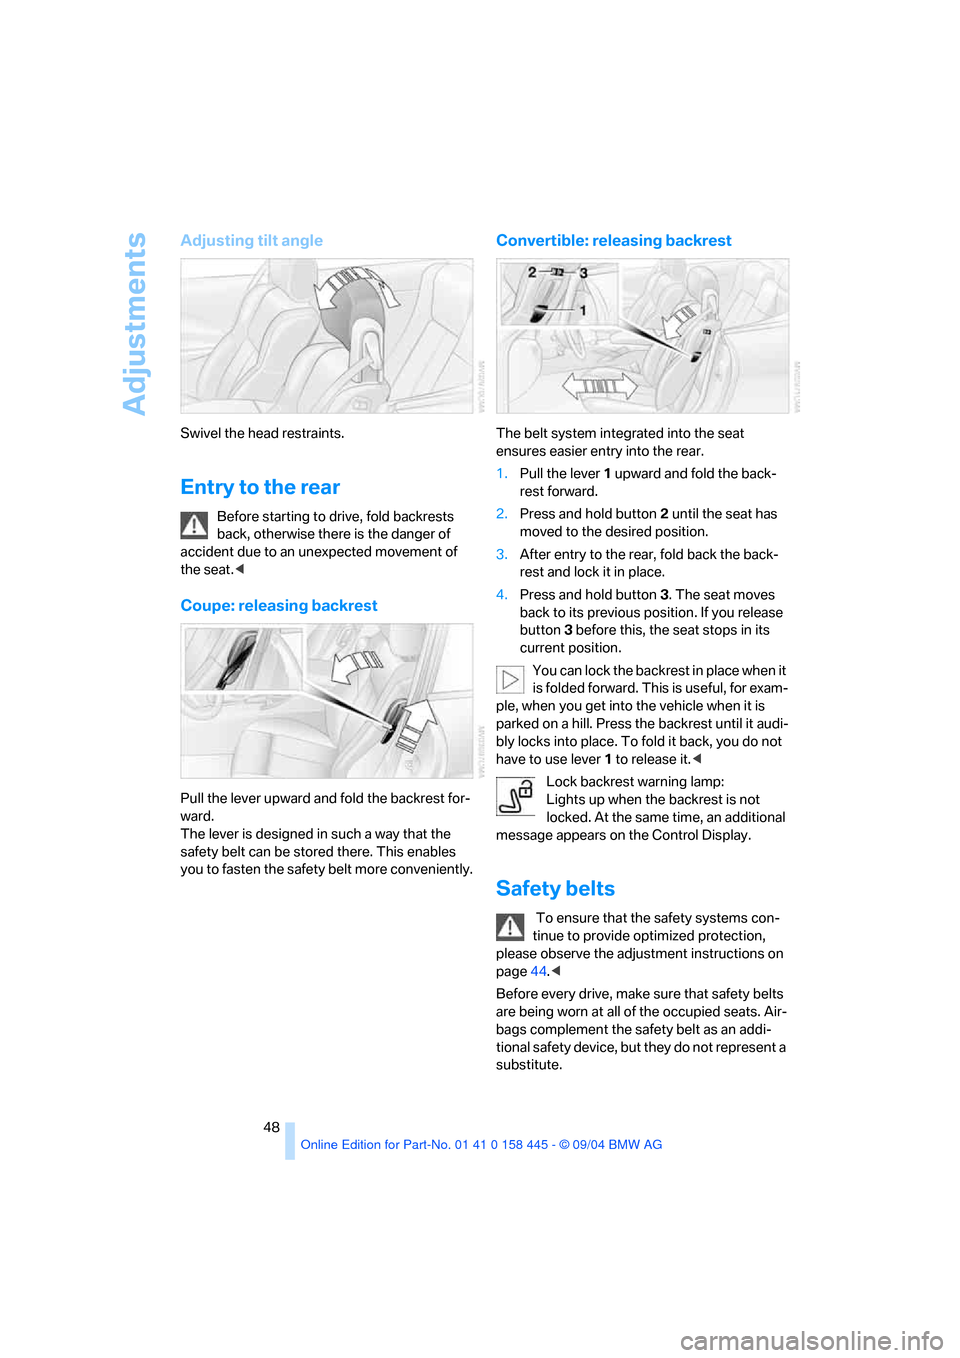
Coupe: releasing backrest
Pull the lever upward and fold the backrest for-
ward.
The lever is designed in such a way that the
safety belt can be stored there. This enables
you to fasten the safety belt more conveniently.
Convertible: releasing backrest
The belt system integrated into the seat
ensures easier entry into the rear.
1.Pull the lever 1 upward and fold the back-
rest forward.
2.Press and hold button 2 until the seat has
moved to the desired position.
3.After entry to the rear, fold back the back-
rest and lock it in place.
4.Press and hold button 3. The seat moves
back to its previous position. If you release
button 3 before this, the seat stops in its
current position.
You can lock the backrest in place when it
is folded forward. This is useful, for exam-
ple, when you get into the vehicle when it is
parked on a hill. Press the backrest until it audi-
bly locks into place. To fold it back, you do not
have to use lever 1 to release it.<
Lock backrest warning lamp:
Lights up when the backrest is not
locked. At the same time, an additional
message appears on the Control Display.
Safety belts
To ensure that the safety systems con-
tinue to provide optimized protection,
please observe the adjustment instructions on
page44.<
Before every drive, make sure that safety belts
are being worn at all of the occupied seats. Air-
bags complement the safety belt as an addi-
tional safety device, but they do not represent a
substitute.
Page 61 of 217
Driving
60
Turn signals/
headlamp flasher
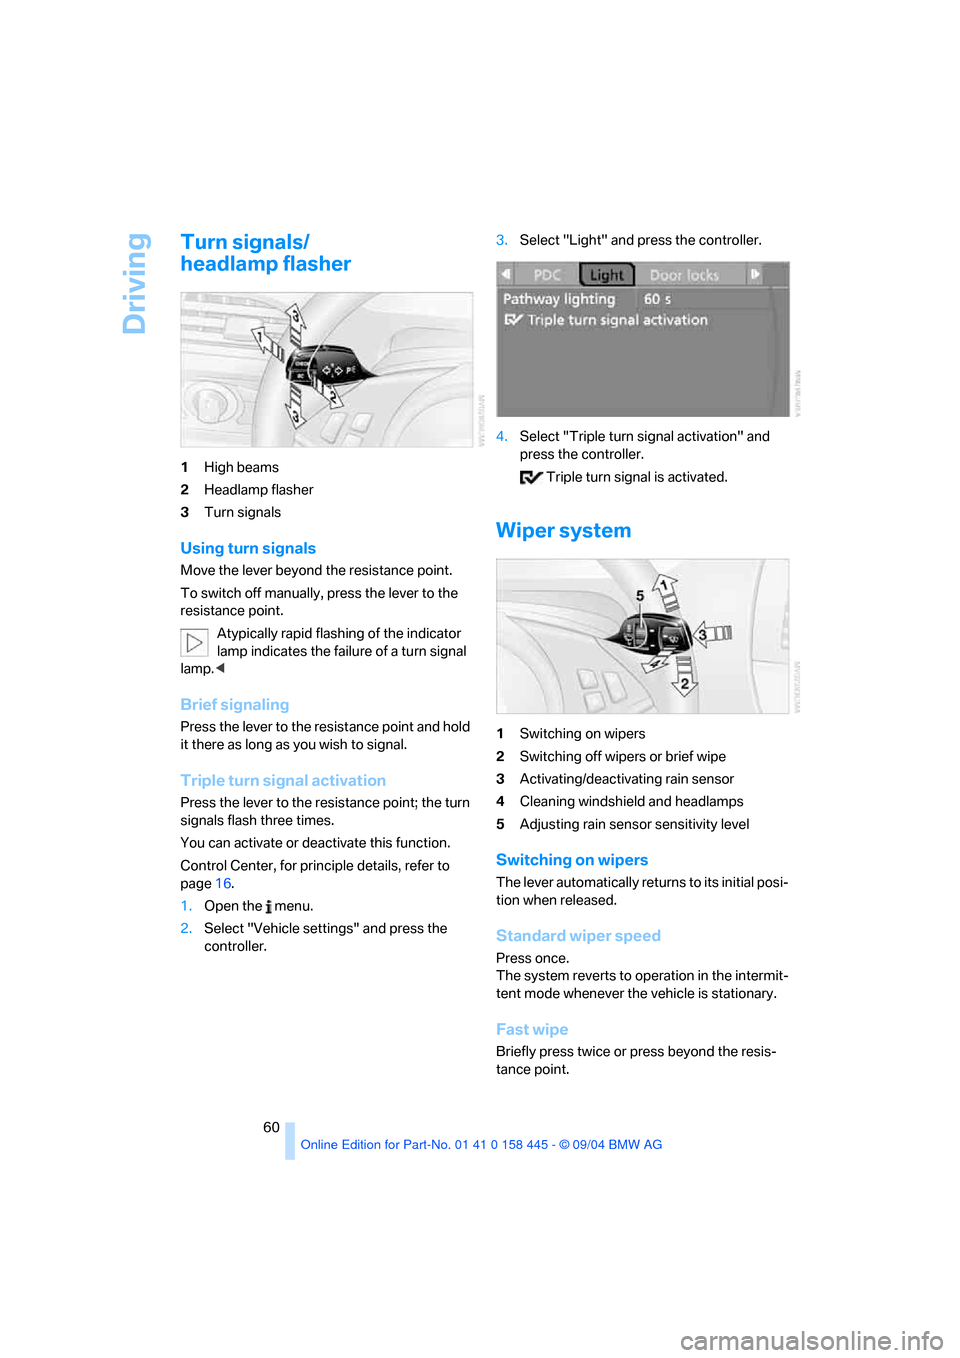
1High beams
2Headlamp flasher
3Turn signals
Using turn signals
Move the lever beyond the resistance point.
To switch off manually, press the lever to the
resistance point.
Atypically rapid flashing of the indicator
lamp indicates the failure of a turn signal
lamp.<
Brief signaling
Press the lever to the resistance point and hold
it there as long as you wish to signal.
Triple turn signal activation
Press the lever to the resistance point; the turn
signals flash three times.
You can activate or deactivate this function.
Control Center, for principle details, refer to
page16.
1.Open the menu.
2.Select "Vehicle settings" and press the
controller.3.Select "Light" and press the controller.
4.Select "Triple turn signal activation" and
press the controller.
Triple turn signal is activated.
Wiper system
1Switching on wipers
2Switching off wipers or brief wipe
3Activating/deactivating rain sensor
4Cleaning windshield and headlamps
5Adjusting rain sensor sensitivity level
Switching on wipers
The lever automatically returns to its initial posi-
tion when released.
Standard wiper speed
Press once.
The system reverts to operation in the intermit-
tent mode whenever the vehicle is stationary.
Fast wipe
Briefly press twice or press beyond the resis-
tance point.
Page 62 of 217
Controls
61Reference
At a glance
Driving tips
Communications
Navigation
Entertainment
Mobility
The system reverts to operation at normal
speed whenever the vehicle is stationary.
Rain sensor
Wiper operation is controlled automatically as a
function of the rain intensity. The rain sensor is
located on the windshield, directly in front of the
interior rearview mirror.
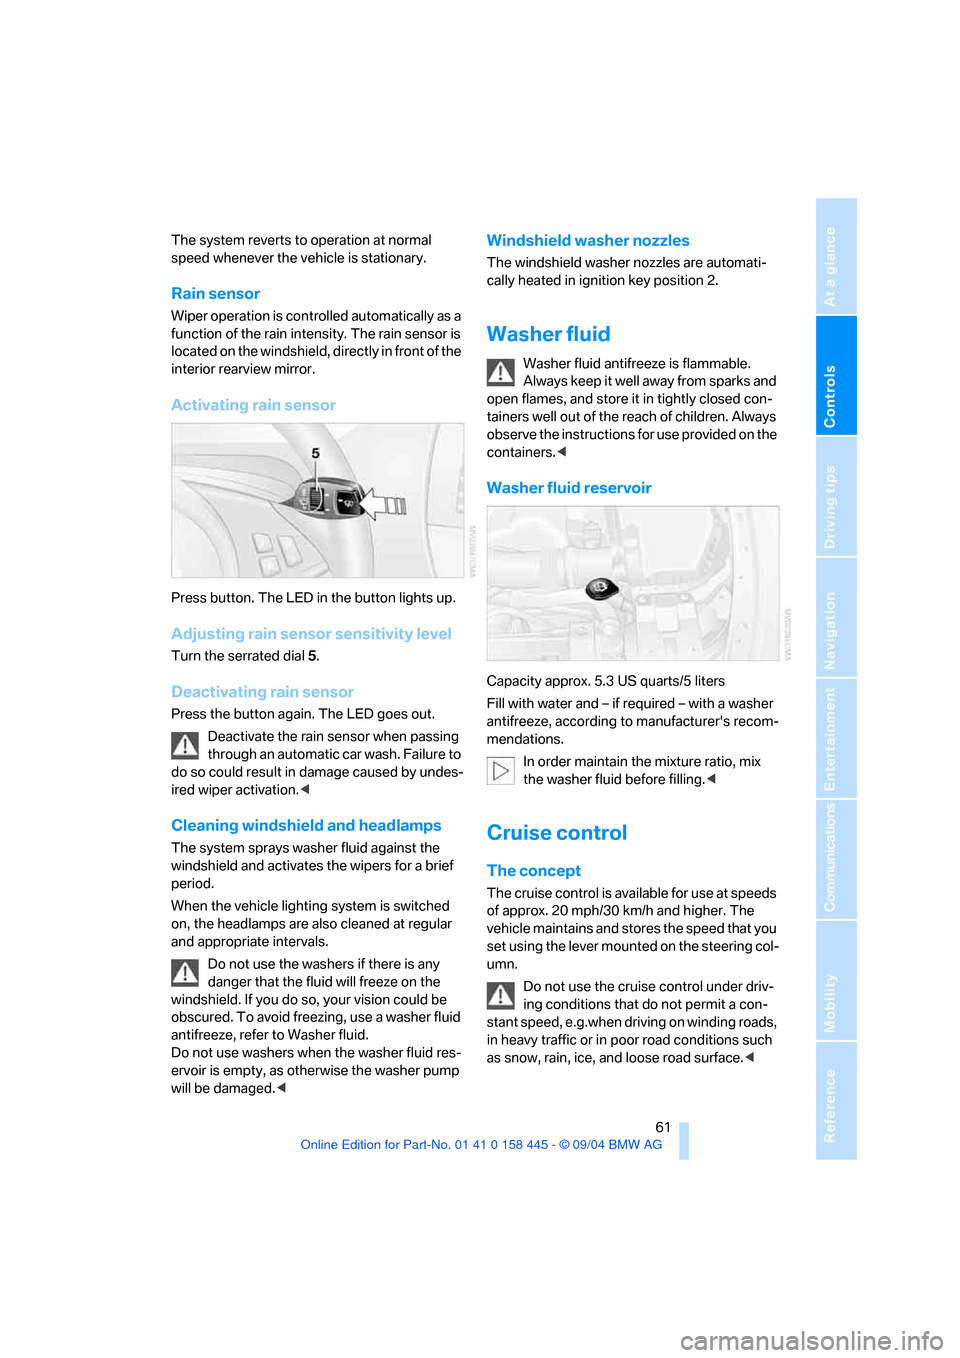
Activating rain sensor
Press button. The LED in the button lights up.
Adjusting rain sensor sensitivity level
Turn the serrated dial 5.
Deactivating rain sensor
Press the button again. The LED goes out.
Deactivate the rain sensor when passing
through an automatic car wash. Failure to
do so could result in damage caused by undes-
ired wiper activation.<
Cleaning windshield and headlamps
The system sprays washer fluid against the
windshield and activates the wipers for a brief
period.
When the vehicle lighting system is switched
on, the headlamps are also cleaned at regular
and appropriate intervals.
Do not use the washers if there is any
danger that the fluid will freeze on the
windshield. If you do so, your vision could be
obscured. To avoid freezing, use a washer fluid
antifreeze, refer to Washer fluid.
Do not use washers when the washer fluid res-
ervoir is empty, as otherwise the washer pump
will be damaged.<
Windshield washer nozzles
The windshield washer nozzles are automati-
cally heated in ignition key position 2.
Washer fluid
Washer fluid antifreeze is flammable.
Always keep it well away from sparks and
open flames, and store it in tightly closed con-
tainers well out of the reach of children. Always
observe the instructions for use provided on the
containers.<
Washer fluid reservoir
Capacity approx. 5.3 US quarts/5 liters
Fill with water and – if required – with a washer
antifreeze, according to manufacturer's recom-
mendations.
In order maintain the mixture ratio, mix
the washer fluid before filling.<
Cruise control
The concept
The cruise control is available for use at speeds
of approx. 20 mph/30 km/h and higher. The
vehicle maintains and stores the speed that you
set using the lever mounted on the steering col-
umn.
Do not use the cruise control under driv-
ing conditions that do not permit a con-
stant speed, e.g.when driving on winding roads,
in heavy traffic or in poor road conditions such
as snow, rain, ice, and loose road surface.<
Page 64 of 217
Controls
63Reference
At a glance
Driving tips
Communications
Navigation
Entertainment
Mobility
cially on longer trips, the system can reduce
fatigue and tension, while increasing your
enjoyment of driving. Please use it safely and
responsibly.
In addition to holding a steady cruising speed, if
you encounter slower vehicles ahead, active
cruise control will, within the scope of given
possibilities, adjust your vehicle's speed auto-
matically so that one can flow with the traffic
without having to make constant adjustments.
If, for example, while cruising at the selected
speed, you begin to approach a slower vehicle
ahead of you in the same lane, the system will
reduce your vehicle's speed to the same as that
of the vehicle ahead to maintain your selected
distance setting between your vehicle and the
vehicle ahead. There are four settings for dis-
tance, which are additionally speed-dependent.
Based on your selected distance setting, the
system automatically decreases the throttle
setting and lightly applies the brakes if neces-
sary. The vehicle brake lamps will automatically
illuminate to signal a following driver to take
action. In addition, it may be necessary for the
vehicle or the driver to downshift, depending on
the kind of transmission your vehicle is
equipped with, to maintain the distance setting
selected. If the vehicle ahead speeds up or
when the lane ahead becomes clear, your vehi-
cle will accelerate to the speed you have
selected by increasing the throttle setting and
shifting gears automatically or by the driver as
needed.
Active cruise control is not and must not
be used as a collision avoidance/warning
system.<
Since this active cruise control system is
a new technology and operates differ-
ently from conventional cruise control systems
which you may be accustomed to, you are
strongly urged to read all of the pages relating
to this system before use. Pay special attention
to the information contained in the Things to
know about active cruise control section in this
manual beginning on page66.
within a normal engine speed range and also
change gears. Continuous operation at very
high or very low engine speeds is not possible.
In this case the driver is asked to shift or the
system deactivates itself.
Vehicles with SMG
Continuous operation at very high engine
speeds is not possible in the Sequential mode.
In this case the driver is asked to shift or the
system deactivates itself.
In the Drive mode the SMG acts similarly to the
automatic transmission in the D position.
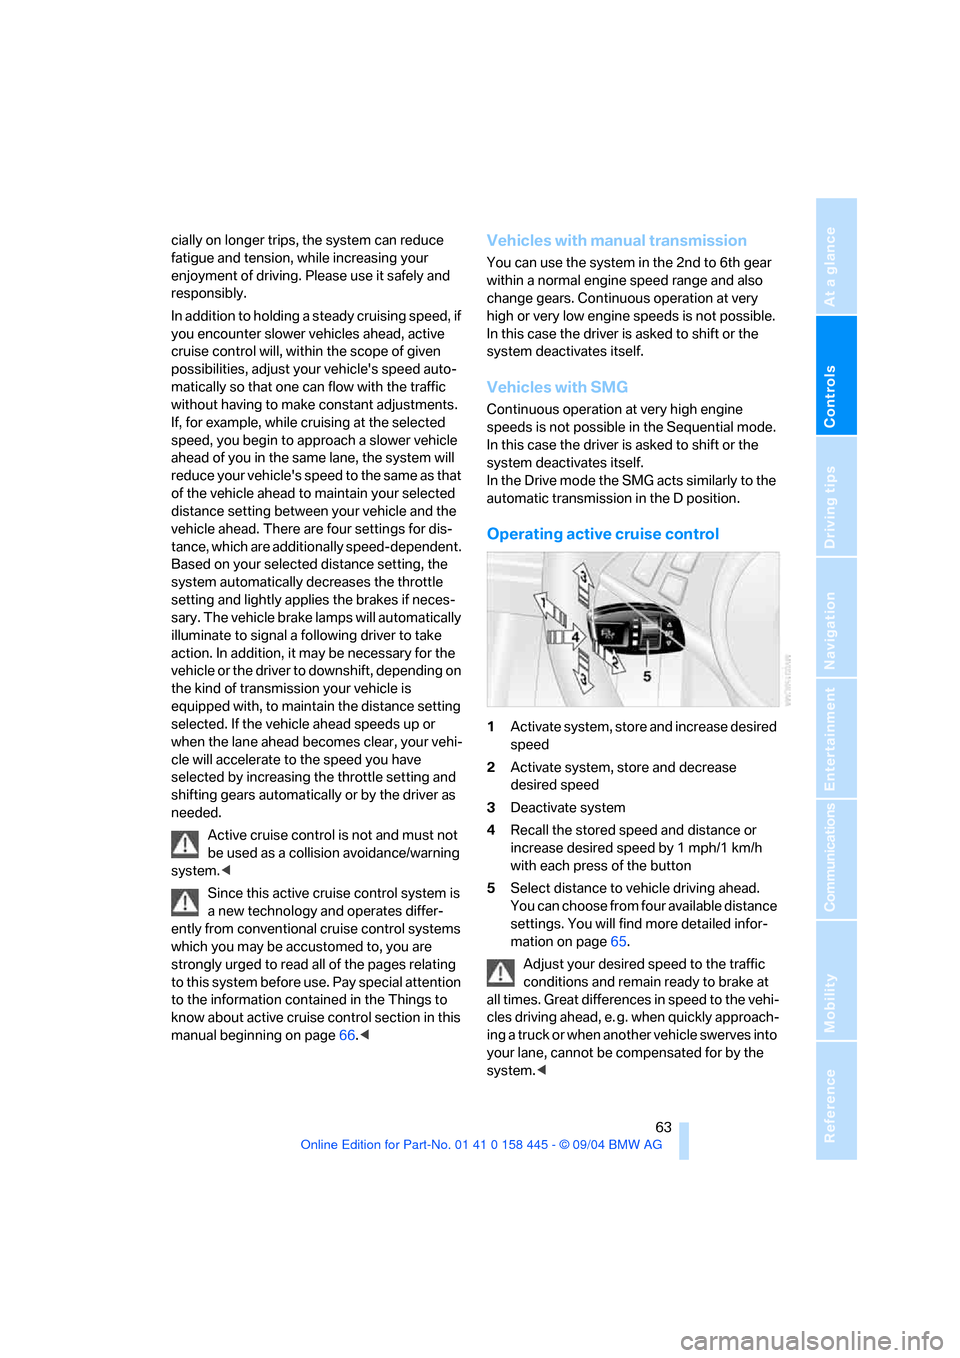
Operating active cruise control
1Activate system, store and increase desired
speed
2Activate system, store and decrease
desired speed
3Deactivate system
4Recall the stored speed and distance or
increase desired speed by 1 mph/1 km/h
with each press of the button
5Select distance to vehicle driving ahead.
You can choose from four available distance
settings. You will find more detailed infor-
mation on page65.
Adjust your desired speed to the traffic
conditions and remain ready to brake at
all times. Great differences in speed to the vehi-
cles driving ahead, e. g. when quickly approach-
ing a truck or when another vehicle swerves into
your lane, cannot be compensated for by the
system.<
Page 65 of 217
Driving
64
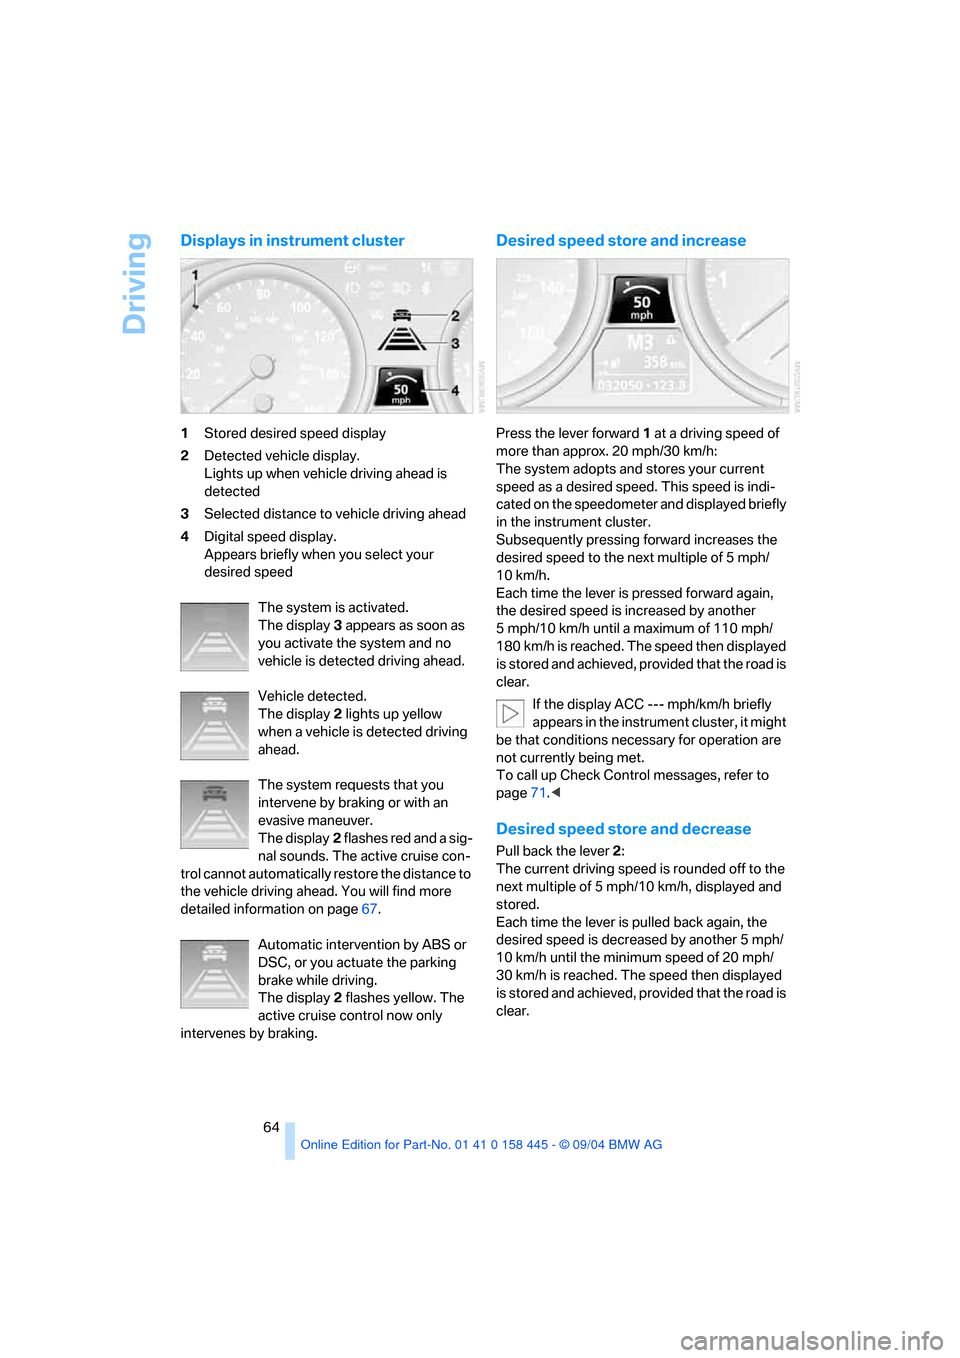
Displays in instrument cluster
1Stored desired speed display
2Detected vehicle display.
Lights up when vehicle driving ahead is
detected
3Selected distance to vehicle driving ahead
4Digital speed display.
Appears briefly when you select your
desired speed
The system is activated.
The display3 appears as soon as
you activate the system and no
vehicle is detected driving ahead.
Vehicle detected.
The display2 lights up yellow
when a vehicle is detected driving
ahead.
The system requests that you
intervene by braking or with an
evasive maneuver.
The display2 flashes red and a sig-
nal sounds. The active cruise con-
trol cannot automatically restore the distance to
the vehicle driving ahead. You will find more
detailed information on page67.
Automatic intervention by ABS or
DSC, or you actuate the parking
brake while driving.
The display2 flashes yellow. The
active cruise control now only
intervenes by braking.
Desired speed store and increase
Press the lever forward1 at a driving speed of
more than approx. 20 mph/30 km/h:
The system adopts and stores your current
speed as a desired speed. This speed is indi-
cated on the speedometer and displayed briefly
in the instrument cluster.
Subsequently pressing forward increases the
desired speed to the next multiple of 5 mph/
10 km/h.
Each time the lever is pressed forward again,
the desired speed is increased by another
5 mph/10 km/h until a maximum of 110 mph/
180 km/h is reached. The speed then displayed
is stored and achieved, provided that the road is
clear.
If the display ACC --- mph/km/h briefly
appears in the instrument cluster, it might
be that conditions necessary for operation are
not currently being met.
To call up Check Control messages, refer to
page71.<
Desired speed store and decrease
Pull back the lever2:
The current driving speed is rounded off to the
next multiple of 5 mph/10 km/h, displayed and
stored.
Each time the lever is pulled back again, the
desired speed is decreased by another 5 mph/
10 km/h until the minimum speed of 20 mph/
30 km/h is reached. The speed then displayed
is stored and achieved, provided that the road is
clear.
Page 67 of 217
Driving
66
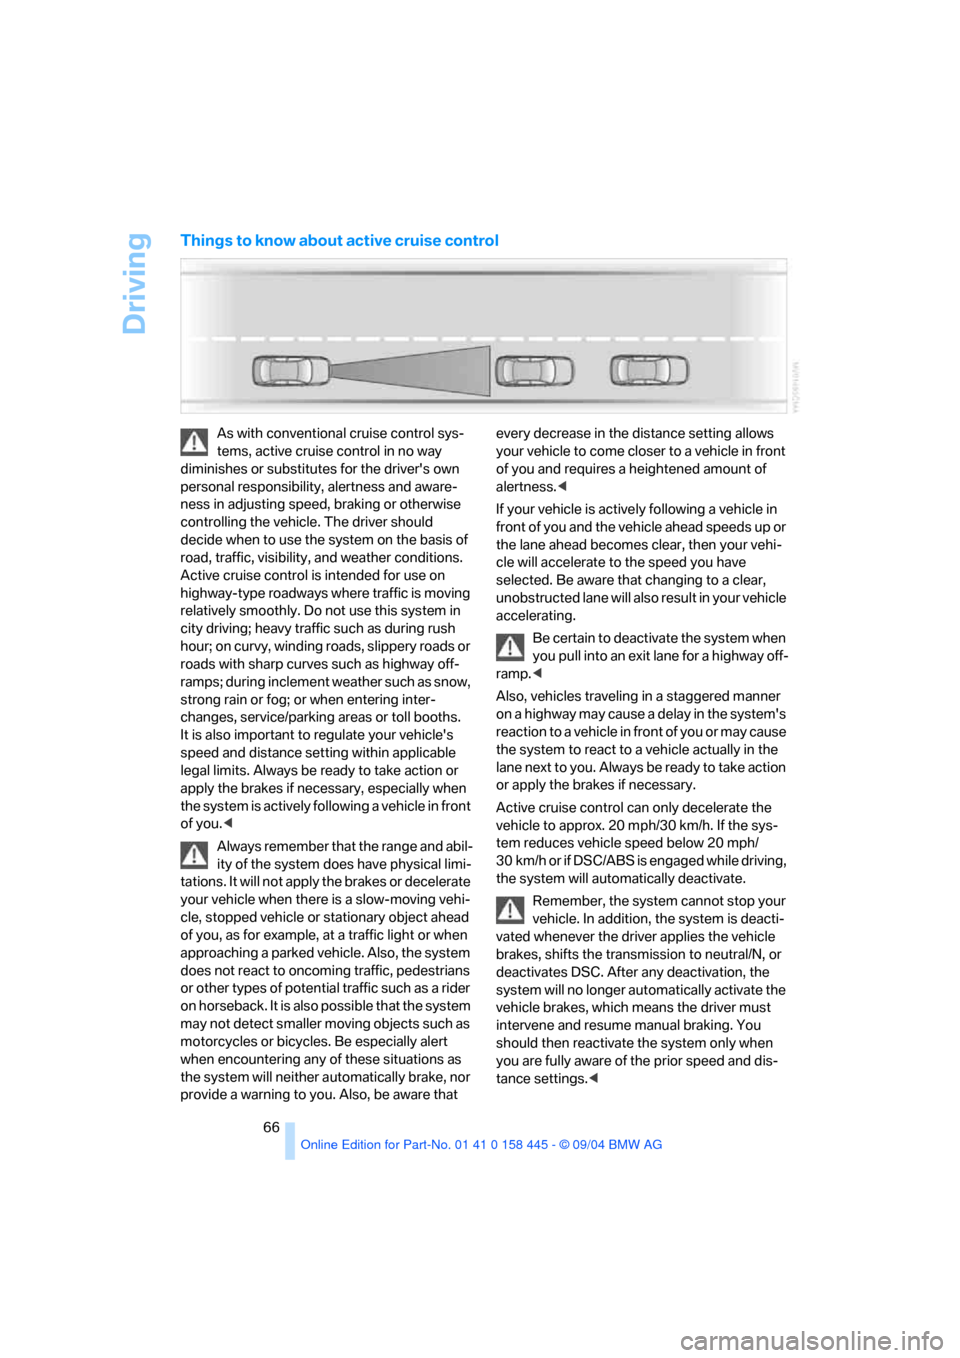
Things to know about active cruise control
As with conventional cruise control sys-
tems, active cruise control in no way
diminishes or substitutes for the driver's own
personal responsibility, alertness and aware-
ness in adjusting speed, braking or otherwise
controlling the vehicle. The driver should
decide when to use the system on the basis of
road, traffic, visibility, and weather conditions.
Active cruise control is intended for use on
highway-type roadways where traffic is moving
relatively smoothly. Do not use this system in
city driving; heavy traffic such as during rush
hour; on curvy, winding roads, slippery roads or
roads with sharp curves such as highway off-
ramps; during inclement weather such as snow,
strong rain or fog; or when entering inter-
changes, service/parking areas or toll booths.
It is also important to regulate your vehicle's
speed and distance setting within applicable
legal limits. Always be ready to take action or
apply the brakes if necessary, especially when
the system is actively following a vehicle in front
of you.<
Always remember that the range and abil-
ity of the system does have physical limi-
tations. It will not apply the brakes or decelerate
your vehicle when there is a slow-moving vehi-
cle, stopped vehicle or stationary object ahead
of you, as for example, at a traffic light or when
approaching a parked vehicle. Also, the system
does not react to oncoming traffic, pedestrians
or other types of potential traffic such as a rider
on horseback. It is also possible that the system
may not detect smaller moving objects such as
motorcycles or bicycles. Be especially alert
when encountering any of these situations as
the system will neither automatically brake, nor
provide a warning to you. Also, be aware that every decrease in the distance setting allows
your vehicle to come closer to a vehicle in front
of you and requires a heightened amount of
alertness.<
If your vehicle is actively following a vehicle in
front of you and the vehicle ahead speeds up or
the lane ahead becomes clear, then your vehi-
cle will accelerate to the speed you have
selected. Be aware that changing to a clear,
unobstructed lane will also result in your vehicle
accelerating.
Be certain to deactivate the system when
you pull into an exit lane for a highway off-
ramp.<
Also, vehicles traveling in a staggered manner
on a highway may cause a delay in the system's
reaction to a vehicle in front of you or may cause
the system to react to a vehicle actually in the
lane next to you. Always be ready to take action
or apply the brakes if necessary.
Active cruise control can only decelerate the
vehicle to approx. 20 mph/30 km/h. If the sys-
tem reduces vehicle speed below 20 mph/
30 km/h or if DSC/ABS is engaged while driving,
the system will automatically deactivate.
Remember, the system cannot stop your
vehicle. In addition, the system is deacti-
vated whenever the driver applies the vehicle
brakes, shifts the transmission to neutral/N, or
deactivates DSC. After any deactivation, the
system will no longer automatically activate the
vehicle brakes, which means the driver must
intervene and resume manual braking. You
should then reactivate the system only when
you are fully aware of the prior speed and dis-
tance settings.<