width BMW 650I 2012 F12 Owner's Manual
[x] Cancel search | Manufacturer: BMW, Model Year: 2012, Model line: 650I, Model: BMW 650I 2012 F12Pages: 282, PDF Size: 8.25 MB
Page 53 of 282
Adjusting
Sitting safely
The
ideal seating position can make a vital con‐
tribution to relaxed, fatigue-free driving.
The seating position plays an important role in
an accident in combination with:
▷ Safety belts, refer to page 56.
▷ Head restraints, refer to page 57.
▷ Airbags, refer to page 88.
Seats
Adjusting
General information Do not adjust the seat while driving
Never attempt to adjust the driver's seat
while driving.
The
seat could respond with unexpected move‐
ment and the ensuing loss of vehicle control
could lead to an accident.◀
Do not incline the backrest too far to the
rear
Do not incline the backrest on the front passen‐
ger side too far to the rear during driving. Oth‐
erwise, there is the danger of sliding under the
safety belt in an accident. This would eliminate
the protection normally provided by the belt.◀
The seat setting is stored for the remote control
currently in use. When the vehicle is unlocked
via the remote control, the position is automati‐
cally retrieved if this function, refer to page 37,
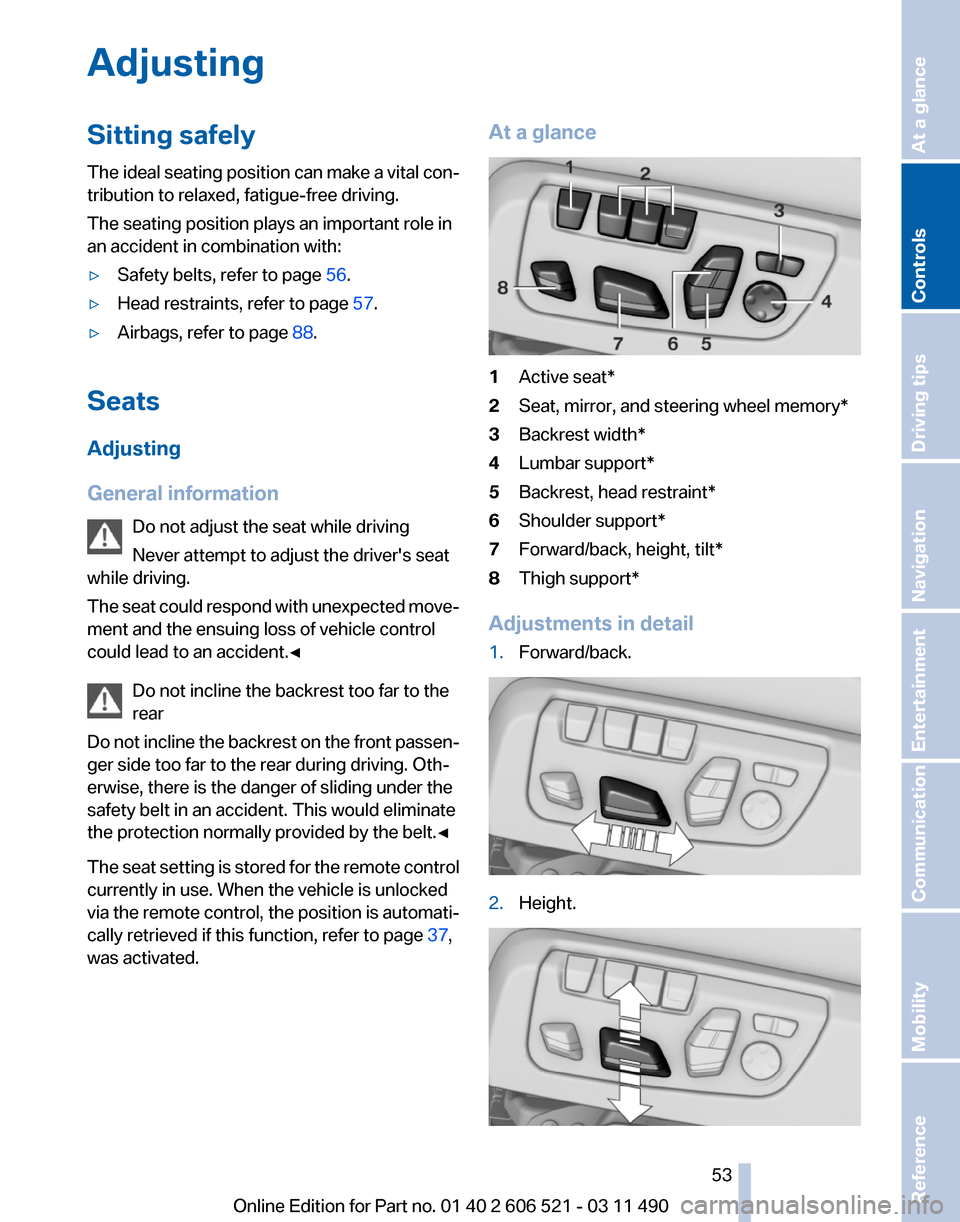
was activated. At a glance
1
Active seat*
2 Seat, mirror, and steering wheel memory*
3 Backrest width*
4 Lumbar support*
5 Backrest, head restraint*
6 Shoulder support*
7 Forward/back, height, tilt*
8 Thigh support*
Adjustments in detail
1. Forward/back. 2.
Height. Seite 53
53Online Edition for Part no. 01 40 2 606 521 - 03 11 490
Reference Mobility Communication Entertainment Navigation Driving tips
Controls At a glance
Page 54 of 282
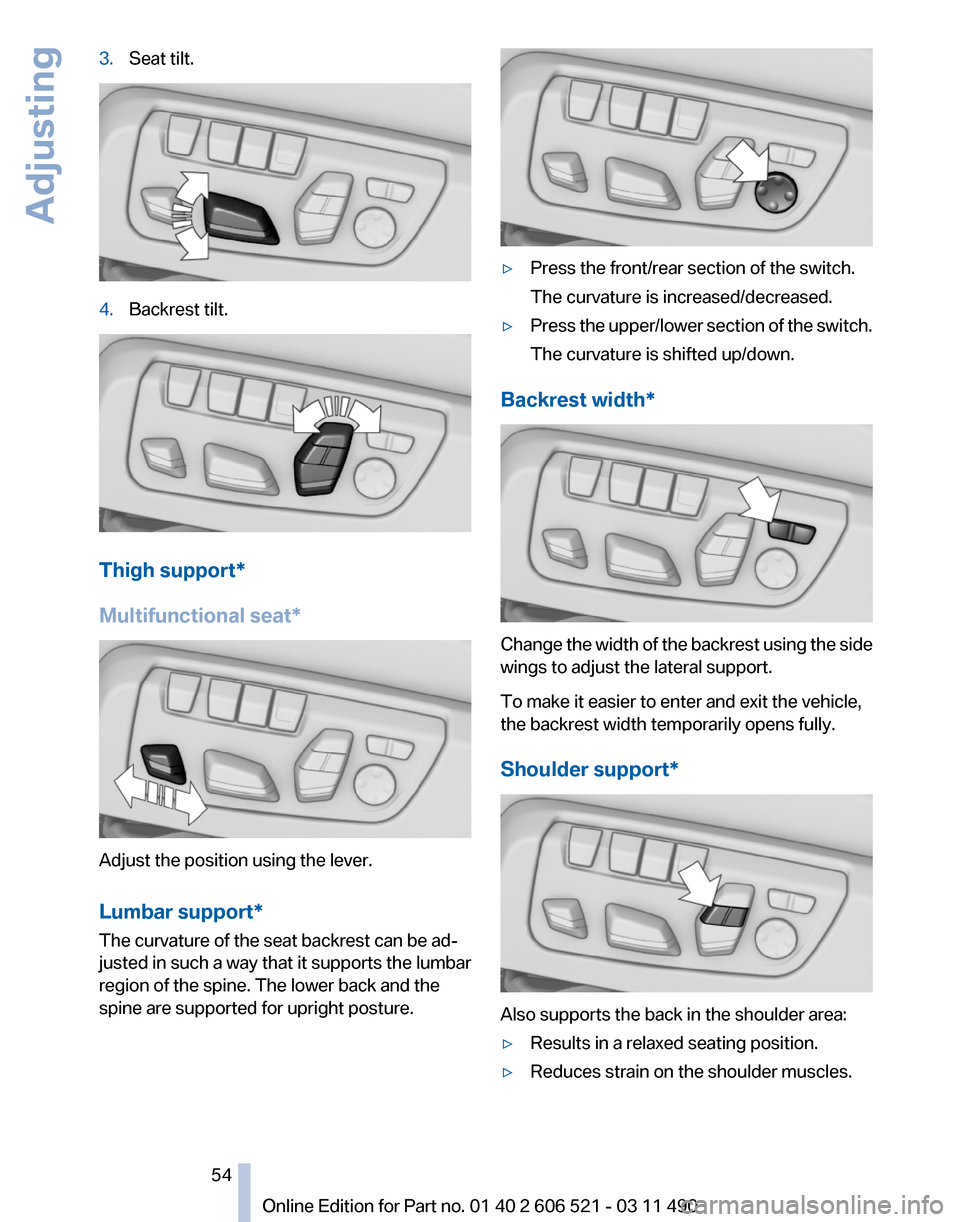
3.
Seat tilt. 4.
Backrest tilt. Thigh support*
Multifunctional seat
*Adjust the position using the lever.
Lumbar support*
The curvature of the seat backrest can be ad‐
justed in such a way that it supports the lumbar
region of the spine. The lower back and the
spine are supported for upright posture. ▷
Press the front/rear section of the switch.
The curvature is increased/decreased.
▷ Press the upper/lower section of the switch.
The curvature is shifted up/down.
Backrest width* Change the width of the backrest using the side
wings to adjust the lateral support.
To make it easier to enter and exit the vehicle,
the backrest width temporarily opens fully.
Shoulder support*
Also supports the back in the shoulder area:
▷
Results in a relaxed seating position.
▷ Reduces strain on the shoulder muscles.
Seite 54
54 Online Edition for Part no. 01 40 2 606 521 - 03 11 490
Adjusting
Page 60 of 282
Possible up to approx. 15 mph/20 km/h.
For example, this is advantageous
▷
In car washes.
▷ In narrow streets.
▷ For folding back mirrors that were folded
away manually.
Mirrors that were folded in are folded out auto‐
matically at a speed of approx. 25 mph/40 km/h.
Fold in the mirror in a car wash
Before entering an automatic car wash,
fold in the exterior mirrors by hand or with the
button; otherwise, they could be damaged, de‐
pending on the width of the vehicle.◀
Automatic heating
Both exterior mirrors are automatically heated
whenever the engine is running.
Automatic dimming feature
Both exterior mirrors are automatically dimmed.
Photocells are used for control in the Interior rear
view mirror, refer to page 60.
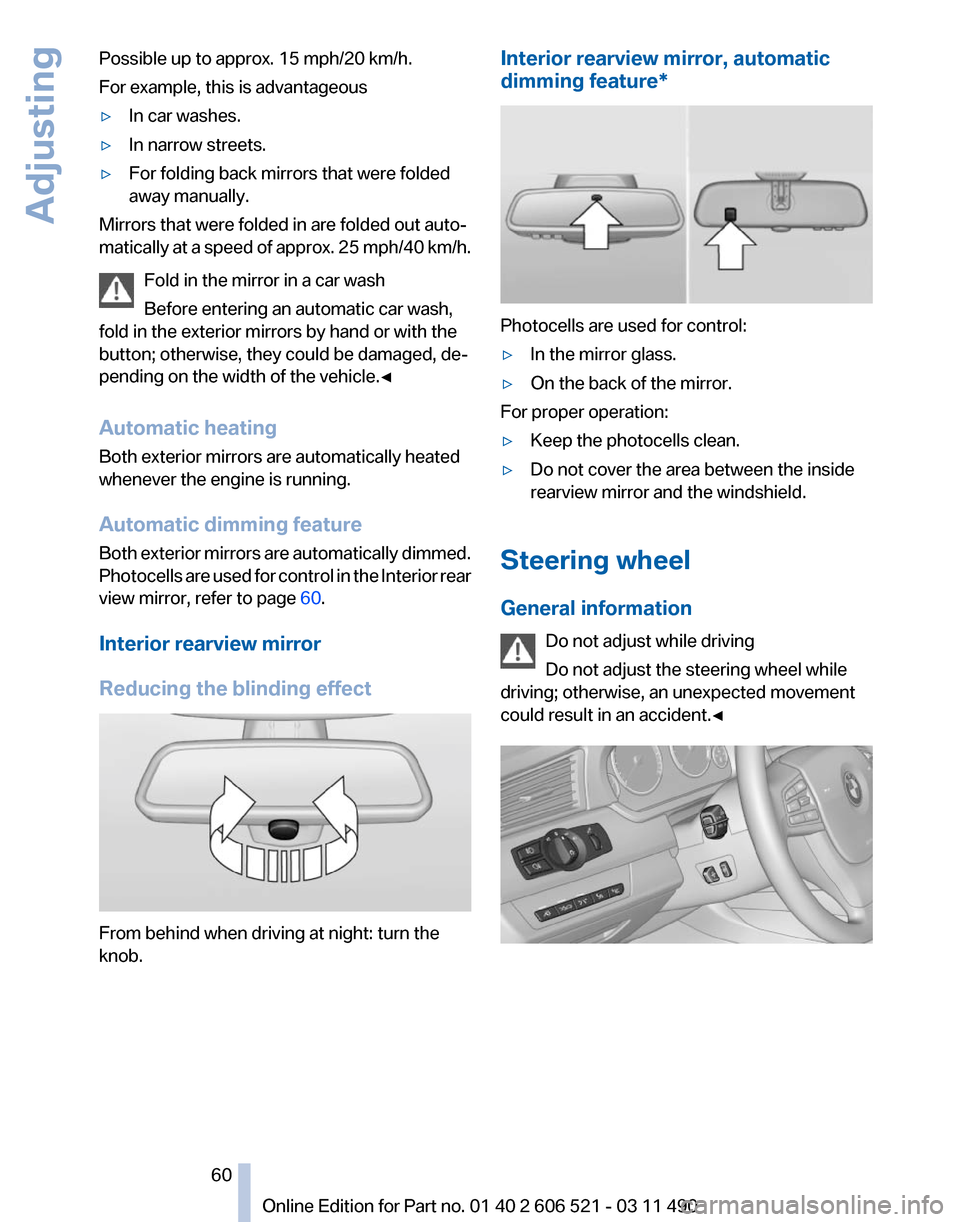
Interior rearview mirror
Reducing the blinding effect From behind when driving at night: turn the
knob. Interior rearview mirror, automatic
dimming feature
* Photocells are used for control:
▷
In the mirror glass.
▷ On the back of the mirror.
For proper operation:
▷ Keep the photocells clean.
▷ Do not cover the area between the inside
rearview mirror and the windshield.
Steering wheel
General information Do not adjust while driving
Do not adjust the steering wheel while
driving; otherwise, an unexpected movement
could result in an accident.◀ Seite 60
60 Online Edition for Part no. 01 40 2 606 521 - 03 11 490
Adjusting
Page 62 of 282
Transporting children safely
The right place for children
Note
Children in the vehicle
Do not leave children unattended in the
vehicle; otherwise, they could endanger them‐
selves and other persons, e.g., by opening the
doors.◀
Children should always be in the rear
Accident research shows that the safest place
for children is in the back seat.
Transporting children in the rear
Only transport children younger than
13
years of age or shorter than 5 ft/150 cm in the
rear in child restraint fixing systems provided in
accordance with the age, weight and size of the
child; otherwise, there is an increased risk of in‐
jury in an accident.
Children 13 years of age or older must wear a
safety belt as soon as a suitable child restraint
fixing system can no longer be used, due to their
age, weight and size.◀
Children on the front passenger seat
Should it ever be necessary to use a child re‐
straint fixing system in the front passenger seat,
make sure that the front, knee and side airbags
on the front passenger side are deactivated. Au‐
tomatic deactivation of front passenger airbags,
refer to page 89.
Deactivating the front passenger airbags
If a child restraint fixing system is used in
the front passenger seat, the front passenger
airbags must be deactivated; otherwise, there is
an increased risk of injury to the child when the
airbags are triggered, even with a child restraint
fixing system.◀ Installing child restraint fixing
systems
Notes
Manufacturer's information for child re‐
straint fixing systems
To select, mount and use child restraint fixing
systems, observe the information provided by
the system manufacturer; otherwise, the pro‐
tective effect can be impaired.
◀
On the front passenger seat
After installing a child restraint fixing system in
the front passenger seat, make sure that the
front, knee and side airbags on the front pas‐
senger side are deactivated.
Deactivate the front passenger airbags auto‐
matically, refer to page 89.
Deactivating the front passenger airbags
If a child restraint fixing system is used in
the front passenger seat, the front passenger
airbags must be deactivated; otherwise, there is
an increased risk of injury to the child when the
airbags are triggered, even with a child restraint
fixing system.◀
Seat position and height
Before installing a child restraint fixing system,
move the front passenger seat as far back as
possible and adjust its height to the highest po‐
sition to obtain the best possible position for the
belt and to offer optimal protection in the event
of an accident.
Do not change the seat position and height after
this.
Backrest width*
Before installing a child restraint fixing system in
the front passenger seat, open the backrest
width completely. Do not change the backrest Seite 62
62 Online Edition for Part no. 01 40 2 606 521 - 03 11 490
Transporting children safely
Page 63 of 282
width again and do not call up a memory posi‐
tion.
Backrest width for the child seat
Before installing a child restraint fixing
system
in the front passenger seat, the backrest
width must be opened completely. Do not
change the adjustment after this; otherwise, the
stability of the child seat will be reduced.◀
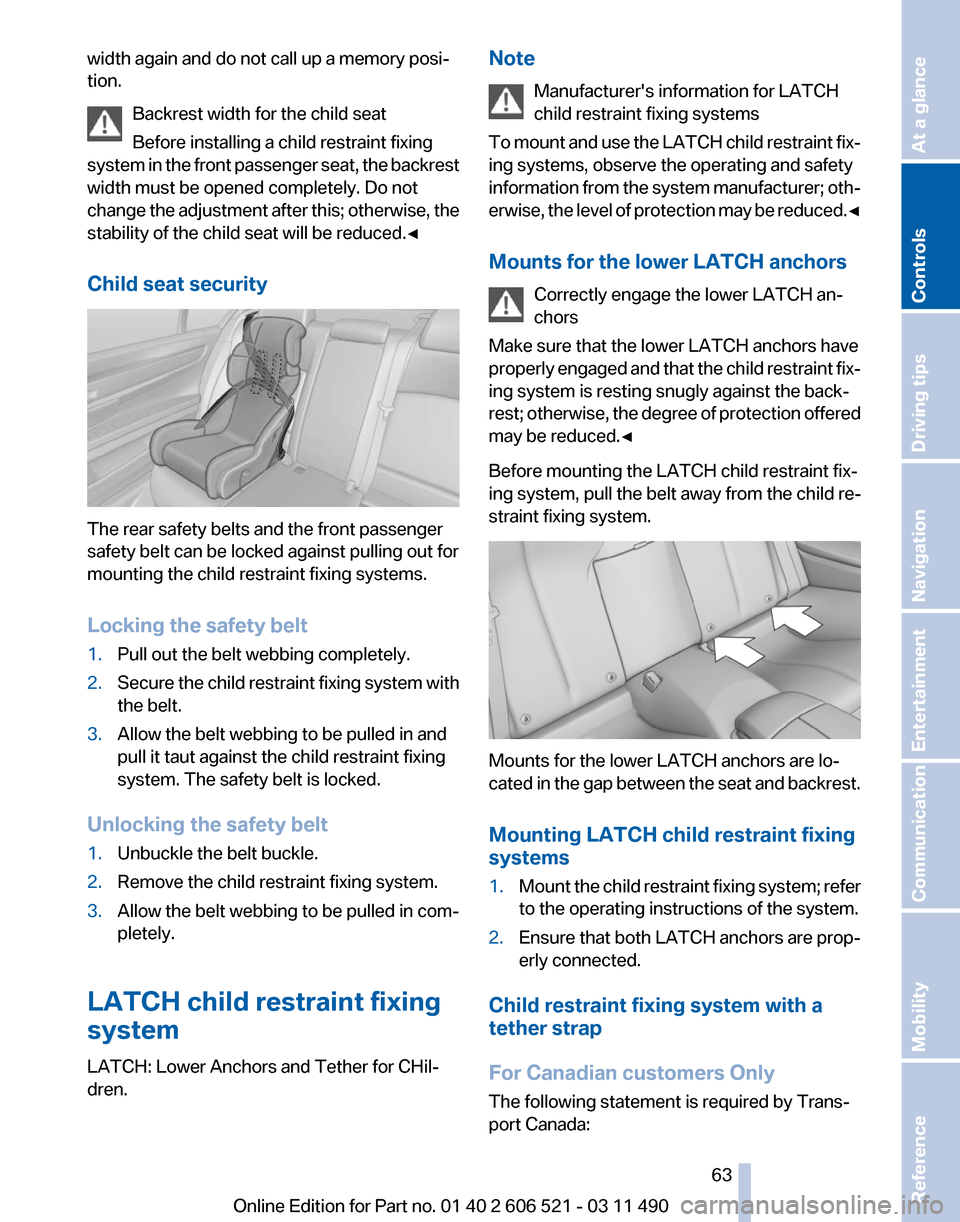
Child seat security The rear safety belts and the front passenger
safety belt can be locked against pulling out for
mounting the child restraint fixing systems.
Locking the safety belt
1.
Pull out the belt webbing completely.
2. Secure the child restraint fixing system with
the belt.
3. Allow the belt webbing to be pulled in and
pull it taut against the child restraint fixing
system. The safety belt is locked.
Unlocking the safety belt
1. Unbuckle the belt buckle.
2. Remove the child restraint fixing system.
3. Allow the belt webbing to be pulled in com‐
pletely.
LATCH child restraint fixing
system
LATCH: Lower Anchors and Tether for CHil‐
dren. Note
Manufacturer's information for LATCH
child restraint fixing systems
To
mount and use the LATCH child restraint fix‐
ing systems, observe the operating and safety
information from the system manufacturer; oth‐
erwise, the level of protection may be reduced.◀
Mounts for the lower LATCH anchors
Correctly engage the lower LATCH an‐
chors
Make sure that the lower LATCH anchors have
properly engaged and that the child restraint fix‐
ing system is resting snugly against the back‐
rest; otherwise, the degree of protection offered
may be reduced.◀
Before mounting the LATCH child restraint fix‐
ing system, pull the belt away from the child re‐
straint fixing system. Mounts for the lower LATCH anchors are lo‐
cated
in the gap between the seat and backrest.
Mounting LATCH child restraint fixing
systems
1. Mount the child restraint fixing system; refer
to the operating instructions of the system.
2. Ensure that both LATCH anchors are prop‐
erly connected.
Child restraint fixing system with a
tether strap
For Canadian customers Only
The following statement is required by Trans‐
port Canada: Seite 63
63Online Edition for Part no. 01 40 2 606 521 - 03 11 490
Reference Mobility Communication Entertainment Navigation Driving tips
Controls At a glance
Page 231 of 282
Tire size
Pressure specifications
in bar/PSI
F: 245/40 R 19 94 Y
R: 275/35 R 19 96 Y 2.6 / 38
--
3.0 / 44
F: 245/35 R 20 95
Y XL
R: 275/30 R 20 97
Y XL 2.8 / 41
-
-
3,3 / 48Tire identification marks
Tire size
255/50 R 19 103 Y
255: nominal width in mm
50: aspect ratio in %
R: radial tire code
19: rim diameter in inches
103: load rating, not for ZR tires
Y: speed rating, before the R on ZR tires
Speed letter
T = up to 118 mph, 190 km/h
H = up to 131 mph, 210 km/h
V = up to 150 mph, 240 km/h
W = up to 167 mph, 270 km/h
Y = up to 186 mph, 300 km/h
Tire Identification Number
DOT code: DOT xxxx xxx 3510
xxxx: manufacturer code for the tire brand
xxx: tire size and tire design
3510: tire age
Tires
with DOT codes meet the guidelines of the
U.S. Department of Transportation.
Tire age
DOT … 3510: the tire was manufactured in the
35th week in 2010. Recommendation
Regardless of wear, replace tires at least every
6 years.
Uniform Tire Quality Grading
Quality grades can be found where applicable
on
the tire sidewall between tread shoulder and
maximum section width.
For example: Treadwear 200; Traction AA;
Temperature A
DOT Quality Grades
Treadwear
Traction AA A B C
Temperature A B C
All passenger car tires must conform to Federal
Safety Requirements in addition to these
grades.
Treadwear
The treadwear grade is a comparative rating
based on the wear rate of the tire when tested
under controlled conditions on a specified gov‐
ernment test course. For example, a tire graded
150 would wear one and one-half, 1 g, times as
well on the government course as a tire graded
100. The relative performance of tires depends
upon the actual conditions of their use, however,
and may depart significantly from the norm due
to variations in driving habits, service practices
and differences in road characteristics and cli‐
mate.
Traction
The traction grades, from highest to lowest, are
AA, A, B, and C.
Those grades represent the tire's ability to stop
on wet pavement as measured under controlled
conditions on specified government test surfa‐
ces of asphalt and concrete. A tire marked C may
have poor traction performance.
The traction grade assigned to this tire is based
on straight-ahead braking traction tests, and
does not include acceleration, cornering, hydro‐
planing, or peak traction characteristics.
Seite 231
231Online Edition for Part no. 01 40 2 606 521 - 03 11 490
Reference
Mobility Communication Entertainment Navigation Driving tips Controls At a glance
Page 254 of 282
Care
Car washes
Notes
Steam jets or high-pressure washers
When using steam jets or high-pressure
washers, hold them a sufficient distance away
and use a maximum temperature of 140 ℉/
60 ℃.
Holding them too close or using excessively
high
pressures or temperatures can cause dam‐
age or preliminary damage that may then lead to
long-term damage.
Follow the operating instructions for the high-
pressure washer.◀
Cleaning sensors/cameras with high-
pressure washers
When using high-pressure washers, do not
spray the exterior sensors and cameras, e.g.,
Park Distance Control*, for extended periods of
time and only from a distance of at least 12 in/
30 cm.◀
Wash your vehicle frequently, particularly in win‐
ter.
Intense soiling and road salt can damage the ve‐
hicle.
Washing in automatic car washes
Your vehicle can be washed in automatic car
washes right from the start.
Give preference to cloth car washes or those
that use soft brushes in order to avoid paint
damage.
Notes
Note the following:
▷ Make sure that the wheels and tires are not
damaged by the transport mechanisms.
▷ Fold in the exterior mirrors; otherwise, they
may
be damaged, depending on the width of
the vehicle. ▷
Deactivate the rain sensor, refer to page 70,
to avoid unintentional wiper activation.
▷ Do not treat the convertible top with wax.
Ensure that a cycle without wax or a special
cycle for convertibles is available.
▷ In some cases, an unintentional alarm can be
triggered
by the interior motion sensor of the
alarm system*. Follow the instructions on
avoiding an unintentional alarm, refer to
page 43.
Guide rails in car washes
Avoid car washes with guide rails higher
than 4 in/10 cm; otherwise, the vehicle body
could be damaged.
◀
Before driving into a car wash
The vehicle is able to roll when the following
steps are taken:
Manual transmission:
1. Shift to neutral.
2. Release the parking brake, refer to page 67.
3. Switch the engine off.
4. Switch on the ignition.
Automatic transmission*:
1. Depress the brake pedal.
2. Engage transmission position N.
3. Release the parking brake, refer to page 67,
or deactivate Automatic Hold, refer to
page 67.
4. Switch the engine off.
Transmission
position P with the igni‐
tion off
When the ignition is switched off, position P
is engaged automatically. When in an auto‐
matic car wash, for example, ensure that the
ignition is not switched off accidentally.◀ The vehicle cannot be locked from the outside
when in transmission position N. Seite 254
254 Online Edition for Part no. 01 40 2 606 521 - 03 11 490
Care
Page 260 of 282
Technical data
Dimensions
Width, height
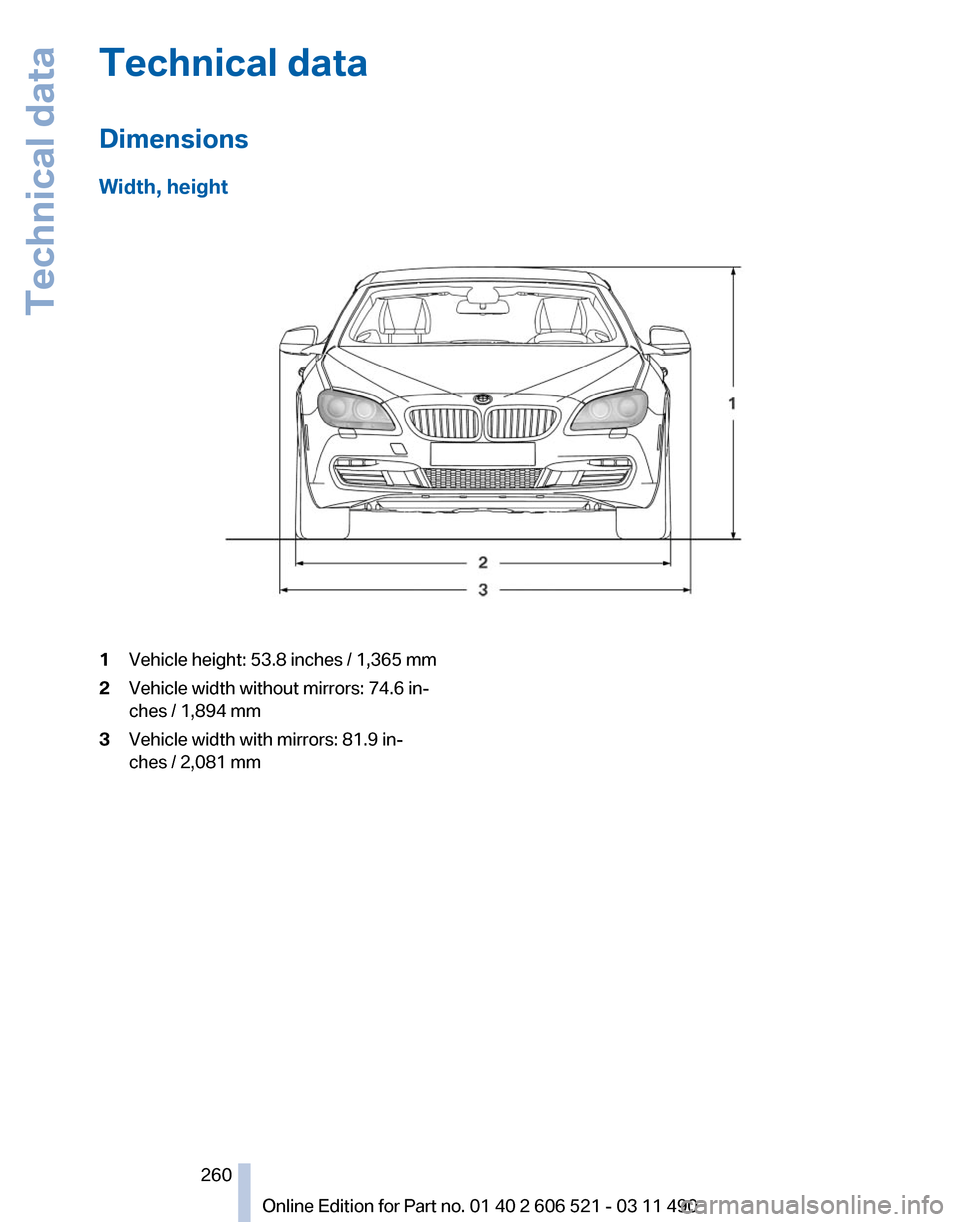
1
Vehicle height: 53.8 inches / 1,365 mm
2 Vehicle width without mirrors: 74.6 in‐
ches / 1,894 mm
3 Vehicle width with mirrors: 81.9 in‐
ches / 2,081 mm
Seite 260
260 Online Edition for Part no. 01 40 2 606 521 - 03 11 490Technical data
Page 272 of 282
Everything from A to Z
Index
A
ABS, Antilock Brake Sys‐
tem 101
Activated-charcoal filter 126
Active Blind Spot Detec‐ tion 98
Active seat, front 55
Active seat ventilation, front 55
Active Steering, integral 102
Adaptive brake lights, refer to Brake force display 100
Adaptive drive 102
Adaptive light control 85
Additional telephone 196
Additives, oil 239
Adjustments, seats/head re‐ straints 53
Airbags 88
Airbags, indicator/warning light 89
Air circulation, refer to Recir‐ culated-air mode 125
Air distribution, manual 123
Air drying, refer to Cooling function 125
Air pressure, tires 229
Air vents, refer to Ventila‐ tion 126
Air volume, automatic climate control 124
Alarm system 42
Alarm, unintentional 43
All around the center con‐ sole 17
All
around the interior rearview
mirror 18
All around the steering wheel 12
ALL program, automatic cli‐ mate control 125 All-season tires, refer to Win‐
ter tires 233
Alternating-code hand-held transmitter 129
Alternative oil types 239
AM/FM station 166
Announcement, navigation, refer to Spoken instruc‐
tions 155
Antifreeze, washer fluid 71
Antilock Brake System, ABS 101
Anti-slip control, refer to DSC 101
Appointments 212
Approved engine oils 239
Apps 222
Armrest, refer to Center arm‐ rest 132
Arrival time 78
Ashtray 129
Assist 218
Assistance, Roadside Assis‐ tance 249
Assistance when driving off 101
Audio playback 173
Audio playback, Blue‐ tooth 188
AUTO intensity 124
Automatic car wash 254
Automatic Curb Monitor 59
Automatic deactivation, front passenger airbags 89
Automatic headlamp con‐ trol 85
Automatic Hold 67
Automatic locking 39
Automatic recirculated-air control 125
Automatic Soft Closing, doors 40 Automatic transmission with
Steptronic 72
AUTO program, automatic cli‐ mate control 124
AUTO program, intensity 124
AUX-IN port 184
Average fuel consumption 77
Average speed 77
Axle loads, weights 261
B
Backrest curvature, refer to Lumbar support 54
Backrest, seats 53
Backrest, width 54
Backup camera 110
Backup lamps, bulb replace‐ ment 245
Balance 164
Band-Aids, refer to First aid kit 249
Bar for tow-starting/tow‐ ing 252
Bass 164
Battery replacement, vehicle battery 247
Battery replacement, vehicle remote control 32
Battery, vehicle 247
Before entering the car wash 254
Belts, safety belts 56
Beverage holder, cu‐ pholder 133
Bluetooth audio 188
BMW Apps 222
BMW Apps, video play‐ back 187
BMW Assist 218
BMW EfficientDynamics, refer to Saving fuel 141
BMW homepage 6
Seite 272
272 Online Edition for Part no. 01 40 2 606 521 - 03 11 490
Everything from A to Z
Page 280 of 282
Updates made after the edito‐
rial deadline 6
Updating software 191
Upholstery care 256
USB audio interface 185
USB interface 132
V
Variable steering, Integral Ac‐ tive Steering 102
Vehicle battery 247
Vehicle
battery, replacing 247
Vehicle, breaking in 138
Vehicle care 255
Vehicle identification number, refer to Identification number
in the engine compart‐
ment 236
Vehicle jack 246
Vehicle paint 255
Vehicle storage 257
Vehicle wash 254
Ventilation 126
Ventilation, refer to Parked-car ventilation 126
Version of the navigation data 160
Video playback 175
Video playback, iPhone 187
Video playback, snap-in adapter 187
Voice activation, mobile phone 203
Voice activation, short com‐ mands 263
Voice activation system 25
Volume, setting 164
W
Warning lamps 14
Warning messages, refer to Check Control 82
Warning triangle 249
Washer fluid 71
Washer fluid reservoir, ca‐ pacity 262 Washer nozzles, wind‐
shield 71
Washer system 69
Washing, vehicle 254
Water on roads 139
Weather Band 168
Weights 261
Welcome lamps 84
Wheel base, vehicle 261
Wheel change 246
Wheels, changing 233
Wheels, everything on wheels and tires 229
Wheels, Flat Tire Monitor FTM 95
Wheels,
Tire Pressure Monitor
TPM 91
Width, vehicle 260
Wind deflector 50
Window defroster, rear 125
Windows, powered 43
Windshield, climate con‐ trol 139
Windshield washer fluid 71
Windshield washer noz‐ zles 71
Windshield washer system 69
Windshield wiper 69
Windshield wipers, fold-out position 71
Winter storage, care 257
Winter tires, suitable tires 233
Winter tires, tread 232
Wiper blades, replacing 243
Wiper fluid 71
Wiper system 69
Wood, care 256
Word match concept, naviga‐ tion 24
Wrench 243
X
Xenon headlamps, bulb re‐ placement 244 Y
Your individual vehicle
6
Seite 280
280 Online Edition for Part no. 01 40 2 606 521 - 03 11 490
Everything from A to Z