turn signal BMW 650I CONVERTIBLE 2010 E64 Owner's Manual
[x] Cancel search | Manufacturer: BMW, Model Year: 2010, Model line: 650I CONVERTIBLE, Model: BMW 650I CONVERTIBLE 2010 E64Pages: 252, PDF Size: 8.4 MB
Page 12 of 252
Cockpit
10
Cockpit
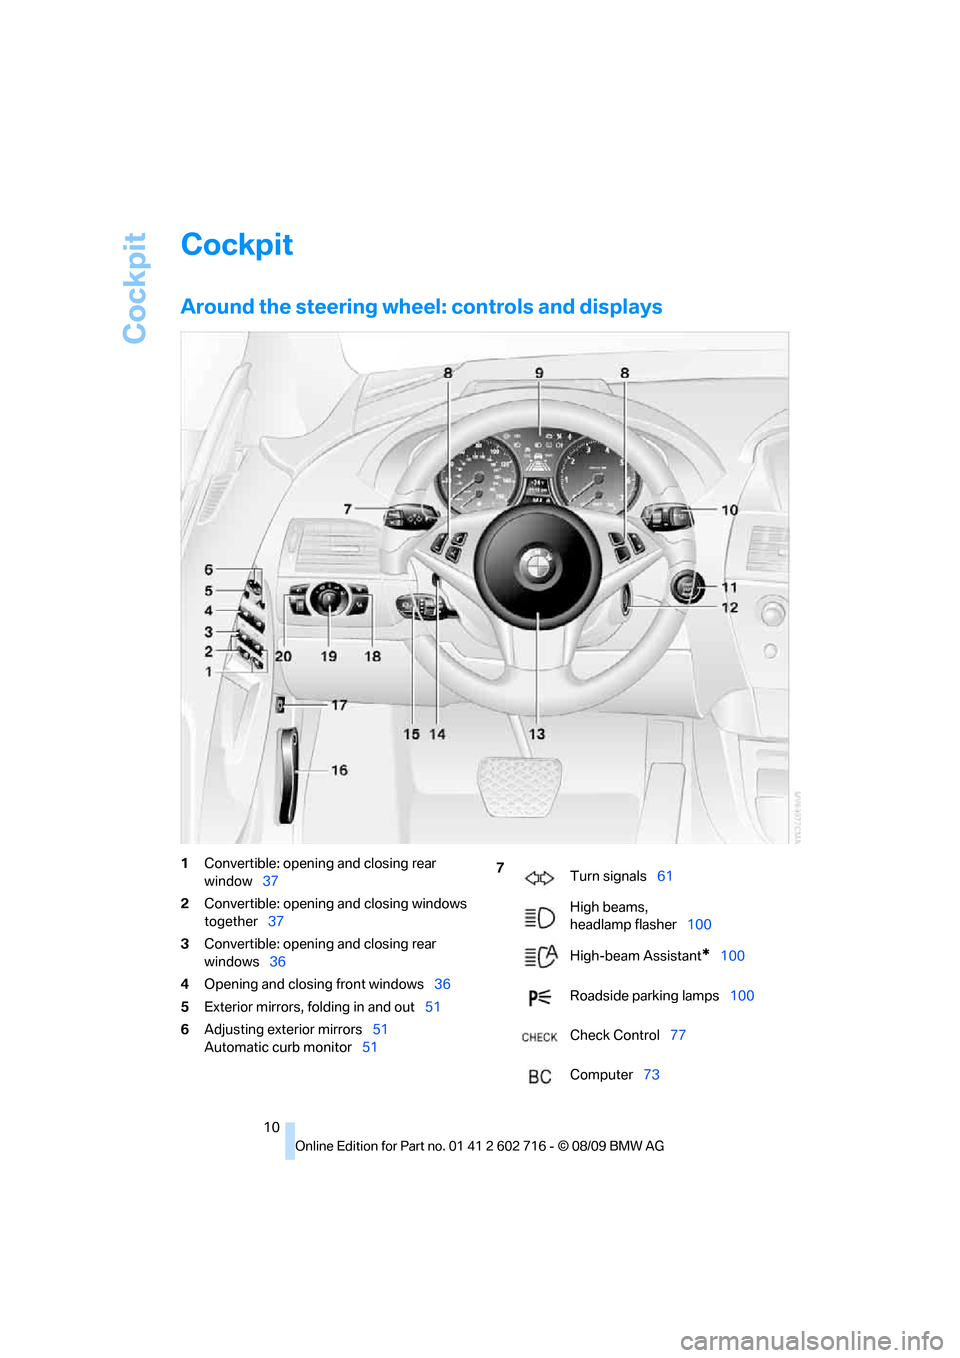
Around the steering wheel: controls and displays
1Convertible: opening and closing rear
window37
2Convertible: opening and closing windows
together37
3Convertible: opening and closing rear
windows36
4Opening and closing front windows36
5Exterior mirrors, folding in and out51
6Adjusting exterior mirrors51
Automatic curb monitor517
Turn signals61
High beams,
headlamp flasher100
High-beam Assistant
*100
Roadside parking lamps100
Check Control77
Computer73
Page 14 of 252
Cockpit
12
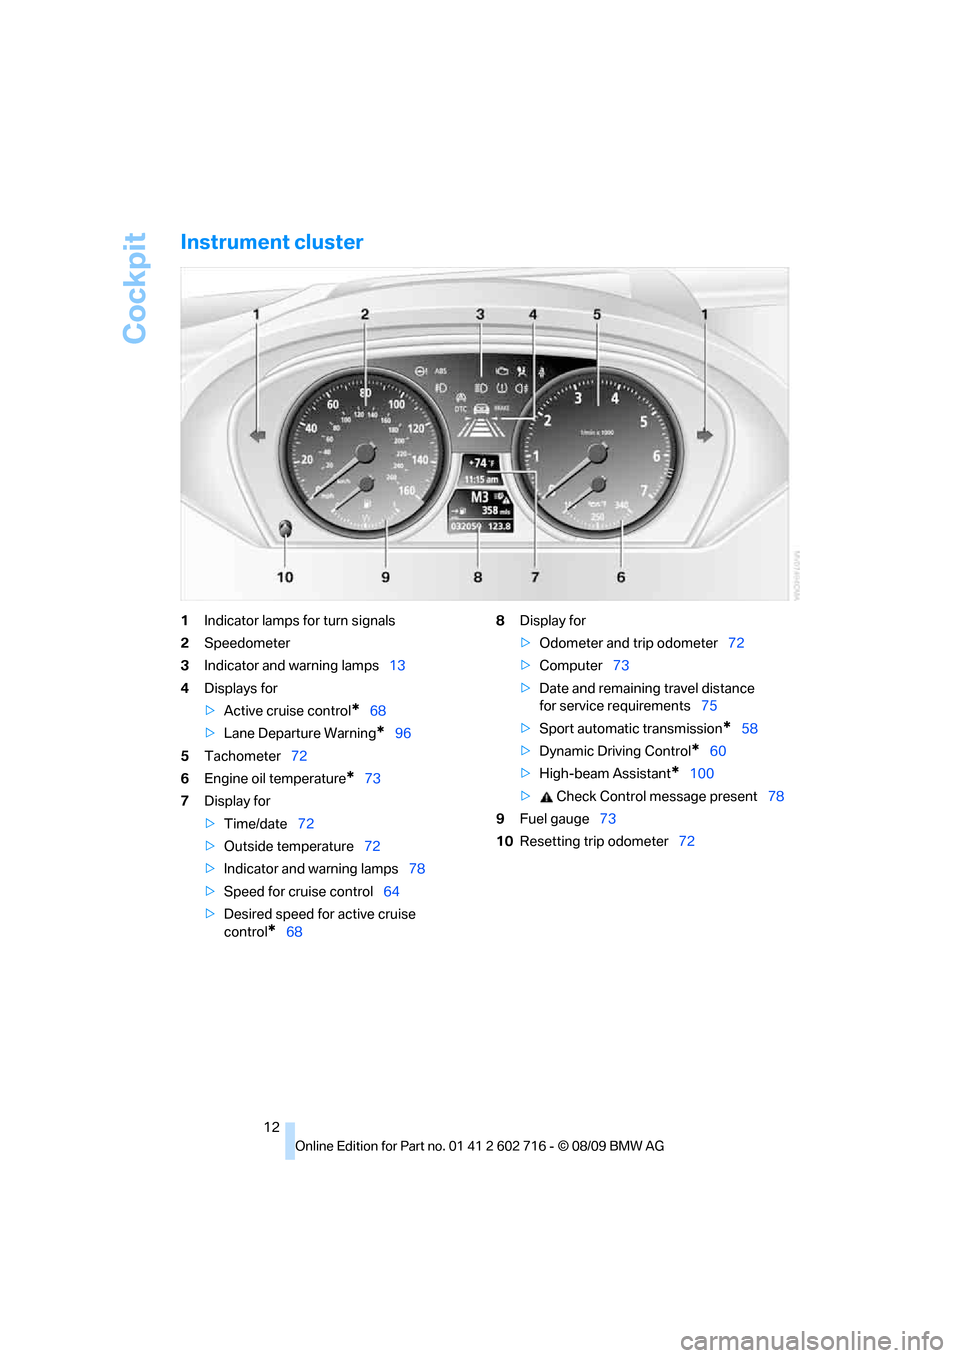
Instrument cluster
1Indicator lamps for turn signals
2Speedometer
3Indicator and warning lamps13
4Displays for
>Active cruise control
*68
>Lane Departure Warning
*96
5Tachometer72
6Engine oil temperature
*73
7Display for
>Time/date72
>Outside temperature72
>Indicator and warning lamps78
>Speed for cruise control64
>Desired speed for active cruise
control
*688Display for
>Odometer and trip odometer72
>Computer73
>Date and remaining travel distance
for service requirements75
>Sport automatic transmission
*58
>Dynamic Driving Control
*60
>High-beam Assistant
*100
> Check Control message present78
9Fuel gauge73
10Resetting trip odometer72
Page 29 of 252
Controls
27Reference
At a glance
Driving tips
Communications
Navigation
Entertainment
Mobility
the vehicle is unlocked, the corresponding
remote control is detected and the settings
stored for it are called up and carried out.
This means that you will always find your BMW
set to your own personal settings even if
another person with his/her own remote control
and settings has used the vehicle since the last
time you drove it. The individual settings are
stored for a maximum of four remote controls,
for two with Comfort Access
*.
Personal Profile settings
Details on the settings are provided on the
specified pages.
>Behavior of the central locking system
when unlocking vehicle, refer to page28
>Automatic locking of the vehicle, refer to
page30
>Displays on Control Display:
>12h/24h clock mode, refer to page77
>Date format, refer to page77
>Brightness of the Control Display, refer
to page81
>Units of measure for consumption,
route/distances, temperature and pres-
sure, refer to page74
>Language on the Control Display, refer
to page80
>Lighting settings:
>Triple turn signal activation, refer to
page62
>Welcome lamps, refer to page98
>Pathway lighting, refer to page99
>Daytime running lamps
*, refer to
page99
>High-beam Assistant
*, refer to
page100
>PDC Park Distance Control
*: optical warn-
ing, refer to page82
>Head-up Display
*: selection and brightness
of display, refer to page93
>BMW Night Vision
*: display settings, refer
to page96>Automatic climate control: for AUTO pro-
gram and intensity, cooling function, and
automatic recirculated air control/recircu-
lated air mode, temperature, air distribution,
temperature in the upper body region, refer
to page104
>Navigation system
*: voice instructions for
destination guidance, refer to page137
In addition, the following, most recently
selected settings are recalled during unlocking:
>Programmable memory buttons: selecting
stored functions, refer to page20
>Driver's seat, exterior-mirror and steering-
wheel position, refer to page47
>Audio sources: volume and tone settings,
refer to page146
>Radio: display of stored stations, refer to
page151
>Phone: adjusting volume, refer to page175
Central locking system
The concept
The central locking system functions when the
driver's door is closed.
The system simultaneously engages and
releases the locks on the following:
>Doors
>Compartment in the front center console
>Luggage compartment lid
>Fuel filler flap
Operating from outside
>Via the remote control
>Using door lock
>With Comfort Access
* via the door handles
These actions operate the anti-theft system
* at
the same time. It prevents the doors from being
unlocked using the lock buttons or door han-
dles. The interior lamps and the courtesy
lamps
* are also switched on and off with the
remote control. The alarm system
is armed/dis-
armed at the same time.
Page 31 of 252
Controls
29Reference
At a glance
Driving tips
Communications
Navigation
Entertainment
Mobility
The luggage compartment lid opens, regard-
less of whether it was previously locked or
unlocked.
A previously locked luggage compart-
ment lid is also locked again after closing.
Coupe: during opening, the luggage compart-
ment lid pivots back and up. Make sure that
adequate clearance is available before open-
ing.<
Confirmation signals
You can activate or deactivate the confirmation
signals.
iDrive, for operating principle refer to page16.
1."Settings"
2."Door locks"
3."Flash when lock/unlock"
4.Press the controller.
Flashing when locking/unlocking the vehi-
cle is switched on.
Malfunction
The remote control may malfunction due to
local radio waves. Should the remote control fail
to operate due to interference of this kind,
unlock and lock the vehicle via the door lock
using a key.
If it is no longer possible to lock the vehicle
using the remote control, then the battery is
discharged. Use this remote control during an
extended drive; this will recharge the battery,
refer to page26.
For US owners only
The transmitter and receiver units comply with
part 15 of the FCC/Federal Communication Commission regulations. Operation is gov-
erned by the following:
FCC ID:
LX8766S
LX8766E
LX8CAS
LX8CAS2
Compliance statement:
This device complies with part 15 of the FCC
Rules. Operation is subject to the following two
conditions:
>This device must not cause harmful inter-
ference, and
>this device must accept any interference
received, including interference that may
cause undesired operation.
Any unauthorized modifications or
changes to these devices could void the
user's authority to operate this equipment.<
Opening and closing:
Using door lock
Do not lock the vehicle from the outside if
persons are inside, as unlocking from the
inside is not possible without special knowl-
edge.<
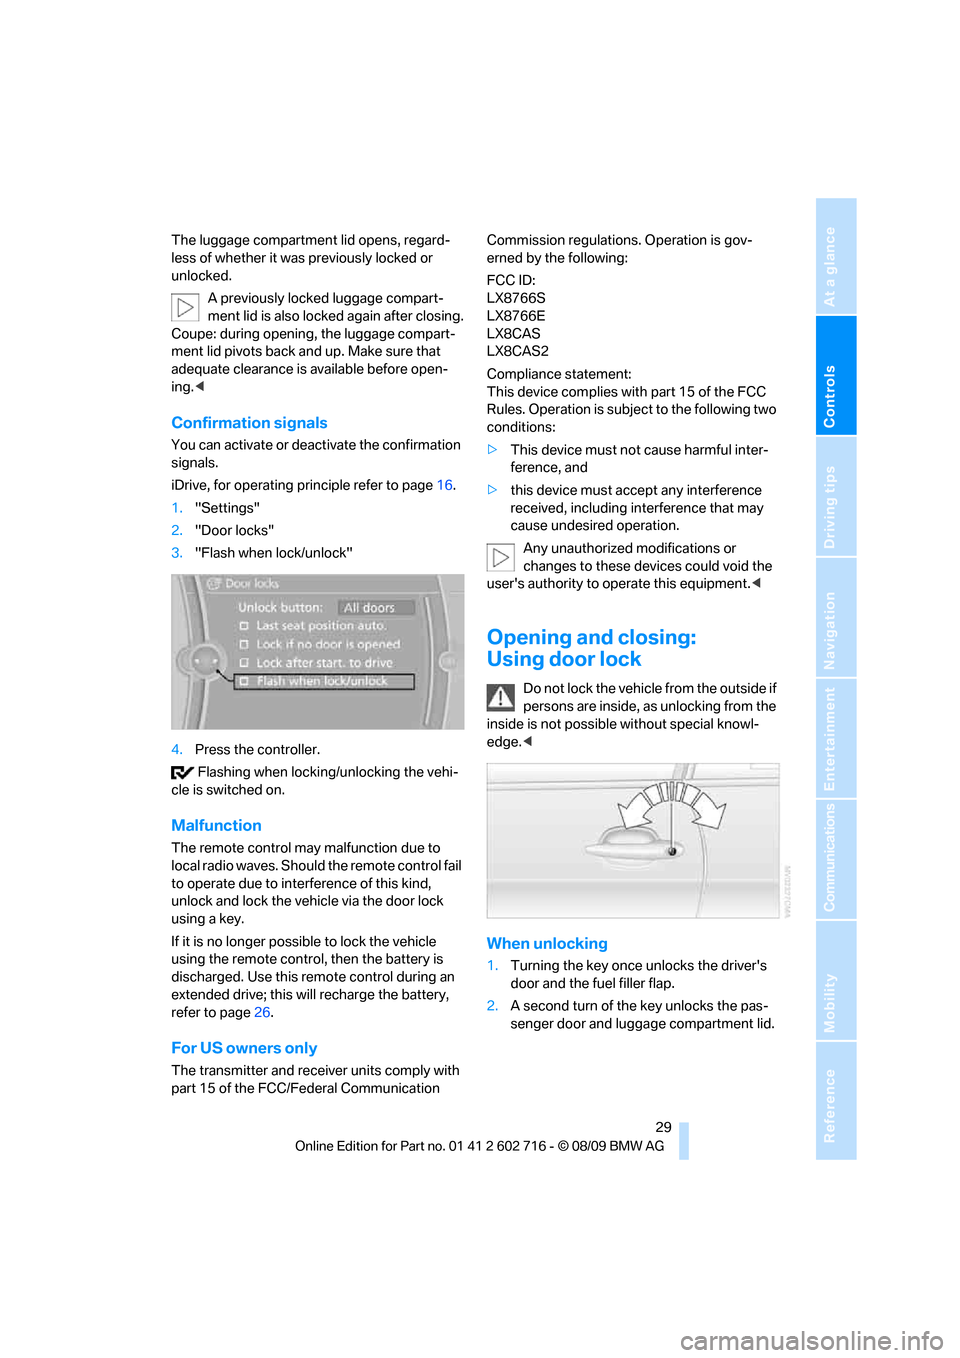
When unlocking
1.Turning the key once unlocks the driver's
door and the fuel filler flap.
2.A second turn of the key unlocks the pas-
senger door and luggage compartment lid.
Page 63 of 252
Controls
61Reference
At a glance
Driving tips
Communications
Navigation
Entertainment
Mobility
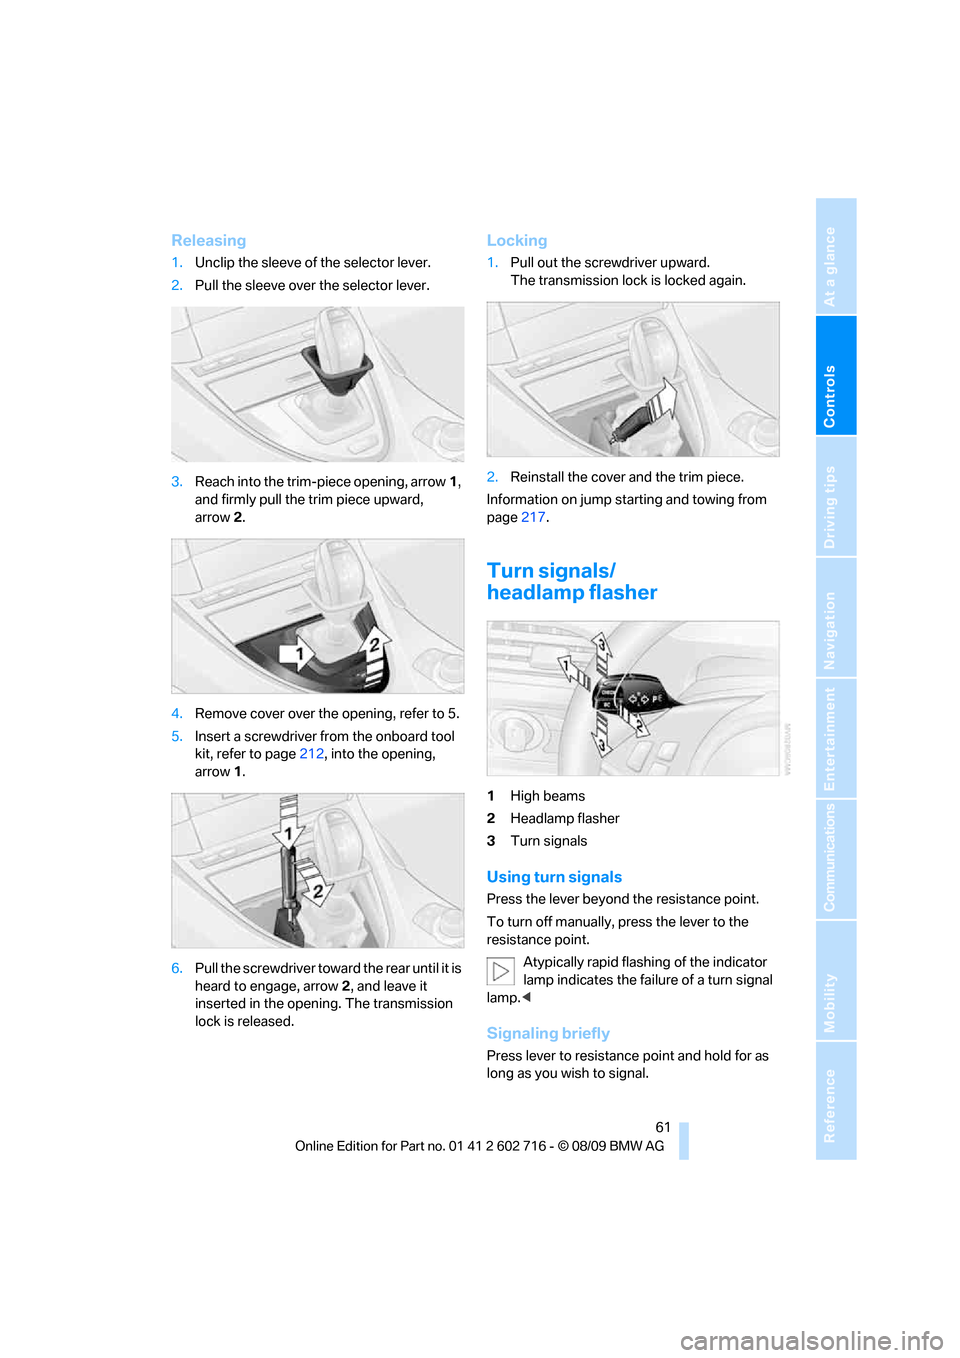
Releasing
1.Unclip the sleeve of the selector lever.
2.Pull the sleeve over the selector lever.
3.Reach into the trim-piece opening, arrow1,
and firmly pull the trim piece upward,
arrow2.
4.Remove cover over the opening, refer to 5.
5.Insert a screwdriver from the onboard tool
kit, refer to page212, into the opening,
arrow1.
6.Pull the screwdriver toward the rear until it is
heard to engage, arrow2, and leave it
inserted in the opening. The transmission
lock is released.
Locking
1.Pull out the screwdriver upward.
The transmission lock is locked again.
2.Reinstall the cover and the trim piece.
Information on jump starting and towing from
page217.
Turn signals/
headlamp flasher
1High beams
2Headlamp flasher
3Turn signals
Using turn signals
Press the lever beyond the resistance point.
To turn off manually, press the lever to the
resistance point.
Atypically rapid flashing of the indicator
lamp indicates the failure of a turn signal
lamp.<
Signaling briefly
Press lever to resistance point and hold for as
long as you wish to signal.
Page 64 of 252
Driving
62
Triple turn signal activation
Press the lever to the resistance point; the turn
signal flashes three times.
You can activate or deactivate this function.
iDrive, for operating principle refer to page16.
1."Settings"
2."Lighting"
3."Triple turn signal"
4. Triple turn signal activation is activated
and is stored for the remote control cur-
rently in use.
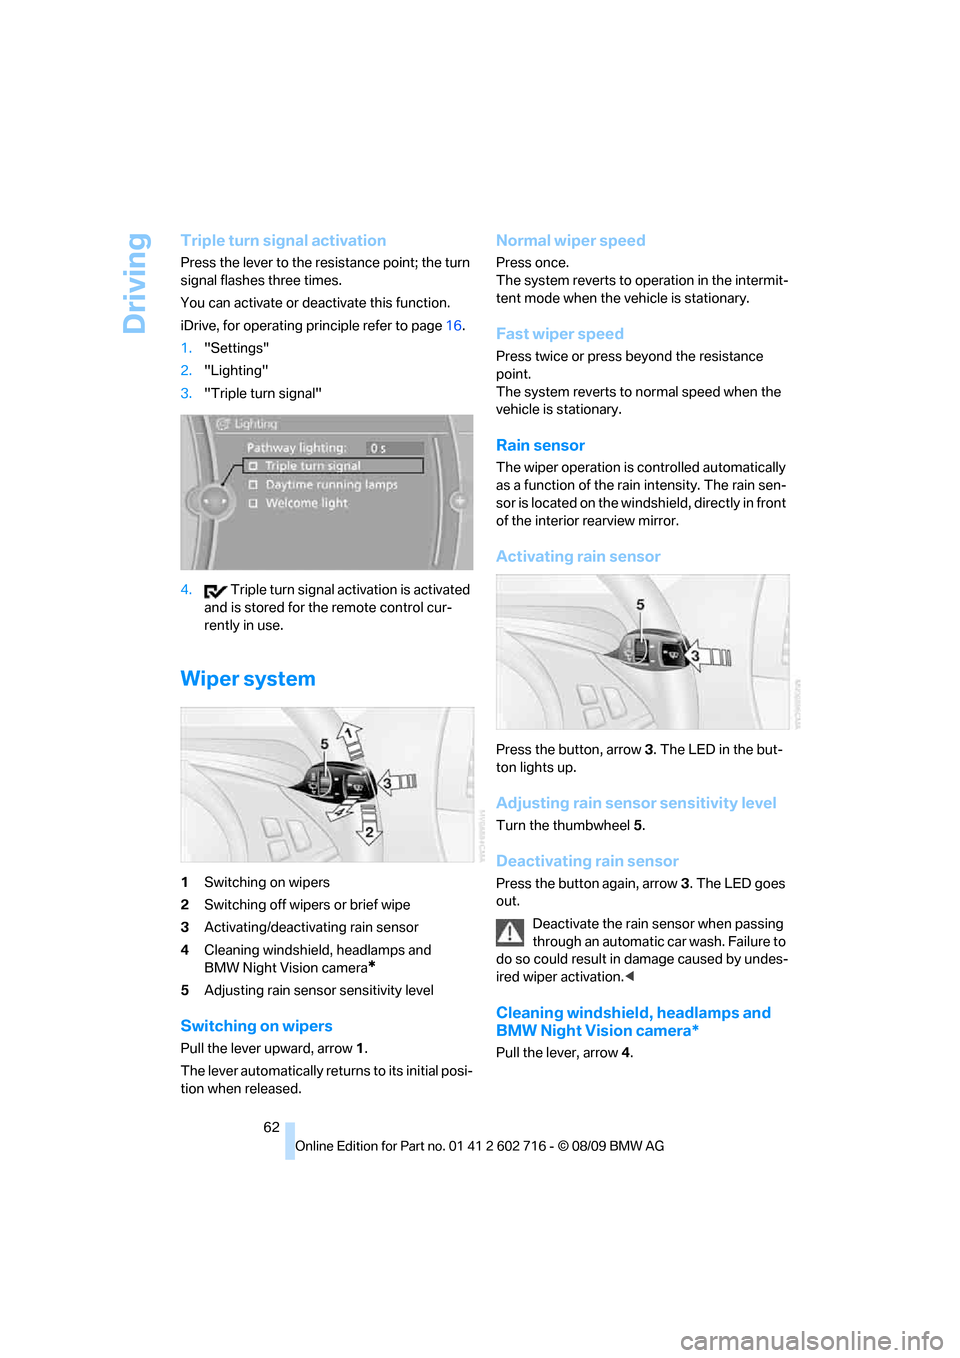
Wiper system
1Switching on wipers
2Switching off wipers or brief wipe
3Activating/deactivating rain sensor
4Cleaning windshield, headlamps and
BMW Night Vision camera
*
5Adjusting rain sensor sensitivity level
Switching on wipers
Pull the lever upward, arrow1.
The lever automatically returns to its initial posi-
tion when released.
Normal wiper speed
Press once.
The system reverts to operation in the intermit-
tent mode when the vehicle is stationary.
Fast wiper speed
Press twice or press beyond the resistance
point.
The system reverts to normal speed when the
vehicle is stationary.
Rain sensor
The wiper operation is controlled automatically
as a function of the rain intensity. The rain sen-
sor is located on the windshield, directly in front
of the interior rearview mirror.
Activating rain sensor
Press the button, arrow3. The LED in the but-
ton lights up.
Adjusting rain sensor sensitivity level
Turn the thumbwheel5.
Deactivating rain sensor
Press the button again, arrow3. The LED goes
out.
Deactivate the rain sensor when passing
through an automatic car wash. Failure to
do so could result in damage caused by undes-
ired wiper activation.<
Cleaning windshield, headlamps and
BMW Night Vision camera*
Pull the lever, arrow4.
Page 74 of 252
Controls Overview
72
Controls Overview
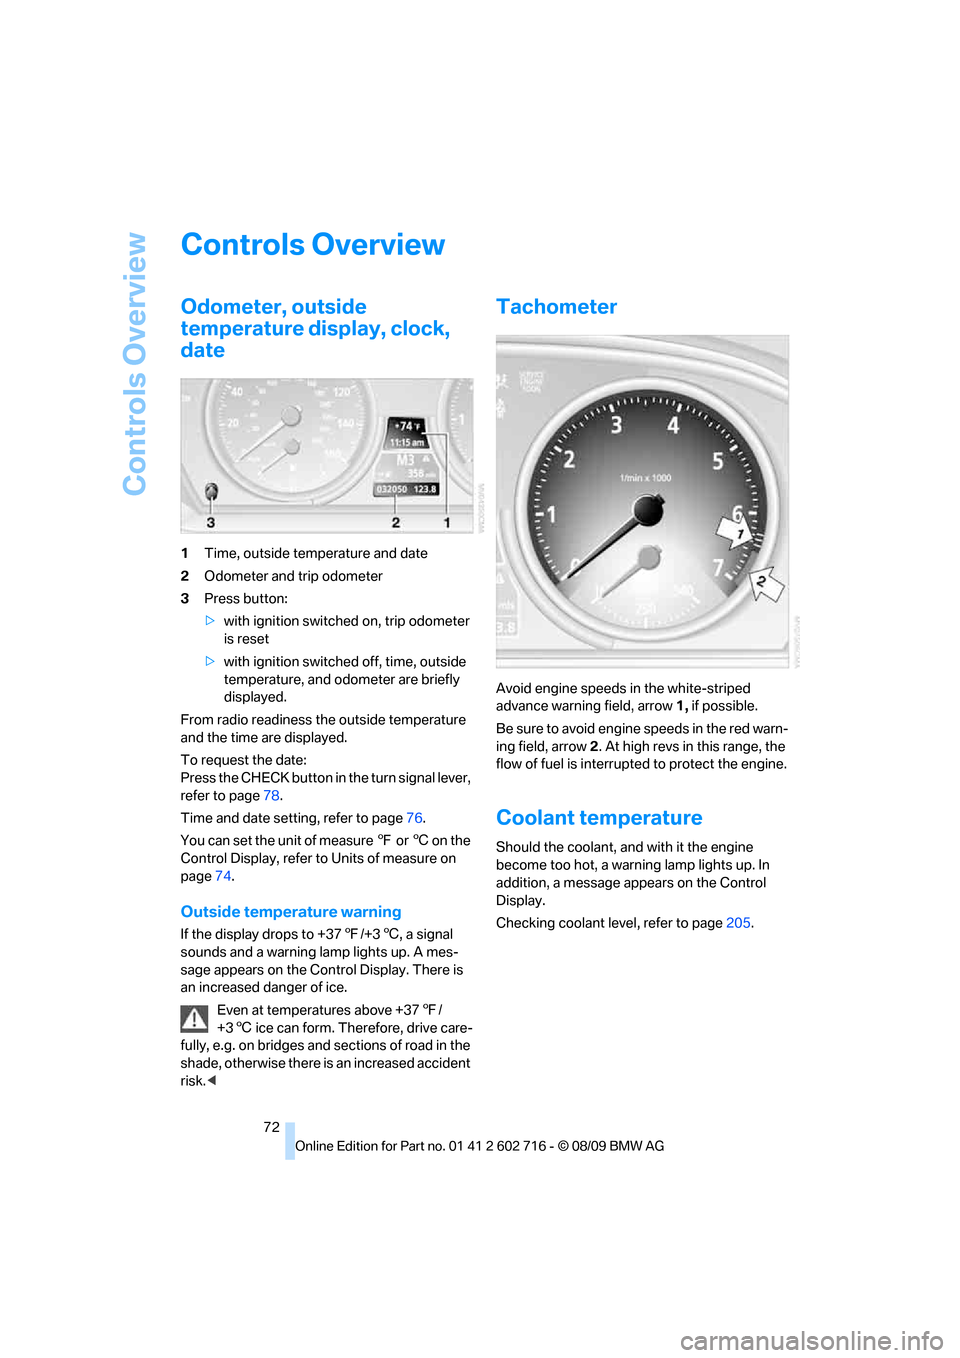
Odometer, outside
temperature display, clock,
date
1Time, outside temperature and date
2Odometer and trip odometer
3Press button:
>with ignition switched on, trip odometer
is reset
>with ignition switched off, time, outside
temperature, and odometer are briefly
displayed.
From radio readiness the outside temperature
and the time are displayed.
To request the date:
Press the CHECK button in the turn signal lever,
refer to page78.
Time and date setting, refer to page76.
You can set the unit of measure 7 or 6 on the
Control Display, refer to Units of measure on
page74.
Outside temperature warning
If the display drops to +377/+36, a signal
sounds and a warning lamp lights up. A mes-
sage appears on the Control Display. There is
an increased danger of ice.
Even at temperatures above +377/
+36 ice can form. Therefore, drive care-
fully, e.g. on bridges and sections of road in the
shade, otherwise there is an increased accident
risk.<
Tachometer
Avoid engine speeds in the white-striped
advance warning field, arrow1, if possible.
Be sure to avoid engine speeds in the red warn-
ing field, arrow2. At high revs in this range, the
flow of fuel is interrupted to protect the engine.
Coolant temperature
Should the coolant, and with it the engine
become too hot, a warning lamp lights up. In
addition, a message appears on the Control
Display.
Checking coolant level, refer to page205.
Page 75 of 252
Controls
73Reference
At a glance
Driving tips
Communications
Navigation
Entertainment
Mobility
Engine oil temperature*
The general operating temperature is between
1607/706 and approx. 3407/1706.
If the engine oil temperature is too high, a mes-
sage appears in the Control Display.
Fuel gauge
Fuel tank capacity: approx. 18.5 US gal/
70 liters, including the reserve capacity of
approx. 2.6 US gal/10 liters. You will find infor-
mation on refueling on page194.
If the tilt of the vehicle varies for a longer period,
when you are driving in mountainous areas, for
example, the indicator may fluctuate slightly.
Reserve
After the reserve quantity has been reached, a
message briefly appears on the Control Display;
the remaining range is shown in the computer.
Below a range of approx. 30 miles/50 km, the
message remains on the Control Display.
Refuel as soon as possible once your
cruising range falls below 30 miles/
50 km, otherwise engine functions are not
ensured and damage can occur.<
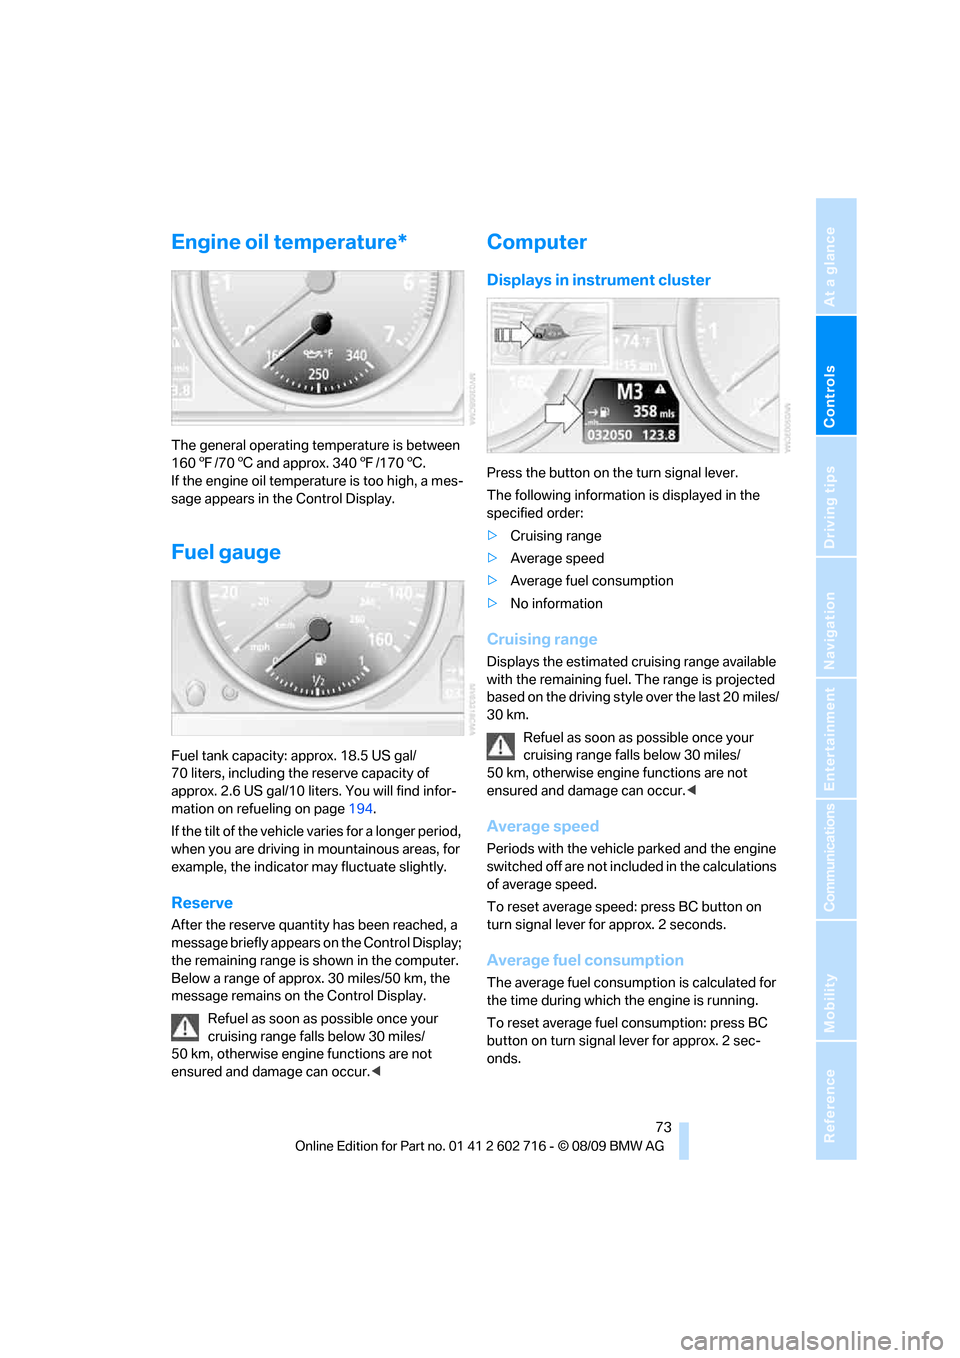
Computer
Displays in instrument cluster
Press the button on the turn signal lever.
The following information is displayed in the
specified order:
>Cruising range
>Average speed
>Average fuel consumption
>No information
Cruising range
Displays the estimated cruising range available
with the remaining fuel. The range is projected
based on the driving style over the last 20 miles/
30 km.
Refuel as soon as possible once your
cruising range falls below 30 miles/
50 km, otherwise engine functions are not
ensured and damage can occur.<
Average speed
Periods with the vehicle parked and the engine
switched off are not included in the calculations
of average speed.
To reset average speed: press BC button on
turn signal lever for approx. 2 seconds.
Average fuel consumption
The average fuel consumption is calculated for
the time during which the engine is running.
To reset average fuel consumption: press BC
button on turn signal lever for approx. 2 sec-
onds.
Page 80 of 252

Controls Overview
78 and warning lamps in the instrument cluster,
and if necessary an acoustic signal and text
messages at the bottom of the Control Display.
Indicator and warning lamps
The indicator and warning lamps can light up in
different combinations and colors.
This symbol means that a Check Control
message has been generated. The symbol con-
tinues to be visible even when the Check Con-
trol message disappears after a short time. The
warning lamps and text messages are stored
and can be displayed later, also refer to
page79.
Explanatory text messages
For most Check Control messages, you can
view more information later, e.g. regarding the cause of a malfunction and how to respond;
refer to the information provided below.
In urgent cases, this information will be shown
as soon as the corresponding lamp lights up.
Exit the displayed information:
Move the controller to the left.
Hiding Check Control messages
Press the CHECK button in the turn signal lever.
Some Check Control messages are displayed
until the malfunctions have been rectified. They
cannot be hidden. If a number of malfunctions
occur simultaneously, they are displayed in
succession.
Other messages are hidden after approx.
20 seconds, but remain stored.
Page 91 of 252
Controls
89Reference
At a glance
Driving tips
Communications
Navigation
Entertainment
Mobility
>In case of a malfunction;
have the system checked.
>If a wheel is mounted without TPM elec-
tronics.
>If TPM is temporarily interfered with by
other systems or devices which use the
same radio frequency.
Declaration according to NHTSA/
FMVSS 138 Tire Pressure Monitoring
Systems
Each tire should be checked monthly when cold
and inflated to the inflation pressure recom-
mended by the vehicle manufacturer on the
vehicle placard or tire inflation pressure label. If
your vehicle has tires of a different size than the
size indicated on the vehicle placard or tire infla-
tion pressure label, you should determine the
proper tire inflation pressure for those tires. As
an added safety feature, your vehicle has been
equipped with a tire pressure monitoring sys-
tem, TPMS, that illuminates a low tire pressure
telltale when one or more of your tires are signif-
icantly underinflated. Accordingly, when the
low tire pressure telltale illuminates, you should
stop and check your tires as soon as possible,
and inflate them to the proper pressure. Driving
on a significantly underinflated tire causes the
tire to overheat and can lead to tire failure.
Underinflation also reduces fuel efficiency and
tire tread life, and may affect the vehicle's han-
dling and stopping ability. Please note that the
TPMS is not a substitute for proper tire mainte-
nance, and it is the driver's responsibility to
maintain correct tire pressure, even if underin-
flation has not reached the level to trigger illumi-
nation of the TPMS low tire pressure telltale.
The TPMS malfunction indicator is combined
with the low tire pressure telltale. When the sys-
tem detects a malfunction, the telltale will flash
for approximately one minute and then remain
continuously illuminated. This sequence will
continue upon subsequent vehicle startups as
long as the malfunction exists. When the mal-
function indicator lights up, the system may not
be able to detect or signal low tire pressure as
intended. TPMS malfunctions may occur for a
variety of reasons, including the installation of replacement or alternate tires or wheels on the
vehicle that prevent the TPMS from functioning
properly. Always check the TPMS malfunction
telltale after replacing one or more tires or
wheels on your vehicle to ensure that the
replacement or alternate tires and wheels allow
the TPMS to continue to function properly.
Active steering*
The concept
Active steering varies the turning angle of the
front wheels in relation to steering wheel move-
ments. It also varies the steering force required
to turn the wheels depending on the speed at
which you are driving.
When you are driving in the low speed range,
e. g. in a town or when parking, the steering
angle increases, i.e. the steering becomes very
direct. In the higher speed range, on the other
hand, the steering angle is reduced more and
more. This improves the handling capability of
your BMW over the entire speed range.
In critical situations, the system can make tar-
geted corrections to the steering angle pro-
vided by the driver and thus stabilize the vehicle
before the driver intervenes. This stability-pro-
moting intervention is deactivated when DSC is
switched off, refer to page83.
Malfunction
The warning lamp lights up yellow and
a message is shown on the Control Dis-
play. Active steering is malfunctioning
or is temporarily deactivated. At low speed,
larger steering wheel movements are required,
while the vehicle reacts more sensitively to
steering wheel movements in the higher road
speed range. The stability-promoting interven-
tion can also be deactivated. Proceed cau-
tiously and drive defensively.
Deactivation
Active steering is deactivated to perform an ini-
tialization. A message indicates that the feature