turn BMW 650I CONVERTIBLE 2013 Owners Manual
[x] Cancel search | Manufacturer: BMW, Model Year: 2013, Model line: 650I CONVERTIBLE, Model: BMW 650I CONVERTIBLE 2013Pages: 240, PDF Size: 9.64 MB
Page 13 of 240
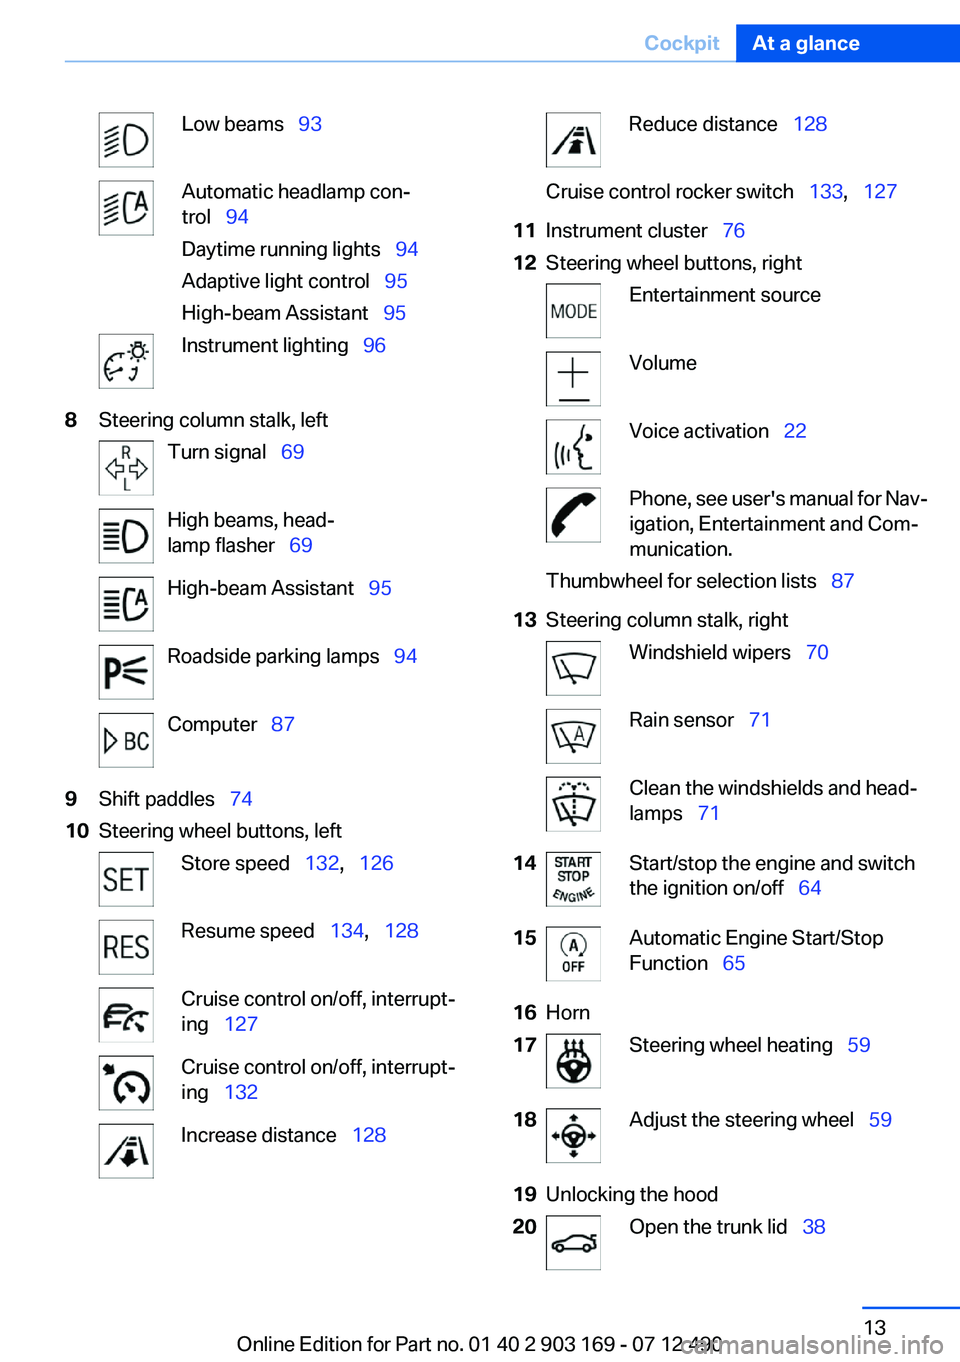
Low beams 93Automatic headlamp con‐
trol 94
Daytime running lights 94
Adaptive light control 95
High-beam Assistant 95Instrument lighting 968Steering column stalk, leftTurn signal 69High beams, head‐
lamp flasher 69High-beam Assistant 95Roadside parking lamps 94Computer 879Shift paddles 7410Steering wheel buttons, leftStore speed 132, 126Resume speed 134, 128Cruise control on/off, interrupt‐
ing 127Cruise control on/off, interrupt‐
ing 132Increase distance 128Reduce distance 128Cruise control rocker switch 133, 12711Instrument cluster 7612Steering wheel buttons, rightEntertainment sourceVolumeVoice activation 22Phone, see user's manual for Nav‐
igation, Entertainment and Com‐
munication.Thumbwheel for selection lists 8713Steering column stalk, rightWindshield wipers 70Rain sensor 71Clean the windshields and head‐
lamps 7114Start/stop the engine and switch
the ignition on/off 6415Automatic Engine Start/Stop
Function 6516Horn17Steering wheel heating 5918Adjust the steering wheel 5919Unlocking the hood20Open the trunk lid 38Seite 13CockpitAt a glance13
Online Edition for Part no. 01 40 2 903 169 - 07 12 490
Page 16 of 240
iDriveVehicle equipment
All standard, country-specific and optional
equipment that is offered in the model series is
described in this chapter. Therefore, equipment
is also described that is not available in a vehicle,
e. g., because of the selected optional equip‐
ment or country variant. This also applies for
safety-related functions and systems.
The concept
The iDrive combines the functions of a multitude
of switches. Thus, these functions can be oper‐
ated from a central location.
Using the iDrive during a trip
To avoid becoming distracted and posing
an unnecessary hazard to your vehicle's occu‐
pants and to other road users, never attempt to
use the controls or enter information unless traf‐
fic and road conditions allow this.◀
Controls at a glance
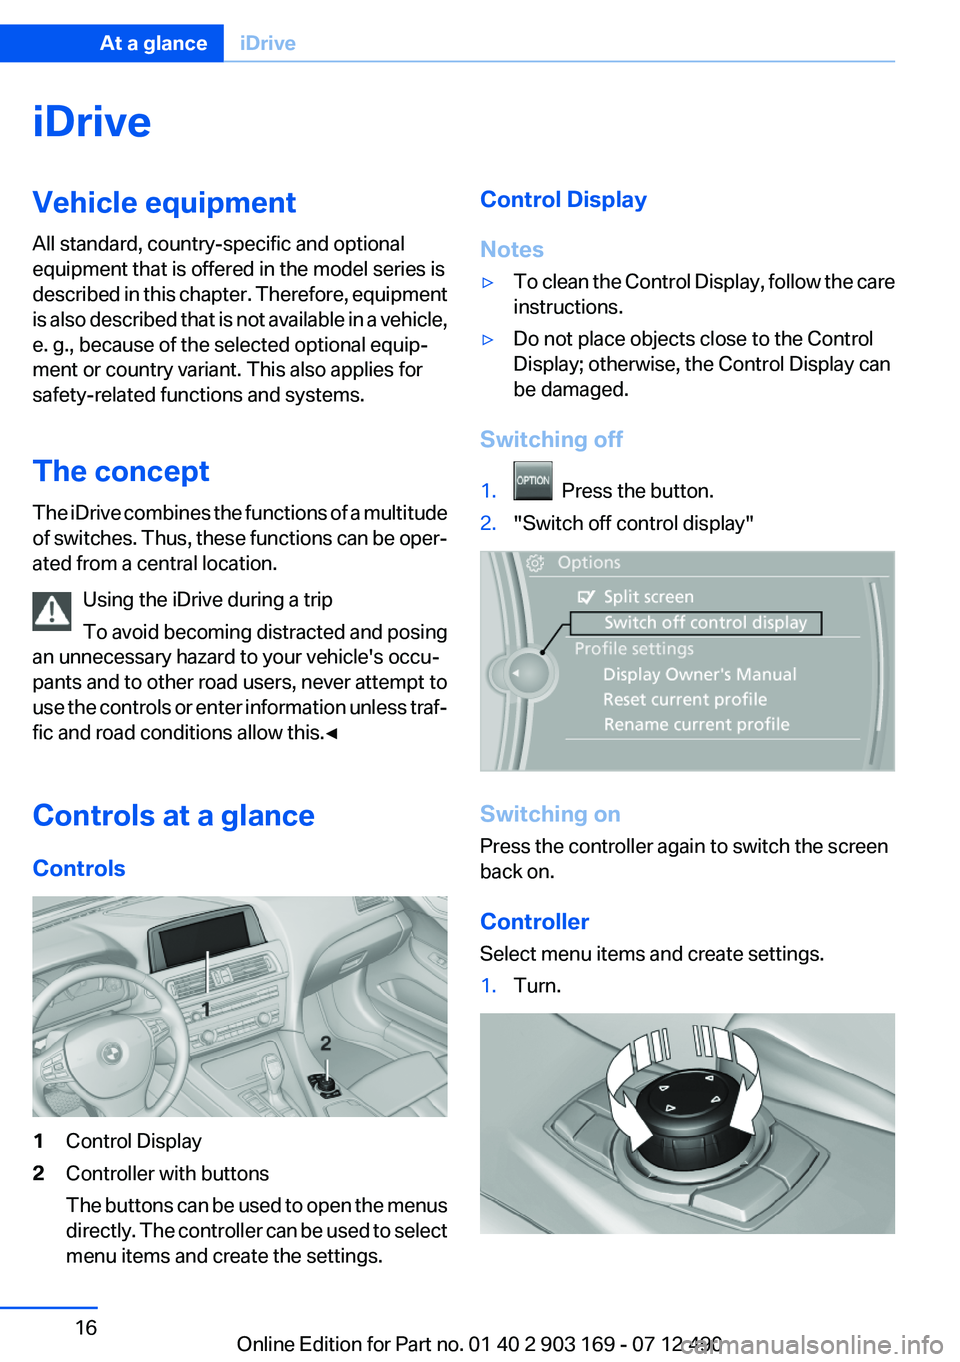
Controls1Control Display2Controller with buttons
The buttons can be used to open the menus
directly. The controller can be used to select
menu items and create the settings.Control Display
Notes▷To clean the Control Display, follow the care
instructions.▷Do not place objects close to the Control
Display; otherwise, the Control Display can
be damaged.
Switching off
1. Press the button.2."Switch off control display"
Switching on
Press the controller again to switch the screen
back on.
Controller
Select menu items and create settings.
1.Turn.Seite 16At a glanceiDrive16
Online Edition for Part no. 01 40 2 903 169 - 07 12 490
Page 17 of 240
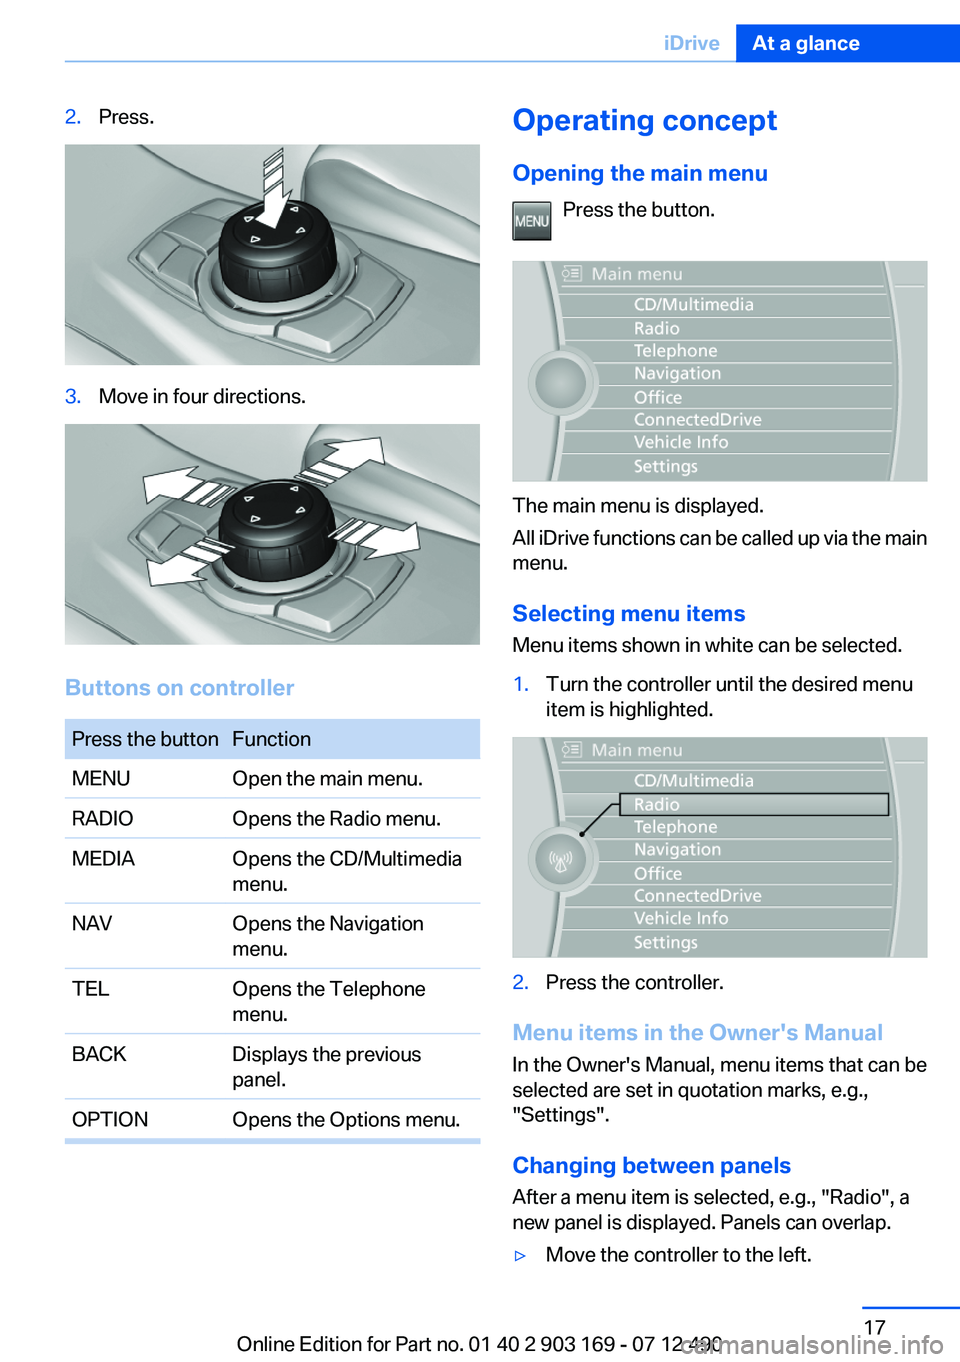
2.Press.3.Move in four directions.
Buttons on controller
Press the buttonFunctionMENUOpen the main menu.RADIOOpens the Radio menu.MEDIAOpens the CD/Multimedia
menu.NAVOpens the Navigation
menu.TELOpens the Telephone
menu.BACKDisplays the previous
panel.OPTIONOpens the Options menu.Operating concept
Opening the main menu Press the button.
The main menu is displayed.
All iDrive functions can be called up via the main
menu.
Selecting menu items
Menu items shown in white can be selected.
1.Turn the controller until the desired menu
item is highlighted.2.Press the controller.
Menu items in the Owner's Manual
In the Owner's Manual, menu items that can be
selected are set in quotation marks, e.g.,
"Settings".
Changing between panels
After a menu item is selected, e.g., "Radio", a
new panel is displayed. Panels can overlap.
▷Move the controller to the left.Seite 17iDriveAt a glance17
Online Edition for Part no. 01 40 2 903 169 - 07 12 490
Page 18 of 240
The current panel is closed and the previous
panel is displayed.
The previous panel is opened again by
pressing the BACK button. In this case, the
current panel is not closed.▷Move the controller to the right.
A new panel is opened on top of the previous
display.
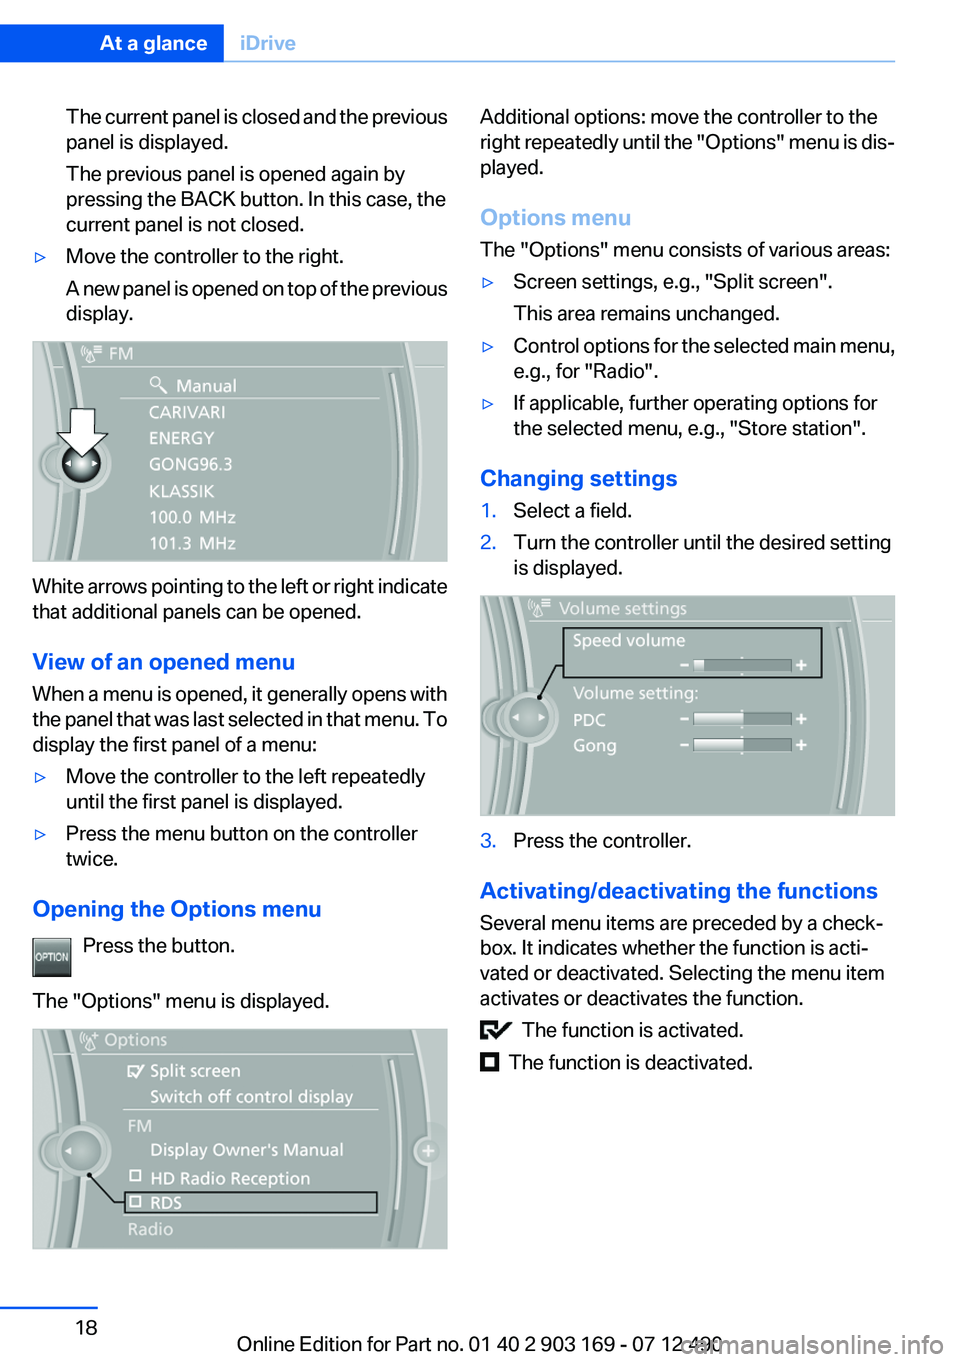
White arrows pointing to the left or right indicate
that additional panels can be opened.
View of an opened menu
When a menu is opened, it generally opens with
the panel that was last selected in that menu. To
display the first panel of a menu:
▷Move the controller to the left repeatedly
until the first panel is displayed.▷Press the menu button on the controller
twice.
Opening the Options menu
Press the button.
The "Options" menu is displayed.
Additional options: move the controller to the
right repeatedly until the "Options" menu is dis‐
played.
Options menu
The "Options" menu consists of various areas:▷Screen settings, e.g., "Split screen".
This area remains unchanged.▷Control options for the selected main menu,
e.g., for "Radio".▷If applicable, further operating options for
the selected menu, e.g., "Store station".
Changing settings
1.Select a field.2.Turn the controller until the desired setting
is displayed.3.Press the controller.
Activating/deactivating the functions
Several menu items are preceded by a check‐
box. It indicates whether the function is acti‐
vated or deactivated. Selecting the menu item
activates or deactivates the function.
The function is activated.
The function is deactivated.
Seite 18At a glanceiDrive18
Online Edition for Part no. 01 40 2 903 169 - 07 12 490
Page 19 of 240
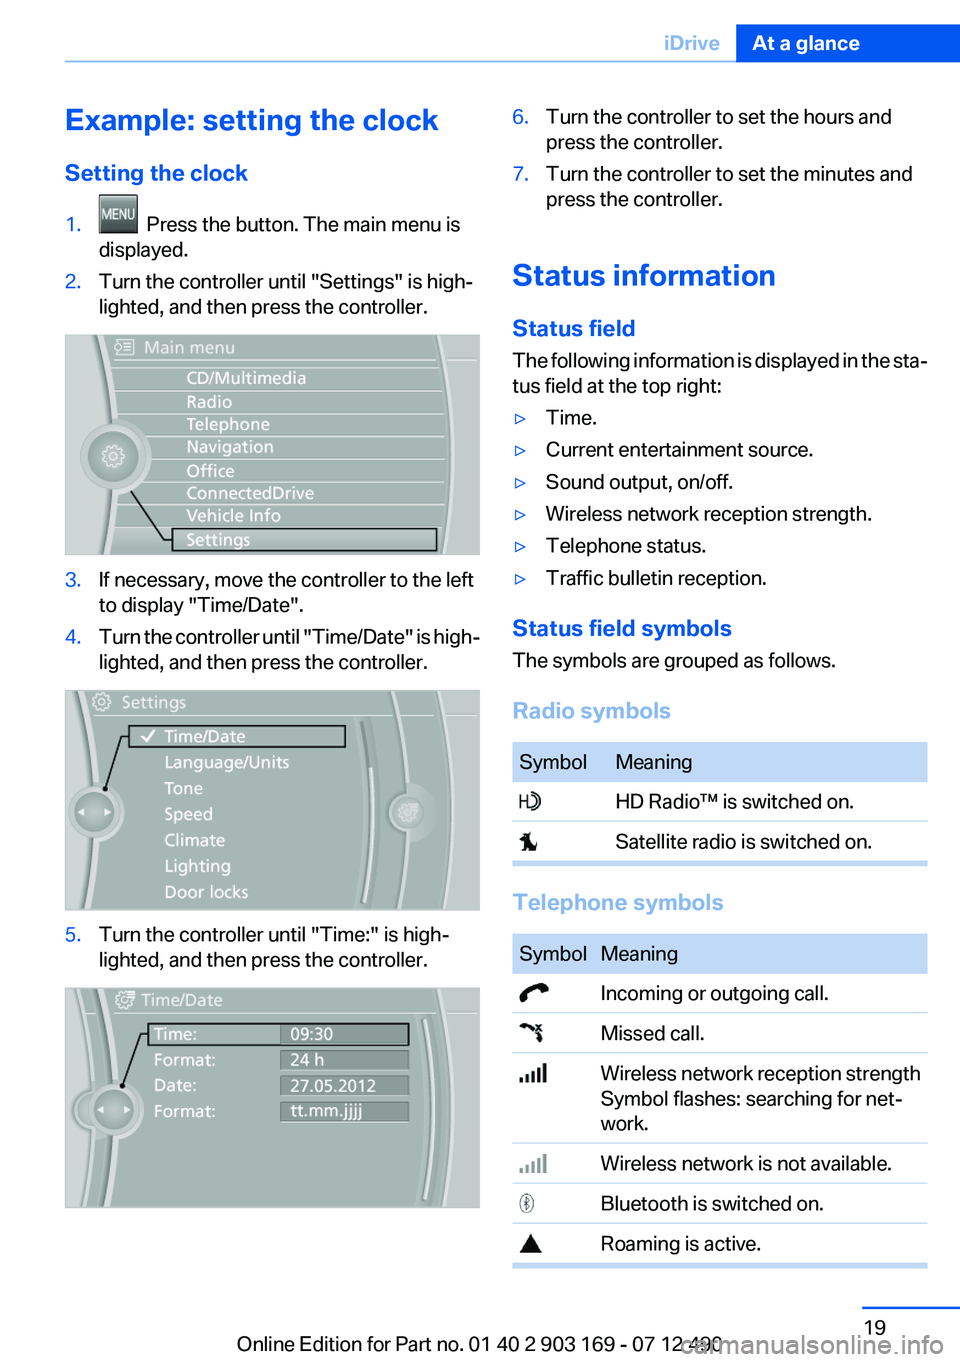
Example: setting the clock
Setting the clock1. Press the button. The main menu is
displayed.2.Turn the controller until "Settings" is high‐
lighted, and then press the controller.3.If necessary, move the controller to the left
to display "Time/Date".4.Turn the controller until "Time/Date" is high‐
lighted, and then press the controller.5.Turn the controller until "Time:" is high‐
lighted, and then press the controller.6.Turn the controller to set the hours and
press the controller.7.Turn the controller to set the minutes and
press the controller.
Status information
Status field
The following information is displayed in the sta‐
tus field at the top right:
▷Time.▷Current entertainment source.▷Sound output, on/off.▷Wireless network reception strength.▷Telephone status.▷Traffic bulletin reception.
Status field symbols
The symbols are grouped as follows.
Radio symbols
SymbolMeaning HD Radio™ is switched on. Satellite radio is switched on.
Telephone symbols
SymbolMeaning Incoming or outgoing call. Missed call. Wireless network reception strength
Symbol flashes: searching for net‐
work. Wireless network is not available. Bluetooth is switched on. Roaming is active.Seite 19iDriveAt a glance19
Online Edition for Part no. 01 40 2 903 169 - 07 12 490
Page 21 of 240
The function will run immediately. This means,
for example, that the number is dialed when a
phone number is selected.
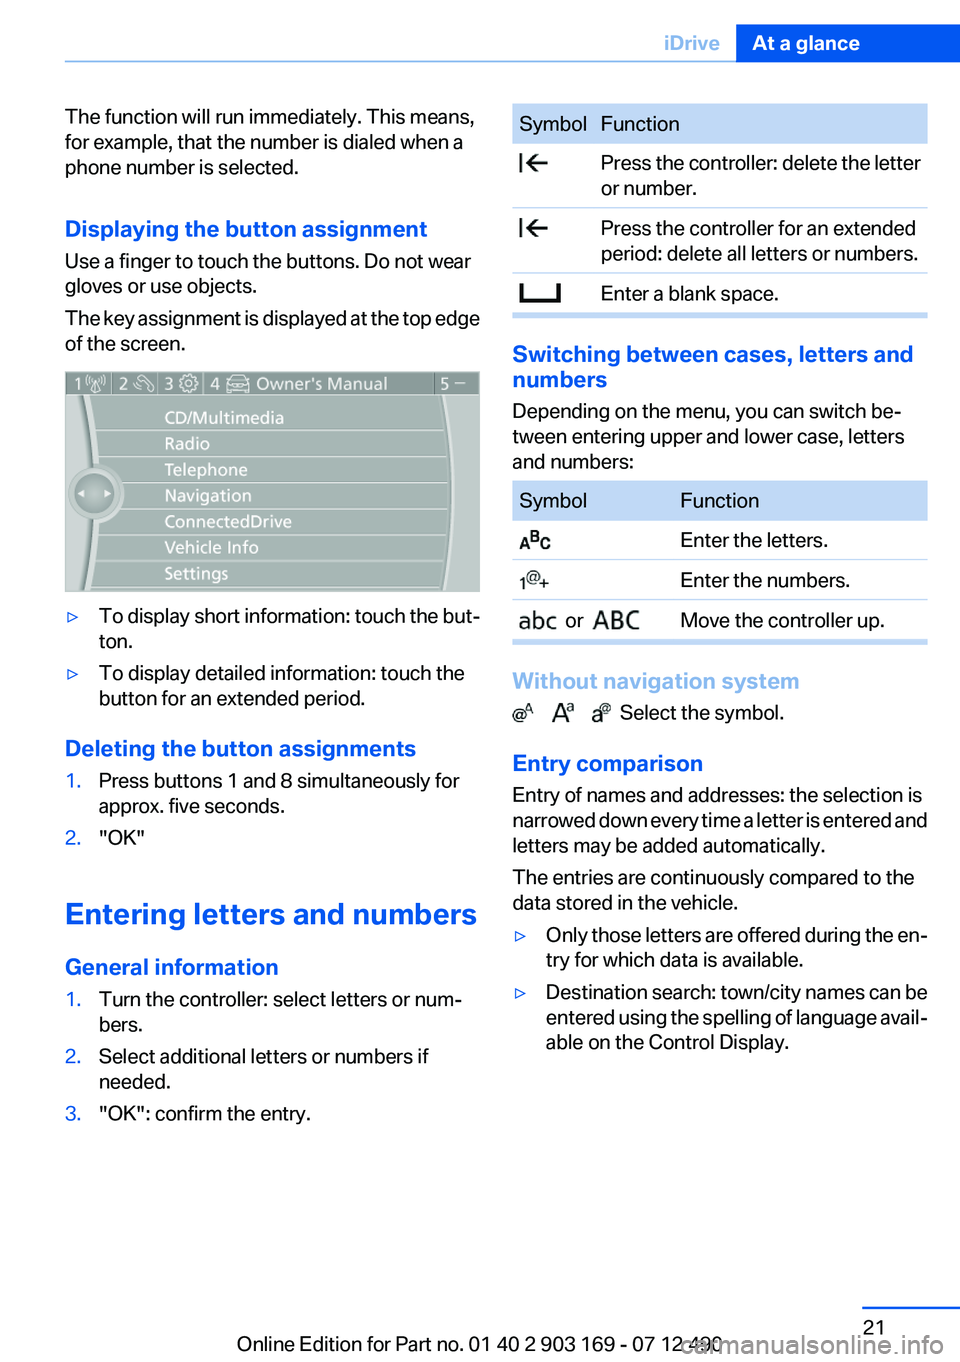
Displaying the button assignment
Use a finger to touch the buttons. Do not wear
gloves or use objects.
The key assignment is displayed at the top edge
of the screen.▷To display short information: touch the but‐
ton.▷To display detailed information: touch the
button for an extended period.
Deleting the button assignments
1.Press buttons 1 and 8 simultaneously for
approx. five seconds.2."OK"
Entering letters and numbers
General information
1.Turn the controller: select letters or num‐
bers.2.Select additional letters or numbers if
needed.3."OK": confirm the entry.SymbolFunction Press the controller: delete the letter
or number. Press the controller for an extended
period: delete all letters or numbers. Enter a blank space.
Switching between cases, letters and
numbers
Depending on the menu, you can switch be‐
tween entering upper and lower case, letters
and numbers:
SymbolFunction Enter the letters. Enter the numbers. or Move the controller up.
Without navigation system
Select the symbol.
Entry comparison
Entry of names and addresses: the selection is
narrowed down every time a letter is entered and
letters may be added automatically.
The entries are continuously compared to the
data stored in the vehicle.
▷Only those letters are offered during the en‐
try for which data is available.▷Destination search: town/city names can be
entered using the spelling of language avail‐
able on the Control Display.Seite 21iDriveAt a glance21
Online Edition for Part no. 01 40 2 903 169 - 07 12 490
Page 23 of 240
respective of which menu item is currently se‐
lected, e.g., ›Vehicle status‹.
List of short commands of the voice activation
system, refer to page 221.
Help dialog for the voice activation
system
Calling up help dialog: ›Help‹
Additional commands for the help dialog:▷›Help with examples‹: information about the
current operating options and the most im‐
portant commands for them are announced.▷›Help with voice activation‹: information
about the principle of operation for the voice
activation system is announced.
Example: playing back a CD
1.Switch on the Entertainment sound output
if necessary.2. Press the button on the steering
wheel.3.›C D and multimedia‹
The medium last played is played back.4.›C D track ...‹ e.g., CD track 4.
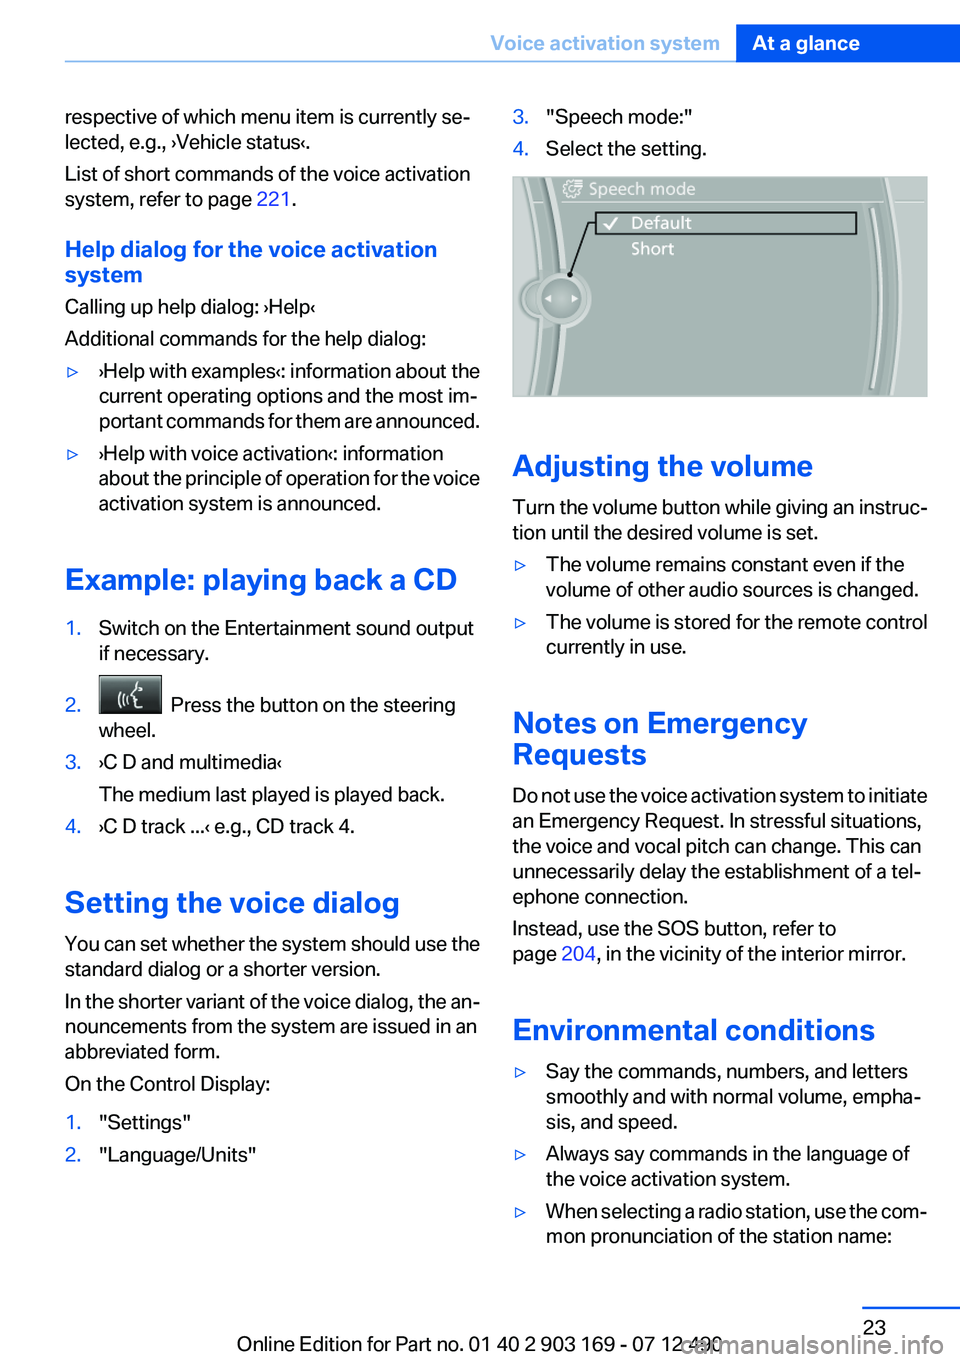
Setting the voice dialog
You can set whether the system should use the
standard dialog or a shorter version.
In the shorter variant of the voice dialog, the an‐
nouncements from the system are issued in an
abbreviated form.
On the Control Display:
1."Settings"2."Language/Units"3."Speech mode:"4.Select the setting.
Adjusting the volume
Turn the volume button while giving an instruc‐
tion until the desired volume is set.
▷The volume remains constant even if the
volume of other audio sources is changed.▷The volume is stored for the remote control
currently in use.
Notes on Emergency
Requests
Do not use the voice activation system to initiate
an Emergency Request. In stressful situations,
the voice and vocal pitch can change. This can
unnecessarily delay the establishment of a tel‐
ephone connection.
Instead, use the SOS button, refer to
page 204, in the vicinity of the interior mirror.
Environmental conditions
▷Say the commands, numbers, and letters
smoothly and with normal volume, empha‐
sis, and speed.▷Always say commands in the language of
the voice activation system.▷When selecting a radio station, use the com‐
mon pronunciation of the station name:Seite 23Voice activation systemAt a glance23
Online Edition for Part no. 01 40 2 903 169 - 07 12 490
Page 25 of 240
Integrated Owner's Manual in the vehicleVehicle equipment
All standard, country-specific and optional
equipment that is offered in the model series is
described in this chapter. Therefore, equipment
is also described that is not available in a vehicle,
e. g., because of the selected optional equip‐
ment or country variant. This also applies for
safety-related functions and systems.
Integrated Owner's Manual in
the vehicle
The integrated Owner's Manual can be dis‐
played on the Control Display. The equipment
and functions that are in the vehicle are descri‐
bed therein.
Components of the integrated Owner's
Manual
The integrated Owner's Manual consists of
three parts, which offer various levels of infor‐
mation or access possibilities.
Quick Reference Guide
Located in the Quick Reference is important in‐
formation for the operation of the vehicle, the
operation of basic vehicle functions or for what
to do in the event of a flat tire. This information
can also be displayed during driving.
Search by pictures
Information and descriptions based on illustra‐
tions can be searched via search by pictures.
This is helpful, for example, if the description of
an outfitting package that cannot be named is
needed.
Owner's Manual
Information and descriptions can be searched
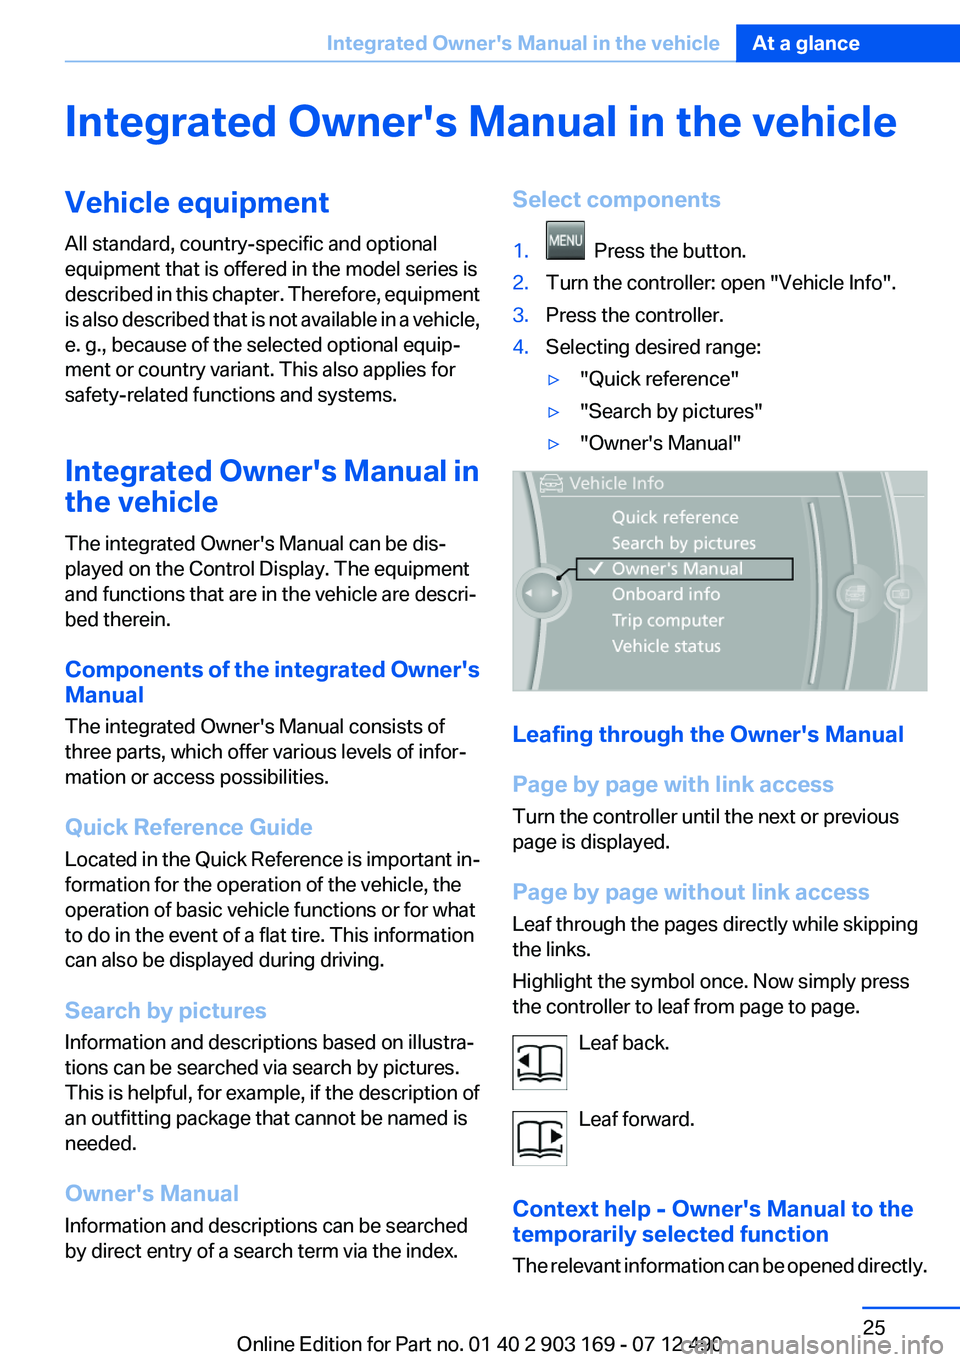
by direct entry of a search term via the index.Select components1. Press the button.2.Turn the controller: open "Vehicle Info".3.Press the controller.4.Selecting desired range:▷"Quick reference"▷"Search by pictures"▷"Owner's Manual"
Leafing through the Owner's Manual
Page by page with link access
Turn the controller until the next or previous
page is displayed.
Page by page without link access
Leaf through the pages directly while skipping
the links.
Highlight the symbol once. Now simply press
the controller to leaf from page to page.
Leaf back.
Leaf forward.
Context help - Owner's Manual to the
temporarily selected function
The relevant information can be opened directly.
Seite 25Integrated Owner's Manual in the vehicleAt a glance25
Online Edition for Part no. 01 40 2 903 169 - 07 12 490
Page 26 of 240
Opening via the iDrive
To move directly from the application on the
Control Display to the options menu:1. Press the button or move the controller
to the right repeatedly until the "Options"
menu is displayed.2."Display Owner's Manual"
Opening when a Check Control
message is displayed
Directly from the Check Control message on the
Control Display:
"Display Owner's Manual"
Changing between a function and the
Owner's Manual
To change from a function, e.g., radio, to the
Owner's Manual on the Control Display and to
switch between the two displays:
1. Press the button or move the controller
to the right repeatedly until the "Options"
menu is displayed.2."Display Owner's Manual"3.Select the desired page in the Owner's
Manual.4. Press the button again to return to the
function displayed last.5. Press the button to return to the page
of the Owner's Manual displayed last.
To switch back and forth repeatedly between
the function displayed last and the page of the
Owner's Manual displayed last, repeat steps 4
and 5. This opens a new panel every time.
Programmable memory buttons
General information
The Owner's Manual can be stored on the pro‐
grammable memory buttons and called up di‐
rectly.
Storing1."Owner's Manual" Select via the iDrive.2. Press the desired button for more
than 2 seconds.
Executing
Press the button.
The Owner's Manual is displayed im‐
mediately.
Seite 26At a glanceIntegrated Owner's Manual in the vehicle26
Online Edition for Part no. 01 40 2 903 169 - 07 12 490
Page 33 of 240
Using the guest profile
The guest profile can be used to make individual
settings without affecting the three Personal
Profiles.
This can be useful for drivers who are using the
vehicle temporarily and do not have their own
profile.1."Settings"2."Profiles"3.The current profile is selected.4.Open "Guest".5.Adjust the settings.
Note: the guest profile cannot be renamed.
Display profile list during start
The profile list can be displayed during each
start for selecting the desired profile.
1."Settings"2."Profiles"3.Open "Options".4."Display user list at startup"
Personal Profile settings
The following functions and settings can be
stored in a profile.
More information on the settings can be found
under:
▷Active Cruise Control: collision warning.▷Collision warning: warning time, last setting
on/off.▷Exterior mirror position.▷CD/Multimedia: audio source listened to
last.▷Driving Experience Switch: sport program.▷Driver's seat position: automatic retrieval af‐
ter unlocking.▷Programmable memory buttons: assign‐
ment.▷Head-up Display: selection, brightness, po‐
sition and rotation of the display.▷Headlamp courtesy delay feature: time set‐
ting.▷Tone: tone settings.▷Automatic climate control: settings.▷Steering wheel position.▷Navigation: map views, route criteria, voice
output on/off.▷Night Vision with pedestrian detection: se‐
lection of functions and type of display.▷Park Distance Control PDC: adjusting the
signal tone volume.▷Radio: stored stations, station listened to
last, special settings.▷Backup camera: selection of functions and
type of display.▷Side View: selection of the display type.▷Language on the Control Display.▷Lane departure warning: last setting, on/off.▷Active Blind Spot Detection: last setting, on/
off.▷Daytime running lights: current setting.▷Triple turn signal activation.▷Locking the vehicle: after a brief period or
after starting to drive.
Central locking system
The concept
The central locking system becomes active
when the driver's door is closed.
The system simultaneously engages and re‐
leases the locks on the following:
▷Doors.▷Compartment in the center armrest.▷Trunk lid.▷Fuel filler flap.Seite 33Opening and closingControls33
Online Edition for Part no. 01 40 2 903 169 - 07 12 490