CD player BMW 650I COUPE 2008 E63 User Guide
[x] Cancel search | Manufacturer: BMW, Model Year: 2008, Model line: 650I COUPE, Model: BMW 650I COUPE 2008 E63Pages: 264, PDF Size: 9.07 MB
Page 175 of 264
Navigation
Entertainment
Driving tips
173Reference
At a glance
Controls
Communications
Mobility
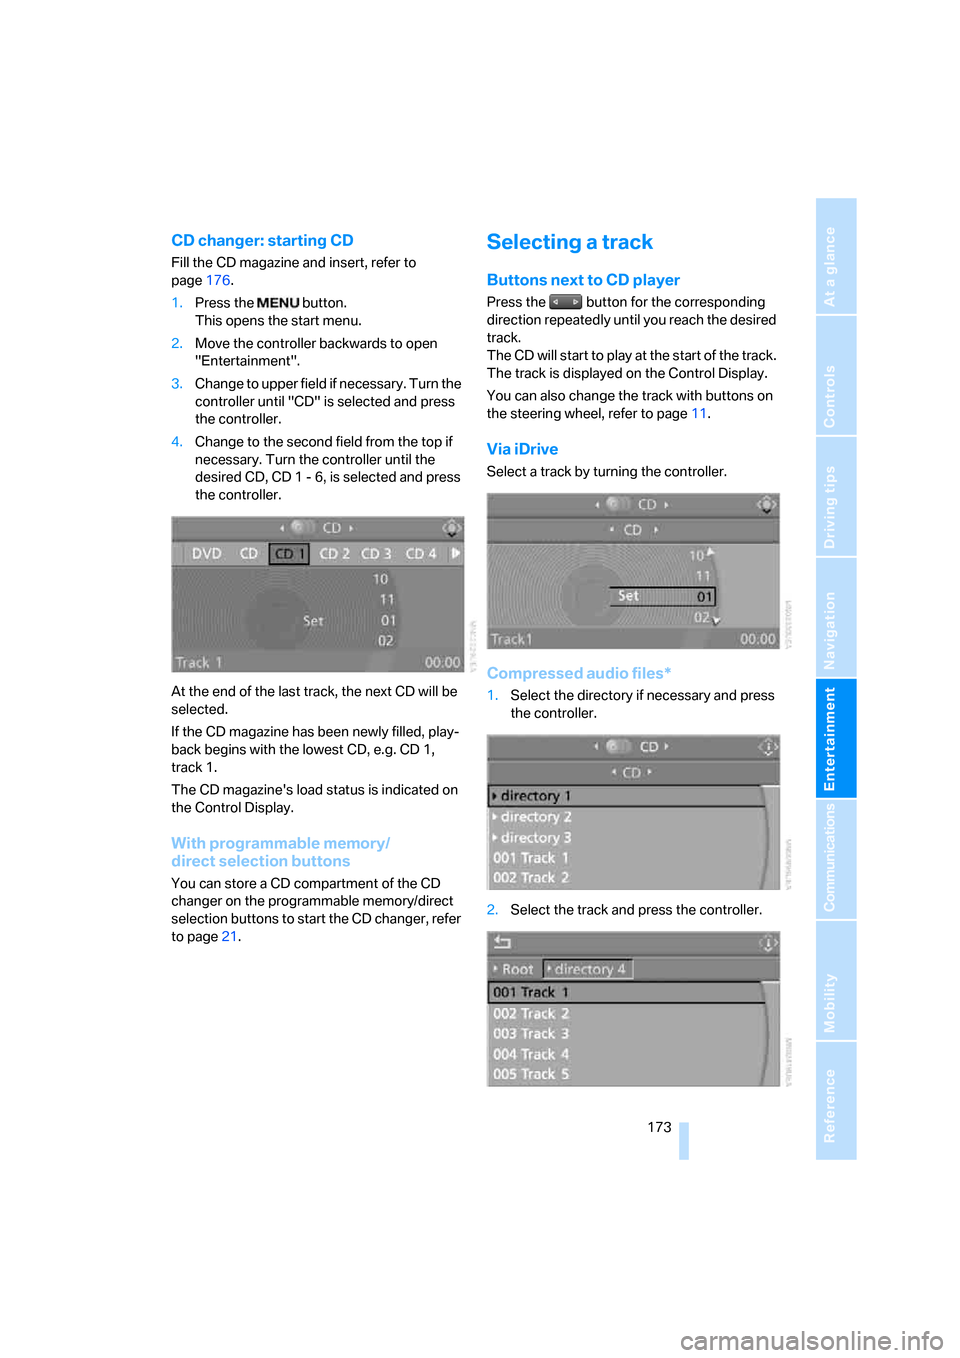
CD changer: starting CD
Fill the CD magazine and insert, refer to
page176.
1.Press the button.
This opens the start menu.
2.Move the controller backwards to open
"Entertainment".
3.Change to upper field if necessary. Turn the
controller until "CD" is selected and press
the controller.
4.Change to the second field from the top if
necessary. Turn the controller until the
desired CD, CD 1 - 6, is selected and press
the controller.
At the end of the last track, the next CD will be
selected.
If the CD magazine has been newly filled, play-
back begins with the lowest CD, e.g. CD 1,
track 1.
The CD magazine's load status is indicated on
the Control Display.
With programmable memory/
direct selection buttons
You can store a CD compartment of the CD
changer on the programmable memory/direct
selection buttons to start the CD changer, refer
to page21.
Selecting a track
Buttons next to CD player
Press the button for the corresponding
direction repeatedly until you reach the desired
track.
The CD will start to play at the start of the track.
The track is displayed on the Control Display.
You can also change the track with buttons on
the steering wheel, refer to page11.
Via iDrive
Select a track by turning the controller.
Compressed audio files*
1.Select the directory if necessary and press
the controller.
2.Select the track and press the controller.
Page 176 of 264
CD player and CD changer
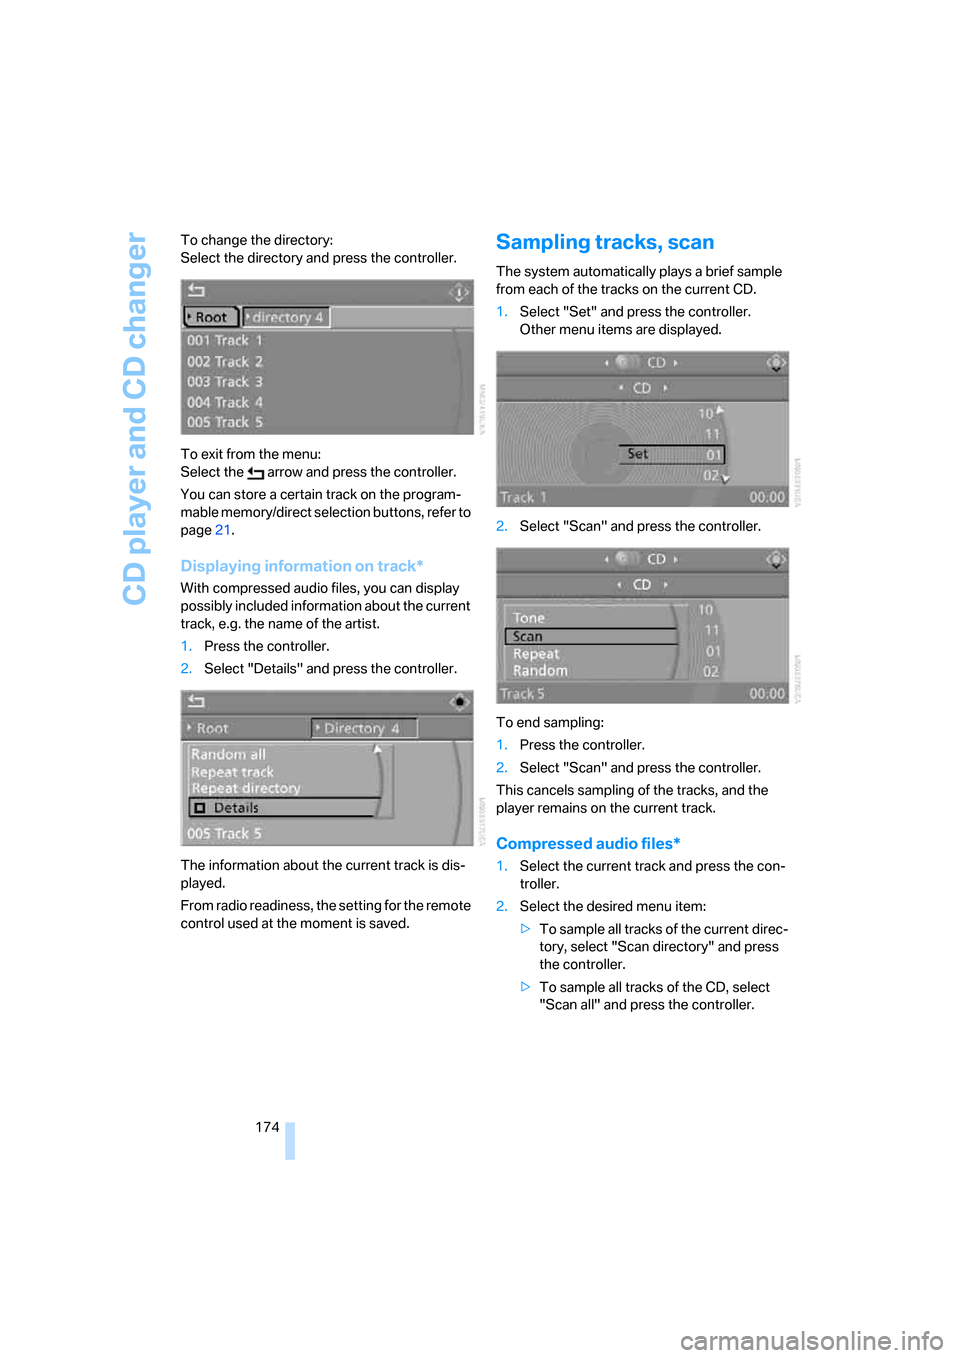
174 To change the directory:
Select the directory and press the controller.
To exit from the menu:
Select the arrow and press the controller.
You can store a certain track on the program-
mable memory/direct selection buttons, refer to
page21.
Displaying information on track*
With compressed audio files, you can display
possibly included information about the current
track, e.g. the name of the artist.
1.Press the controller.
2.Select "Details" and press the controller.
The information about the current track is dis-
played.
From radio readiness, the setting for the remote
control used at the moment is saved.
Sampling tracks, scan
The system automatically plays a brief sample
from each of the tracks on the current CD.
1.Select "Set" and press the controller.
Other menu items are displayed.
2.Select "Scan" and press the controller.
To end sampling:
1.Press the controller.
2.Select "Scan" and press the controller.
This cancels sampling of the tracks, and the
player remains on the current track.
Compressed audio files*
1.Select the current track and press the con-
troller.
2.Select the desired menu item:
>To sample all tracks of the current direc-
tory, select "Scan directory" and press
the controller.
>To sample all tracks of the CD, select
"Scan all" and press the controller.
Page 177 of 264
Navigation
Entertainment
Driving tips
175Reference
At a glance
Controls
Communications
Mobility
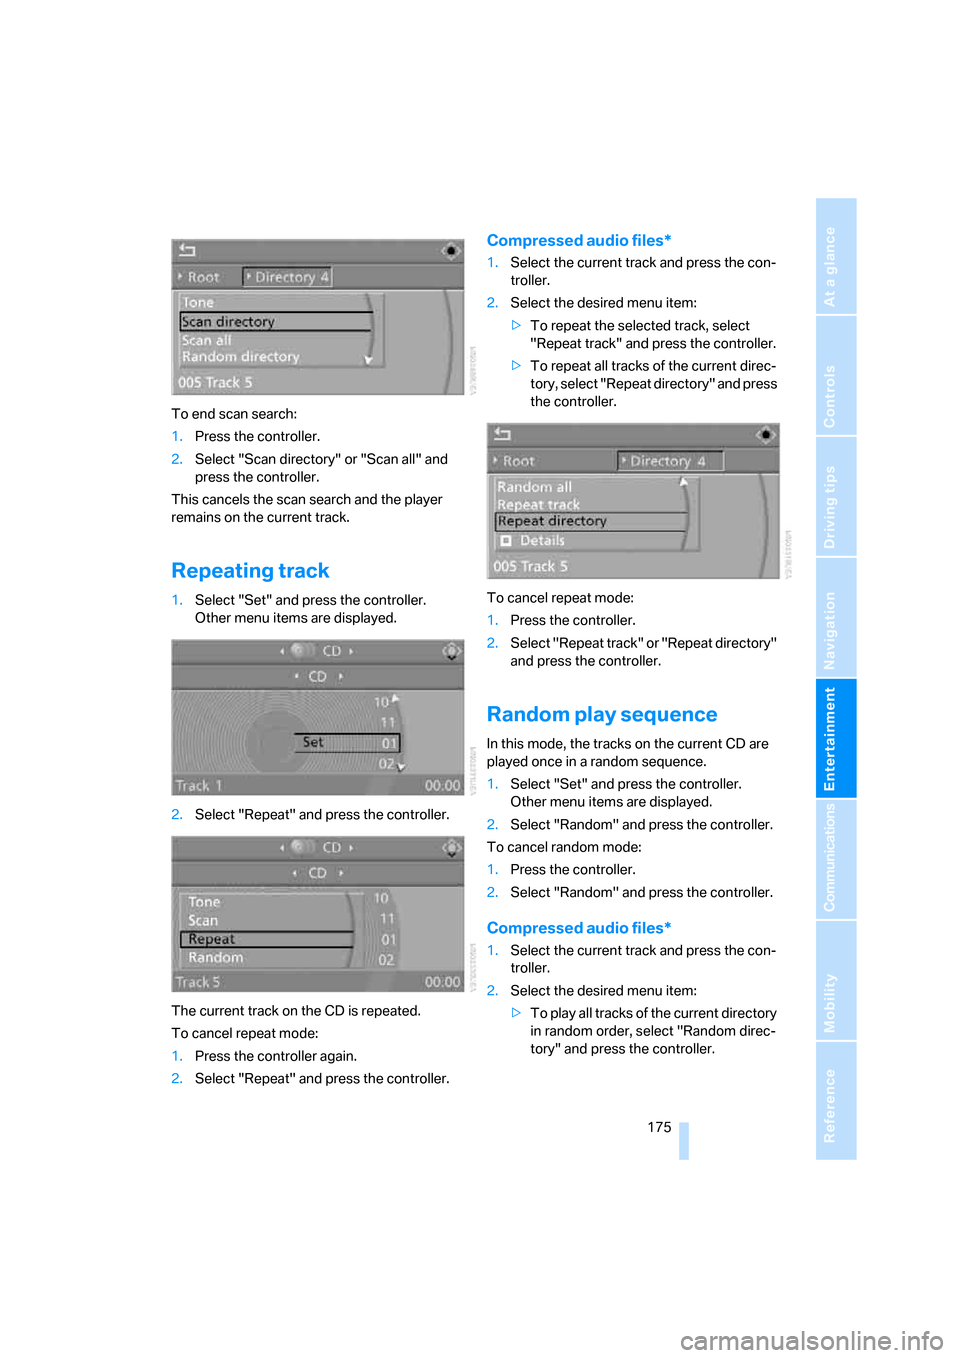
To end scan search:
1.Press the controller.
2.Select "Scan directory" or "Scan all" and
press the controller.
This cancels the scan search and the player
remains on the current track.
Repeating track
1.Select "Set" and press the controller.
Other menu items are displayed.
2.Select "Repeat" and press the controller.
The current track on the CD is repeated.
To cancel repeat mode:
1.Press the controller again.
2.Select "Repeat" and press the controller.
Compressed audio files*
1.Select the current track and press the con-
troller.
2.Select the desired menu item:
>To repeat the selected track, select
"Repeat track" and press the controller.
>To repeat all tracks of the current direc-
tory, select "Repeat directory" and press
the controller.
To cancel repeat mode:
1.Press the controller.
2.Select "Repeat track" or "Repeat directory"
and press the controller.
Random play sequence
In this mode, the tracks on the current CD are
played once in a random sequence.
1.Select "Set" and press the controller.
Other menu items are displayed.
2.Select "Random" and press the controller.
To cancel random mode:
1.Press the controller.
2.Select "Random" and press the controller.
Compressed audio files*
1.Select the current track and press the con-
troller.
2.Select the desired menu item:
>To play all tracks of the current directory
in random order, select "Random direc-
tory" and press the controller.
Page 178 of 264
CD player and CD changer
176 >To play all tracks of the CD in random
order, select "Random all" and press the
controller.
To cancel random mode:
1.Press the controller.
2.Select "Random directory" or "Random all"
and press the controller.
Fast forward/reverse
Buttons next to CD player:
Press and hold the button for the corre-
sponding direction.
CD magazine
The BMW CD changer for six CDs is installed in
the glove compartment.
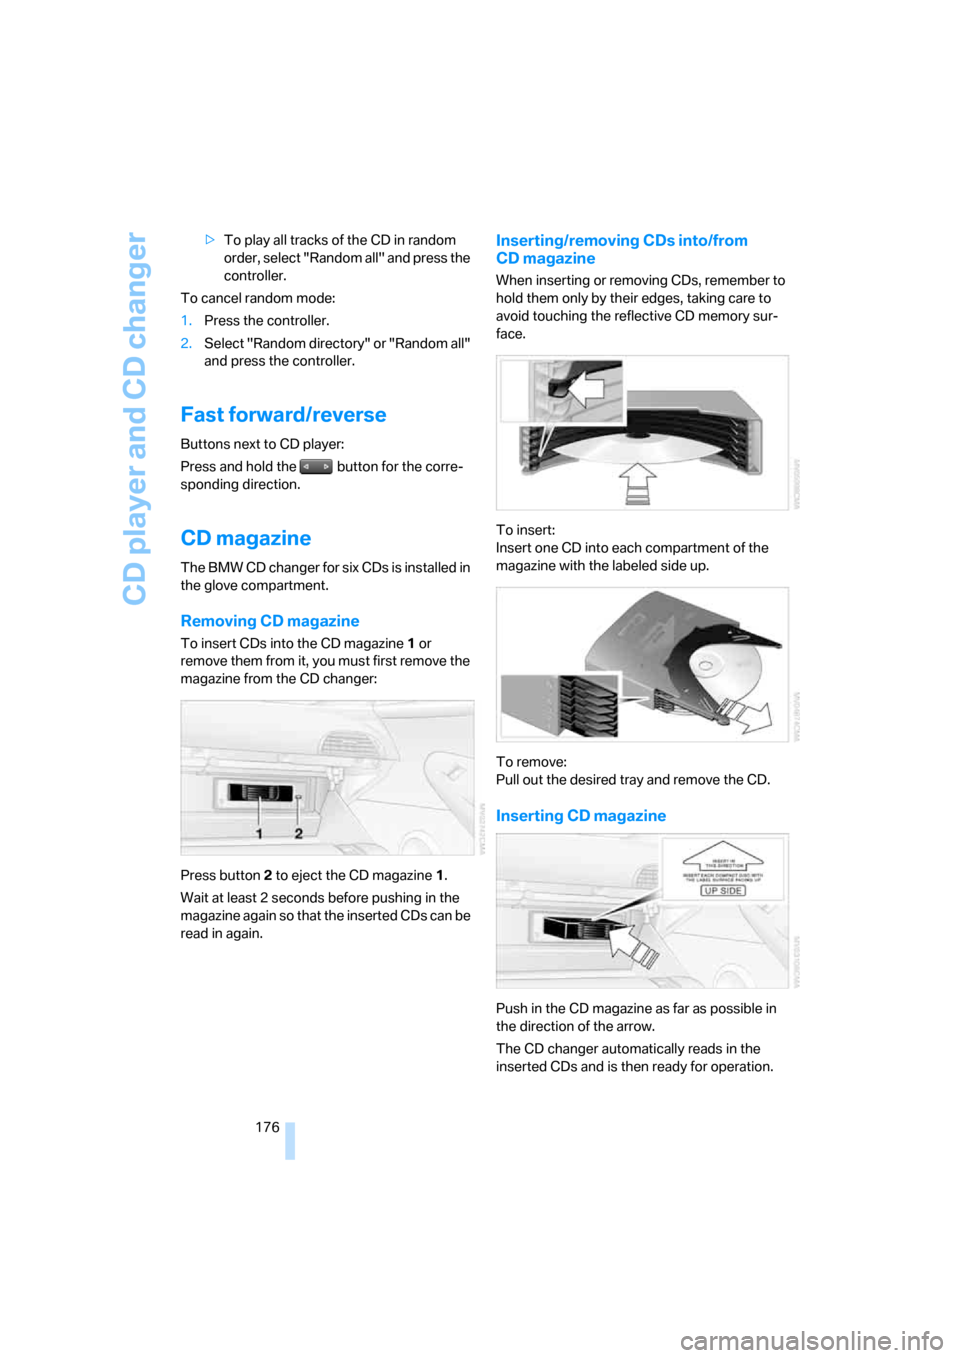
Removing CD magazine
To insert CDs into the CD magazine 1 or
remove them from it, you must first remove the
magazine from the CD changer:
Press button2 to eject the CD magazine1.
Wait at least 2 seconds before pushing in the
magazine again so that the inserted CDs can be
read in again.
Inserting/removing CDs into/from
CD magazine
When inserting or removing CDs, remember to
hold them only by their edges, taking care to
avoid touching the reflective CD memory sur-
face.
To insert:
Insert one CD into each compartment of the
magazine with the labeled side up.
To remove:
Pull out the desired tray and remove the CD.
Inserting CD magazine
Push in the CD magazine as far as possible in
the direction of the arrow.
The CD changer automatically reads in the
inserted CDs and is then ready for operation.
Page 179 of 264
Navigation
Entertainment
Driving tips
177Reference
At a glance
Controls
Communications
Mobility
Notes
BMW CD/DVD players and changers are
officially designated Class 1 laser prod-
ucts. Do not operate if the cover is damaged,
otherwise severe eye damage can result.
Do not use self-recorded CDs with adhesive
labels as these can come loose during playback
due to heat build-up and cause irreparable
damage to the system.
Only use round CDs/DVDs with a standard
diameter of 4.7 in/12 cm and do not play CDs/
DVDs with an adapter, e.g. Single-CDs, other-
wise the CDs or the adapter can jam and may no
longer be ejected.
Do not use a combined CD/DVD, e.g. DVD
Plus;
otherwise, the CD/DVD can jam and will no
longer eject.<
General malfunctions
BMW CD/DVD changers and players have been
optimized for performance in vehicles. In some
instances they may be more sensitive to faulty
CDs/DVDs than stationary devices would be.
If a CD/DVD cannot be played, first check
whether it has been inserted correctly.
Humidity
High levels of humidity can lead to condensa-
tion on the CD/DVD or the laser's scan lens and
temporarily prevent playback.
Malfunctions with individual CDs/DVDs
If malfunctions occur only with particular CDs/
DVDs, this can be due to one of the following
causes.
Home-recorded CDs/DVDs
Possible reasons for malfunctions with self-
recorded CDs/DVDs are, e.g., inconsistent
data-creation or recording processes, or poor
quality or advanced age of the CD/DVD blank.
Label CDs/DVDs only on the top, using a marker
designed for this purpose.
Damaged CDs/DVDs
Avoid fingerprints dust, scratches, and mois-
ture.
Keep CDs/DVDs in a sleeve.
Do not subject CDs/DVDs to temperatures over
1227/506, high levels of humidity or direct
sunlight.
CDs/DVDs with copy protection
Manufacturers often provide CDs/DVDs with
copy protection. This can mean that some CDs/
DVDs cannot be played or can only be played to
a limited extent.
Care
If necessary, clean the reflective scanning side
of the CDs/DVDs with a commercially available
cleaning cloth by wiping in straight lines from
the center outward.
Page 180 of 264
AUX-In connection
178
AUX-In connection
You can connect an external audio device, e.g.
an MP3 player, and play the sound via the vehi-
cle loudspeakers. The sound can be adjusted
via iDrive.
Connecting
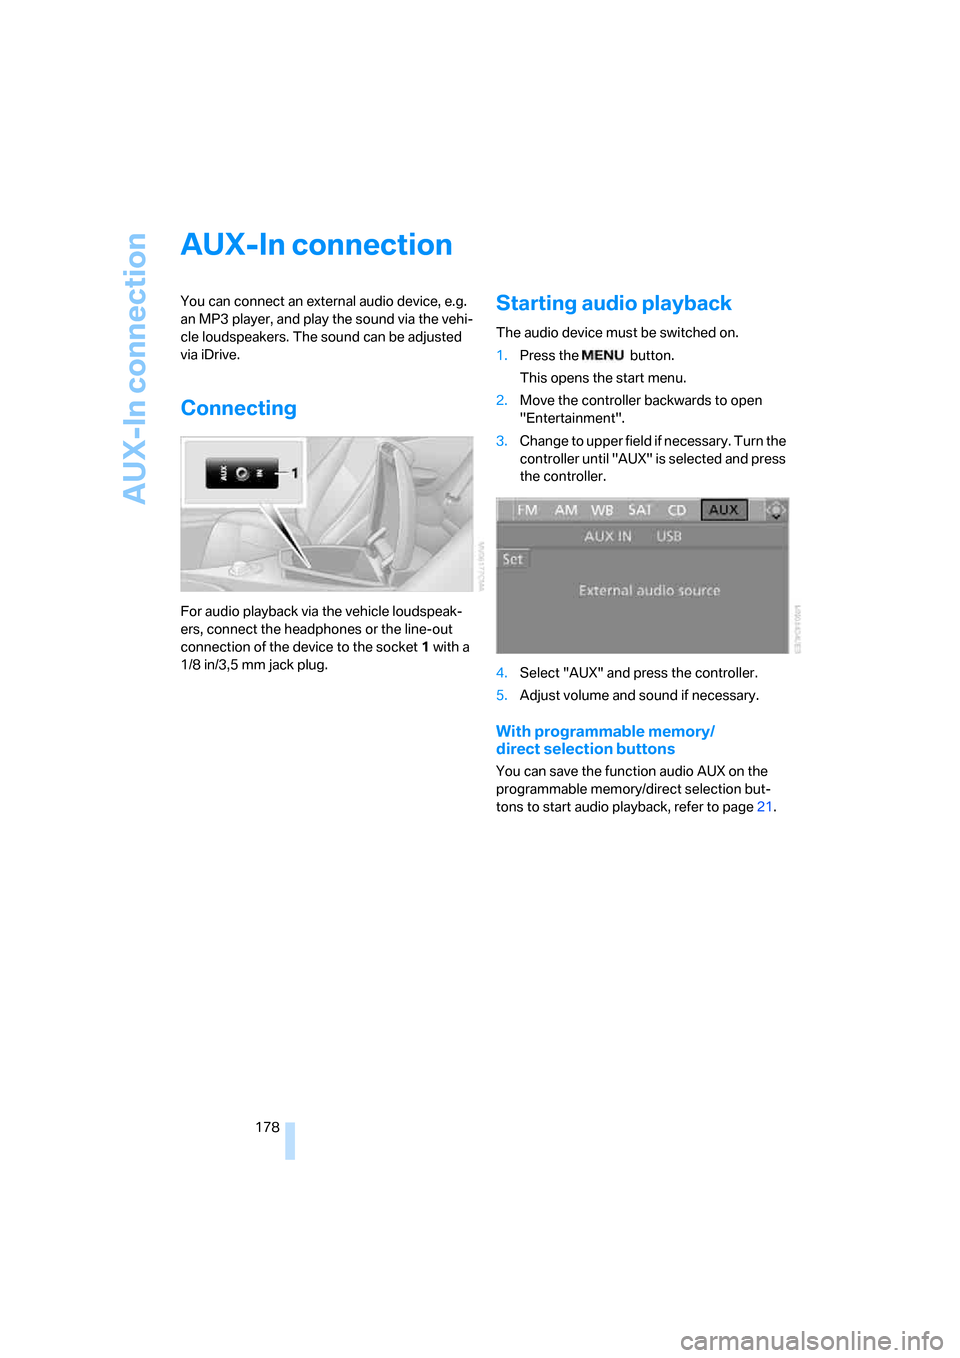
For audio playback via the vehicle loudspeak-
ers, connect the headphones or the line-out
connection of the device to the socket1 with a
1/8 in/3,5 mm jack plug.
Starting audio playback
The audio device must be switched on.
1.Press the button.
This opens the start menu.
2.Move the controller backwards to open
"Entertainment".
3.Change to upper field if necessary. Turn the
controller until "AUX" is selected and press
the controller.
4.Select "AUX" and press the controller.
5.Adjust volume and sound if necessary.
With programmable memory/
direct selection buttons
You can save the function audio AUX on the
programmable memory/direct selection but-
tons to start audio playback, refer to page21.
Page 181 of 264
Navigation
Entertainment
Driving tips
179Reference
At a glance
Controls
Communications
Mobility
USB/audio interface
You can connect audio devices to the USB/
audio interface, e.g. an iPod or a USB device
(MP3 player, USB memory stick). You can then
operate these va iDrive.
The system can play back common audio files,
e.g. MP3, WMA, WAV (PCM) and ACC, as well
as playback lists in the M3U format.
Due to the large number of audio devices avail-
able on the market, operation via the vehicle
cannot be ensured for every audio device.
Ask your BMW center which audio devices are
suitable.
Connecting
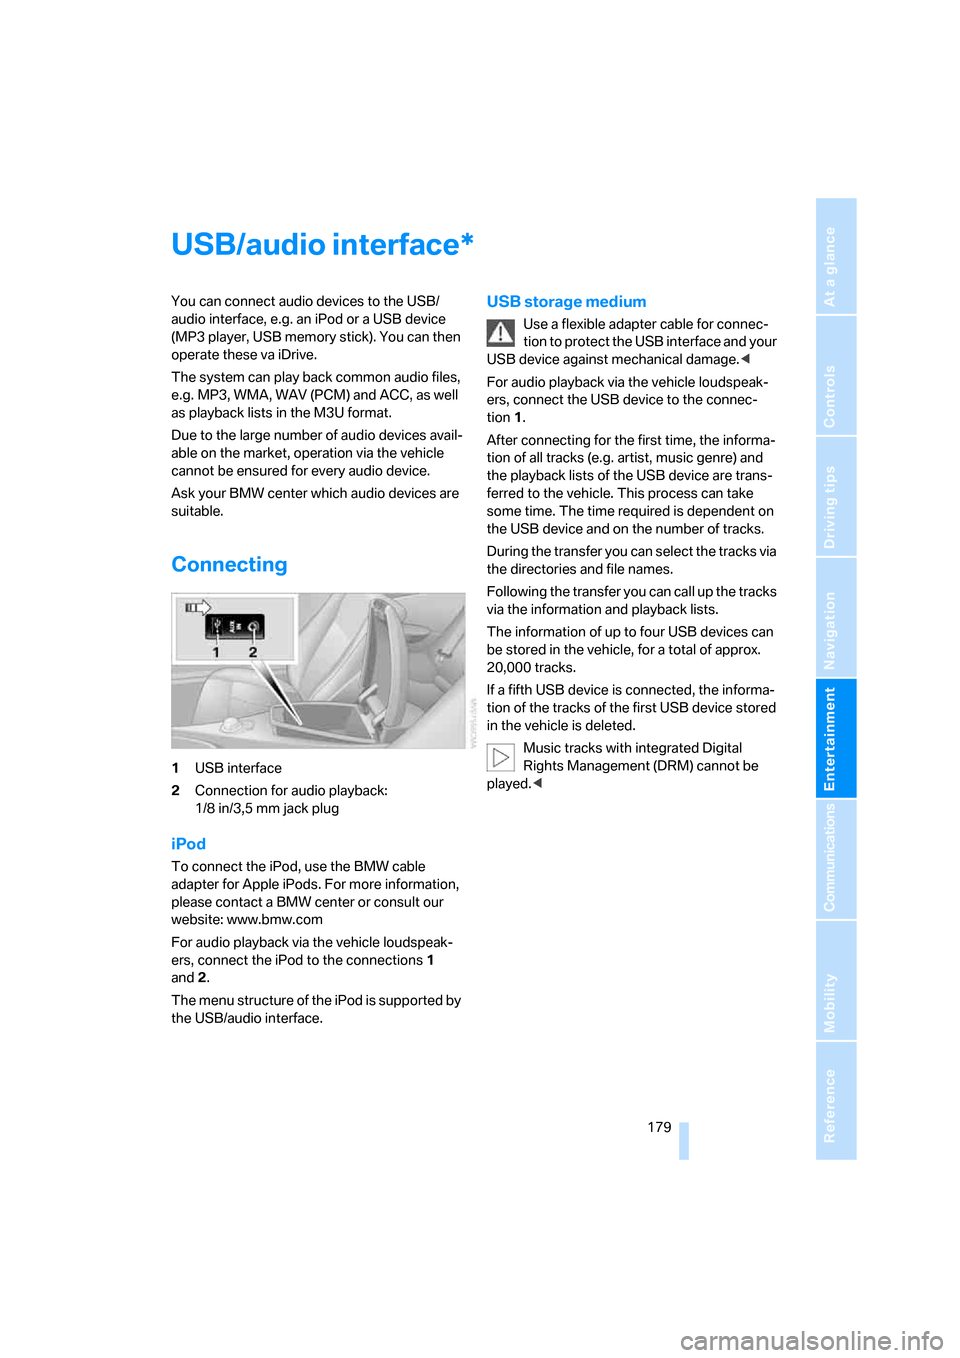
1USB interface
2Connection for audio playback:
1/8 in/3,5 mm jack plug
iPod
To connect the iPod, use the BMW cable
adapter for Apple iPods. For more information,
please contact a BMW center or consult our
website: www.bmw.com
For audio playback via the vehicle loudspeak-
ers, connect the iPod to the connections1
and2.
The menu structure of the iPod is supported by
the USB/audio interface.
USB storage medium
Use a flexible adapter cable for connec-
tion to protect the USB interface and your
USB device against mechanical damage.<
For audio playback via the vehicle loudspeak-
ers, connect the USB device to the connec-
tion1.
After connecting for the first time, the informa-
tion of all tracks (e.g. artist, music genre) and
the playback lists of the USB device are trans-
ferred to the vehicle. This process can take
some time. The time required is dependent on
the USB device and on the number of tracks.
During the transfer you can select the tracks via
the directories and file names.
Following the transfer you can call up the tracks
via the information and playback lists.
The information of up to four USB devices can
be stored in the vehicle, for a total of approx.
20,000 tracks.
If a fifth USB device is connected, the informa-
tion of the tracks of the first USB device stored
in the vehicle is deleted.
Music tracks with integrated Digital
Rights Management (DRM) cannot be
played.<
*
Page 183 of 264
Navigation
Entertainment
Driving tips
181Reference
At a glance
Controls
Communications
Mobility
Repeating track
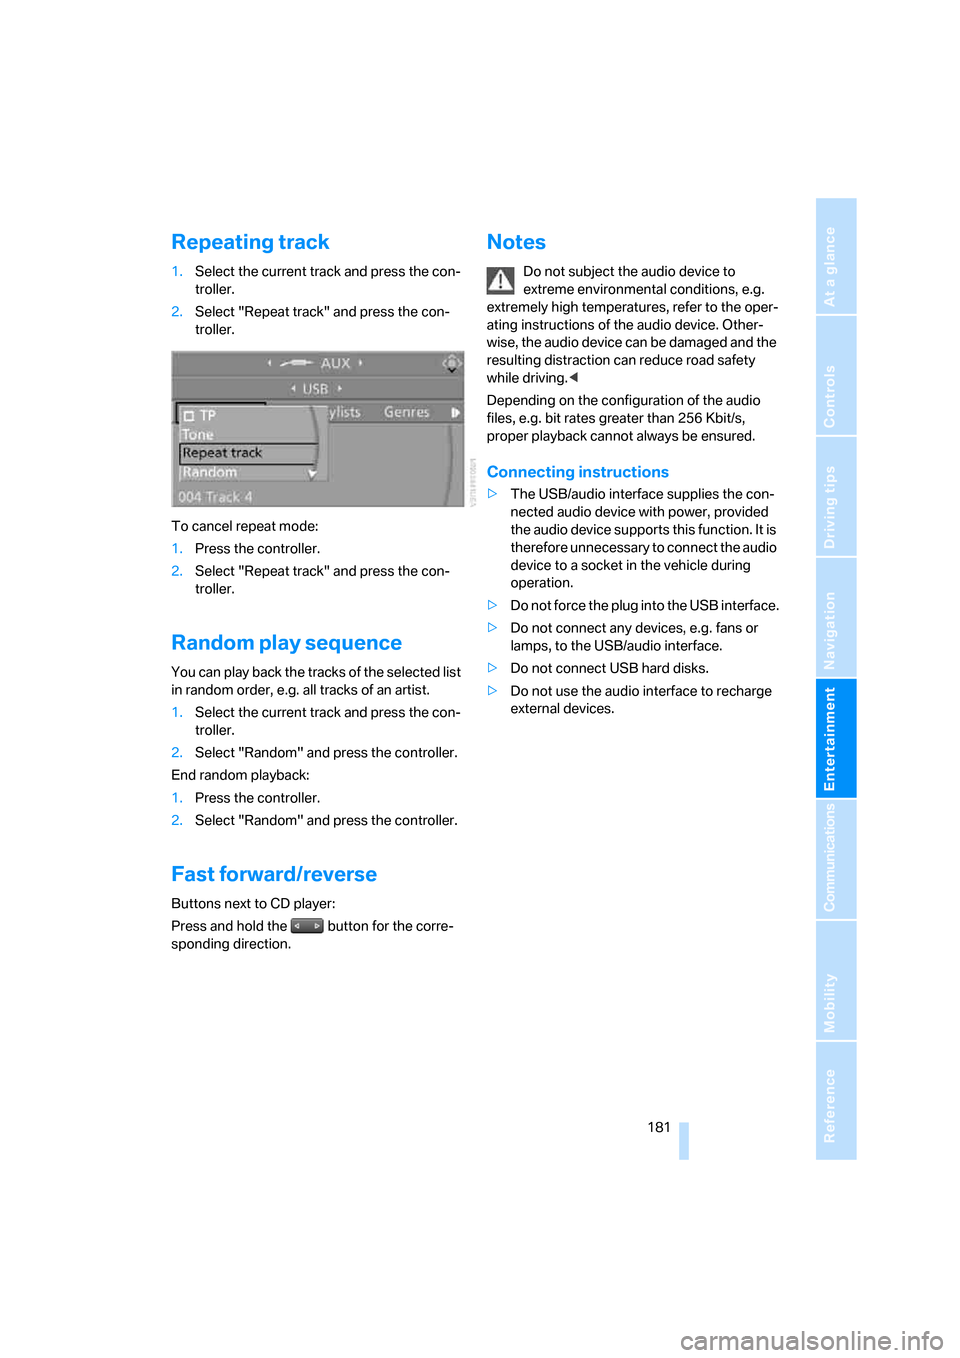
1.Select the current track and press the con-
troller.
2.Select "Repeat track" and press the con-
troller.
To cancel repeat mode:
1.Press the controller.
2.Select "Repeat track" and press the con-
troller.
Random play sequence
You can play back the tracks of the selected list
in random order, e.g. all tracks of an artist.
1.Select the current track and press the con-
troller.
2.Select "Random" and press the controller.
End random playback:
1.Press the controller.
2.Select "Random" and press the controller.
Fast forward/reverse
Buttons next to CD player:
Press and hold the button for the corre-
sponding direction.
Notes
Do not subject the audio device to
extreme environmental conditions, e.g.
extremely high temperatures, refer to the oper-
ating instructions of the audio device. Other-
wise, the audio device can be damaged and the
resulting distraction can reduce road safety
while driving.<
Depending on the configuration of the audio
files, e.g. bit rates greater than 256 Kbit/s,
proper playback cannot always be ensured.
Connecting instructions
>The USB/audio interface supplies the con-
nected audio device with power, provided
the audio device supports this function. It is
therefore unnecessary to connect the audio
device to a socket in the vehicle during
operation.
>Do not force the plug into the USB interface.
>Do not connect any devices, e.g. fans or
lamps, to the USB/audio interface.
>Do not connect USB hard disks.
>Do not use the audio interface to recharge
external devices.
Page 242 of 264
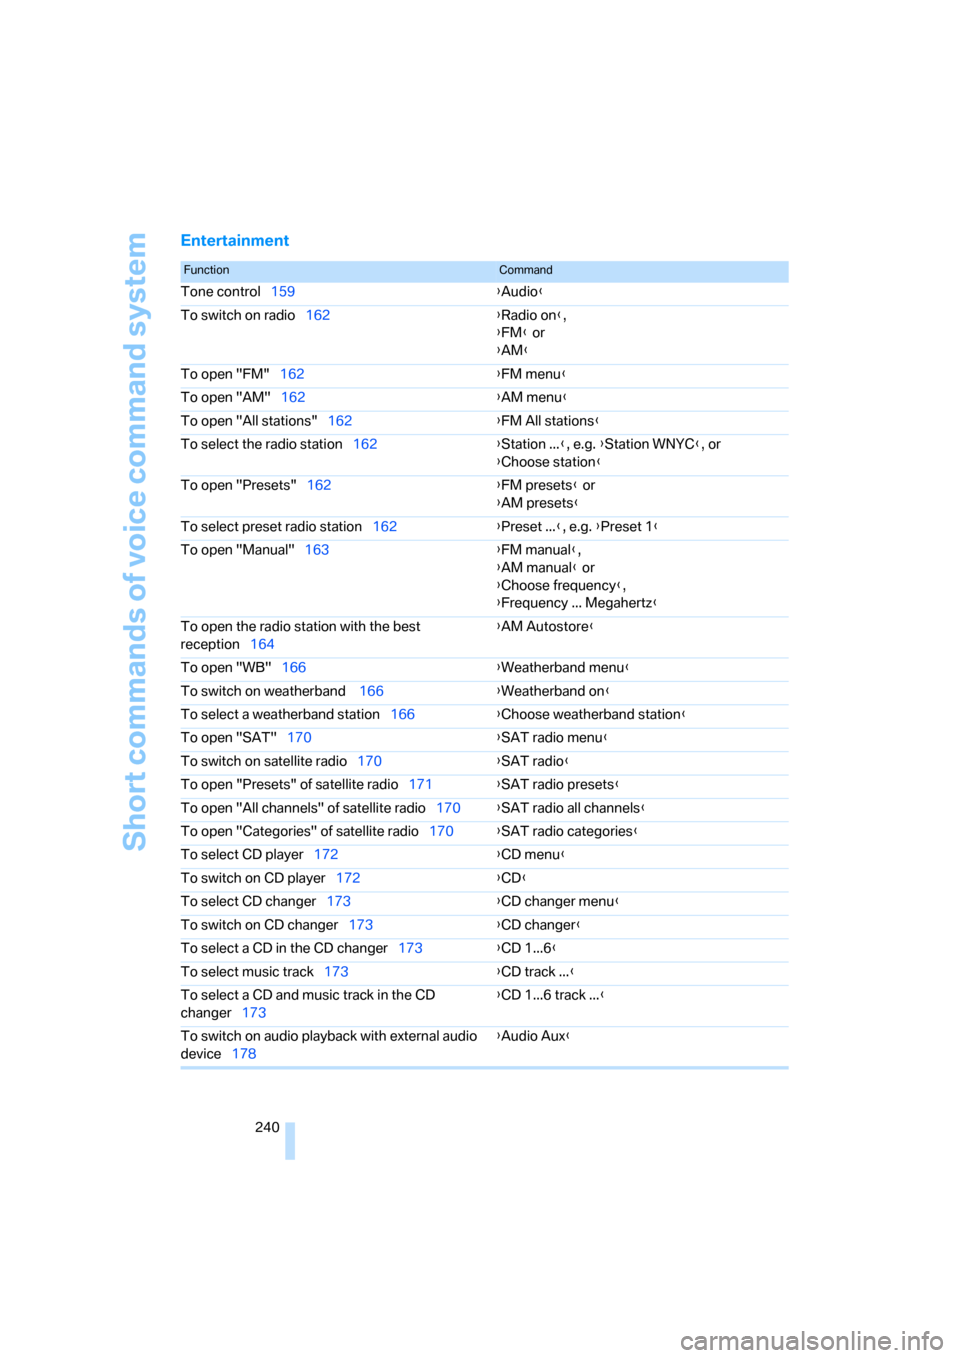
Short commands of voice command system
240
Entertainment
FunctionCommand
Tone control159{Audio}
To switch on radio162{Radio on},
{FM} or
{AM}
To open "FM"162{FM menu}
To open "AM"162{AM menu}
To open "All stations"162{FM All stations}
To select the radio station162{Station ...}, e.g. {Station WNYC}, or
{Choose station}
To open "Presets"162{FM presets} or
{AM presets}
To select preset radio station162{Preset ...}, e.g. {Preset 1}
To open "Manual"163{FM manual},
{AM manual} or
{Choose frequency},
{Frequency ... Megahertz}
To open the radio station with the best
reception164{AM Autostore}
To open "WB"166{Weatherband menu}
To switch on weatherband 166{Weatherband on}
To select a weatherband station166{Choose weatherband station
}
To open "SAT"170{SAT radio menu}
To switch on satellite radio170{SAT radio}
To open "Presets" of satellite radio171{SAT radio presets}
To open "All channels" of satellite radio170{SAT radio all channels}
To open "Categories" of satellite radio170{SAT radio categories}
To select CD player172{CD menu}
To switch on CD player172{CD}
To select CD changer173{CD changer menu}
To switch on CD changer173{CD changer}
To select a CD in the CD changer173{CD 1...6}
To select music track173{CD track ...}
To select a CD and music track in the CD
changer173{CD 1...6 track ...}
To switch on audio playback with external audio
device178{Audio Aux}
Page 247 of 264
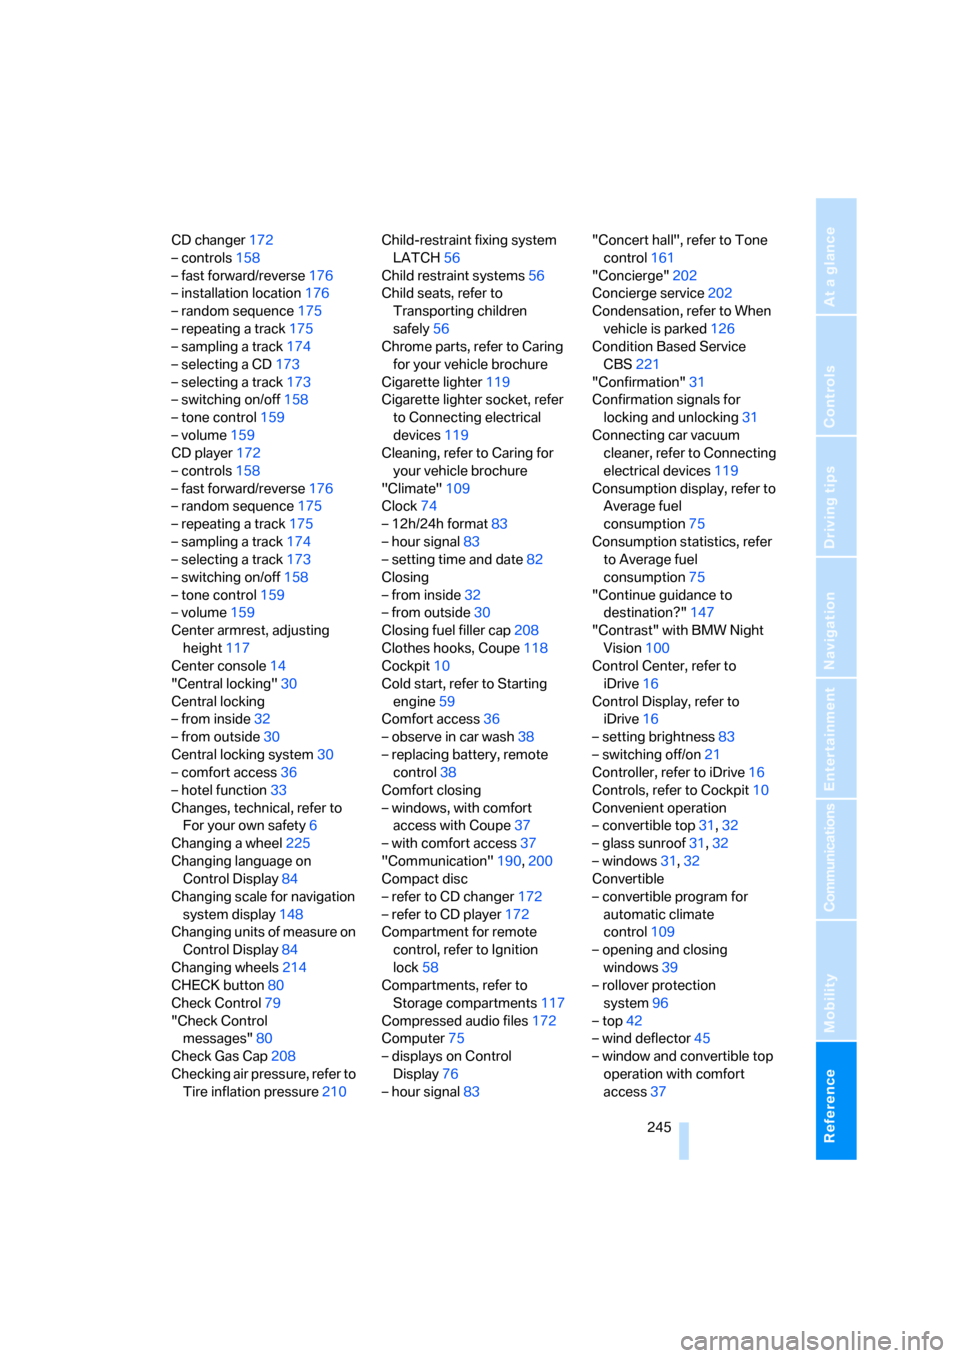
Reference 245
At a glance
Controls
Driving tips
Communications
Navigation
Entertainment
Mobility
CD changer172
– controls158
– fast forward/reverse176
– installation location176
– random sequence175
– repeating a track175
– sampling a track174
– selecting a CD173
– selecting a track173
– switching on/off158
– tone control159
– volume159
CD player172
– controls158
– fast forward/reverse176
– random sequence175
– repeating a track175
– sampling a track174
– selecting a track173
– switching on/off158
– tone control159
– volume159
Center armrest, adjusting
height117
Center console14
"Central locking"30
Central locking
– from inside32
– from outside30
Central locking system30
– comfort access36
– hotel function33
Changes, technical, refer to
For your own safety6
Changing a wheel225
Changing language on
Control Display84
Changing scale for navigation
system display148
Changing units of measure on
Control Display84
Changing wheels214
CHECK button80
Check Control79
"Check Control
messages"80
Check Gas Cap208
Checking air pressure, refer to
Tire inflation pressure210Child-restraint fixing system
LATCH56
Child restraint systems56
Child seats, refer to
Transporting children
safely56
Chrome parts, refer to Caring
for your vehicle brochure
Cigarette lighter
119
Cigarette lighter socket, refer
to Connecting electrical
devices119
Cleaning, refer to Caring for
your vehicle brochure
"Climate"109
Clock74
– 12h/24h format83
– hour signal83
– setting time and date82
Closing
– from inside32
– from outside30
Closing fuel filler cap208
Clothes hooks, Coupe118
Cockpit10
Cold start, refer to Starting
engine59
Comfort access36
– observe in car wash38
– replacing battery, remote
control38
Comfort closing
– windows, with comfort
access with Coupe37
– with comfort access37
"Communication"190,200
Compact disc
– refer to CD changer172
– refer to CD player172
Compartment for remote
control, refer to Ignition
lock58
Compartments, refer to
Storage compartments117
Compressed audio files172
Computer75
– displays on Control
Display76
– hour signal83"Concert hall", refer to Tone
control161
"Concierge"202
Concierge service202
Condensation, refer to When
vehicle is parked126
Condition Based Service
CBS221
"Confirmation"31
Confirmation signals for
locking and unlocking31
Connecting car vacuum
cleaner, refer to Connecting
electrical devices119
Consumption display, refer to
Average fuel
consumption75
Consumption statistics, refer
to Average fuel
consumption75
"Continue guidance to
destination?"147
"Contrast" with BMW Night
Vision100
Control Center, refer to
iDrive16
Control Display, refer to
iDrive16
– setting brightness83
– switching off/on21
Controller, refer to iDrive16
Controls, refer to Cockpit10
Convenient operation
– convertible top31,32
– glass sunroof31,32
– windows31,32
Convertible
– convertible program for
automatic climate
control109
– opening and closing
windows39
– rollover protection
system96
– top42
– wind deflector45
– window and convertible top
operation with comfort
access37