BMW 650I COUPE 2010 E63 Owner's Manual
Manufacturer: BMW, Model Year: 2010, Model line: 650I COUPE, Model: BMW 650I COUPE 2010 E63Pages: 252, PDF Size: 8.4 MB
Page 211 of 252
Mobility
209Reference
At a glance
Controls
Driving tips
Communications
Navigation
Entertainment
Insufficient distance or excessive pressure or
temperature can damage parts of the vehicle or
can result in water penetration. Follow the oper-
ating instructions for the high-pressure clean-
ing jets.<
When using high-pressure cleaning jets,
do not remain in one place for a long time
and be sure to maintain a distance of at least
12 in/30 cm from sensors, e.g. Park Distance
Control sensors or radar sensors.<
Hand washing
When washing the vehicle by hand, use plenty
of water and car washing shampoo. Clean the
vehicle with gentle pressure using a sponge or a
washing brush.
Before cleaning the windshield, deacti-
vate the rain sensor or switch off the igni-
tion to prevent unwanted wiper operation.<
Follow local guidelines for washing vehi-
cles by hand.<
Headlamps
Do not rub dry and never use abrasives or
strong solvents to clean the covers.
Loosen dirt, e.g. insects, with shampoo or
insect remover and wash away with plenty of
water.
Use a window deicer to remove accumulated
ice and snow, not a scraper.
Windows
Use a glass cleaner to clean the inside and out-
side surfaces of the windows and the glass sur-
faces of the mirrors.
Do not use quartz-containing cleansers
to clean glass surfaces of the mirrors.<
Convertible top care
The appearance and service life of the convert-
ible top depend on proper care and operation.
Please follow these instructions:
>Never stow the convertible top in the con-
vertible top compartment when it is wet or frozen, since this can cause water marks,
mildew stains, and scuff marks.
>If water marks do occur on the headliner,
remove them with a microfiber cloth and
interior cleanser.
>When parking for long intervals in enclosed
spaces, make sure there is sufficient venti-
lation.
>Remove bird droppings immediately
because their caustic properties have a cor-
rosive effect on the convertible top and can
damage the rubber seals.
Do not use stain remover, paint thinner,
solvents, gasoline, or the like to remove
stains. These substances can damage the rub-
ber coating. Improper care and cleaning can
cause leaks to develop in the convertible top
and its seams.<
In the event of more serious soiling, use a spe-
cial convertible top cleaner.
When doing so, follow the manufacturer's
directions for use.
After three to five washings, treat the convert-
ible top with sealant.
Caring for the vehicle finish
Regular care helps your vehicle retain its value
and protects the paint from the long-term
effects of aggressive substances.
Regionally occurring environmental factors can
affect and damage vehicle finish. It is therefore
important to tailor the frequency and extent of
your car care accordingly.
Immediately remove particularly aggressive
substances such as spilled fuel, oil, grease,
brake fluid, tree resin, or bird droppings; other-
wise, they may damage your paint.
Repairing paint damage
Repair stone damage or scratches imme-
diately, depending on the severity of the
damage, to prevent the formation of rust.<
BMW recommends having paint damage pro-
fessionally repaired using Genuine BMW finish
materials in accordance with factory guidelines.
Page 212 of 252
Care
210
Waxing
Sealant is required when water no longer beads
on the clean surface of the paint. Use only prod-
ucts that contain carnauba wax or synthetic wax
to seal your finish.
Rubber gaskets
Treat only with water or a rubber care product.
To avoid noise or damage, do not use
products that contain silicone to care for
rubber gaskets.<
Chrome components
Particularly after exposure to road salt, thor-
oughly cleanse parts like the radiator grille, door
handles, or window frames with plenty of water
with shampoo added to it. For additional treat-
ment, use chrome polish.
Alloy wheels
Depending on your system, braking can gener-
ate dust, which settles on the light-alloy wheels.
Remove this dust regularly with acid-free wheel
cleaner.
Do not use aggressive, acid-containing,
strongly alkaline, or coarse cleansers and
do not use steam cleaners at temperatures
greater than 140 °F/606, otherwise you may
damage your vehicle.<
Outside sensors
Sensors on the outside of the vehicle, such as
Park Distance Control sensors or radar sensors,
should be kept clean and free of ice to retain
their full function.
Interior care
Upholstery/fabrics
Clean regularly with a vacuum cleaner in order
to remove surface dirt.
In the event of more serious soiling such as bev-
erage stains, use a soft sponge or a lint-free
microfiber cloth in combination with suitable interior cleaners. Follow the instructions on the
packaging.
Clean upholstery material over a large
area extending out to the seams. Avoid
intense friction.<
Open Velcro fasteners on pants or other
items of clothing can cause damage to
the seat covering. Make sure that the Velcro
fasteners are closed.<
Leather/leather coverings
The leather used by BMW is a high quality
natural product. Slight patterns in the
grain are part of the typical properties of a natu-
ral leather.<
Dust and dirt from the road chafe in pores and
folds and result in considerable wear and cause
the leather surface to become prematurely brit-
tle. We therefore suggest that you clean the
leather with a dust cloth or vacuum cleaner at
regular intervals.
Particularly with light-colored leather, make
sure to clean it regularly since it has a greater
tendency to become soiled.
Treat the leather twice a year with a leather
lotion since dirt and grease harm the protective
layer of the leather.
Carpets/cargo bay
Carpeting, floor mats, and luggage compart-
ment rugs and paneling can be cleaned with a
vacuum or in the event of more serious soiling,
cleansed with an interior cleaner.
Floor mats and luggage compartment rugs can
be removed for cleaning. When inserting into
place, make sure that the seat rails do not pro-
trude over the floor mats; otherwise floor mats
can be damaged.
Fluff on new floor mats is a result of the produc-
tion process and can be removed by repeated
vacuuming.
Plastic components inside
Clean the glass cover of the instrument panel,
imitation leather surfaces, lamp lenses, and
Page 213 of 252
Mobility
211Reference
At a glance
Controls
Driving tips
Communications
Navigation
Entertainment
matte components with water and, if necessary,
a solvent-free plastic cleaner.
Fine wooden components
Use a damp cloth to clean fine wooden trim
panels and components. Follow up by drying
with a soft cloth.
Safety belts
Dirty belt straps impede the reeling action and
thus have a negative impact on safety.
Chemical cleaning
Do not clean chemically, as this may
destroy the webbing.<
Inside sensors
Clean inside sensors such as those of the High-
beam Assistant using a lint-free cloth moist-
ened with glass cleaner.
Displays
Clean displays like the radio or the Control Dis-
play using a display-cleaning cloth or a soft,
nonabrasive lint-free cloth.
Avoid using excessive pressure when
cleaning displays; otherwise, you could
damage them.<
Never use chemical-based cleansers or
household scouring products. Keep all
liquids away from the equipment. Otherwise
corrosion or damage to surfaces or electrical
components can occur.<
CD/DVD drives
Do not use cleaning CDs; they can dam-
age parts of the player.<
Storing your vehicle
When storing your vehicle for longer than three
months, please seek the advice of your BMW
center or a workshop that works in accordance
with BMW guidelines.
Page 214 of 252
Replacing components
212
Replacing components
Onboard vehicle tool kit
Coupe
Convertible
The onboard tool kit is located in the luggage
compartment under the floor mat.
Replacing wiper blades
1.Fold the wiper arm out and grasp firmly.
2.Press the safety tabs together while sliding
the wiper blade toward the front to disen-
gage it.3.Mount the new wiper blade and slide in until
it is heard to engage.
Lamps and bulbs
Lamps and bulbs make an essential contribu-
tion to vehicle safety. You must be duly diligent
in replacing them. If you are not familiar with the
specified procedures, have the corresponding
work carried out at your BMW center.
Never touch the glass of new bulbs with
your bare fingers, as even minute
amounts of contamination will burn into the
bulb's surface and reduce its service life. Use a
clean cloth, napkin, etc., or hold the bulb by its
metal socket.<
A selection of replacement bulbs is available at
your BMW center.
Whenever you perform any work on the
electrical system, turn off the systems/
consumers involved to prevent short circuits
from occurring. To avoid possible injury or
equipment damage when replacing bulbs,
observe any instructions provided by the bulb
manufacturer.<
For information on how to care for the head-
lamps, please follow the instructions on
page208.
For bulbs for which changing is not
described, and for checking and adjusting
headlamp aim, please contact your BMW cen-
ter.<
Light-emitting diodes LEDs
Light-emitting diodes installed behind translu-
cent lenses serve as the light source for many of
the controls and displays in your vehicle. These
light-emitting diodes, which operate using a
concept similar to that applied in conventional
lasers, are officially designated as Class 1 light-
emitting diodes.
Page 215 of 252
Mobility
213Reference
At a glance
Controls
Driving tips
Communications
Navigation
Entertainment
Do not remove the covers, and never
stare into the unfiltered light for several
hours, as irritation of the retina could result.<
Xenon lamps
The service life of these bulbs is very long and
the probability of a failure is very low, provided
that they are not switched on and off an unusual
number of times. If one of these bulbs should
nevertheless fail, it is possible to continue driv-
ing with great caution using the fog lamps, pro-
vided traffic laws in your area do not prohibit
this.
Have work on the xenon lighting system
performed only by your BMW center or a
workshop that works according to BMW repair
procedures with correspondingly trained per-
sonnel. Due to the high voltage present in the
system, there is a danger of fatal injuries when
work is carried out improperly.<
Parking lamps, roadside parking
lamps, daytime running lamps
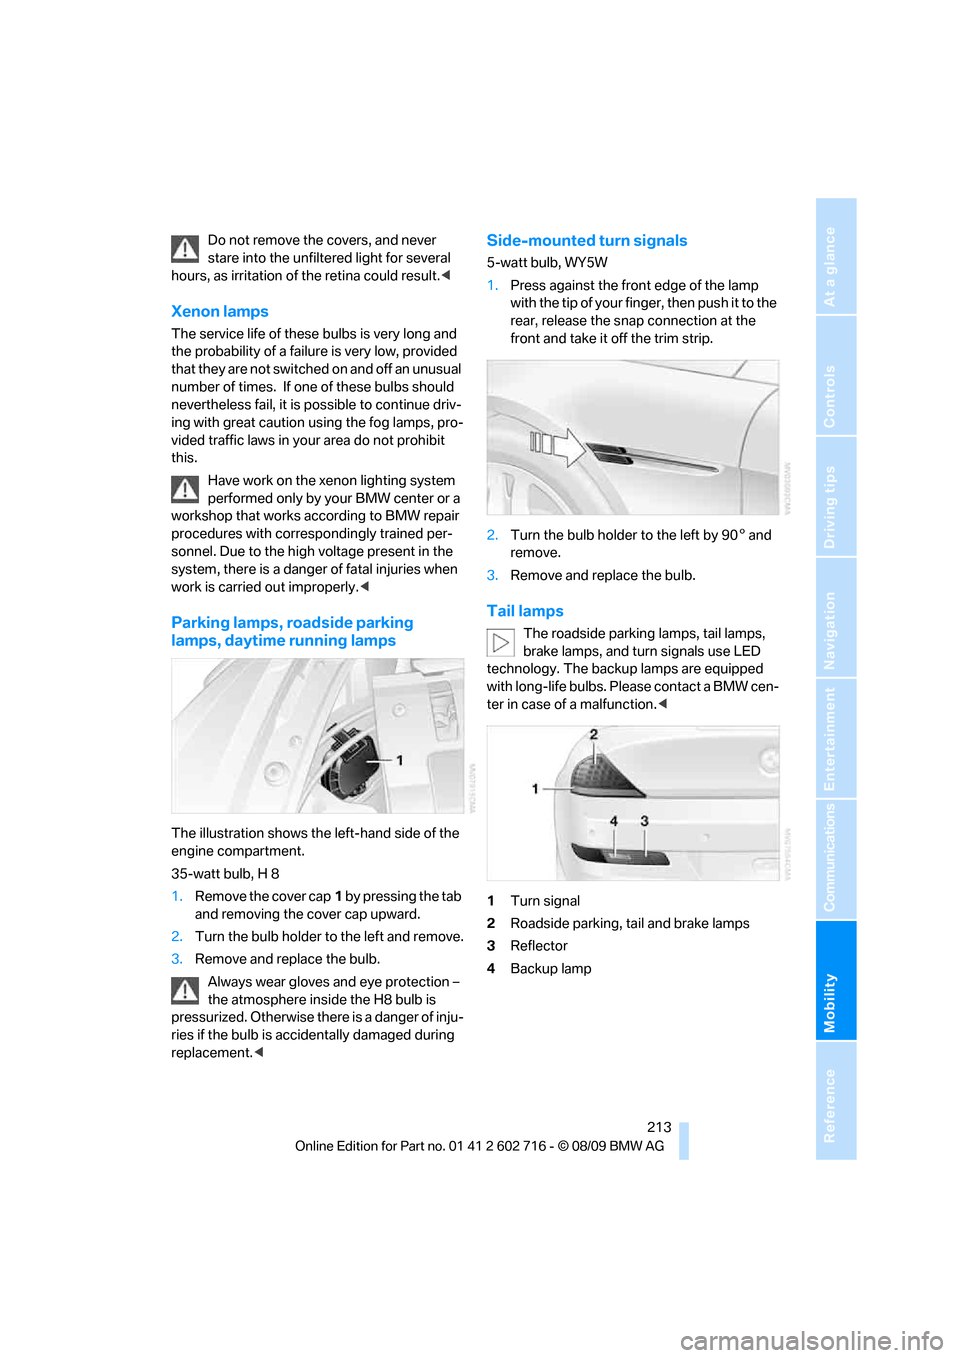
The illustration shows the left-hand side of the
engine compartment.
35-watt bulb, H 8
1.Remove the cover cap1 by pressing the tab
and removing the cover cap upward.
2.Turn the bulb holder to the left and remove.
3.Remove and replace the bulb.
Always wear gloves and eye protection –
the atmosphere inside the H8 bulb is
pressurized. Otherwise there is a danger of inju-
ries if the bulb is accidentally damaged during
replacement.<
Side-mounted turn signals
5-watt bulb, WY5W
1.Press against the front edge of the lamp
with the tip of your finger, then push it to the
rear, release the snap connection at the
front and take it off the trim strip.
2.Turn the bulb holder to the left by 905 and
remove.
3.Remove and replace the bulb.
Tail lamps
The roadside parking lamps, tail lamps,
brake lamps, and turn signals use LED
technology. The backup lamps are equipped
with long-life bulbs. Please contact a BMW cen-
ter in case of a malfunction.<
1Turn signal
2Roadside parking, tail and brake lamps
3Reflector
4Backup lamp
Page 216 of 252
Replacing components
214
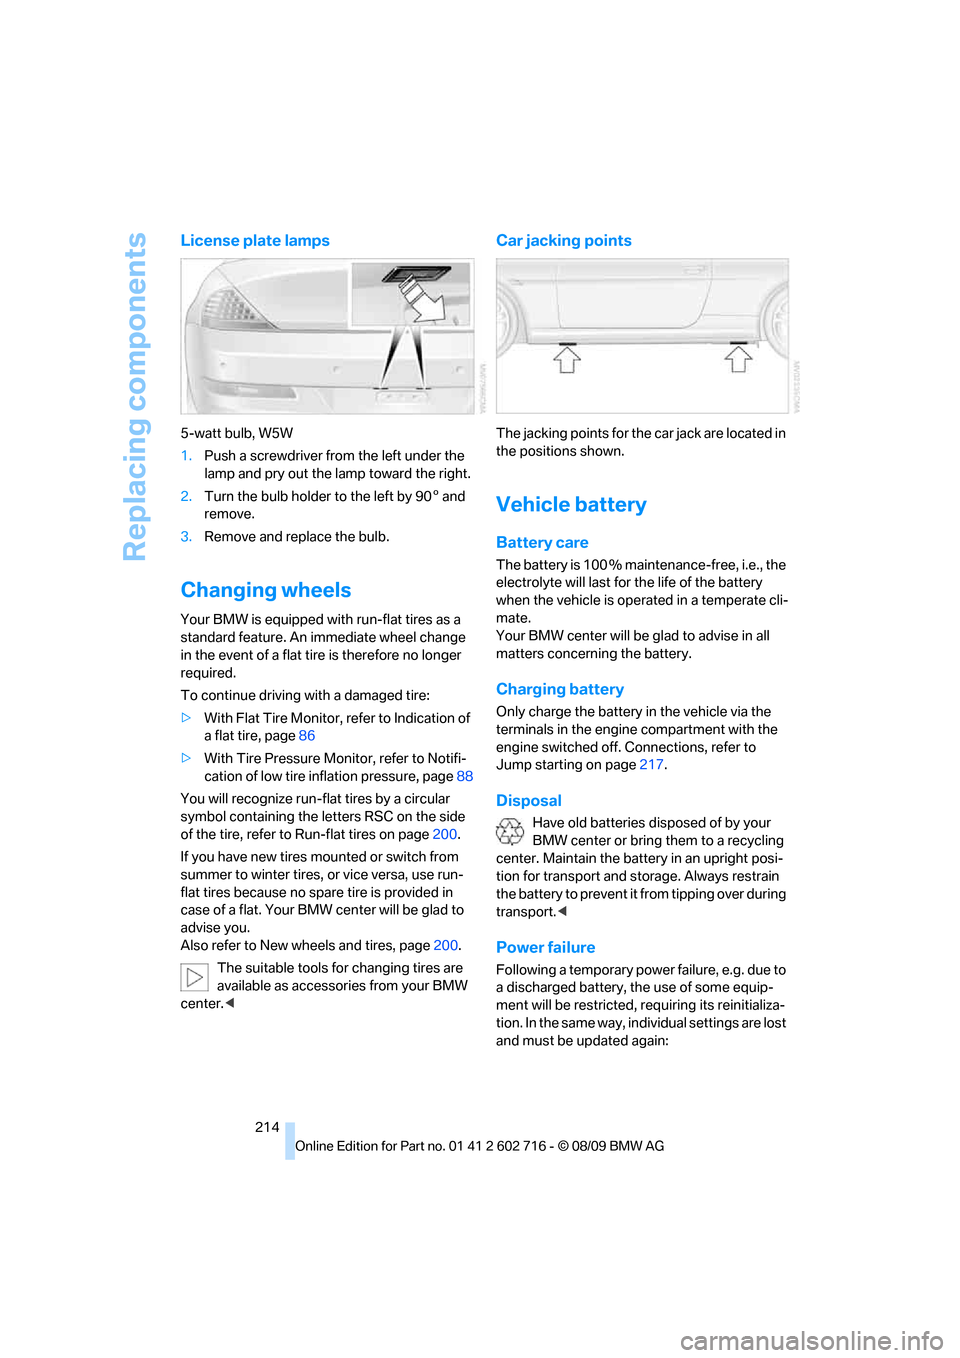
License plate lamps
5-watt bulb, W5W
1.Push a screwdriver from the left under the
lamp and pry out the lamp toward the right.
2.Turn the bulb holder to the left by 905 and
remove.
3.Remove and replace the bulb.
Changing wheels
Your BMW is equipped with run-flat tires as a
standard feature. An immediate wheel change
in the event of a flat tire is therefore no longer
required.
To continue driving with a damaged tire:
>With Flat Tire Monitor, refer to Indication of
a flat tire, page86
>With Tire Pressure Monitor, refer to Notifi-
cation of low tire inflation pressure, page88
You will recognize run-flat tires by a circular
symbol containing the letters RSC on the side
of the tire, refer to Run-flat tires on page200.
If you have new tires mounted or switch from
summer to winter tires, or vice versa, use run-
flat tires because no spare tire is provided in
case of a flat. Your BMW center will be glad to
advise you.
Also refer to New wheels and tires, page200.
The suitable tools for changing tires are
available as accessories from your BMW
center.<
Car jacking points
The jacking points for the car jack are located in
the positions shown.
Vehicle battery
Battery care
The battery is 100 % maintenance-free, i.e., the
electrolyte will last for the life of the battery
when the vehicle is operated in a temperate cli-
mate.
Your BMW center will be glad to advise in all
matters concerning the battery.
Charging battery
Only charge the battery in the vehicle via the
terminals in the engine compartment with the
engine switched off. Connections, refer to
Jump starting on page217.
Disposal
Have old batteries disposed of by your
BMW center or bring them to a recycling
center. Maintain the battery in an upright posi-
tion for transport and storage. Always restrain
the battery to prevent it from tipping over during
transport.<
Power failure
Following a temporary power failure, e.g. due to
a discharged battery, the use of some equip-
ment will be restricted, requiring its reinitializa-
tion. In the same way, individual settings are lost
and must be updated again:
Page 217 of 252
Mobility
215Reference
At a glance
Controls
Driving tips
Communications
Navigation
Entertainment
>Seat, mirror and steering wheel* memory
The positions must be stored again, refer to
page47.
>Time and date
Must be updated again, refer to page76.
>Radio
Radio stations need to be stored again,
refer to page150.
>Navigation system
You must wait until the system becomes
functional again, refer to page126.
>Glass roof, electric
It may not be possible to move the glass
roof. The system must be initialized, refer to
page38.
>Active steering
The system automatically initializes itself
briefly during a trip. The system is deacti-
vated during this time, refer to page89.
>Power windows
The pinch prevention system for the power
windows must be reinitialized, refer to
page36.
Talk to your BMW center before placing
the stored vehicle back in service. <
Fuses
Never attempt to repair a blown fuse and
do not replace a defective fuse with a sub-
stitute of another color or amperage rating, as
this could lead to a circuit overload, ultimately
resulting in a fire in the vehicle.<
Spare fuses and a pair of plastic tweezers are
located in the compartment for the onboard tool
kit, refer to page212.
Information on fuse allocation is located below
the bracket for the onboard tool kit, see below.
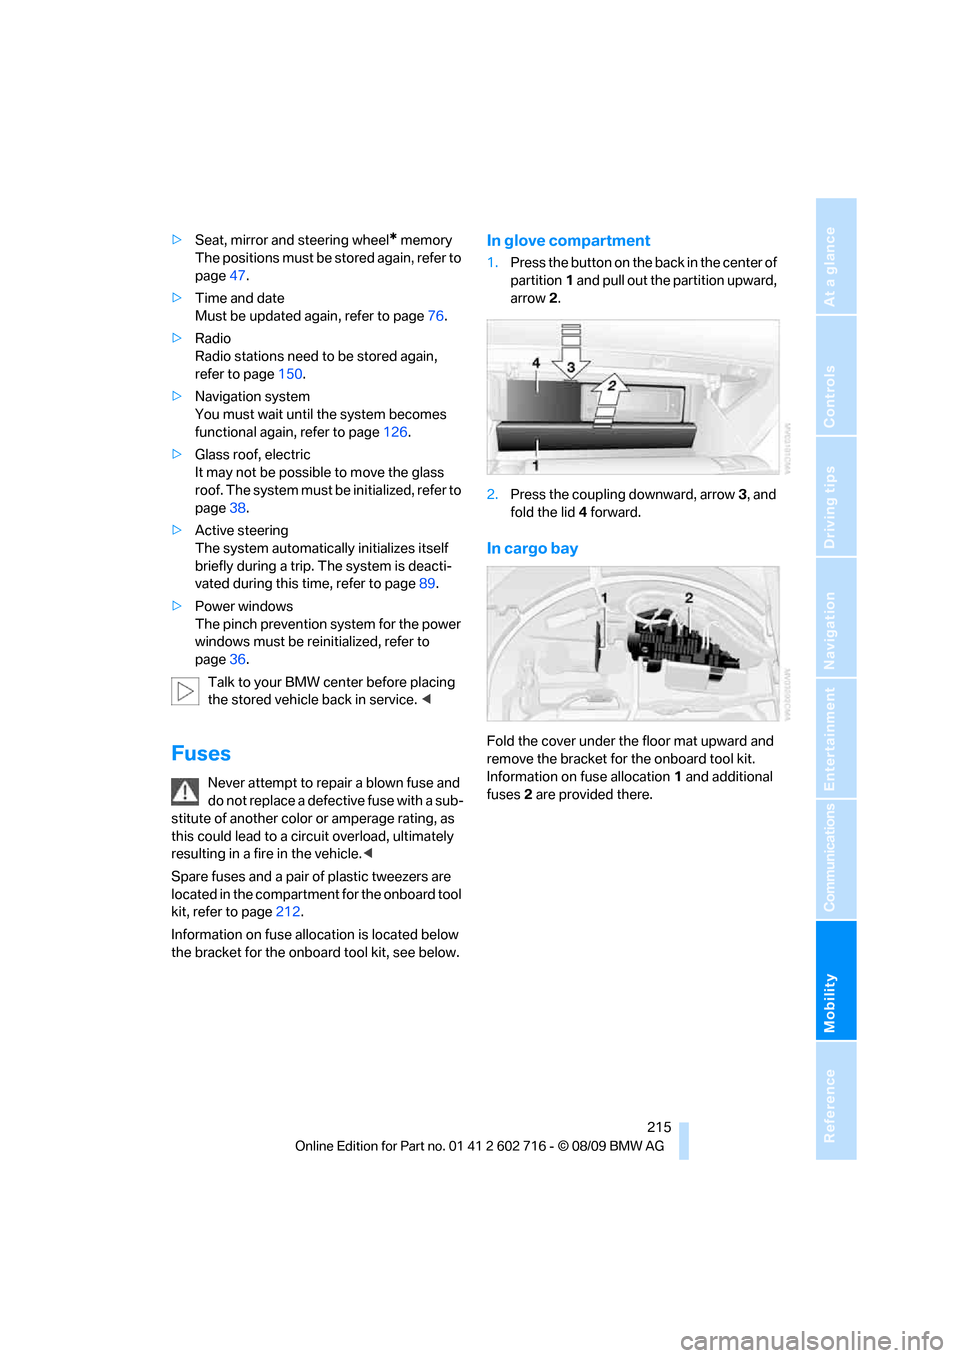
In glove compartment
1.Press the button on the back in the center of
partition1 and pull out the partition upward,
arrow2.
2.Press the coupling downward, arrow3, and
fold the lid 4 forward.
In cargo bay
Fold the cover under the floor mat upward and
remove the bracket for the onboard tool kit.
Information on fuse allocation1 and additional
fuses2 are provided there.
Page 218 of 252
Giving and receiving assistance
216
Giving and receiving assistance
Emergency request
Requirements
>BMW Assist is activated.
Activating BMW Assist, refer to page188.
>Radio readiness is activated.
>The BMW Assist system is logged on to a
mobile phone network.
>The BMW Assist system is functional.
>Full preparation package mobile phone.
With this equipment, an Emergency
Request is still possible when no mobile
phone is paired with the vehicle.
Once your BMW Assist subscription expires,
the BMW Assist system can be deactivated by
a BMW center without you having to visit a
workshop. If the BMW Assist system has been
deactivated, Emergency Requests are not pos-
sible. The BMW Assist system can be reacti-
vated by a BMW center after signing a new con-
tract.
Initiating an Emergency Request
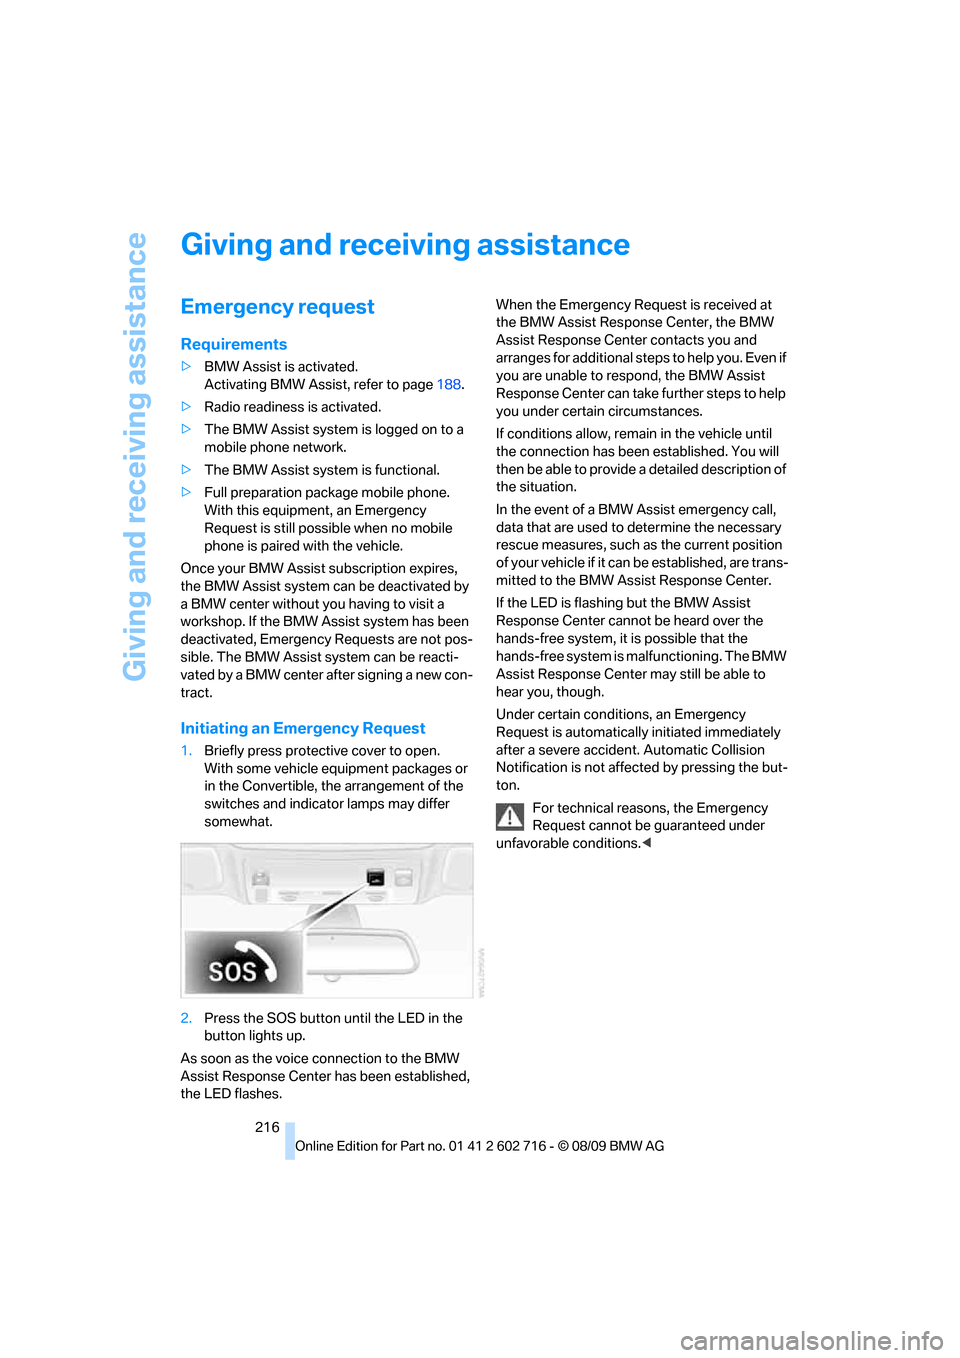
1.Briefly press protective cover to open.
With some vehicle equipment packages or
in the Convertible, the arrangement of the
switches and indicator lamps may differ
somewhat.
2.Press the SOS button until the LED in the
button lights up.
As soon as the voice connection to the BMW
Assist Response Center has been established,
the LED flashes.When the Emergency Request is received at
the BMW Assist Response Center, the BMW
Assist Response Center contacts you and
arranges for additional steps to help you. Even if
you are unable to respond, the BMW Assist
Response Center can take further steps to help
you under certain circumstances.
If conditions allow, remain in the vehicle until
the connection has been established. You will
then be able to provide a detailed description of
the situation.
In the event of a BMW Assist emergency call,
data that are used to determine the necessary
rescue measures, such as the current position
of your vehicle if it can be established, are trans-
mitted to the BMW Assist Response Center.
If the LED is flashing but the BMW Assist
Response Center cannot be heard over the
hands-free system, it is possible that the
hands-free system is malfunctioning. The BMW
Assist Response Center may still be able to
hear you, though.
Under certain conditions, an Emergency
Request is automatically initiated immediately
after a severe accident. Automatic Collision
Notification is not affected by pressing the but-
ton.
For technical reasons, the Emergency
Request cannot be guaranteed under
unfavorable conditions.<
Page 219 of 252
Mobility
217Reference
At a glance
Controls
Driving tips
Communications
Navigation
Entertainment
Warning triangle*
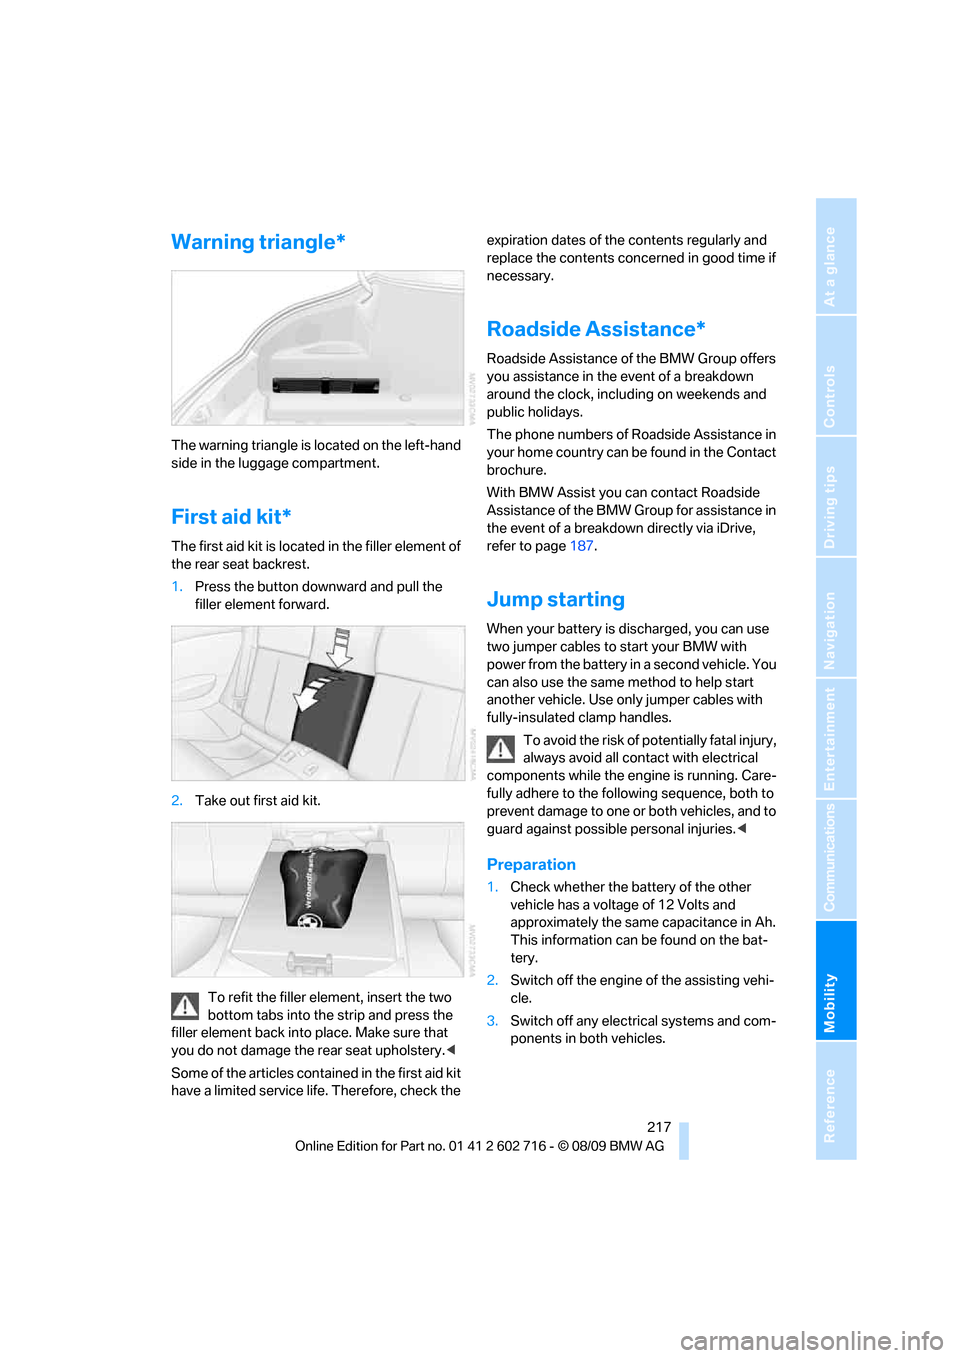
The warning triangle is located on the left-hand
side in the luggage compartment.
First aid kit*
The first aid kit is located in the filler element of
the rear seat backrest.
1.Press the button downward and pull the
filler element forward.
2.Take out first aid kit.
To refit the filler element, insert the two
bottom tabs into the strip and press the
filler element back into place. Make sure that
you do not damage the rear seat upholstery.<
Some of the articles contained in the first aid kit
have a limited service life. Therefore, check the expiration dates of the contents regularly and
replace the contents concerned in good time if
necessary.
Roadside Assistance*
Roadside Assistance of the BMW Group offers
you assistance in the event of a breakdown
around the clock, including on weekends and
public holidays.
The phone numbers of Roadside Assistance in
your home country can be found in the Contact
brochure.
With BMW Assist you can contact Roadside
Assistance of the BMW Group for assistance in
the event of a breakdown directly via iDrive,
refer to page187.
Jump starting
When your battery is discharged, you can use
two jumper cables to start your BMW with
power from the battery in a second vehicle. You
can also use the same method to help start
another vehicle. Use only jumper cables with
fully-insulated clamp handles.
To avoid the risk of potentially fatal injury,
always avoid all contact with electrical
components while the engine is running. Care-
fully adhere to the following sequence, both to
prevent damage to one or both vehicles, and to
guard against possible personal injuries.<
Preparation
1.Check whether the battery of the other
vehicle has a voltage of 12 Volts and
approximately the same capacitance in Ah.
This information can be found on the bat-
tery.
2.Switch off the engine of the assisting vehi-
cle.
3.Switch off any electrical systems and com-
ponents in both vehicles.
Page 220 of 252
Giving and receiving assistance
218 There must not be any contact between
the bodies of the two vehicles, otherwise
there is a danger of shorting.<
Connecting jumper cables
To avoid personal injury from sparks, fol-
low this sequence when connecting
jumper cables.<
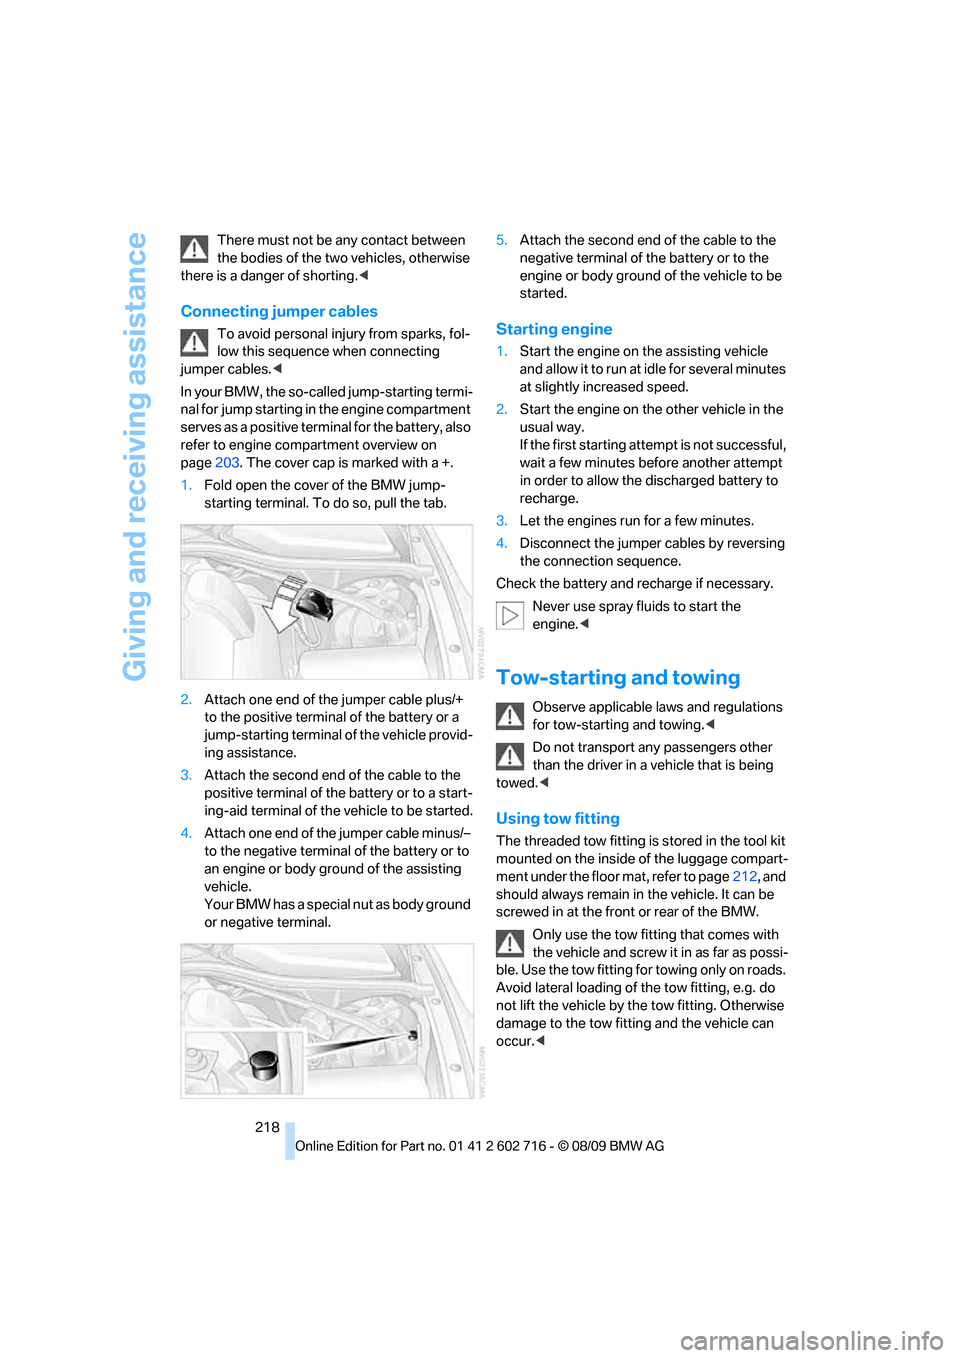
In your BMW, the so-called jump-starting termi-
nal for jump starting in the engine compartment
serves as a positive terminal for the battery, also
refer to engine compartment overview on
page203. The cover cap is marked with a +.
1.Fold open the cover of the BMW jump-
starting terminal. To do so, pull the tab.
2.Attach one end of the jumper cable plus/+
to the positive terminal of the battery or a
jump-starting terminal of the vehicle provid-
ing assistance.
3.Attach the second end of the cable to the
positive terminal of the battery or to a start-
ing-aid terminal of the vehicle to be started.
4.Attach one end of the jumper cable minus/–
to the negative terminal of the battery or to
an engine or body ground of the assisting
vehicle.
Your BMW has a special nut as body ground
or negative terminal.5.Attach the second end of the cable to the
negative terminal of the battery or to the
engine or body ground of the vehicle to be
started.Starting engine
1.Start the engine on the assisting vehicle
and allow it to run at idle for several minutes
at slightly increased speed.
2.Start the engine on the other vehicle in the
usual way.
If the first starting attempt is not successful,
wait a few minutes before another attempt
in order to allow the discharged battery to
recharge.
3.Let the engines run for a few minutes.
4.Disconnect the jumper cables by reversing
the connection sequence.
Check the battery and recharge if necessary.
Never use spray fluids to start the
engine.<
Tow-starting and towing
Observe applicable laws and regulations
for tow-starting and towing.<
Do not transport any passengers other
than the driver in a vehicle that is being
towed.<
Using tow fitting
The threaded tow fitting is stored in the tool kit
mounted on the inside of the luggage compart-
ment under the floor mat, refer to page212, and
should always remain in the vehicle. It can be
screwed in at the front or rear of the BMW.
Only use the tow fitting that comes with
the vehicle and screw it in as far as possi-
ble. Use the tow fitting for towing only on roads.
Avoid lateral loading of the tow fitting, e.g. do
not lift the vehicle by the tow fitting. Otherwise
damage to the tow fitting and the vehicle can
occur.<