roof BMW 650I COUPE&CONVERTIBLE 2006 Owners Manual
[x] Cancel search | Manufacturer: BMW, Model Year: 2006, Model line: 650I COUPE&CONVERTIBLE, Model: BMW 650I COUPE&CONVERTIBLE 2006Pages: 242, PDF Size: 8.47 MB
Page 16 of 242
At a glance
15Reference
Controls
Driving tips
Communications
Navigation
Entertainment
Mobility
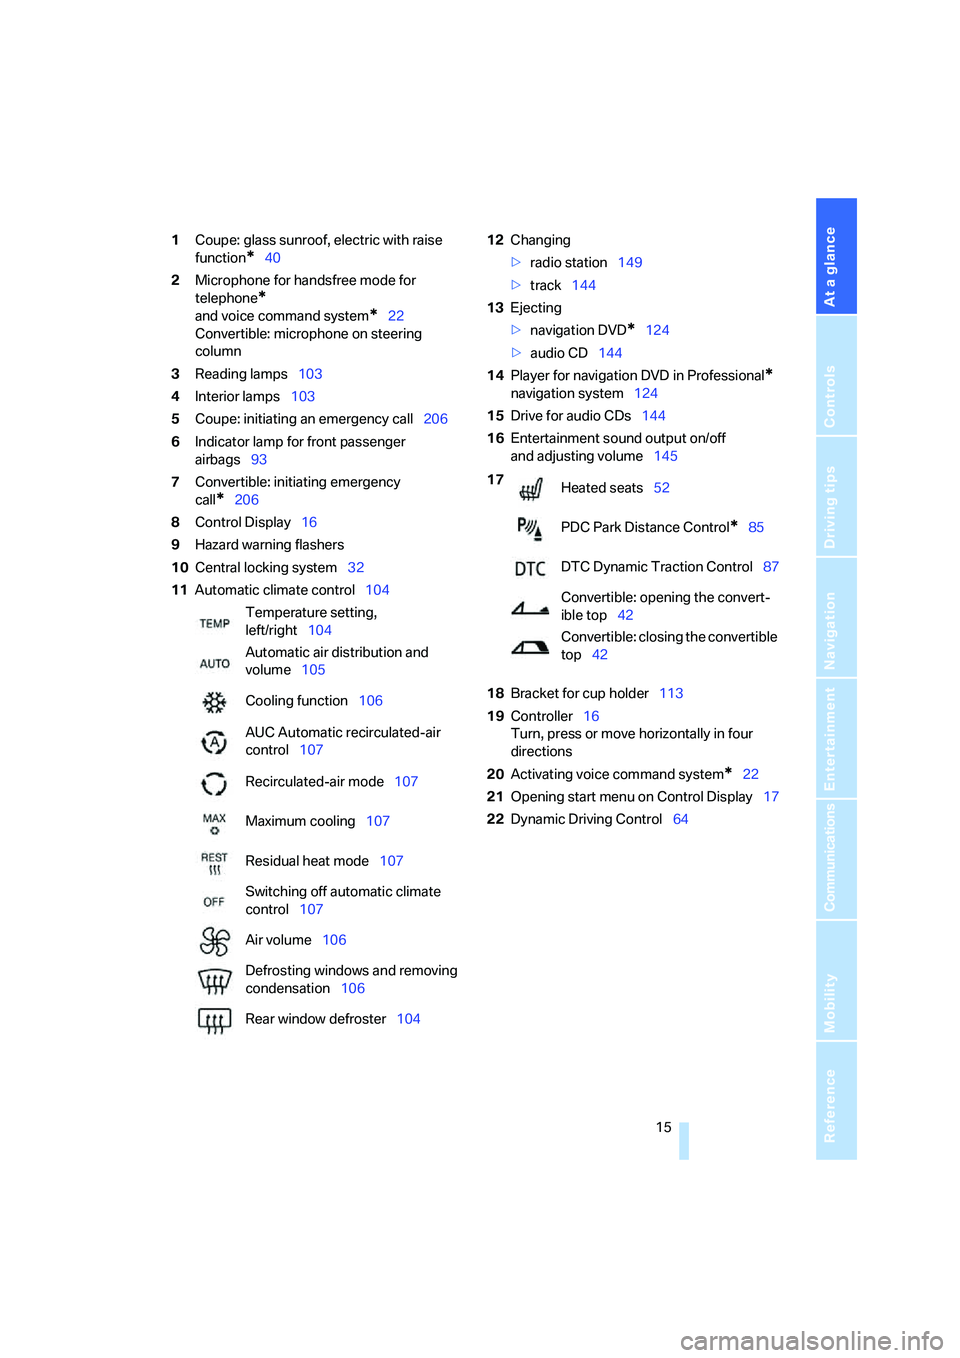
1Coupe: glass sunroof, electric with raise
function
*40
2Microphone for handsfree mode for
telephone
*
and voice command system*22
Convertible: microphone on steering
column
3Reading lamps103
4Interior lamps103
5Coupe: initiating
an emergency call206
6Indicator lamp
for front passenger
airbags93
7Convertible: initiating emergency
call
*206
8Control Display16
9Hazard warning flashers
10Central locking system32
11Automatic climate control10412Changing
>radio station149
>track144
13Ejecting
>navigation DVD
*124
>audio CD144
14Player for navigation DVD in Professional
*
navigation system124
15Drive for audio CDs144
16Entertainment sound output on/off
and adjusting volume145
18Bracket for cup holder113
19Controller16
Turn, press or move horizontally in four
directions
20Activating voice command system
*22
21Opening start menu on Control Display17
22Dynamic Driving Control64 Temperature setting,
left/right104
Automatic air distribution and
volume105
Cooling function106
AUC Automatic recirculated-air
control107
Recirculated-air mode107
Maximum cooling107
Residual heat mode107
Switching off automatic climate
control107
Air volume106
Defrosting windows and removing
condensation106
Rear window defroster104
17
Heated seats52
PDC Park Distance Control
*85
DTC Dynamic Traction Control87
Convertible: opening the convert-
ible top42
Convertible: closing the convertible
top42
Page 25 of 242
Voice command system
24
Notes
The mobile phone can also be operated
with voice commands, refer to
page174.<
For voice commands, bear the following in
mind:
>Say the commands and numbers smoothly
and at normal volume, avoiding excessive
emphasis and pauses. This also applies to
spelling when entering the destination.
>Always say the commands in the language
of voice command system.
>When selecting a radio station, use the
usual pronunciation of the station name.
>For entries in the voice-activated phone
book, only use names in the language of the
voice command system and no abbrevia-
tions.
>Keep the doors, windows and glass sun-
roof
* or convertible top closed to prevent
interference from ambient noise.
>Avoid background noises in the vehicle
while speaking.
Page 32 of 242
Controls
31Reference
At a glance
Driving tips
Communications
Navigation
Entertainment
Mobility
Convenience opening mode
Press the button longer:
>Coupe: the windows are opened, the glass
sunroof
* is raised and the sliding visor
slides back.
>Convertible: the windows and the convert-
ible top are opened.
Watch the convertible top during the
opening process to be sure that no
one is injured. Releasing the button stops
the operation.<
Locking doors
Press the button.
Switching on interior lamps
With vehicle locked:
Press the button.
You can also use this function to locate your
vehicle in parking garages etc.
Panic mode*
You can also trigger the alarm system in case of
danger:
Press the button for at least 3 seconds.
To switch off alarm: press any button.
Opening luggage compartment lid
Press the button for approx. 1 second.
The luggage compartment lid opens, regard-
less of whether it was previously locked or
unlocked.
A previously locked luggage compart-
ment lid is also locked again after closing.
Coupe: during opening, the luggage compart-
ment lid pivots back and up. Make sure there is
sufficient clearance.<
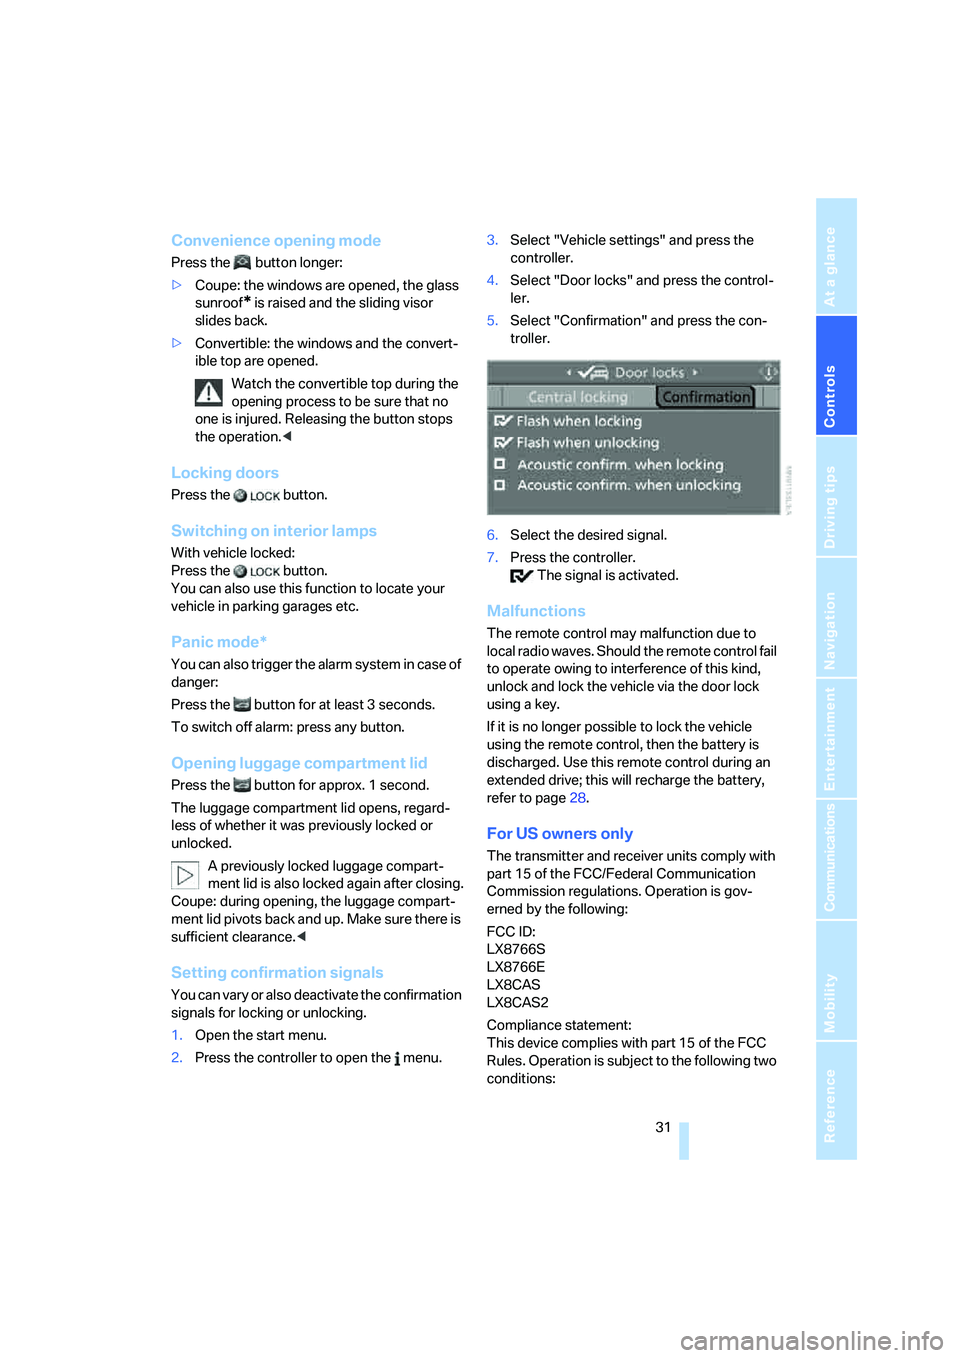
Setting confirmation signals
You can vary or also deactivate the confirmation
signals for locking or unlocking.
1.Open the start menu.
2.Press the controller to open the menu.3.Select "Vehicle settings" and press the
controller.
4.Select "Door locks" and press the control-
ler.
5.Select "Confirmation" and press the con-
troller.
6.Select the desired signal.
7.Press the controller.
The signal is activated.
Malfunctions
The remote control may malfunction due to
local radio waves. Should the remote control fail
to operate owing to interference of this kind,
unlock and lock the vehicle via the door lock
using a key.
If it is no longer possible to lock the vehicle
using the remote control, then the battery is
discharged. Use this remote control during an
extended drive; this will recharge the battery,
refer to page28.
For US owners only
The transmitter and receiver units comply with
part 15 of the FCC/Federal Communication
Commission regulations. Operation is gov-
erned by the following:
FCC ID:
LX8766S
LX8766E
LX8CAS
LX8CAS2
Compliance statement:
This device complies with part 15 of the FCC
Rules. Operation is subject to the following two
conditions:
Page 33 of 242
Opening and closing
32 >This device may not cause harmful interfer-
ence, and
>this device must accept any interference
received, including interference that may
cause undesired operation.
Any unauthorized modifications or
changes to these devices could void the
user's authority to operate this equipment.<
Using door lock
When unlocking
1.Turning the key once unlocks the driver's
door and the fuel filler door.
2.A second turn of the key unlocks the pas-
senger door and luggage compartment lid.
Convenience operation
You can use the door lock to operate the win-
dows and the glass sunroof
* in the Coupe or to
operate the windows and the top in the Con-
vertible.
Turn and hold the key in the positions for
unlocking or locking.
Keep a close eye on the closing process
and also on the opening process of the
convertible top to be sure that no one is injured.
Releasing the key stops the operation.<
Manual operation
In the event of an electrical malfunction, you can
turn a key all the way to the right or left in the
door lock to lock or unlock the driver's door.
Opening and closing:
from inside
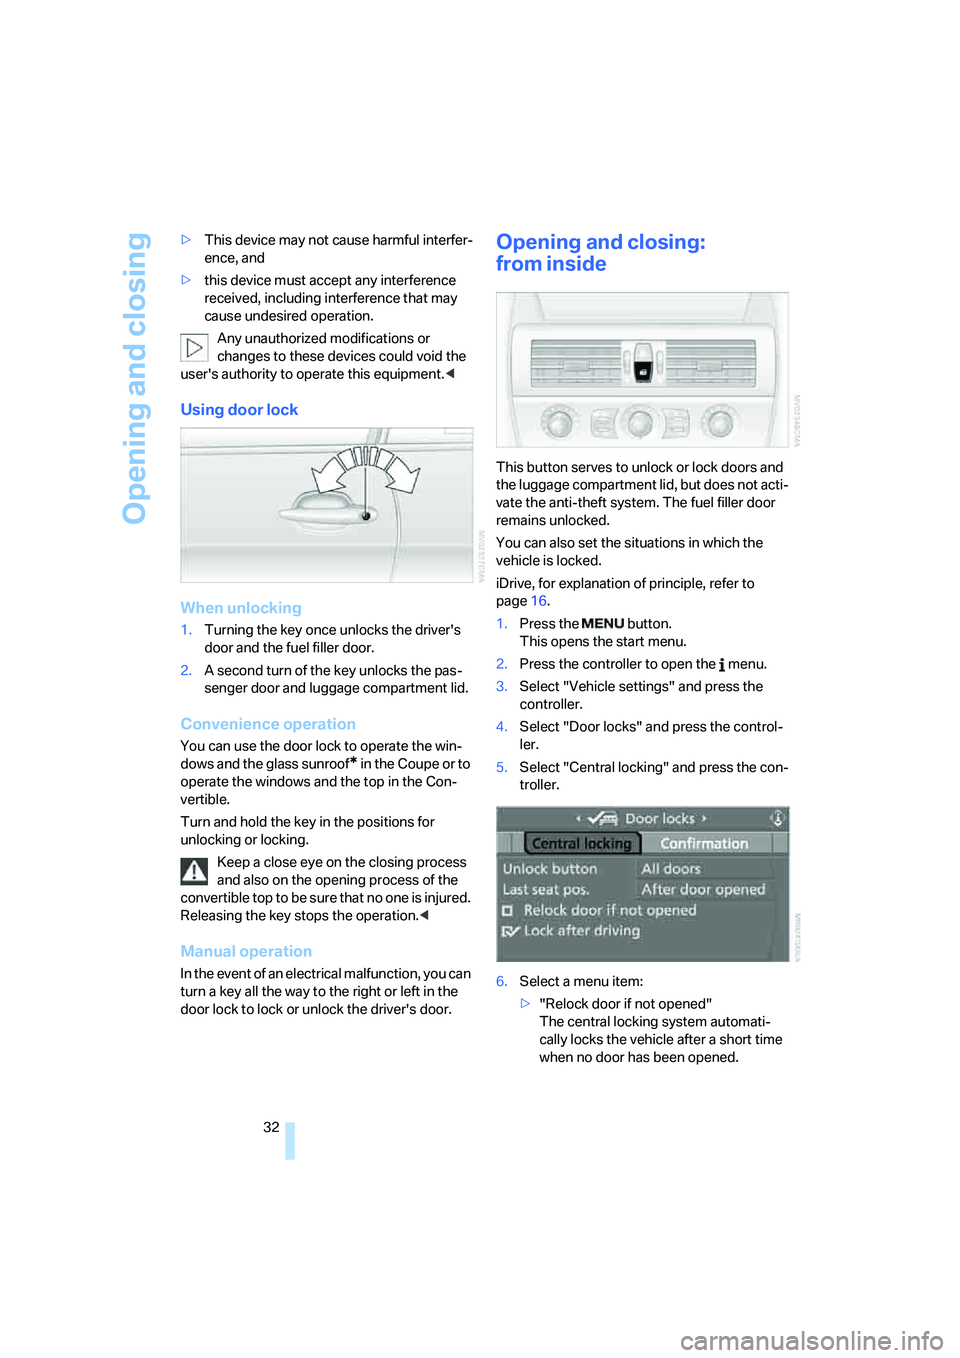
This button serves to unlock or lock doors and
the luggage compartment lid, but does not acti-
vate the anti-theft system. The fuel filler door
remains unlocked.
You can also set the situations in which the
vehicle is locked.
iDrive, for explanation of principle, refer to
page16.
1.Press the button.
This opens the start menu.
2.Press the controller to open the menu.
3.Select "Vehicle settings" and press the
controller.
4.Select "Door locks" and press the control-
ler.
5.Select "Central locking" and press the con-
troller.
6.Select a menu item:
>"Relock door if not opened"
The central locking system automati-
cally locks the vehicle after a short time
when no door has been opened.
Page 37 of 242
Opening and closing
36
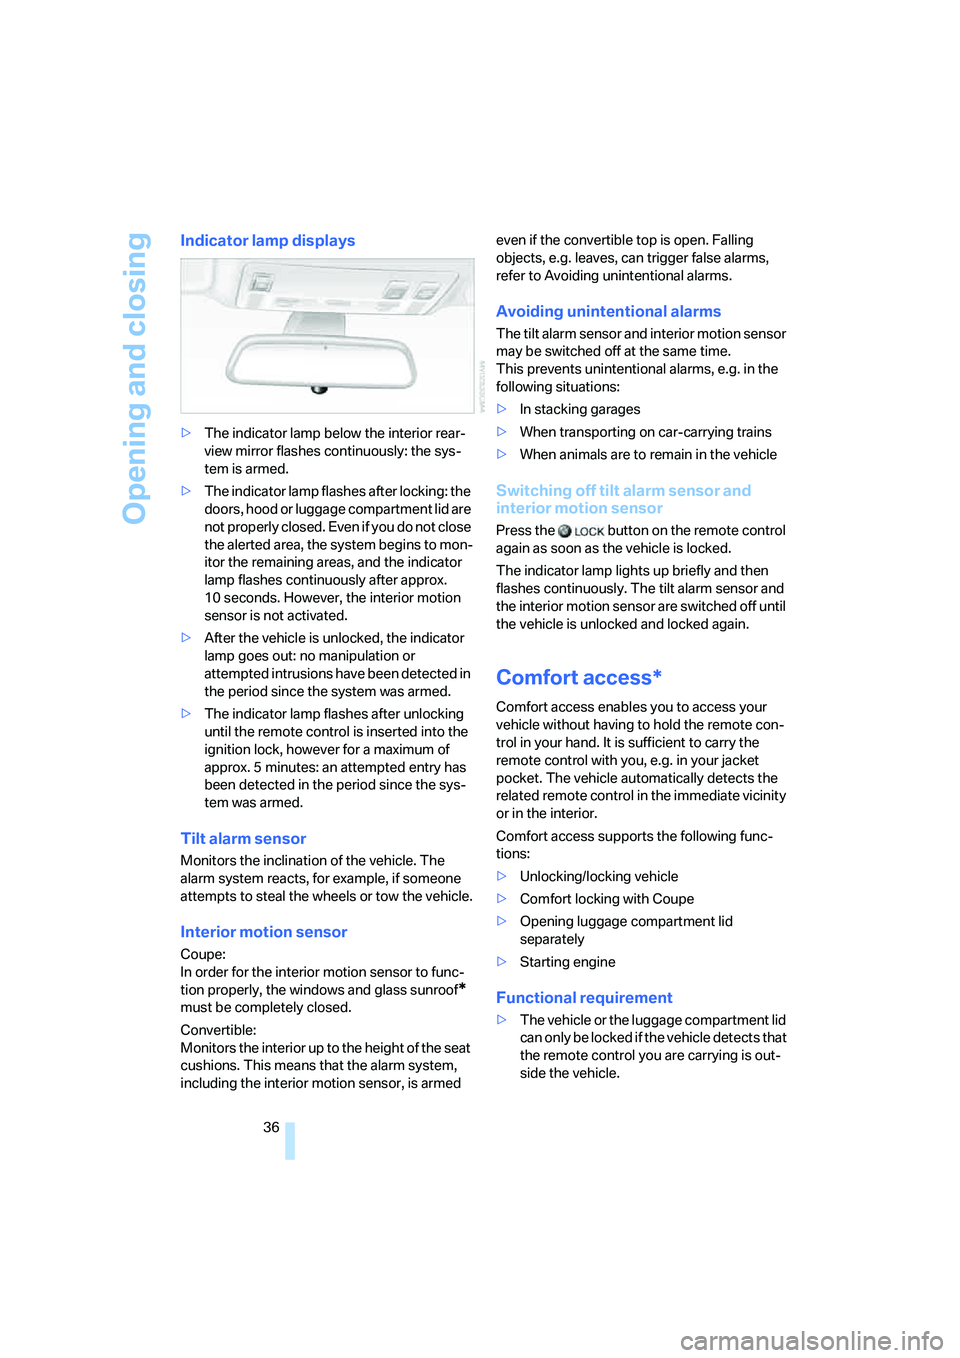
Indicator lamp displays
>The indicator lamp below the interior rear-
view mirror flashes continuously: the sys-
tem is armed.
>The indicator lamp flashes after locking: the
doors, hood or luggage compartment lid are
not properly closed. Even if you do not close
the alerted area, the system begins to mon-
itor the remaining areas, and the indicator
lamp flashes continuously after approx.
10 seconds. However, the interior motion
sensor is not activated.
>After the vehicle is unlocked, the indicator
lamp goes out: no manipulation or
attempted intrusions have been detected in
the period since the system was armed.
>The indicator lamp flashes after unlocking
until the remote control is inserted into the
ignition lock, however for a maximum of
approx. 5 minutes: an attempted entry has
been detected in the period since the sys-
tem was armed.
Tilt alarm sensor
Monitors the inclination of the vehicle. The
alarm system reacts, for example, if someone
attempts to steal the wheels or tow the vehicle.
Interior motion sensor
Coupe:
In order for the interior motion sensor to func-
tion properly, the windows and glass sunroof
*
must be completely closed.
Convertible:
Monitors the interior up to the height of the seat
cushions. This means that the alarm system,
including the interior motion sensor, is armed even if the convertible top is open. Falling
objects, e.g. leaves, can trigger false alarms,
refer to Avoiding unintentional alarms.
Avoiding unintentional alarms
The tilt alarm sensor and interior motion sensor
may be switched off at the same time.
This prevents unintentional alarms, e.g. in the
following situations:
>In stacking garages
>When transporting on car-carrying trains
>When animals are to remain in the vehicle
Switching off tilt alarm sensor and
interior motion sensor
Press the button on the remote control
again as soon as the vehicle is locked.
The indicator lamp lights up briefly and then
flashes continuously. The tilt alarm sensor and
the interior motion sensor are switched off until
the vehicle is unlocked and locked again.
Comfort access*
Comfort access enables you to access your
vehicle without having to hold the remote con-
trol in your hand. It is sufficient to carry the
remote control with you, e.g. in your jacket
pocket. The vehicle automatically detects the
related remote control in the immediate vicinity
or in the interior.
Comfort access supports the following func-
tions:
>Unlocking/locking vehicle
>Comfort locking with Coupe
>Opening luggage compartment lid
separately
>Starting engine
Functional requirement
>The vehicle or the luggage compartment lid
can only be locked if the vehicle detects that
the remote control you are carrying is out-
side the vehicle.
Page 38 of 242
Controls
37Reference
At a glance
Driving tips
Communications
Navigation
Entertainment
Mobility
>The next unlocking and locking cycle is not
possible until after approx. 2 seconds.
>The engine can only be started if the vehicle
detects that the remote control is located in
the vehicle.
Comparison with ordinary remote
control
You can control the functions mentioned previ-
ously with the comfort access or by pressing
the buttons on the remote control. Before doing
so, please familiarize yourself with the informa-
tion on opening and closing, starting on
page28.
The special features when using comfort
access are described below.
Should a short delay occur when opening
or closing the windows, the glass sunroof
or the convertible top, the system is checking
whether a remote control is located in the vehi-
cle. Please repeat opening or closing if neces-
sary.<
Unlocking
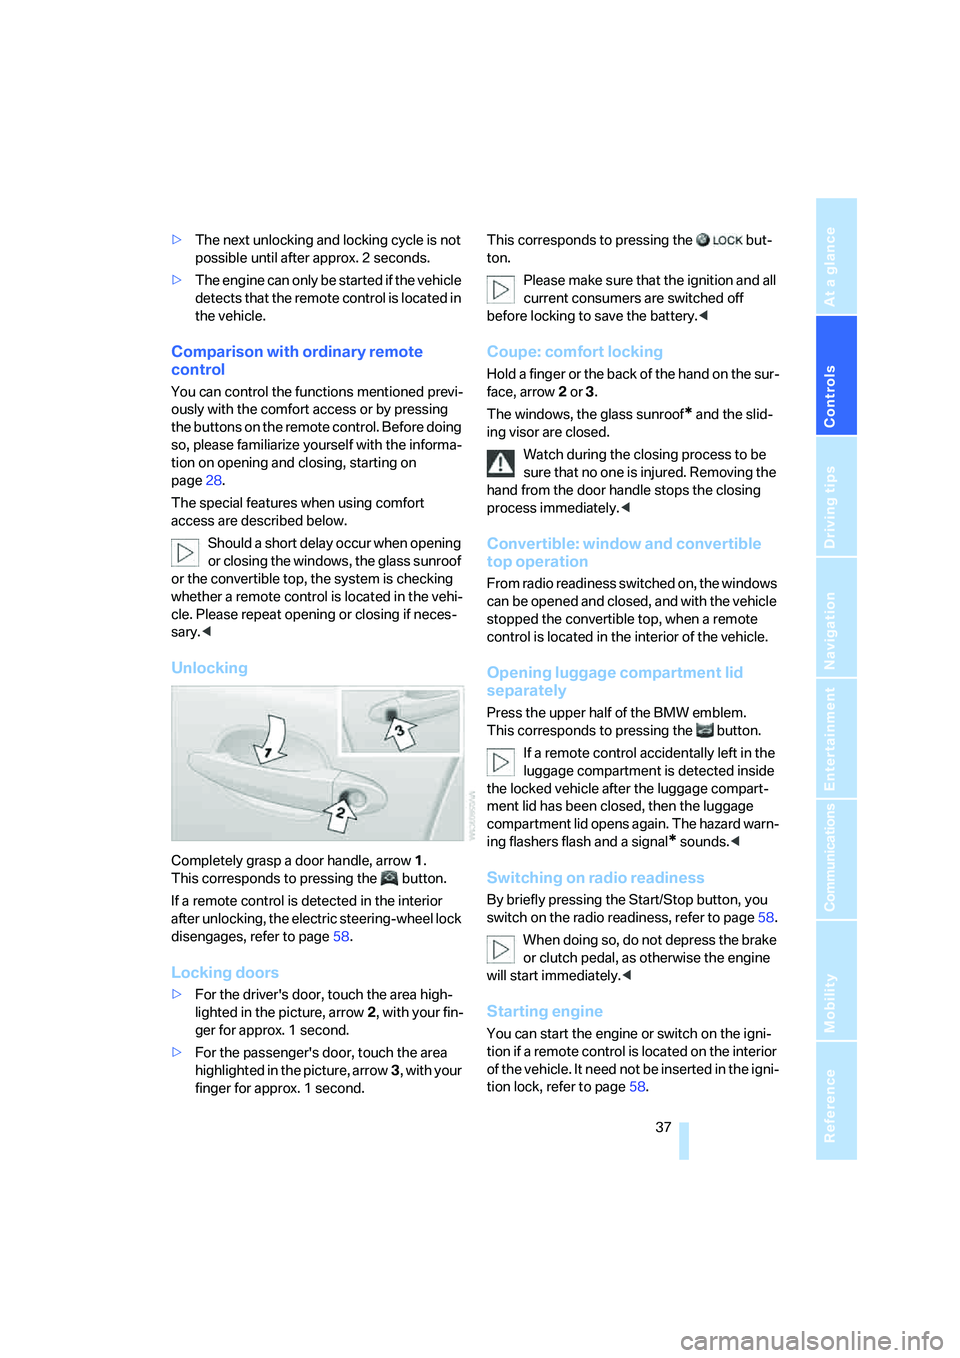
Completely grasp a door handle, arrow1.
This corresponds to pressing the button.
If a remote control is detected in the interior
after unlocking, the electric steering-wheel lock
disengages, refer to page58.
Locking doors
>For the driver's door, touch the area high-
lighted in the picture, arrow2, with your fin-
ger for approx. 1 second.
>For the passenger's door, touch the area
highlighted in the picture, arrow3, with your
finger for approx. 1 second.This corresponds to pressing the but-
ton.
Please make sure that the ignition and all
current consumers are switched off
before locking to save the battery.<
Coupe: comfort locking
Hold a finger or the back of the hand on the sur-
face, arrow2 or 3.
The windows, the glass sunroof
* and the slid-
ing visor are closed.
Watch during the closing process to be
sure that no one is injured. Removing the
hand from the door handle stops the closing
process immediately.<
Convertible: window and convertible
top operation
From radio readiness switched on, the windows
can be opened and closed, and with the vehicle
stopped the convertible top, when a remote
control is located in the interior of the vehicle.
Opening luggage compartment lid
separately
Press the upper half of the BMW emblem.
This corresponds to pressing the button.
If a remote control accidentally left in the
luggage compartment is detected inside
the locked vehicle after the luggage compart-
ment lid has been closed, then the luggage
compartment lid opens again. The hazard warn-
ing flashers flash and a signal
* sounds.<
Switching on radio readiness
By briefly pressing the Start/Stop button, you
switch on the radio readiness, refer to page58.
When doing so, do not depress the brake
or clutch pedal, as otherwise the engine
will start immediately.<
Starting engine
You can start the engine or switch on the igni-
tion if a remote control is located on the interior
of the vehicle. It need not be inserted in the igni-
tion lock, refer to page58.
Page 41 of 242
Opening and closing
40 Coupe: for information on comfort closing with
comfort access, refer to page37.
Pinch protection system
If the closing force rises beyond a predefined
threshold during closing, the system will imme-
diately stop moving the window prior to lower-
ing it slightly.
Despite the pinch protection system,
inspect the window's travel path prior to
closing it, as the safety system might fail to
detect certain kinds of obstructions, such as
thin objects, and the window would continue
closing.
Pulling the switch beyond the resistance point
and holding it limits the response of the pinch
protection system. In this case, the window will
respond to forces beyond a defined threshold
by opening only slightly.
If you pull the switch past the resistance point
again within approx. 4 seconds and hold it there,
the pinch protection system will be deactivated.
Do not install any accessories in the range of
movement of the windows, as otherwise the
pinch protection system will be impaired.
Convertible: the rear side windows and rear
window are not equipped with a pinch protec-
tion system. Therefore, watch the rear side win-
dows and the rear window during closing, as
otherwise injuries can occur.<
Coupe:
Glass sunroof, electric with
raise function*
The glass sunroof and sliding visor are opera-
tional whenever the ignition is switched on.
To prevent injuries, exercise care when
closing the glass sunroof and keep it in
your field of vision until it is shut.
Always take along the remote control when you
leave the vehicle; otherwise, children could, for
example, operate the roof and injure them-
selves.<
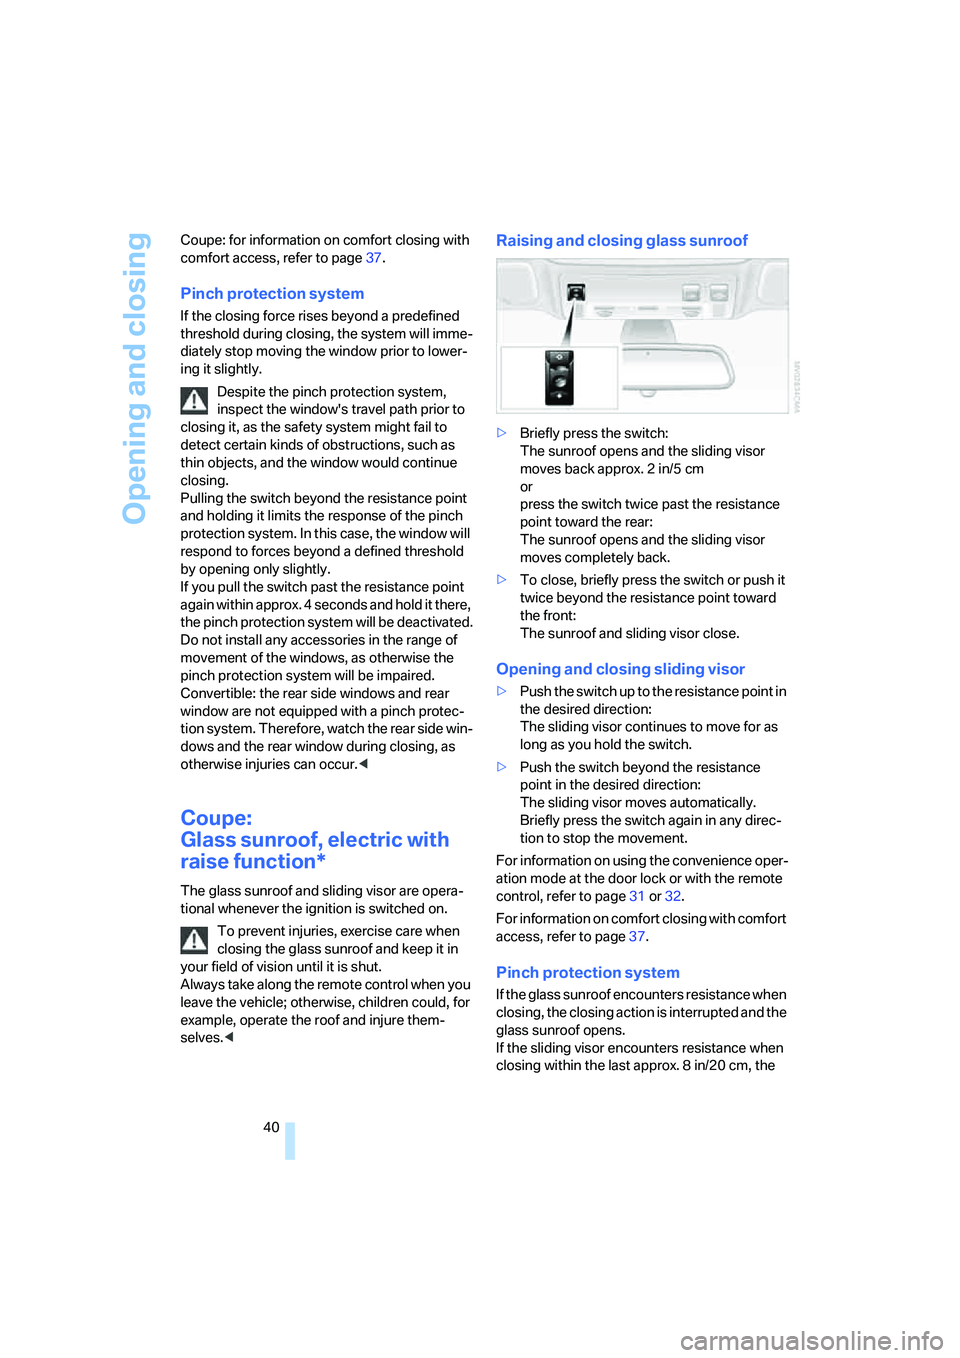
Raising and closing glass sunroof
>Briefly press the switch:
The sunroof opens and the sliding visor
moves back approx. 2 in/5 cm
or
press the switch twice past the resistance
point toward the rear:
The sunroof opens and the sliding visor
moves completely back.
>To close, briefly press the switch or push it
twice beyond the resistance point toward
the front:
The sunroof and sliding visor close.
Opening and closing sliding visor
>Push the switch up to the resistance point in
the desired direction:
The sliding visor continues to move for as
long as you hold the switch.
>Push the switch beyond the resistance
point in the desired direction:
The sliding visor moves automatically.
Briefly press the switch again in any direc-
tion to stop the movement.
For information on using the convenience oper-
ation mode at the door lock or with the remote
control, refer to page31 or32.
For information on comfort closing with comfort
access, refer to page37.
Pinch protection system
If the glass sunroof encounters resistance when
closing, the closing action is interrupted and the
glass sunroof opens.
If the sliding visor encounters resistance when
closing within the last approx. 8 in/20 cm, the
Page 42 of 242
Controls
41Reference
At a glance
Driving tips
Communications
Navigation
Entertainment
Mobility
closing action is interrupted and the sliding
visor opens again slightly.
Despite the pinch protection system, you
should inspect the sunroof's travel range
prior to closing it, as the safety feature might fail
to detect certain kinds of obstructions, such as
very thin objects, and the sunroof would con-
tinue closing.
Pressing the switch beyond the resistance
point and holding it deactivates the pinch pro-
tection system.<
Following interruptions in electrical
power supply
After an interruption in the power supply the
glass sunroof may not move. The system has to
be initialized. Should this occur, please have the
sunroof initialized at your BMW center.
Moving manually
In the event of an electrical malfunction, you can
move the panorama glass sunroof and the slid-
ing visor manually.
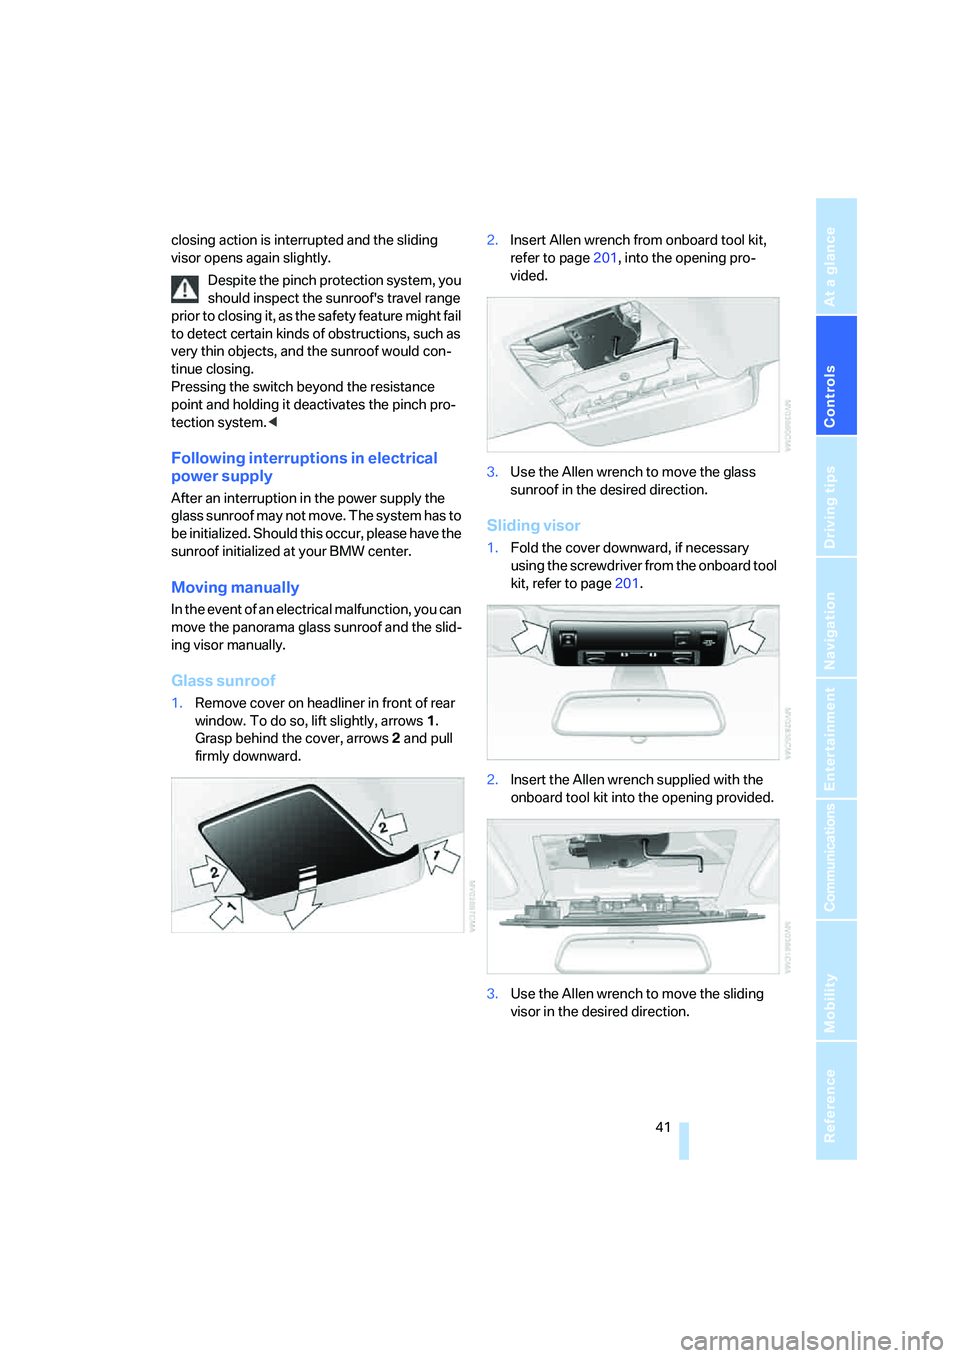
Glass sunroof
1.Remove cover on headliner in front of rear
window. To do so, lift slightly, arrows1.
Grasp behind the cover, arrows2 and pull
firmly downward.2.Insert Allen wrench from onboard tool kit,
refer to page201, into the opening pro-
vided.
3.Use the Allen wrench to move the glass
sunroof in the desired direction.
Sliding visor
1.Fold the cover downward, if necessary
using the screwdriver from the onboard tool
kit, refer to page201.
2.Insert the Allen wrench supplied with the
onboard tool kit into the opening provided.
3.Use the Allen wrench to move the sliding
visor in the desired direction.
Page 94 of 242
Controls
93Reference
At a glance
Driving tips
Communications
Navigation
Entertainment
Mobility
head and side airbags help provide protection in
the event of a side impact. The relevant side air-
bag supports the side upper body area. The
head airbag supports the head. The knee airbag
protects the legs from colliding with the cockpit.
The airbags are deliberately not triggered in
every impact situation, e. g. less severe acci-
dents or rear-end collisions.
Do not apply adhesive materials to the
cover panels of the airbags, cover them or
modify them in any other way. Do not attempt to
remove the airbag retention system from the
vehicle. Do not modify or tamper with either the
wiring or the individual components in the air-
bag system. This category includes the uphol-
stery in the center of the steering wheel, on the
instrument panel, the side trim panels on the
doors and on the Coupe, the roof pillars along
with the sides of the headliner. Do not attempt
to remove or dismantle the steering wheel.
Do not touch the individual components
directly after the system has been triggered,
because there is a danger of burns.
In the event of malfunctions, deactivation, or
triggering of the airbag restraint system, have
the testing, repair, removal, and disposal of air-
bag generators carried out only by a BMW cen-
ter or a workshop that works according to BMW
repair procedures with appropriately trained
personnel and has the required explosives
licenses. Unprofessional attempts to service
the system could lead to failure in an emer-
gency or undesired airbag activation, either of
which could result in personal injury.<
Warnings and information on the airbags is also
provided on the sun visors.
Automatic deactivation of front
passenger airbags
The occupation of the seat is detected by eval-
uating the impression on the occupied seat sur-
face of the front passenger seat. The system
correspondingly activates or deactivates the
front, knee and side airbag on the front passen-
ger side.The current status of the front passenger
airbag, i.e. deactivated or activated, is
indicated by the indicator lamp over the interior
rearview mirror, refer to Operating state of front
passenger airbags below.<
Before transporting a child in the front
passenger seat, read the safety informa-
tion and follow the instructions under Trans-
porting children safely, refer to page56.
The front, knee and side airbag on the front pas-
senger side can be deactivated for teenagers
and adults in certain seat positions; the indica-
tor lamp for the front passenger airbags lights
up when this occurs. In these cases, change the
seat position so that the front passenger air-
bags are activated and the indicator lamp goes
out. If the desired status cannot be produced by
changing the seat position, transport the corre-
sponding person in the rear seat.
Do not fit seat covers, seat cushion padding,
beaded mats or other items onto the front pas-
senger seat unless they are specifically recom-
mended by BMW. Do not place objects under
the seat which could press against the seat
from below. Otherwise a correct evaluation of
the occupied seat surface cannot be ensured.<
Operating state of front passenger
airbags
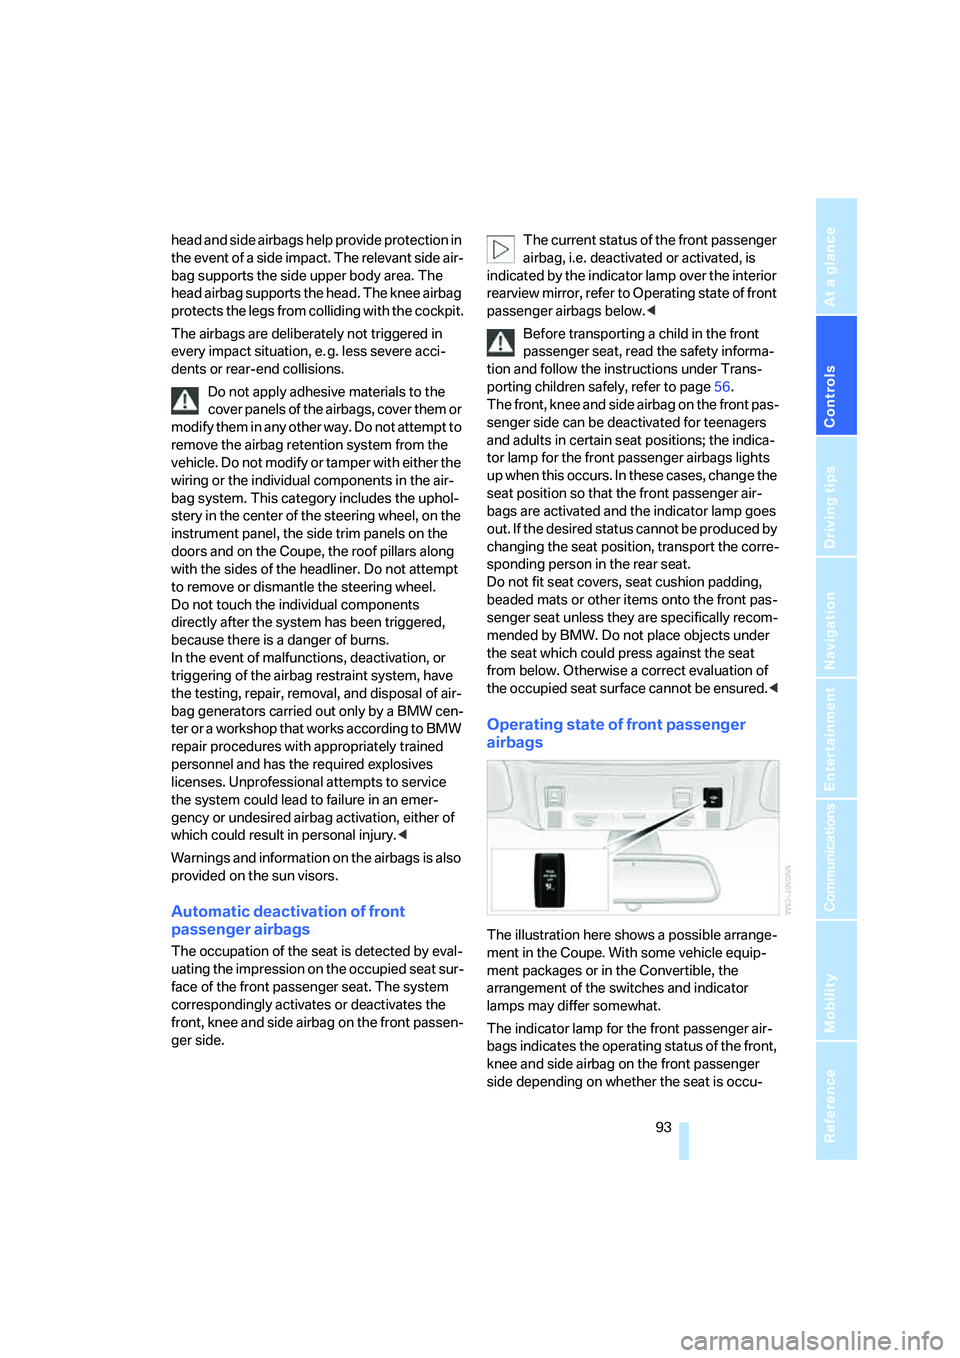
The illustration here shows a possible arrange-
ment in the Coupe. With some vehicle equip-
ment packages or in the Convertible, the
arrangement of the switches and indicator
lamps may differ somewhat.
The indicator lamp for the front passenger air-
bags indicates the operating status of the front,
knee and side airbag on the front passenger
side depending on whether the seat is occu-
Page 119 of 242
Things to remember when driving
118
Things to remember when driving
Breaking-in
Moving parts need time to adjust to one
another. To ensure that your vehicle continues
to provide optimized economy of operation
throughout an extended service life, we request
that you devote careful attention to the follow-
ing section.
Engine and differential
Always obey all official speed limits.
Up to 1,200 miles/2,000 km
Drive at changing engine and driving speeds,
however do not exceed 4,500 rpm or 100 mph/
160 km/h.
Avoid full-throttle operation and use of the
transmission's kick-down mode during these
initial miles.
From 1,200 miles/2,000 km
The engine and vehicle speed can gradually be
increased.
SMG Sequential Manual Transmission
Do not use the acceleration assistant during the
break-in period, refer to page64.
Tires
Due to technical factors associated with their
manufacture, tires do not achieve their full trac-
tion potential until after an initial break-in
period. Therefore, drive reservedly during the
first 200 miles/300 km.
Brake system
Brakes require an initial break-in period of
approx. 300 miles/500 km to achieve optimized
contact and wear patterns between brake pads
and rotors. Drive in a reserved manner during
this break-in period.
Clutch
The function of the clutch is only at its opti-
mized level after a distance driven of approx.
300 miles/500 km. During this break-in period,
engage the clutch gently.
Following part replacement
Observe the break-in instructions again if com-
ponents mentioned above must be replaced
after subsequent driving operation.
General driving notes
Closing luggage compartment lid
Only drive with the luggage compartment
lid completely closed, otherwise exhaust
can penetrate into the passenger compart-
ment.<
If special circumstances should make it abso-
lutely necessary to operate the vehicle with the
luggage compartment lid open:
1.Coupe: close both windows and the glass
sunroof.
Convertible: with closed top, close all win-
dows.
2.Increase the air volume of the automatic
climate control to a high level, refer to
page106.
Hot exhaust system
As in all vehicles, extremely high temper-
atures are generated in the exhaust sys-
tem. Do not remove the heat shields installed
adjacent to it, and never apply undercoating to
them. When driving, standing at idle and while
parking, take care to avoid possible contact
between the hot exhaust system and any highly
flammable materials such as hay, leaves, grass,
etc. Such contact could lead to a fire, and with it
the risk of serious property damage as well as
personal injury.<