Safety switch BMW 7 SERIES 2016 G11 Owner's Manual
[x] Cancel search | Manufacturer: BMW, Model Year: 2016, Model line: 7 SERIES, Model: BMW 7 SERIES 2016 G11Pages: 314, PDF Size: 7.9 MB
Page 14 of 314
CockpitVehicle features and options
This chapter describes all standard, country-
specific and optional features offered with the
series. It also describes features that are not
necessarily available in your car, e. g., due tothe selected options or country versions. This
also applies to safety-related functions and
systems. The respectively applicable country
provisions must be observed when using the
respective features and systems.
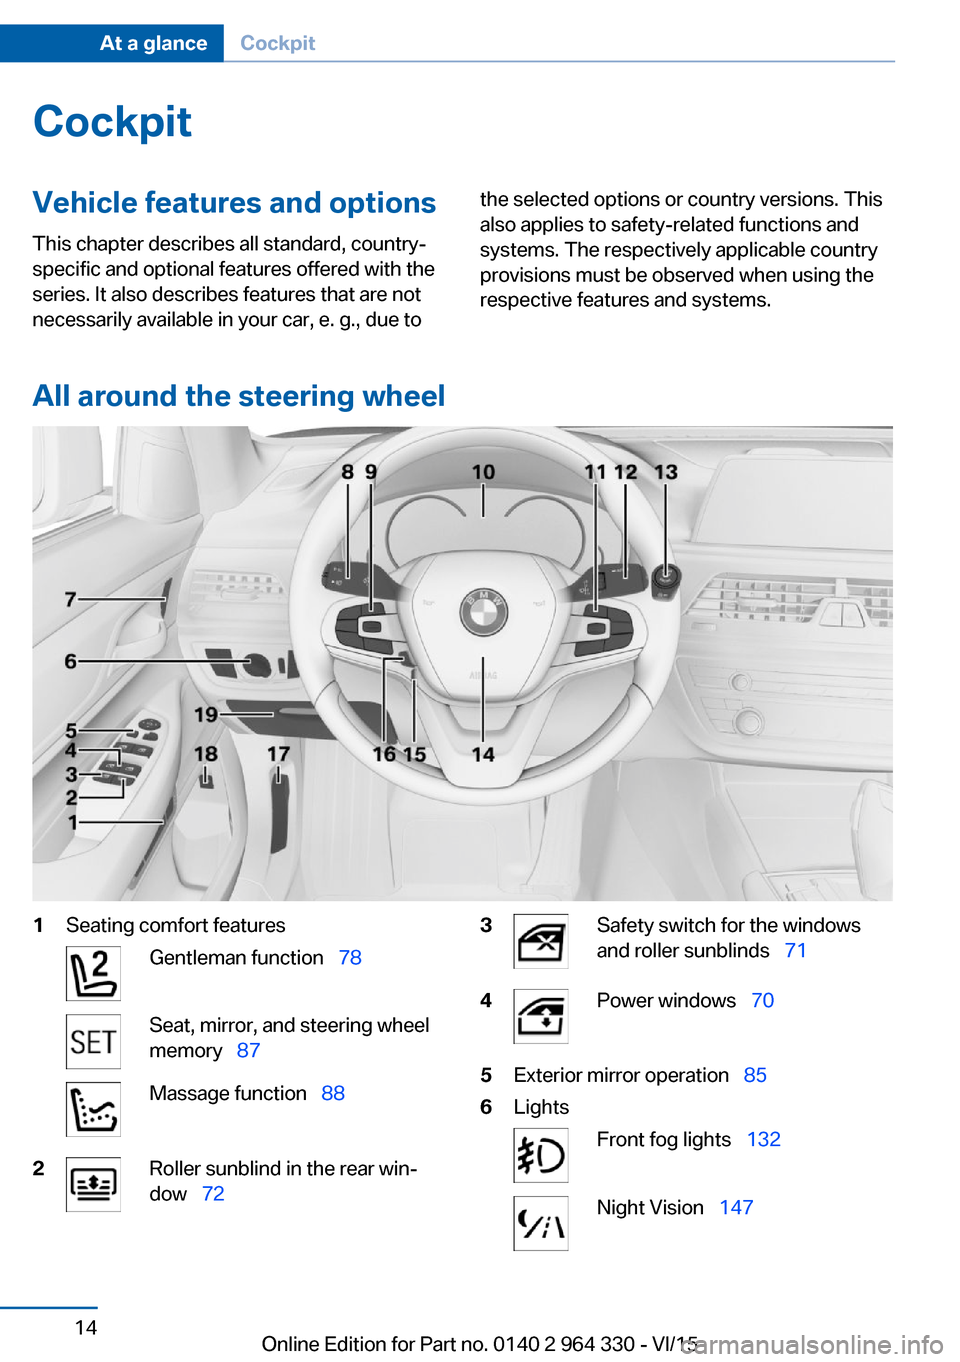
All around the steering wheel
1Seating comfort featuresGentleman function 78Seat, mirror, and steering wheel
memory 87Massage function 882Roller sunblind in the rear win‐
dow 723Safety switch for the windows
and roller sunblinds 714Power windows 705Exterior mirror operation 856LightsFront fog lights 132Night Vision 147Seite 14At a glanceCockpit14
Online Edition for Part no. 0140 2 964 330 - VI/15
Page 19 of 314
Idle state, operating and drive readinessVehicle features and optionsThis chapter describes all standard, country-
specific and optional features offered with the
series. It also describes features that are not
necessarily available in your car, e. g., due to
the selected options or country versions. This
also applies to safety-related functions and
systems. The respectively applicable country
provisions must be observed when using the
respective features and systems.
General information Depending on the situation, the vehicle is in
one of the three states:▷Idle state.▷Operating readiness.▷Drive readiness.
Idle state
The concept The vehicle is switched off in idle state. All
electronic systems/power consumers are de‐
activated.
General information
The vehicle is in idle state prior to opening
from the outside and after exiting and locking.
Information WARNING
An unsecured vehicle can put itself into
motion and roll away. There is risk of an acci‐
dent. Before exiting, secure the vehicle against
rolling.
In order to ensure that the vehicle is secured
against rolling away, observe the following:
▷Set the parking brake.▷On uphill grades or on a slope, turn the
front wheels in the direction of the curb.▷On uphill grades or on a slope, also secure
the vehicle, e.g. with a wheel chock.◀
WARNING
Unattended children or animals can
move the vehicle and endanger themselves
and traffic, e.g. with the following actions:
▷Pressing the Start/Stop button.▷Releasing the parking brake.▷Opening and closing of doors or windows.▷Shifting the selector lever into neutral.▷Using vehicle equipment.
There is risk of accidents or injuries. Do not
leave children or animals unattended in the ve‐
hicle. Carry remote control along when exiting
and lock the vehicle.◀
Idle state automatic
The idle state is automatically established:
▷After several minutes, if no operation takes
place on the vehicle.▷If the charging state of the vehicle batteries
is low.▷If one of the front doors is opened, de‐
pending on the setting via iDrive,
The idle state is not automatically established
while a phone call is active.
Establishing idle state when opening
the front doors
About iDrive:
1."My Vehicle"2."Vehicle settings"3."Doors/Key"4."Turn off after door opening"Seite 19Idle state, operating and drive readinessAt a glance19
Online Edition for Part no. 0140 2 964 330 - VI/15
Page 21 of 314
iDriveVehicle features and options
This chapter describes all standard, country-
specific and optional features offered with the
series. It also describes features that are not
necessarily available in your car, e. g., due to
the selected options or country versions. This
also applies to safety-related functions and
systems. The respectively applicable country
provisions must be observed when using the
respective features and systems.
The concept
The iDrive combines the functions of many
switches. These functions can be operated via
controller or touchscreen.
Information WARNING
Operating the integrated information
system and communication devices while driv‐
ing can distract from traffic. It is possible to
lose control of the vehicle. There is risk of an
accident. Only use the systems or devices
when the traffic situation allows. If necessary
stop and use the systems and devices while
the vehicle is stationary.◀Control elements
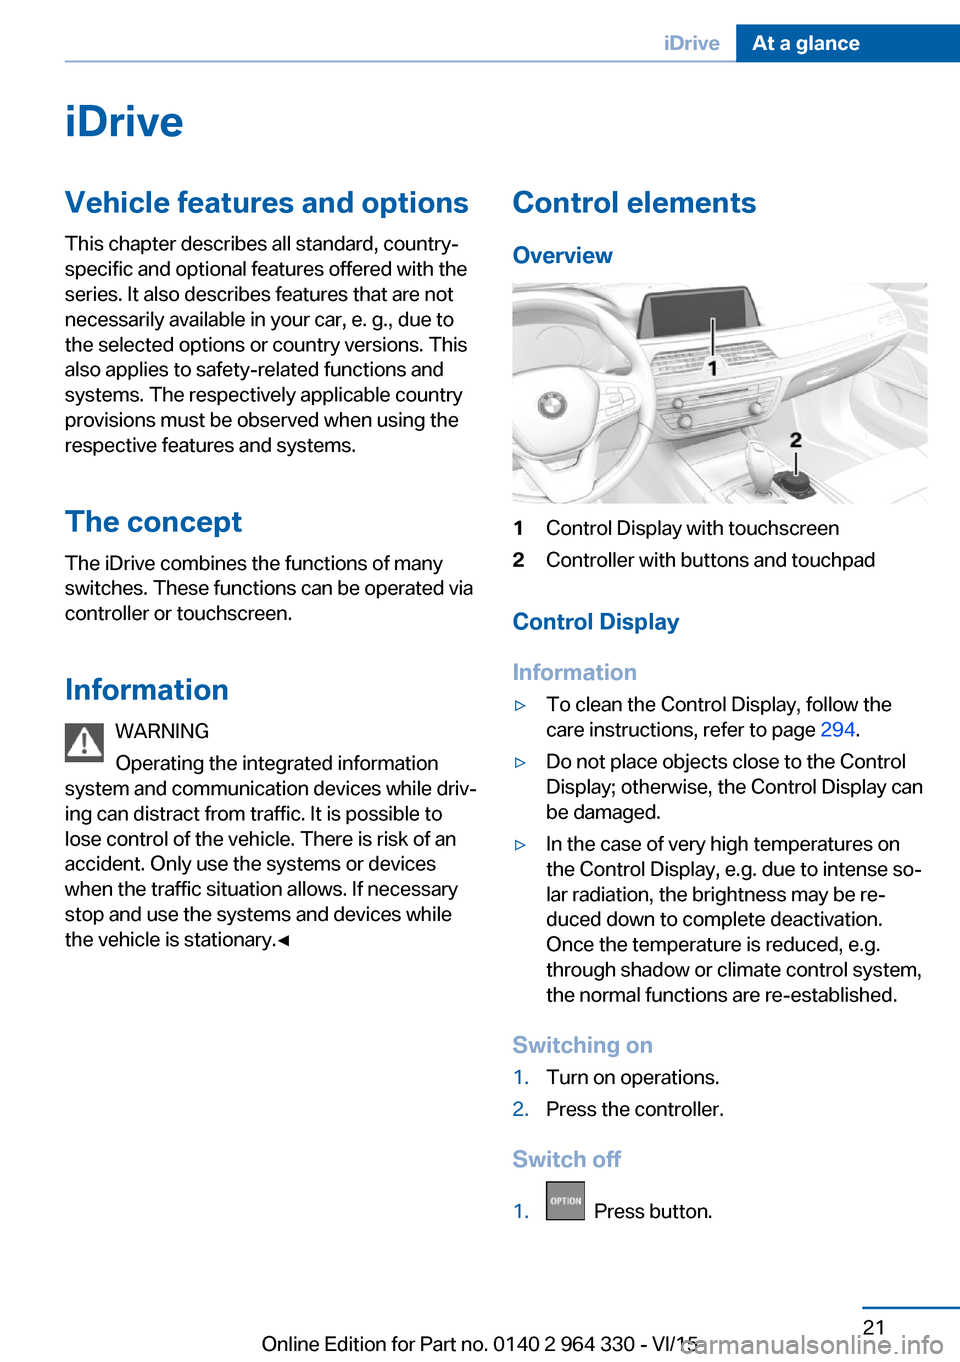
Overview1Control Display with touchscreen2Controller with buttons and touchpad
Control Display
Information
▷To clean the Control Display, follow the
care instructions, refer to page 294.▷Do not place objects close to the Control
Display; otherwise, the Control Display can
be damaged.▷In the case of very high temperatures on
the Control Display, e.g. due to intense so‐
lar radiation, the brightness may be re‐
duced down to complete deactivation.
Once the temperature is reduced, e.g.
through shadow or climate control system,
the normal functions are re-established.
Switching on
1.Turn on operations.2.Press the controller.
Switch off
1. Press button.
Seite 21iDriveAt a glance21
Online Edition for Part no. 0140 2 964 330 - VI/15
Page 36 of 314
BMW Touch CommandVehicle features and options
This chapter describes all standard, country-
specific and optional features offered with the
series. It also describes features that are not
necessarily available in your car, e. g., due to
the selected options or country versions. This
also applies to safety-related functions and
systems. The respectively applicable country
provisions must be observed when using the
respective features and systems.
BMW Touch Command The concept
Important functions of the vehicle can be used
via BMW Touch Command.▷Seat adjustments for front passenger seat
and seats in the rear.▷Climate control in the rear.▷Sun protection.▷Ambient light.▷Ambient light accent.▷Bowers & Wilkins loudspeaker lighting.▷Audio sources front.▷Rear entertainment.▷Some functions of the telephone in the
rear.
General information
Depending on the vehicle's equipment, BMW
Touch Command is located in the rear console
or in the center armrest in the rear.
Control elements at a glance
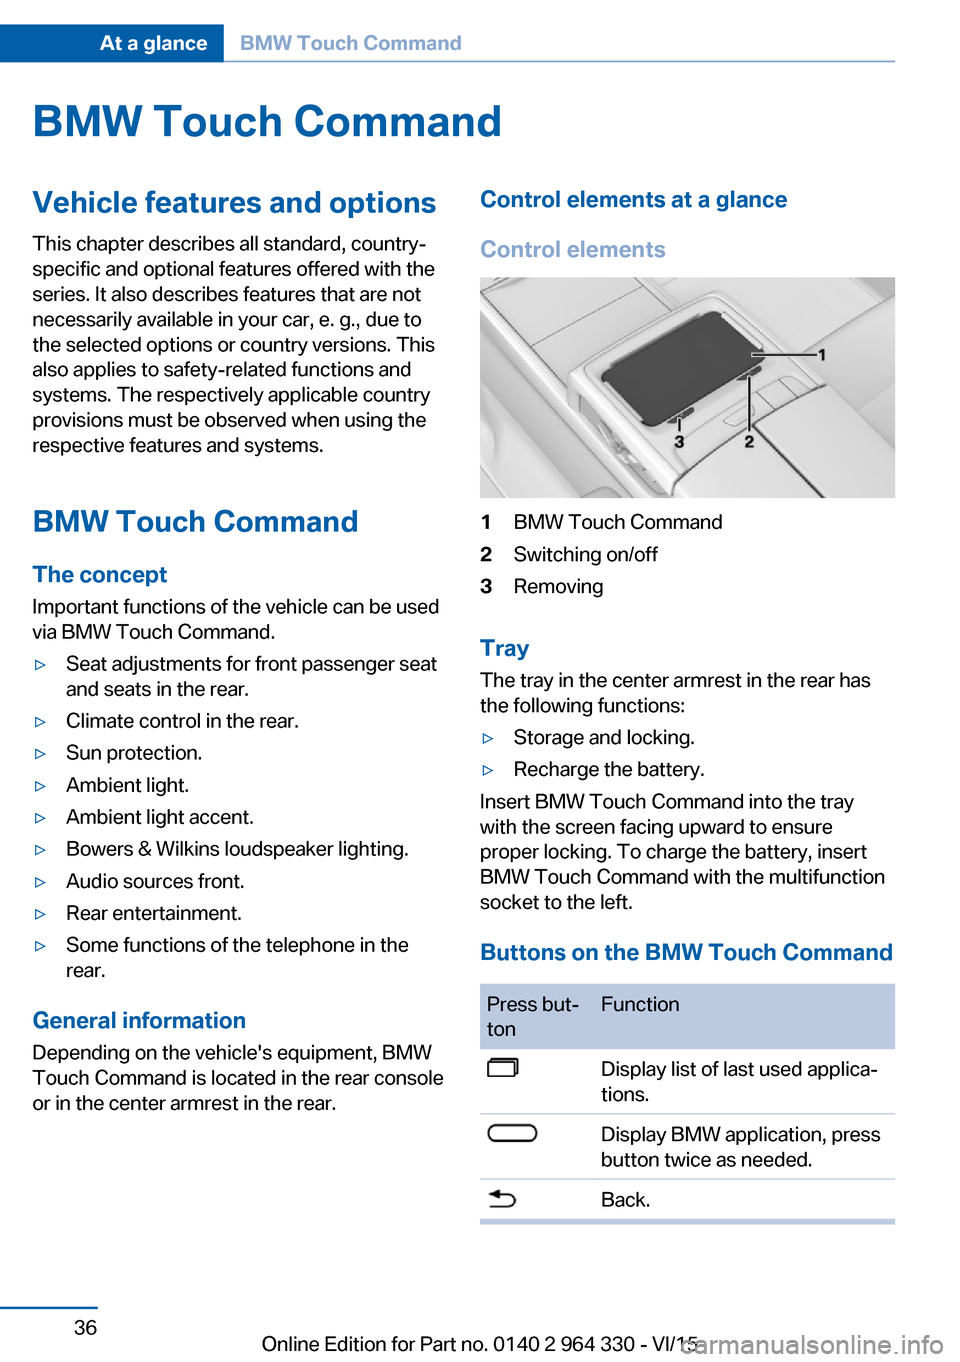
Control elements1BMW Touch Command2Switching on/off3Removing
Tray
The tray in the center armrest in the rear has
the following functions:
▷Storage and locking.▷Recharge the battery.
Insert BMW Touch Command into the tray
with the screen facing upward to ensure
proper locking. To charge the battery, insert
BMW Touch Command with the multifunction
socket to the left.
Buttons on the BMW Touch Command
Press but‐
tonFunctionDisplay list of last used applica‐
tions.Display BMW application, press
button twice as needed.Back.Seite 36At a glanceBMW Touch Command36
Online Edition for Part no. 0140 2 964 330 - VI/15
Page 54 of 314
Opening and closingVehicle features and options
This chapter describes all standard, country-
specific and optional features offered with the
series. It also describes features that are not
necessarily available in your car, e. g., due to
the selected options or country versions. This
also applies to safety-related functions and
systems. The respectively applicable country
provisions must be observed when using the
respective features and systems.
Remote control/key General information
The vehicle is supplied with two remote con‐
trols with integrated key.
Every remote control holds a replaceable bat‐
tery.
You may set the key functions depending on
the optional features and country-specific ver‐
sion. For Settings, refer to page 67.
The vehicle stores personal settings for every
remote control. Profile, refer to page 58.
The remote controls hold information on re‐
quired maintenance. Service data in the re‐
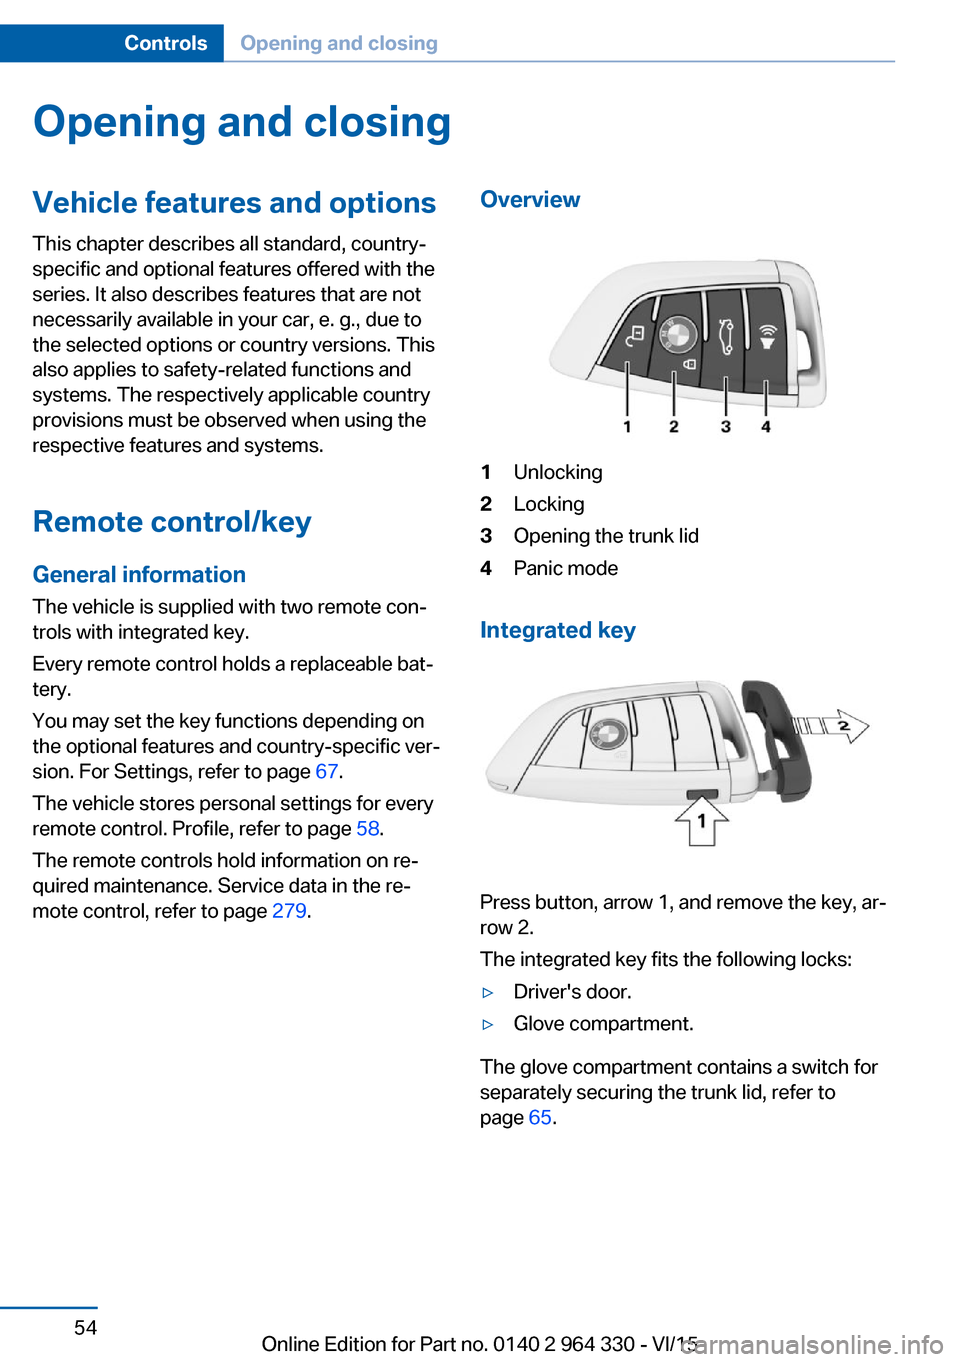
mote control, refer to page 279.Overview1Unlocking2Locking3Opening the trunk lid4Panic mode
Integrated key
Press button, arrow 1, and remove the key, ar‐
row 2.
The integrated key fits the following locks:
▷Driver's door.▷Glove compartment.
The glove compartment contains a switch for
separately securing the trunk lid, refer to
page 65.
Seite 54ControlsOpening and closing54
Online Edition for Part no. 0140 2 964 330 - VI/15
Page 71 of 314
ClosingWARNING
When operating the windows, body parts
and objects can be jammed. There is risk of in‐
juries or risk of property damage. Make sure
that the area of movement of the windows is
clear during opening and closing.◀▷Pull the switch to the resistance
point.
The window closes while the switch is
held.▷Pull the switch beyond the resistance
point.
The window closes automatically. Pulling
again stops the motion.
See also: closing by means of Comfort Access,
refer to page 65.
Pinch protection system WARNING
When operating the windows, body parts
and objects can be jammed. There is risk of in‐
juries or risk of property damage. Make sure
that the area of movement of the windows is
clear during opening and closing.◀
WARNING
Accessories on the windows such as an‐
tennas can impact jam protection. There is risk
of injuries. Do not install accessories in the
area of movement of the windows.◀
If closing force exceeds a specific margin as a
window closes, closing is interrupted.
The window reopens slightly.
Closing without the pinch protection system
WARNING
When operating the windows, body parts
and objects can be jammed. There is risk of in‐
juries or risk of property damage. Make sure
that the area of movement of the windows is
clear during opening and closing.◀
In case of danger from the outside or if ice
might prevent normal closing, proceed as fol‐
lows:1.Pull the switch past the resistance point
and hold it there.
The pinch protection is limited and the
window reopens slightly if the closing force
exceeds a certain margin.2.Pull the switch past the resistance point
again within approx. 4 seconds and hold it
there.
The window closes without jam protection.
Safety switch
The concept With the safety switch for the rear, it is possible
to block particular functions. This makes sense, for example, if children or animals are
carried in the rear.
General information
The following functions can be locked using
the switch:
▷Opening and closing of the rear windows
using the switches in the rear.▷Operation of the roller sunblind in the rear
window using the switches in the rear.▷Operation of the roller sunblinds in the side
windows using the switches in the rear.▷Adjustment of the power rear seats.▷Operation of the rear sliding visor using the
switches in the rear.
Information
WARNING
When operating the windows, body parts
and objects can be jammed. There is risk of in‐
juries or risk of property damage. Make sure
Seite 71Opening and closingControls71
Online Edition for Part no. 0140 2 964 330 - VI/15
Page 72 of 314
that the area of movement of the windows is
clear during opening and closing.◀
In order to prevent uncontrolled closing of the
windows, press the safety switch, e.g. if chil‐
dren or animals are carried in the rear.
Switching on and off Press button.
The LED lights up if the safety func‐
tion is switched on.
Roller sunblinds
General information The safety switch, refer to page 71, in the driv‐
er's door can be used to prevent children, e.g.,
from operating the roller sunblinds using the
switches in the rear.
BMW Touch Command The roller sunblinds can also be operated us‐
ing BMW Touch Command.
Information If you are no longer able to move the roller sun‐
blinds after having activated them consecu‐
tively a number of times, the system is blocked
for a limited time to prevent overheating. Let
the system cool.
The roller sunblinds cannot be moved at low
interior temperatures.Roller sunblind in the rear window
Overview
Driver's door
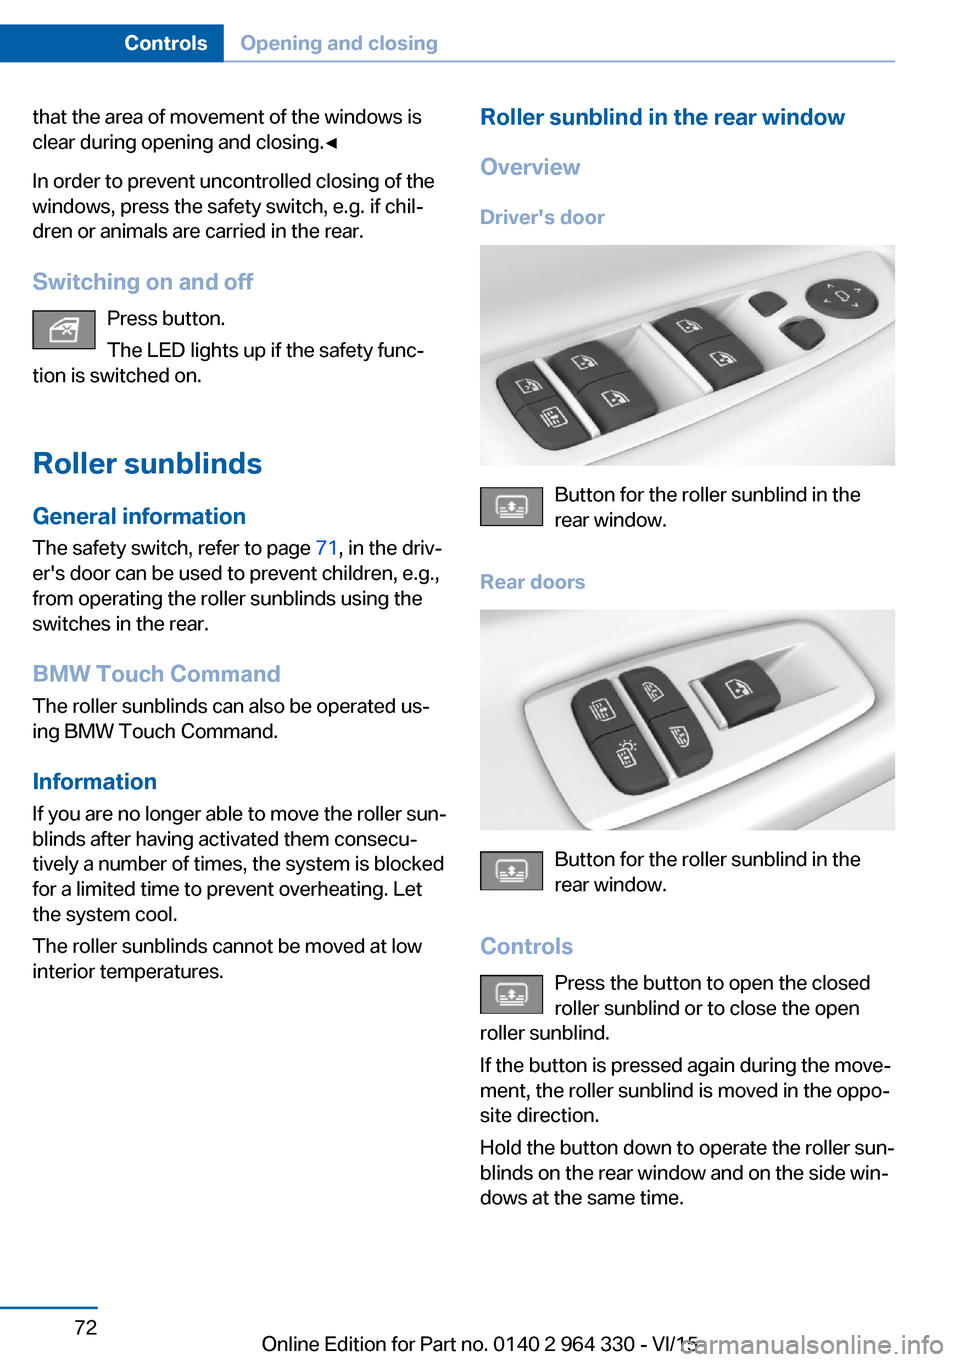
Button for the roller sunblind in the
rear window.
Rear doors
Button for the roller sunblind in the
rear window.
Controls Press the button to open the closed
roller sunblind or to close the open
roller sunblind.
If the button is pressed again during the move‐
ment, the roller sunblind is moved in the oppo‐
site direction.
Hold the button down to operate the roller sun‐
blinds on the rear window and on the side win‐
dows at the same time.
Seite 72ControlsOpening and closing72
Online Edition for Part no. 0140 2 964 330 - VI/15
Page 74 of 314
▷The tilted glass sunroof is being closed.
Opening/closing the glass sunroof and
front sliding visor separately
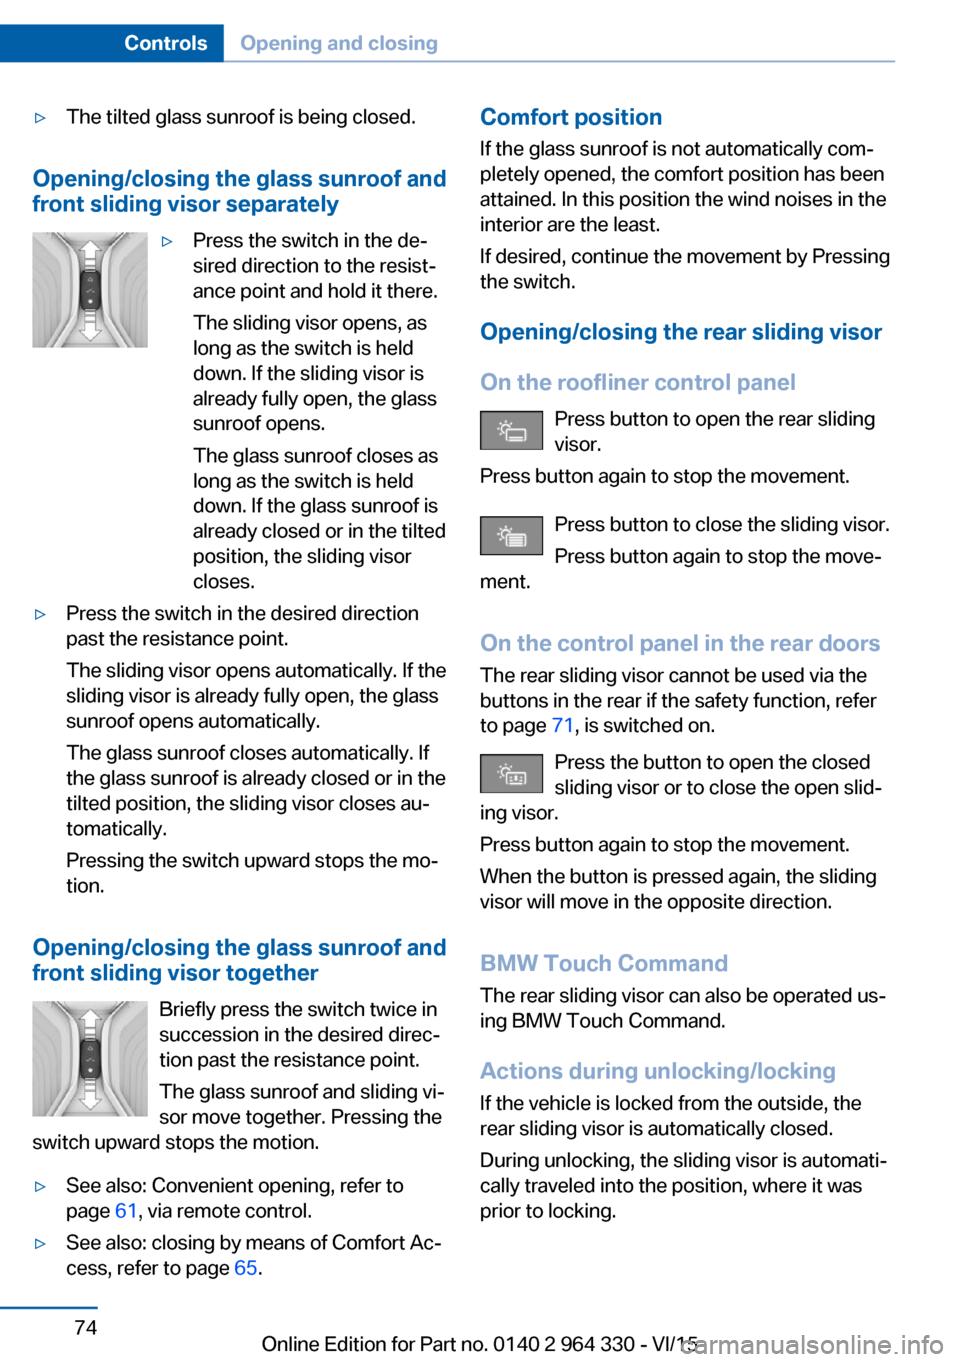
▷Press the switch in the de‐
sired direction to the resist‐
ance point and hold it there.
The sliding visor opens, as
long as the switch is held
down. If the sliding visor is
already fully open, the glass
sunroof opens.
The glass sunroof closes as
long as the switch is held
down. If the glass sunroof is
already closed or in the tilted
position, the sliding visor
closes.▷Press the switch in the desired direction
past the resistance point.
The sliding visor opens automatically. If the
sliding visor is already fully open, the glass
sunroof opens automatically.
The glass sunroof closes automatically. If
the glass sunroof is already closed or in the
tilted position, the sliding visor closes au‐
tomatically.
Pressing the switch upward stops the mo‐
tion.
Opening/closing the glass sunroof and
front sliding visor together
Briefly press the switch twice in
succession in the desired direc‐
tion past the resistance point.
The glass sunroof and sliding vi‐
sor move together. Pressing the
switch upward stops the motion.
▷See also: Convenient opening, refer to
page 61, via remote control.▷See also: closing by means of Comfort Ac‐
cess, refer to page 65.Comfort position
If the glass sunroof is not automatically com‐
pletely opened, the comfort position has been
attained. In this position the wind noises in the
interior are the least.
If desired, continue the movement by Pressing
the switch.
Opening/closing the rear sliding visor
On the roofliner control panel Press button to open the rear sliding
visor.
Press button again to stop the movement.
Press button to close the sliding visor.
Press button again to stop the move‐
ment.
On the control panel in the rear doors
The rear sliding visor cannot be used via the
buttons in the rear if the safety function, refer
to page 71, is switched on.
Press the button to open the closed
sliding visor or to close the open slid‐
ing visor.
Press button again to stop the movement.
When the button is pressed again, the sliding
visor will move in the opposite direction.
BMW Touch Command
The rear sliding visor can also be operated us‐
ing BMW Touch Command.
Actions during unlocking/locking If the vehicle is locked from the outside, the
rear sliding visor is automatically closed.
During unlocking, the sliding visor is automati‐
cally traveled into the position, where it was
prior to locking.Seite 74ControlsOpening and closing74
Online Edition for Part no. 0140 2 964 330 - VI/15
Page 78 of 314
▷Reduces strain on the shoulder muscles.
Gentleman function
The concept The front passenger seat can be adjusted with
the switches of the driver's seat, e.g. to in‐
crease the legroom in the rear.
Overview
Gentleman function
Switching on
1. Press button. The LED lights up.2.Adjust the front passenger seat on your
own seat.
If needed, store the memory position, refer
to page 87, for the front passenger seat.
Switch off
Press button and hold until LED goes
out.
The function deactivates itself automatically
after some time.
BMW Touch Command
The front passenger seat can also be operated
using BMW Touch Command.
Rear seats
General information
The seats in the rear can be used using the
seat adjustment switch in the center armrest
or via BMW Touch Command.
Information WARNING
There is a risk of jamming when folding
down the center armrest in the rear. There is
risk of injuries. Make sure that the area of
movement of the center armrest is clear during
folding down.◀
Electrically adjustable seats
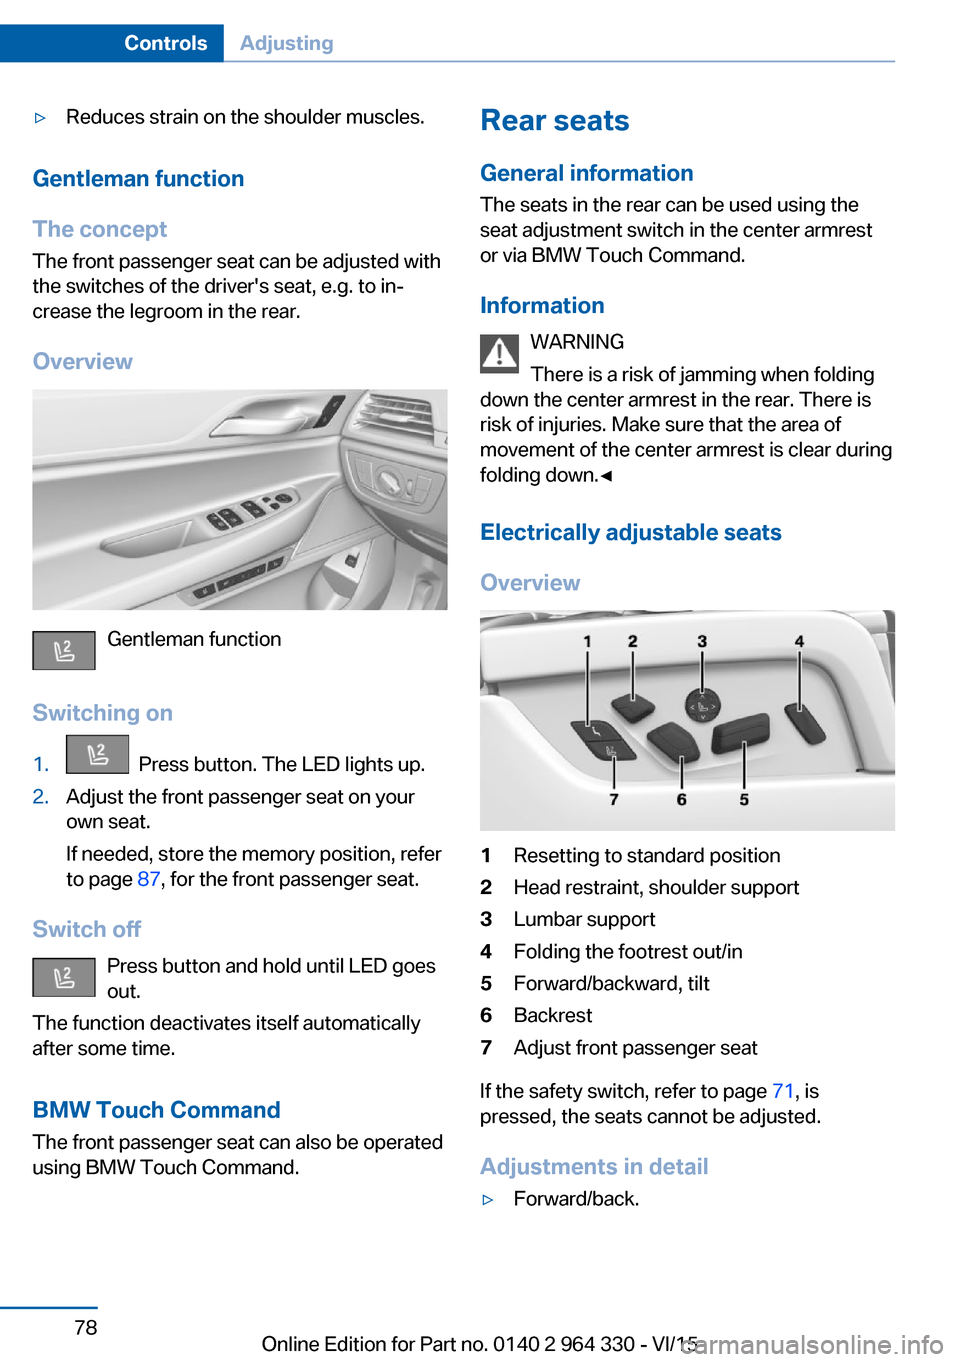
Overview1Resetting to standard position2Head restraint, shoulder support3Lumbar support4Folding the footrest out/in5Forward/backward, tilt6Backrest7Adjust front passenger seat
If the safety switch, refer to page 71, is
pressed, the seats cannot be adjusted.
Adjustments in detail
▷Forward/back.Seite 78ControlsAdjusting78
Online Edition for Part no. 0140 2 964 330 - VI/15
Page 84 of 314
Adjusting the height
Manual head restraints
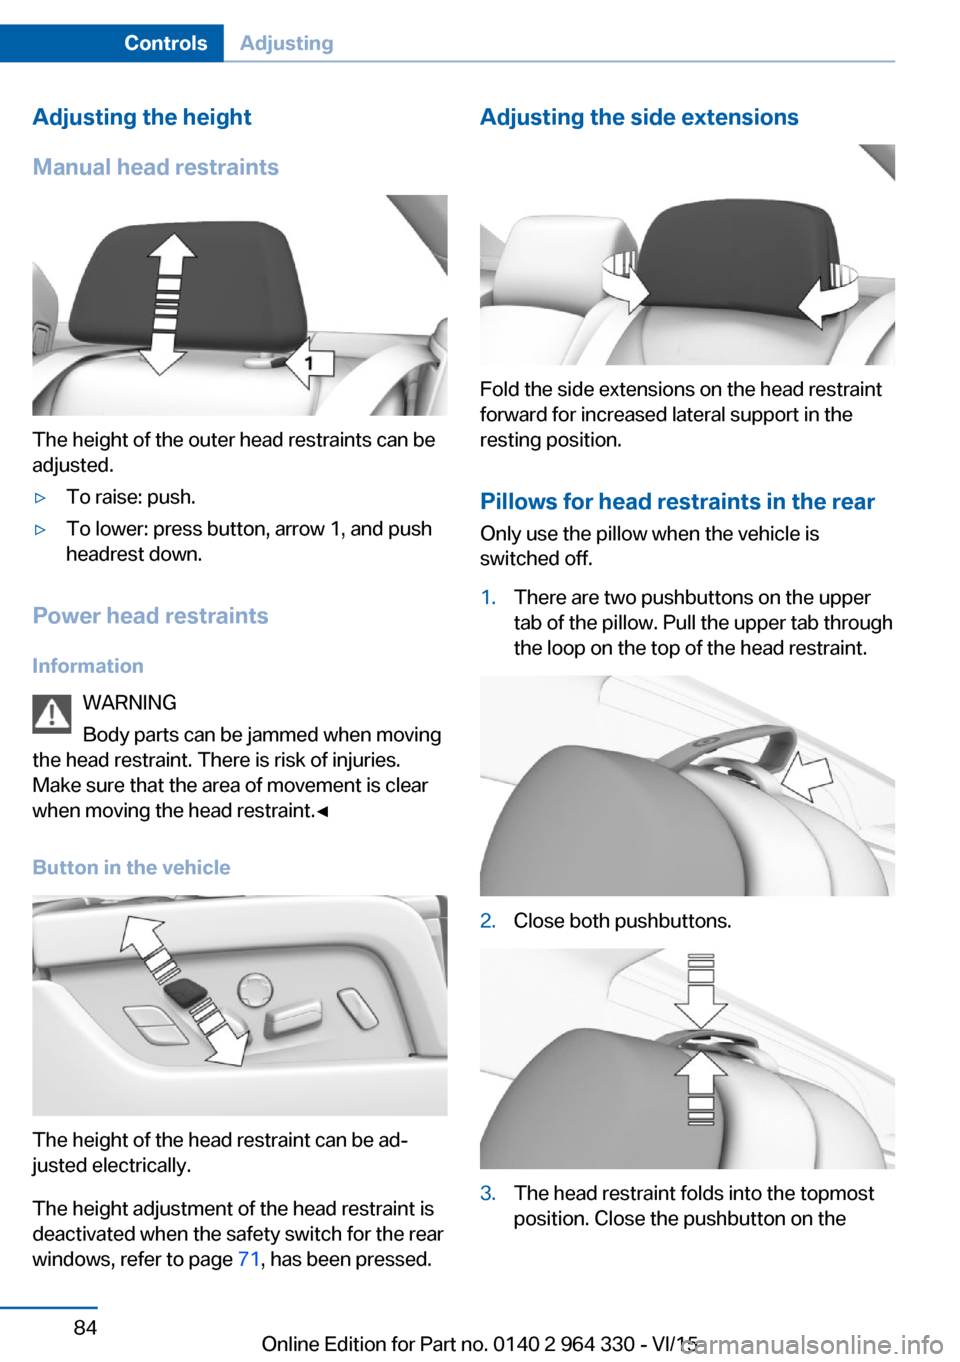
The height of the outer head restraints can be
adjusted.
▷To raise: push.▷To lower: press button, arrow 1, and push
headrest down.
Power head restraints
Information WARNING
Body parts can be jammed when moving
the head restraint. There is risk of injuries.
Make sure that the area of movement is clear
when moving the head restraint.◀
Button in the vehicle
The height of the head restraint can be ad‐
justed electrically.
The height adjustment of the head restraint is
deactivated when the safety switch for the rear
windows, refer to page 71, has been pressed.
Adjusting the side extensions
Fold the side extensions on the head restraint
forward for increased lateral support in the
resting position.
Pillows for head restraints in the rear
Only use the pillow when the vehicle is
switched off.
1.There are two pushbuttons on the upper
tab of the pillow. Pull the upper tab through
the loop on the top of the head restraint.2.Close both pushbuttons.3.The head restraint folds into the topmost
position. Close the pushbutton on theSeite 84ControlsAdjusting84
Online Edition for Part no. 0140 2 964 330 - VI/15