ad blue BMW 745i 2004 E65 Owner's Manual
[x] Cancel search | Manufacturer: BMW, Model Year: 2004, Model line: 745i, Model: BMW 745i 2004 E65Pages: 232, PDF Size: 5.27 MB
Page 15 of 232

At a glance
13Reference
Controls
Driving tips
Communications
Navigation
Entertainment
Mobility
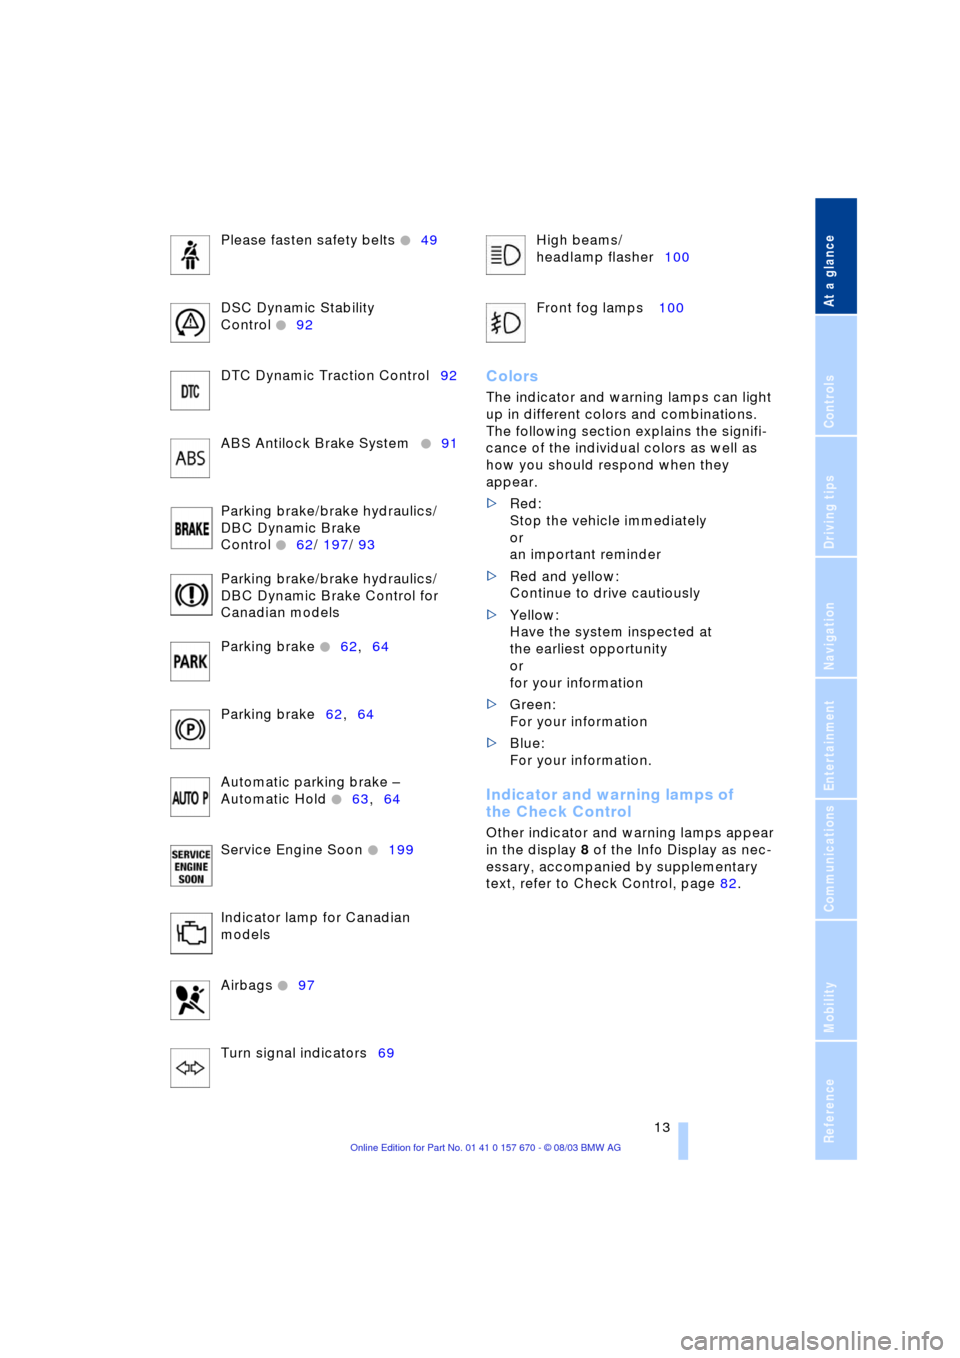
Please fasten safety belts +49
DSC Dynamic Stability
Control
+92
DTC Dynamic Traction Control92
ABS Antilock Brake System
+91
Parking brake/brake hydraulics/
DBC Dynamic Brake
Control
+62/ 197/ 93
Parking brake/brake hydraulics/
DBC Dynamic Brake Control for
Canadian models
Parking brake
+62,64
Parking brake62,64
Automatic parking brake Ð
Automatic Hold
+63,64
Service Engine Soon
+199
Indicator lamp for Canadian
models
Airbags
+97
Turn signal indicators69High beams/
headlamp flasher100
Front fog lamps 100
Colors
The indicator and warning lamps can light
up in different colors and combinations.
The following section explains the signifi-
cance of the individual colors as well as
how you should respond when they
appear.
>Red:
Stop the vehicle immediately
or
an important reminder
>Red and yellow:
Continue to drive cautiously
>Yellow:
Have the system inspected at
the earliest opportunity
or
for your information
>Green:
For your information
>Blue:
For your information.
Indicator and warning lamps of
the Check Control
Other indicator and warning lamps appear
in the display 8 of the Info Display as nec-
essary, accompanied by supplementary
text, refer to Check Control, page 82.
Page 71 of 232

Controls
69Reference
At a glance
Driving tips
Communications
Navigation
Entertainment
Mobility
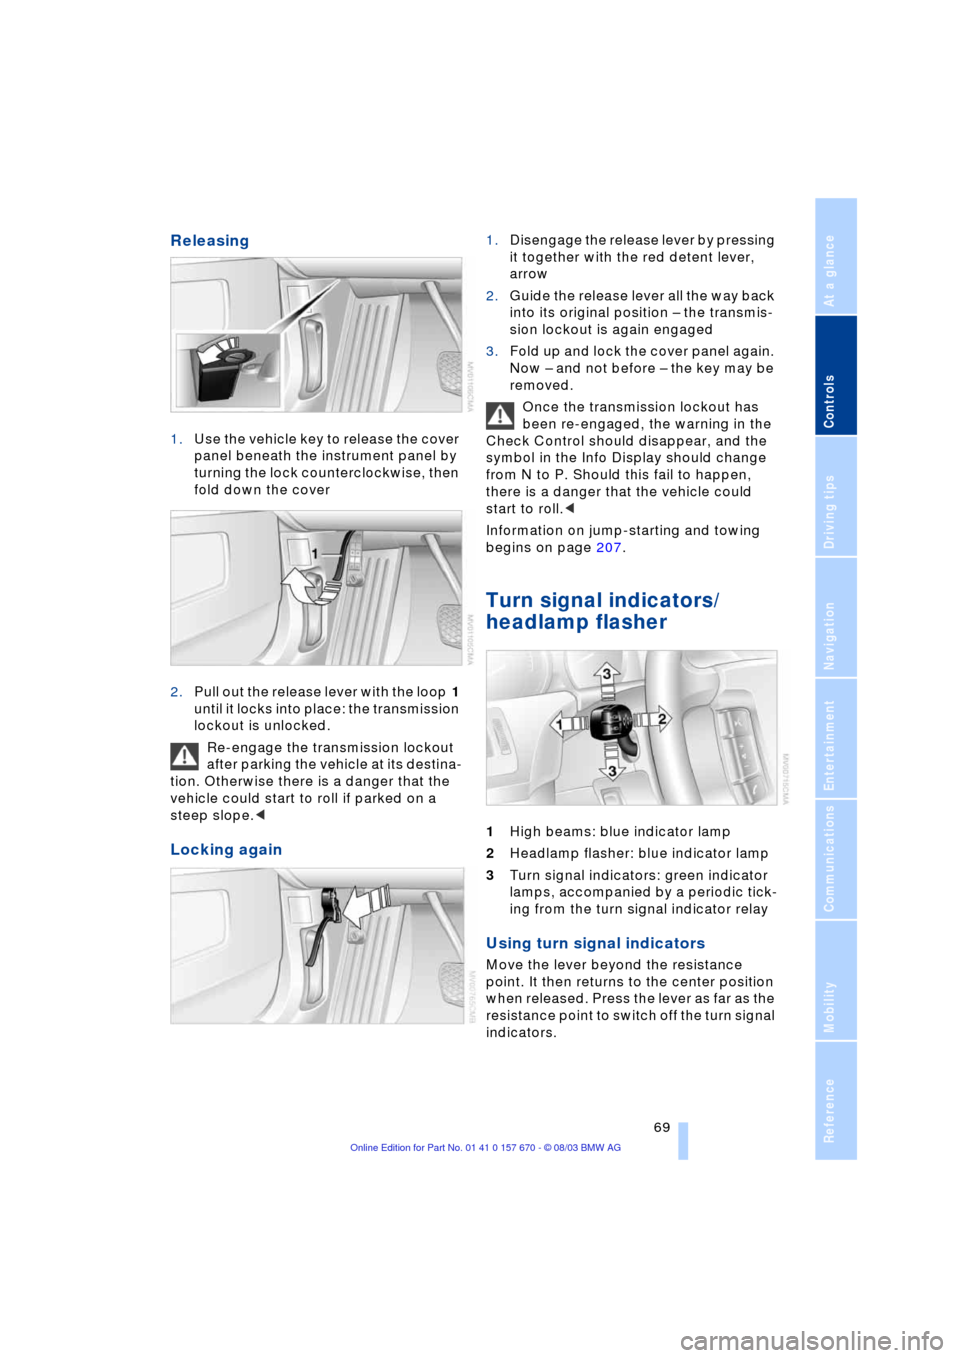
Releasing
1.Use the vehicle key to release the cover
panel beneath the instrument panel by
turning the lock counterclockwise, then
fold down the cover
2.Pull out the release lever with the loop 1
until it locks into place: the transmission
lockout is unlocked.
Re-engage the transmission lockout
after parking the vehicle at its destina-
tion. Otherwise there is a danger that the
vehicle could start to roll if parked on a
steep slope.<
Locking again
1.Disengage the release lever by pressing
it together with the red detent lever,
arrow
2.Guide the release lever all the way back
into its original position Ð the transmis-
sion lockout is again engaged
3.Fold up and lock the cover panel again.
Now Ð and not before Ð the key may be
removed.
Once the transmission lockout has
been re-engaged, the warning in the
Check Control should disappear, and the
symbol in the Info Display should change
from N to P. Should this fail to happen,
there is a danger that the vehicle could
start to roll.<
Information on jump-starting and towing
begins on page 207.
Turn signal indicators/
headlamp flasher
1High beams: blue indicator lamp
2Headlamp flasher: blue indicator lamp
3Turn signal indicators: green indicator
lamps, accompanied by a periodic tick-
ing from the turn signal indicator relay
Using turn signal indicators
Move the lever beyond the resistance
point. It then returns to the center position
when released. Press the lever as far as the
resistance point to switch off the turn signal
indicators.
Page 102 of 232

Lamps
100
Activating the Adaptive Head Light
With the ignition on, refer to
page 60, turn the light switch to the
position Automatic headlamp con-
trol, refer to page 99.
When the vehicle is backing up, the
Adaptive Head Light is inactive; when
the vehicle is at a standstill, it is only active
in one direction.<
In case of malfunction
The LED above the symbol for automatic
headlamp control flashes, refer to page 99.
Please have the system inspected at your
BMW center.
Instrument lighting
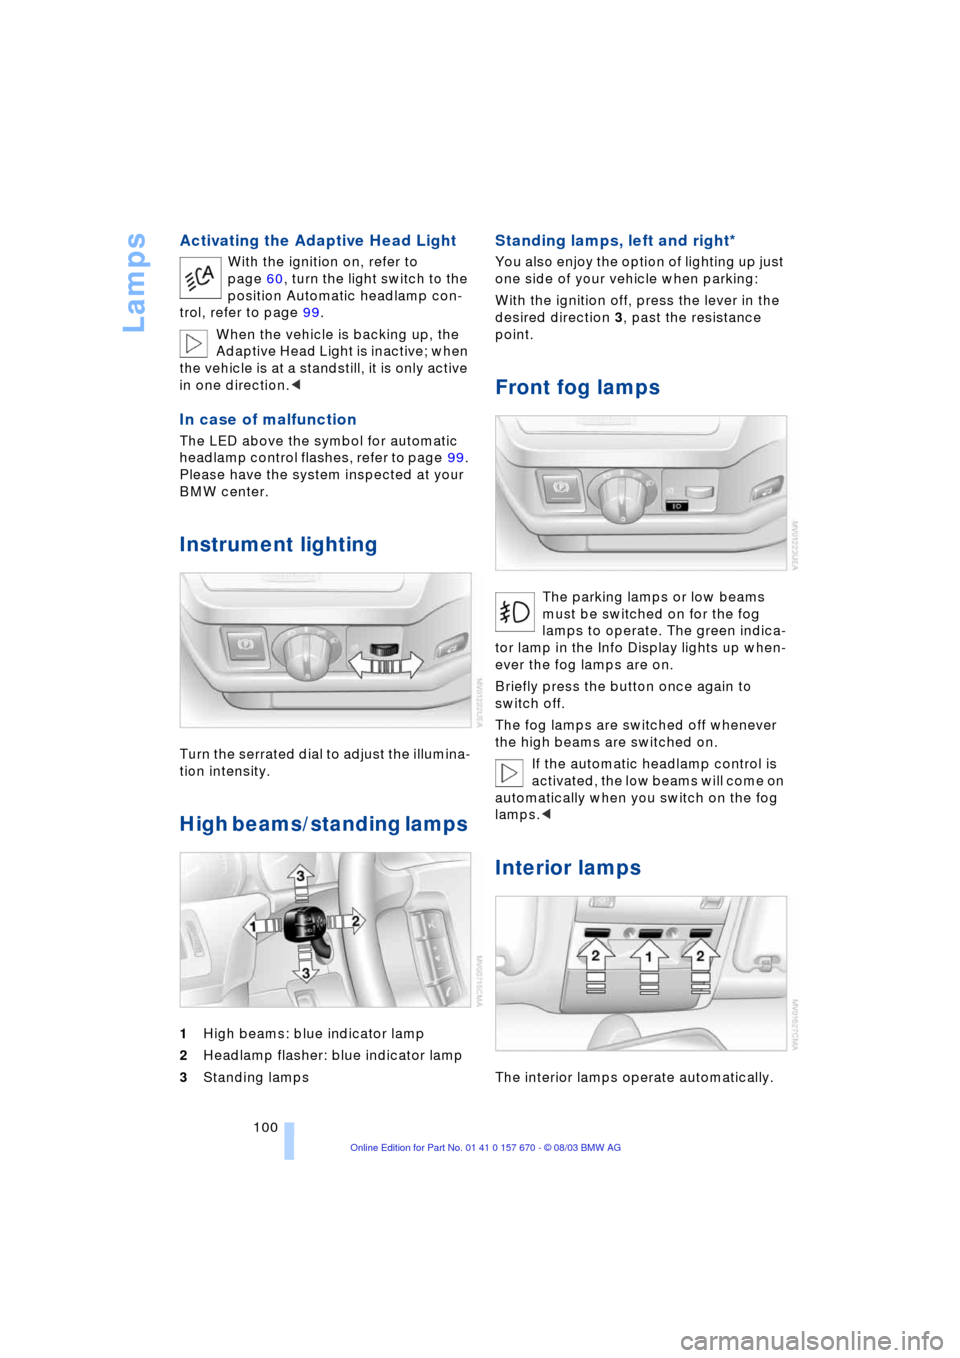
Turn the serrated dial to adjust the illumina-
tion intensity.
High beams/standing lamps
1High beams: blue indicator lamp
2Headlamp flasher: blue indicator lamp
3Standing lamps
Standing lamps, left and right*
You also enjoy the option of lighting up just
one side of your vehicle when parking:
With the ignition off, press the lever in the
desired direction 3, past the resistance
point.
Front fog lamps
The parking lamps or low beams
must be switched on for the fog
lamps to operate. The green indica-
tor lamp in the Info Display lights up when-
ever the fog lamps are on.
Briefly press the button once again to
switch off.
The fog lamps are switched off whenever
the high beams are switched on.
If the automatic headlamp control is
activated, the low beams will come on
automatically when you switch on the fog
lamps.<
Interior lamps
The interior lamps operate automatically.
Page 107 of 232

Controls
105Reference
At a glance
Driving tips
Communications
Navigation
Entertainment
Mobility
Residual heat mode
The system uses the warmth
stored in the engine to heat the
interior when the ignition is off,
for instance, while the vehicle
is stopped at a school to pick
up a child.
You can adjust the automatic climate con-
trol's settings when the ignition lock is in
the radio mode. The system blows heated
air into the interior in accordance with the
selected distribution pattern while the igni-
tion is off.
Provided that the engine has warmed
to its normal operating temperature
and the battery is charged, you can use this
function for up to 15 minutes after switch-
ing off the ignition. The LED within the but-
ton lights up to confirm compliance with
both of these conditions.<
Front ventilation
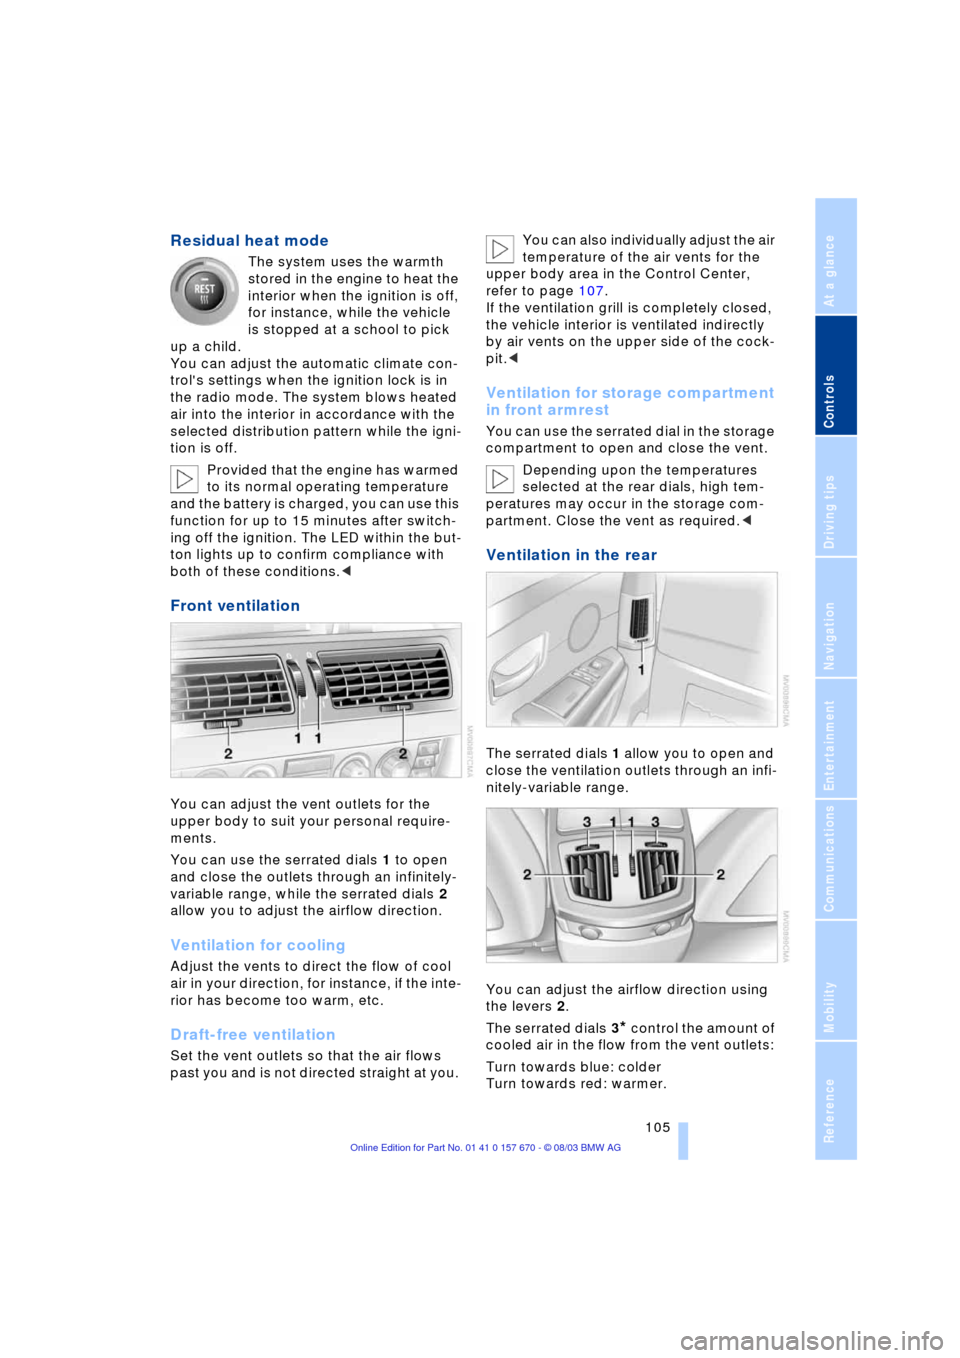
You can adjust the vent outlets for the
upper body to suit your personal require-
ments.
You can use the serrated dials 1 to open
and close the outlets through an infinitely-
variable range, while the serrated dials 2
allow you to adjust the airflow direction.
Ventilation for cooling
Adjust the vents to direct the flow of cool
air in your direction, for instance, if the inte-
rior has become too warm, etc.
Draft-free ventilation
Set the vent outlets so that the air flows
past you and is not directed straight at you. You can also individually adjust the air
temperature of the air vents for the
upper body area in the Control Center,
refer to page 107.
If the ventilation grill is completely closed,
the vehicle interior is ventilated indirectly
by air vents on the upper side of the cock-
pit.<
Ventilation for storage compartment
in front armrest
You can use the serrated dial in the storage
compartment to open and close the vent.
Depending upon the temperatures
selected at the rear dials, high tem-
peratures may occur in the storage com-
partment. Close the vent as required.<
Ventilation in the rear
The serrated dials 1 allow you to open and
close the ventilation outlets through an infi-
nitely-variable range.
You can adjust the airflow direction using
the levers 2.
The serrated dials 3
* control the amount of
cooled air in the flow from the vent outlets:
Turn towards blue: colder
Turn towards red: warmer.