height BMW 745i 2004 E65 Owner's Manual
[x] Cancel search | Manufacturer: BMW, Model Year: 2004, Model line: 745i, Model: BMW 745i 2004 E65Pages: 232, PDF Size: 5.27 MB
Page 47 of 232
Controls
45Reference
At a glance
Driving tips
Communications
Navigation
Entertainment
Mobility
ment, and the ensuing loss of vehicle con-
trol could lead to an accident.
Also on the passenger's side, do not incline
the backrest too far to the rear while the
vehicle is being driven, as otherwise there
is a danger in the event of an accident of
sliding under the safety belt, eliminating the
protection normally provided by the belt.<
Please observe the information on damage
to safety belts provided on page 49 and the
information on the active head restraints on
page 47.
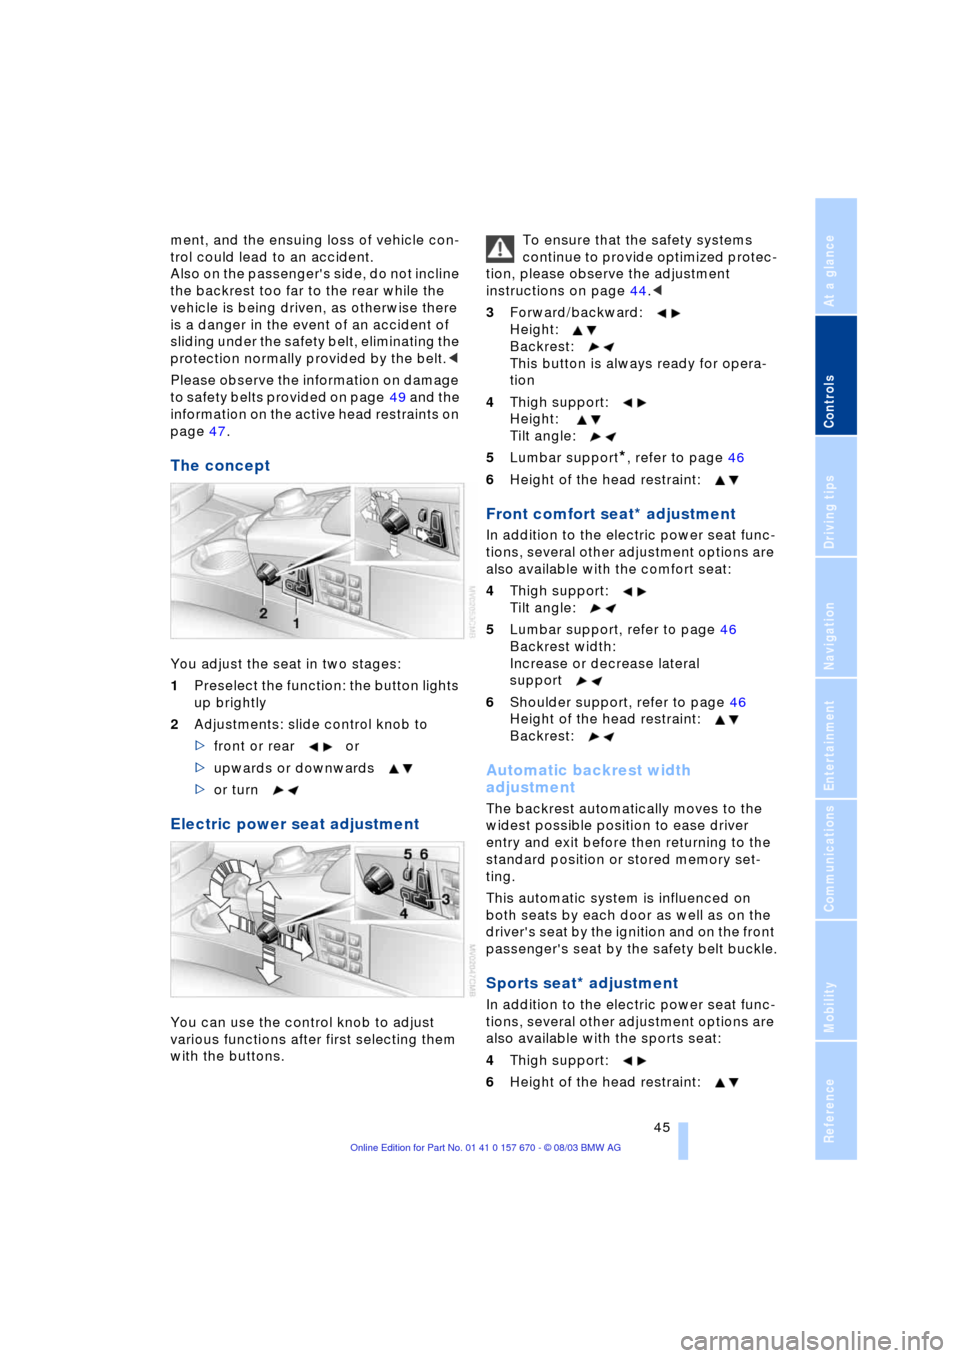
The concept
You adjust the seat in two stages:
1Preselect the function: the button lights
up brightly
2Adjustments: slide control knob to
>front or rear or
>upwards or downwards
>or turn
Electric power seat adjustment
You can use the control knob to adjust
various functions after first selecting them
with the buttons. To ensure that the safety systems
continue to provide optimized protec-
tion, please observe the adjustment
instructions on page 44.<
3Forward/backward:
Height:
Backrest:
This button is always ready for opera-
tion
4Thigh support:
Height:
Tilt angle:
5Lumbar support
*, refer to page 46
6Height of the head restraint:
Front comfort seat* adjustment
In addition to the electric power seat func-
tions, several other adjustment options are
also available with the comfort seat:
4Thigh support:
Tilt angle:
5Lumbar support, refer to page 46
Backrest width:
Increase or decrease lateral
support
6Shoulder support, refer to page 46
Height of the head restraint:
Backrest:
Automatic backrest width
adjustment
The backrest automatically moves to the
widest possible position to ease driver
entry and exit before then returning to the
standard position or stored memory set-
ting.
This automatic system is influenced on
both seats by each door as well as on the
driver's seat by the ignition and on the front
passenger's seat by the safety belt buckle.
Sports seat* adjustment
In addition to the electric power seat func-
tions, several other adjustment options are
also available with the sports seat:
4Thigh support:
6Height of the head restraint:
Page 48 of 232
Adjustments
46
Lumbar support adjustment
5Lumbar support
You can also adjust the contours of the
backrest to obtain additional support in the
lumbar region.
The upper hips and spinal column receive
supplementary support to help you main-
tain a relaxed, upright sitting position.
Increase or decrease curvature
Increase curvature at top or bottom.
Shoulder support adjustment
6Adjust the tilt angle of the shoulder
support:
You can use the adjustable upper backrest
for supplementary support in the shoulder
region. This provides a relaxed driving
position and helps relieve stress on the
shoulder muscles.
Make corrections in the forward/
backward adjustment of the seat to
ensure that the safety belt still fits firmly
against your body. If you do not do this, the
protection provided by the safety belt may
be reduced.<
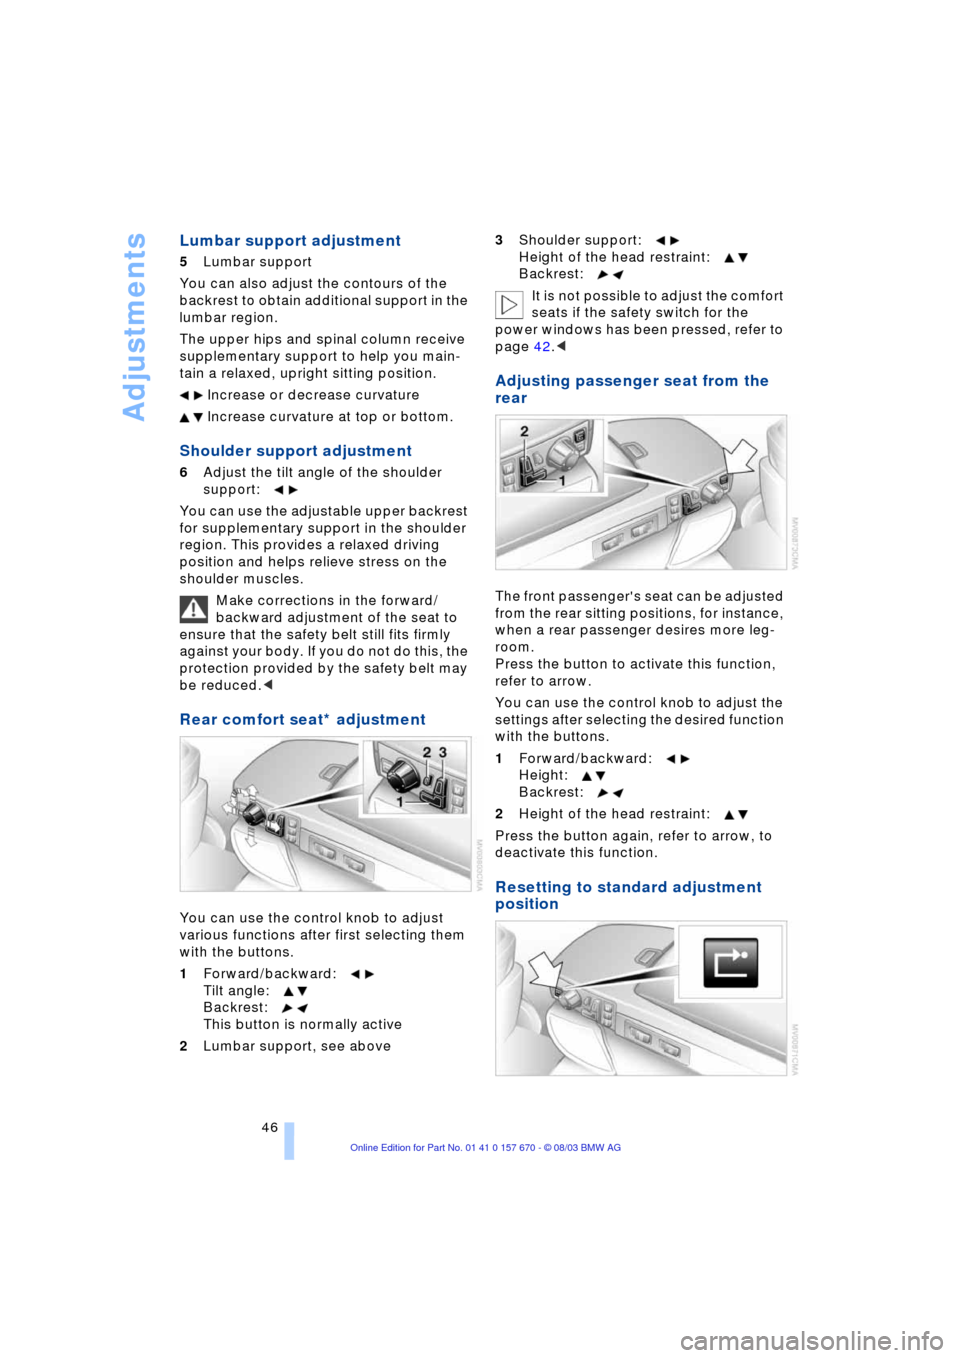
Rear comfort seat* adjustment
You can use the control knob to adjust
various functions after first selecting them
with the buttons.
1Forward/backward:
Tilt angle:
Backrest:
This button is normally active
2Lumbar support, see above3Shoulder support:
Height of the head restraint:
Backrest:
It is not possible to adjust the comfort
seats if the safety switch for the
power windows has been pressed, refer to
page 42.<
Adjusting passenger seat from the
rear
The front passenger's seat can be adjusted
from the rear sitting positions, for instance,
when a rear passenger desires more leg-
room.
Press the button to activate this function,
refer to arrow.
You can use the control knob to adjust the
settings after selecting the desired function
with the buttons.
1Forward/backward:
Height:
Backrest:
2Height of the head restraint:
Press the button again, refer to arrow, to
deactivate this function.
Resetting to standard adjustment
position
Page 49 of 232
Controls
47Reference
At a glance
Driving tips
Communications
Navigation
Entertainment
Mobility
You can use the button to return the rear
seats to their standard or default positions.
Maintain pressure on the button until the
system completes the adjustment.
It will be necessary to return the rear
seats to their standard position, for
instance, before using a child-restraint sys-
tem, refer to page 56.<
Head restraints
Adjustment information
Head restraints reduce the risk of spi-
nal injury in the event of an accident.
Adjust the head restraints so that they are
centered roughly at the level of your ears.<
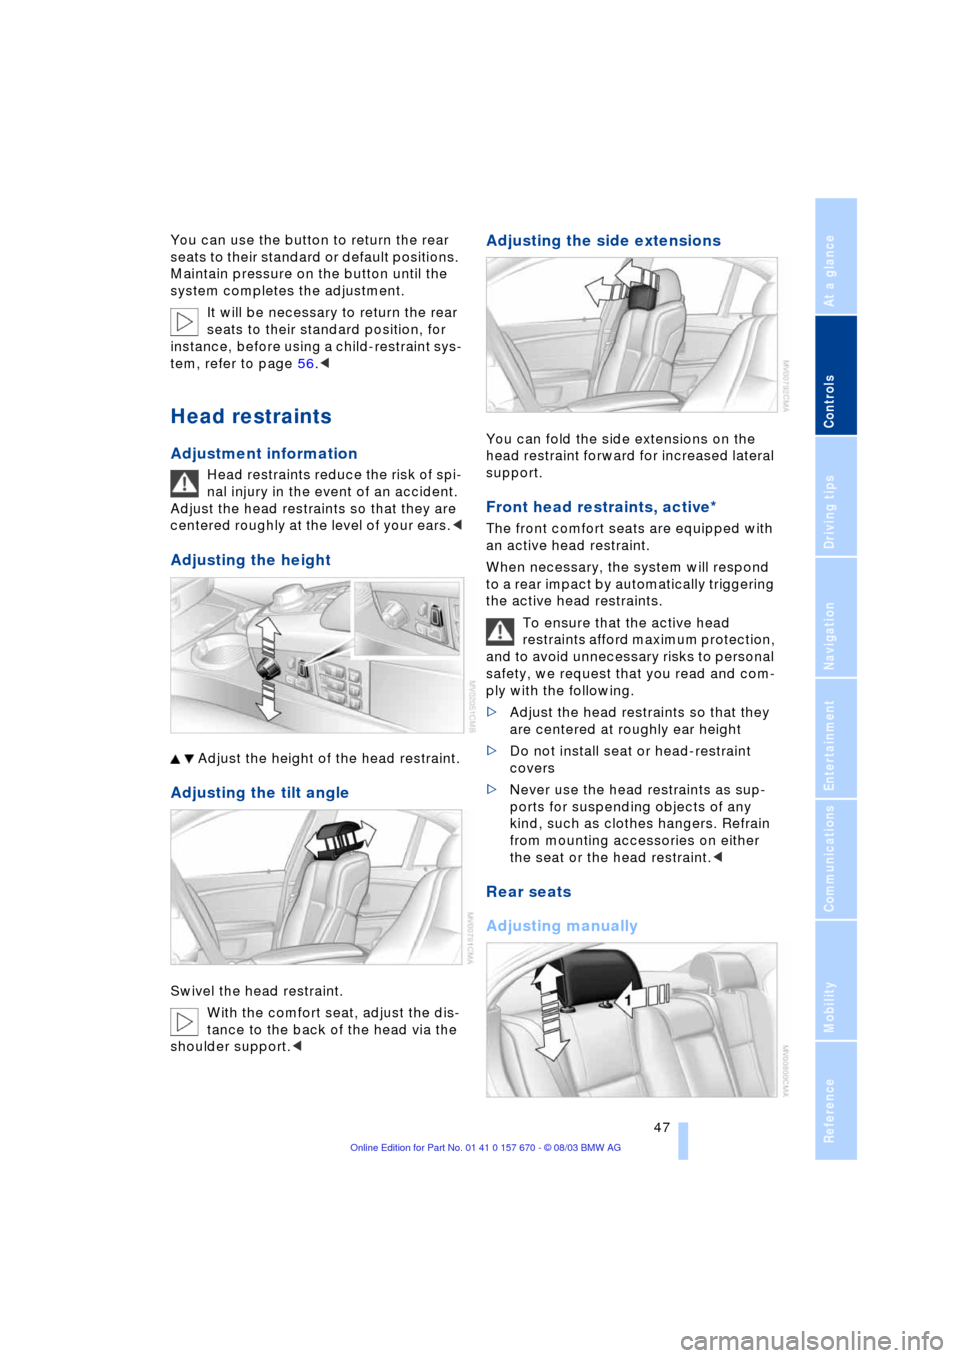
Adjusting the height
Adjust the height of the head restraint.
Adjusting the tilt angle
Swivel the head restraint.
With the comfort seat, adjust the dis-
tance to the back of the head via the
shoulder support.<
Adjusting the side extensions
You can fold the side extensions on the
head restraint forward for increased lateral
support.
Front head restraints, active*
The front comfort seats are equipped with
an active head restraint.
When necessary, the system will respond
to a rear impact by automatically triggering
the active head restraints.
To ensure that the active head
restraints afford maximum protection,
and to avoid unnecessary risks to personal
safety, we request that you read and com-
ply with the following.
>Adjust the head restraints so that they
are centered at roughly ear height
>Do not install seat or head-restraint
covers
>Never use the head restraints as sup-
ports for suspending objects of any
kind, such as clothes hangers. Refrain
from mounting accessories on either
the seat or the head restraint.<
Rear seats
Adjusting manually
Page 50 of 232
Adjustments
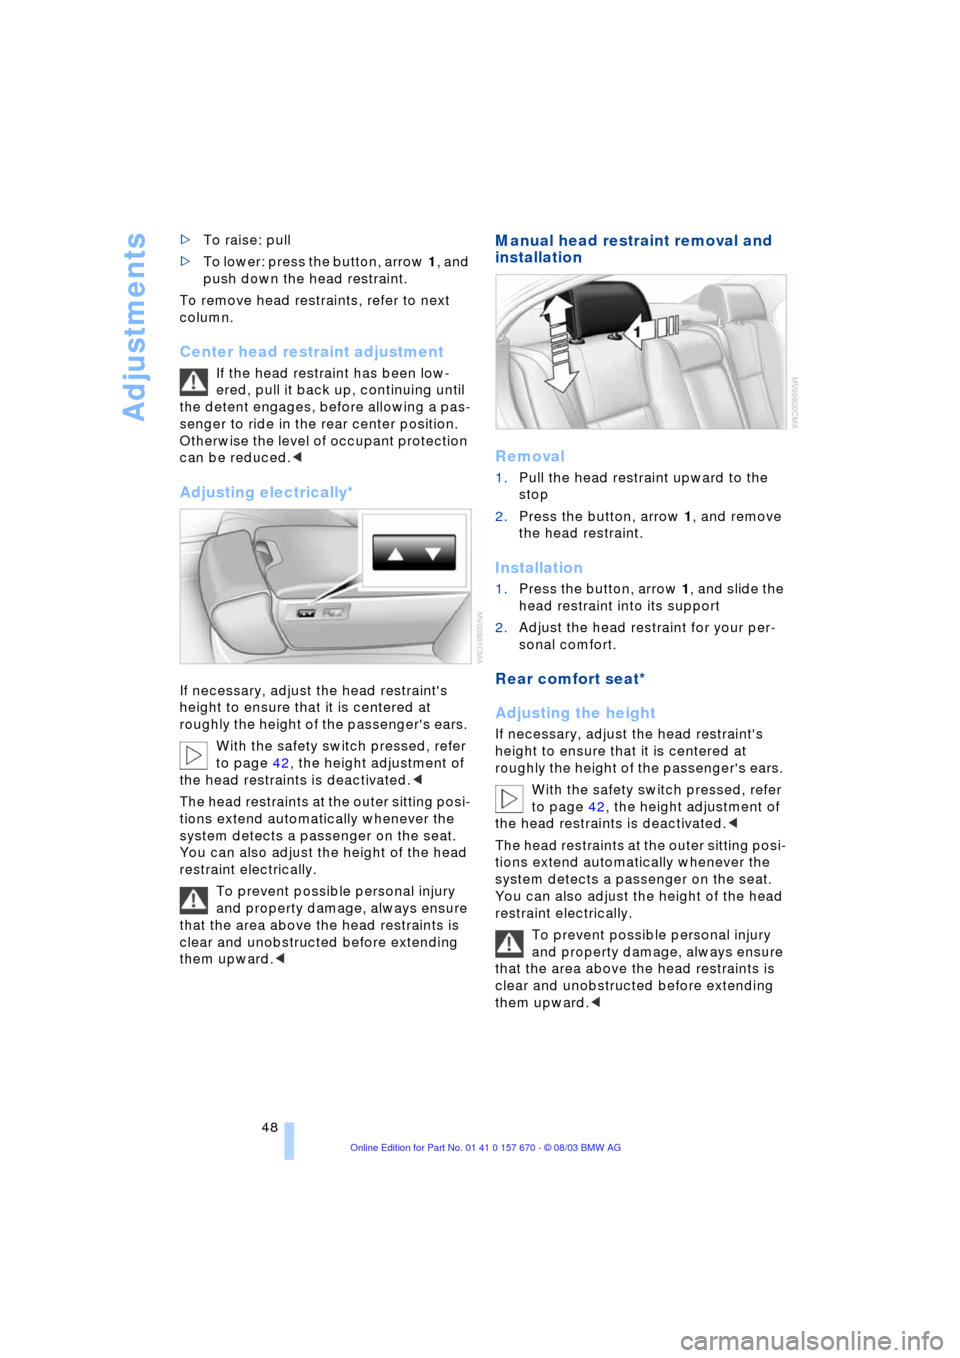
48 >To raise: pull
>To lower: press the button, arrow 1, and
push down the head restraint.
To remove head restraints, refer to next
column.
Center head restraint adjustment
If the head restraint has been low-
ered, pull it back up, continuing until
the detent engages, before allowing a pas-
senger to ride in the rear center position.
Otherwise the level of occupant protection
can be reduced.<
Adjusting electrically*
If necessary, adjust the head restraint's
height to ensure that it is centered at
roughly the height of the passenger's ears.
With the safety switch pressed, refer
to page 42, the height adjustment of
the head restraints is deactivated.<
The head restraints at the outer sitting posi-
tions extend automatically whenever the
system detects a passenger on the seat.
You can also adjust the height of the head
restraint electrically.
To prevent possible personal injury
and property damage, always ensure
that the area above the head restraints is
clear and unobstructed before extending
them upward.<
Manual head restraint removal and
installation
Removal
1.Pull the head restraint upward to the
stop
2.Press the button, arrow 1, and remove
the head restraint.
Installation
1.Press the button, arrow 1, and slide the
head restraint into its support
2.Adjust the head restraint for your per-
sonal comfort.
Rear comfort seat*
Adjusting the height
If necessary, adjust the head restraint's
height to ensure that it is centered at
roughly the height of the passenger's ears.
With the safety switch pressed, refer
to page 42, the height adjustment of
the head restraints is deactivated.<
The head restraints at the outer sitting posi-
tions extend automatically whenever the
system detects a passenger on the seat.
You can also adjust the height of the head
restraint electrically.
To prevent possible personal injury
and property damage, always ensure
that the area above the head restraints is
clear and unobstructed before extending
them upward.<
Page 58 of 232
Transporting children safely
56
Transporting children safely
The right place for children
Children always in the rear
Accident research shows that the safest
place for children in a vehicle is in the rear
seat.
Older children should be tightly secured
with a safety belt, after they have outgrown
a booster seat that is appropriate for their
age, height and weight.
A child sitting in the rear seat and not
properly restrained may place his or
her head on or near the airbag, if so
equipped. For example, a child Ñ even
though belted Ñ may fall asleep with his or
her head against the side airbag. It may be
difficult for a driver to ensure that children
in the rear seat will remain properly posi-
tioned at all times and do not place their
heads on or near the side airbags. There-
fore, we recommend that the rear side air-
bags, if provided, be deactivated if you plan
to transport children in the rear seat.<
Child-restraint system in the rear
Child-restraint systems appropriate for
every age group and weight are available
at your BMW center.
Children under 13 years of age and
children less than 5 ft/150 cm tall
should always ride in the rear and the
restraint systems should be secured with
the vehicleÔs safety belts.<
Younger children should be secured in an
appropriate forward-facing child-restraint
system that has first been properly secured
with a safety belt.
All rear sitting positions in your vehicle
meet the recommendations of SAE J1819,
an industry-recommended practice for
securing child-restraint systems in motor
vehicles.
Exception for the front passenger
seat
Should it become necessary to use
a child-restraint system on the front
passenger seat, the airbags on the passen-
ger's side must be deactivated. Your BMW
center will be glad to advise you.<
Never install a rearward-facing child-
restraint system in the front passen-
ger seat of this vehicle if the passenger air-
bag is not deactivated. If you do so, the
child could be severely injured when the
airbag is triggered.
Your vehicle is equipped with an airbag
supplemental restraint system for the front
passenger. Because the backrest on any
rearward-facing child-restraint system Ð of
the kind designed for infants under 1 year
and 20 Ibs./9 kg Ð would be within the air-
bag's deployment range, you should never
mount such a system in the front passenger
seat, since the impact of the airbag against
the child restraint's backrest could lead to
serious or fatal injuries.<
Installing child-restraint
systems
Before installing any child-restraint system
or child seat, read the following:
Observe the child-restraint system
manufacturer's instructions for instal-
lation and use. Otherwise the degree of
protection can be reduced.
After an accident, have all parts of the
child-restraint system and of the relevant
vehicle safety belt system checked by a
BMW center and replaced if necessary.<
Commercially-available child-restraint sys-
tems are designed to be secured with a lap
belt or with the lap belt portion of a combi-
nation lap/shoulder belt. Improperly or
inadequately installed restraint systems
can increase the risk of injury to children.
Page 79 of 232
Controls
77Reference
At a glance
Driving tips
Communications
Navigation
Entertainment
Mobility
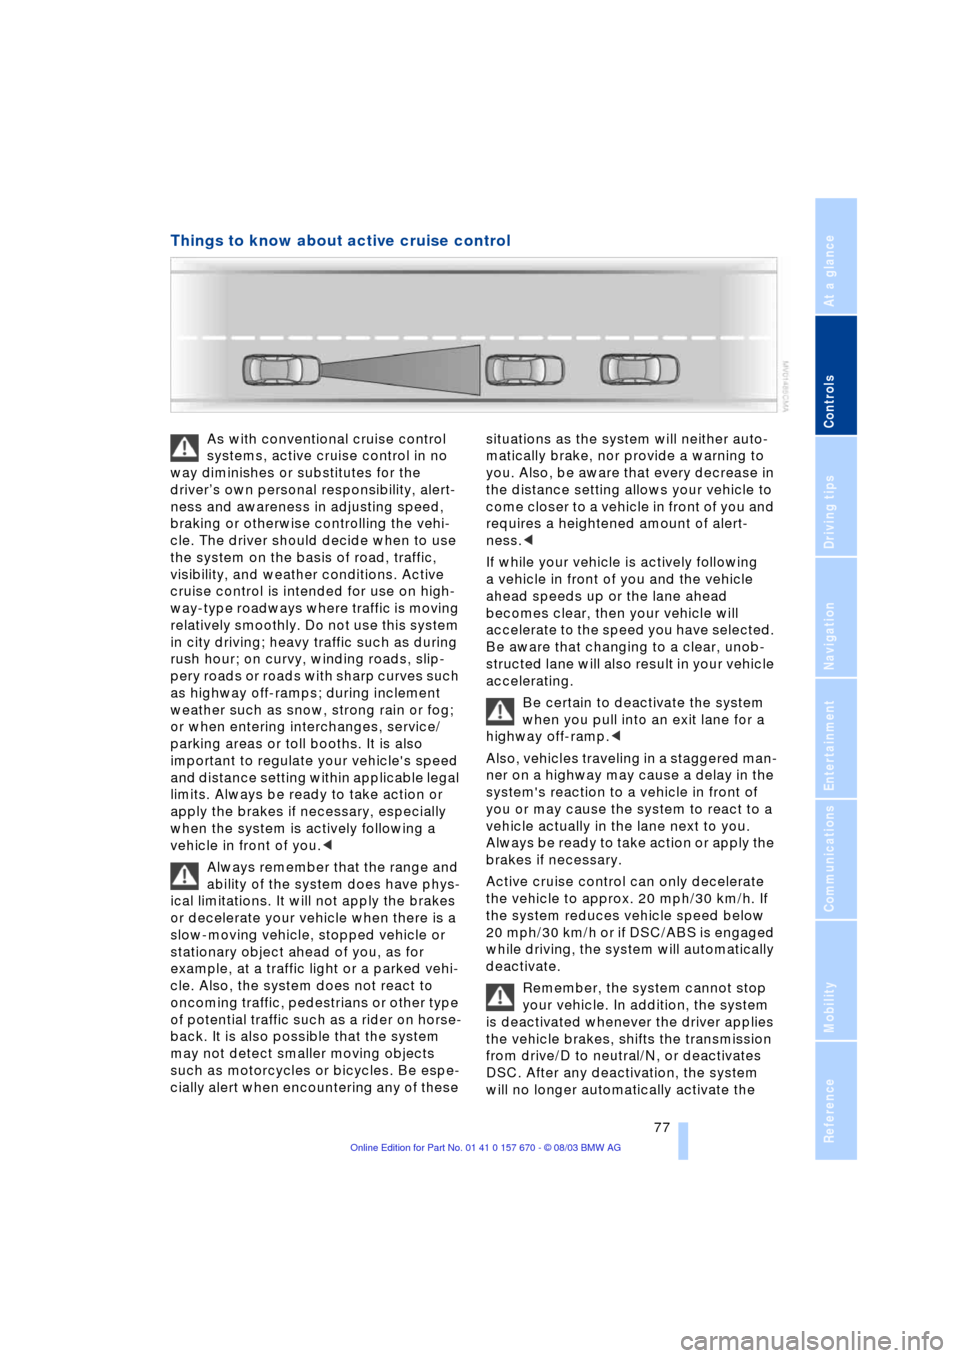
Things to know about active cruise control
As with conventional cruise control
systems, active cruise control in no
way diminishes or substitutes for the
driverÕs own personal responsibility, alert-
ness and awareness in adjusting speed,
braking or otherwise controlling the vehi-
cle. The driver should decide when to use
the system on the basis of road, traffic,
visibility, and weather conditions. Active
cruise control is intended for use on high-
way-type roadways where traffic is moving
relatively smoothly. Do not use this system
in city driving; heavy traffic such as during
rush hour; on curvy, winding roads, slip-
pery roads or roads with sharp curves such
as highway off-ramps; during inclement
weather such as snow, strong rain or fog;
or when entering interchanges, service/
parking areas or toll booths. It is also
important to regulate your vehicle's speed
and distance setting within applicable legal
limits. Always be ready to take action or
apply the brakes if necessary, especially
when the system is actively following a
vehicle in front of you.<
Always remember that the range and
ability of the system does have phys-
ical limitations. It will not apply the brakes
or decelerate your vehicle when there is a
slow-moving vehicle, stopped vehicle or
stationary object ahead of you, as for
example, at a traffic light or a parked vehi-
cle. Also, the system does not react to
oncoming traffic, pedestrians or other type
of potential traffic such as a rider on horse-
back. It is also possible that the system
may not detect smaller moving objects
such as motorcycles or bicycles. Be espe-
cially alert when encountering any of these situations as the system will neither auto-
matically brake, nor provide a warning to
you. Also, be aware that every decrease in
the distance setting allows your vehicle to
come closer to a vehicle in front of you and
requires a heightened amount of alert-
ness.<
If while your vehicle is actively following
a vehicle in front of you and the vehicle
ahead speeds up or the lane ahead
becomes clear, then your vehicle will
accelerate to the speed you have selected.
Be aware that changing to a clear, unob-
structed lane will also result in your vehicle
accelerating.
Be certain to deactivate the system
when you pull into an exit lane for a
highway off-ramp.<
Also, vehicles traveling in a staggered man-
ner on a highway may cause a delay in the
system's reaction to a vehicle in front of
you or may cause the system to react to a
vehicle actually in the lane next to you.
Always be ready to take action or apply the
brakes if necessary.
Active cruise control can only decelerate
the vehicle to approx. 20 mph/30 km/h. If
the system reduces vehicle speed below
20 mph/30 km/h or if DSC/ABS is engaged
while driving, the system will automatically
deactivate.
Remember, the system cannot stop
your vehicle. In addition, the system
is deactivated whenever the driver applies
the vehicle brakes, shifts the transmission
from drive/D to neutral/N, or deactivates
DSC. After any deactivation, the system
will no longer automatically activate the
Page 196 of 232
Under the hood
194
Under the hood
Hood
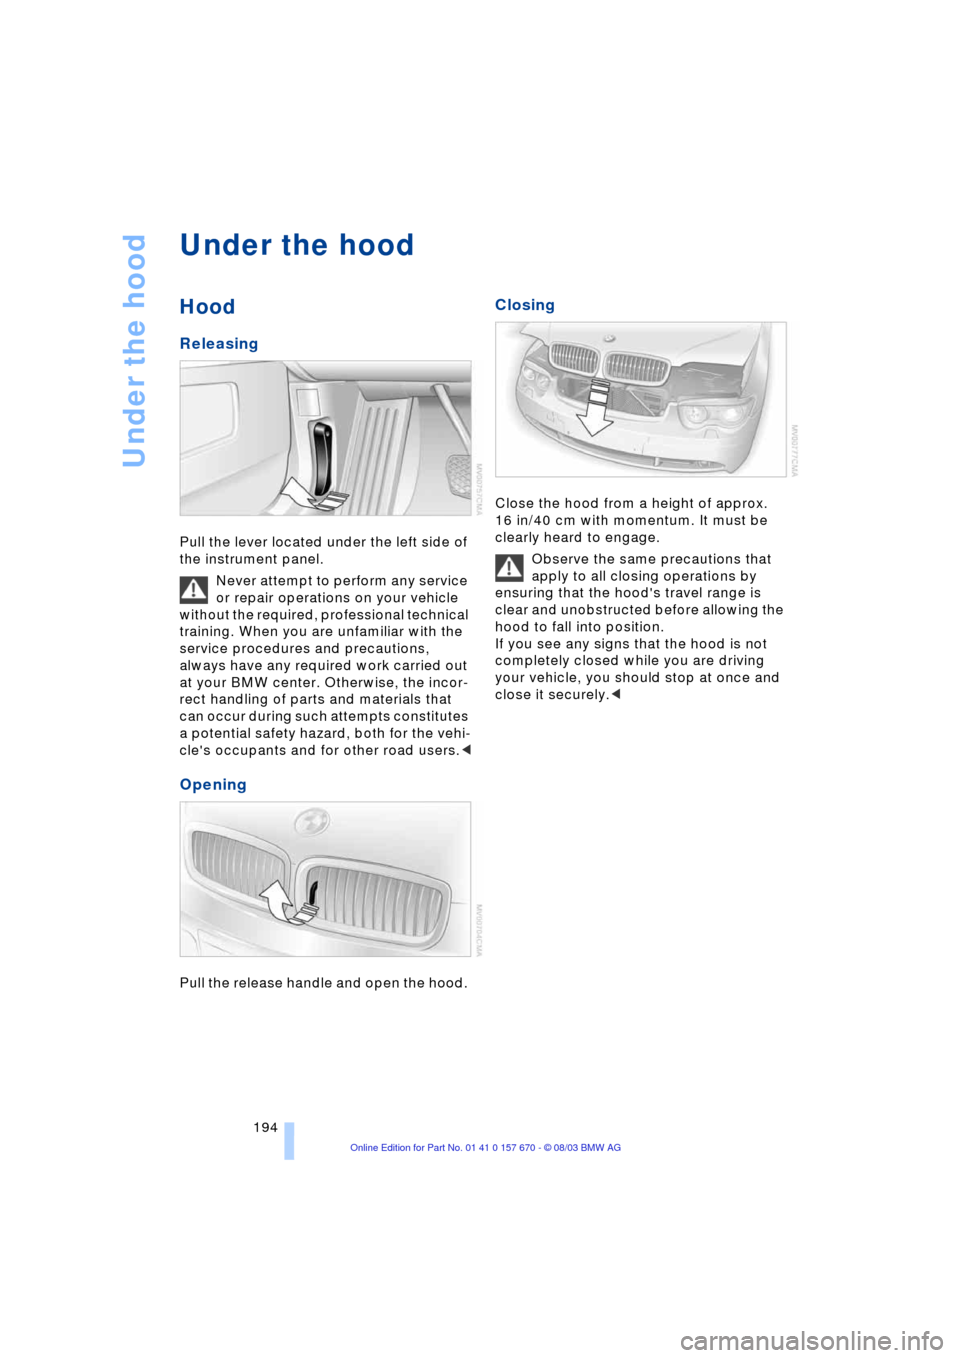
Releasing
Pull the lever located under the left side of
the instrument panel.
Never attempt to perform any service
or repair operations on your vehicle
without the required, professional technical
training. When you are unfamiliar with the
service procedures and precautions,
always have any required work carried out
at your BMW center. Otherwise, the incor-
rect handling of parts and materials that
can occur during such attempts constitutes
a potential safety hazard, both for the vehi-
cle's occupants and for other road users.<
Opening
Pull the release handle and open the hood.
Closing
Close the hood from a height of approx.
16 in/40 cm with momentum. It must be
clearly heard to engage.
Observe the same precautions that
apply to all closing operations by
ensuring that the hood's travel range is
clear and unobstructed before allowing the
hood to fall into position.
If you see any signs that the hood is not
completely closed while you are driving
your vehicle, you should stop at once and
close it securely.<
Page 205 of 232
Mobility
203Reference
At a glance
Controls
Driving tips
Communications
Navigation
Entertainment
Change the wheel only on a level, firm sur-
face which is not slippery. The vehicle or
the jack could slip to the side if you attempt
to raise the vehicle on a soft or slippery sur-
face such as snow, ice, tiles, etc.
Position the jack on a firm support surface.
Do not use a wooden block or similar
object as a support base for the jack, as
this would prevent it from extending to its
full support height and reduce its load-car-
rying capacity.
To avoid serious or fatal injury: never lie
under the vehicle, and never start the
engine while it is supported by the jack.<
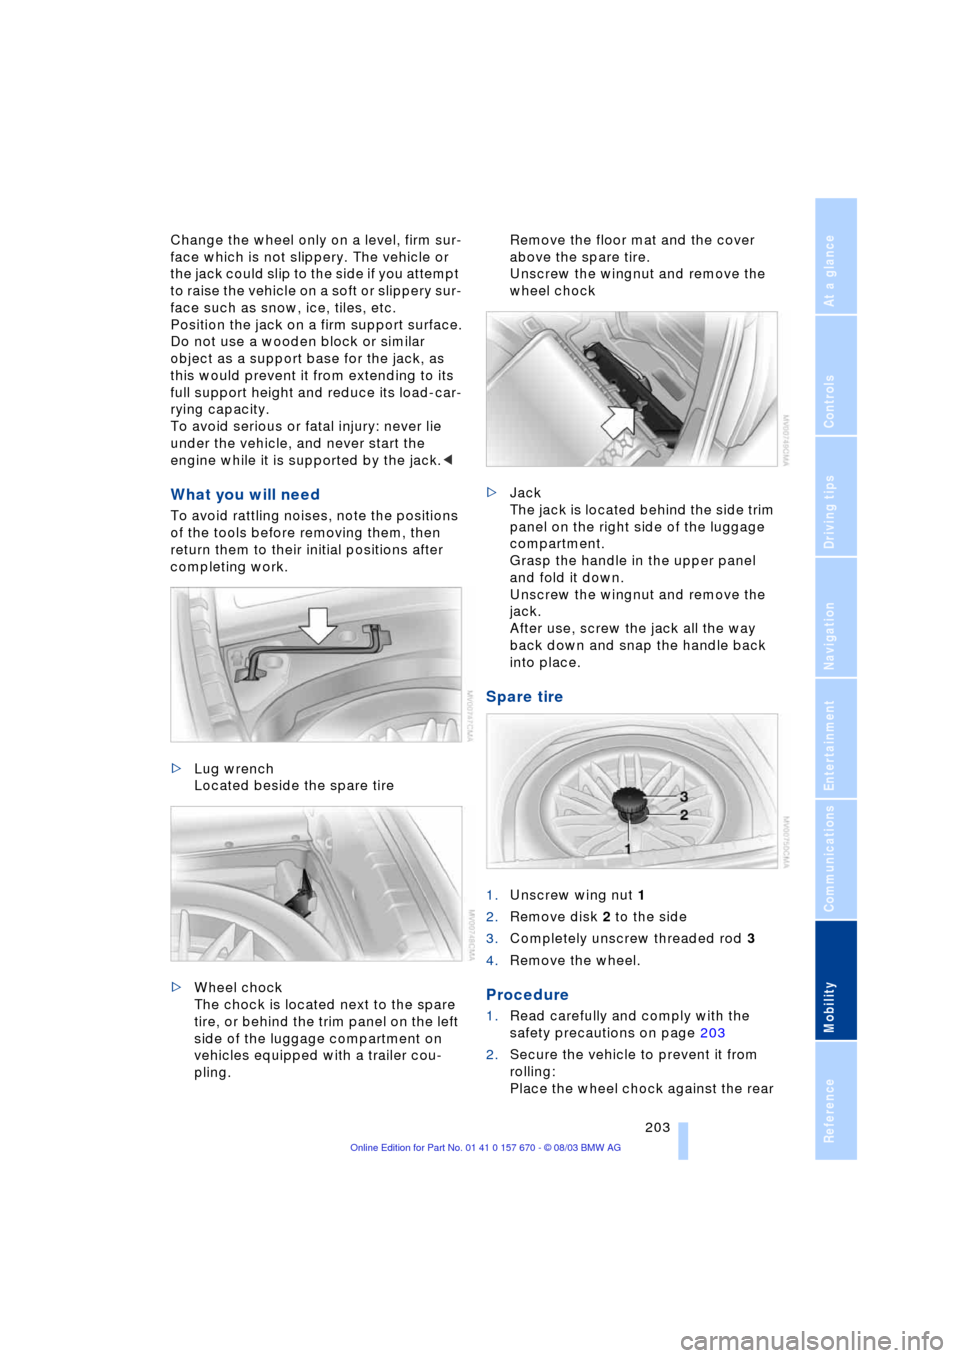
What you will need
To avoid rattling noises, note the positions
of the tools before removing them, then
return them to their initial positions after
completing work.
>Lug wrench
Located beside the spare tire
>Wheel chock
The chock is located next to the spare
tire, or behind the trim panel on the left
side of the luggage compartment on
vehicles equipped with a trailer cou-
pling. Remove the floor mat and the cover
above the spare tire.
Unscrew the wingnut and remove the
wheel chock
>Jack
The jack is located behind the side trim
panel on the right side of the luggage
compartment.
Grasp the handle in the upper panel
and fold it down.
Unscrew the wingnut and remove the
jack.
After use, screw the jack all the way
back down and snap the handle back
into place.
Spare tire
1.Unscrew wing nut 1
2.Remove disk 2 to the side
3.Completely unscrew threaded rod 3
4.Remove the wheel.
Procedure
1.Read carefully and comply with the
safety precautions on page 203
2.Secure the vehicle to prevent it from
rolling:
Place the wheel chock against the rear
Page 222 of 232
Everything from A to Z
220 Environmentally friendly
driving, refer to Energy
Control 85
Equalizer 149, 150
ESP, refer to DSC 92
Extended vehicle storage,
refer to the Caring for
your vehicle brochure
Exterior mirrors 51
Ð automatic dimming
feature 51
"Extra"
Ð in "Climate" menu 106
Ð rear air conditioning 109
Ð rear cooler 113
F
Factory preparations for
phone installation 177
Fader 149
"Fader" for audio mode 150
Failure messages, refer to
Check Control 82
Failure of a current
consumer 206
Fan, refer to Air supply 104
"Fastest route" 137
Fastest route 137
Filling the washer
reservoir 71
Filling the windshield
washer reservoir 71
First-aid kit 207
Fittings, towing 209
Flashlight 114
Flat Tire Monitor 95
Flat tires 188, 191
"FM..." 148, 152, 154
FM waveband 152
Fog lamps 100
"Footwell" 107
Footwell lamps 101
Front armrest, refer to Front
center armrest 114
Front center armrest 114
Front seat adjustment 44
Front-to-rear adjustment in
audio mode 149"FTM" 95
Fuel 187
Fuel capacity 186
Fuel economy 86
Fuel filler door 186
Ð releasing in the event of
electrical defect 186
Fuel gauge 85
Fuel-saving driving, refer to
Energy Control 85
Fuel specifications 187
Fuel tank capacity 186
"FULL MENU" 167, 168
"Full Release" 24
Fuses 206
G
Garage door opener, refer
to Integrated universal
remote control 111
Gasoline 187
Gear changes, refer to
Automatic transmission
with Steptronic 66
Gearshifts, refer to
Automatic transmission
with Steptronic 66
General driving notes 122
Glasses compartment 115
Glass roof, electrical 42
Ð closing in the event of an
electrical malfunction 43
Ð convenience operation 36
Ð remote control 34
Glove compartment 114
GPS, refer to Navigation
system 130
H
Hand lamp 114
Hands-free
microphone 177
Hands-free system 177
Having vehicle towed 208
Hazard warning flashers 14
Headlamp control,
automatic 99
Headlamp flasher 69
Headlamp washers 70Headlamp washer
system 71
Head Light, refer to
Adaptive Head Light 99
Head restraints 47
Ð front head restraints,
active 47
Heated seats 49
Heated steering wheel 52
Heating and ventilation 102
Heating while stopped 105
Height 213
Height adjustment
Ð seats 45
Ð steering wheel 52
"Help" 18, 21
Help texts in Control
Display 22
High beams 100
Ð replacing bulbs 201
Home address 142, 143
Horn 11
"Hotline" 182
Hydraulic brake assistant,
refer to DBC 93
Hydroplaning 122, 191
I
Ice warning 80
iDrive, refer to Control
Center 17
Ignition key 32
Ignition lock 60
Ð with Comfort Access 60
Independent
ventilation 109
"Indep. ventil." 109
Indicator lamps 12
"Individual" 107
Individual button
assignment 17
Ð on steering wheel 52
Inflation pressure 188
Info Display 12
"Information" for
navigation 135, 136
Information on the
navigation system, refer
to Voice guidance for
navigation 141