headlamp BMW 745i 2005 E65 Owner's Manual
[x] Cancel search | Manufacturer: BMW, Model Year: 2005, Model line: 745i, Model: BMW 745i 2005 E65Pages: 239, PDF Size: 8.03 MB
Page 13 of 239
At a glance
11Reference
Controls
Driving tips
Communications
Navigation
Entertainment
Mobility
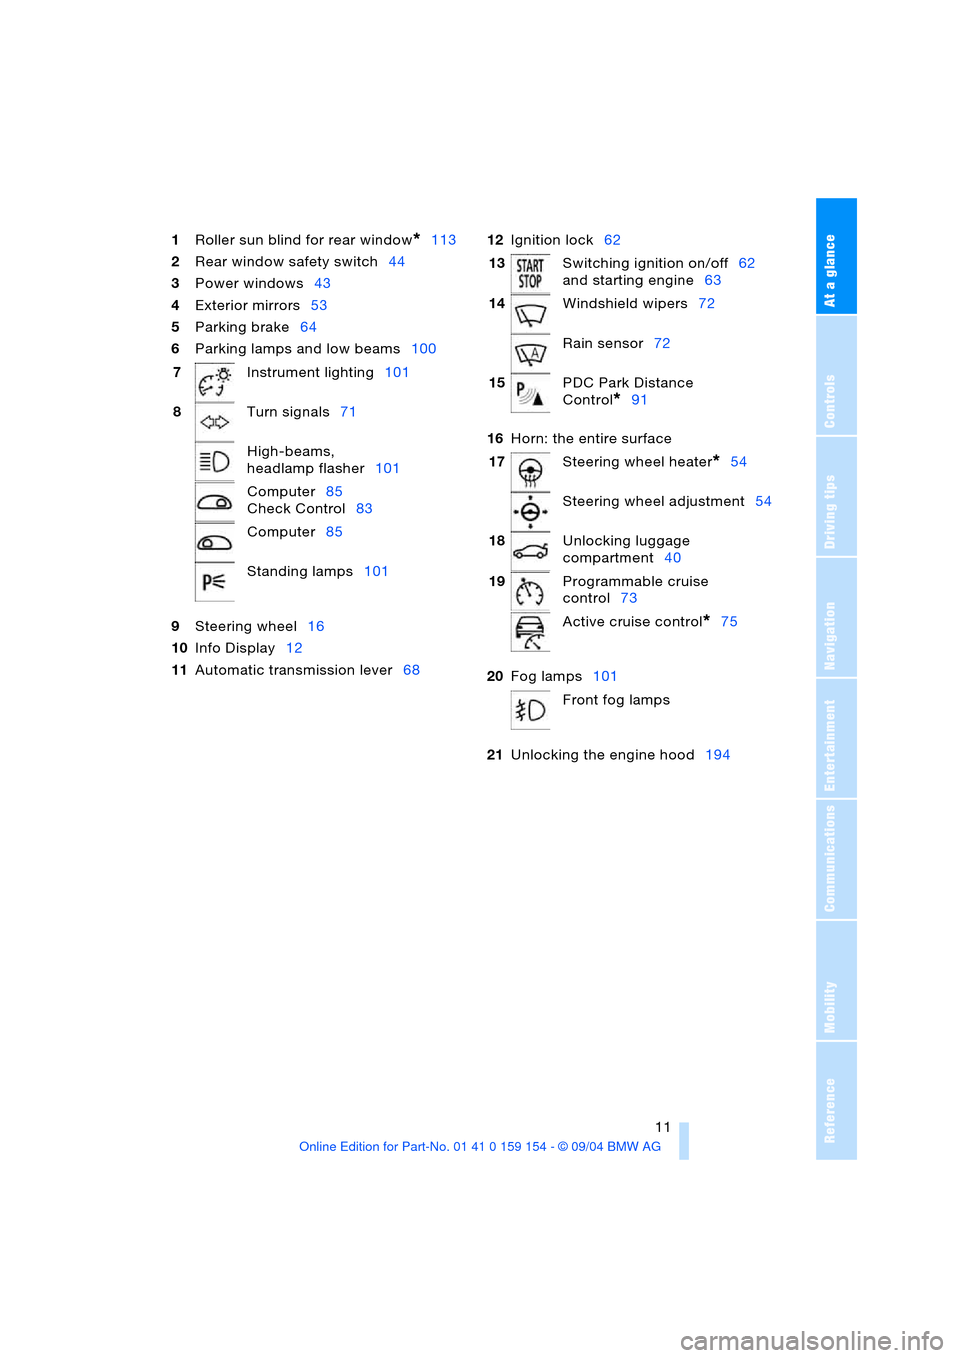
1Roller sun blind for rear window*113
2Rear window safety switch44
3Power windows43
4Exterior mirrors53
5Parking brake64
6Parking lamps and low beams100
9Steering wheel16
10Info Display12
11Automatic transmission lever6812Ignition lock62
16Horn: the entire surface
20Fog lamps101
21Unlocking the engine hood194 7Instrument lighting101
8Turn signals71
High-beams,
headlamp flasher101
Computer85
Check Control83
Computer85
Standing lamps101
13Switching ignition on/off62
and starting engine63
14Windshield wipers72
Rain sensor72
15PDC Park Distance
Control
*91
17Steering wheel heater
*54
Steering wheel adjustment54
18Unlocking luggage
compartment40
19Programmable cruise
control73
Active cruise control
*75
Front fog lamps
Page 15 of 239
At a glance
13Reference
Controls
Driving tips
Communications
Navigation
Entertainment
Mobility
Indicator and warning
lamps
Technology that monitors itself
The indicator and warning lamps identified
by the
+ symbol are subjected to an oper-
ation check each time you switch on the
ignition or start the engine. They each light
up once for different periods of time.
When a malfunction occurs in a monitored
system, the corresponding lamp will either
fail to go out when the engine is started, or
it will come on again during normal driving.
Detailed information is provided on the
specified pages.
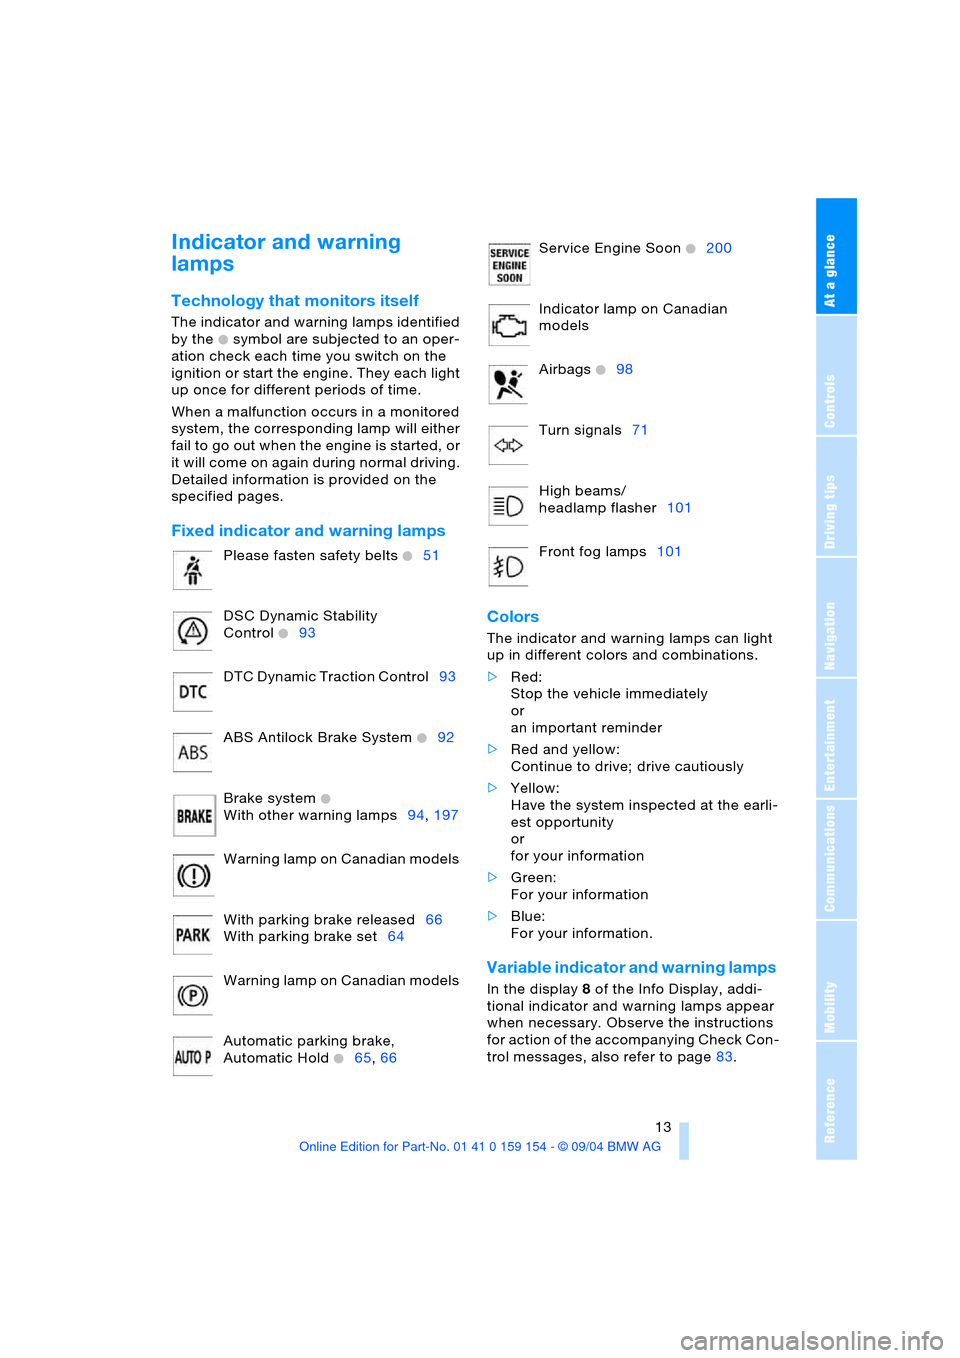
Fixed indicator and warning lamps
Colors
The indicator and warning lamps can light
up in different colors and combinations.
>Red:
Stop the vehicle immediately
or
an important reminder
>Red and yellow:
Continue to drive; drive cautiously
>Yellow:
Have the system inspected at the earli-
est opportunity
or
for your information
>Green:
For your information
>Blue:
For your information.
Variable indicator and warning lamps
In the display 8 of the Info Display, addi-
tional indicator and warning lamps appear
when necessary. Observe the instructions
for action of the accompanying Check Con-
trol messages, also refer to page83. Please fasten safety belts
+51
DSC Dynamic Stability
Control
+93
DTC Dynamic Traction Control93
ABS Antilock Brake System
+92
Brake system
+
With other warning lamps94,197
Warning lamp on Canadian models
With parking brake released66
With parking brake set64
Warning lamp on Canadian models
Automatic parking brake,
Automatic Hold
+65,66
Service Engine Soon +200
Indicator lamp on Canadian
models
Airbags
+98
Turn signals71
High beams/
headlamp flasher101
Front fog lamps101
Page 59 of 239
Controls
57Reference
At a glance
Driving tips
Communications
Navigation
Entertainment
Mobility
>Alarm system: set different acknowl-
edgment signals to confirm arming/dis-
arming
>Alarm system: activate/deactivate inte-
rior motion sensor and tilt alarm sensor
>Automatic headlamp control: adjust
sensitivity.
Examples of Key Memory functions
>Seat memory: activate/deactivate func-
tion
>Central locking system: vehicle is
locked as soon as you drive off or if you
have not opened a door or the luggage
compartment lid after unlocking. Acti-
vate/deactivate function
>Automatic climate control: key-specific
storage of the temperature, fan and air
conditioner setting. Activate/deactivate
function
>Check Control: set languages and units
>Seat heating: recall personal tempera-
ture distribution.
Page 73 of 239
Controls
71Reference
At a glance
Driving tips
Communications
Navigation
Entertainment
Mobility
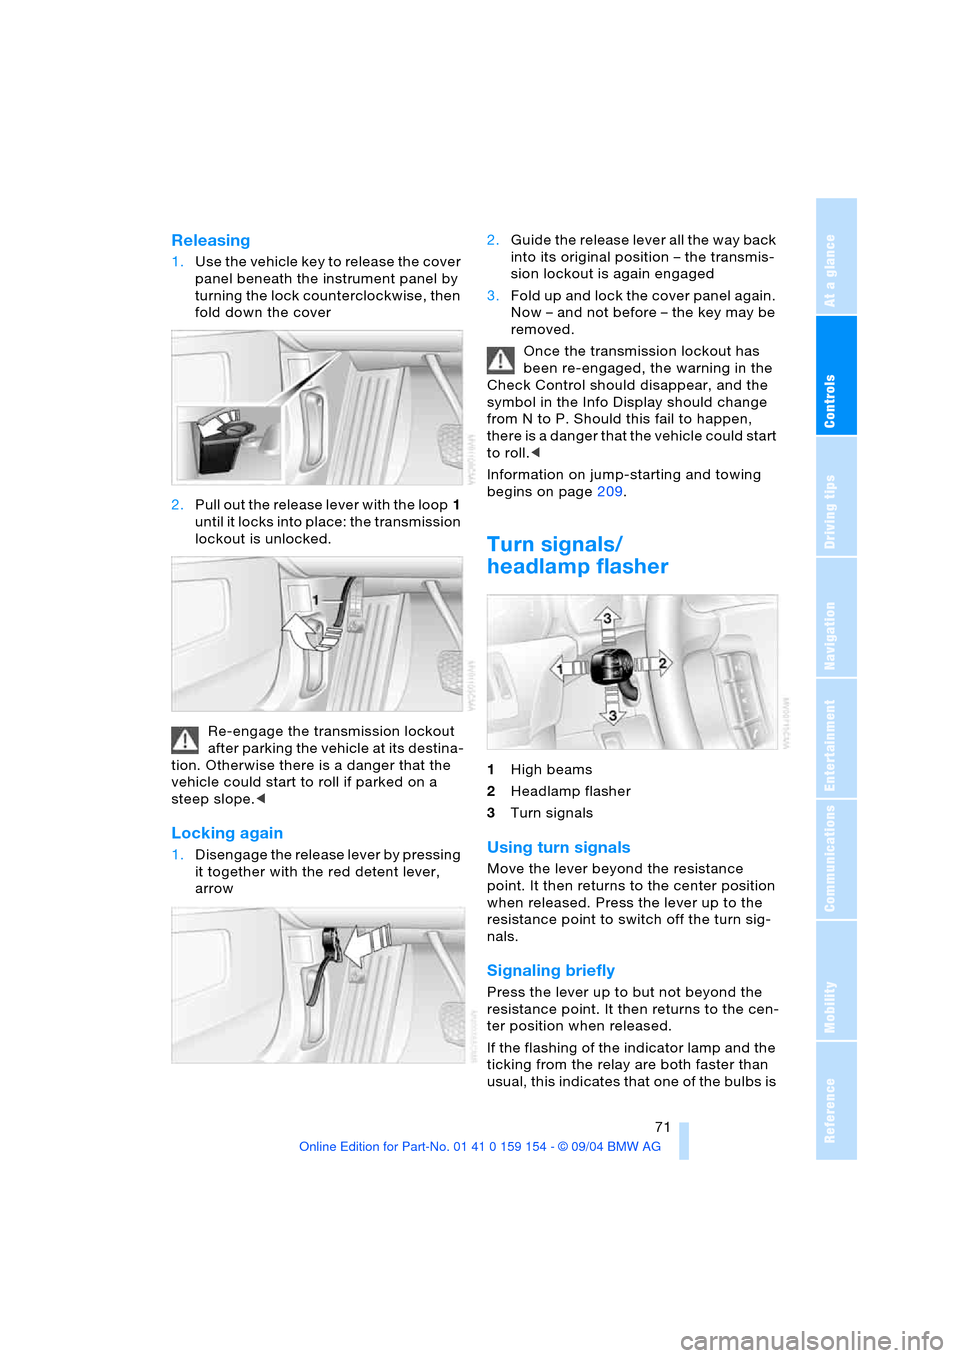
Releasing
1.Use the vehicle key to release the cover
panel beneath the instrument panel by
turning the lock counterclockwise, then
fold down the cover
2.Pull out the release lever with the loop1
until it locks into place: the transmission
lockout is unlocked.
Re-engage the transmission lockout
after parking the vehicle at its destina-
tion. Otherwise there is a danger that the
vehicle could start to roll if parked on a
steep slope.<
Locking again
1.Disengage the release lever by pressing
it together with the red detent lever,
arrow 2.Guide the release lever all the way back
into its original position – the transmis-
sion lockout is again engaged
3.Fold up and lock the cover panel again.
Now – and not before – the key may be
removed.
Once the transmission lockout has
been re-engaged, the warning in the
Check Control should disappear, and the
symbol in the Info Display should change
from N to P. Should this fail to happen,
there is a danger that the vehicle could start
to roll.<
Information on jump-starting and towing
begins on page209.
Turn signals/
headlamp flasher
1High beams
2Headlamp flasher
3Turn signals
Using turn signals
Move the lever beyond the resistance
point. It then returns to the center position
when released. Press the lever up to the
resistance point to switch off the turn sig-
nals.
Signaling briefly
Press the lever up to but not beyond the
resistance point. It then returns to the cen-
ter position when released.
If the flashing of the indicator lamp and the
ticking from the relay are both faster than
usual, this indicates that one of the bulbs is
Page 74 of 239
Driving
72 defective; if a trailer is attached, this could
also indicate that one of its turn signal
bulbs is defective.
Wiper system
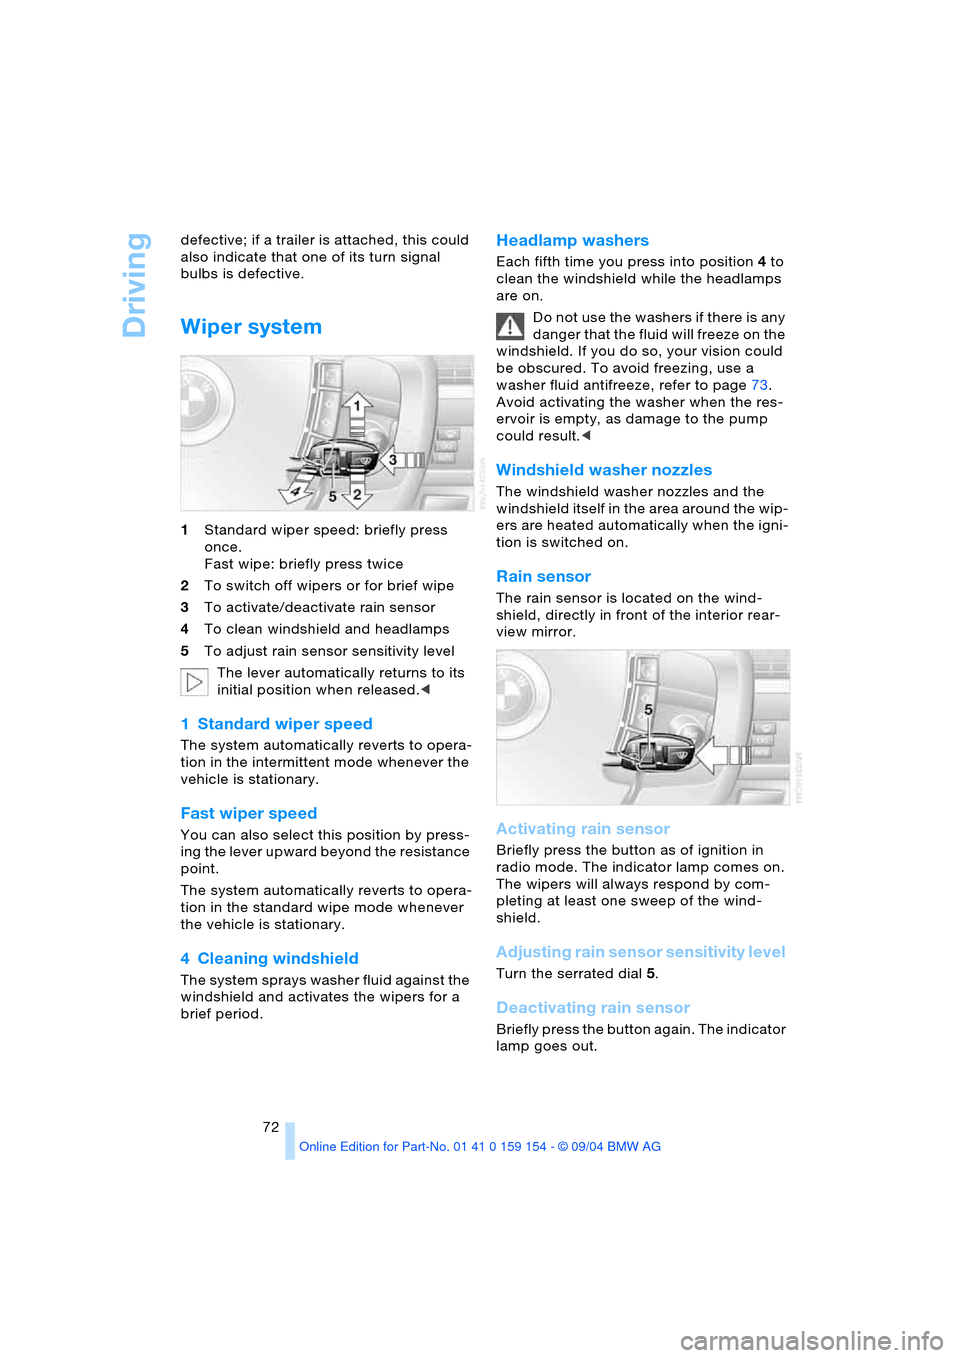
1Standard wiper speed: briefly press
once.
Fast wipe: briefly press twice
2To switch off wipers or for brief wipe
3To activate/deactivate rain sensor
4To clean windshield and headlamps
5To adjust rain sensor sensitivity level
The lever automatically returns to its
initial position when released.<
1 Standard wiper speed
The system automatically reverts to opera-
tion in the intermittent mode whenever the
vehicle is stationary.
Fast wiper speed
You can also select this position by press-
ing the lever upward beyond the resistance
point.
The system automatically reverts to opera-
tion in the standard wipe mode whenever
the vehicle is stationary.
4 Cleaning windshield
The system sprays washer fluid against the
windshield and activates the wipers for a
brief period.
Headlamp washers
Each fifth time you press into position 4 to
clean the windshield while the headlamps
are on.
Do not use the washers if there is any
danger that the fluid will freeze on the
windshield. If you do so, your vision could
be obscured. To avoid freezing, use a
washer fluid antifreeze, refer to page73.
Avoid activating the washer when the res-
ervoir is empty, as damage to the pump
could result.<
Windshield washer nozzles
The windshield washer nozzles and the
windshield itself in the area around the wip-
ers are heated automatically when the igni-
tion is switched on.
Rain sensor
The rain sensor is located on the wind-
shield, directly in front of the interior rear-
view mirror.
Activating rain sensor
Briefly press the button as of ignition in
radio mode. The indicator lamp comes on.
The wipers will always respond by com-
pleting at least one sweep of the wind-
shield.
Adjusting rain sensor sensitivity level
Turn the serrated dial 5.
Deactivating rain sensor
Briefly press the button again. The indicator
lamp goes out.
Page 75 of 239
Controls
73Reference
At a glance
Driving tips
Communications
Navigation
Entertainment
Mobility
The rain sensor is automatically deac-
tivated when you switch off the igni-
tion.<
Deactivate the rain sensor when
passing through an automatic car
wash. Failure to do so could result in dam-
age caused by undesired wiper activa-
tion.<
Selecting wiper fold-out position
Important for changing wiper blades, when
folding away from windshield to prevent
blades from sticking when ice forms, etc.
1.Switch off the engine and remove the
remote control from the ignition lock
2.Press the wiper lever up and maintain
pressure for about 3 seconds until the
wipers are roughly vertical: this is the
fold-out position.
After folding the wipers back against the
windshield you will need to reactivate the
wiper system:
1.Insert the remote control to activate the
radio mode in the ignition lock
2.Apply brief upward pressure to the
wiper lever. The wipers return to their
retracted position and are ready for nor-
mal operation.
To prevent damage to the wipers,
always fold them back against the
windshield before switching on either the
radio mode or the ignition.<
Washer fluid
Washer fluid antifreeze is flammable.
Always keep it well away from sparks
and open flames, and store it in tightly
closed containers well out of the reach of
children. Always observe the instructions
for use provided on the containers.<
We recommend that you mix the
washer fluid before adding it to the
reservoir.<
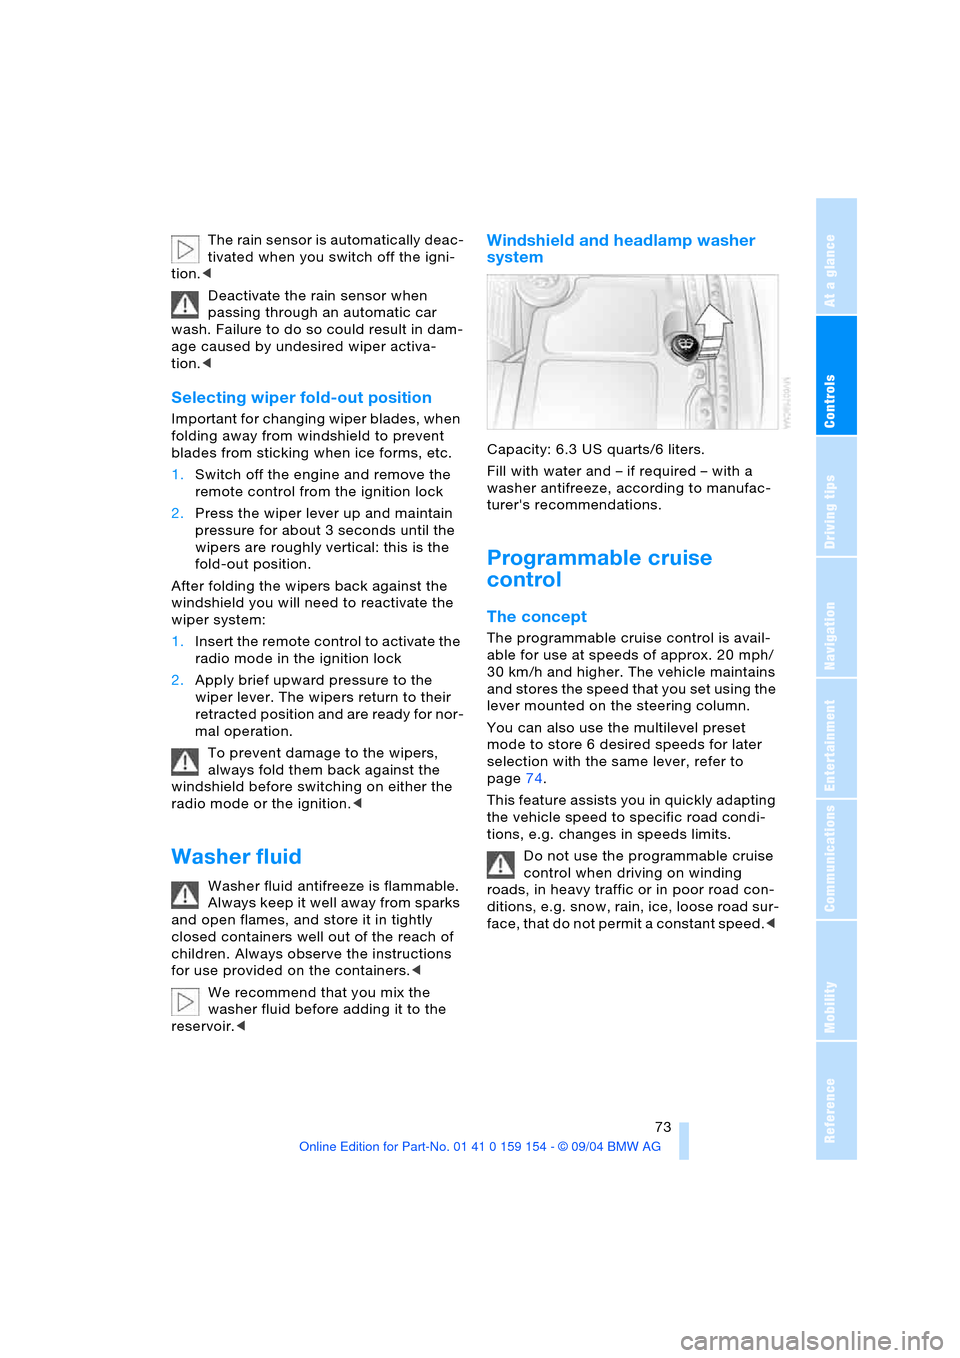
Windshield and headlamp washer
system
Capacity: 6.3USquarts/6liters.
Fill with water and – if required – with a
washer antifreeze, according to manufac-
turer's recommendations.
Programmable cruise
control
The concept
The programmable cruise control is avail-
able for use at speeds of approx. 20 mph/
30 km/h and higher. The vehicle maintains
and stores the speed that you set using the
lever mounted on the steering column.
You can also use the multilevel preset
mode to store 6 desired speeds for later
selection with the same lever, refer to
page74.
This feature assists you in quickly adapting
the vehicle speed to specific road condi-
tions, e.g. changes in speeds limits.
Do not use the programmable cruise
control when driving on winding
roads, in heavy traffic or in poor road con-
ditions, e.g. snow, rain, ice, loose road sur-
face, that do not permit a constant speed.<
Page 102 of 239
Lamps
100
Lamps
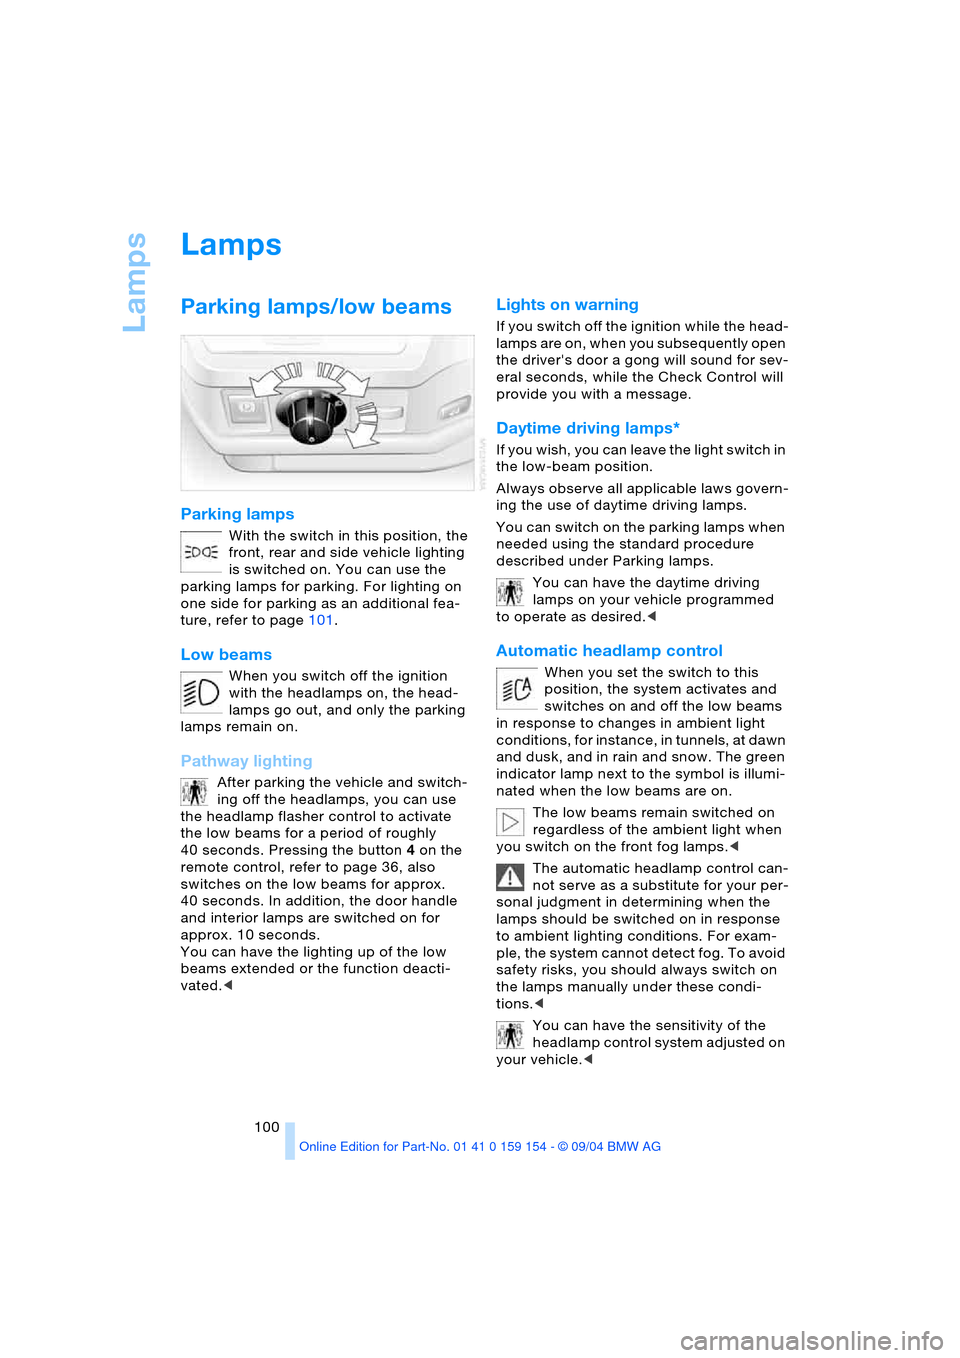
Parking lamps/low beams
Parking lamps
With the switch in this position, the
front, rear and side vehicle lighting
is switched on. You can use the
parking lamps for parking. For lighting on
one side for parking as an additional fea-
ture, refer to page101.
Low beams
When you switch off the ignition
with the headlamps on, the head-
lamps go out, and only the parking
lamps remain on.
Pathway lighting
After parking the vehicle and switch-
ing off the headlamps, you can use
the headlamp flasher control to activate
the low beams for a period of roughly
40 seconds. Pressing the button 4 on the
remote control, refer to page 36, also
switches on the low beams for approx.
40 seconds. In addition, the door handle
and interior lamps are switched on for
approx. 10 seconds.
You can have the lighting up of the low
beams extended or the function deacti-
vated.<
Lights on warning
If you switch off the ignition while the head-
lamps are on, when you subsequently open
the driver's door a gong will sound for sev-
eral seconds, while the Check Control will
provide you with a message
.
Daytime driving lamps*
If you wish, you can leave the light switch in
the low-beam position.
Always observe all applicable laws govern-
ing the use of daytime driving lamps.
You can switch on the parking lamps when
needed using the standard procedure
described under Parking lamps.
You can have the daytime driving
lamps on your vehicle programmed
to operate as desired.<
Automatic headlamp control
When you set the switch to this
position, the system activates and
switches on and off the low beams
in response to changes in ambient light
conditions, for instance, in tunnels, at dawn
and dusk, and in rain and snow. The green
indicator lamp next to the symbol is illumi-
nated when the low beams are on.
The low beams remain switched on
regardless of the ambient light when
you switch on the front fog lamps.<
The automatic headlamp control can-
not serve as a substitute for your per-
sonal judgment in determining when the
lamps should be switched on in response
to ambient lighting conditions. For exam-
ple, the system cannot detect fog. To avoid
safety risks, you should always switch on
the lamps manually under these condi-
tions.<
You can have the sensitivity of the
headlamp control system adjusted on
your vehicle.<
Page 103 of 239
Controls
101Reference
At a glance
Driving tips
Communications
Navigation
Entertainment
Mobility
Adaptive Head Light*
The concept
Adaptive Head Light is a variable headlamp
control system that enables dynamic illumi-
nation of the road surface. Depending on
the steering angle and other assumptions,
the light from the headlamp follows the
course of the road.
Activating Adaptive Head Light
With the ignition on, refer to
page62, turn the light switch to the
position 'Automatic headlamp con-
trol', refer to page100.
To avoid blinding oncoming traffic, the
Adaptive Head Light:
>Is not active when driving in reverse
>Is only active toward the passenger's
side with the vehicle stationary.
Malfunction
The LED above the symbol for automatic
headlamp control flashes. Adaptive Head
Light is faulty or has failed. Have the system
checked as soon as possible.
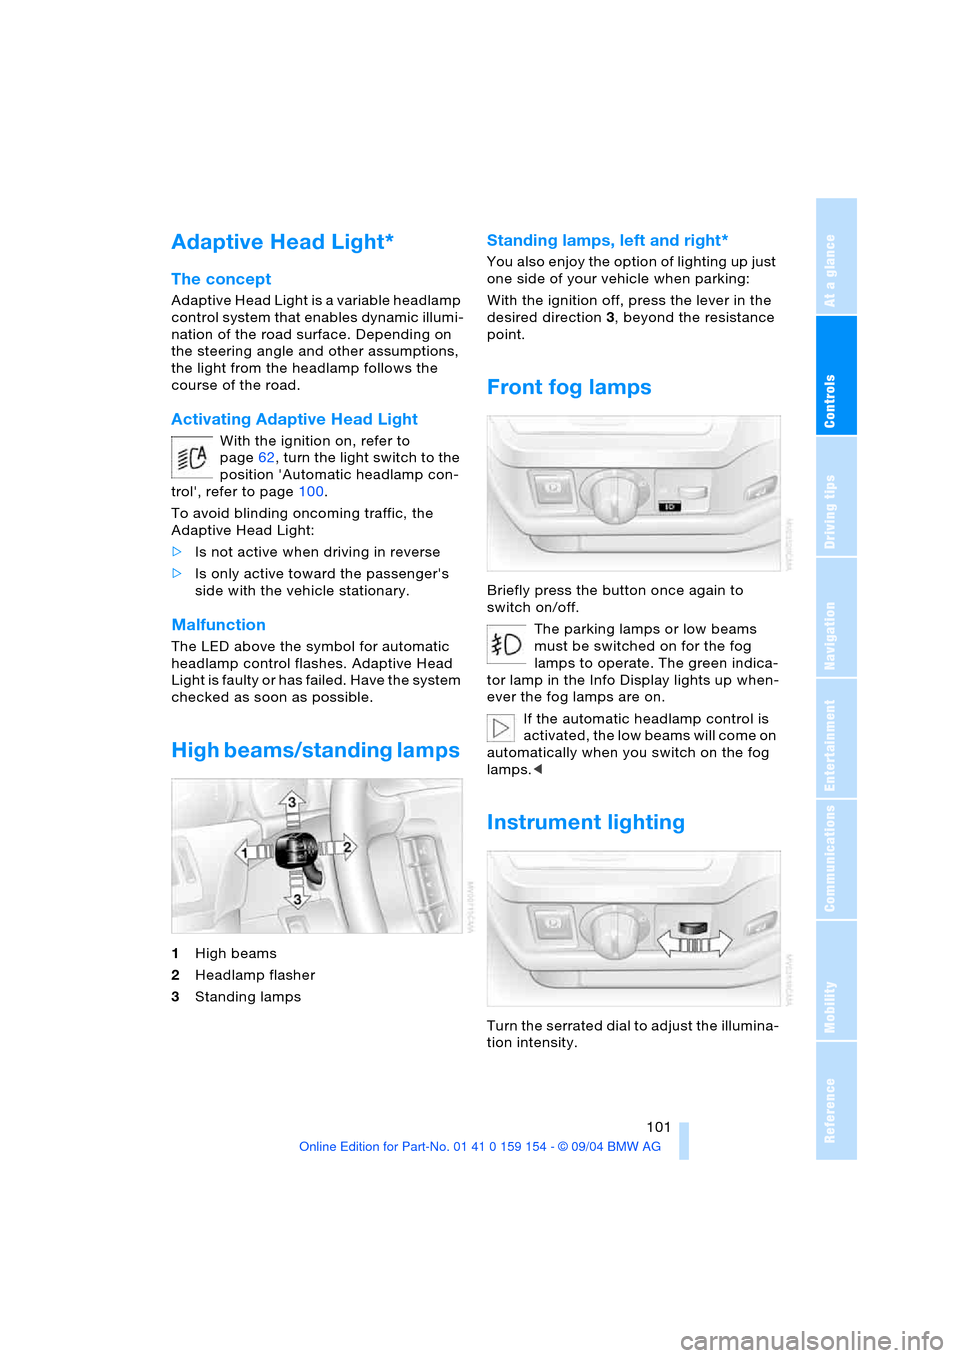
High beams/standing lamps
1High beams
2Headlamp flasher
3Standing lamps
Standing lamps, left and right*
You also enjoy the option of lighting up just
one side of your vehicle when parking:
With the ignition off, press the lever in the
desired direction3, beyond the resistance
point.
Front fog lamps
Briefly press the button once again to
switch on/off.
The parking lamps or low beams
must be switched on for the fog
lamps to operate. The green indica-
tor lamp in the Info Display lights up when-
ever the fog lamps are on.
If the automatic headlamp control is
activated, the low beams will come on
automatically when you switch on the fog
lamps.<
Instrument lighting
Turn the serrated dial to adjust the illumina-
tion intensity.
Page 197 of 239
Mobility
195Reference
At a glance
Controls
Driving tips
Communications
Navigation
Entertainment
Engine compartment
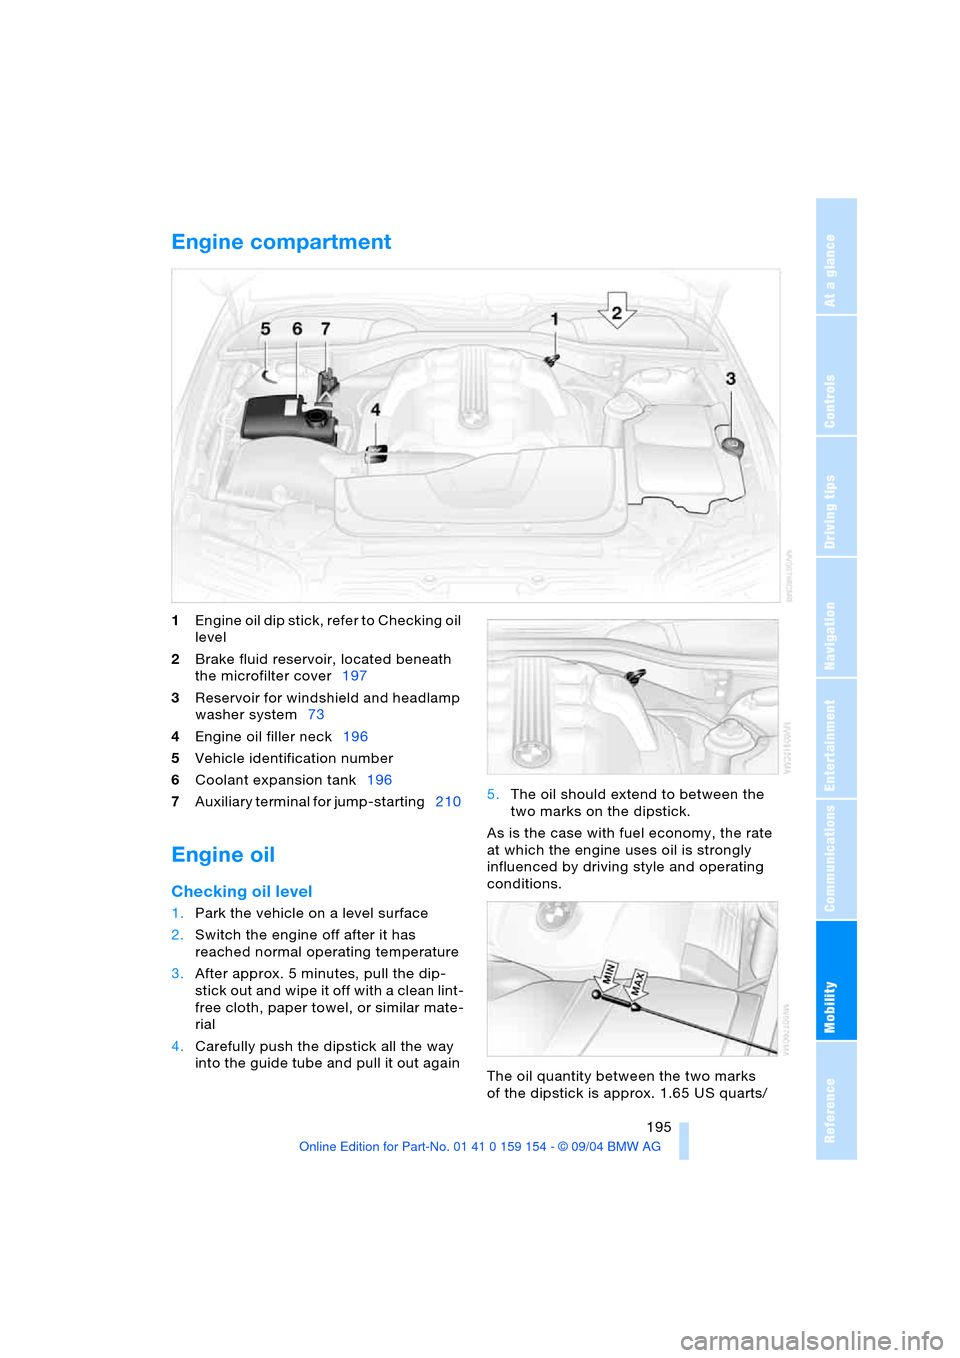
1Engine oil dip stick, refer to Checking oil
level
2Brake fluid reservoir, located beneath
the microfilter cover197
3Reservoir for windshield and headlamp
washer system73
4Engine oil filler neck196
5Vehicle identification number
6Coolant expansion tank196
7Auxiliary terminal for jump-starting210
Engine oil
Checking oil level
1.Park the vehicle on a level surface
2.Switch the engine off after it has
reached normal operating temperature
3.After approx. 5 minutes, pull the dip-
stick out and wipe it off with a clean lint-
free cloth, paper towel, or similar mate-
rial
4.Carefully push the dipstick all the way
into the guide tube and pull it out again 5.The oil should extend to between the
two marks on the dipstick.
As is the case with fuel economy, the rate
at which the engine uses oil is strongly
influenced by driving style and operating
conditions.
The oil quantity between the two marks
of the dipstick is approx. 1.65 US quarts/
Page 203 of 239
Mobility
201Reference
At a glance
Controls
Driving tips
Communications
Navigation
Entertainment
Replacing components
Onboard tool kit
The onboard tool kit is located in the lug-
gage compartment lid.
Loosen the wingnut to open.
The adapter for the spare key can be stored
beneath the open-ended spanners.
Windshield wiper blades
To replace the blades, start by folding the
wipers out and away from the windshield,
refer to page73.
Lamps and bulbs
The lamps and bulbs are essential factors
contributing to the safety of your vehicle.
Therefore, comply fully with the following
instructions during bulb replacement. If you
are not familiar with the specified proce-
dures, BMW recommends having the
replacements carried out at your BMW
center.
Never touch the glass of new bulbs
w i t h y o u r b a r e f i n g e r s , a s e v e n m i n u t e
amounts of contamination will burn into the
bulb's surface and reduce its service life.
Use a clean cloth, napkin, etc., or hold the
bulb by its metal socket.<
You can obtain a selection of replacement
bulbs at your BMW center. To prevent short circuits, before
working on any electrical system,
equipment or accessory you should always
switch it off and disconnect the cable from
the battery's negative terminal before start-
ing.
To avoid possible injury or equipment dam-
age when changing bulbs, observe any
instructions provided by the bulb manufac-
turer.<
When maintaining the headlamps,
please comply with the instructions in
the separate Caring for your vehicle bro-
chure.<
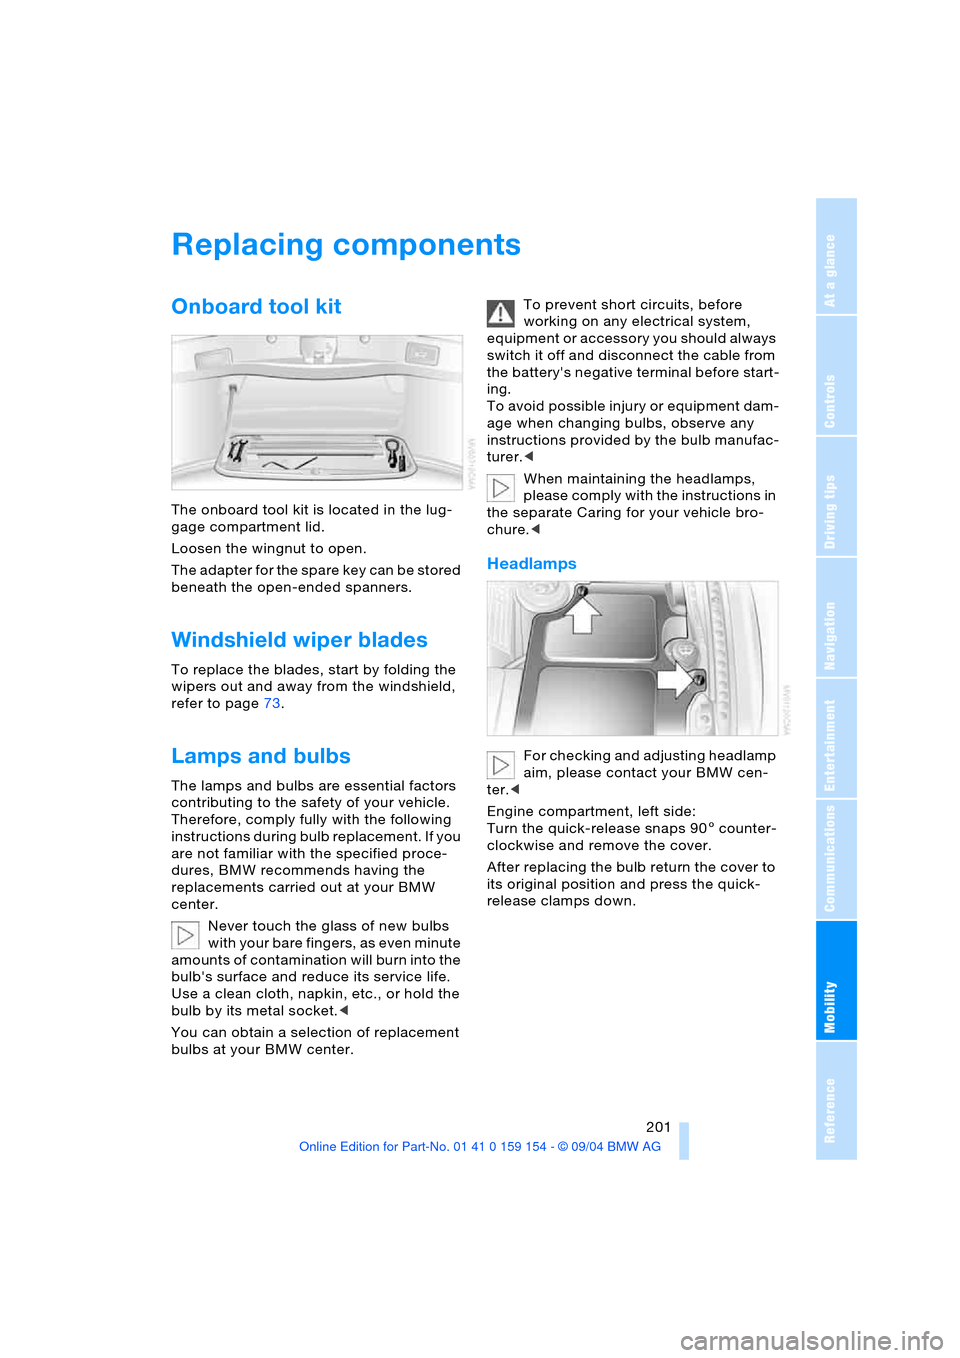
Headlamps
For checking and adjusting headlamp
aim, please contact your BMW cen-
ter.<
Engine compartment, left side:
Turn the quick-release snaps 905 counter-
clockwise and remove the cover.
After replacing the bulb return the cover to
its original position and press the quick-
release clamps down.