BMW 745Li 2005 E66 Owner's Manual
Manufacturer: BMW, Model Year: 2005, Model line: 745Li, Model: BMW 745Li 2005 E66Pages: 239, PDF Size: 8.03 MB
Page 161 of 239
Navigation
Entertainment
Driving tips
159Reference
At a glance
Controls
Communications
Mobility
Fast forward/reverse
1.Select the direction.
Press and hold the button. The tracks
can be heard, but the sound is distorted
2.To interrupt the fast forward/reverse
function, release the button.
The CD will start play at the point
selected.
Malfunctions
The CD player is a 'Class 1' laser
product. Never remove the cover from
the housing. Do not operate the unit if the
cover is damaged. Operation without the
cover can lead to serious eye injury from
invisible laser beams.
Always refer all repair and maintenance
operations to qualified technicians.
With self-recorded CDs, labels applied
later can become detached during play-
back due to the development of heat, caus-
ing irreparable damage to the device.<
To prevent CDs from being copied
illegally, they are often provided with
copy protection by the manufacturer.
Under certain circumstances this can pre-
vent or restrict the playing of CDs on your
CD player. In this case please contact the
CD dealer or manufacturer.<
If you play self-recorded audio CDs, faults,
e.g. drop-outs, can occur, or the CD is not
played at all.
High levels of humidity inside the
player can condense on the laser's
scan lens and prevent it from reading the
CD.
Only use round CDs with a standard diam-
eter of 4.7 in/12 cm and do not play CDs
with an adapter, e.g. maxi CDs, as other-
wise the CDs or the adapter can jam and
may no longer be ejected.
Do not use combined CD/DVD, e.g. DVD+,
as otherwise the CD/DVD can jam, prevent-
ing it from being ejected.<
Page 162 of 239
CD changer
160
CD changer
Location
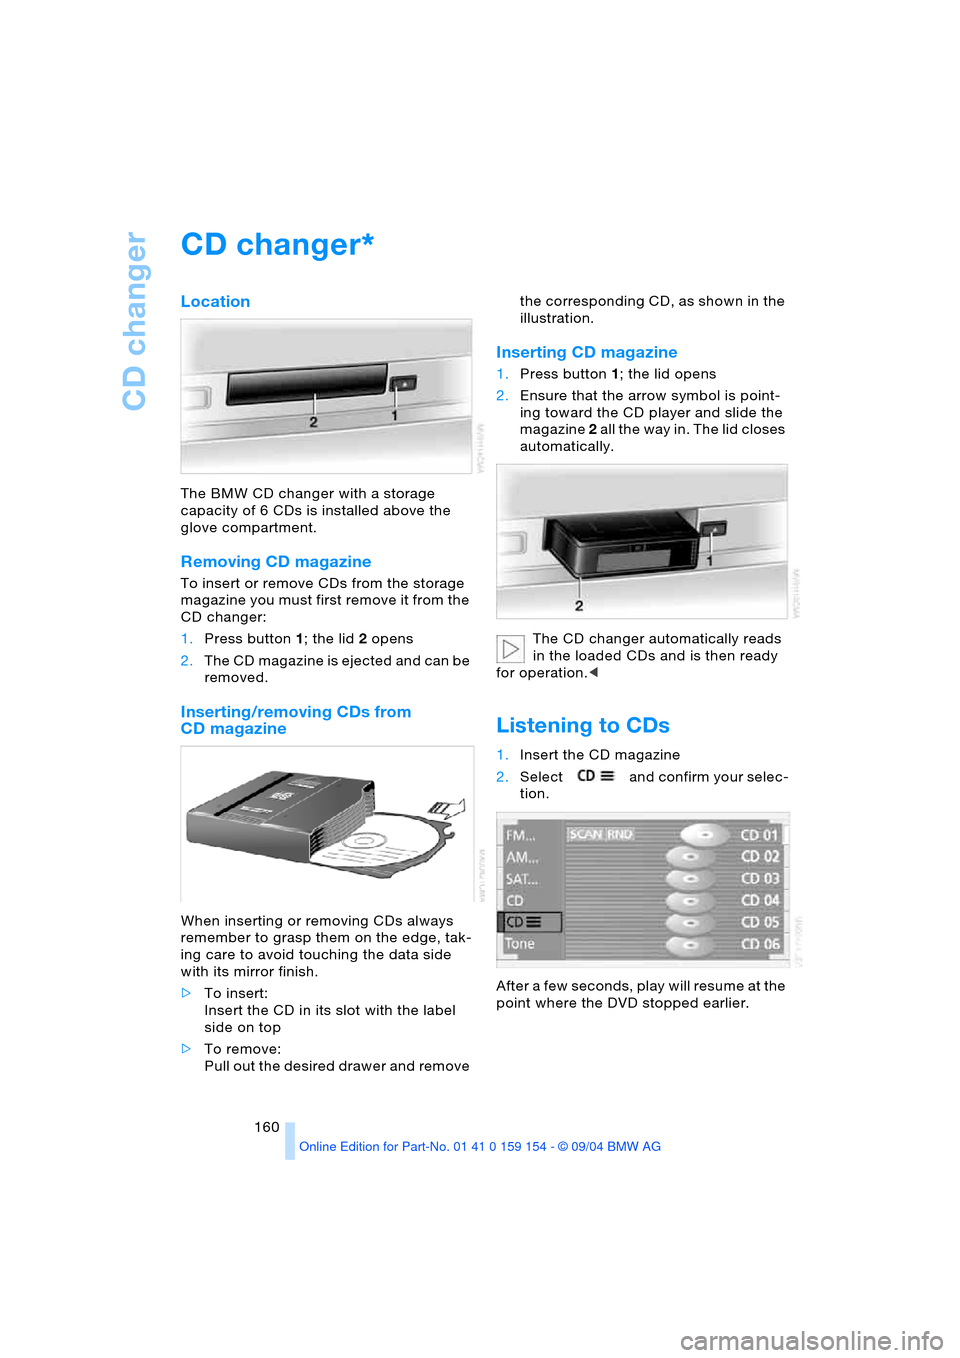
The BMW CD changer with a storage
capacity of 6 CDs is installed above the
glove compartment.
Removing CD magazine
To insert or remove CDs from the storage
magazine you must first remove it from the
CD changer:
1.Press button 1; the lid 2 opens
2.The CD magazine is ejected and can be
removed.
Inserting/removing CDs from
CD magazine
When inserting or removing CDs always
remember to grasp them on the edge, tak-
ing care to avoid touching the data side
with its mirror finish.
>To insert:
Insert the CD in its slot with the label
side on top
>To remove:
Pull out the desired drawer and remove the corresponding CD, as shown in the
illustration.
Inserting CD magazine
1.Press button 1; the lid opens
2.Ensure that the arrow symbol is point-
ing toward the CD player and slide the
magazine 2 all the way in. The lid closes
automatically.
The CD changer automatically reads
in the loaded CDs and is then ready
for operation.<
Listening to CDs
1.Insert the CD magazine
2.Select and confirm your selec-
tion.
After a few seconds, play will resume at the
point where the DVD stopped earlier.
*
Page 163 of 239
Navigation
Entertainment
Driving tips
161Reference
At a glance
Controls
Communications
Mobility
If the CD magazine has been newly filled,
playback begins with the lowest CD, e.g.
CD 1, track 1.
Volume adjustment, refer to page149.
Tone control, refer to page149.
If you play self-recorded audio CDs,
faults, e.g. drop-outs, can occur, or
the CD is not played at all.<
Status displays
The CD magazine's load status is indicated
on the Control Display.
If the display fails to detect a CD that
you have loaded in the magazine,
check to ensure that the CD has been
inserted correctly and inspect it for signs of
defects.<
Selecting a track using
Control Center
Selecting a CD
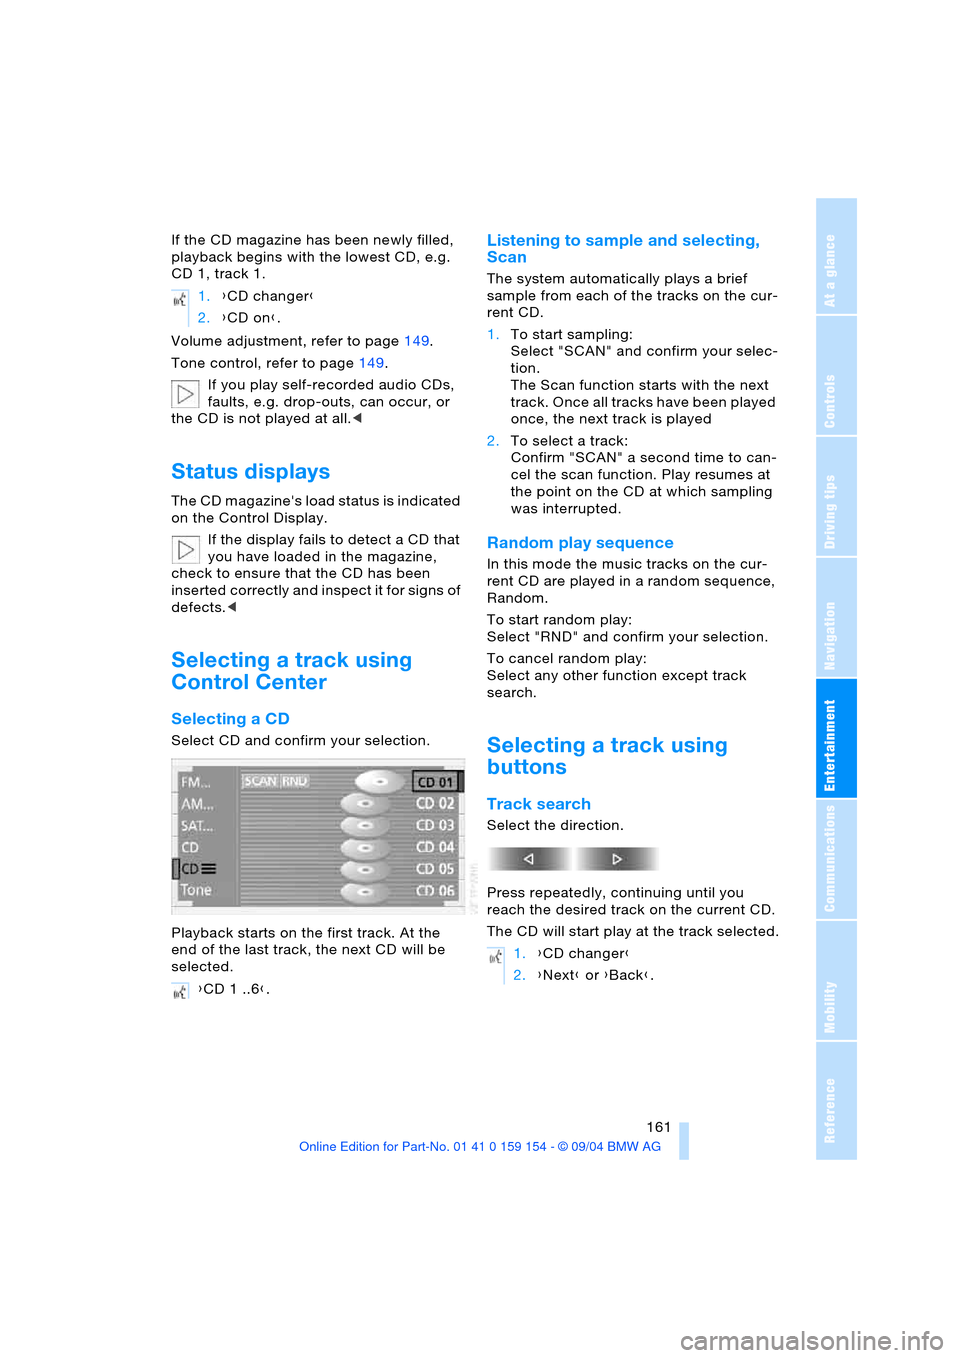
Select CD and confirm your selection.
Playback starts on the first track. At the
end of the last track, the next CD will be
selected.
Listening to sample and selecting,
Scan
The system automatically plays a brief
sample from each of the tracks on the cur-
rent CD.
1.To start sampling:
Select "SCAN" and confirm your selec-
tion.
The Scan function starts with the next
track. Once all tracks have been played
once, the next track is played
2.To select a track:
Confirm "SCAN" a second time to can-
cel the scan function. Play resumes at
the point on the CD at which sampling
was interrupted.
Random play sequence
In this mode the music tracks on the cur-
rent CD are played in a random sequence,
Random.
To start random play:
Select "RND" and confirm your selection.
To cancel random play:
Select any other function except track
search.
Selecting a track using
buttons
Track search
Select the direction.
Press repeatedly, continuing until you
reach the desired track on the current CD.
The CD will start play at the track selected. 1.{CD changer}
2.{CD on}.
{CD 1 ..6}.
1.{CD changer}
2.{Next} or {Back}.
Page 164 of 239
CD changer
162
Fast forward/reverse
1.Select the direction.
Press and hold the button. The tracks
can be heard, but the sound is distorted
2.To interrupt the fast forward/reverse
function, release the button.
The system will continue play at the
point on the CD at which the button was
released.
Selecting music track
Malfunctions
The BMW CD changer is a 'Class 1'
laser product. Never remove the
cover from the housing. Do not operate the
unit if the cover is damaged. Operation
without the cover can lead to serious eye
injury from invisible laser beams.
Always refer all repair and maintenance
operations to qualified technicians.
With self-recorded CDs, labels applied
later can become detached during play-
back due to the development of heat, caus-
ing irreparable damage to the device.<
To prevent CDs from being copied
illegally, they are often provided with
copy protection by the manufacturer.
Under certain circumstances, this can pre-
vent or restrict the playing of CDs on your
CD changer. In this case please contact the
CD dealer or manufacturer.<
If you play self-recorded audio CDs, faults,
e.g. drop-outs, can occur, or the CD is not
played at all.
High levels of humidity inside the
player can condense on the laser's
scan lens and temporarily prevent it from
reading the CD.
Do not use combined CD/DVD, e.g. DVD+,
as otherwise the CD/DVD can jam, prevent-
ing it from being ejected.< 1.{CD changer}
2.{Track 1 ..30}.
Page 165 of 239
Navigation
Entertainment
Driving tips
163Reference
At a glance
Controls
Communications
Mobility
TV
For your own safety, the TV picture is only
shown on the rear screen.
The system is designed for reception
of analog television. Due to the quality
of mobile reception, reduced picture qual-
ity can result depending on the current
position and network coverage in spite of
the highly advanced reception technology
used. A change in vehicle locations can
result in improved reception quality in many
cases.<
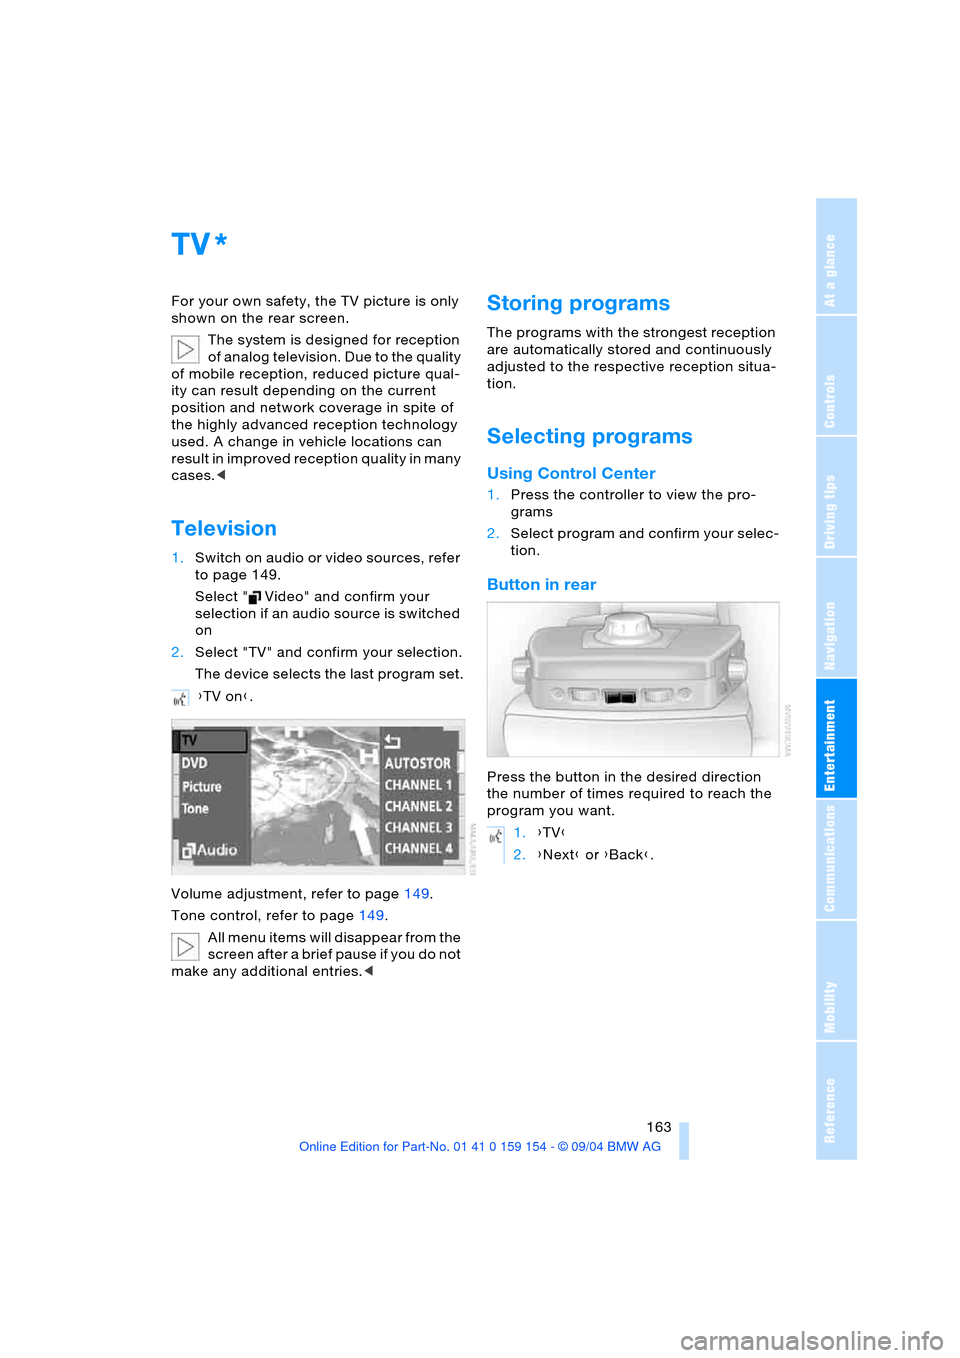
Television
1.Switch on audio or video sources, refer
to page 149.
Select " Video" and confirm your
selection if an audio source is switched
on
2.Select "TV" and confirm your selection.
The device selects the last program set.
Volume adjustment, refer to page149.
Tone control, refer to page149.
All menu items will disappear from the
screen after a brief pause if you do not
make any additional entries.<
Storing programs
The programs with the strongest reception
are automatically stored and continuously
adjusted to the respective reception situa-
tion.
Selecting programs
Using Control Center
1.Press the controller to view the pro-
grams
2.Select program and confirm your selec-
tion.
Button in rear
Press the button in the desired direction
the number of times required to reach the
program you want.
*
{TV on}.
1.{TV}
2.{Next} or {Back}.
Page 166 of 239
TV
164
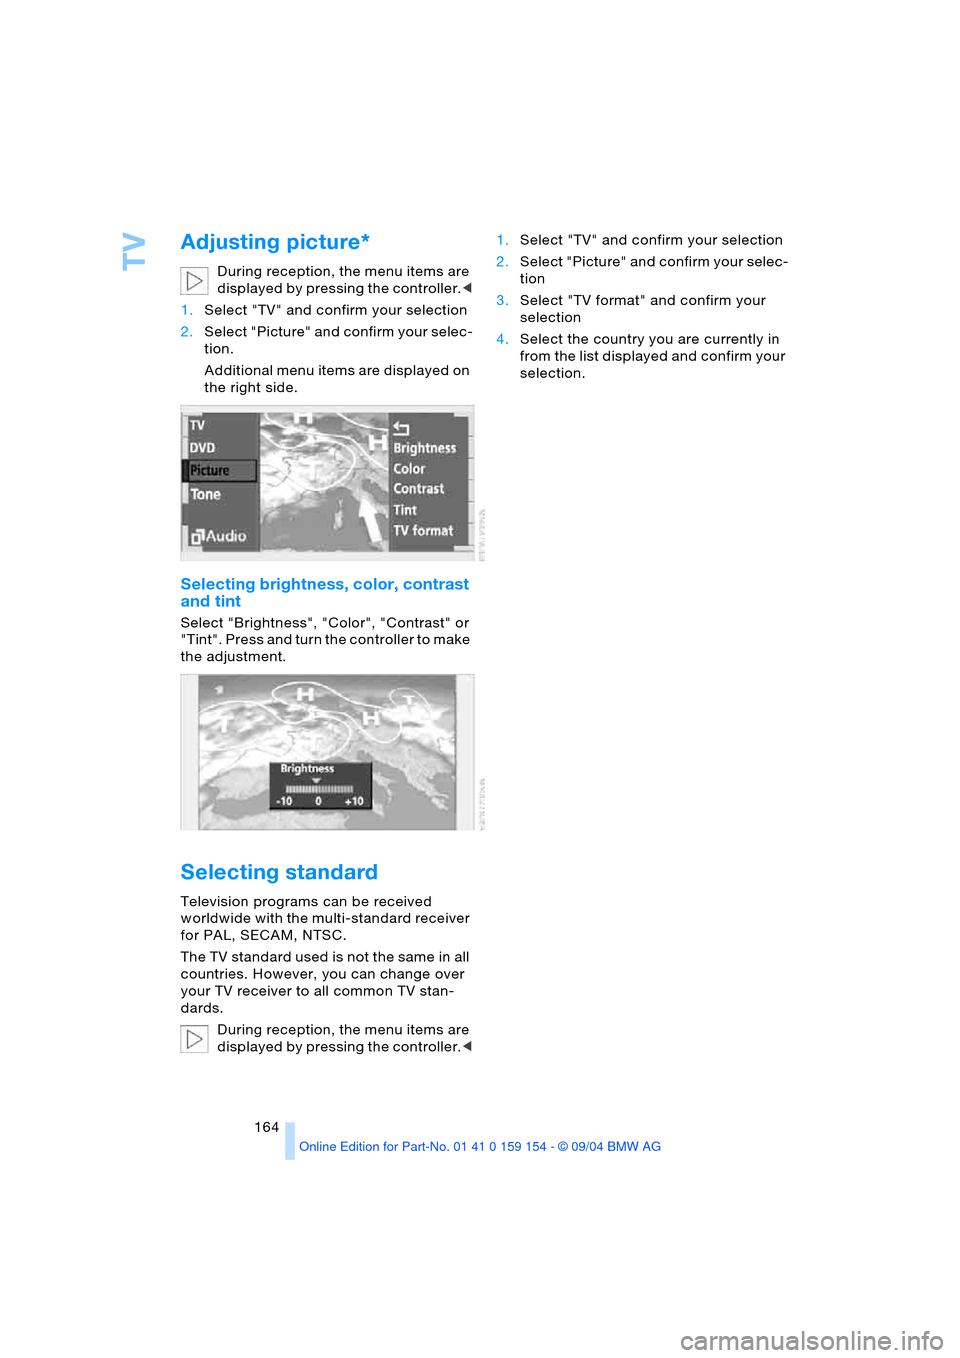
Adjusting picture*
During reception, the menu items are
displayed by pressing the controller.<
1.Select "TV" and confirm your selection
2.Select "Picture" and confirm your selec-
tion.
Additional menu items are displayed on
the right side.
Selecting brightness, color, contrast
and tint
Select "Brightness", "Color", "Contrast" or
"Tint". Press and turn the controller to make
the adjustment.
Selecting standard
Television programs can be received
worldwide with the multi-standard receiver
for PAL, SECAM, NTSC.
The TV standard used is not the same in all
countries. However, you can change over
your TV receiver to all common TV stan-
dards.
During reception, the menu items are
displayed by pressing the controller.<1.Select "TV" and confirm your selection
2.Select "Picture" and confirm your selec-
tion
3.Select "TV format" and confirm your
selection
4.Select the country you are currently in
from the list displayed and confirm your
selection.
Page 167 of 239
Navigation
Entertainment
Driving tips
165Reference
At a glance
Controls
Communications
Mobility
DVD changer
Location
The BMW DVD changer for 6 DVDs or
audio CDs is mounted behind the left side
trim panel in the luggage compartment.
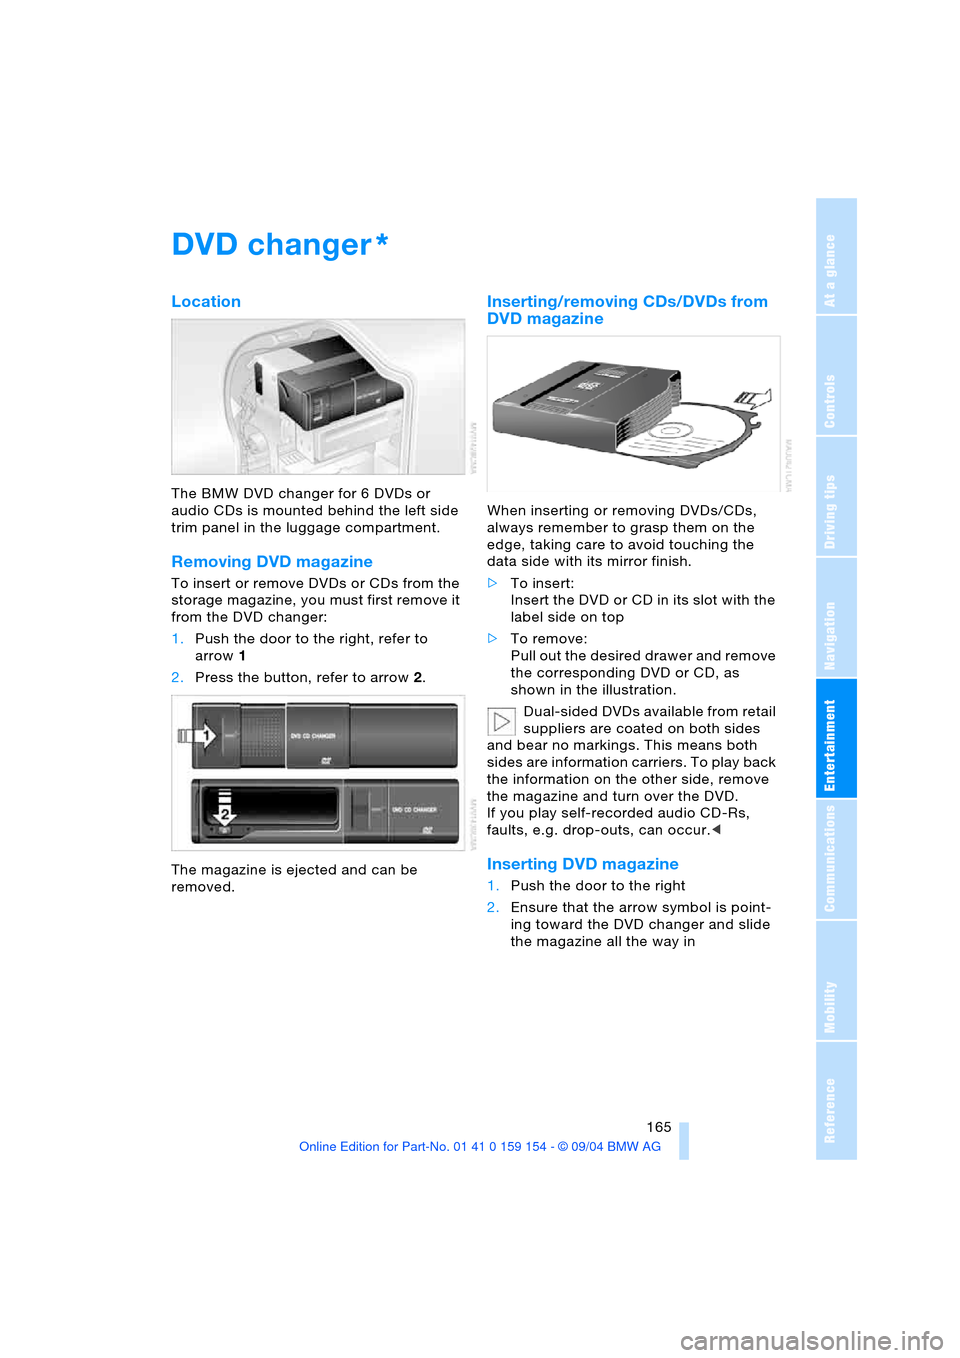
Removing DVD magazine
To insert or remove DVDs or CDs from the
storage magazine, you must first remove it
from the DVD changer:
1.Push the door to the right, refer to
arrow1
2.Press the button, refer to arrow2.
The magazine is ejected and can be
removed.
Inserting/removing CDs/DVDs from
DVD magazine
When inserting or removing DVDs/CDs,
always remember to grasp them on the
edge, taking care to avoid touching the
data side with its mirror finish.
>To insert:
Insert the DVD or CD in its slot with the
label side on top
>To remove:
Pull out the desired drawer and remove
the corresponding DVD or CD, as
shown in the illustration.
Dual-sided DVDs available from retail
suppliers are coated on both sides
and bear no markings. This means both
sides are information carriers. To play back
the information on the other side, remove
the magazine and turn over the DVD.
If you play self-recorded audio CD-Rs,
faults, e.g. drop-outs, can occur.<
Inserting DVD magazine
1.Push the door to the right
2.Ensure that the arrow symbol is point-
ing toward the DVD changer and slide
the magazine all the way in
*
Page 168 of 239
DVD changer
166 3.Close the door again.
The DVD changer checks the maga-
zine for inserted DVDs or CDs and is
then ready for operation.<
DVD country codes
Your DVD changer only plays DVDs with
the coding 0 or 1. This coding cannot be
changed.
Playing DVDs
Make all entries with the vehicle sta-
tionary. If you do not observe this pre-
caution, you may endanger vehicle occu-
pants and other road users.<
1.Insert the DVD magazine
2.Select "DVD" and confirm your selec-
tion.
After a few seconds, play will resume at the
point where the DVD stopped earlier.
If the DVD magazine has been newly
filled or an audio CD played from the
DVD magazine, playback begins with the
lowest DVD in the DVD magazine.Volume adjustment, refer to page149.
Tone control, refer to page149.
Status displays
The DVD magazine's load status is indi-
cated on the Control Display.
If the display fails to detect a DVD that
you have loaded in the magazine,
check to ensure that the DVD has been
inserted correctly and inspect it for signs of
defects.
If there are audio CDs in the DVD maga-
zine, these will not be displayed in the DVD
menu, but instead in the CD changer menu.
If your vehicle is equipped with an addi-
tional CD changer, they will be displayed
with the numbers 7 to 12.<
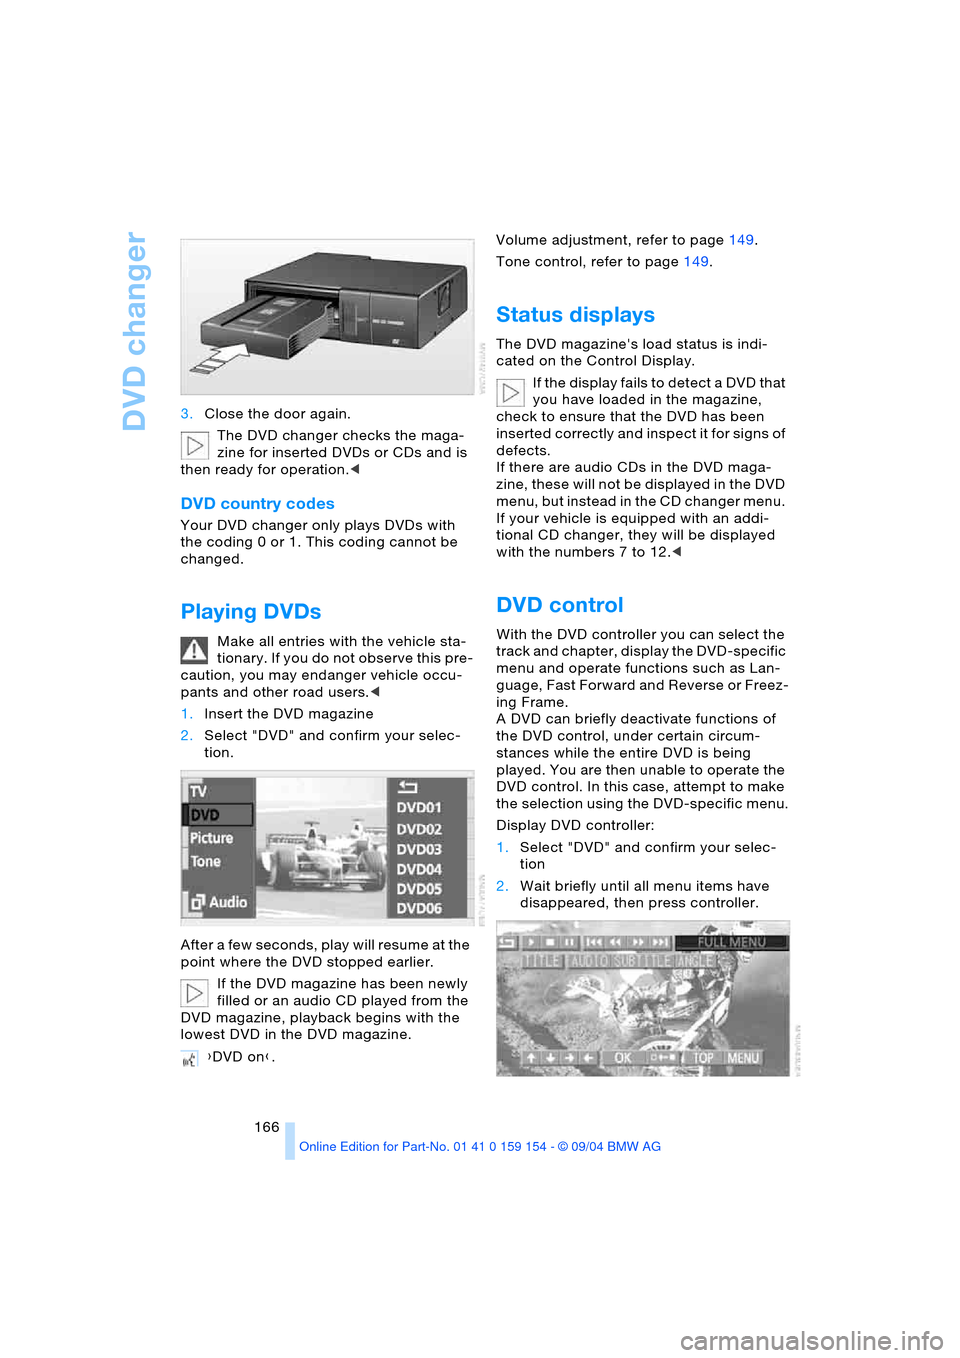
DVD control
With the DVD controller you can select the
track and chapter, display the DVD-specific
menu and operate functions such as Lan-
guage, Fast Forward and Reverse or Freez-
ing Frame.
A DVD can briefly deactivate functions of
the DVD control, under certain circum-
stances while the entire DVD is being
played. You are then unable to operate the
DVD control. In this case, attempt to make
the selection using the DVD-specific menu.
Display DVD controller:
1.Select "DVD" and confirm your selec-
tion
2.Wait briefly until all menu items have
disappeared, then press controller.
{DVD on}.
Page 169 of 239
Navigation
Entertainment
Driving tips
167Reference
At a glance
Controls
Communications
Mobility
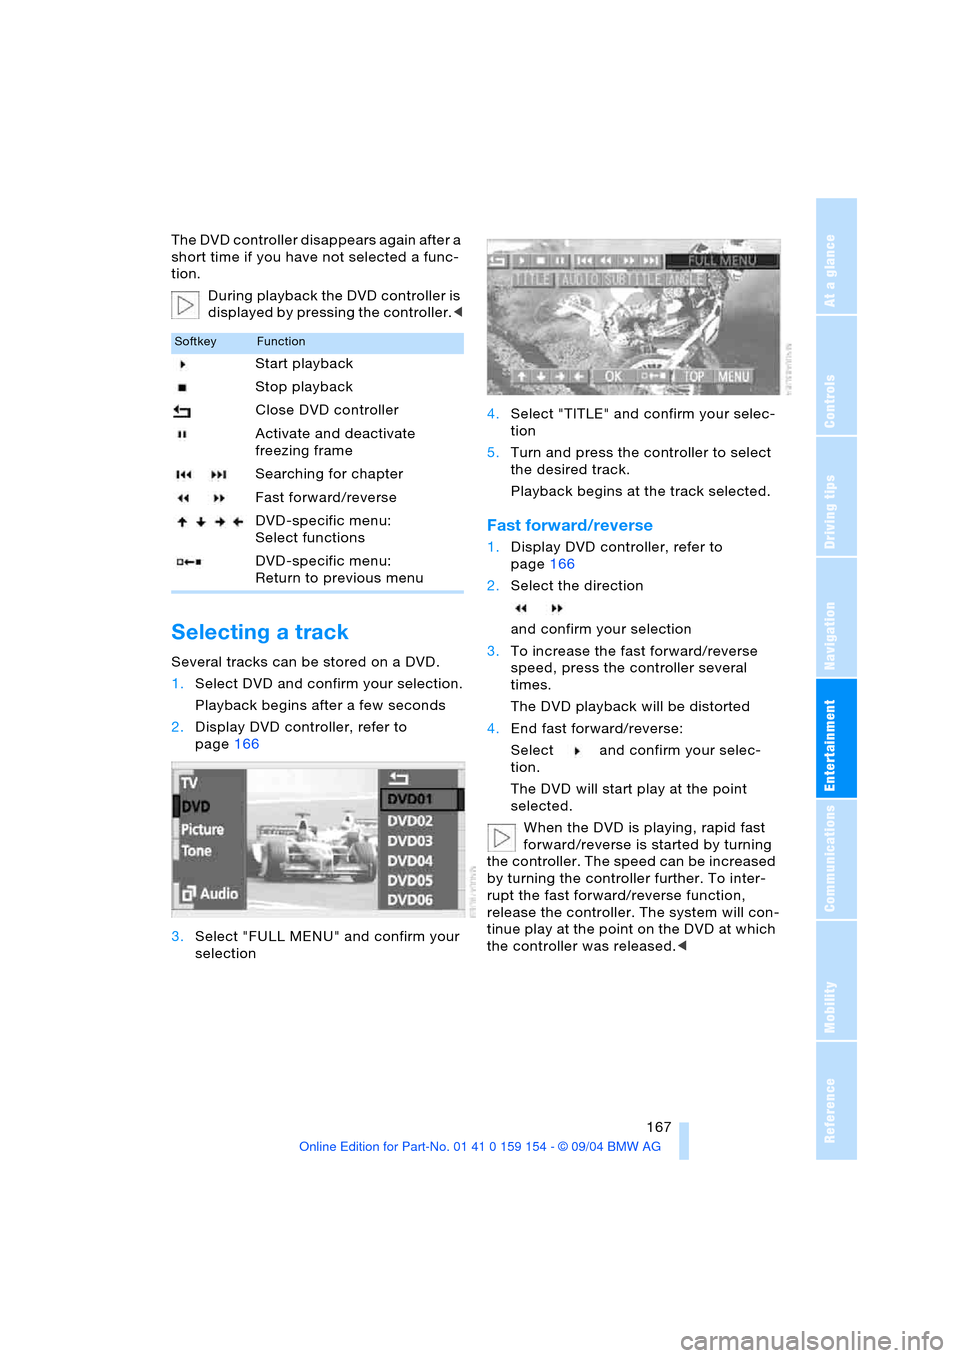
The DVD controller disappears again after a
short time if you have not selected a func-
tion.
During playback the DVD controller is
displayed by pressing the controller.<
Selecting a track
Several tracks can be stored on a DVD.
1.Select DVD and confirm your selection.
Playback begins after a few seconds
2.Display DVD controller, refer to
page166
3.Select "FULL MENU" and confirm your
selection4.Select "TITLE" and confirm your selec-
tion
5.Turn and press the controller to select
the desired track.
Playback begins at the track selected.
Fast forward/reverse
1.Display DVD controller, refer to
page166
2.Select the direction
and confirm your selection
3.To increase the fast forward/reverse
speed, press the controller several
times.
The DVD playback will be distorted
4.End fast forward/reverse:
Select and confirm your selec-
tion.
The DVD will start play at the point
selected.
When the DVD is playing, rapid fast
forward/reverse is started by turning
the controller. The speed can be increased
by turning the controller further. To inter-
rupt the fast forward/reverse function,
release the controller. The system will con-
tinue play at the point on the DVD at which
the controller was released.<
SoftkeyFunction
Start playback
Stop playback
Close DVD controller
Activate and deactivate
freezing frame
Searching for chapter
Fast forward/reverse
DVD-specific menu:
Select functions
DVD-specific menu:
Return to previous menu
Page 170 of 239
DVD changer
168
Searching for chapter
You can change to the next or previ-
ous chapter during playback.<
1.Display DVD controller, refer to
page166
2.Select the direction
and confirm repeatedly, continuing until
you reach the desired chapter
or with buttons
select the direction.
Press repeatedly, continuing until you
reach the desired chapter on the current
DVD.
Playback begins at the chapter selected.
Adjusting picture
1.During playback, press controller
2.Select and confirm your selection
3.Adjusting the picture, refer to page164.
Freezing frame
1.Display DVD controller, refer to
page166
2.At the desired point:
Select and confirm your selec-
tion.
The film is stopped
3.To restart the DVD:
Select or and confirm your
selection.
DVD playback is continued at the point
at which it was interrupted.
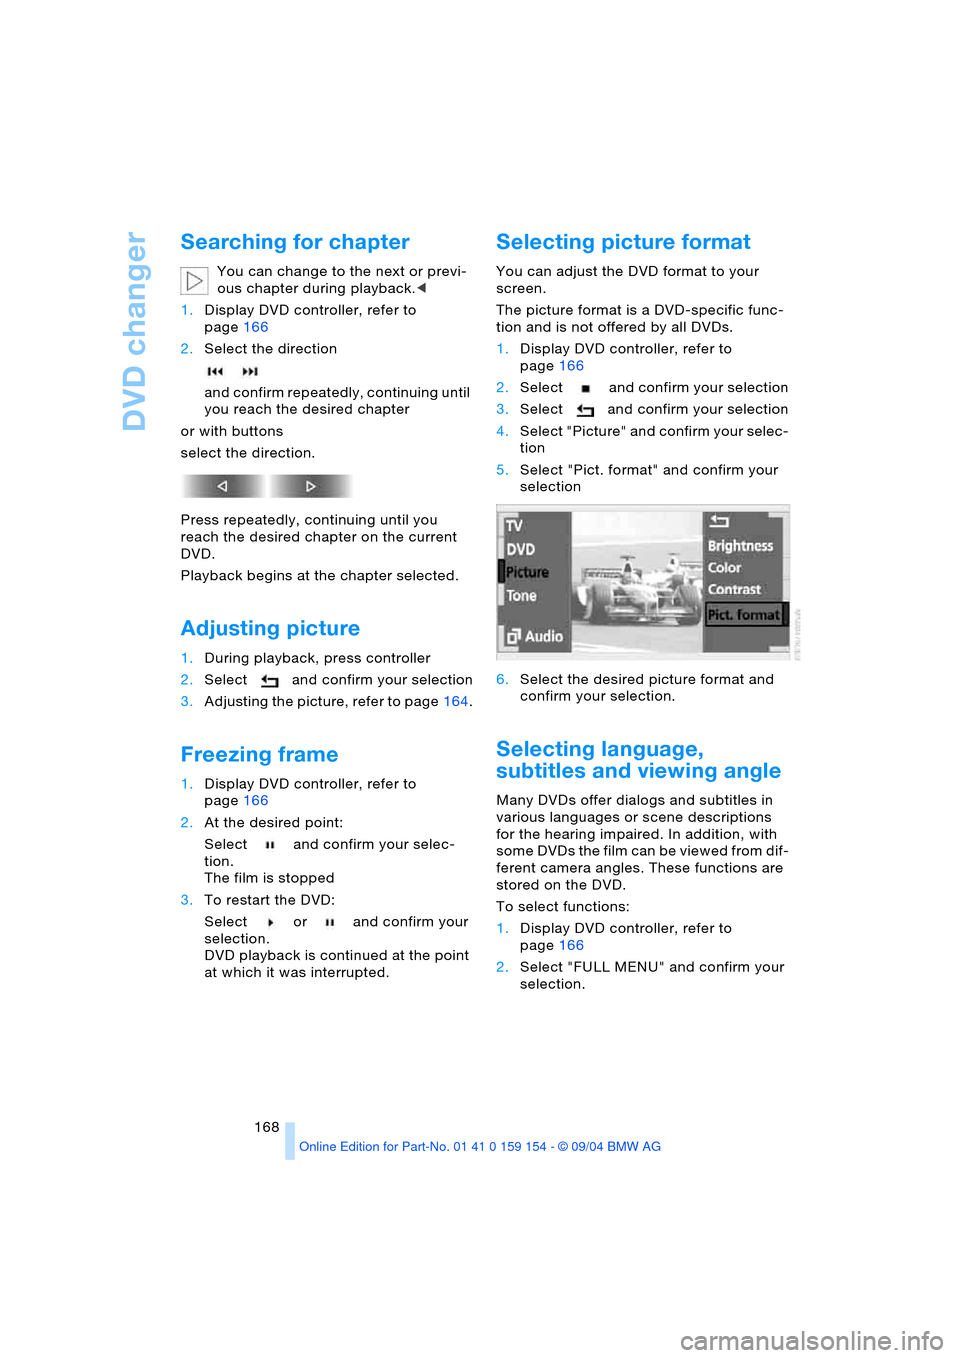
Selecting picture format
You can adjust the DVD format to your
screen.
The picture format is a DVD-specific func-
tion and is not offered by all DVDs.
1.Display DVD controller, refer to
page166
2.Select and confirm your selection
3.Select and confirm your selection
4.Select "Picture" and confirm your selec-
tion
5.Select "Pict. format" and confirm your
selection
6.Select the desired picture format and
confirm your selection.
Selecting language,
subtitles and viewing angle
Many DVDs offer dialogs and subtitles in
various languages or scene descriptions
for the hearing impaired. In addition, with
some DVDs the film can be viewed from dif-
ferent camera angles. These functions are
stored on the DVD.
To select functions:
1.Display DVD controller, refer to
page166
2.Select "FULL MENU" and confirm your
selection.