sensor BMW 745Li 2006 E66 Owner's Manual
[x] Cancel search | Manufacturer: BMW, Model Year: 2006, Model line: 745Li, Model: BMW 745Li 2006 E66Pages: 247, PDF Size: 8.66 MB
Page 13 of 247
At a glance
11Reference
Controls
Driving tips
Communications
Navigation
Entertainment
Mobility
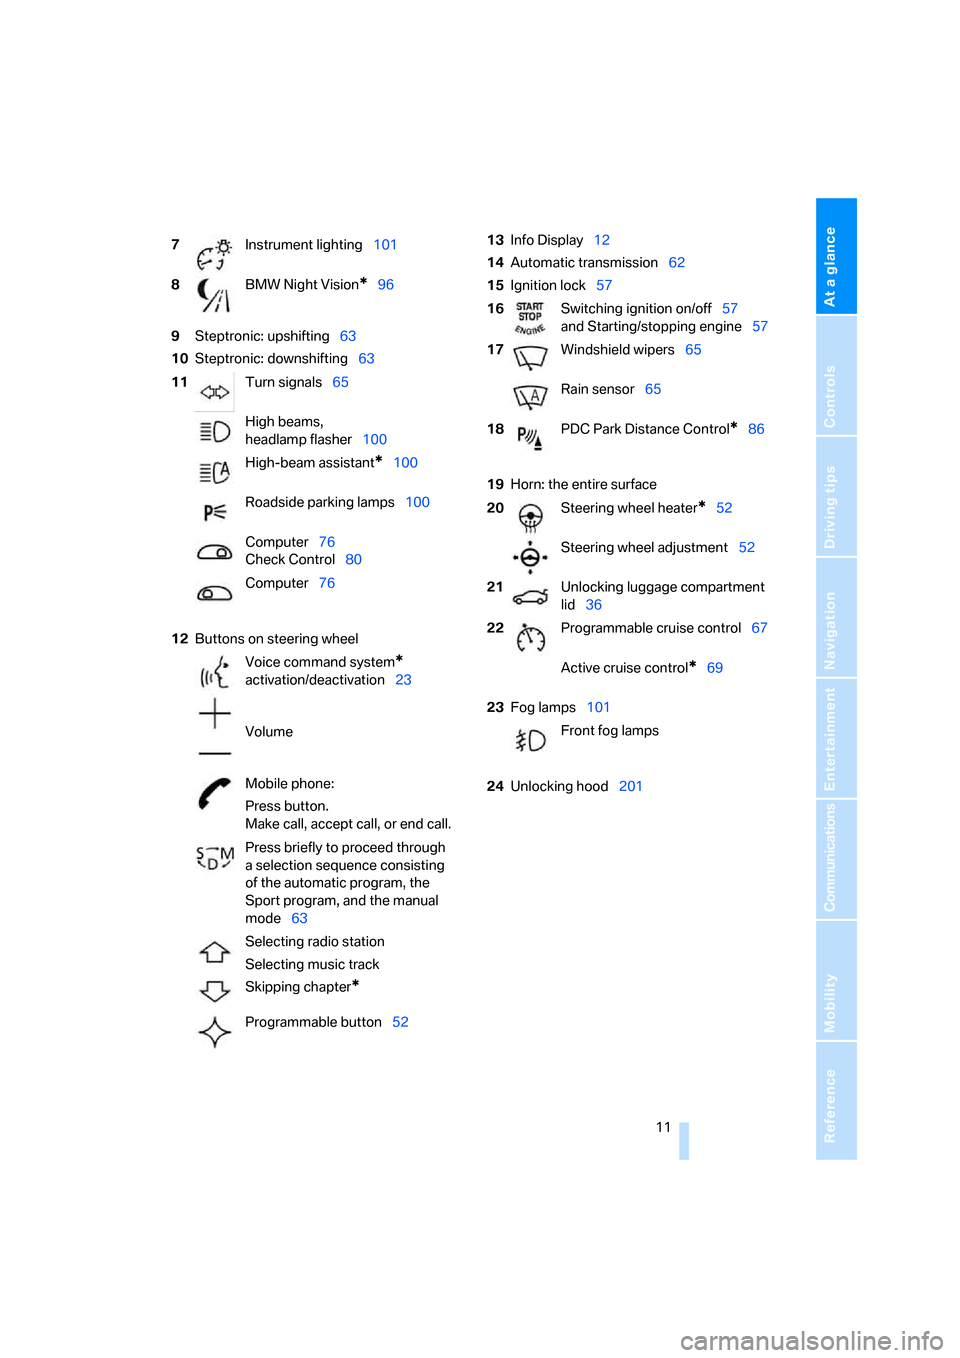
9Steptronic: upshifting63
10Steptronic: downshifting63
12Buttons on steering wheel13Info Display12
14Automatic transmission62
15Ignition lock57
19Horn: the entire surface
23Fog lamps101
24Unlocking hood201 7Instrument lighting101
8BMW Night Vision
*96
11Turn signals65
High beams,
headlamp flasher100
High-beam assistant
*100
Roadside parking lamps100
Computer76
Check Control80
Computer76
Voice command system
*
activation/deactivation23
Volume
Mobile phone:
Press button.
Make call, accept call, or end call.
Press briefly to proceed through
a selection sequence consisting
of the automatic program, the
Sport program, and the manual
mode63
Selecting radio station
Selecting music track
Skipping chapter
*
Programmable button52
16Switching ignition on/off57
and Starting/stopping engine57
17Windshield wipers65
Rain sensor65
18PDC Park Distance Control
*86
20Steering wheel heater
*52
Steering wheel adjustment52
21Unlocking luggage compartment
lid36
22Programmable cruise control67
Active cruise control
*69
Front fog lamps
Page 34 of 247
Opening and closing
32
Central locking system
The concept
The central locking system is ready for opera-
tion whenever the driver's door is closed. This
simultaneously engages and releases the locks
on the following:
>Doors
>Luggage compartment lid
>Fuel filler door
The central locking system can be operated
from the outside:
>via the remote control
>via the driver's door lock
>with Comfort Access
* via the door handles
and from inside via the button for the central
locking system.
When the system is locked from inside, the fuel
filler door remains unlocked. Refer to page34.
Each time the central locking system is locked
or unlocked from outside the vehicle, this simul-
taneously engages or disengages the anti-theft
system. The alarm system is also armed or dis-
armed. The remote control also switches the
interior lamps on and off.
For additional details on alarm system
refer to
page37.
In an accident of corresponding severity, the
central locking system automatically unlocks
the vehicle. In addition, the hazard warning
flashers and interior lamps switch on.
Opening and closing: from
outside
Using remote control
Because any persons or animals left unat-
tended in a parked vehicle could lock the
doors from the inside, you should always keep
the remote control with you; this precaution
ensures that you will remain able to unlock the
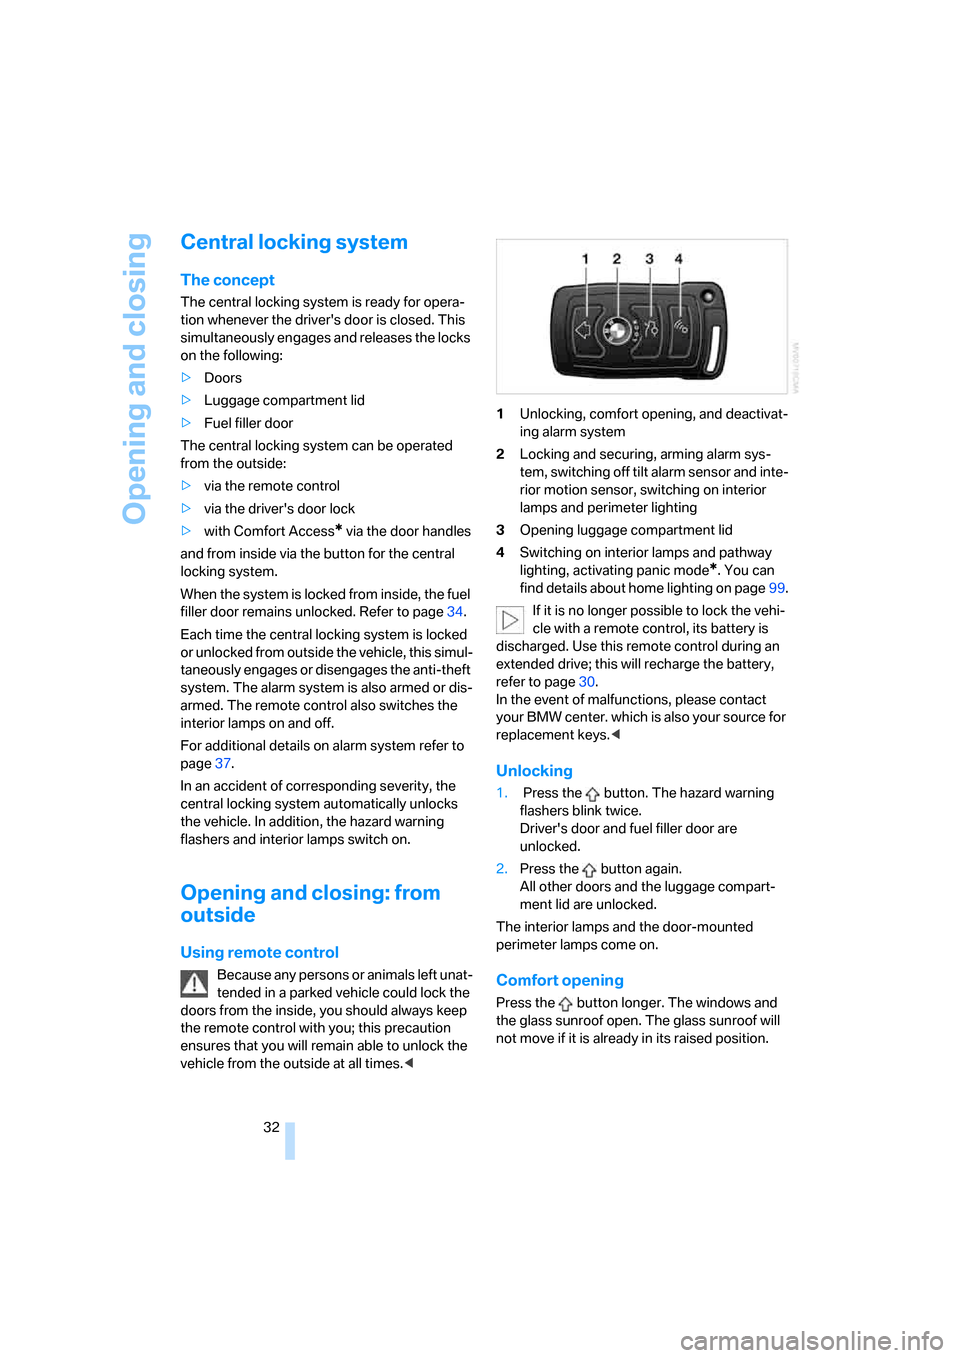
vehicle from the outside at all times.<1Unlocking, comfort opening, and deactivat-
ing alarm system
2Locking and securing, arming alarm sys-
tem, switching off tilt alarm sensor and inte-
rior motion sensor, switching on interior
lamps and perimeter lighting
3Opening luggage compartment lid
4Switching on interior lamps and pathway
lighting, activating panic mode
*. You can
find details about home lighting on page99.
If it is no longer possible to lock the vehi-
cle with a remote control, its battery is
discharged. Use this remote control during an
extended drive; this will recharge the battery,
refer to page30.
In the event of malfunctions, please contact
your BMW center. which is also your source for
replacement keys.<
Unlocking
1. Press the button. The hazard warning
flashers blink twice.
Driver's door and fuel filler door are
unlocked.
2.Press the button again.
All other doors and the luggage compart-
ment lid are unlocked.
The interior lamps and the door-mounted
perimeter lamps come on.
Comfort opening
Press the button longer. The windows and
the glass sunroof open. The glass sunroof will
not move if it is already in its raised position.
Page 36 of 247
Opening and closing
34
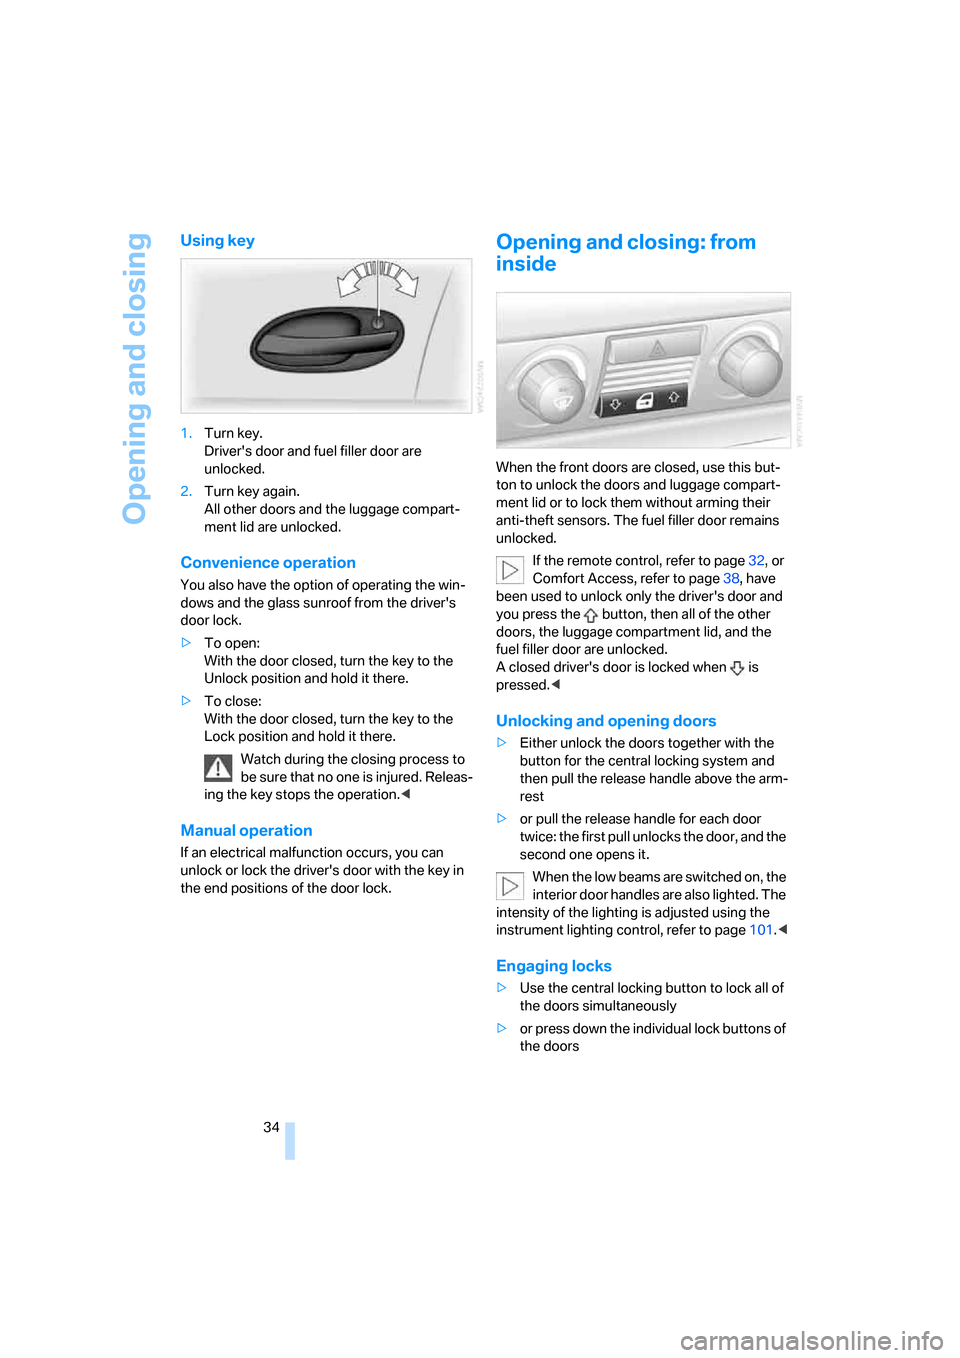
Using key
1.Turn key.
Driver's door and fuel filler door are
unlocked.
2.Turn key again.
All other doors and the luggage compart-
ment lid are unlocked.
Convenience operation
You also have the option of operating the win-
dows and the glass sunroof from the driver's
door lock.
>To open:
With the door closed, turn the key to the
Unlock position and hold it there.
>To close:
With the door closed, turn the key to the
Lock position and hold it there.
Watch during the closing process to
be sure that no one is injured. Releas-
ing the key stops the operation.<
Manual operation
If an electrical malfunction occurs, you can
unlock or lock the driver's door with the key in
the end positions of the door lock.
Opening and closing: from
inside
When the front doors are closed, use this but-
ton to unlock the doors and luggage compart-
ment lid or to lock them without arming their
anti-theft sensors. The fuel filler door remains
unlocked.
If the remote control, refer to page32, or
Comfort Access, refer to page38, have
been used to unlock only the driver's door and
you press the button, then all of the other
doors, the luggage compartment lid, and the
fuel filler door are unlocked.
A closed driver's door is locked when is
pressed.<
Unlocking and opening doors
>Either unlock the doors together with the
button for the central locking system and
then pull the release handle above the arm-
rest
>or pull the release handle for each door
twice: the first pull unlocks the door, and the
second one opens it.
When the low beams are switched on, the
interior door handles are also lighted. The
intensity of the lighting is adjusted using the
instrument lighting control, refer to page101.<
Engaging locks
>Use the central locking button to lock all of
the doors simultaneously
>or press down the individual lock buttons of
the doors
Page 39 of 247
Controls
37Reference
At a glance
Driving tips
Communications
Navigation
Entertainment
Mobility
Manual operation
In the case of an electrical malfunction, you can
unlock the luggage compartment lid with the
key, refer to page35, and slowly open and close
it without sudden movements.
Emergency release
Pull lever in luggage compartment. This
unlocks the luggage compartment lid.
Alarm system
The concept
The vehicle alarm system responds to:
>opening of a door, the hood or the luggage
compartment lid
>movement in the vehicle interior: interior
motion sensor, refer to page38
>changes in the vehicle's tilt if someone
attempts to steal the wheels or tow the
vehicle
>interruptions in battery voltage
The alarm system briefly indicates unautho-
rized tampering:
>with an acoustic alarm
>by switching on
the hazard warning flashers
>by flashing the high beams
Arming and disarming alarm system
When you lock or unlock the vehicle, either with
the remote control or at the door lock, the alarm
system is armed or disarmed at the same time.
When the alarm system is armed, you can also
open the luggage compartment lid with the button on the remote control, refer to
page33. When the luggage compartment lid is
closed, it is relocked and monitored again.
Unlocking via the door lock will trigger the
alarm on some national-market versions.
Pressing the 'Panic mode' button for a longer
period also triggers the alarm, refer to
page33.<
Switching off alarm
>Unlock the vehicle using the remote control,
refer to page32.
>Insert the remote control into the ignition
lock
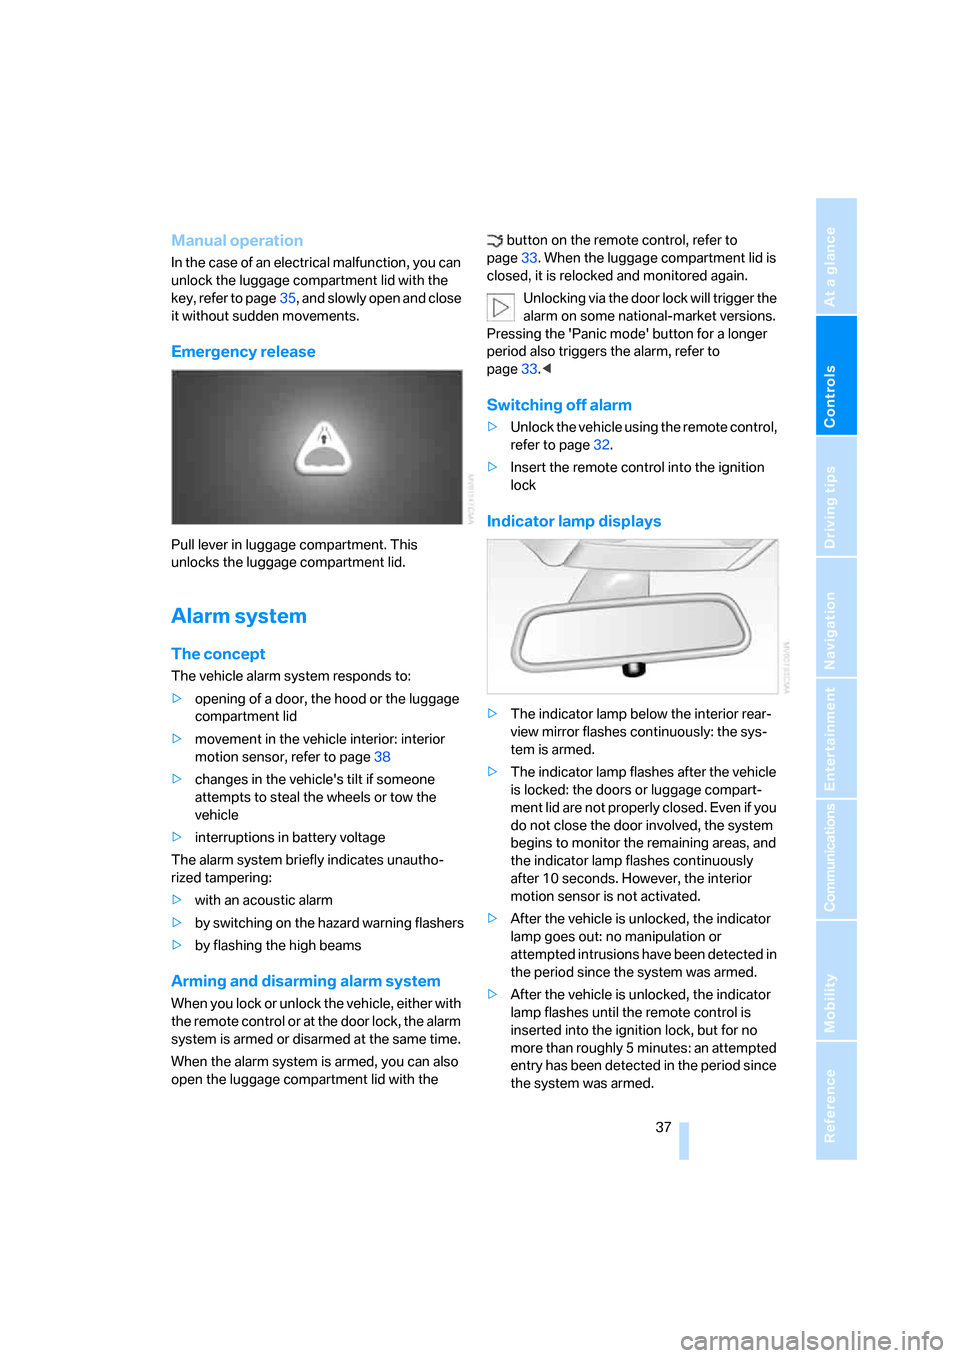
Indicator lamp displays
>The indicator lamp below the interior rear-
view mirror flashes continuously: the sys-
tem is armed.
>The indicator lamp flashes after the vehicle
is locked: the doors or luggage compart-
ment lid are not properly closed. Even if you
do not close the door involved, the system
begins to monitor the remaining areas, and
the indicator lamp flashes continuously
after 10 seconds. However, the interior
motion sensor is not activated.
>After the vehicle is unlocked, the indicator
lamp goes out: no manipulation or
attempted intrusions have been detected in
the period since the system was armed.
>After the vehicle is unlocked, the indicator
lamp flashes until the remote control is
inserted into the ignition lock, but for no
more than roughly 5 minutes: an attempted
entry has been detected in the period since
the system was armed.
Page 40 of 247
Opening and closing
38
Tilt alarm sensor
The tilt of the vehicle is monitored. The alarm
system reacts, e.g. in case of an attempted
wheel theft or towing.
Interior motion sensor
In order for the interior motion sensor to func-
tion properly, the windows and glass sunroof
must be completely closed.
Avoiding unintentional alarms
The tilt alarm sensor and interior motion sensor
may be switched off at the same time. This pre-
vents unintentional alarms, e.g. in the following
situations:
>In duplex garages
>When transporting on car-carrying trains
>When animals are to remain in the vehicle
Switching off tilt alarm sensor and
interior motion sensor
Press the button on the remote control
again as soon as the vehicle is locked.
The indicator lamp lights up briefly and then
flashes continuously. The tilt alarm sensor and
the interior motion sensor are switched off until
the next time the vehicle is unlocked and subse-
quently locked again.
Comfort Access*
With Comfort Access, you can have access to
your vehicle without having to hold the remote
control in your hand. It is sufficient to carry the
remote control on your person, e.g. in a jacket
pocket. The vehicle automatically detects the
associated remote control in the immediate
vicinity or in the passenger compartment.
Comfort Access supports the following func-
tions:
>Locking/unlocking the vehicle
>Unlocking the luggage compartment lid
separately
>Starting the engine
Functional requirements
>The vehicle can only be locked if the remote
control is outside the vehicle.
>The next unlocking and locking cycle is not
possible until after approx. 2 seconds.
>The engine can only be started if the remote
control is inside the vehicle.
Comparison to conventional remote
control
You can control the functions mentioned previ-
ously with the Comfort Access or by pressing
the buttons on the remote control. Therefore
please first familiarize yourself with the instruc-
tions for opening and closing, starting on
page32.
The specific features involved in the use of
Comfort Access are described below.
If a short delay occurs when opening or
closing the windows and the glass sun-
roof, then this indicates that the system is
checking whether a remote control is located in
the vehicle. Please repeat opening or closing if
necessary.<
Unlocking
Pull a door handle. This corresponds to press-
ing the button.
Only the door of the door handle you have
pulled is unlocked.
You unlock the other doors from the inside,
using the central locking system button, refer to
page34.<
Engaging locks
Push a door handle. This corresponds to press-
ing the button.
Before locking, make sure that the igni-
tion and all current-consuming devices
are switched off in order to minimized the drain
on the battery.<
If a remote control is detected in the inte-
rior, the vehicle is unlocked again or not
locked in the first place.<
Page 67 of 247
Controls
65Reference
At a glance
Driving tips
Communications
Navigation
Entertainment
Mobility
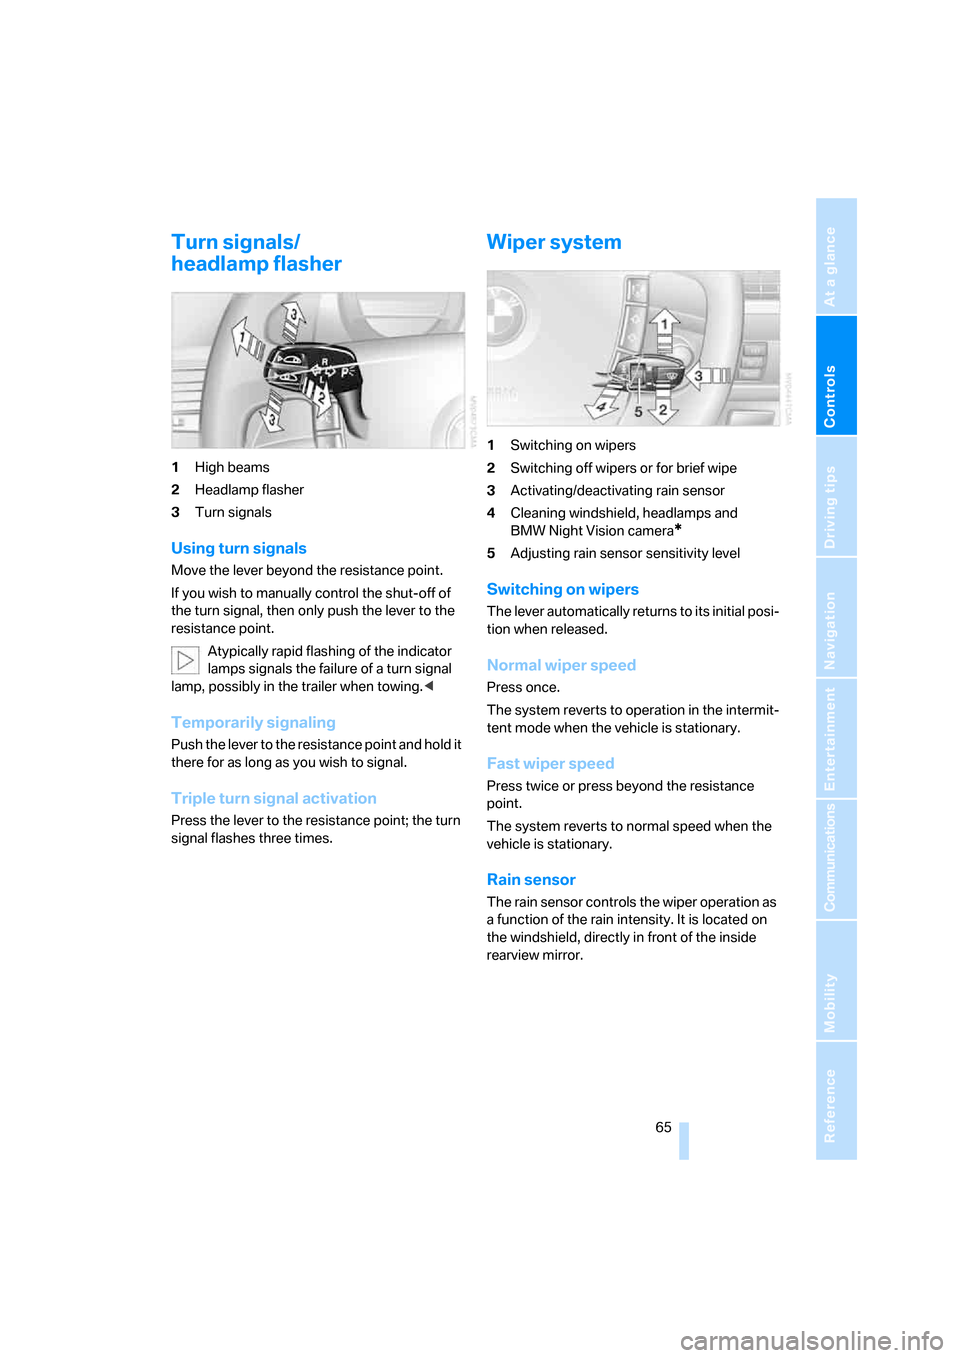
Turn signals/
headlamp flasher
1High beams
2Headlamp flasher
3Turn signals
Using turn signals
Move the lever beyond the resistance point.
If you wish to manually control the shut-off of
the turn signal, then only push the lever to the
resistance point.
Atypically rapid flashing of the indicator
lamps signals the failure of a turn signal
lamp, possibly in the trailer when towing.<
Temporarily signaling
Push the lever to the resistance point and hold it
there for as long as you wish to signal.
Triple turn signal activation
Press the lever to the resistance point; the turn
signal flashes three times.
Wiper system
1Switching on wipers
2Switching off wipers or for brief wipe
3Activating/deactivating rain sensor
4Cleaning windshield, headlamps and
BMW Night Vision camera
*
5Adjusting rain sensor sensitivity level
Switching on wipers
The lever automatically returns to its initial posi-
tion when released.
Normal wiper speed
Press once.
The system reverts to operation in the intermit-
tent mode when the vehicle is stationary.
Fast wiper speed
Press twice or press beyond the resistance
point.
The system reverts to normal speed when the
vehicle is stationary.
Rain sensor
The rain sensor controls the wiper operation as
a function of the rain intensity. It is located on
the windshield, directly in front of the inside
rearview mirror.
Page 68 of 247
Driving
66
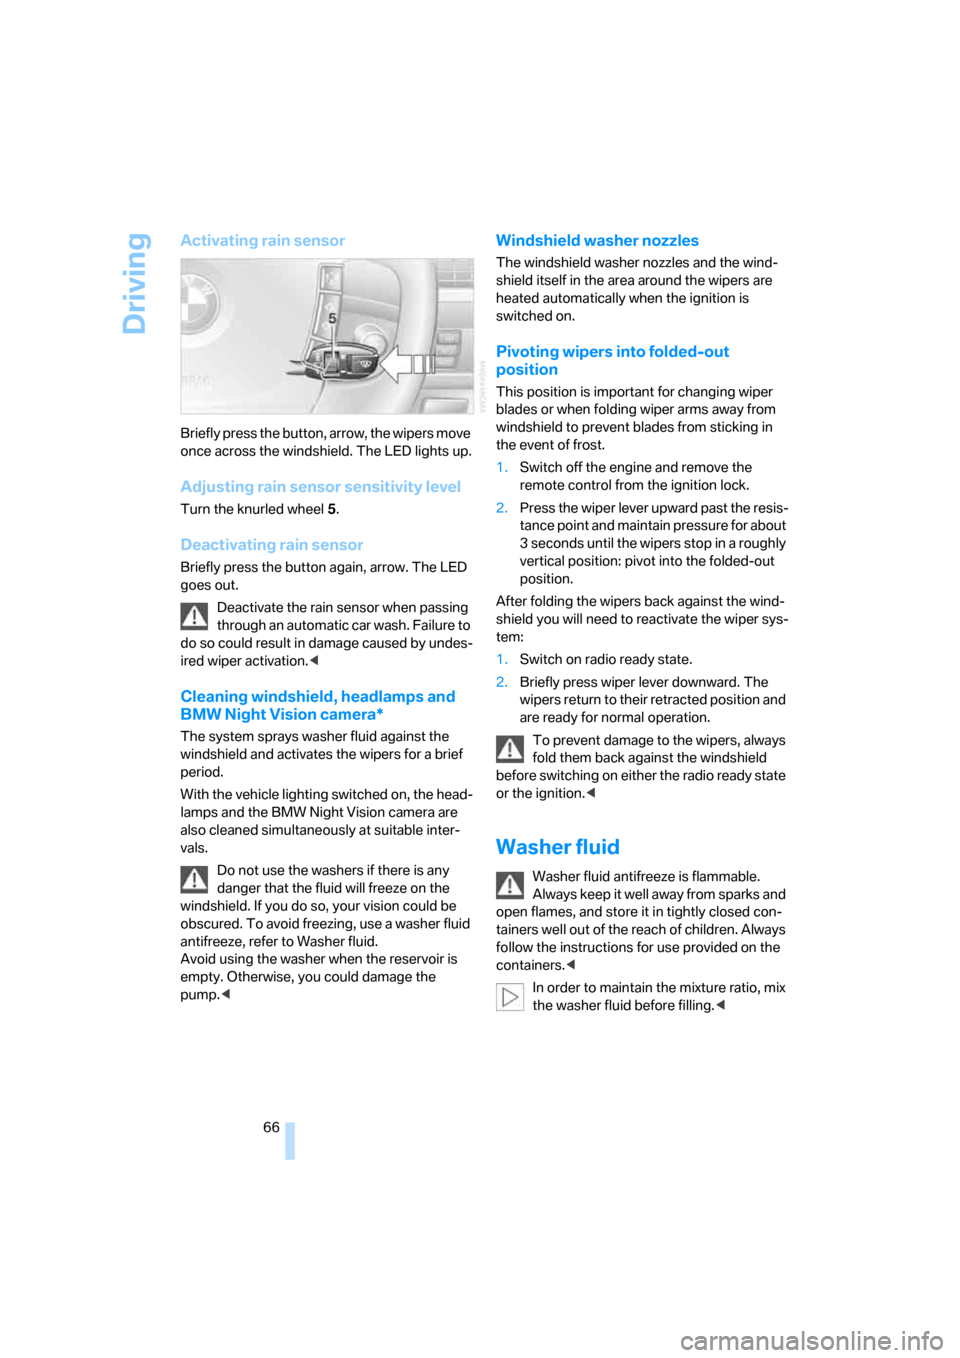
Activating rain sensor
Briefly press the button, arrow, the wipers move
once across the windshield. The LED lights up.
Adjusting rain sensor sensitivity level
Turn the knurled wheel 5.
Deactivating rain sensor
Briefly press the button again, arrow. The LED
goes out.
Deactivate the rain sensor when passing
through an automatic car wash. Failure to
do so could result in damage caused by undes-
ired wiper activation.<
Cleaning windshield, headlamps and
BMW Night Vision camera*
The system sprays washer fluid against the
windshield and activates the wipers for a brief
period.
With the vehicle lighting switched on, the head-
lamps and the BMW Night Vision camera are
also cleaned simultaneously at suitable inter-
vals.
Do not use the washers if there is any
danger that the fluid will freeze on the
windshield. If you do so, your vision could be
obscured. To avoid freezing, use a washer fluid
antifreeze, refer to Washer fluid.
Avoid using the washer when the reservoir is
empty. Otherwise, you could damage the
pump.<
Windshield washer nozzles
The windshield washer nozzles and the wind-
shield itself in the area around the wipers are
heated automatically when the ignition is
switched on.
Pivoting wipers into folded-out
position
This position is important for changing wiper
blades or when folding wiper arms away from
windshield to prevent blades from sticking in
the event of frost.
1.Switch off the engine and remove the
remote control from the ignition lock.
2.Press the wiper lever upward past the resis-
tance point and maintain pressure for about
3 seconds until the wipers stop in a roughly
vertical position: pivot into the folded-out
position.
After folding the wipers back against the wind-
shield you will need to reactivate the wiper sys-
tem:
1.Switch on radio ready state.
2.Briefly press wiper lever downward. The
wipers return to their retracted position and
are ready for normal operation.
To prevent damage to the wipers, always
fold them back against the windshield
before switching on either the radio ready state
or the ignition.<
Washer fluid
Washer fluid antifreeze is flammable.
Always keep it well away from sparks and
open flames, and store it in tightly closed con-
tainers well out of the reach of children. Always
follow the instructions for use provided on the
containers.<
In order to maintain the mixture ratio, mix
the washer fluid before filling.<
Page 73 of 247
Controls
71Reference
At a glance
Driving tips
Communications
Navigation
Entertainment
Mobility
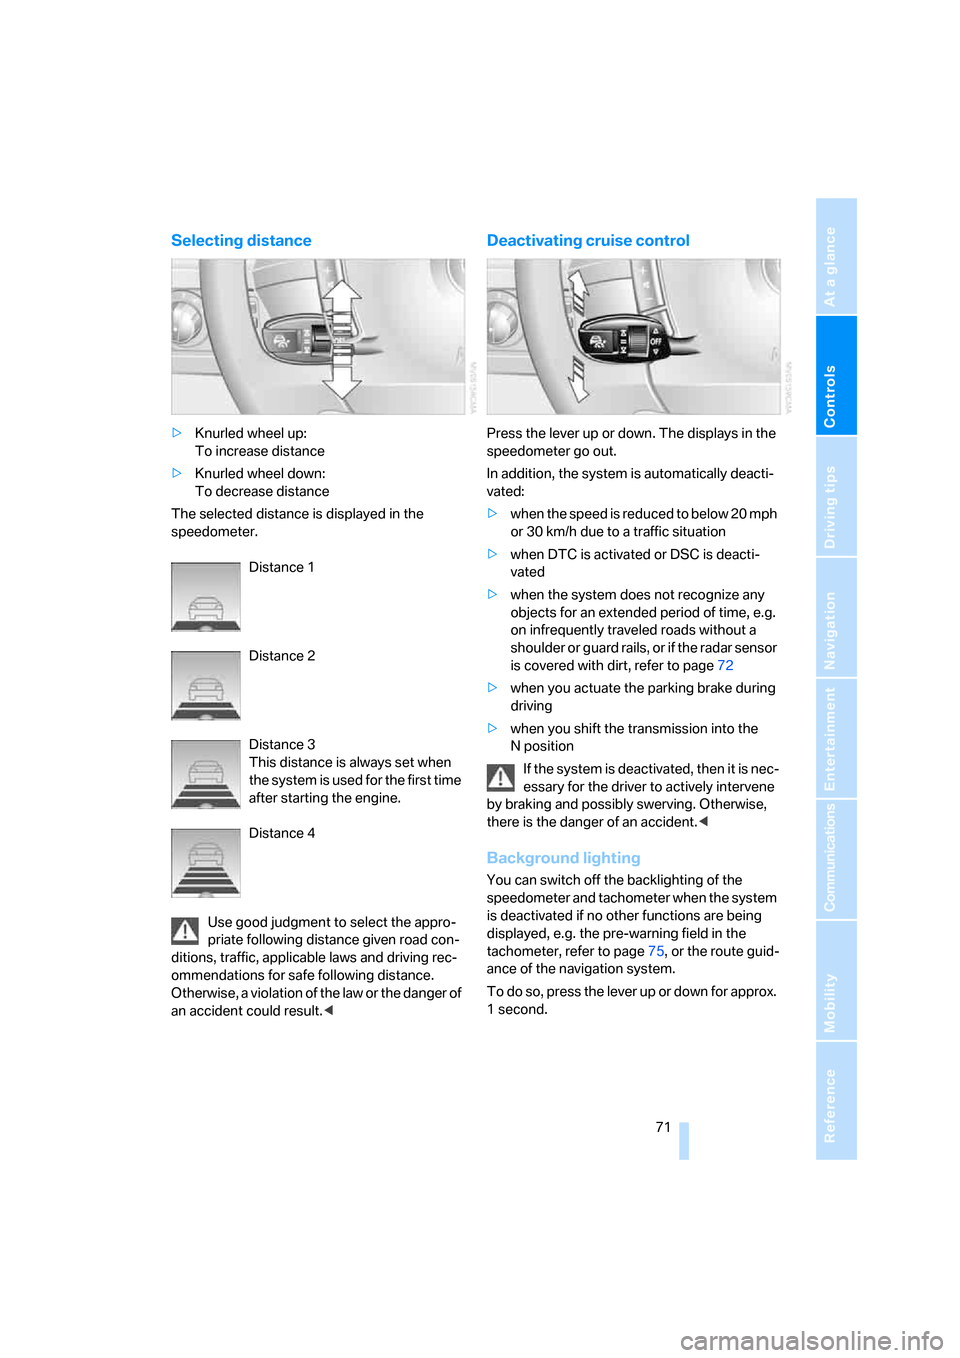
Selecting distance
>Knurled wheel up:
To increase distance
>Knurled wheel down:
To decrease distance
The selected distance is displayed in the
speedometer.
Distance 1
Distance 2
Distance 3
This distance is always set when
the system is used for the first time
after starting the engine.
Distance 4
Use good judgment to select the appro-
priate following distance given road con-
ditions, traffic, applicable laws and driving rec-
ommendations for safe following distance.
Otherwise, a violation of the law or the danger of
an accident could result.<
Deactivating cruise control
Press the lever up or down. The displays in the
speedometer go out.
In addition, the system is automatically deacti-
vated:
>when the speed is reduced to below 20 mph
or 30 km/h due to a traffic situation
>when DTC is activated or DSC is deacti-
vated
>when the system does not recognize any
objects for an extended period of time, e.g.
on infrequently traveled roads without a
shoulder or guard rails, or if the radar sensor
is covered with dirt, refer to page72
>when you actuate the parking brake during
driving
>when you shift the transmission into the
Nposition
If the system is deactivated, then it is nec-
essary for the driver to actively intervene
by braking and possibly swerving. Otherwise,
there is the danger of an accident.<
Background lighting
You can switch off the backlighting of the
speedometer and tachometer when the system
is deactivated if no other functions are being
displayed, e.g. the pre-warning field in the
tachometer, refer to page75, or the route guid-
ance of the navigation system.
To do so, press the lever up or down for approx.
1second.
Page 74 of 247
Driving
72
Resuming stored desired speed and
distance
Press button4:
The displays appear in the speedometer.
When you switch off the ignition, the stored
desired speed is deleted.
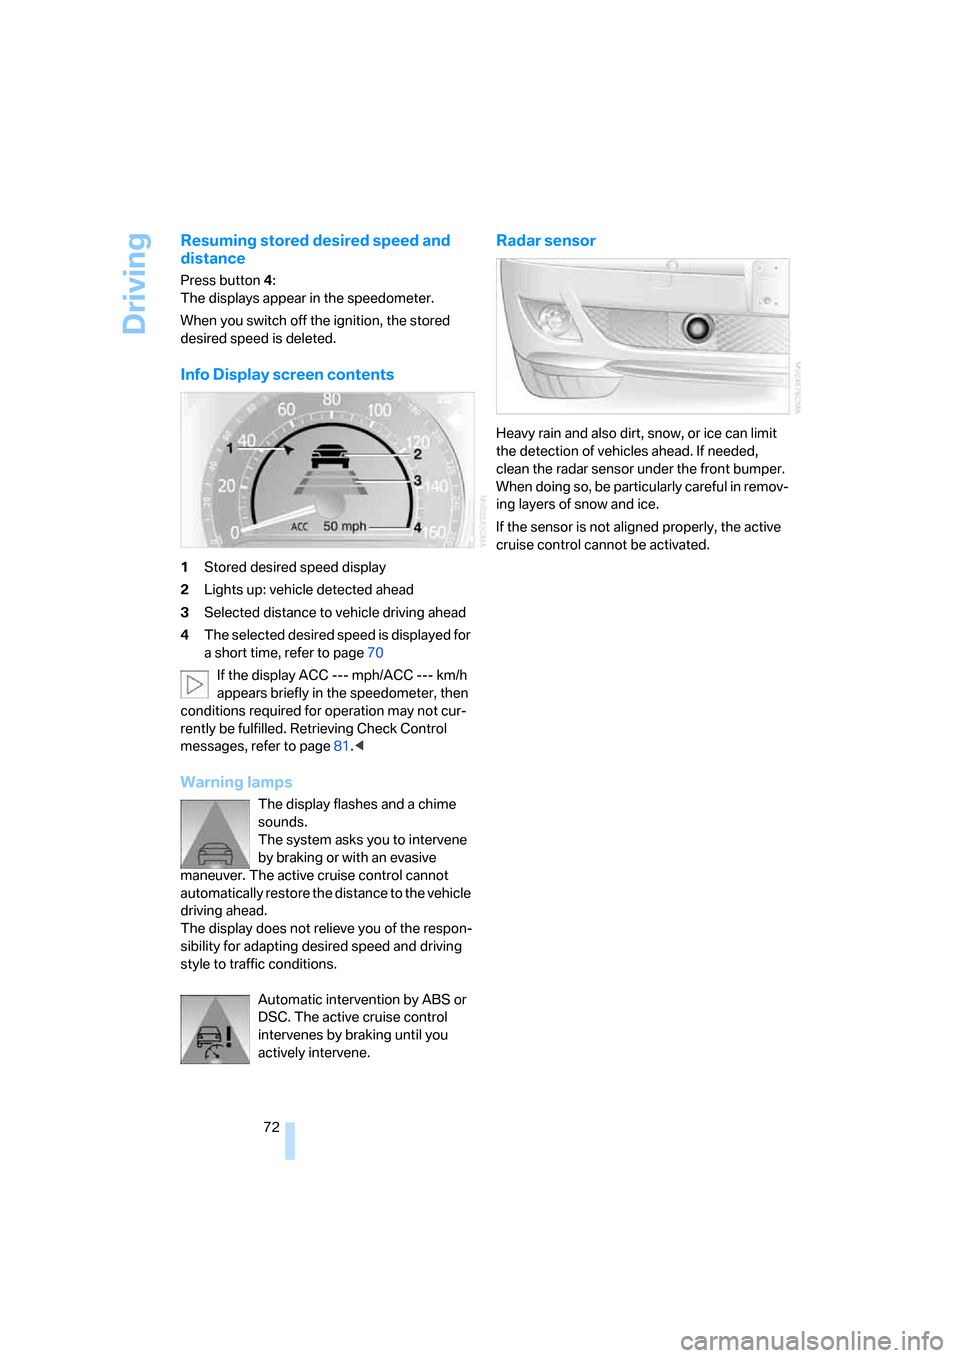
Info Display screen contents
1Stored desired speed display
2Lights up: vehicle detected ahead
3Selected distance to vehicle driving ahead
4The selected desired speed is displayed for
a short time, refer to page70
If the display ACC --- mph/ACC --- km/h
appears briefly in the speedometer, then
conditions required for operation may not cur-
rently be fulfilled. Retrieving Check Control
messages, refer to page81.<
Warning lamps
The display flashes and a chime
sounds.
The system asks you to intervene
by braking or with an evasive
maneuver. The active cruise control cannot
automatically restore the distance to the vehicle
driving ahead.
The display does not relieve you of the respon-
sibility for adapting desired speed and driving
style to traffic conditions.
Automatic intervention by ABS or
DSC. The active cruise control
intervenes by braking until you
actively intervene.
Radar sensor
Heavy rain and also dirt, snow, or ice can limit
the detection of vehicles ahead. If needed,
clean the radar sensor under the front bumper.
When doing so, be particularly careful in remov-
ing layers of snow and ice.
If the sensor is not aligned properly, the active
cruise control cannot be activated.
Page 88 of 247
Technology for comfort, convenience and safety
86
Technology for comfort, convenience and
safety
PDC Park Distance Control*
The concept
The PDC assists you when you are parking.
Audible signals and an optical display indicate
that you are approaching an object in front of or
behind your vehicle. To measure the distance,
four ultrasonic sensors are provided in each
bumper. The range of these sensors is approx.
6 ft/2 m. However, an acoustic warning begins
to sound for the sensors at the front and at the
two rear corners at approx. 24 in/60 cm, and for
the center rear sensors at approx. 5 ft/1.50 m.
PDC is a parking aid that can indicate
objects when they are approached
slowly, as is usually the case when parking.
Avoid approaching an object at high speed; oth-
erwise, the system may sound the warning of
physical obstacles too late.<
Automatically activating
The system starts to operate automatically
approx. 1 second after you engage the trans-
mission position R with the engine running or
the ignition switched on.
Wait this short period before driving.
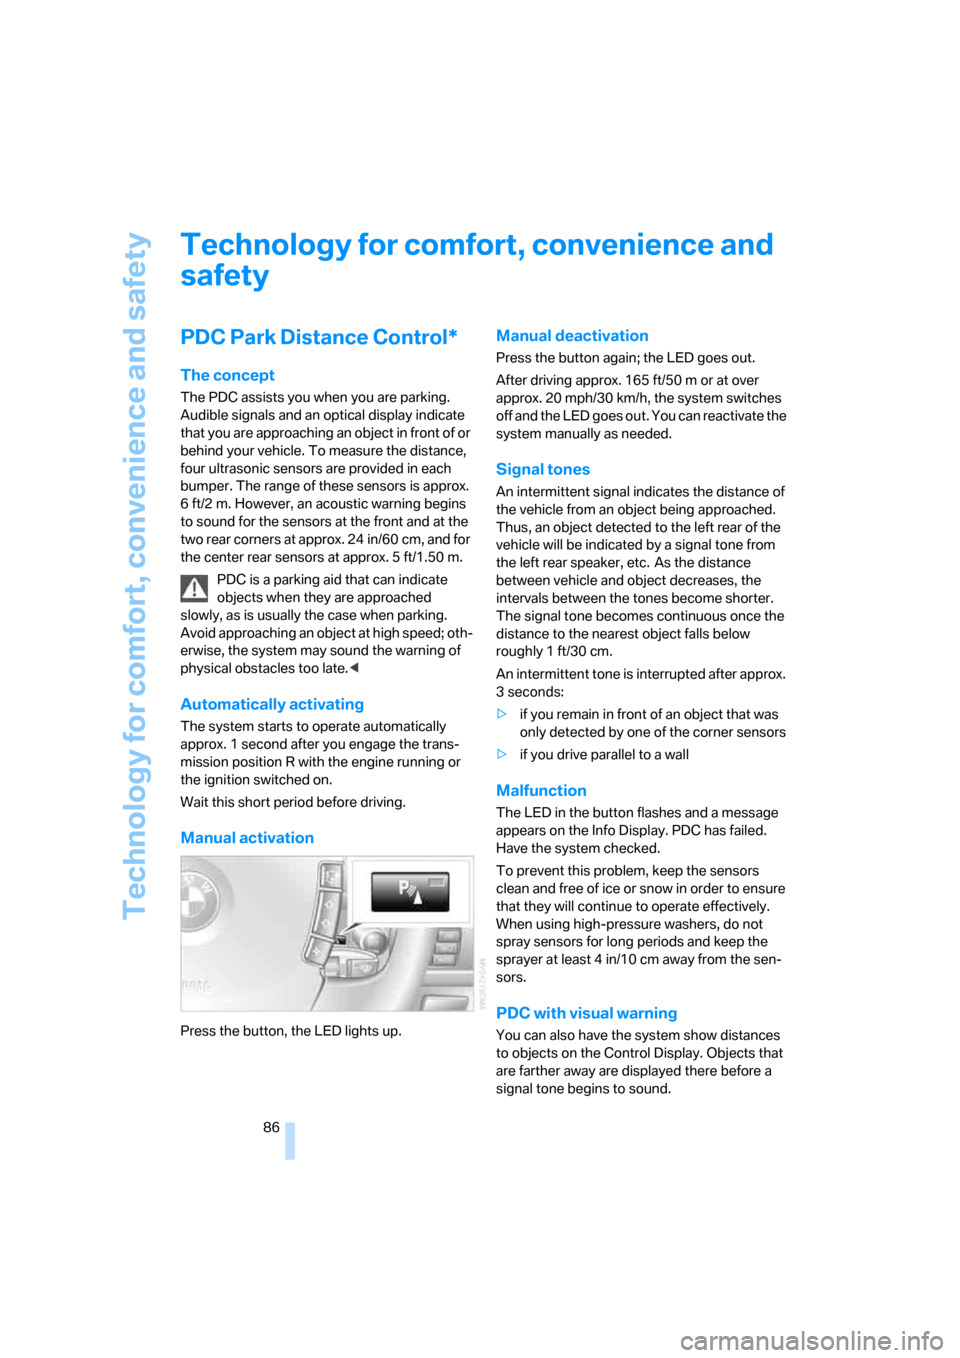
Manual activation
Press the button, the LED lights up.
Manual deactivation
Press the button again; the LED goes out.
After driving approx. 165 ft/50 m or at over
approx. 20 mph/30 km/h, the system switches
off and the LED goes out. You can reactivate the
system manually as needed.
Signal tones
An intermittent signal indicates the distance of
the vehicle from an object being approached.
Thus, an object detected to the left rear of the
vehicle will be indicated by a signal tone from
the left rear speaker, etc. As the distance
between vehicle and object decreases, the
intervals between the tones become shorter.
The signal tone becomes continuous once the
distance to the nearest object falls below
roughly 1 ft/30 cm.
An intermittent tone is interrupted after approx.
3seconds:
>if you remain in front of an object that was
only detected by one of the corner sensors
>if you drive parallel to a wall
Malfunction
The LED in the button flashes and a message
appears on the Info Display. PDC has failed.
Have the system checked.
To prevent this problem, keep the sensors
clean and free of ice or snow in order to ensure
that they will continue to operate effectively.
When using high-pressure washers, do not
spray sensors for long periods and keep the
sprayer at least 4 in/10 cm away from the sen-
sors.
PDC with visual warning
You can also have the system show distances
to objects on the Control Display. Objects that
are farther away are displayed there before a
signal tone begins to sound.