remote start BMW 745LI SEDAN 2002 Owners Manual
[x] Cancel search | Manufacturer: BMW, Model Year: 2002, Model line: 745LI SEDAN, Model: BMW 745LI SEDAN 2002Pages: 208, PDF Size: 6.33 MB
Page 35 of 208
Opening and closing
34
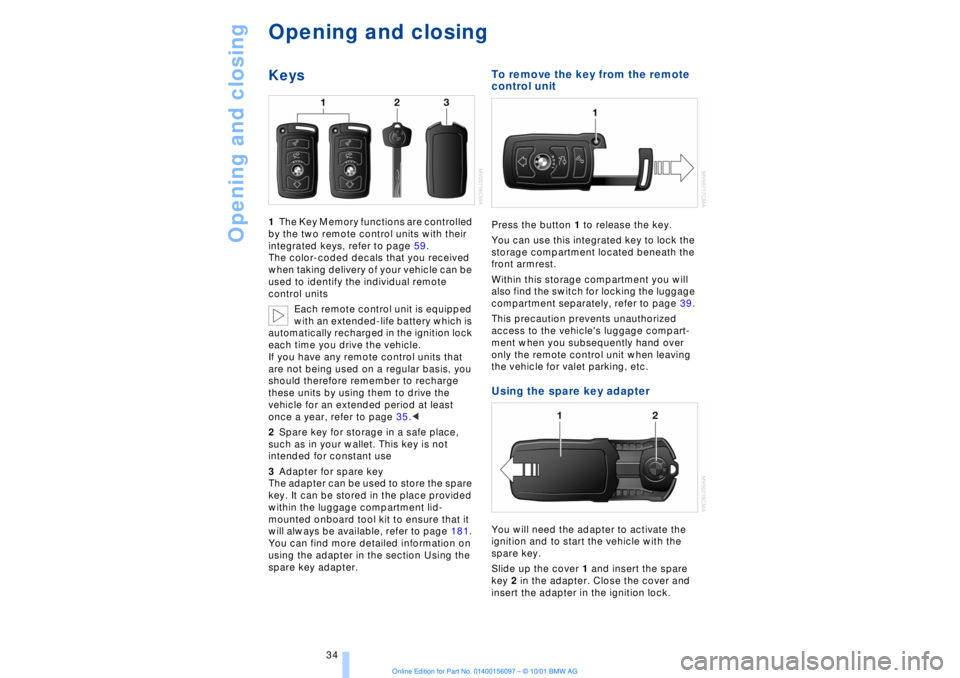
Opening and closingKeys1The Key Memory functions are controlled
by the two remote control units with their
integrated keys, refer to page 59.
The color-coded decals that you received
when taking delivery of your vehicle can be
used to identify the individual remote
control units
Each remote control unit is equipped
with an extended-life battery which is
automatically recharged in the ignition lock
each time you drive the vehicle.
If you have any remote control units that
are not being used on a regular basis, you
should therefore remember to recharge
these units by using them to drive the
vehicle for an extended period at least
once a year, refer to page 35.<
2Spare key for storage in a safe place,
such as in your wallet. This key is not
intended for constant use
3Adapter for spare key
The adapter can be used to store the spare
key. It can be stored in the place provided
within the luggage compartment lid-
mounted onboard tool kit to ensure that it
will always be available, refer to page 181.
You can find more detailed information on
using the adapter in the section Using the
spare key adapter.
To remove the key from the remote
control unit Press the button 1 to release the key.
You can use this integrated key to lock the
storage compartment located beneath the
front armrest.
Within this storage compartment you will
also find the switch for locking the luggage
compartment separately, refer to page 39.
This precaution prevents unauthorized
access to the vehicle's luggage compart-
ment when you subsequently hand over
only the remote control unit when leaving
the vehicle for valet parking, etc. Using the spare key adapter You will need the adapter to activate the
ignition and to start the vehicle with the
spare key.
Slide up the cover 1 and insert the spare
key 2 in the adapter. Close the cover and
insert the adapter in the ignition lock.
Page 42 of 208
At a glanceControlsDriving tipsCommunicationsNavigationEntertainmentMobilityReference
41
>The hazard warning flashers for approx.
five minutes
>The high beams, which flash on and off
in the same rhythm.To arm and disarm the alarm system When you lock (or unlock) the vehicle,
either with the remote control unit or at the
door lock, the alarm system is armed (or
disarmed) at the same time.
The system indicates that is has been
correctly armed by switching on the hazard
warning flashers for a single cycle and by
emitting an acoustic signal.
You can have different acknowledg-
ment signals set to confirm arming
and disarming.<
Even with the alarm system armed, you can
open the luggage compartment lid using
the button 3on the remote control
unit, refer to page 36. The alarm system will
start to monitor the luggage compartment
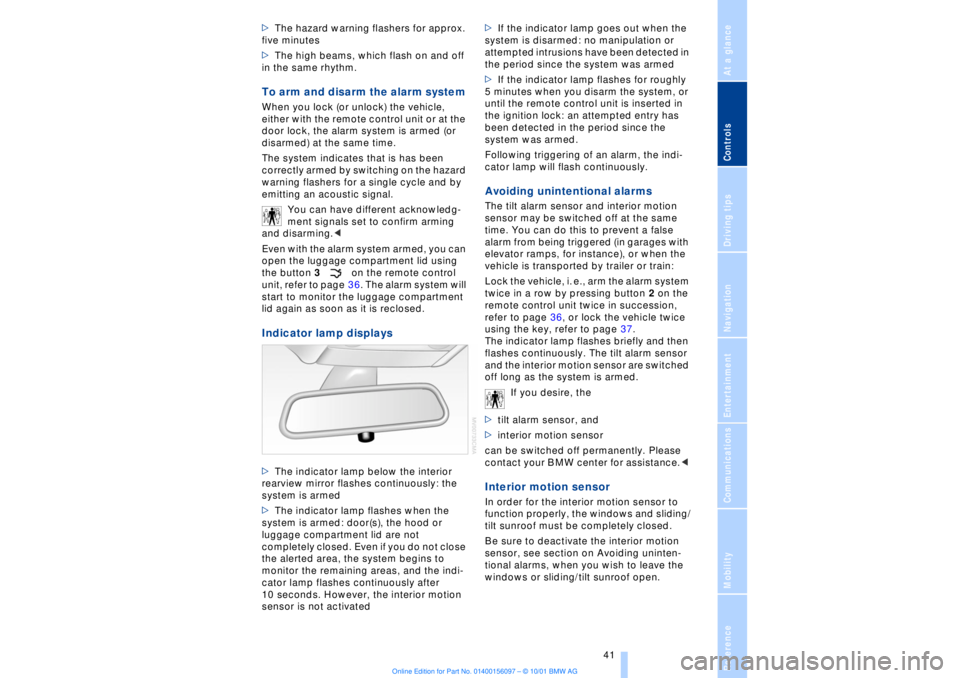
lid again as soon as it is reclosed. Indicator lamp displays>The indicator lamp below the interior
rearview mirror flashes continuously: the
system is armed
>The indicator lamp flashes when the
system is armed: door(s), the hood or
luggage compartment lid are not
completely closed. Even if you do not close
the alerted area, the system begins to
monitor the remaining areas, and the indi-
cator lamp flashes continuously after
10 seconds. However, the interior motion
sensor is not activated >If the indicator lamp goes out when the
system is disarmed: no manipulation or
attempted intrusions have been detected in
the period since the system was armed
>If the indicator lamp flashes for roughly
5 minutes when you disarm the system, or
until the remote control unit is inserted in
the ignition lock: an attempted entry has
been detected in the period since the
system was armed.
Following triggering of an alarm, the indi-
cator lamp will flash continuously.
Avoiding unintentional alarms The tilt alarm sensor and interior motion
sensor may be switched off at the same
time. You can do this to prevent a false
alarm from being triggered (in garages with
elevator ramps, for instance), or when the
vehicle is transported by trailer or train:
Lock the vehicle, i. e., arm the alarm system
twice in a row by pressing button 2 on the
remote control unit twice in succession,
refer to page 36, or lock the vehicle twice
using the key, refer to page 37.
The indicator lamp flashes briefly and then
flashes continuously. The tilt alarm sensor
and the interior motion sensor are switched
off long as the system is armed.
If you desire, the
>tilt alarm sensor, and
>interior motion sensor
can be switched off permanently. Please
contact your BMW center for assistance.< Interior motion sensor In order for the interior motion sensor to
function properly, the windows and sliding/
tilt sunroof must be completely closed.
Be sure to deactivate the interior motion
sensor, see section on Avoiding uninten-
tional alarms, when you wish to leave the
windows or sliding/tilt sunroof open.
Page 62 of 208
At a glanceControlsDriving tipsCommunicationsNavigationEntertainmentMobilityReference
61
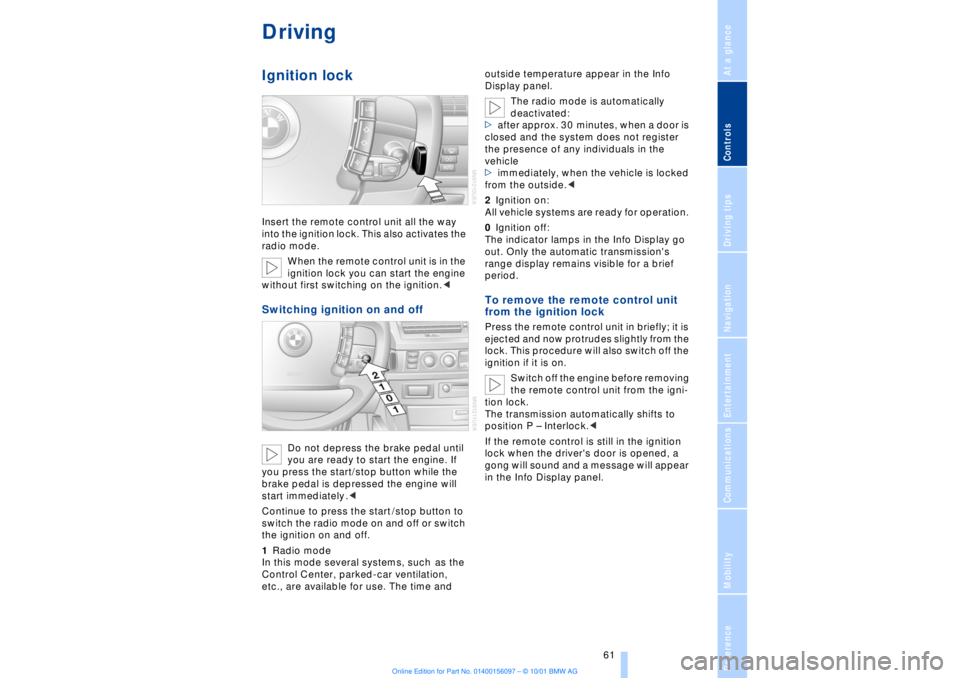
DrivingIgnition lockInsert the remote control unit all the way
into the ignition lock. This also activates the
radio mode.
When the remote control unit is in the
ignition lock you can start the engine
without first switching on the ignition.
you are ready to start the engine. If
you press the start/stop button while the
brake pedal is depressed the engine will
start immediately .<
Continue to press the start /stop button to
switch the radio mode on and off or switch
the ignition on and off.
1Radio mode
In this mode several systems, such as the
Control Center, parked-car ventilation,
etc., are available for use. The time and outside temperature appear in the Info
Display panel.
The radio mode is automatically
deactivated:
>after approx. 30 minutes, when a door is
closed and the system does not register
the presence of any individuals in the
vehicle
>immediately, when the vehicle is locked
from the outside.<
2Ignition on:
All vehicle systems are ready for operation.
0Ignition off:
The indicator lamps in the Info Display go
out. Only the automatic transmission's
range display remains visible for a brief
period.
To remove the remote control unit
from the ignition lock Press the remote control unit in briefly; it is
ejected and now protrudes slightly from the
lock. This procedure will also switch off the
ignition if it is on.
Switch off the engine before removing
the remote control unit from the igni-
tion lock.
The transmission automatically shifts to
position P Ð Interlock.<
If the remote control is still in the ignition
lock when the driver's door is opened, a
gong will sound and a message will appear
in the Info Display panel.
Page 63 of 208
Driving
62
Starting the engine
Do not allow the engine to run in
enclosed spaces. The exhaust gases
contain carbon monoxide, an odorless and
colorless, but highly toxic gas. Breathing
the exhaust gases poses an extreme health
risk, and can lead to unconsciousness and
death.
Never leave the vehicle parked with the
engine running, as it would then pose a
potential safety hazard.<
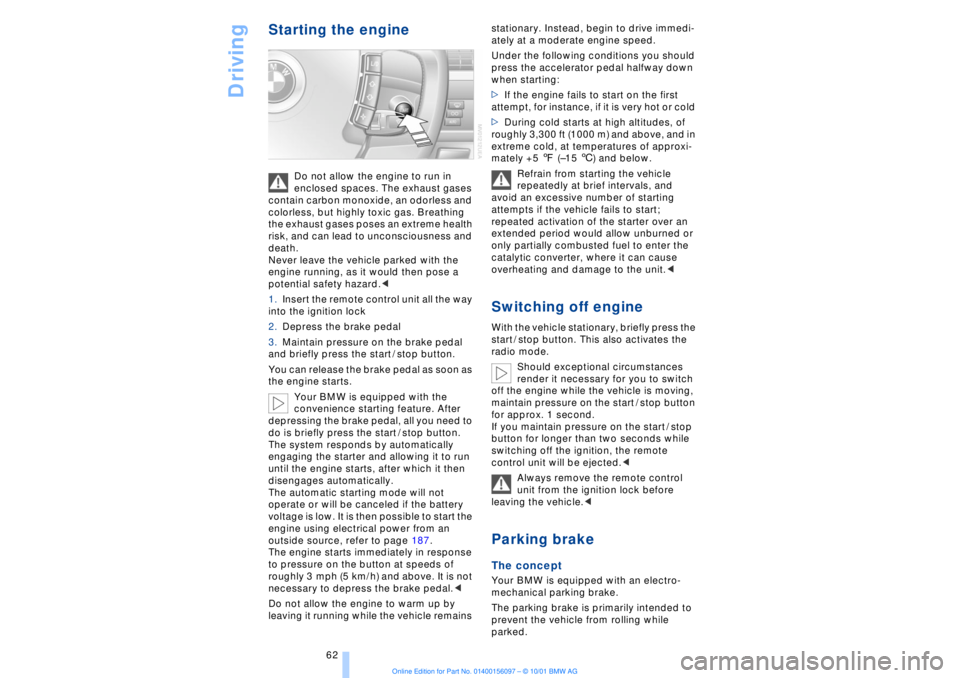
1.Insert the remote control unit all the way
into the ignition lock
2.Depress the brake pedal
3.Maintain pressure on the brake pedal
and briefly press the start / stop button.
You can release the brake pedal as soon as
the engine starts.
Your BMW is equipped with the
convenience starting feature. After
depressing the brake pedal, all you need to
do is briefly press the start / stop button.
The system responds by automatically
engaging the starter and allowing it to run
until the engine starts, after which it then
disengages automatically.
The automatic starting mode will not
operate or will be canceled if the battery
voltage is low. It is then possible to start the
engine using electrical power from an
outside source, refer to page 187.
The engine starts immediately in response
to pressure on the button at speeds of
roughly 3 mph (5 km/h) and above. It is not
necessary to depress the brake pedal.<
Do not allow the engine to warm up by
leaving it running while the vehicle remains stationary. Instead, begin to drive immedi-
ately at a moderate engine speed.
Under the following conditions you should
press the accelerator pedal halfway down
when starting:
>If the engine fails to start on the first
attempt, for instance, if it is very hot or cold
>During cold starts at high altitudes, of
roughly 3,300 ft (1000 m) and above, and in
extreme cold, at temperatures of approxi-
mately +5 7 (Ð15 6) and below.
Refrain from starting the vehicle
repeatedly at brief intervals, and
avoid an excessive number of starting
attempts if the vehicle fails to start;
repeated activation of the starter over an
extended period would allow unburned or
only partially combusted fuel to enter the
catalytic converter, where it can cause
overheating and damage to the unit.<
Switching off engineWith the vehicle stationary, briefly press the
start / stop button. This also activates the
radio mode.
Should exceptional circumstances
render it necessary for you to switch
off the engine while the vehicle is moving,
maintain pressure on the start / stop button
for approx. 1 second.
If you maintain pressure on the start / stop
button for longer than two seconds while
switching off the ignition, the remote
control unit will be ejected.<
Always remove the remote control
unit from the ignition lock before
leaving the vehicle.< Parking brake The concept Your BMW is equipped with an electro-
mechanical parking brake.
The parking brake is primarily intended to
prevent the vehicle from rolling while
parked.
Page 64 of 208
At a glanceControlsDriving tipsCommunicationsNavigationEntertainmentMobilityReference
63
You have two separate options for
engaging the parking brake:
>Manually, by briefly pressing the button
>Automatically, through activation of the
Automatic Hold mode, refer to next
column.
An electrohydraulic mechanism then
engages the parking brakes to prevent the
rear wheels from turning whenever you
switch off the engine.
When the engine is running, parking brake
engagement is controlled by the brake
system's hydraulic circuits, which act on
the disc brakes at the front and rear
wheels. Brake pedal feel Because this function is activated using the
brake system's hydraulic circuits, the
response of the brake pedal may change
slightly. Engagement may also be accom-
panied by activation noise Ð this is normal. Manual engagement
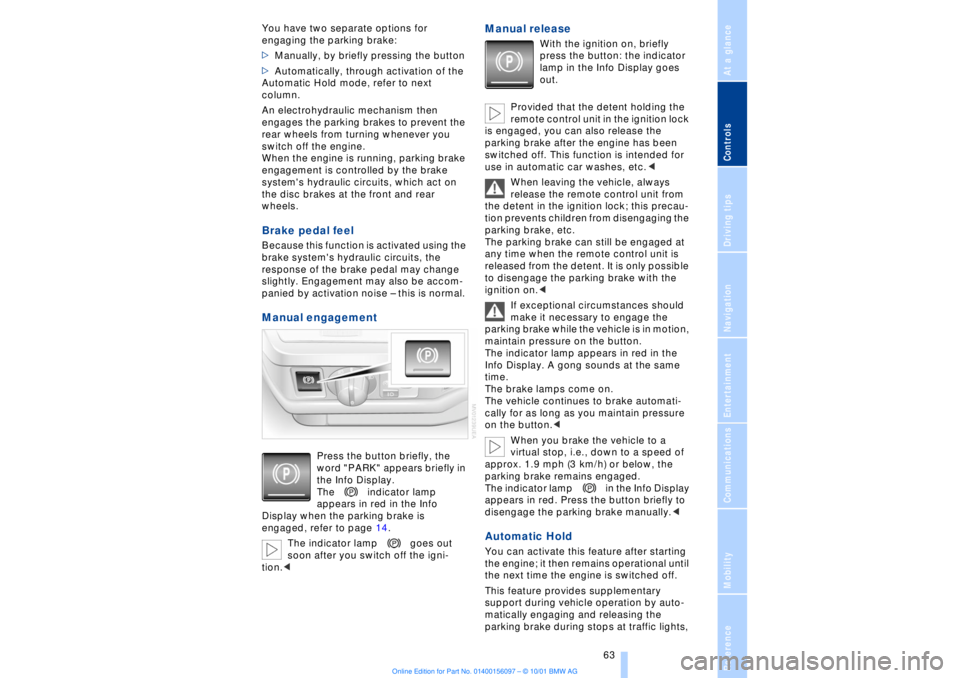
Press the button briefly, the
word "PARK" appears briefly in
the Info Display.
The indicator lamp
appears in red in the Info
Display when the parking brake is
engaged, refer to page 14.
The indicator lamp goes out
soon after you switch off the igni-
tion.<
Manual release
With the ignition on, briefly
press the button: the indicator
lamp in the Info Display goes
out.
Provided that the detent holding the
remote control unit in the ignition lock
is engaged, you can also release the
parking brake after the engine has been
switched off. This function is intended for
use in automatic car washes, etc.<
When leaving the vehicle, always
release the remote control unit from
the detent in the ignition lock; this precau-
tion prevents children from disengaging the
parking brake, etc.
The parking brake can still be engaged at
any time when the remote control unit is
released from the detent. It is only possible
to disengage the parking brake with the
ignition on.<
If exceptional circumstances should
make it necessary to engage the
parking brake while the vehicle is in motion,
maintain pressure on the button.
The indicator lamp appears in red in the
Info Display. A gong sounds at the same
time.
The brake lamps come on.
The vehicle continues to brake automati-
cally for as long as you maintain pressure
on the button.<
When you brake the vehicle to a
virtual stop, i.e., down to a speed of
approx. 1.9 mph (3 km/h) or below, the
parking brake remains engaged.
The indicator lamp in the Info Display
appears in red. Press the button briefly to
disengage the parking brake manually.<
Automatic Hold You can activate this feature after starting
the engine; it then remains operational until
the next time the engine is switched off.
This feature provides supplementary
support during vehicle operation by auto-
matically engaging and releasing the
parking brake during stops at traffic lights,
Page 65 of 208
Driving
64 in stop-and-go traffic, etc. As the vehicle
then no longer tends to "creep" when a
driving position is engaged, it is no longer
necessary to hold the vehicle by
depressing the brake pedal.
It prevents the vehicle from rolling back-
ward during uphill starts.
The parking brake also engages automati-
cally when you switch off the engine after
stopping the vehicle.
You can activate and deactivate the Auto-
matic Hold feature by selecting the
"Settings" menu in the Control Center. A
description of the Control Center is
provided on page 19.
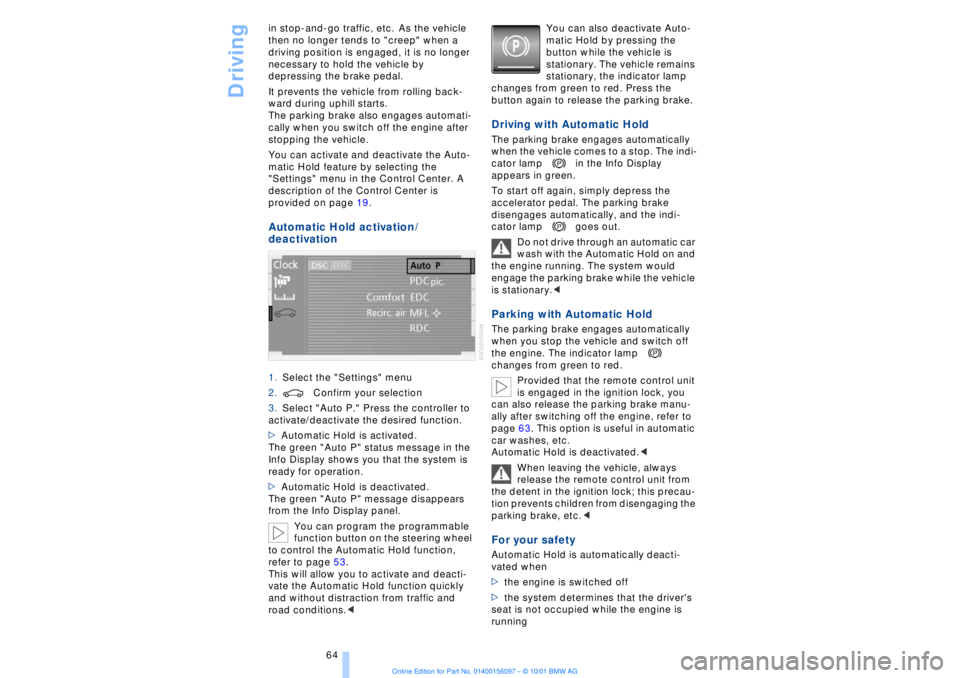
Automatic Hold activation /
deactivation 1.Select the "Settings" menu
2.Confirm your selection
3.Select "Auto P." Press the controller to
activate/deactivate the desired function.
>Automatic Hold is activated.
The green "Auto P" status message in the
Info Display shows you that the system is
ready for operation.
>Automatic Hold is deactivated.
The green "Auto P" message disappears
from the Info Display panel.
You can program the programmable
function button on the steering wheel
to control the Automatic Hold function,
refer to page 53.
This will allow you to activate and deacti-
vate the Automatic Hold function quickly
and without distraction from traffic and
road conditions.< You can also deactivate Auto-
matic Hold by pressing the
button while the vehicle is
stationary. The vehicle remains
stationary, the indicator lamp
changes from green to red. Press the
button again to release the parking brake.
Driving with Automatic Hold The parking brake engages automatically
when the vehicle comes to a stop. The indi-
cator lamp in the Info Display
appears in green.
To start off again, simply depress the
accelerator pedal. The parking brake
disengages automatically, and the indi-
cator lamp goes out.
Do not drive through an automatic car
wash with the Automatic Hold on and
the engine running. The system would
engage the parking brake while the vehicle
is stationary.
the engine. The indicator lamp
changes from green to red.
Provided that the remote control unit
is engaged in the ignition lock, you
can also release the parking brake manu-
ally after switching off the engine, refer to
page 63. This option is useful in automatic
car washes, etc.
Automatic Hold is deactivated.<
When leaving the vehicle, always
release the remote control unit from
the detent in the ignition lock; this precau-
tion prevents children from disengaging the
parking brake, etc.
>the engine is switched off
>the system determines that the driver's
seat is not occupied while the engine is
running
Page 68 of 208
At a glanceControlsDriving tipsCommunicationsNavigationEntertainmentMobilityReference
67
P R N D Program displayL1 Ð L6 Buttons on steering wheel L/D Ð Selecting transmission range
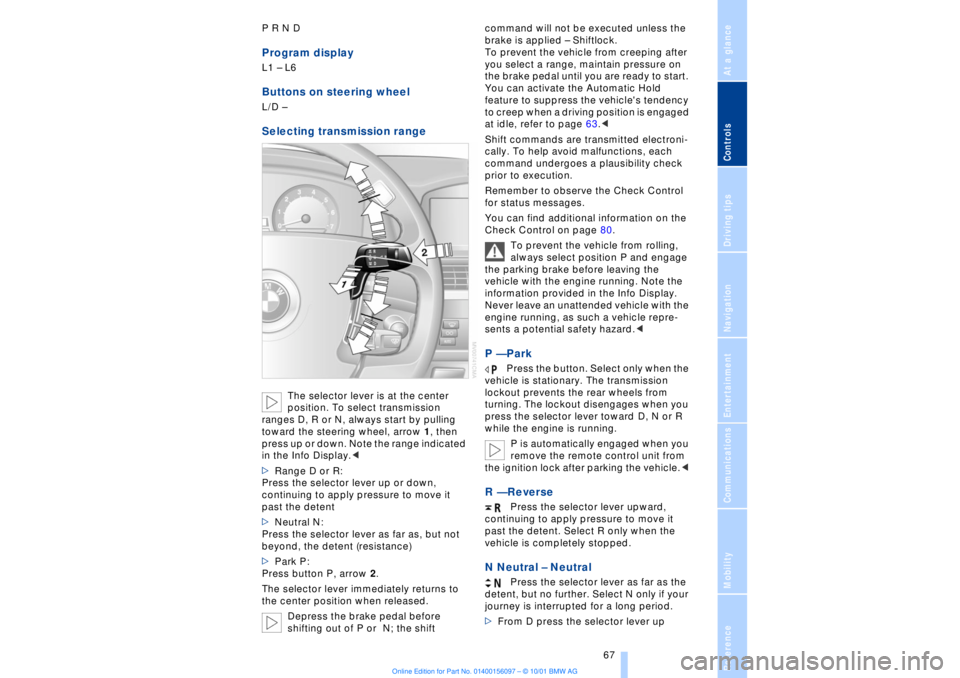
The selector lever is at the center
position. To select transmission
ranges D, R or N, always start by pulling
toward the steering wheel, arrow 1, then
press up or down. Note the range indicated
in the Info Display.<
>Range D or R:
Press the selector lever up or down,
continuing to apply pressure to move it
past the detent
>Neutral N:
Press the selector lever as far as, but not
beyond, the detent (resistance)
>Park P:
Press button P, arrow 2.
The selector lever immediately returns to
the center position when released.
Depress the brake pedal before
shifting out of P or N; the shift command will not be executed unless the
brake is applied Ð Shiftlock.
To prevent the vehicle from creeping after
you select a range, maintain pressure on
the brake pedal until you are ready to start.
You can activate the Automatic Hold
feature to suppress the vehicle's tendency
to creep when a driving position is engaged
at idle, refer to page 63.<
Shift commands are transmitted electroni-
cally. To help avoid malfunctions, each
command undergoes a plausibility check
prior to execution.
Remember to observe the Check Control
for status messages.
You can find additional information on the
Check Control on page 80.
To prevent the vehicle from rolling,
always select position P and engage
the parking brake before leaving the
vehicle with the engine running. Note the
information provided in the Info Display.
Never leave an unattended vehicle with the
engine running, as such a vehicle repre-
sents a potential safety hazard.<
P Ñ Park
Press the button. Select only when the
vehicle is stationary. The transmission
lockout prevents the rear wheels from
turning. The lockout disengages when you
press the selector lever toward D, N or R
while the engine is running.
P is automatically engaged when you
remove the remote control unit from
the ignition lock after parking the vehicle.<
R Ñ Reverse
Press the selector lever upward,
continuing to apply pressure to move it
past the detent. Select R only when the
vehicle is completely stopped.
N Neutral Ð Neutral
Press the selector lever as far as the
detent, but no further. Select N only if your
journey is interrupted for a long period.
>From D press the selector lever up
Page 109 of 208
Practical interior accessories
108
Practical interior accessoriesUniversal Garage Door
Opener*
The concept The Universal Garage Door Opener can
replace as many as three hand-held trans-
mitters for various accessories, such as
door openers, alarms and door-locking
systems. The Universal Garage Door
Opener registers and stores signals from
the original hand-held transmitters.
The signal of an original hand-held trans-
mitter can be programmed on one of the
three channel keys. Following that, each of
the devices can be actuated with the
appropriately-programmed channel key.
The indicator lamp flashes to confirm trans-
mission of the signal.
If the vehicle is sold, the memory of the
channel keys should be cleared as
described on page 109.
To prevent possible damage or injury,
before programming or using the
Universal Garage Door Opener always
inspect the immediate area to make certain
that no people, animals or objects are
within the travel range of the device. Also,
comply with the safety precautions of the
original hand-held transmitter.< Original hand-held transmitter
If you see this symbol on the pack-
aging or in the manual supplied with
the original remote control unit, it is
safe to assume that it is compatible with
the Universal Garage Door Opener.
To check for alternating codes To determine whether the original hand-
held transmitter operates using an alter-
nating code, you should either consult the
manual enclosed with it or program a
channel key as described in the Program-
ming section. After programming, press and hold down
the key on the Universal Garage Door
Opener. If the indicator lamp on the
Universal Garage Door Opener flashes for
two seconds before remaining on continu-
ously, this indicates that the original hand-
held transmitter uses an alernating code. In
this case, you can program the channel
keys using the procedure described on the
next page in the section on programming
alternating-code transmitters.
If you have additional questions,
please consult your BMW center or
call 1-800-355-3515.
You can also visit these websites:
www.bmwusa.com or
www.homelink.com.
HomeLink is a registered trademark owned
by Johnson Controls, Inc.<
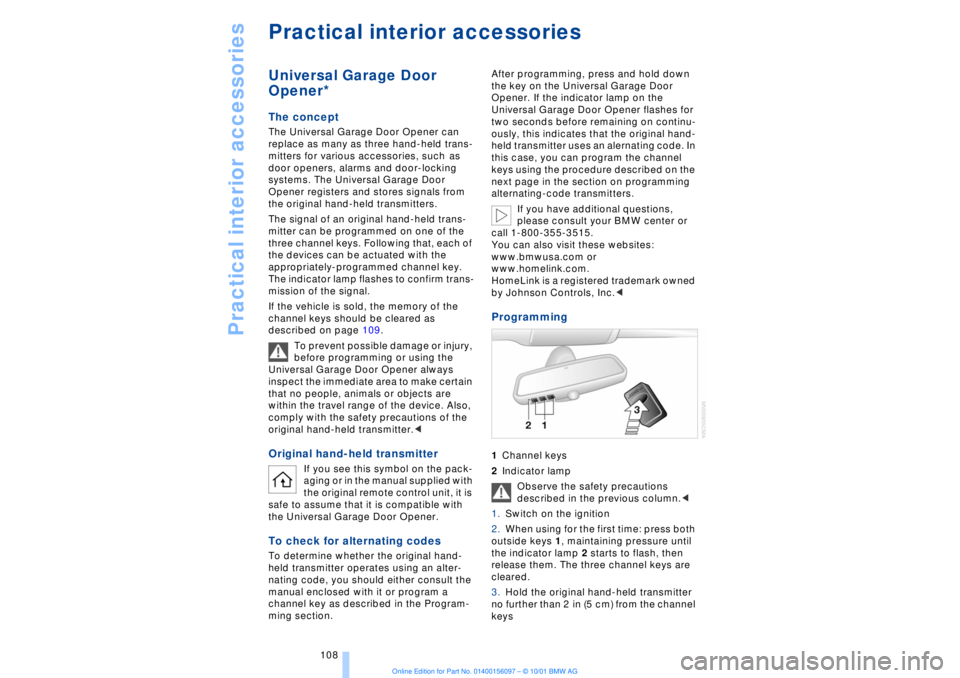
Programming 1Channel keys
2Indicator lamp
Observe the safety precautions
described in the previous column.<
1.Switch on the ignition
2.When using for the first time: press both
outside keys 1, maintaining pressure until
the indicator lamp 2 starts to flash, then
release them. The three channel keys are
cleared.
3.Hold the original hand-held transmitter
no further than 2 in (5 cm) from the channel
keys
Page 110 of 208
At a glanceControlsDriving tipsCommunicationsNavigationEntertainmentMobilityReference
109
4.Simultaneously press the transmit key
on the original hand-held transmitter,
arrow 3 and the selected channel key 1
on the Universal Garage Door Opener.
Release both keys as soon as the indicator
lamp flashes rapidly
5.To program other original hand-held
transmitters, repeat steps 3 and 4.
The corresponding channel key is now
programmed with the signal of the original
hand-held transmitter. Programming alternating-code
transmitters
Observe all of the safety precautions
described on the previous page.<
Consult the unit's operating instructions
when programming the Universal Garage
Door Opener.
When programming hand-held transmitters
that employ an alternating code, please
observe the following supplementary
instructions:
Programming will be easier with the
aid of a second person.<
1.Program the Universal Garage Door
Opener by following the instructions given
above under Programming.
2.Maintain pressure on the alternating-
code transmitter for roughly two seconds,
continuing until the program lamp lights up.
3.Press the selected channel key on the
Universal Garage Door Opener three times.
If you have any additional questions,
please contact your BMW center.<
To clear channel keys
Observe all of the safety precautions
described on the previous page.<
The memory of individual channel keys
cannot be deleted. However, the three
channel keys can be cleared together as
follows:
>Press both outside keys on the Universal
Garage Door Opener; maintain pressure
until the indicator lamp starts to flash, then
release the key.
Sun blinds*
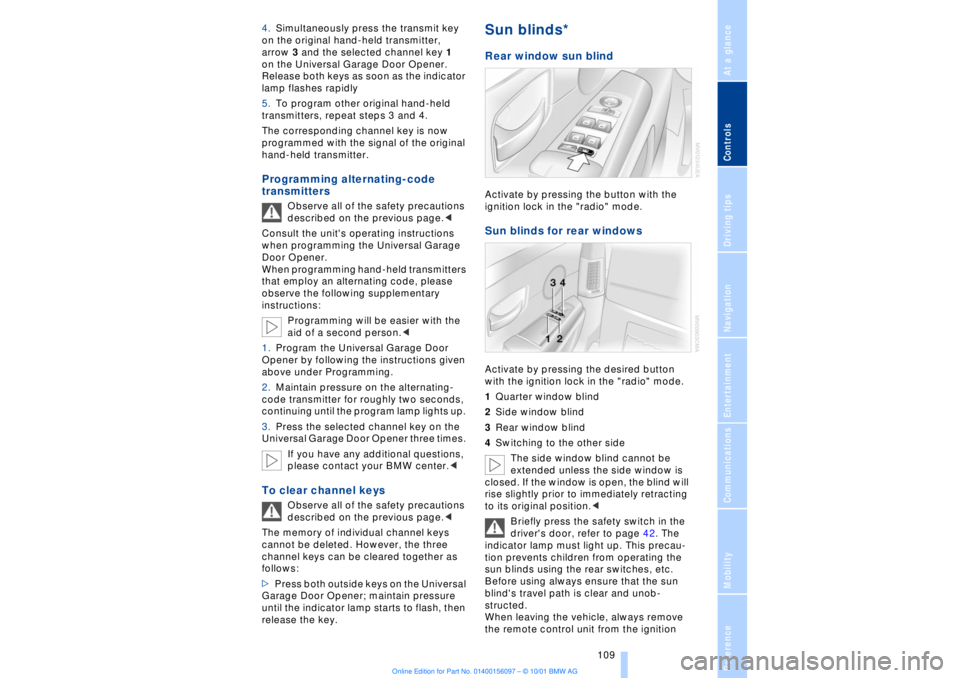
Rear window sun blind Activate by pressing the button with the
ignition lock in the "radio" mode. Sun blinds for rear windows Activate by pressing the desired button
with the ignition lock in the "radio" mode.
1Quarter window blind
2Side window blind
3Rear window blind
4Switching to the other side
The side window blind cannot be
extended unless the side window is
closed. If the window is open, the blind will
rise slightly prior to immediately retracting
to its original position.<
Briefly press the safety switch in the
driver's door, refer to page 42. The
indicator lamp must light up. This precau-
tion prevents children from operating the
sun blinds using the rear switches, etc.
Before using always ensure that the sun
blind's travel path is clear and unob-
structed.
When leaving the vehicle, always remove
the remote control unit from the ignition
Page 198 of 208
197
At a glanceControlsDriving tipsCommunicationsNavigationEntertainmentMobilityReference
Computer 81
Ð automatic climate
control 103
Ð "BC" 84
Ð changing settings 86
Ð changing time and
date 86
Ð Control Display screen
contents 83
Ð displays, menus 22
Ð language selection 86
Ð status lines 24
Ð symbols 20
Computer, refer to Control
Center 19
Condition Based Service
(CBS) 179
Connecting car vacuum
cleaner 113
Consumption display 82
Control Center 19
Ð assistance window 23
Ð automatic climate
control 103
Ð changing menu page 20
Ð changing settings 86
Ð confirm selection or
entry 20
Ð display help texts 23
Ð displays, menus 22
Ð language selection 86
Ð lists 20
Ð menu entry selection 19
Ð selecting units of measure
and display format 86
Ð setting time and date 86
Ð status lines 24
Ð symbols 20
Ð symbols and lists 20
Control Display 19
Controller, refer to Control
Center 19
Convenience operation of
windows and sliding/tilt
sunroof 36, 37
Convenience starting
feature 62
"Coolant" 179
Coolant 176, 177
Cooler, refer to Rear
cooler 110Cooling adjustment
Ð rear air conditioner 105
Copyright 2
Cornering Brake Control
(CBC) 91
Courtesy lamps 98
Cruise control 73
Cruise control, see Pro-
grammable cruise
control 73
Cruising range 82
Cup holder, refer to Bever-
age holder 112
Curb lamp
Ð bulb replacement 182
Curb weight 194
Current fuel
consumption 83
D"Date" 86
Daytime driving lamp
mode 96
DBC (Dynamic Brake
Control) 91
Deactivating
Ð tilt alarm sensor 36, 41
Defrosting, windows 101
Defrost setting 101
"DELETE" for
navigation 130
Destination entry 126
Destination for navigation
system
Ð selecting in
"Information" 129
Destination memory 129
"Destinations" 126
"Dest. input" 126
Dialed numbers 164
Dimensions 193
Dimming mirrors 52
Dipstick, engine oil 176
Direction
Ð arrow 132
Ð to destination 131
Ð voice instructions 133
Directional indicators, see
Turn signal indicators 71Directory creation
Ð with navigation
system 134
"Dir. of travel" with naviga-
tion system 132
"Dir. to north" with naviga-
tion system 132
Disc brakes 119
Displacement 192
Display, refer to Control
Display 19
Display format and units of
measure in Control
Display, changing 86
Display illumination, refer to
Instrument lighting 97
Displays 14
Ð computer 22
Ð Control Center 22
Distance 83
Distance to destination 83
Distance warning 88
Door keys 34
Doors
Ð locking and unlocking 35
Ð manual operation 37
Ð remote control 35
DOT Quality Grades 172
Draft-free ventilation 102
Drink holders, refer to
Beverage holders 112
Driving stability control 89
Driving tips 118
"DSC" 90
DSC (Dynamic Stability
Control) 89
"DTC" 90
DTC (Dynamic Traction
Control) 15, 90
Dynamic Brake Control
(DBC) 91
Dynamic Drive 91
Dynamic Stability Control
(DSC) 89
Dynamic Traction Control
(DTC) 15, 90
EEBV (Electronic Brake-
force Distribution) 91