ECU BMW 750I XDRIVE SEDAN 2014 Owner's Guide
[x] Cancel search | Manufacturer: BMW, Model Year: 2014, Model line: 750I XDRIVE SEDAN, Model: BMW 750I XDRIVE SEDAN 2014Pages: 265, PDF Size: 5.68 MB
Page 193 of 265
LoadingVehicle features and options
This chapter describes all standard, country-
specific and optional features offered with the
series. It also describes features that are not
necessarily available in your car, e. g., due to
the selected options or country versions. This
also applies to safety-related functions and
systems.
Hints Overloading the vehicle
To avoid exceeding the approved ca‐
pacity of the tires, never overload the vehicle.
Overloading can lead to overheating and in‐
creases the rate at which damage develops in‐
side the tires. This could result in a sudden
loss of tire inflation pressure.◀
No fluids in the cargo area
Make sure that fluids do not leak into the
cargo area; otherwise, the vehicle may be dam‐
aged.◀
Heavy and hard objects
Do not stow any heavy and hard objects
in the car's interior without securing them; oth‐
erwise, they may present a danger to occu‐
pants, e.g., during braking and evasive maneu‐
vers.◀
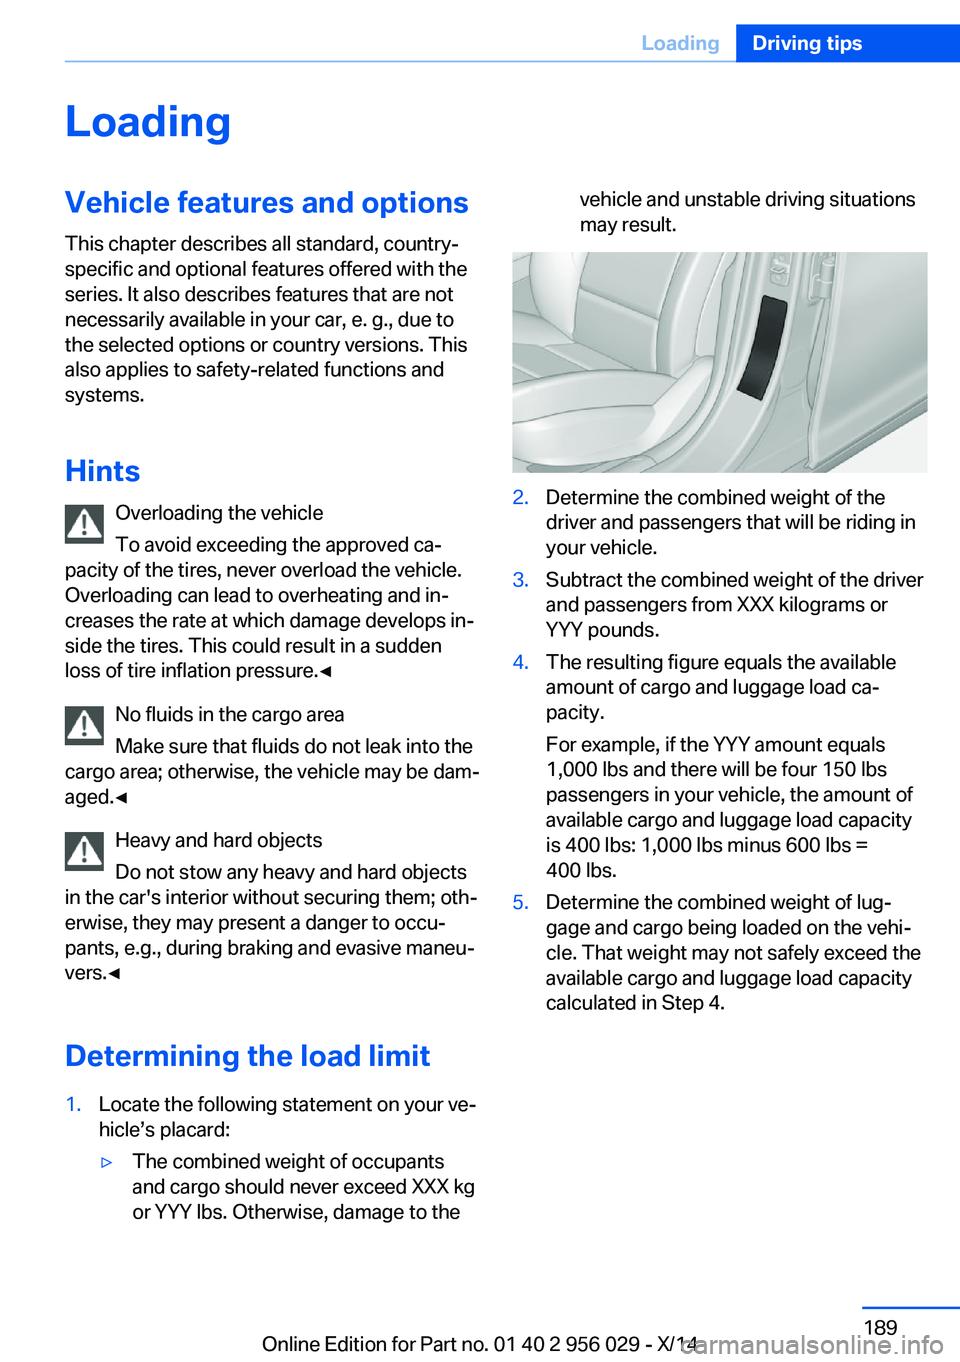
Determining the load limit1.Locate the following statement on your ve‐
hicle’s placard:▷The combined weight of occupants
and cargo should never exceed XXX kg
or YYY lbs. Otherwise, damage to thevehicle and unstable driving situations
may result.2.Determine the combined weight of the
driver and passengers that will be riding in
your vehicle.3.Subtract the combined weight of the driver
and passengers from XXX kilograms or
YYY pounds.4.The resulting figure equals the available
amount of cargo and luggage load ca‐
pacity.
For example, if the YYY amount equals
1,000 lbs and there will be four 150 lbs
passengers in your vehicle, the amount of
available cargo and luggage load capacity
is 400 lbs: 1,000 lbs minus 600 lbs =
400 lbs.5.Determine the combined weight of lug‐
gage and cargo being loaded on the vehi‐
cle. That weight may not safely exceed the
available cargo and luggage load capacity
calculated in Step 4.Seite 189LoadingDriving tips189
Online Edition for Part no. 01 40 2 956 029 - X/14
Page 194 of 265
Load
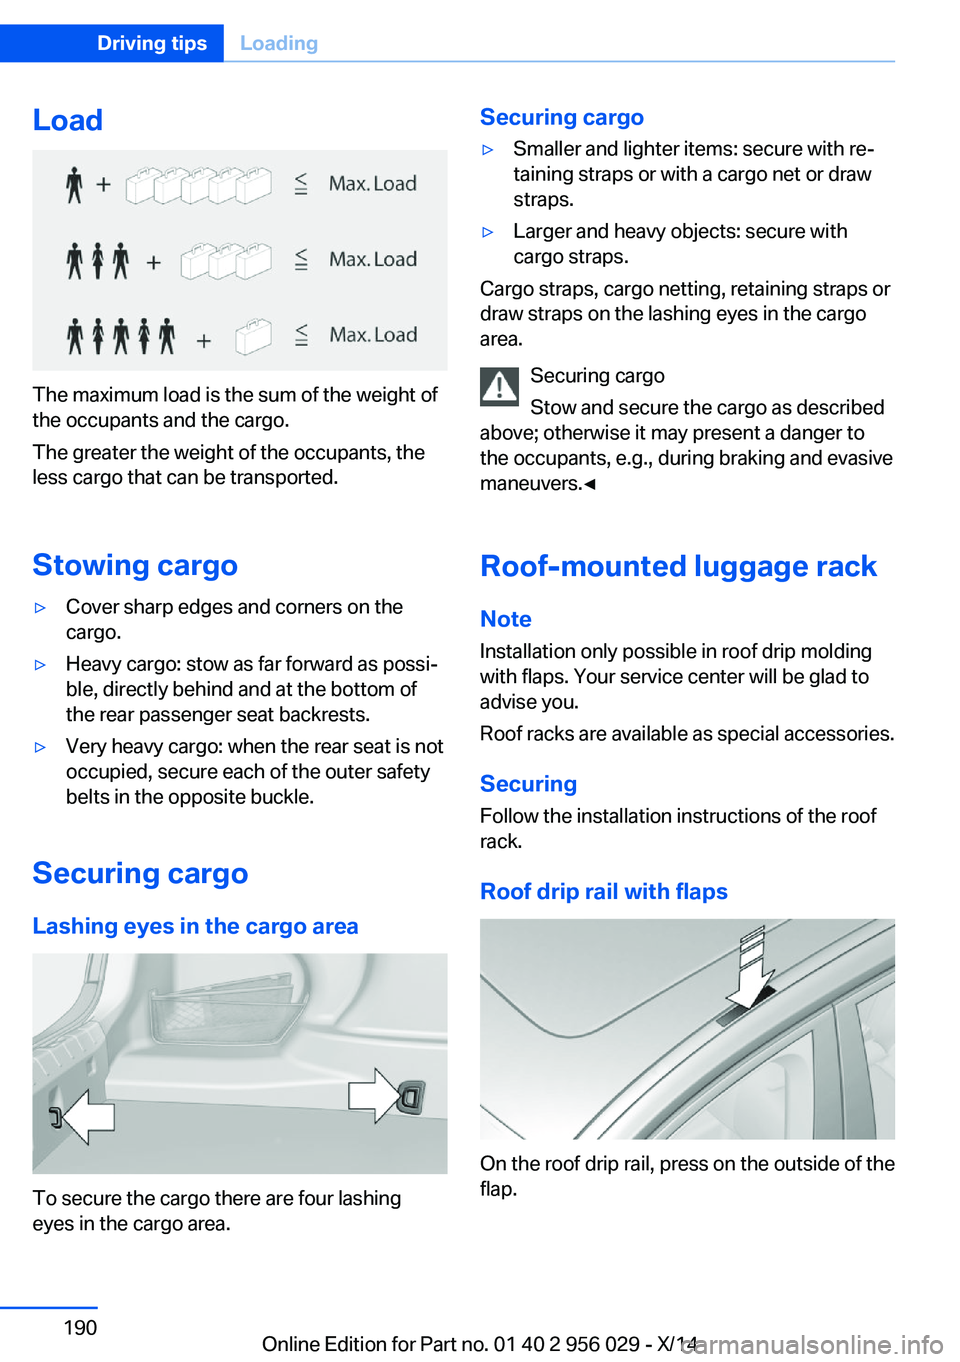
The maximum load is the sum of the weight of
the occupants and the cargo.
The greater the weight of the occupants, the
less cargo that can be transported.
Stowing cargo
▷Cover sharp edges and corners on the
cargo.▷Heavy cargo: stow as far forward as possi‐
ble, directly behind and at the bottom of
the rear passenger seat backrests.▷Very heavy cargo: when the rear seat is not
occupied, secure each of the outer safety
belts in the opposite buckle.
Securing cargo
Lashing eyes in the cargo area
To secure the cargo there are four lashing
eyes in the cargo area.
Securing cargo▷Smaller and lighter items: secure with re‐
taining straps or with a cargo net or draw
straps.▷Larger and heavy objects: secure with
cargo straps.
Cargo straps, cargo netting, retaining straps or
draw straps on the lashing eyes in the cargo
area.
Securing cargo
Stow and secure the cargo as described
above; otherwise it may present a danger to
the occupants, e.g., during braking and evasive
maneuvers.◀
Roof-mounted luggage rack Note
Installation only possible in roof drip molding
with flaps. Your service center will be glad to
advise you.
Roof racks are available as special accessories.
Securing
Follow the installation instructions of the roof
rack.
Roof drip rail with flaps
On the roof drip rail, press on the outside of the
flap.
Seite 190Driving tipsLoading190
Online Edition for Part no. 01 40 2 956 029 - X/14
Page 195 of 265
MountingThe preparation for the mounting plate is lo‐
cated below the roof drip rail. Have the mount‐
ing plate installed by the service center before
installation of a roof rack.
Be sure that adequate clearance is maintained
for tilting and opening the glass sunroof.
Magnetic roof-mounted luggage rack Because of the aluminum roof, magnetic roof-
mounted luggage racks cannot be used.
Loading Because roof racks raise the vehicle's center
of gravity when loaded, they have a major ef‐
fect on vehicle handling and steering re‐
sponse.
Therefore, note the following when loading
and driving:▷Do not exceed the approved roof/axle
loads and the approved gross vehicle
weight.▷Distribute the roof load uniformly.▷The roof load should not extend past the
loading area.▷Always place the heaviest pieces on the
bottom.▷Secure the roof luggage firmly, e.g., tie
with ratchet straps.▷Do not let objects project into the opening
path of the trunk lid.▷Drive cautiously and avoid sudden acceler‐
ation and braking maneuvers. Take corners
gently.Seite 191LoadingDriving tips191
Online Edition for Part no. 01 40 2 956 029 - X/14
Page 223 of 265
Never reach into the engine compart‐
ment
Never reach into spaces or gaps in the engine
compartment; otherwise, there is a risk of in‐
jury, e.g., from rotating or hot parts.◀
Danger of injury when the hood is open
There is a danger of injury from protrud‐
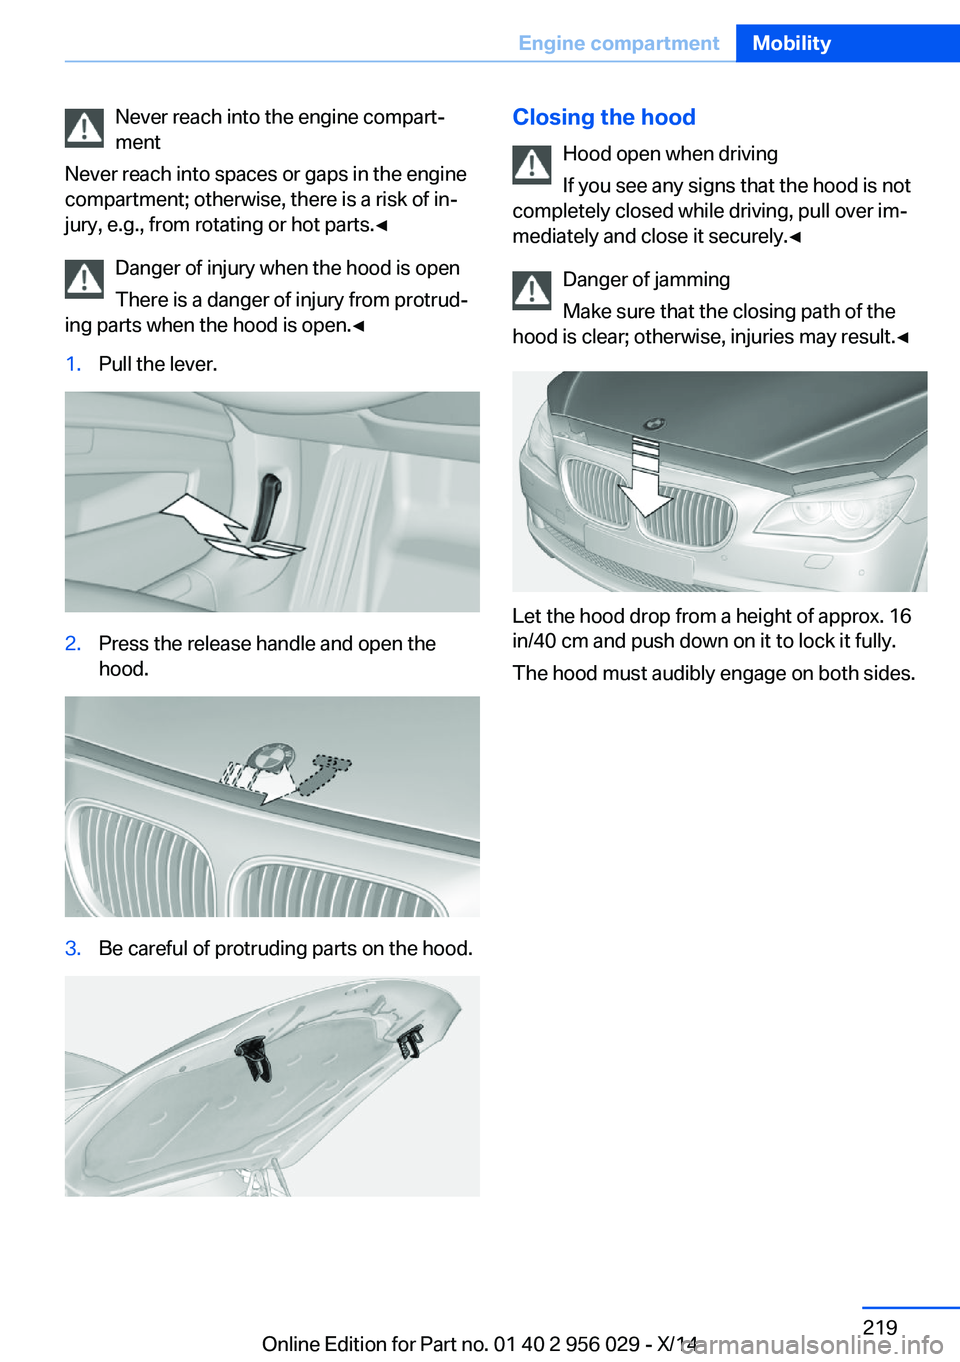
ing parts when the hood is open.◀1.Pull the lever.2.Press the release handle and open the
hood.3.Be careful of protruding parts on the hood.Closing the hood
Hood open when driving
If you see any signs that the hood is not
completely closed while driving, pull over im‐
mediately and close it securely.◀
Danger of jamming
Make sure that the closing path of the
hood is clear; otherwise, injuries may result.◀
Let the hood drop from a height of approx. 16
in/40 cm and push down on it to lock it fully.
The hood must audibly engage on both sides.
Seite 219Engine compartmentMobility219
Online Edition for Part no. 01 40 2 956 029 - X/14
Page 237 of 265
Maintain the battery in an upright position for
transport and storage. Secure the battery so
that it does not tip over during transport.
Fuses Hints Replacing fuses
Never attempt to repair a blown fuse and
do not replace a defective fuse with a substi‐
tute of another color or amperage rating; this
could lead to a circuit overload, ultimately re‐
sulting in a fire in the vehicle.◀
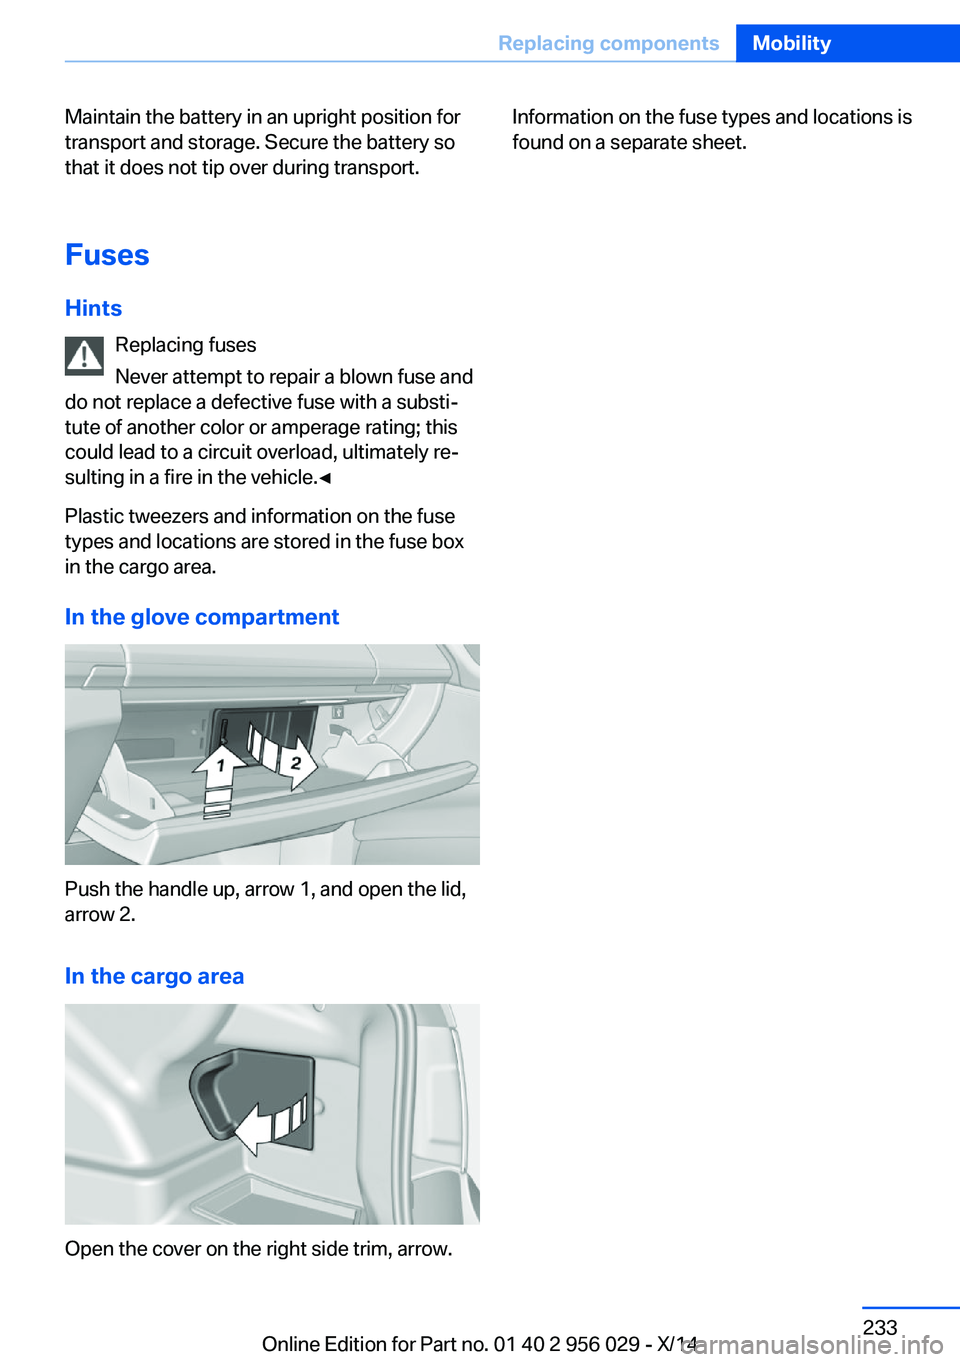
Plastic tweezers and information on the fuse
types and locations are stored in the fuse box
in the cargo area.
In the glove compartment
Push the handle up, arrow 1, and open the lid,
arrow 2.
In the cargo area
Open the cover on the right side trim, arrow.
Information on the fuse types and locations is
found on a separate sheet.Seite 233Replacing componentsMobility233
Online Edition for Part no. 01 40 2 956 029 - X/14
Page 241 of 265
If the first starting attempt is not success‐
ful, wait a few minutes before making an‐
other attempt in order to allow the dis‐
charged battery to recharge.3.Let both engines run for several minutes.4.Disconnect the jumper cables in the re‐
verse order.
Check the battery and recharge if needed.
Tow-starting and towing Note Tow-starting and towing
For towing the vehicle turn, switch off the
Intelligent Safety systems; otherwise malfunc‐
tions of the individual braking systems might
lead to accidents.◀
Transporting your vehicle
Note Your vehicle is not permitted to be towed.
Therefore, contact a service center in the
event of a breakdown.
Do not have the vehicle towed
Have your vehicle transported on a load‐
ing platform only; otherwise, damage may oc‐ cur.◀
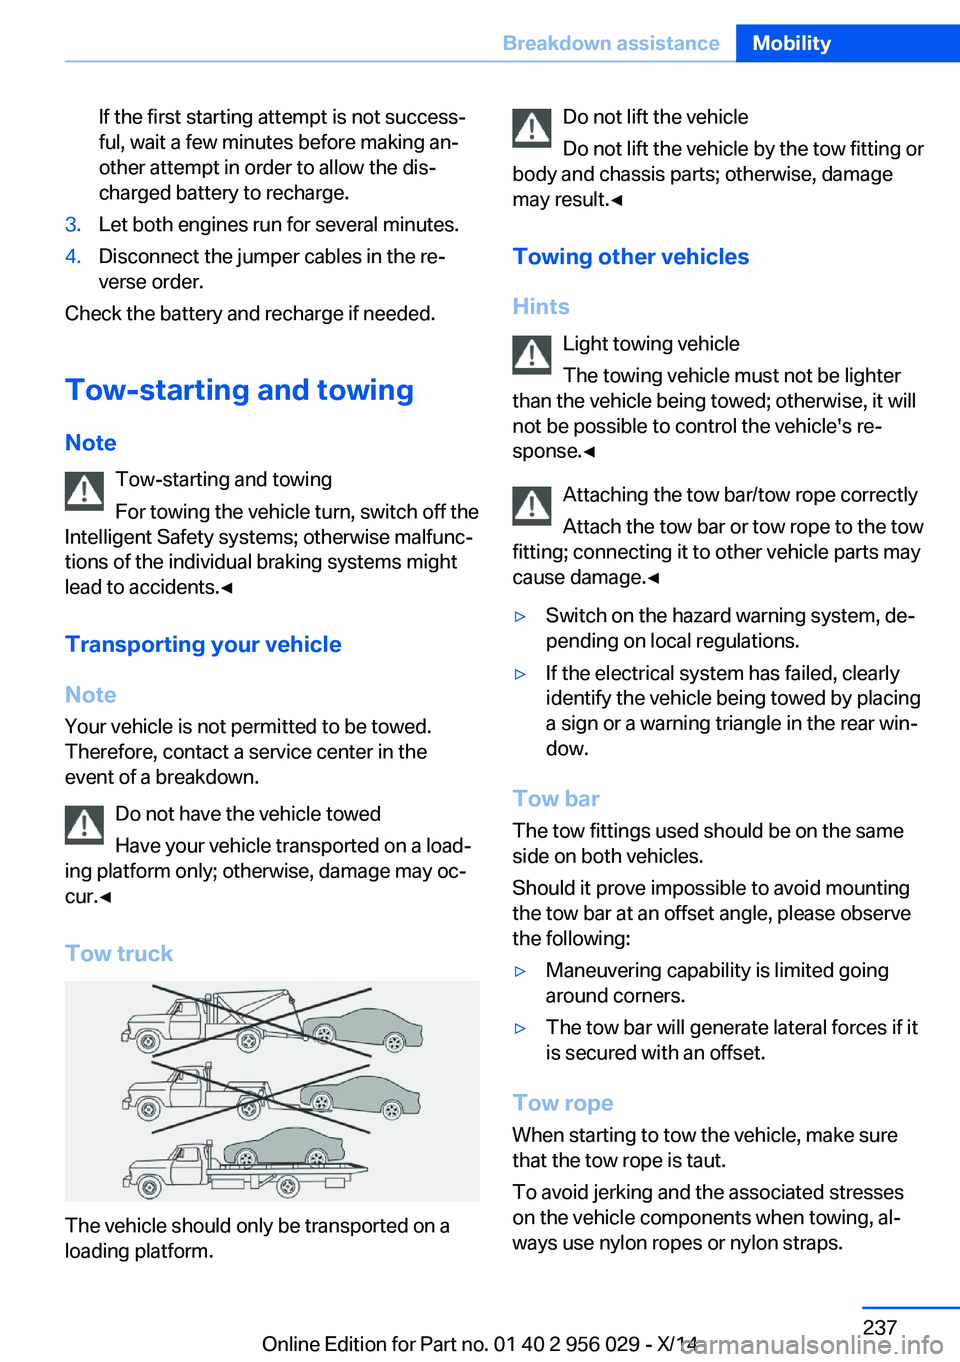
Tow truck
The vehicle should only be transported on a
loading platform.
Do not lift the vehicle
Do not lift the vehicle by the tow fitting or
body and chassis parts; otherwise, damage
may result.◀
Towing other vehicles
Hints Light towing vehicle
The towing vehicle must not be lighter
than the vehicle being towed; otherwise, it will
not be possible to control the vehicle's re‐
sponse.◀
Attaching the tow bar/tow rope correctly
Attach the tow bar or tow rope to the tow
fitting; connecting it to other vehicle parts may
cause damage.◀▷Switch on the hazard warning system, de‐
pending on local regulations.▷If the electrical system has failed, clearly
identify the vehicle being towed by placing
a sign or a warning triangle in the rear win‐
dow.
Tow bar
The tow fittings used should be on the same
side on both vehicles.
Should it prove impossible to avoid mounting
the tow bar at an offset angle, please observe
the following:
▷Maneuvering capability is limited going
around corners.▷The tow bar will generate lateral forces if it
is secured with an offset.
Tow rope
When starting to tow the vehicle, make sure
that the tow rope is taut.
To avoid jerking and the associated stresses
on the vehicle components when towing, al‐
ways use nylon ropes or nylon straps.
Seite 237Breakdown assistanceMobility237
Online Edition for Part no. 01 40 2 956 029 - X/14
Page 246 of 265
Carpets and floor matsNo objects in the area around the pedals
Keep floor mats, carpets, and any other
objects out of the pedal area; otherwise, the
function of the pedals could be impeded while driving and create the risk of an accident.
Do not place additional floor mats over existing
mats or other objects.
Only use floor mats that have been approved
for the vehicle and can be properly attached to
floor.
Ensure that the floor mats are securely fas‐
tened again after they were removed for clean‐
ing, e.g.◀
Floor mats can be removed from the car's inte‐
rior for cleaning.
If the floor carpets are very dirty, clean with a microfiber cloth and water or a textile cleaner.
To prevent matting of the carpet, rub back and
forth in the direction of travel only.
Sensors/cameras
To clean sensors and cameras, use a cloth
moistened with a small amount of glass
cleaner.
Displays/monitors Cleaning displays and screens
Do not use any chemical or household
cleaning agents; otherwise, surfaces can be af‐
fected.◀
Keeping out moisture
Keep all fluids and moisture away from
the unit; otherwise, electrical components can
be damaged.◀
Avoid pressure
Avoid pressing too hard when cleaning
and do not use abrasive materials; otherwise,
damage can result.◀
Clean with a clean, antistatic microfiber cloth.Long-term When the vehicle is shut down for longer than
three months, special measures must be
taken. Additional information is available from
the service center.Seite 242MobilityCare242
Online Edition for Part no. 01 40 2 956 029 - X/14
Page 255 of 265
Battery replacement, vehiclebattery 232
Battery replacement, vehicle remote control 35
Battery, vehicle 232
Belts, safety belts 60
Beverage holder, cu‐ pholder 182
Blinds, sun protection 50
BMW Advanced Diesel 203
BMW Assist, see user's manual for Navigation, En‐
tertainment and Communi‐
cation
BMW maintenance sys‐ tem 225
Bonus range, ECO PRO 194
Bottle holder, refer to Cu‐ pholder 182
Brake assistant 136
Brake assistant, adaptive 136
Brake discs, break-in 186
Brake force display 133
Brake lights, adaptive 133
Brake lights, brake force dis‐ play 133
Brake lights, bulb replace‐ ment 230
Brake pads, break-in 186
Braking, hints 188
Breakdown assis‐ tance 234, 235
Break-in 186
Brightness of Control Dis‐ play 103
Bulb replacement, rear 230
Bulb replacement, see Lamp and bulb replacement 227
Button, RES 147
Button, Start/Stop 73
Bypassing, refer to Jump- starting 235 C
California Proposition 65 Warning 7
Calling up mirror adjust‐ ment 47
Calling up seat adjust‐ ment 47
Calling up steering wheel ad‐ justment 47
Camera, care 242
Camera, rearview cam‐ era 156
Camera, Side View 158
Camera, Top View 160
Can holder, refer to Cu‐ pholder 182
Car battery 232
Car care products 240
Care, displays 242
Care, vehicle 240
Cargo 189
Cargo area, storage compart‐ ments 182
Cargo, securing 190
Cargo straps, securing cargo 190
Car key, refer to Remote con‐ trol 34
Carpet, care 242
Car wash 239
Catalytic converter, refer to Hot exhaust system 186
CBS Condition Based Serv‐ ice 225
CD/Multimedia, see user's manual for Navigation, En‐
tertainment and Communi‐
cation
Center armrest 181
Center console 16
Central locking system 39
Central screen, refer to Con‐ trol Display 18
Changes, technical, refer to Safety 7 Changing parts 227
Changing wheels 231
Changing wheels/tires 214
Chassis number, see vehicle identification number 9
Check Control 90
Checking the engine oil level electronically 220
Checking the oil level elec‐ tronically 220
Children, seating position 69
Children, transporting safely 69
Child restraint fixing sys‐ tem 69
Child restraint fixing system LATCH 70
Child restraint fixing systems, mounting 69
Child safety locks 72
Child seat, mounting 69
Child seats 69
Chrome parts, care 241
Cigarette lighter 174
Cleaning displays 242
Climate control 165
Climate control laminated tinted safety glass 187
Climate control on roof‐ liner 171
Climate control wind‐ shield 187
Clock 95
Closing/opening via door lock 39
Closing/opening with remote control 37
Closing the trunk lid with no- touch activation 45
Clothes hooks 182
Coasting 196
Coasting with engine decou‐ pled, coasting 196
Coasting with idling en‐ gine 196 Seite 251Everything from A to ZReference251
Online Edition for Part no. 01 40 2 956 029 - X/14
Page 257 of 265
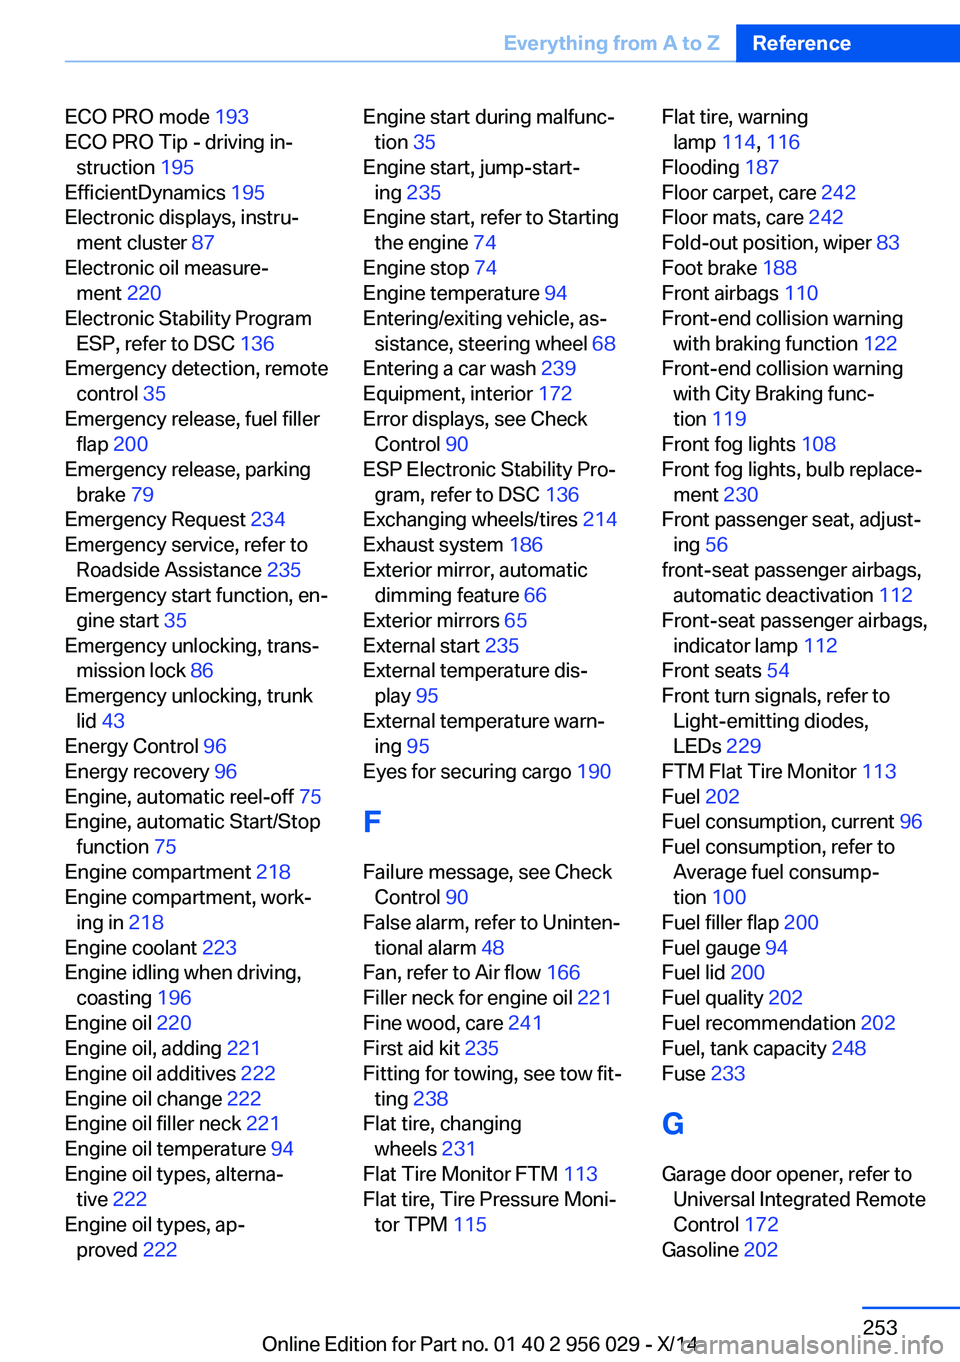
ECO PRO mode 193
ECO PRO Tip - driving in‐ struction 195
EfficientDynamics 195
Electronic displays, instru‐ ment cluster 87
Electronic oil measure‐ ment 220
Electronic Stability Program ESP, refer to DSC 136
Emergency detection, remote control 35
Emergency release, fuel filler flap 200
Emergency release, parking brake 79
Emergency Request 234
Emergency service, refer to Roadside Assistance 235
Emergency start function, en‐ gine start 35
Emergency unlocking, trans‐ mission lock 86
Emergency unlocking, trunk lid 43
Energy Control 96
Energy recovery 96
Engine, automatic reel-off 75
Engine, automatic Start/Stop function 75
Engine compartment 218
Engine compartment, work‐ ing in 218
Engine coolant 223
Engine idling when driving, coasting 196
Engine oil 220
Engine oil, adding 221
Engine oil additives 222
Engine oil change 222
Engine oil filler neck 221
Engine oil temperature 94
Engine oil types, alterna‐ tive 222
Engine oil types, ap‐ proved 222 Engine start during malfunc‐
tion 35
Engine start, jump-start‐ ing 235
Engine start, refer to Starting the engine 74
Engine stop 74
Engine temperature 94
Entering/exiting vehicle, as‐ sistance, steering wheel 68
Entering a car wash 239
Equipment, interior 172
Error displays, see Check Control 90
ESP Electronic Stability Pro‐ gram, refer to DSC 136
Exchanging wheels/tires 214
Exhaust system 186
Exterior mirror, automatic dimming feature 66
Exterior mirrors 65
External start 235
External temperature dis‐ play 95
External temperature warn‐ ing 95
Eyes for securing cargo 190
F
Failure message, see Check Control 90
False alarm, refer to Uninten‐ tional alarm 48
Fan, refer to Air flow 166
Filler neck for engine oil 221
Fine wood, care 241
First aid kit 235
Fitting for towing, see tow fit‐ ting 238
Flat tire, changing wheels 231
Flat Tire Monitor FTM 113
Flat tire, Tire Pressure Moni‐ tor TPM 115 Flat tire, warning
lamp 114, 116
Flooding 187
Floor carpet, care 242
Floor mats, care 242
Fold-out position, wiper 83
Foot brake 188
Front airbags 110
Front-end collision warning with braking function 122
Front-end collision warning with City Braking func‐
tion 119
Front fog lights 108
Front fog lights, bulb replace‐ ment 230
Front passenger seat, adjust‐ ing 56
front-seat passenger airbags, automatic deactivation 112
Front-seat passenger airbags, indicator lamp 112
Front seats 54
Front turn signals, refer to Light-emitting diodes,
LEDs 229
FTM Flat Tire Monitor 113
Fuel 202
Fuel consumption, current 96
Fuel consumption, refer to Average fuel consump‐
tion 100
Fuel filler flap 200
Fuel gauge 94
Fuel lid 200
Fuel quality 202
Fuel recommendation 202
Fuel, tank capacity 248
Fuse 233
G
Garage door opener, refer to Universal Integrated Remote
Control 172
Gasoline 202 Seite 253Everything from A to ZReference253
Online Edition for Part no. 01 40 2 956 029 - X/14
Page 259 of 265
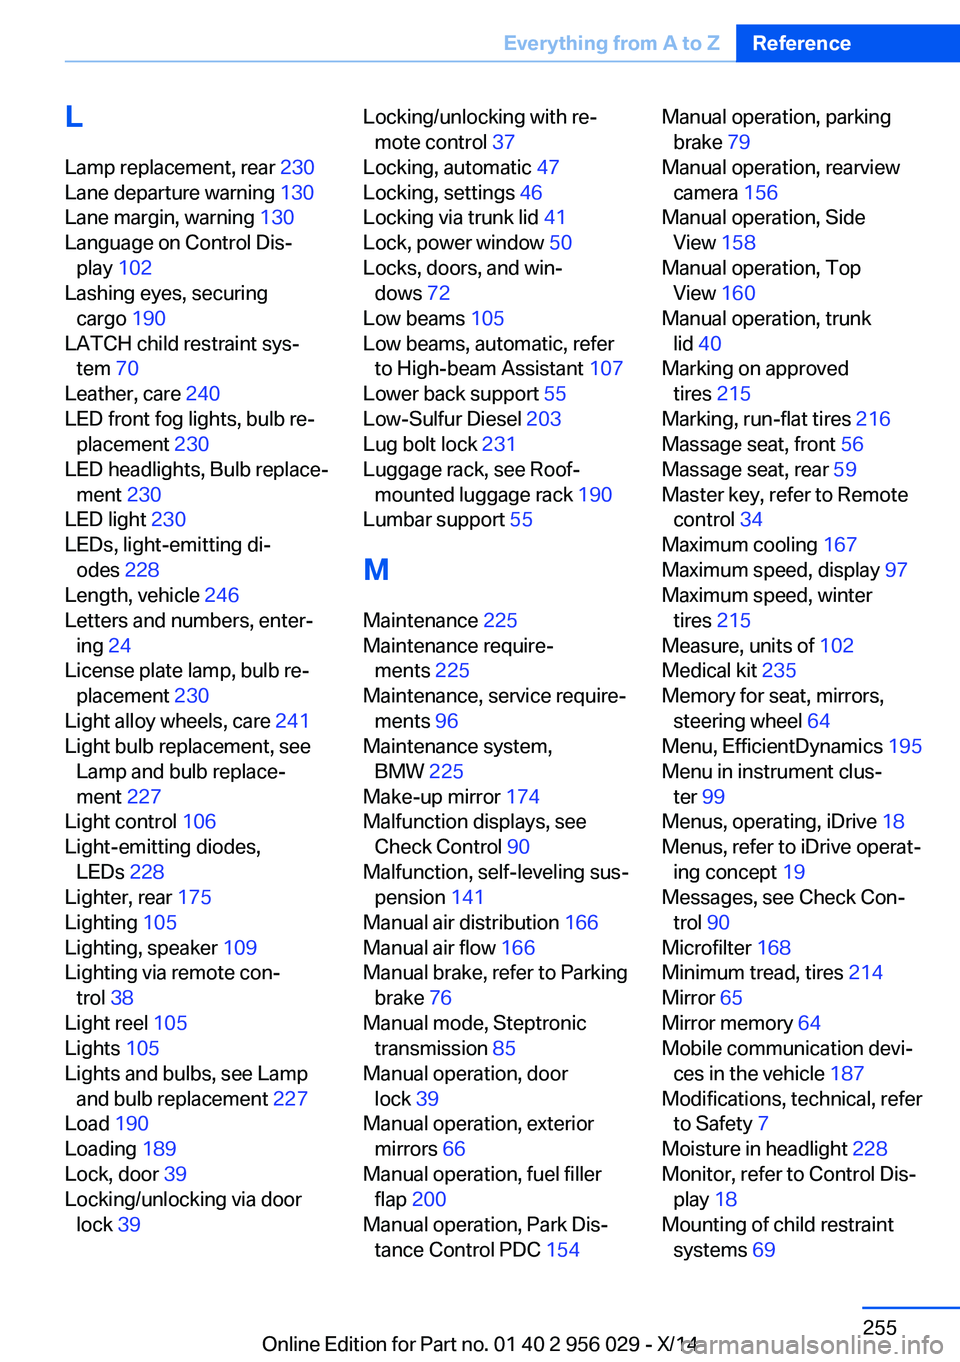
LLamp replacement, rear 230
Lane departure warning 130
Lane margin, warning 130
Language on Control Dis‐ play 102
Lashing eyes, securing cargo 190
LATCH child restraint sys‐ tem 70
Leather, care 240
LED front fog lights, bulb re‐ placement 230
LED headlights, Bulb replace‐ ment 230
LED light 230
LEDs, light-emitting di‐ odes 228
Length, vehicle 246
Letters and numbers, enter‐ ing 24
License plate lamp, bulb re‐ placement 230
Light alloy wheels, care 241
Light bulb replacement, see Lamp and bulb replace‐
ment 227
Light control 106
Light-emitting diodes, LEDs 228
Lighter, rear 175
Lighting 105
Lighting, speaker 109
Lighting via remote con‐ trol 38
Light reel 105
Lights 105
Lights and bulbs, see Lamp and bulb replacement 227
Load 190
Loading 189
Lock, door 39
Locking/unlocking via door lock 39 Locking/unlocking with re‐
mote control 37
Locking, automatic 47
Locking, settings 46
Locking via trunk lid 41
Lock, power window 50
Locks, doors, and win‐ dows 72
Low beams 105
Low beams, automatic, refer to High-beam Assistant 107
Lower back support 55
Low-Sulfur Diesel 203
Lug bolt lock 231
Luggage rack, see Roof- mounted luggage rack 190
Lumbar support 55
M
Maintenance 225
Maintenance require‐ ments 225
Maintenance, service require‐ ments 96
Maintenance system, BMW 225
Make-up mirror 174
Malfunction displays, see Check Control 90
Malfunction, self-leveling sus‐ pension 141
Manual air distribution 166
Manual air flow 166
Manual brake, refer to Parking brake 76
Manual mode, Steptronic transmission 85
Manual operation, door lock 39
Manual operation, exterior mirrors 66
Manual operation, fuel filler flap 200
Manual operation, Park Dis‐ tance Control PDC 154 Manual operation, parking
brake 79
Manual operation, rearview camera 156
Manual operation, Side View 158
Manual operation, Top View 160
Manual operation, trunk lid 40
Marking on approved tires 215
Marking, run-flat tires 216
Massage seat, front 56
Massage seat, rear 59
Master key, refer to Remote control 34
Maximum cooling 167
Maximum speed, display 97
Maximum speed, winter tires 215
Measure, units of 102
Medical kit 235
Memory for seat, mirrors, steering wheel 64
Menu, EfficientDynamics 195
Menu in instrument clus‐ ter 99
Menus, operating, iDrive 18
Menus, refer to iDrive operat‐ ing concept 19
Messages, see Check Con‐ trol 90
Microfilter 168
Minimum tread, tires 214
Mirror 65
Mirror memory 64
Mobile communication devi‐ ces in the vehicle 187
Modifications, technical, refer to Safety 7
Moisture in headlight 228
Monitor, refer to Control Dis‐ play 18
Mounting of child restraint systems 69 Seite 255Everything from A to ZReference255
Online Edition for Part no. 01 40 2 956 029 - X/14