change time BMW 750LI SEDAN 2007 Owners Manual
[x] Cancel search | Manufacturer: BMW, Model Year: 2007, Model line: 750LI SEDAN, Model: BMW 750LI SEDAN 2007Pages: 254, PDF Size: 7.98 MB
Page 20 of 254
iDrive
18 DVDs can only be played on the rear
seat screen, refer to Rear seat
screen
* on page21.<
7Settings
>Parking brake58
>PDC Park Distance Control86
>EDC Electronic Damping Control89
>Programmable buttons52
>FTM Flat Tire Monitor
*90
>TPM Tire Pressure Monitor
*91
>Time and date84
>Language84
>Units of measure and display format84
>Brightness85
>Rear seat screen
*21
>Pairing mobile phone with vehicle182
8Climate
>Intensity of AUTO program104
>Air volume106
>Heated seats
*49
>Parked car ventilation109
>Extra, e.g. rear air conditioner108
Basic operation
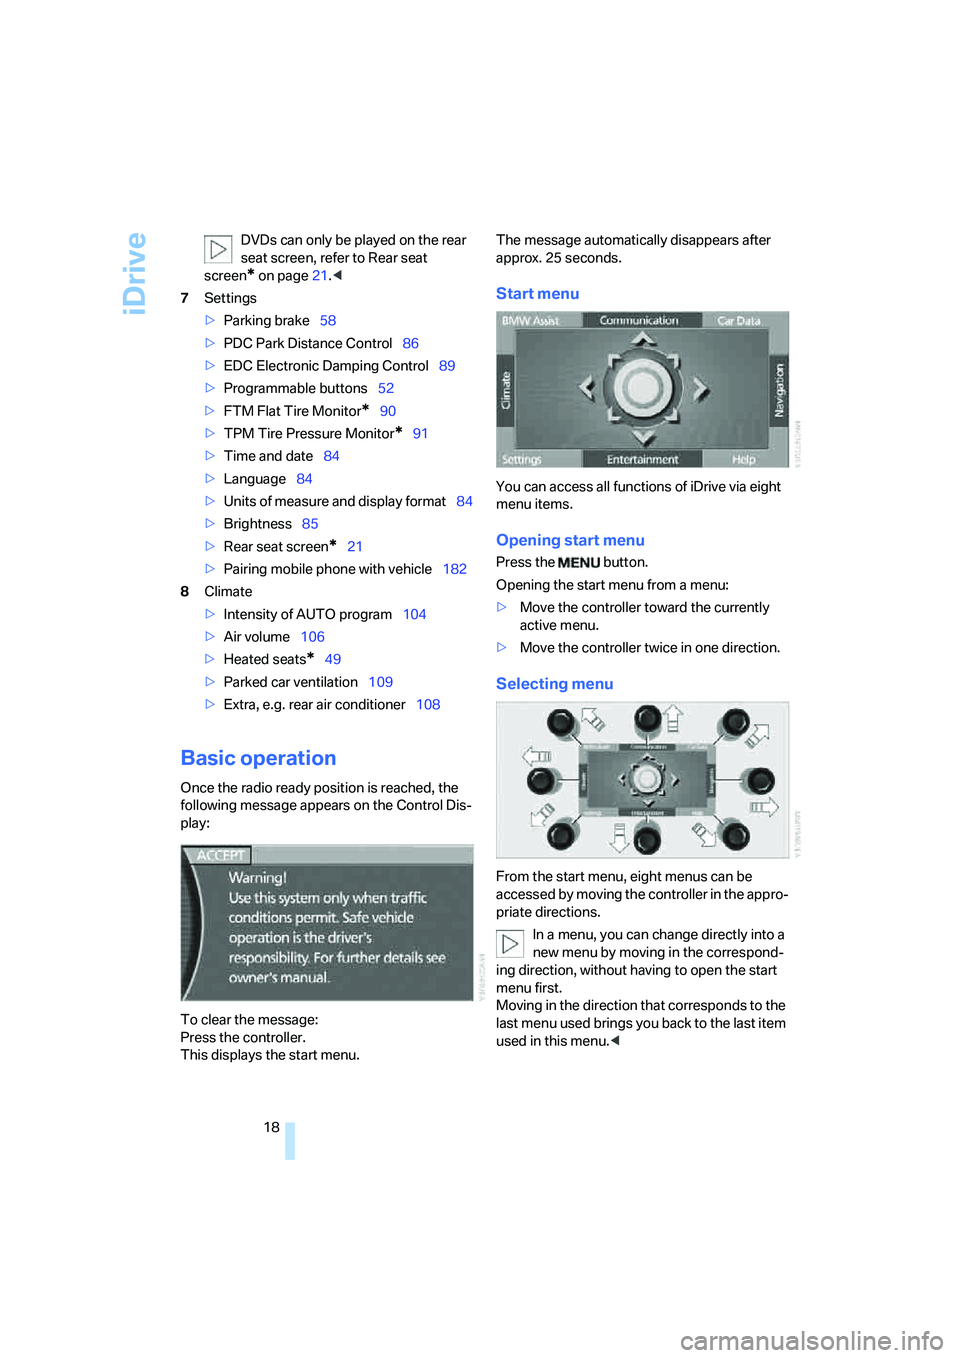
Once the radio ready position is reached, the
following message appears on the Control Dis-
play:
To clear the message:
Press the controller.
This displays the start menu.The message automatically disappears after
approx. 25 seconds.
Start menu
You can access all functions of iDrive via eight
menu items.
Opening start menu
Press the button.
Opening the start menu from a menu:
>Move the controller toward the currently
active menu.
>Move the controller twice in one direction.
Selecting menu
From the start menu, eight menus can be
accessed by moving the controller in the appro-
priate directions.
In a menu, you can change directly into a
new menu by moving in the correspond-
ing direction, without having to open the start
menu first.
Moving in the direction that corresponds to the
last menu used brings you back to the last item
used in this menu.<
Page 21 of 254
At a glance
19Reference
Controls
Driving tips
Communications
Navigation
Entertainment
Mobility
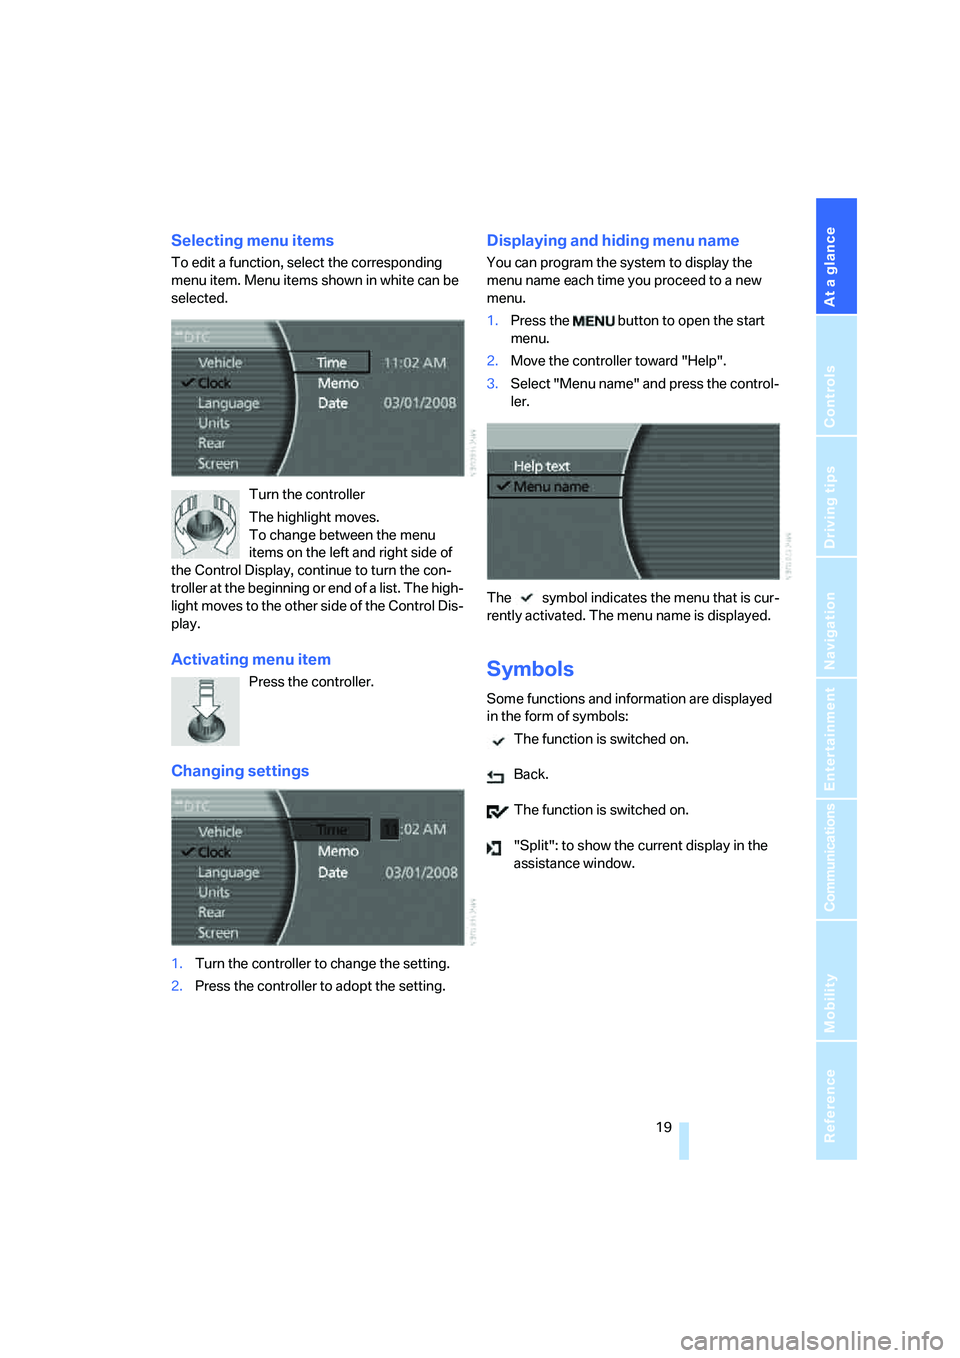
Selecting menu items
To edit a function, select the corresponding
menu item. Menu items shown in white can be
selected.
Turn the controller
The highlight moves.
To change between the menu
items on the left and right side of
the Control Display, continue to turn the con-
troller at the beginning or end of a list. The high-
light moves to the other side of the Control Dis-
play.
Activating menu item
Press the controller.
Changing settings
1.Turn the controller to change the setting.
2.Press the controller to adopt the setting.
Displaying and hiding menu name
You can program the system to display the
menu name each time you proceed to a new
menu.
1.Press the button to open the start
menu.
2.Move the controller toward "Help".
3.Select "Menu name" and press the control-
ler.
The symbol indicates the menu that is cur-
rently activated. The menu name is displayed.
Symbols
Some functions and information are displayed
in the form of symbols:
The function is switched on.
Back.
The function is switched on.
"Split": to show the current display in the
assistance window.
Page 25 of 254
At a glance
23Reference
Controls
Driving tips
Communications
Navigation
Entertainment
Mobility
Voice command system
The concept
The voice command system allows you to con-
trol operation of various vehicle systems with-
out ever removing your hands from the steering
wheel. The system operates on the basis of
voice commands that you will learn easily after
using them a few times. In many cases, the
voice command system assists you with
announcements or questions while you are
making your entries.
The voice command system transforms your
oral commands and dialog answers into control
signals for the selected systems.
Please take the time to acquaint yourself
with how a particular system operates
before proceeding to control it using the voice
command system.<
Note
Use iDrive to set the language that will be used
so that the voice command system will be able
to identify the commands spoken. Setting the
language of iDrive, refer to page84.
Symbols used
{...} Verbal instructions to use with the voice
command system.
{{...}} Identifies the answers generated by the
voice command system.
Systems available for use with voice
command
>{Navigation}, refer to page130
>{Radio}, refer to page156
>{Telephone}, refer to page184
>{CD}, refer to page163
>{CD changer}, refer to page165
>{Notepad}, refer to page25
>{DVD}, refer to page170The Info Display, refer to page24, will display
either the equipment that you are now operat-
ing or any current error messages.
Voice commands
Voice command system activation
Briefly press the button on the steering
wheel.
An acoustic signal and the display "SVS active"
on the Info Display, refer to page24, indicate
that the system is ready for operation. The sys-
tem automatically starts in the main menu.
From here, you can call up all the equipment
that can be operated.
Canceling voice command
Briefly press the button on the steering
wheel
or
In dialogs in which any text can be spoken, e.g.
names, notes, canceling is only possible using
the button.
The system automatically switches over
to its telephone mode if you receive a call
during voice input. "SVS active" appears on the
Info Display, refer to page24.<
Voice commands
The voice command system operates on the
basis of specific, predefined commands; these
commands should be spoken precisely as indi-
cated. You can have the possible commands
read aloud at any point. To do so, say the com-
mand {Options}.
In addition to the commands described, there
are often other commands that run the same
function. Instead of {Options}, you can, for
example, also say {What now}. In addition,
*
These sections contain information on
using the voice command system.
{Cancel}.
Page 39 of 254
Controls
37Reference
At a glance
Driving tips
Communications
Navigation
Entertainment
Mobility
Manual operation
In the case of an electrical malfunction, you can
unlock the luggage compartment lid with the
key, refer to page35, and slowly open and close
it without sudden movements.
Emergency release
Pull the lever inside the luggage compartment.
This unlocks the luggage compartment lid.
Alarm system
The concept
The vehicle alarm system responds to:
>opening of a door, the hood or the luggage
compartment lid
>movement in the vehicle interior: interior
motion sensor, refer to page38
>changes in the vehicle's tilt if someone
attempts to steal the wheels or tow the
vehicle
>interruptions in battery voltage
The alarm system briefly indicates unautho-
rized tampering:
>with an acoustic alarm
>by switching on
the hazard warning flashers
>by flashing the high beams
Arming and disarming alarm system
When you lock or unlock the vehicle, either with
the remote control or at the door lock, the alarm
system is armed or disarmed at the same time.
When the alarm system is armed, you can also
open the luggage compartment lid with the button on the remote control, refer to
page33. When the luggage compartment lid is
closed, it is relocked and monitored again.
Unlocking via the door lock will trigger the
alarm on some national-market versions.
Pressing the 'Panic mode' button for a longer
period also triggers the alarm, refer to
page33.<
Switching off alarm
>Unlock the vehicle using the remote control,
refer to page32.
>Insert the remote control into the ignition
lock.
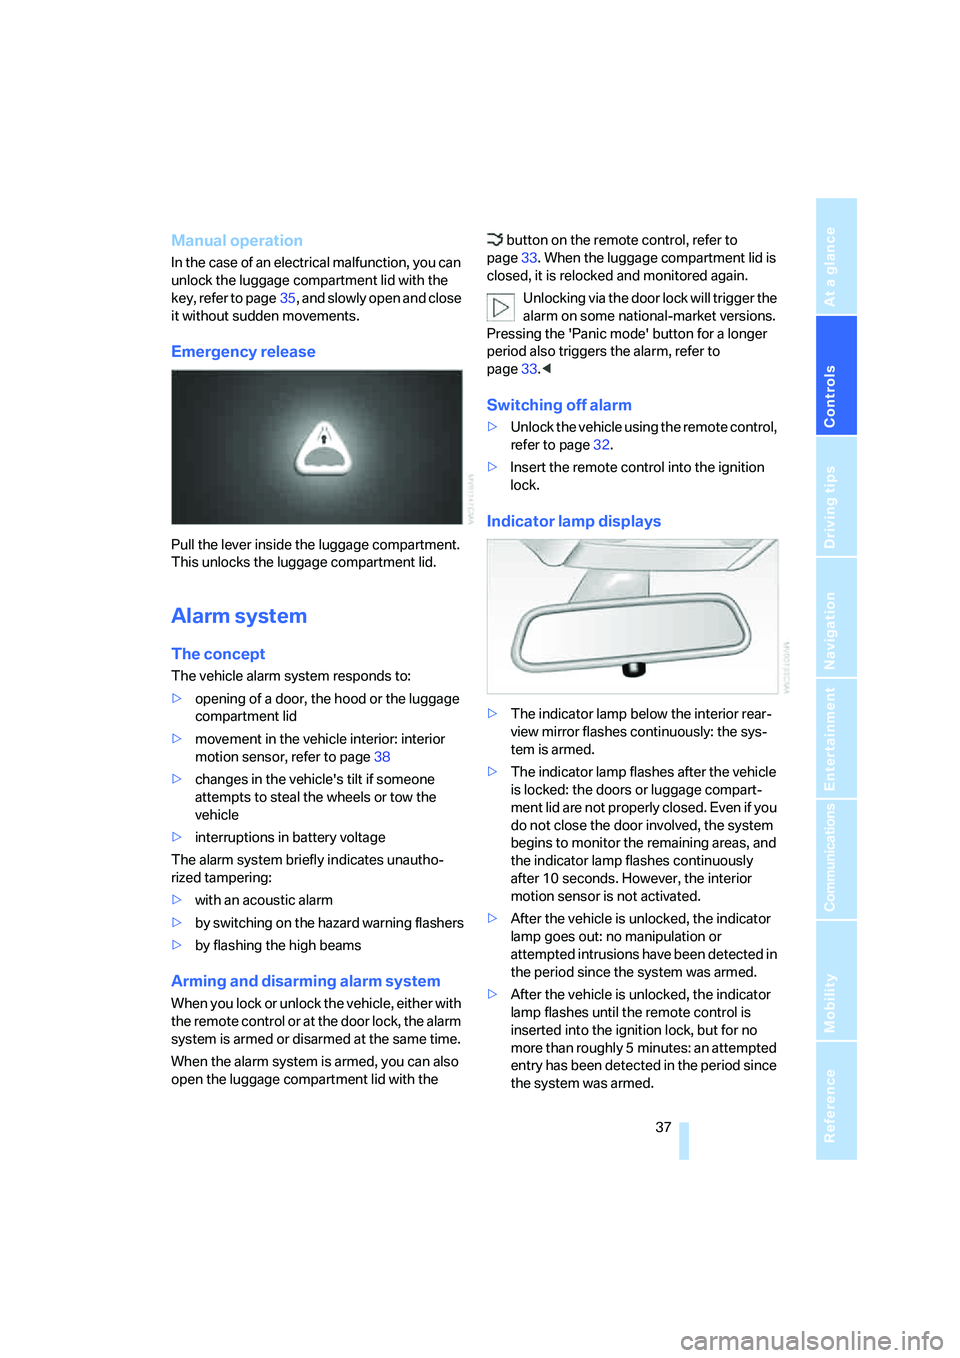
Indicator lamp displays
>The indicator lamp below the interior rear-
view mirror flashes continuously: the sys-
tem is armed.
>The indicator lamp flashes after the vehicle
is locked: the doors or luggage compart-
ment lid are not properly closed. Even if you
do not close the door involved, the system
begins to monitor the remaining areas, and
the indicator lamp flashes continuously
after 10 seconds. However, the interior
motion sensor is not activated.
>After the vehicle is unlocked, the indicator
lamp goes out: no manipulation or
attempted intrusions have been detected in
the period since the system was armed.
>After the vehicle is unlocked, the indicator
lamp flashes until the remote control is
inserted into the ignition lock, but for no
more than roughly 5 minutes: an attempted
entry has been detected in the period since
the system was armed.
Page 62 of 254
Driving
60 engage the parking brake the moment the vehi-
cle comes to a stop.<
Parking
The parking brake engages automatically when
you stop the vehicle and switch off the engine.
The indicator lamp changes from green to
red.
You can also release the parking brake
manually after the engine is switched off,
as long as the remote control is in the ignition
lock, refer to page59. You can use this function,
for example, in a car wash.
Automatic Hold is deactivated.<
When leaving the vehicle, release the
remote control from the detent in the igni-
tion lock; this precaution prevents children from
disengaging the parking brake etc.<
For your safety
Automatic Hold is automatically deactivated
when:
>the engine is switched off
>the system detects that the driver's seat is
not occupied while the engine is running
>the hood is opened while the engine is run-
ning
>the luggage compartment is opened while
the engine is running and the transmission
is in reverse
>and when the parking brake is used to brake
the vehicle to a stop during driving
The indicator lamp changes from green to
red, and the indication AUTO P on the Info Dis-
play disappears.
Before starting off again, briefly press the but-
ton to disengage the parking brake manually,
refer to page59, or reactivate Automatic Hold,
refer to page59.
Before leaving the vehicle with the engine
running, always move the automatic
transmission's selector lever to position P and
make sure that the parking brake is engaged.
The vehicle could start to roll if you fail to take
these precautions.
tendency for the wheels to spin in response to
slippery road surfaces.
Pay attention to the messages on the Info Dis-
play. For additional information, refer to Check
Control on page80.<
Releasing parking brake manually
In the event of an electrical power loss or elec-
trical malfunction, you can release the parking
brake manually.
Before manually releasing the parking
brake and each time you park the vehicle
without engaging the parking brake, make sure
that the automatic transmission is in position P,
refer to page62. Be sure to pay attention to the
information on the Info Display.
If circumstances should force you to park on a
steeply inclined road surface, it is essential to
take additional precautions against inadvertent
rolling, e.g. by using the chock, refer to
page216. Otherwise, there is the danger of the
vehicle rolling, depending on the incline.<
If it becomes necessary to also unlock the
transmission lock of the automatic transmis-
sion, follow this sequence:
1.If necessary, start by releasing the parking
brake manually.
2.Then release the automatic transmission's
transmission lock manually, refer to
page64.
Jump starting and tow starting information,
refer to section starting on page220.
Page 69 of 254

Controls
67Reference
At a glance
Driving tips
Communications
Navigation
Entertainment
Mobility
All of the washer jets are supplied from a single
tank.
Fill with water and – if required – with a washer
antifreeze, according to manufacturer's recom-
mendations.
In order to maintain the mixture ratio, mix
the washer fluid before filling.<
Capacity
Approx. 6.3 US quarts/6 liters.
Programmable cruise control
The concept
The programmable cruise control is available
for use at speeds of approx. 20 mph/30 km/h
and higher. The vehicle maintains and stores
the speed that you set using the lever mounted
on the steering column.
You can also use the multilevel preset mode to
store six desired speeds for later selection with
the lever, refer to page67.
This feature assists you in quickly adapting the
vehicle speed to specific road conditions, e.g.
changes in speeds limits.
Do not use the programmable cruise con-
trol when unfavorable conditions do not
permit you to drive at a constant speed, e.g.
when driving on winding roads, in heavy traffic
or under poor road conditions such as snow,
rain, ice, or a loose road surface. If you do, you
could lose control of the vehicle and cause an
accident.<
One lever for all functions
1Maintaining speed, storing, and accelerat-
ing
2Maintaining speed, storing, and decelerat-
ing
3Interrupt or deactivate cruise control
4Resuming stored speed
Maintaining speed, storing, and
accelerating
Press lever to resistance point, arrow 1:
The system maintains and stores the current
vehicle speed. The pointer5 in the speedome-
ter indicates this speed, refer to Displays in
speedometer on page68. Each time the lever is
pressed again briefly, the speed is increased by
approx. 1 mph or 1 km/h.
Push the lever to the resistance point for a
longer time:
The vehicle accelerates without pressure on
the accelerator pedal. The system maintains
and stores your current speed as soon as you
release the lever.
Press the lever past the resistance point if no
desired speeds6 are stored:
The pointer5 jumps to the next multiple of
5 mph or 10 km/h and then further, as long as
the lever is held. The speed then indicated is
reached and stored.
The vehicle may accelerate beyond the preset
speed on steep downhill stretches where the
engine's braking action alone may not be suffi-
cient to slow the vehicle. Speed can drop on
uphill grades if the engine output is insufficient.
Page 77 of 254
Controls
75Reference
At a glance
Driving tips
Communications
Navigation
Entertainment
Mobility
Everything under control
Odometer, outside temperature display, clock
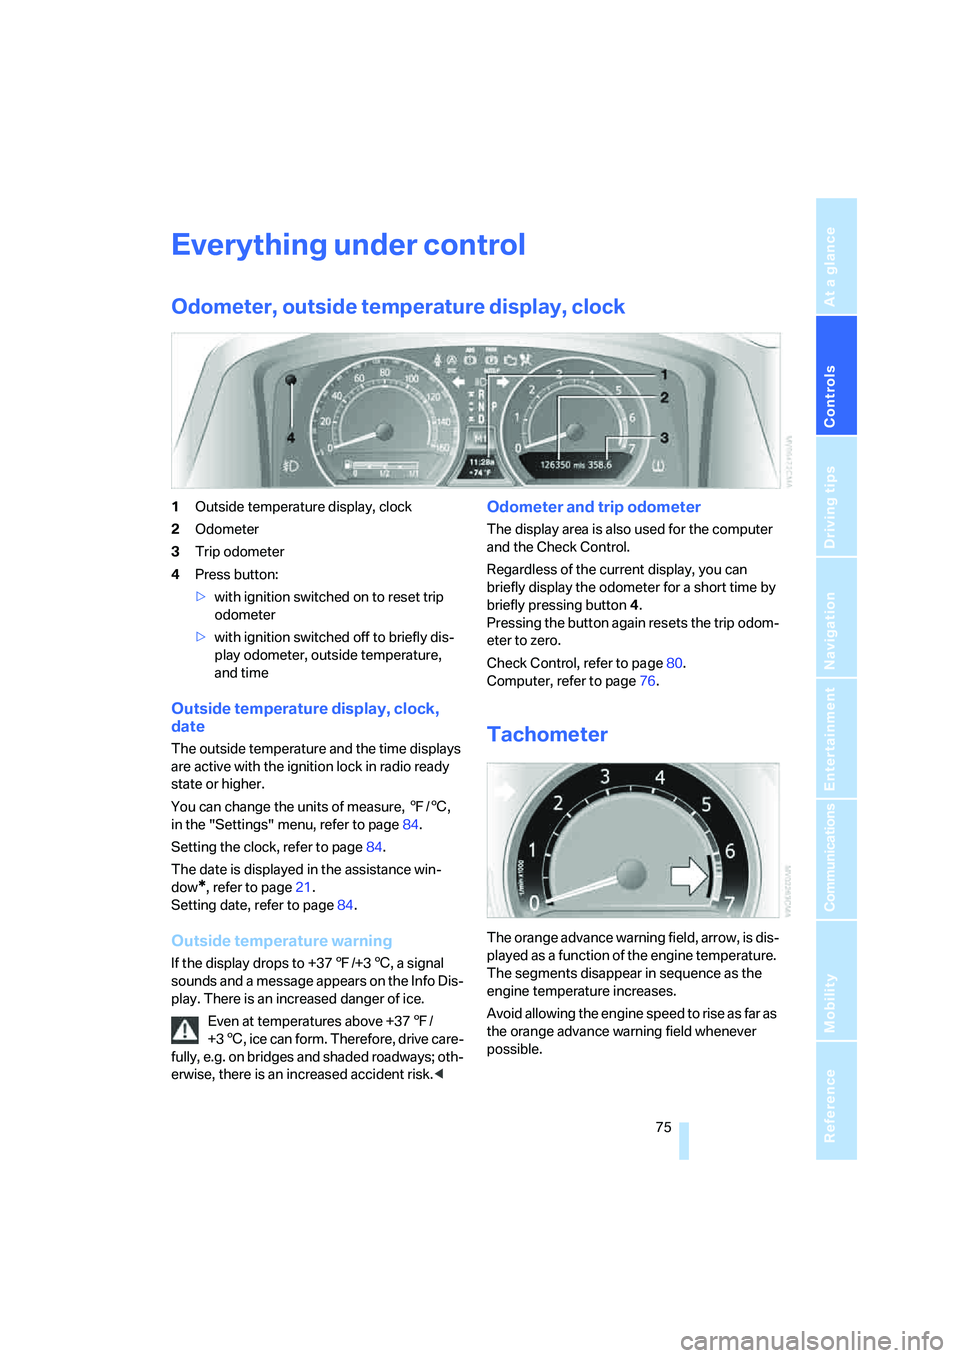
1Outside temperature display, clock
2Odometer
3Trip odometer
4Press button:
>with ignition switched on to reset trip
odometer
>with ignition switched off to briefly dis-
play odometer, outside temperature,
and time
Outside temperature display, clock,
date
The outside temperature and the time displays
are active with the ignition lock in radio ready
state or higher.
You can change the units of measure, 7/6,
in the "Settings" menu, refer to page84.
Setting the clock, refer to page84.
The date is displayed in the assistance win-
dow
*, refer to page21.
Setting date, refer to page84.
Outside temperature warning
If the display drops to +377/+36, a signal
sounds and a message appears on the Info Dis-
play. There is an increased danger of ice.
Even at temperatures above +377/
+36, ice can form. Therefore, drive care-
fully, e.g. on bridges and shaded roadways; oth-
erwise, there is an increased accident risk.<
Odometer and trip odometer
The display area is also used for the computer
and the Check Control.
Regardless of the current display, you can
briefly display the odometer for a short time by
briefly pressing button4.
Pressing the button again resets the trip odom-
eter to zero.
Check Control, refer to page80.
Computer, refer to page76.
Tachometer
The orange advance warning field, arrow, is dis-
played as a function of the engine temperature.
The segments disappear in sequence as the
engine temperature increases.
Avoid allowing the engine speed to rise as far as
the orange advance warning field whenever
possible.
Page 81 of 254

Controls
79Reference
At a glance
Driving tips
Communications
Navigation
Entertainment
Mobility
deadline, refer to Automatic service notification
on page190.
Additional information
You can view additional information on service
and maintenance procedures on the Control
Display.
iDrive, for principle details, refer to page16.
1.Press the button to open the start
menu.
2.Move the controller toward "Car Data".
3.Select and press the controller.
The display shows a list of selected service and
maintenance procedures, as well as legally-
mandated inspections.
Symbols
No service is currently required.
The deadline for service or a legally-man-
dated inspection is approaching. Please
arrange for a service appointment at the earliest
available opportunity.
The service deadline has already passed.
You can view more detailed information about
every entry:
Select the entry and press the controller.To exit the menu:
The arrow is selected. Press the controller.
Condition Based Service does not con-
tinue counting down to the next service
during periods when the vehicle is stored with
the battery disconnected or the battery switch
in the OFF position.
It is therefore important, independent of the dis-
play, to change the brake fluid at least every
2years.
The same is true for other time-dependent
maintenance procedures.<
Deadlines for scheduled legally
mandated inspections, displaying and
entering
Make sure the date and time are always set cor-
rectly, refer to page84; otherwise, CBS Condi-
tion Based Service cannot function correctly.
iDrive, for principle details, refer to page16.
1.Press the button to open the start
menu.
2.Move the controller toward "Car Data".
3.Select and press the controller.
4.Select "State inspection" and press the
controller.
Page 86 of 254
Everything under control
84
Settings on Control Display
Setting units of measure and display
format
You can change the units of measure used in
the displays of fuel consumption, distances and
temperatures as well as the display format for
the time and date.
iDrive, for principle details, refer to page16.
1.Press the button to open the start
menu.
2.Move the controller toward "Settings".
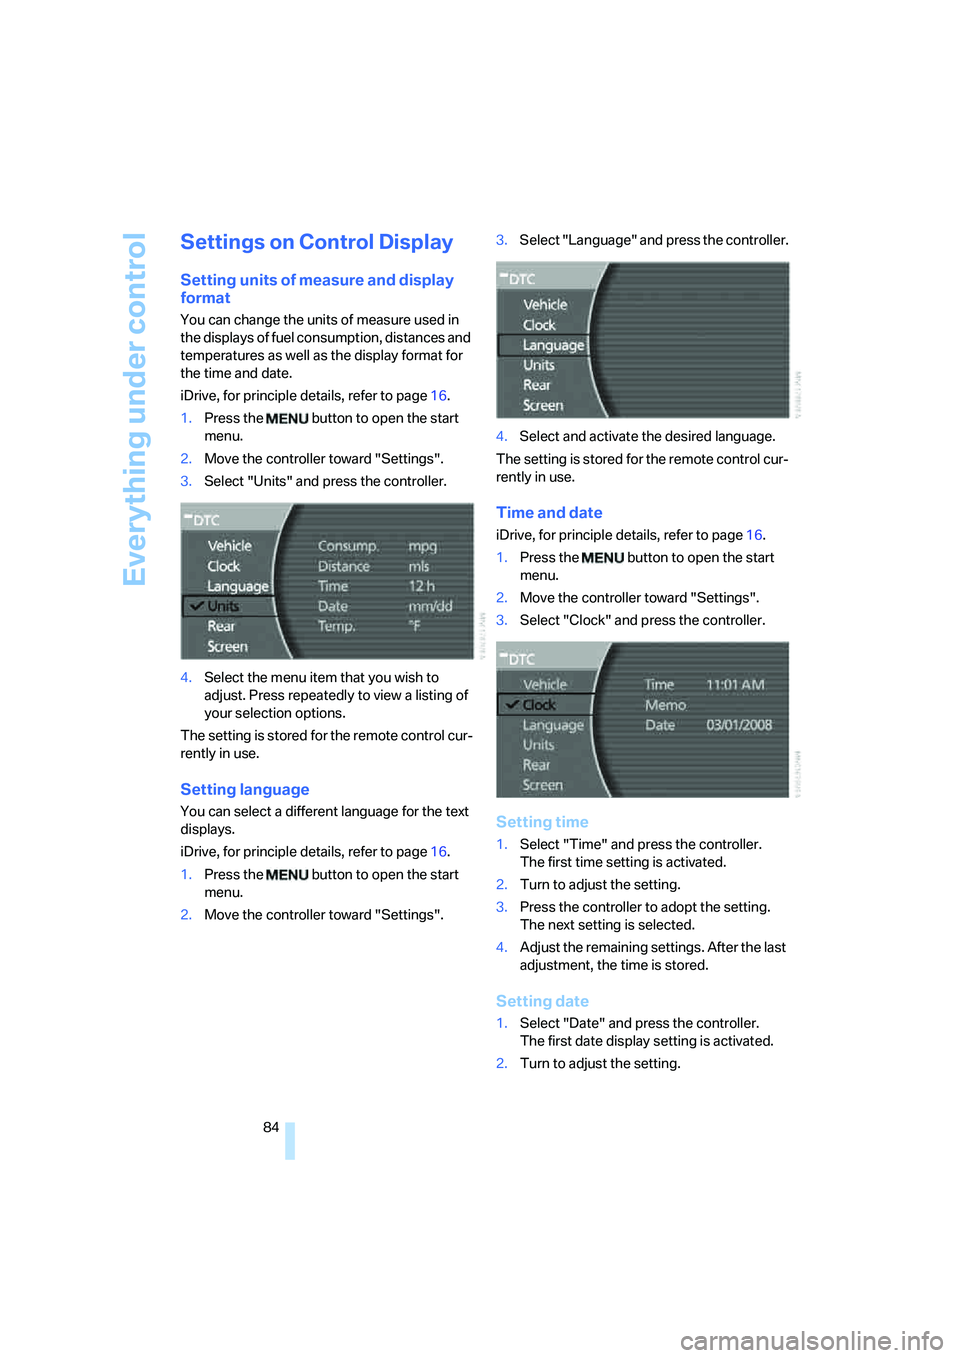
3.Select "Units" and press the controller.
4.Select the menu item that you wish to
adjust. Press repeatedly to view a listing of
your selection options.
The setting is stored for the remote control cur-
rently in use.
Setting language
You can select a different language for the text
displays.
iDrive, for principle details, refer to page16.
1.Press the button to open the start
menu.
2.Move the controller toward "Settings".3.Select "Language" and press the controller.
4.Select and activate the desired language.
The setting is stored for the remote control cur-
rently in use.
Time and date
iDrive, for principle details, refer to page16.
1.Press the button to open the start
menu.
2.Move the controller toward "Settings".
3.Select "Clock" and press the controller.
Setting time
1.Select "Time" and press the controller.
The first time setting is activated.
2.Turn to adjust the setting.
3.Press the controller to adopt the setting.
The next setting is selected.
4.Adjust the remaining settings. After the last
adjustment, the time is stored.
Setting date
1.Select "Date" and press the controller.
The first date display setting is activated.
2.Turn to adjust the setting.
Page 89 of 254
Controls
87Reference
At a glance
Driving tips
Communications
Navigation
Entertainment
Mobility
1.Press the button to open the start
menu.
2.Move the controller toward "Settings".
3.Select "Vehicle" and press the controller.
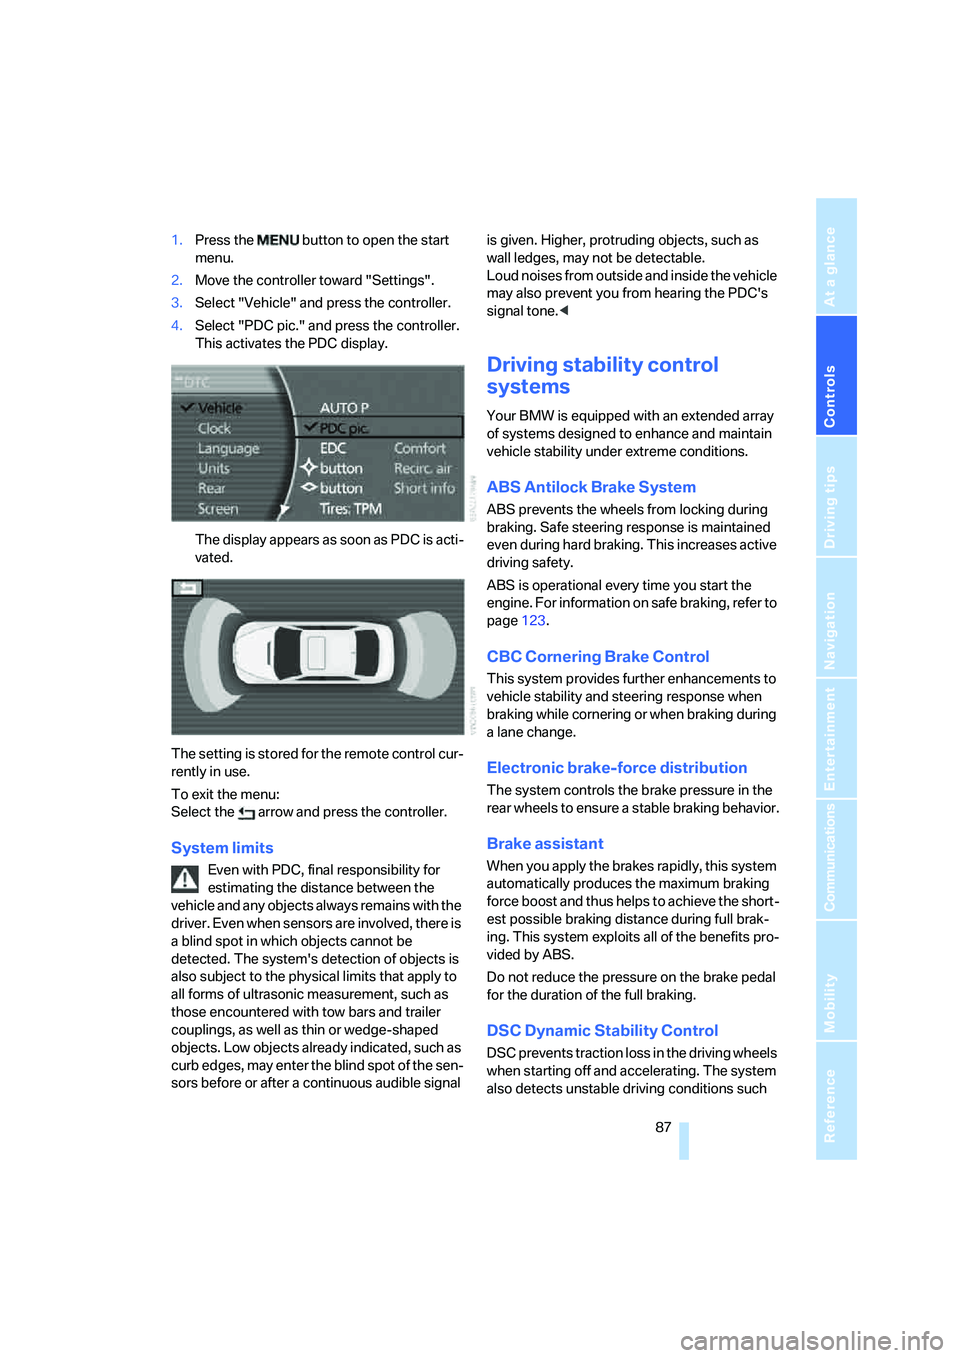
4.Select "PDC pic." and press the controller.
This activates the PDC display.
The display appears as soon as PDC is acti-
vated.
The setting is stored for the remote control cur-
rently in use.
To exit the menu:
Select the arrow and press the controller.
System limits
Even with PDC, final responsibility for
estimating the distance between the
vehicle and any objects always remains with the
driver. Even when sensors are involved, there is
a blind spot in which objects cannot be
detected. The system's detection of objects is
also subject to the physical limits that apply to
all forms of ultrasonic measurement, such as
those encountered with tow bars and trailer
couplings, as well as thin or wedge-shaped
objects. Low objects already indicated, such as
curb edges, may enter the blind spot of the sen-
sors before or after a continuous audible signal is given. Higher, protruding objects, such as
wall ledges, may not be detectable.
Loud noises from outside and inside the vehicle
may also prevent you from hearing the PDC's
signal tone.<
Driving stability control
systems
Your BMW is equipped with an extended array
of systems designed to enhance and maintain
vehicle stability under extreme conditions.
ABS Antilock Brake System
ABS prevents the wheels from locking during
braking. Safe steering response is maintained
even during hard braking. This increases active
driving safety.
ABS is operational every time you start the
engine. For information on safe braking, refer to
page123.
CBC Cornering Brake Control
This system provides further enhancements to
vehicle stability and steering response when
braking while cornering or when braking during
a lane change.
Electronic brake-force distribution
The system controls the brake pressure in the
rear wheels to ensure a stable braking behavior.
Brake assistant
When you apply the brakes rapidly, this system
automatically produces the maximum braking
force boost and thus helps to achieve the short-
est possible braking distance during full brak-
ing. This system exploits all of the benefits pro-
vided by ABS.
Do not reduce the pressure on the brake pedal
for the duration of the full braking.
DSC Dynamic Stability Control
DSC prevents traction loss in the driving wheels
when starting off and accelerating. The system
also detects unstable driving conditions such