climate control BMW 750LI XDRIVE 2013 User Guide
[x] Cancel search | Manufacturer: BMW, Model Year: 2013, Model line: 750LI XDRIVE, Model: BMW 750LI XDRIVE 2013Pages: 243, PDF Size: 5.37 MB
Page 157 of 243
is shown on the display of the automatic cli‐
mate control.
The interior temperature, air volume and air dis‐
tribution can be adjusted with the ignition
switched on.
Switching off
At the lowest fan speed, press the left side of the
button on the driver's side.
on the display of the automatic climate control
goes out.
Switching the system on/off
Switching off
▷Complete system: Press and hold the left button on
the driver's side until the control
clicks off.▷On the front passenger side:
Press and hold the left button on
the front passenger side.
Switching on
Press any button except:
▷ALL program.▷Rear window defroster.▷Left side of Air volume button.▷Seat heating.▷Seat ventilation.
Microfilter/activated-charcoal filter
The microfilter removes dust and pollen from
the incoming air.
The activated-charcoal filter removes gaseous
pollutants from the outside air that enters the
vehicle.
This combined filter should be replaced during
scheduled maintenance, refer to page 208, of
your vehicle.
Ventilation
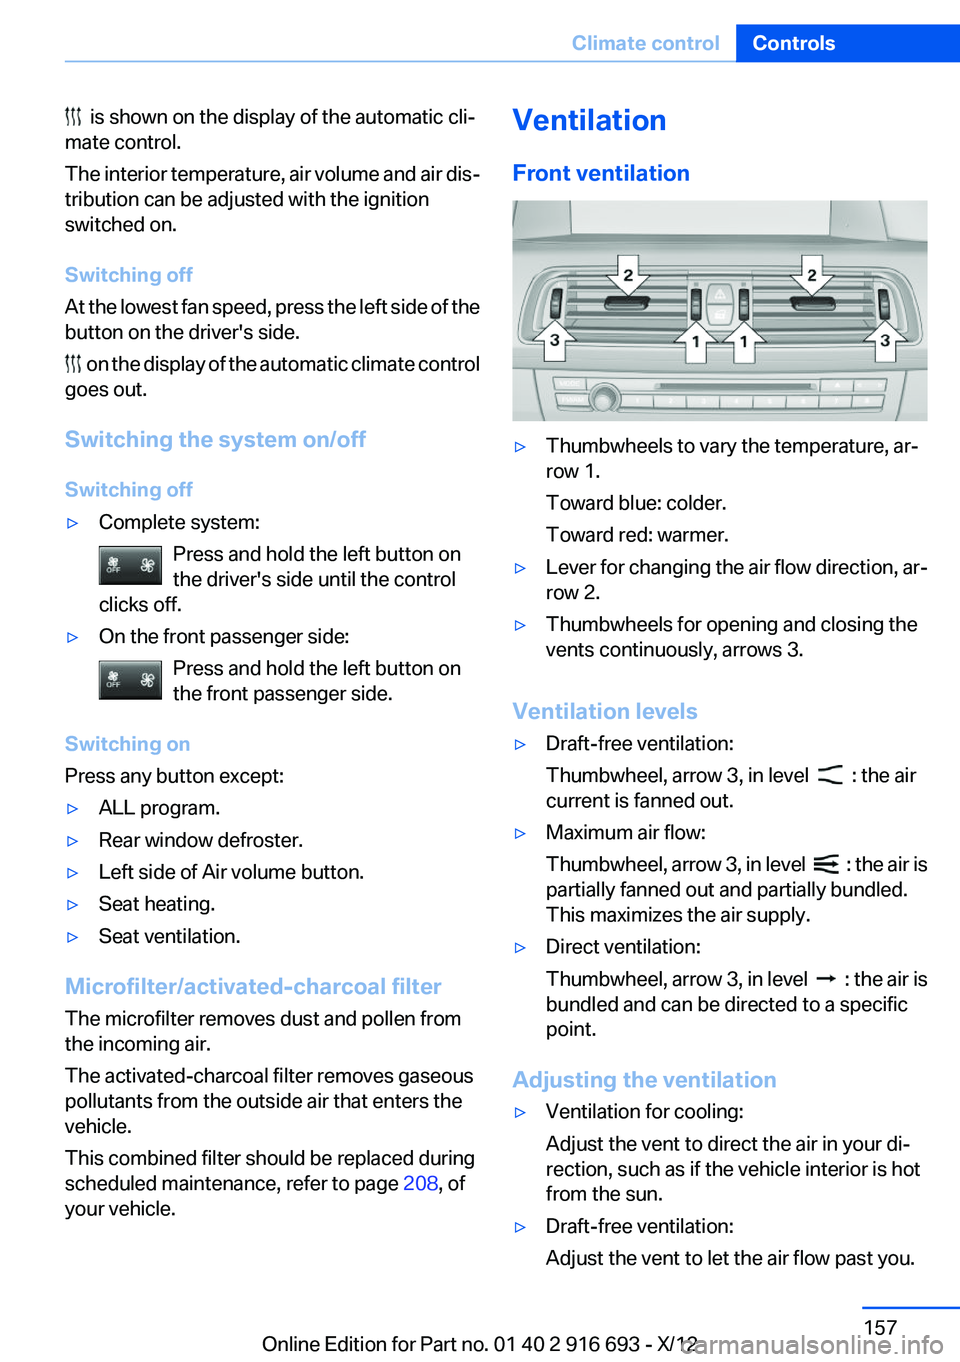
Front ventilation▷Thumbwheels to vary the temperature, ar‐
row 1.
Toward blue: colder.
Toward red: warmer.▷Lever for changing the air flow direction, ar‐
row 2.▷Thumbwheels for opening and closing the
vents continuously, arrows 3.
Ventilation levels
▷Draft-free ventilation:
Thumbwheel, arrow 3, in level
: the air
current is fanned out.
▷Maximum air flow:
Thumbwheel, arrow 3, in level
: the air is
partially fanned out and partially bundled.
This maximizes the air supply.
▷Direct ventilation:
Thumbwheel, arrow 3, in level
: the air is
bundled and can be directed to a specific
point.
Adjusting the ventilation
▷Ventilation for cooling:
Adjust the vent to direct the air in your di‐
rection, such as if the vehicle interior is hot
from the sun.▷Draft-free ventilation:
Adjust the vent to let the air flow past you.Seite 157Climate controlControls157
Online Edition for Part no. 01 40 2 916 693 - X/12
Page 158 of 243
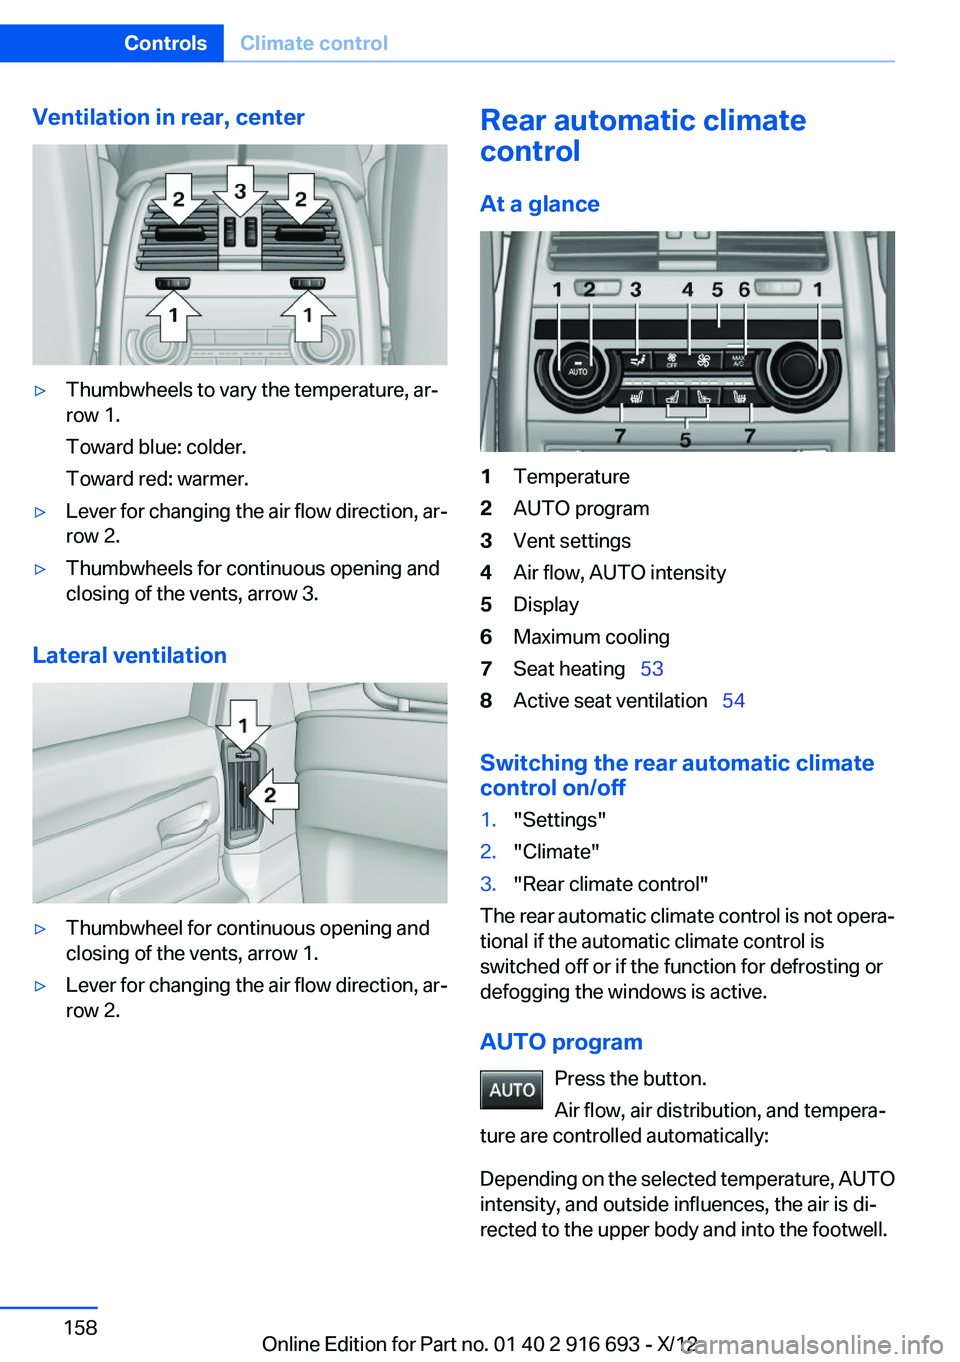
Ventilation in rear, center▷Thumbwheels to vary the temperature, ar‐
row 1.
Toward blue: colder.
Toward red: warmer.▷Lever for changing the air flow direction, ar‐
row 2.▷Thumbwheels for continuous opening and
closing of the vents, arrow 3.
Lateral ventilation
▷Thumbwheel for continuous opening and
closing of the vents, arrow 1.▷Lever for changing the air flow direction, ar‐
row 2.Rear automatic climate
control
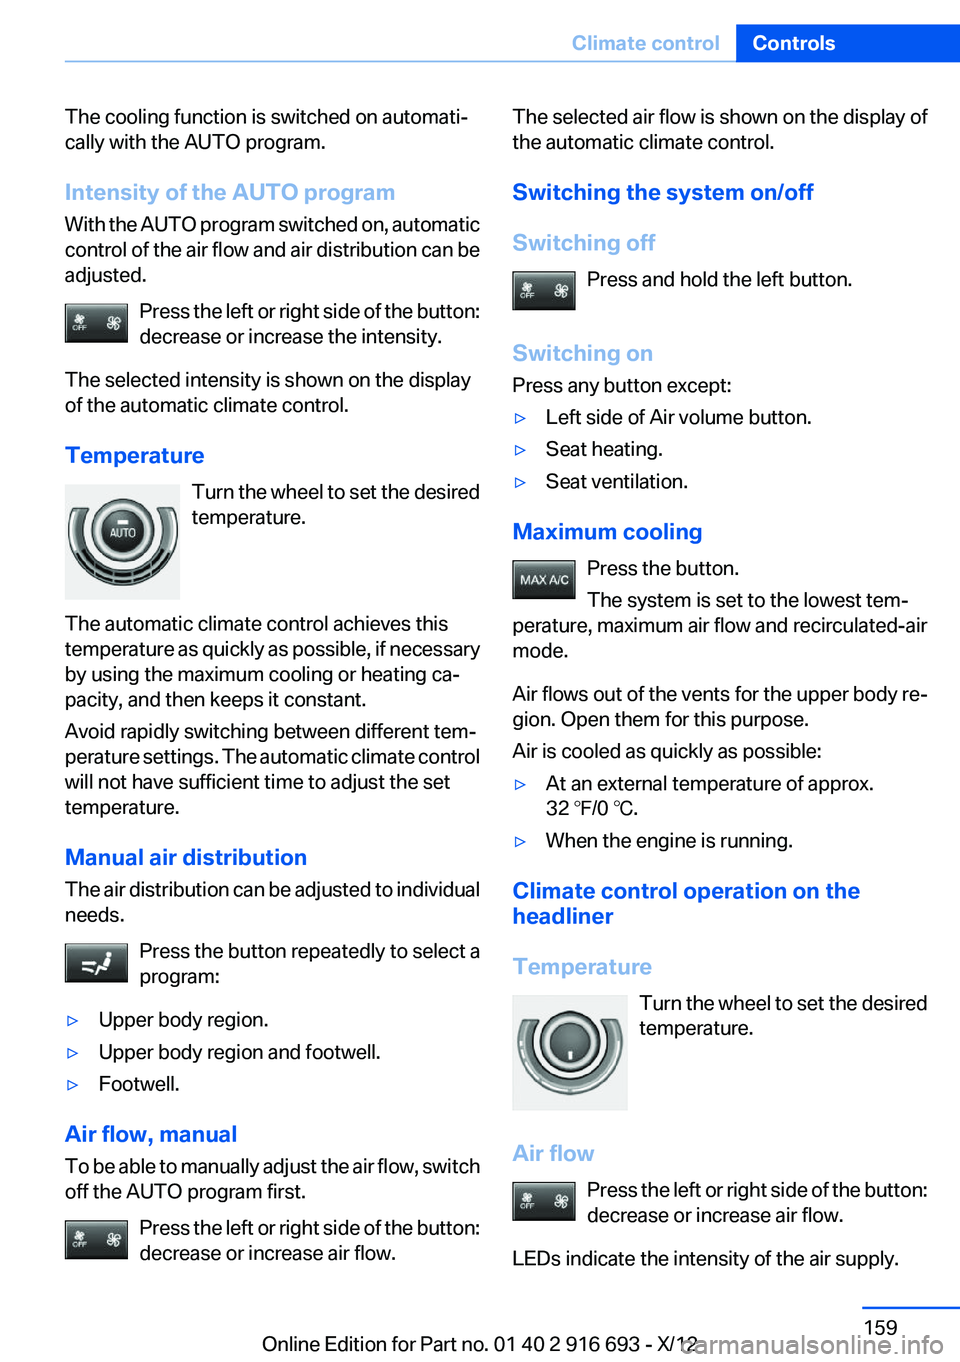
At a glance1Temperature2AUTO program3Vent settings4Air flow, AUTO intensity5Display6Maximum cooling7Seat heating 538Active seat ventilation 54
Switching the rear automatic climate
control on/off
1."Settings"2."Climate"3."Rear climate control"
The rear automatic climate control is not opera‐
tional if the automatic climate control is
switched off or if the function for defrosting or
defogging the windows is active.
AUTO program Press the button.
Air flow, air distribution, and tempera‐
ture are controlled automatically:
Depending on the selected temperature, AUTO
intensity, and outside influences, the air is di‐
rected to the upper body and into the footwell.
Seite 158ControlsClimate control158
Online Edition for Part no. 01 40 2 916 693 - X/12
Page 159 of 243
The cooling function is switched on automati‐
cally with the AUTO program.
Intensity of the AUTO program
With the AUTO program switched on, automatic
control of the air flow and air distribution can be
adjusted.
Press the left or right side of the button:
decrease or increase the intensity.
The selected intensity is shown on the display
of the automatic climate control.
Temperature Turn the wheel to set the desired
temperature.
The automatic climate control achieves this
temperature as quickly as possible, if necessary
by using the maximum cooling or heating ca‐
pacity, and then keeps it constant.
Avoid rapidly switching between different tem‐
perature settings. The automatic climate control
will not have sufficient time to adjust the set
temperature.
Manual air distribution
The air distribution can be adjusted to individual
needs.
Press the button repeatedly to select a
program:▷Upper body region.▷Upper body region and footwell.▷Footwell.
Air flow, manual
To be able to manually adjust the air flow, switch
off the AUTO program first.
Press the left or right side of the button:
decrease or increase air flow.
The selected air flow is shown on the display of
the automatic climate control.
Switching the system on/off
Switching off Press and hold the left button.
Switching on
Press any button except:▷Left side of Air volume button.▷Seat heating.▷Seat ventilation.
Maximum cooling
Press the button.
The system is set to the lowest tem‐
perature, maximum air flow and recirculated-air
mode.
Air flows out of the vents for the upper body re‐
gion. Open them for this purpose.
Air is cooled as quickly as possible:
▷At an external temperature of approx.
32 ℉/0 ℃.▷When the engine is running.
Climate control operation on the
headliner
Temperature Turn the wheel to set the desired
temperature.
Air flow Press the left or right side of the button:
decrease or increase air flow.
LEDs indicate the intensity of the air supply.
Seite 159Climate controlControls159
Online Edition for Part no. 01 40 2 916 693 - X/12
Page 160 of 243
The air flow may be reduced automatically to
save battery power.
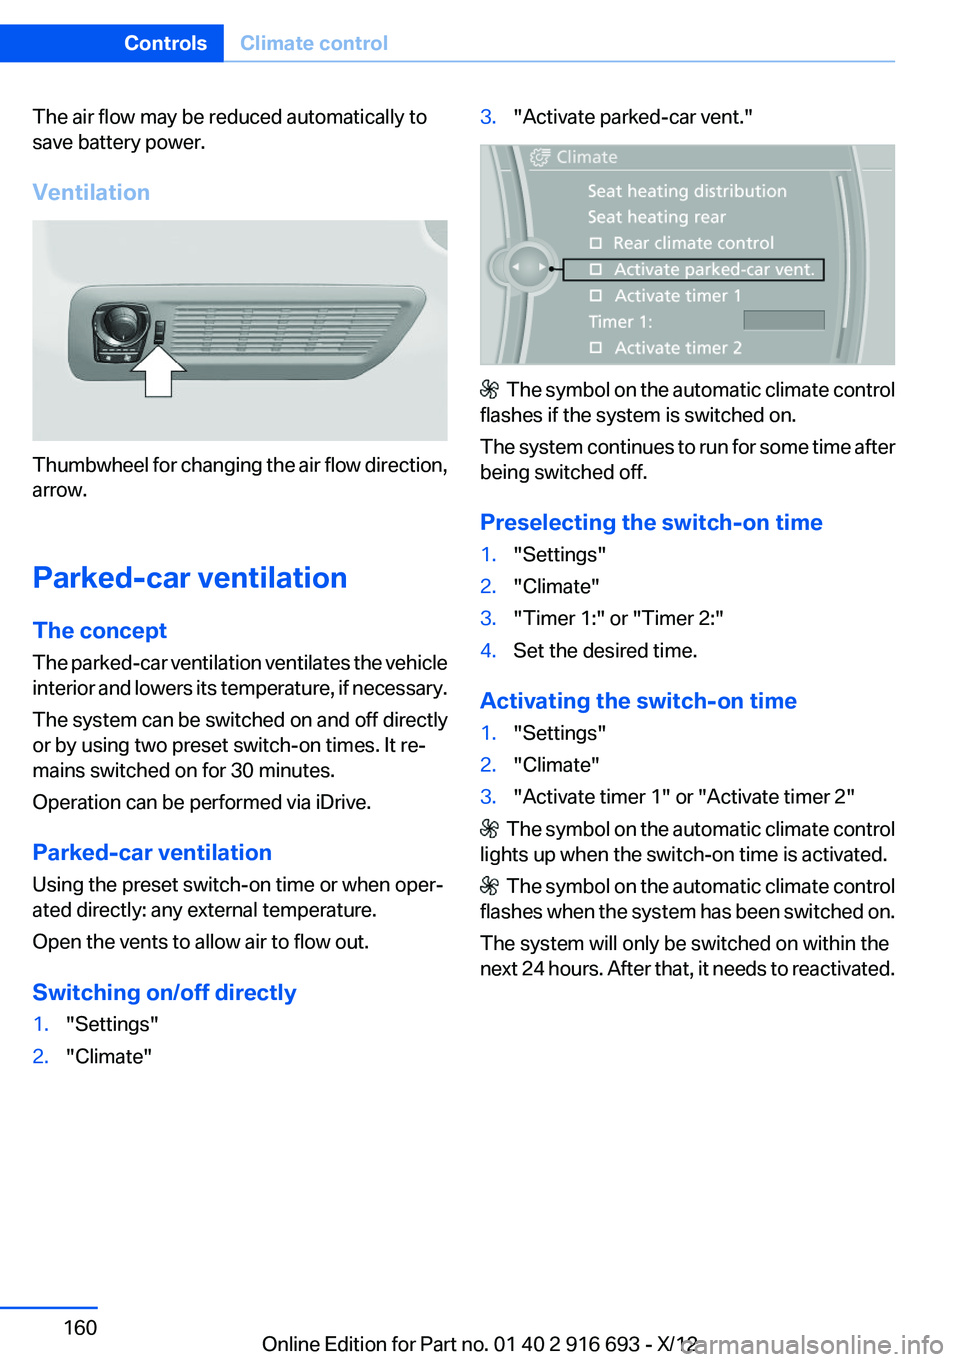
Ventilation
Thumbwheel for changing the air flow direction,
arrow.
Parked-car ventilation
The concept
The parked-car ventilation ventilates the vehicle
interior and lowers its temperature, if necessary.
The system can be switched on and off directly
or by using two preset switch-on times. It re‐
mains switched on for 30 minutes.
Operation can be performed via iDrive.
Parked-car ventilation
Using the preset switch-on time or when oper‐
ated directly: any external temperature.
Open the vents to allow air to flow out.
Switching on/off directly
1."Settings"2."Climate"3."Activate parked-car vent."
The symbol on the automatic climate control
flashes if the system is switched on.
The system continues to run for some time after
being switched off.
Preselecting the switch-on time
1."Settings"2."Climate"3."Timer 1:" or "Timer 2:"4.Set the desired time.
Activating the switch-on time
1."Settings"2."Climate"3."Activate timer 1" or "Activate timer 2"
The symbol on the automatic climate control
lights up when the switch-on time is activated.
The symbol on the automatic climate control
flashes when the system has been switched on.
The system will only be switched on within the
next 24 hours. After that, it needs to reactivated.
Seite 160ControlsClimate control160
Online Edition for Part no. 01 40 2 916 693 - X/12
Page 175 of 243
als such as hay, leaves, grass, etc. Such contact
could lead to a fire, and with it the risk of serious
personal injury as well as property damage.
Do not touch hot exhaust pipes; otherwise, there
is the danger of getting burned.◀
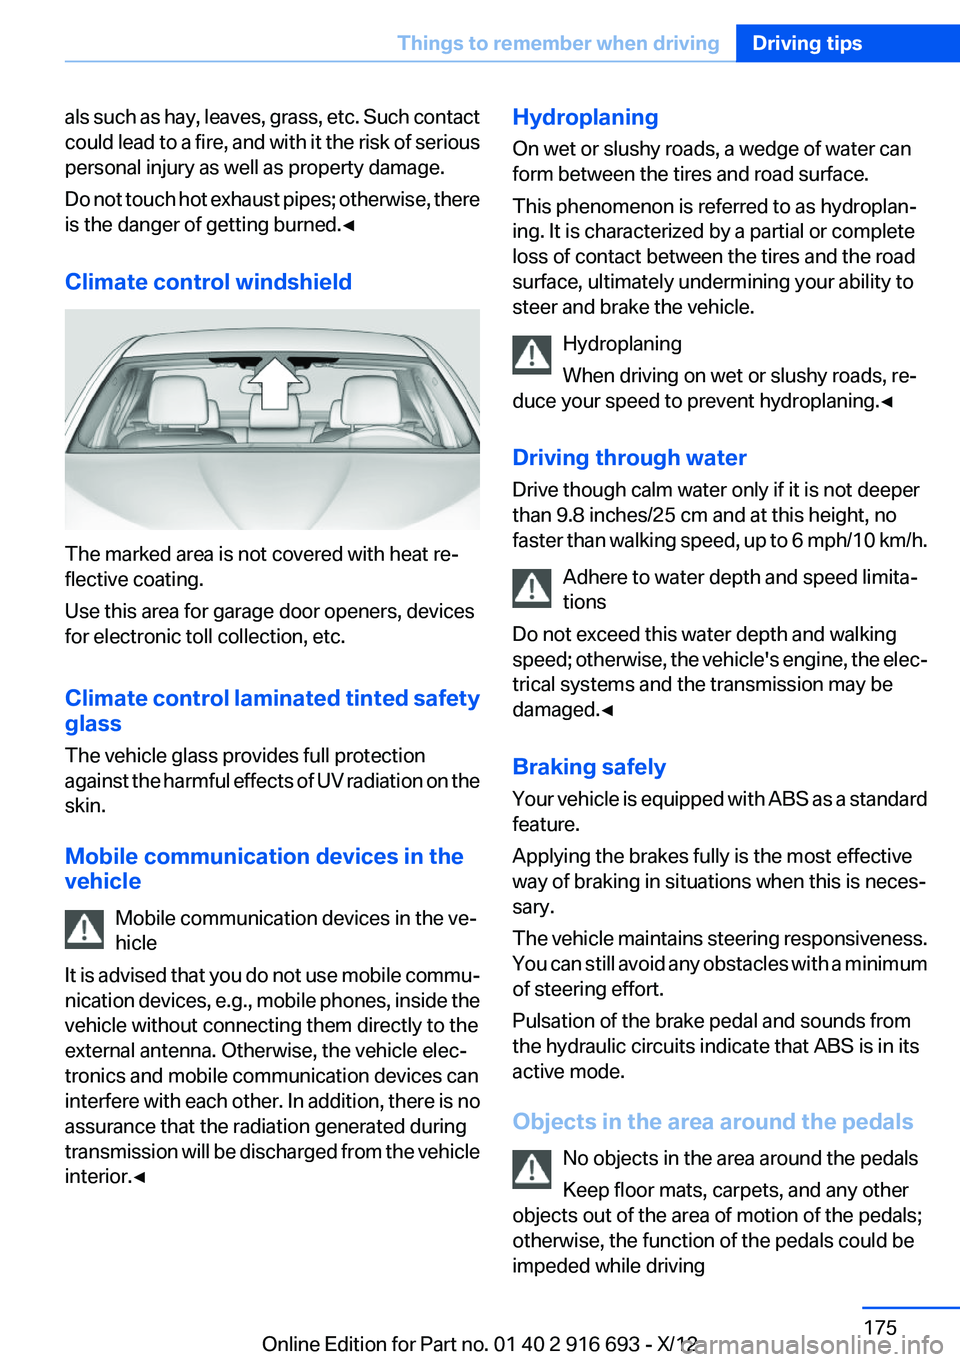
Climate control windshield
The marked area is not covered with heat re‐
flective coating.
Use this area for garage door openers, devices
for electronic toll collection, etc.
Climate control laminated tinted safety
glass
The vehicle glass provides full protection
against the harmful effects of UV radiation on the
skin.
Mobile communication devices in the
vehicle
Mobile communication devices in the ve‐
hicle
It is advised that you do not use mobile commu‐
nication devices, e.g., mobile phones, inside the
vehicle without connecting them directly to the
external antenna. Otherwise, the vehicle elec‐
tronics and mobile communication devices can
interfere with each other. In addition, there is no
assurance that the radiation generated during
transmission will be discharged from the vehicle
interior.◀
Hydroplaning
On wet or slushy roads, a wedge of water can
form between the tires and road surface.
This phenomenon is referred to as hydroplan‐
ing. It is characterized by a partial or complete
loss of contact between the tires and the road
surface, ultimately undermining your ability to
steer and brake the vehicle.
Hydroplaning
When driving on wet or slushy roads, re‐
duce your speed to prevent hydroplaning.◀
Driving through water
Drive though calm water only if it is not deeper
than 9.8 inches/25 cm and at this height, no
faster than walking speed, up to 6 mph/10 km/h.
Adhere to water depth and speed limita‐
tions
Do not exceed this water depth and walking
speed; otherwise, the vehicle's engine, the elec‐
trical systems and the transmission may be
damaged.◀
Braking safely
Your vehicle is equipped with ABS as a standard
feature.
Applying the brakes fully is the most effective
way of braking in situations when this is neces‐
sary.
The vehicle maintains steering responsiveness.
You can still avoid any obstacles with a minimum
of steering effort.
Pulsation of the brake pedal and sounds from
the hydraulic circuits indicate that ABS is in its
active mode.
Objects in the area around the pedals No objects in the area around the pedals
Keep floor mats, carpets, and any other
objects out of the area of motion of the pedals;
otherwise, the function of the pedals could be
impeded while drivingSeite 175Things to remember when drivingDriving tips175
Online Edition for Part no. 01 40 2 916 693 - X/12
Page 176 of 243
Do not place additional floor mats over existing
mats or other objects.
Only use floor mats that have been approved for
the vehicle and can be properly fixed in place.
Ensure that the floor mats are securely fastened
again after they were removed for cleaning, for
example.◀
Driving in wet conditions
When roads are wet or there is heavy rain, briefly
exert gentle pressure on the brake pedal every
few miles.
Ensure that this action does not endanger other
road users.
The heat generated in this process helps dry the
brake discs and pads.
In this way braking efficiency will be available
when you need it.
Hills
Drive long or steep downhill gradients in the gear
in which the least braking is required. Otherwise,
the brake system may overheat, resulting in a
reduction in the brake system efficiency.
You can increase the engine's braking effect by
shifting down, going all the way to first gear, if
necessary.
Avoid load on the brakes
Avoid placing excessive load on the brake
system. Light but consistent brake pressure can
lead to high temperatures, brake wear and pos‐
sibly even brake failure.◀
Do not drive in neutral
Do not drive in neutral or with the engine
stopped, as doing so disables engine braking. In
addition, steering and brake assist is unavailable
with the engine stopped.◀
Brake disc corrosion
Corrosion on the brake discs and contamination
on the brake pads are furthered by:▷Low mileage.▷Extended periods when the vehicle is not
used at all.▷Infrequent use of the brakes.
Corrosion occurs when the minimum pressure
that must be exerted by the pads during brake
applications to clean the discs is not reached.
Should corrosion form on the brake discs, the
brakes will tend to respond with a pulsating ef‐
fect that generally cannot be corrected.
Condensation under the parked vehicle
When using the automatic climate control, con‐
densation water develops that exits underneath
the vehicle.
Traces of water under the vehicle like this are
normal.
Seite 176Driving tipsThings to remember when driving176
Online Edition for Part no. 01 40 2 916 693 - X/12
Page 181 of 243
Use coasting conditions
When approaching a red light, take your foot off
the accelerator and let the vehicle coast to a halt.
On a downhill gradient, take your foot off the ac‐
celerator and let the vehicle roll.
The flow of fuel is interrupted while coasting.
Switch off the engine during
longer stops
Switch off the engine during longer stops, e.g.,
at traffic lights, railroad crossings or in traffic
congestion.
Auto Start/Stop function
The Auto Start/Stop function of your vehicle au‐
tomatically switches off the engine during a
stop.
If the engine is switched off and then restarted
rather than leaving the engine running con‐
stantly, fuel consumption and emissions are re‐
duced. Savings can begin within a few seconds
of switching off the engine.
Using this system can cause certain compo‐
nents of the vehicle to become worn prema‐
turely.
In addition, fuel consumption is also determined
by other factors, such as driving style, road con‐
ditions, maintenance or environmental factors.
Switch off any functions that
are not currently needed
Functions such as seat heating and the rear win‐
dow defroster require a lot of energy and con‐
sume additional fuel, especially in city and stop-
and-go traffic.
Therefore, switch off these functions if they are
not actually needed.Have maintenance carried out
Have vehicles maintained regularly to achieve
optimal vehicle economy and operating life.
Have the maintenance carried out by your serv‐
ice center.
Please also note the BMW Maintenance Sys‐
tem, refer to page 208.
ECO PRO
The concept
ECO PRO supports a driving style that saves on
fuel consumption. For this purpose, the engine
control and comfort functions, e. g. the climate
control output, are adjusted.
Under certain conditions the engine is automat‐
ically decoupled from the transmission when
transmission position D is engaged. The vehicle
continues traveling with the engine idling to re‐
duce fuel consumption. Transmission position
D remains engaged.
In addition, context-sensitive instructions can
be displayed that assist in driving in a manner
that optimizes fuel consumption.
The extension of the range that is achieved as a
result can be displayed in the instrument cluster.
At a glance
The system includes the following
EfficientDynamics functions and displays:▷ECO PRO bonus range, refer to page 182▷ECO PRO tips driving instruction, refer to
page 183▷ECO PRO climate control, refer to
page 182▷ECO PRO coasting driving status, refer to
page 184
Activating ECO PRO
Press button repeatedly until ECO PRO
is displayed in the instrument cluster.
Seite 181Saving fuelDriving tips181
Online Edition for Part no. 01 40 2 916 693 - X/12
Page 182 of 243
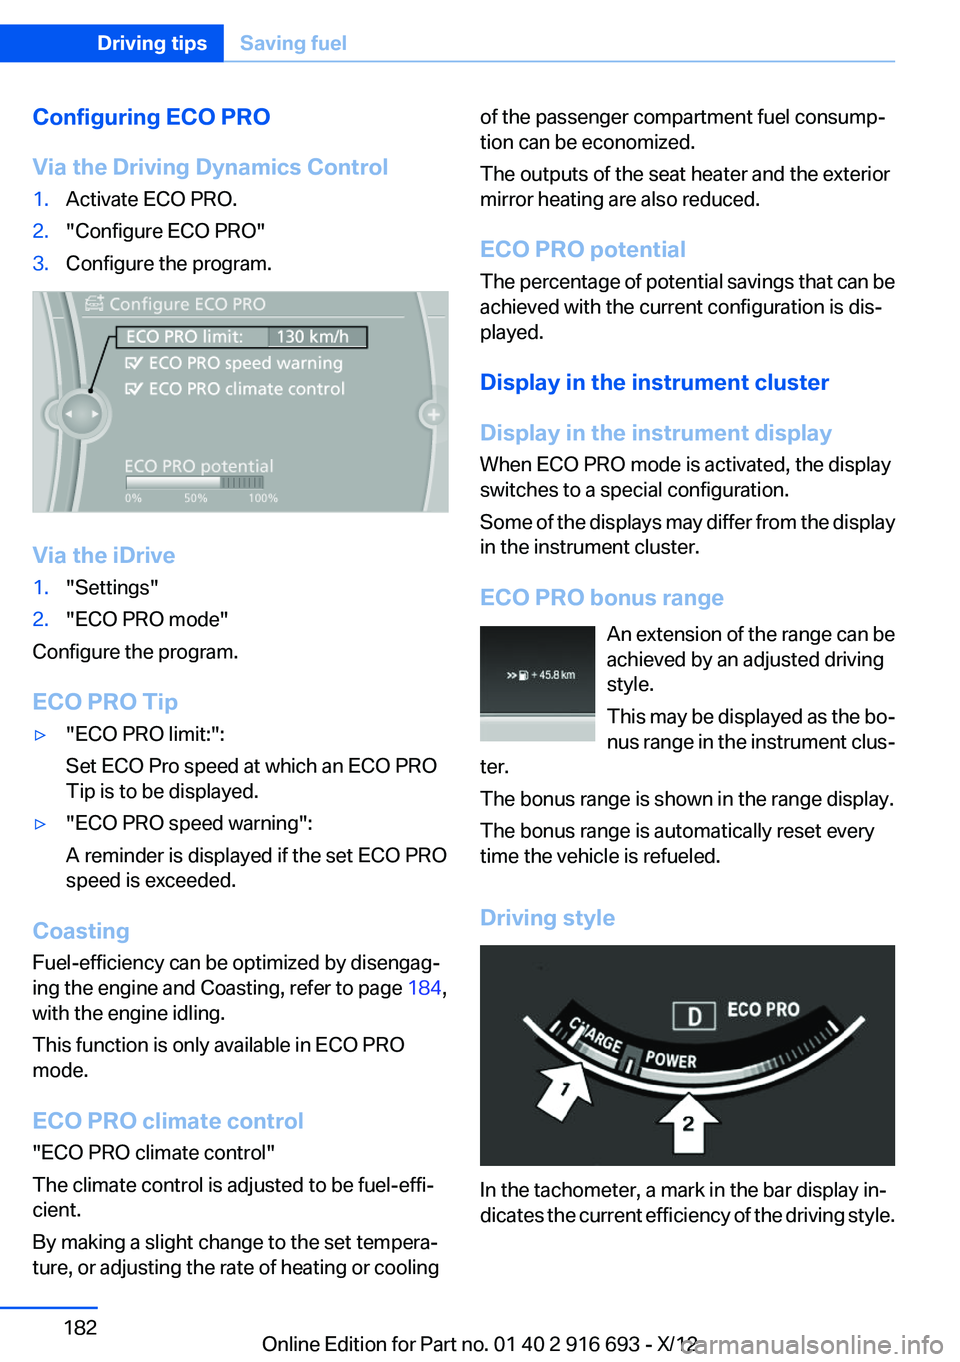
Configuring ECO PRO
Via the Driving Dynamics Control1.Activate ECO PRO.2."Configure ECO PRO"3.Configure the program.
Via the iDrive
1."Settings"2."ECO PRO mode"
Configure the program.
ECO PRO Tip
▷"ECO PRO limit:":
Set ECO Pro speed at which an ECO PRO
Tip is to be displayed.▷"ECO PRO speed warning":
A reminder is displayed if the set ECO PRO
speed is exceeded.
Coasting
Fuel-efficiency can be optimized by disengag‐
ing the engine and Coasting, refer to page 184,
with the engine idling.
This function is only available in ECO PRO
mode.
ECO PRO climate control
"ECO PRO climate control"
The climate control is adjusted to be fuel-effi‐
cient.
By making a slight change to the set tempera‐
ture, or adjusting the rate of heating or cooling
of the passenger compartment fuel consump‐
tion can be economized.
The outputs of the seat heater and the exterior
mirror heating are also reduced.
ECO PRO potential
The percentage of potential savings that can be
achieved with the current configuration is dis‐
played.
Display in the instrument cluster
Display in the instrument display
When ECO PRO mode is activated, the display
switches to a special configuration.
Some of the displays may differ from the display
in the instrument cluster.
ECO PRO bonus range An extension of the range can be
achieved by an adjusted driving
style.
This may be displayed as the bo‐
nus range in the instrument clus‐
ter.
The bonus range is shown in the range display.
The bonus range is automatically reset every
time the vehicle is refueled.
Driving style
In the tachometer, a mark in the bar display in‐
dicates the current efficiency of the driving style.
Seite 182Driving tipsSaving fuel182
Online Edition for Part no. 01 40 2 916 693 - X/12
Page 184 of 243
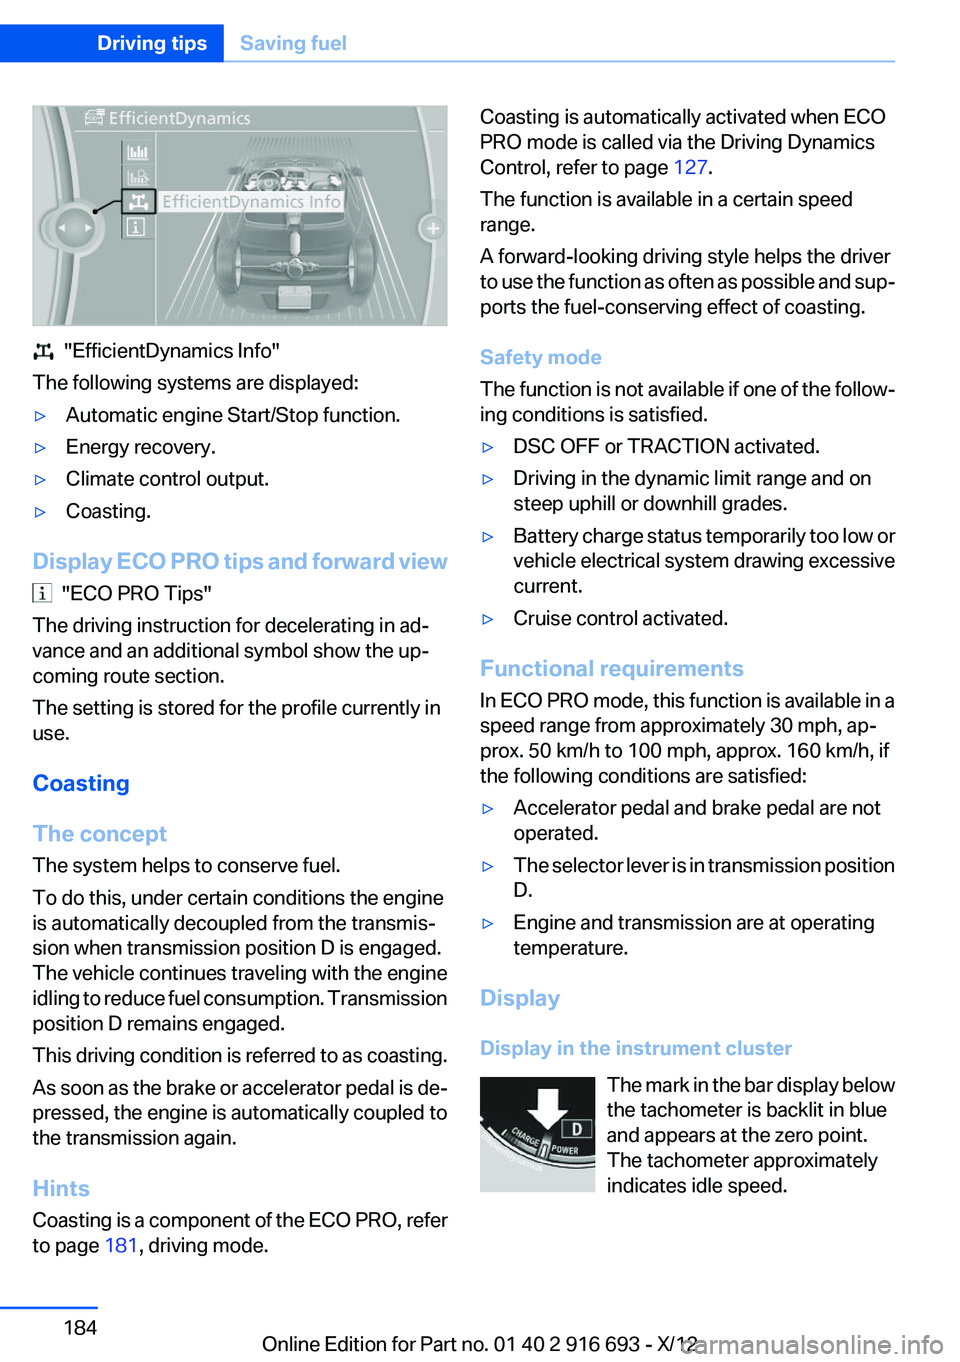
"EfficientDynamics Info"
The following systems are displayed:
▷Automatic engine Start/Stop function.▷Energy recovery.▷Climate control output.▷Coasting.
Display ECO PRO tips and forward view
"ECO PRO Tips"
The driving instruction for decelerating in ad‐
vance and an additional symbol show the up‐
coming route section.
The setting is stored for the profile currently in
use.
Coasting
The concept
The system helps to conserve fuel.
To do this, under certain conditions the engine
is automatically decoupled from the transmis‐
sion when transmission position D is engaged.
The vehicle continues traveling with the engine
idling to reduce fuel consumption. Transmission
position D remains engaged.
This driving condition is referred to as coasting.
As soon as the brake or accelerator pedal is de‐
pressed, the engine is automatically coupled to
the transmission again.
Hints
Coasting is a component of the ECO PRO, refer
to page 181, driving mode.
Coasting is automatically activated when ECO
PRO mode is called via the Driving Dynamics
Control, refer to page 127.
The function is available in a certain speed
range.
A forward-looking driving style helps the driver
to use the function as often as possible and sup‐
ports the fuel-conserving effect of coasting.
Safety mode
The function is not available if one of the follow‐
ing conditions is satisfied.▷DSC OFF or TRACTION activated.▷Driving in the dynamic limit range and on
steep uphill or downhill grades.▷Battery charge status temporarily too low or
vehicle electrical system drawing excessive
current.▷Cruise control activated.
Functional requirements
In ECO PRO mode, this function is available in a
speed range from approximately 30 mph, ap‐
prox. 50 km/h to 100 mph, approx. 160 km/h, if
the following conditions are satisfied:
▷Accelerator pedal and brake pedal are not
operated.▷The selector lever is in transmission position
D.▷Engine and transmission are at operating
temperature.
Display
Display in the instrument cluster The mark in the bar display below
the tachometer is backlit in blue
and appears at the zero point.
The tachometer approximately
indicates idle speed.
Seite 184Driving tipsSaving fuel184
Online Edition for Part no. 01 40 2 916 693 - X/12
Page 232 of 243
Everything from A to Z
IndexA
ABS, Antilock Brake Sys‐ tem 123
ACC, Active Cruise Control with Stop & Go 131
Activated-charcoal filter 157
Active Blind Spot Detec‐ tion 118
Active Cruise Control with Stop & Go, ACC 131
Active Protection 120
Active seat, front 50
Active seat ventilation, front 51
Active seat ventilation, rear 54
Active Steering, integral 126
Adaptive brake lights, refer to Brake force display 120
Adaptive drive 125
Adaptive light control 97
Adaptive light control, bulb re‐ placement 212
Additives, oil 205
Adjust front seat 48
Adjustments, seats/head re‐ straints 48
After washing vehicle 223
Airbags 101
Airbags, indicator/warning light 102
Air circulation, refer to Recir‐ culated-air mode 156
Air, dehumidifying, refer to Cooling function 156
Air distribution, manual 155
Air flow, automatic climate control 155
Air pressure, tires 191 Air vents, refer to Ventila‐
tion 157
Alarm system 42
Alarm, unintentional 43
All around the center con‐ sole 14
All around the headliner 15
All around the steering wheel 12
ALL program, automatic cli‐ mate control 156
All-season tires, refer to Win‐ ter tires 199
All-wheel-drive 124
Alternating-code hand-held transmitter 162
Alternative oil types 205
Ambient light 99
Antifreeze, washer fluid 76
Antilock Brake System, ABS 123
Anti-slip control, refer to DSC 123
Approved axle load 229
Approved engine oils 205
Armrest, refer to Center arm‐ rest 169
Arrival time 91
Ashtray 163
Assistance, Roadside Assis‐ tance 218
Assistance when driving off 123
Assist system, refer to Intelli‐ gent Safety 109
Attentiveness assistant 120
AUTO H button, refer to Auto‐ matic Hold 72
AUTO intensity 155
Automatic car wash 222 Automatic climate con‐
trol 154
Automatic Cruise Control with Stop & Go 131
Automatic Curb Monitor 59
Automatic deactivation, front passenger airbags 103
Automatic headlamp con‐ trol 96
Automatic Hold 72
Automatic locking 37
Automatic recirculated-air control 156
Automatic Soft Closing, doors 37
Automatic Soft Closing, trunk lid 38
Automatic tailgate 38
Automatic transmission with Steptronic 76
AUTO program, automatic cli‐ mate control 155
AUTO program, intensity 155
Auto Start/Stop function 68
Average fuel consumption 91
Average speed 91
Axle loads, weights 229
B
Backrest curvature, refer to Lumbar support 49
Backrest, width 49
Back seats, adjusting 51
Backup camera 141
Band-aids, refer to First aid kit 218
Bar for tow-starting/tow‐ ing 220
Basic position, rear seats 53 Seite 232ReferenceEverything from A to Z232
Online Edition for Part no. 01 40 2 916 693 - X/12