key BMW 760I 2007 E65 User Guide
[x] Cancel search | Manufacturer: BMW, Model Year: 2007, Model line: 760I, Model: BMW 760I 2007 E65Pages: 254, PDF Size: 7.98 MB
Page 43 of 254
Controls
41Reference
At a glance
Driving tips
Communications
Navigation
Entertainment
Mobility
Press the safety switch when children
ride in the rear; otherwise, unsupervised
closing of the windows could lead to injuries.<
In order to deactivate the function again,
you must insert the remote control into
the ignition lock or, with Comfort Access, you
must switch into radio ready state.<
Glass sunroof, electric*
To prevent bodily injuries, watch the
glass sunroof as it closes.
Always take along the remote control when you
leave the vehicle; otherwise, children could, for
example, operate the roof and injure them-
selves.<
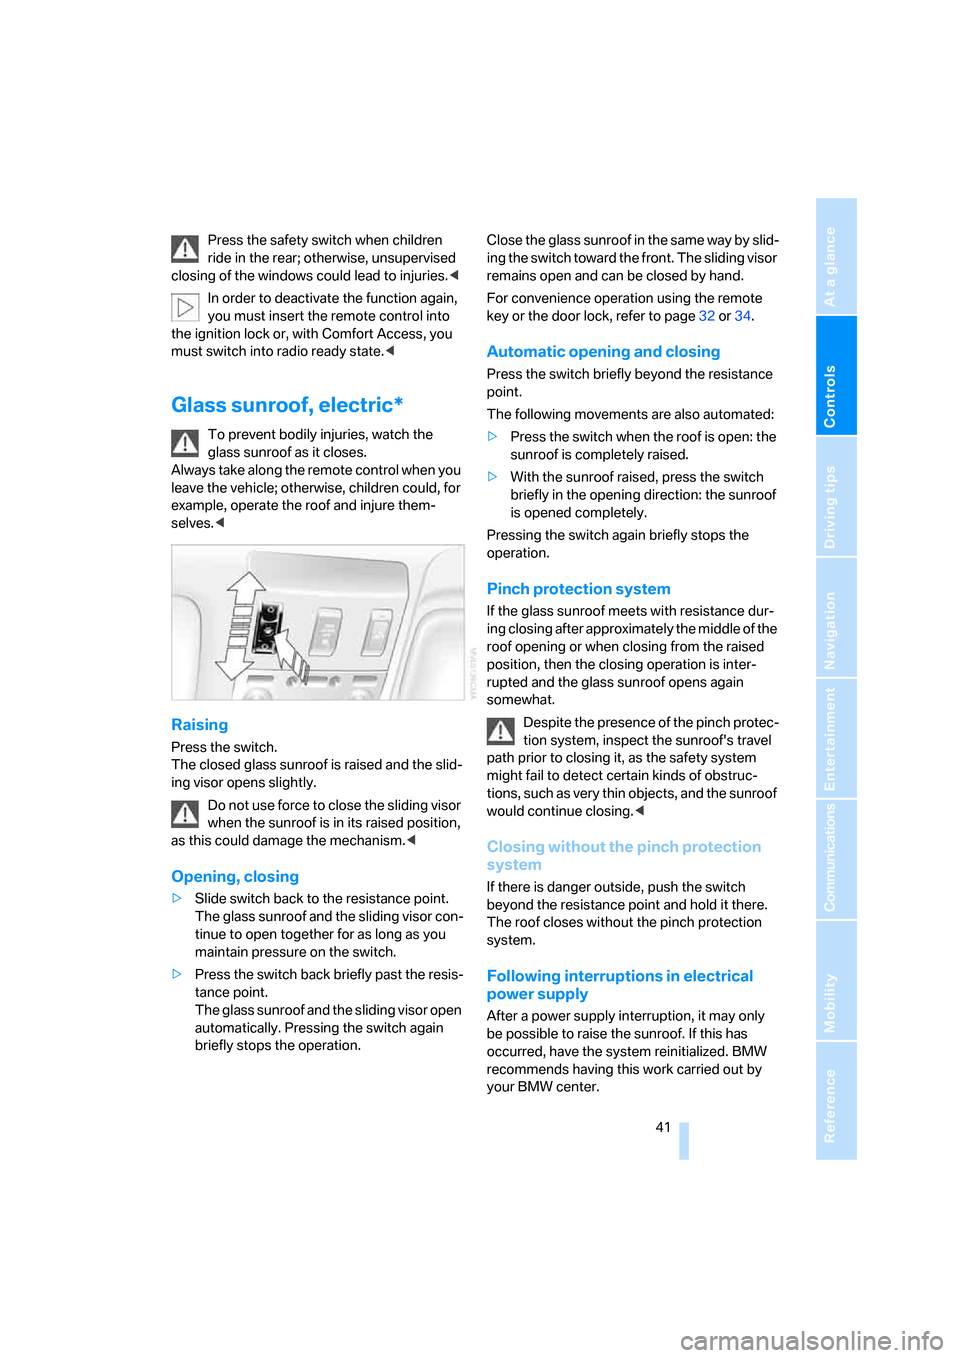
Raising
Press the switch.
The closed glass sunroof is raised and the slid-
ing visor opens slightly.
Do not use force to close the sliding visor
when the sunroof is in its raised position,
as this could damage the mechanism.<
Opening, closing
>Slide switch back to the resistance point.
The glass sunroof and the sliding visor con-
tinue to open together for as long as you
maintain pressure on the switch.
>Press the switch back briefly past the resis-
tance point.
The glass sunroof and the sliding visor open
automatically. Pressing the switch again
briefly stops the operation.Close the glass sunroof in the same way by slid-
ing the switch toward the front. The sliding visor
remains open and can be closed by hand.
For convenience operation using the remote
key or the door lock, refer to page32 or34.
Automatic opening and closing
Press the switch briefly beyond the resistance
point.
The following movements are also automated:
>Press the switch when the roof is open: the
sunroof is completely raised.
>With the sunroof raised, press the switch
briefly in the opening direction: the sunroof
is opened completely.
Pressing the switch again briefly stops the
operation.
Pinch protection system
If the glass sunroof meets with resistance dur-
ing closing after approximately the middle of the
roof opening or when closing from the raised
position, then the closing operation is inter-
rupted and the glass sunroof opens again
somewhat.
Despite the presence of the pinch protec-
tion system, inspect the sunroof's travel
path prior to closing it, as the safety system
might fail to detect certain kinds of obstruc-
tions, such as very thin objects, and the sunroof
would continue closing.<
Closing without the pinch protection
system
If there is danger outside, push the switch
beyond the resistance point and hold it there.
The roof closes without the pinch protection
system.
Following interruptions in electrical
power supply
After a power supply interruption, it may only
be possible to raise the sunroof. If this has
occurred, have the system reinitialized. BMW
recommends having this work carried out by
your BMW center.
Page 66 of 254
Driving
64
Manually unlocking and locking the
transmission lock
In the event of a power supply interruption, e.g.
when the battery is dead or disconnected or
when there is an electrical malfunction, the
transmission lock must be released manually;
otherwise, the rear wheels are locked and the
vehicle cannot be towed.
Step on the brake when manually unlock-
ing the transmission lock; otherwise,
there is a danger of the vehicle rolling.<
The transmission lock should only be released
for towing. Reengage the transmission lock
after parking the vehicle at its destination.
If it also becomes necessary to manually
release the parking brake, follow this sequence:
1.Start by manually releasing the parking
brake, refer to page60.
2.Then proceed to manually releasing the
transmission lock.
Releasing
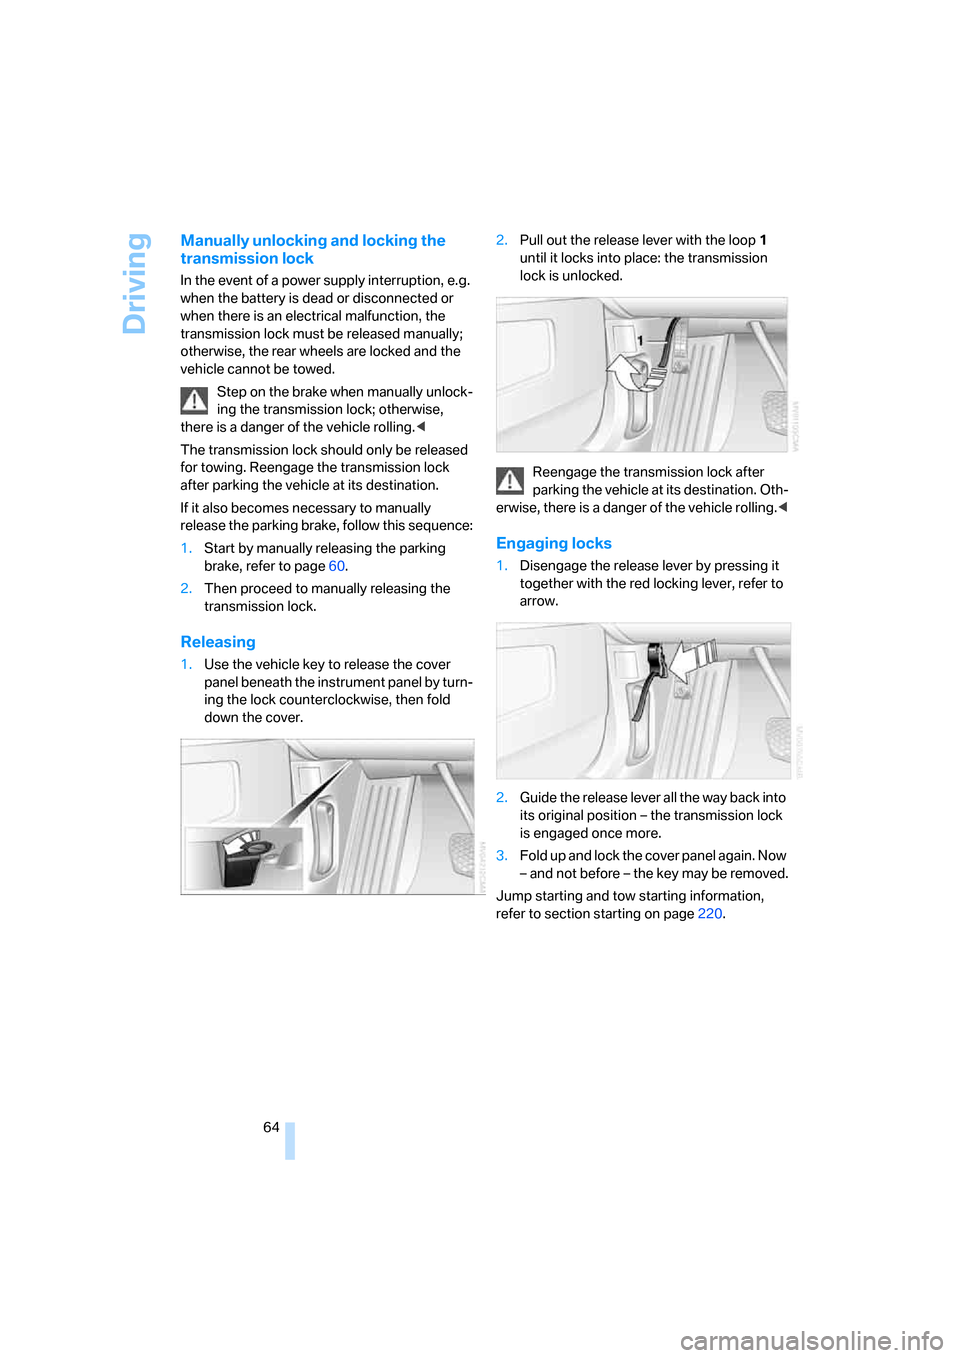
1.Use the vehicle key to release the cover
panel beneath the instrument panel by turn-
ing the lock counterclockwise, then fold
down the cover.2.Pull out the release lever with the loop1
until it locks into place: the transmission
lock is unlocked.
Reengage the transmission lock after
parking the vehicle at its destination. Oth-
erwise, there is a danger of the vehicle rolling.<
Engaging locks
1.Disengage the release lever by pressing it
together with the red locking lever, refer to
arrow.
2.Guide the release lever all the way back into
its original position – the transmission lock
is engaged once more.
3.Fold up and lock the cover panel again. Now
– and not before – the key may be removed.
Jump starting and tow starting information,
refer to section starting on page220.
Page 106 of 254
Climate
104
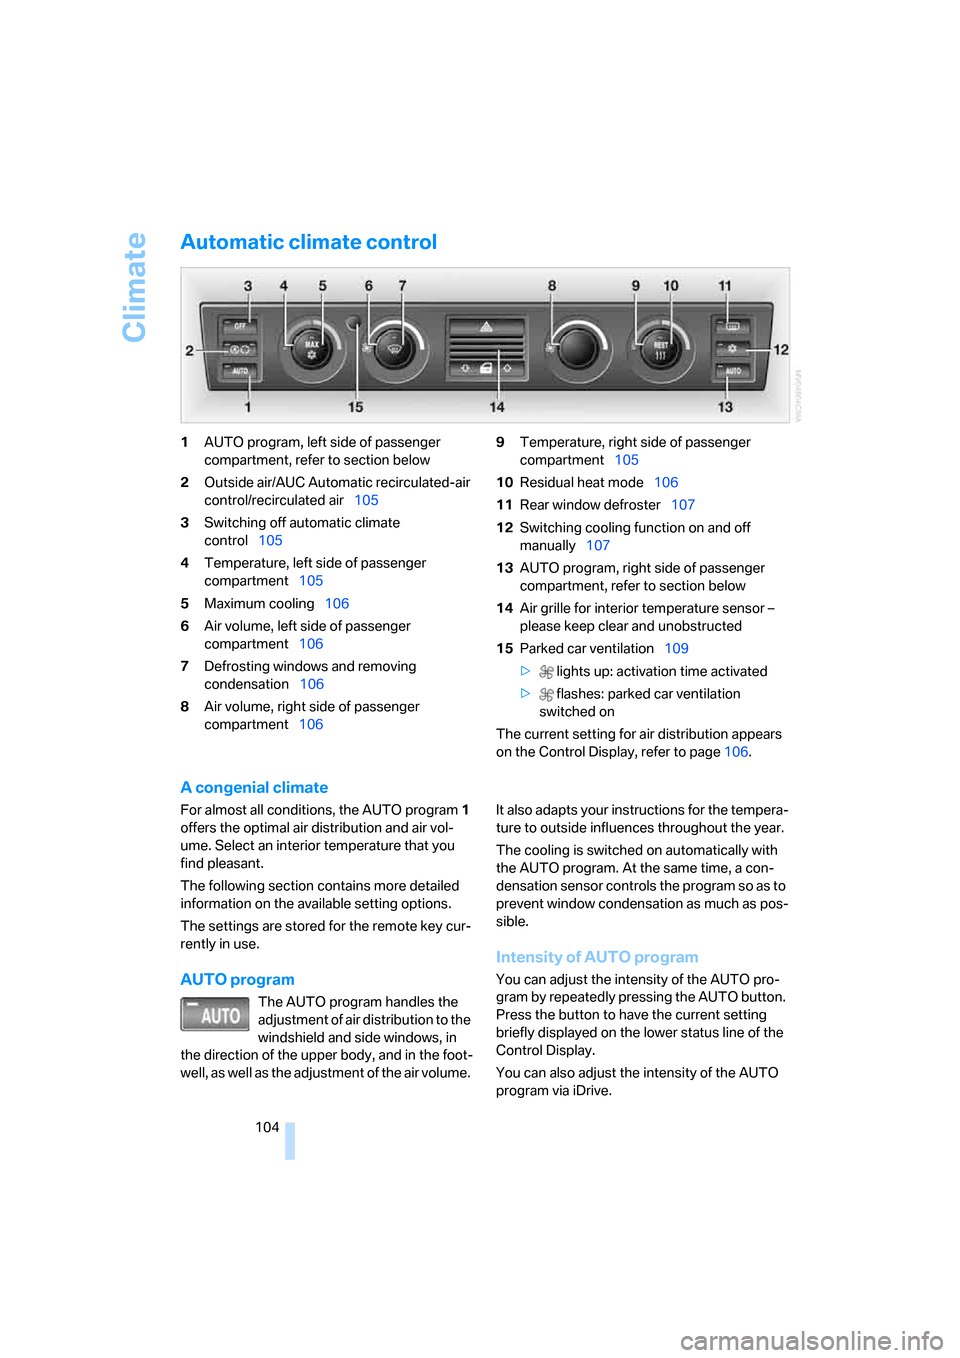
Automatic climate control
1AUTO program, left side of passenger
compartment, refer to section below
2Outside air/AUC Automatic recirculated-air
control/recirculated air105
3Switching off automatic climate
control105
4Temperature, left side of passenger
compartment105
5Maximum cooling106
6Air volume, left side of passenger
compartment106
7Defrosting windows and removing
condensation106
8Air volume, right side of passenger
compartment1069Temperature, right side of passenger
compartment105
10Residual heat mode106
11Rear window defroster107
12Switching cooling function on and off
manually107
13AUTO program, right side of passenger
compartment, refer to section below
14Air grille for interior temperature sensor –
please keep clear and unobstructed
15Parked car ventilation109
> lights up: activation time activated
> flashes: parked car ventilation
switched on
The current setting for air distribution appears
on the Control Display, refer to page106.
A congenial climate
For almost all conditions, the AUTO program1
offers the optimal air distribution and air vol-
ume. Select an interior temperature that you
find pleasant.
The following section contains more detailed
information on the available setting options.
The settings are stored for the remote key cur-
rently in use.
AUTO program
The AUTO program handles the
adjustment of air distribution to the
windshield and side windows, in
the direction of the upper body, and in the foot-
well, as well as the adjustment of the air volume. It also adapts your instructions for the tempera-
ture to outside influences throughout the year.
The cooling is switched on automatically with
the AUTO program. At the same time, a con-
densation sensor controls the program so as to
prevent window condensation as much as pos-
sible.
Intensity of AUTO program
You can adjust the intensity of the AUTO pro-
gram by repeatedly pressing the AUTO button.
Press the button to have the current setting
briefly displayed on the lower status line of the
Control Display.
You can also adjust the intensity of the AUTO
program via iDrive.
Page 116 of 254
Practical interior accessories
114 Depending upon your equipment package, any
of the following may be located in the storage
compartment:
>Removable CD holder
*
>Folding, removable storage compartment*,
e.g. for glasses or mobile phone
>Folding, removable waste receptacle
*
Locking storage compartment
You can use the key to lock the storage com-
partment in the armrest.
For example at a hotel, if you want to lock
the luggage compartment lid separately,
refer to page35. Then lock the armrest storage
compartment and surrender only the remote
control without the key, refer to page30. This
prevents unauthorized access to the armrest
storage compartment and the luggage com-
partment.<
Ventilating storage compartment
You can use the knurled wheel in the storage
compartment to open and close the vent.
Depending on the automatic climate con-
trol setting, the temperature in the stor-
age compartment may be higher than in the rest
of the passenger compartment. Close the vent
as required.<
The temperature in the storage compartment
depends on the setting for the upper body area,
refer to page105.
Connection for external audio device
You can connect an external audio device such
as a CD or MP3 player and play the sound over
the vehicle's speaker system, refer to page169.
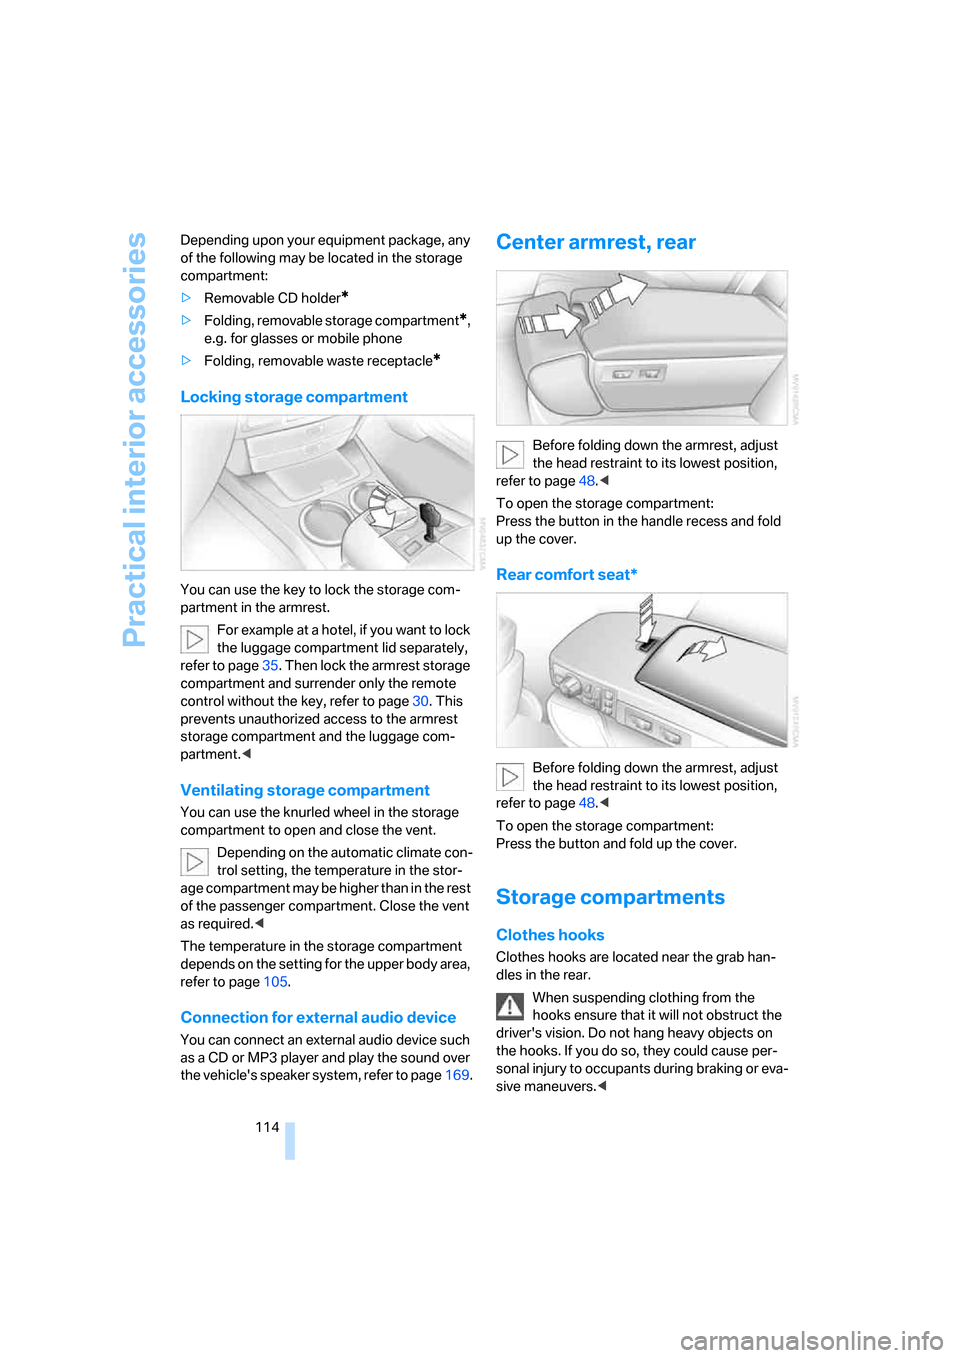
Center armrest, rear
Before folding down the armrest, adjust
the head restraint to its lowest position,
refer to page48.<
To open the storage compartment:
Press the button in the handle recess and fold
up the cover.
Rear comfort seat*
Before folding down the armrest, adjust
the head restraint to its lowest position,
refer to page48.<
To open the storage compartment:
Press the button and fold up the cover.
Storage compartments
Clothes hooks
Clothes hooks are located near the grab han-
dles in the rear.
When suspending clothing from the
hooks ensure that it will not obstruct the
driver's vision. Do not hang heavy objects on
the hooks. If you do so, they could cause per-
sonal injury to occupants during braking or eva-
sive maneuvers.<
Page 174 of 254
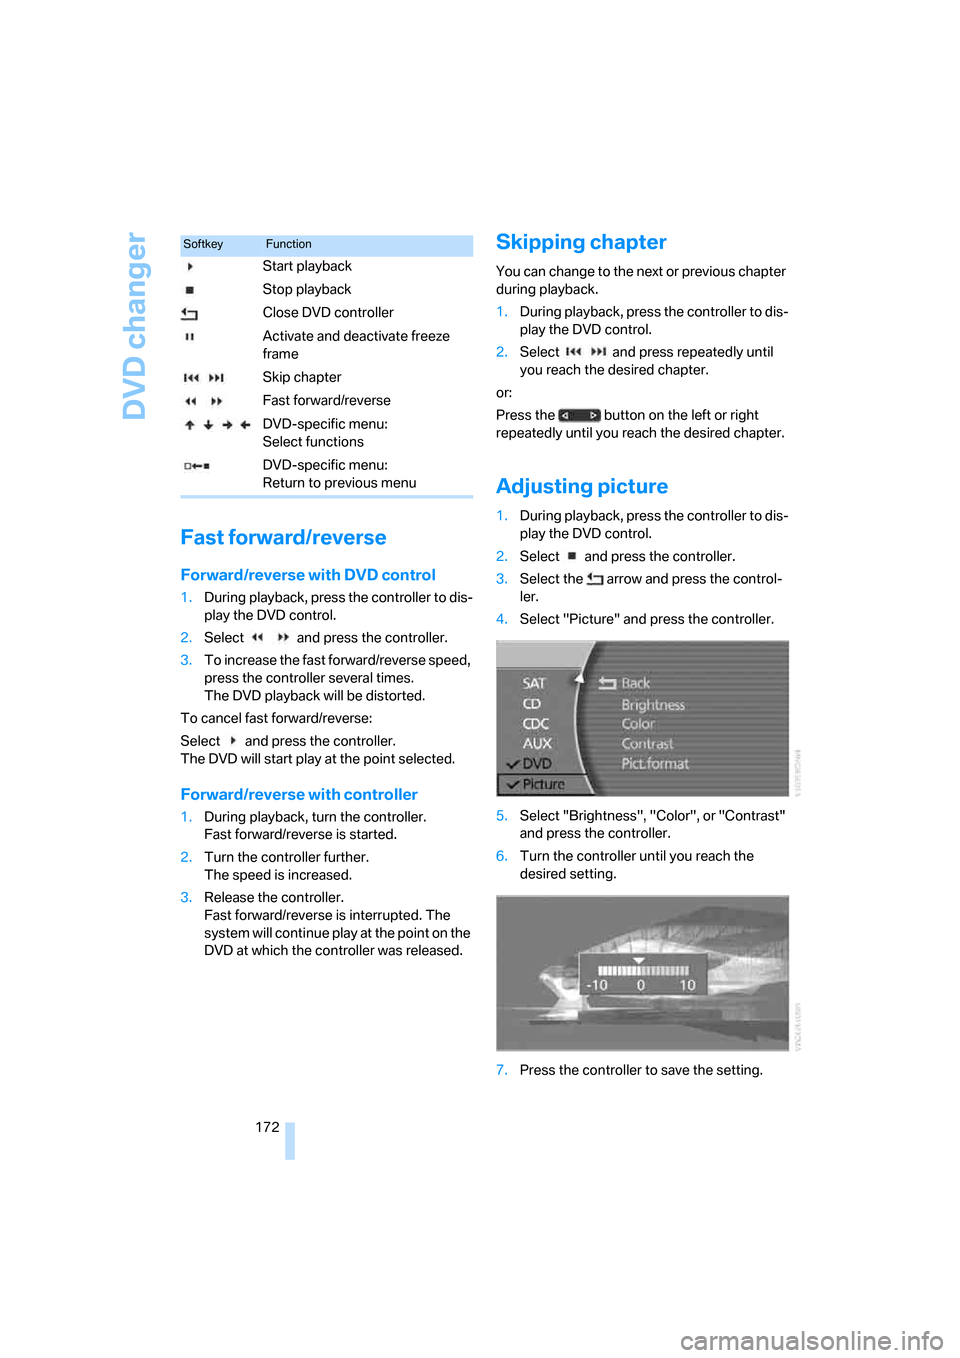
DVD changer
172
Fast forward/reverse
Forward/reverse with DVD control
1.During playback, press the controller to dis-
play the DVD control.
2.Select and press the controller.
3.To increase the fast forward/reverse speed,
press the controller several times.
The DVD playback will be distorted.
To cancel fast forward/reverse:
Select and press the controller.
The DVD will start play at the point selected.
Forward/reverse with controller
1.During playback, turn the controller.
Fast forward/reverse is started.
2.Turn the controller further.
The speed is increased.
3.Release the controller.
Fast forward/reverse is interrupted. The
system will continue play at the point on the
DVD at which the controller was released.
Skipping chapter
You can change to the next or previous chapter
during playback.
1.During playback, press the controller to dis-
play the DVD control.
2.Select and press repeatedly until
you reach the desired chapter.
or:
Press the button on the left or right
repeatedly until you reach the desired chapter.
Adjusting picture
1.During playback, press the controller to dis-
play the DVD control.
2.Select and press the controller.
3.Select the arrow and press the control-
ler.
4.Select "Picture" and press the controller.
5.Select "Brightness", "Color", or "Contrast"
and press the controller.
6.Turn the controller until you reach the
desired setting.
7.Press the controller to save the setting.
SoftkeyFunction
Start playback
Stop playback
Close DVD controller
Activate and deactivate freeze
frame
Skip chapter
Fast forward/reverse
DVD-specific menu:
Select functions
DVD-specific menu:
Return to previous menu
Page 180 of 254
Telephone overview
178
Telephone overview
The concept
Your BMW is equipped with a mobile phone
preparation package. After a suitable mobile
phone has been paired with the vehicle once,
you can operate the mobile phone via iDrive, via
the button on the steering wheel, via the phone
keypad and by voice
*.
A mobile phone that has been paired with the
vehicle once is automatically detected again
with the engine running or the ignition switched
on as soon as it is brought inside the vehicle.
The logon data of up to four mobile phones can
be stored simultaneously. If several mobile
phones are detected simultaneously, then the
vehicle can be used to operate the mobile
phone that was most recently paired with it.
Using a phone in your vehicle
Using snap-in adapter*
The so-called snap-in adapter, a cradle for your
mobile phone, is inserted into the center arm-
rest. If the mobile phone is inserted into the
snap-in adapter, the battery is charged and the
mobile phone is connected to the external
antenna of the vehicle whenever the ignition
key is in the radio ready state or higher. This
assures better network reception and uniform
sound quality. Ask your BMW center which
mobile phones snap-in adapters are offered for.
To use the snap-in adapter, refer to page181.
BMW discourages the use of mobile
phones or other mobile communications
devices inside the vehicle without a direct con-
nection to an outside antenna. Otherwise, the
vehicle electronics and mobile communications
device can interfere with each other. In addition,
there is no assurance that the radiation gener-
ated during transmission will be discharged
from the vehicle interior.
phone; otherwise, malfunctions can occur.
The mobile phone can be operated by means
of:
>the button on the steering wheel, refer to
page11
>the retracting telephone keypad, refer to
page179
>iDrive, refer to Initiating communication,
page184
>the voice command system
*, refer to
page23
For information on operating your mobile
phone, please consult the separate operating
instructions.
For your safety
Only make entries when the traffic situa-
tion allows you to do so. Do not hold the
mobile phone in your hand while you are driving;
use the hands-free system instead. If you do
not comply with this precaution, your being dis-
tracted can endanger vehicle occupants and
other road users.<
Suitable mobile phones
Ask your BMW center which mobile phones
with a Bluetooth interface are supported by the
mobile phone preparation package or which
mobile phones snap-in adapters are available
for. These mobile phones support the functions
described in this Owner's Manual with a certain
software version. Malfunctions can occur with
other mobile phones.
*
Page 181 of 254
179
Entertainment
Reference
At a glance
Controls
Driving tips Communications
Navigation
Mobility
Hands-free system
The hands-free microphone is located on the
left-hand side on the headliner.
The hands-free system is activated whenever
you establish or receive a call using the follow-
ing:
>the button on the steering wheel, refer to
page11
>the retracting telephone keypad
>iDrive, refer to Initiating communication,
page184
>the voice command system
*, refer to
page23, except for incoming calls
Volume adjustment
You can set the volume for the hands-free sys-
tem and the ring tone separately:
>Turn knob during a call.
>Turn knob during an incoming call.
The volume can also be adjusted using
the buttons on the steering wheel.<
This volume is maintained, even if the other
audio sources are set to minimum volume.
The setting is stored for the remote control cur-
rently in use.
Retracting telephone keypad
The telephone keypad allows you to use all of
the basic mobile phone functions without ever
picking up the handset.
Calls are automatically routed through the
hands-free system.
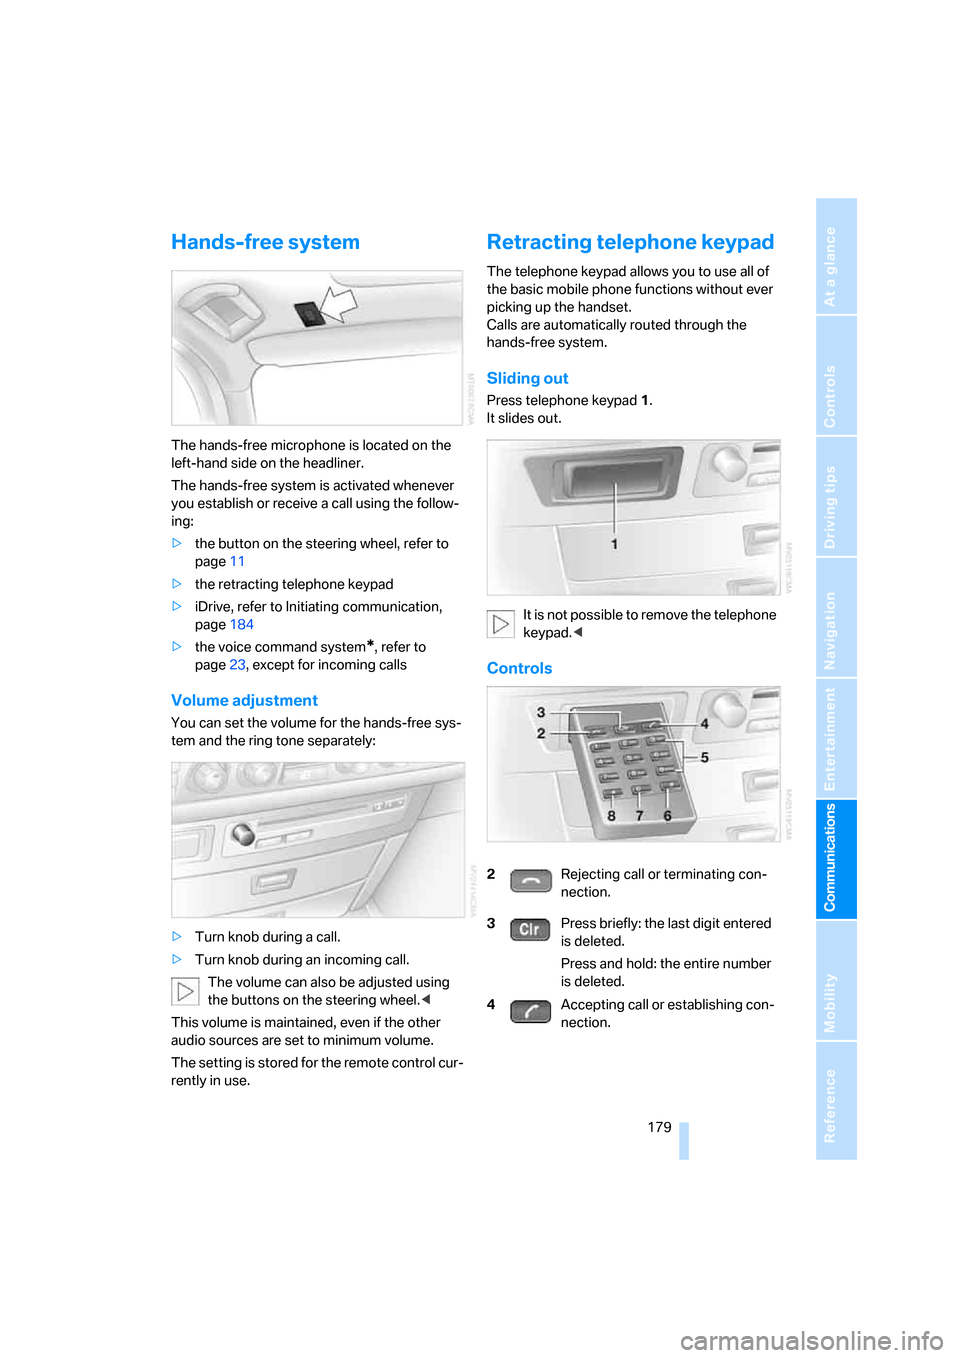
Sliding out
Press telephone keypad1.
It slides out.
It is not possible to remove the telephone
keypad.<
Controls
2Rejecting call or terminating con-
nection.
3Press briefly: the last digit entered
is deleted.
Press and hold: the entire number
is deleted.
4Accepting call or establishing con-
nection.
Page 182 of 254
Telephone overview
180
Touch tone dialing
You can use the touch tone dialing to access
network services or to control devices, e.g. for
remotely checking the messages on a tele-
phone answering machine. This requires the
corresponding digits or number combination,
the touch tone code.
You can use the touch tone dialing during a
connection.
1.Enter the phone number.
2.Press the button to establish the con-
nection.
3.Press the button longer.
4.Enter the desired digits or number combi-
nations according to the touch tone code.
Each digit or number is transmitted immedi-
ately, which is indicated by a tone.
Sliding in
Slide telephone keypad in until it engages.
Emergency call*
Initiating an emergency call and prerequisites
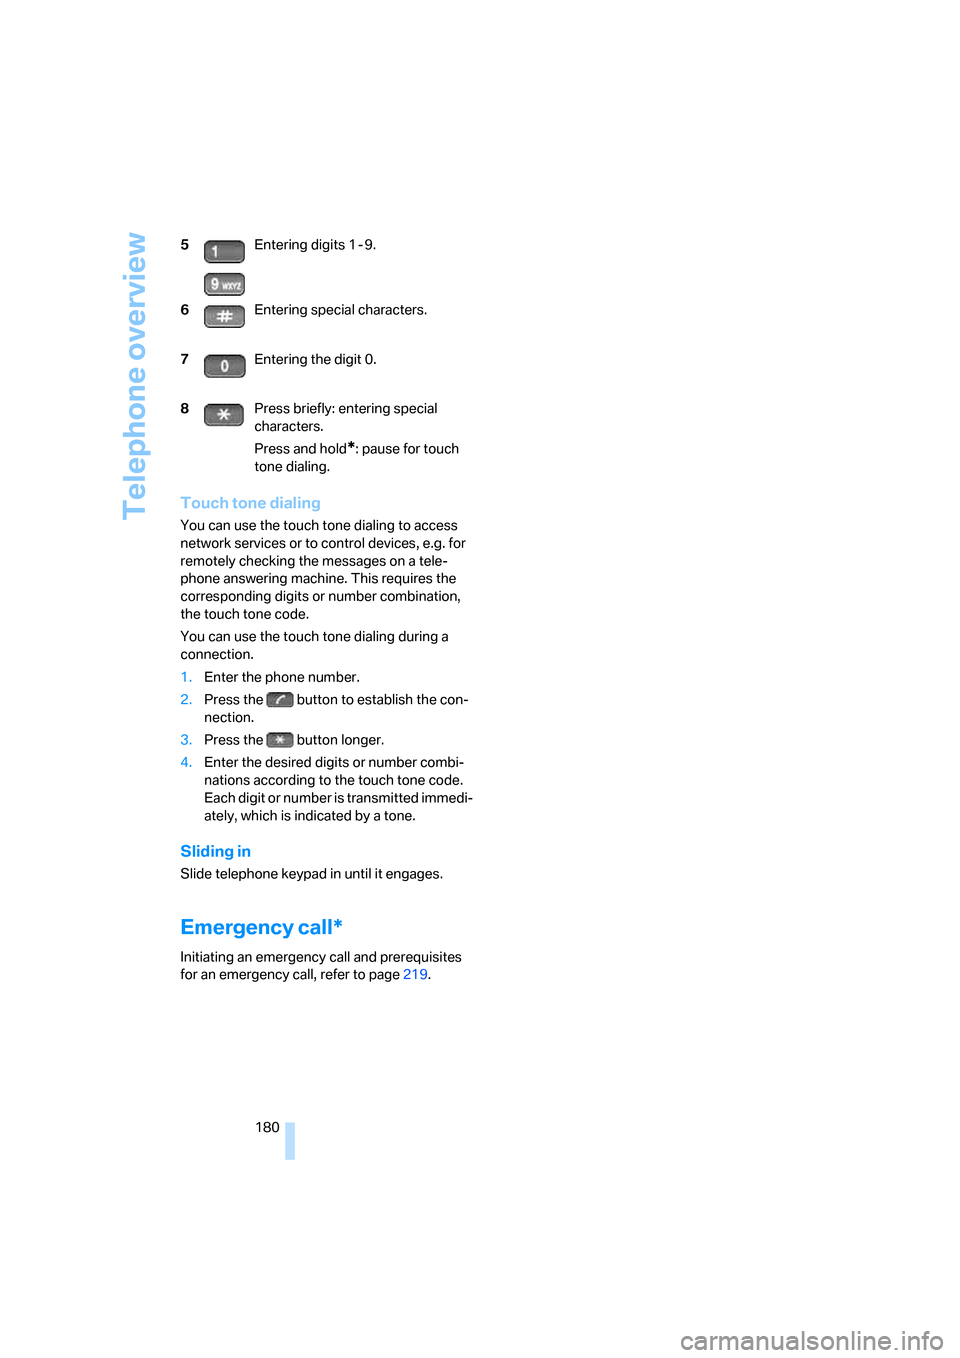
for an emergency call, refer to page219. 5Entering digits 1 - 9.
6Entering special characters.
7Entering the digit 0.
8Press briefly: entering special
characters.
Press and hold
*: pause for touch
tone dialing.
Page 183 of 254
181
Entertainment
Reference
At a glance
Controls
Driving tips Communications
Navigation
Mobility
Getting started
Snap-in adapter*
The so-called snap-in adapter, a cradle for your
mobile phone, is inserted into the center arm-
rest. If the mobile phone is inserted into the
snap-in adapter, the battery is charged and the
mobile phone is connected to the external
antenna of the vehicle whenever the ignition
key is in the radio ready state or higher. This
assures better network reception and uniform
sound quality. Ask your BMW center which
mobile phones snap-in adapters are offered for.
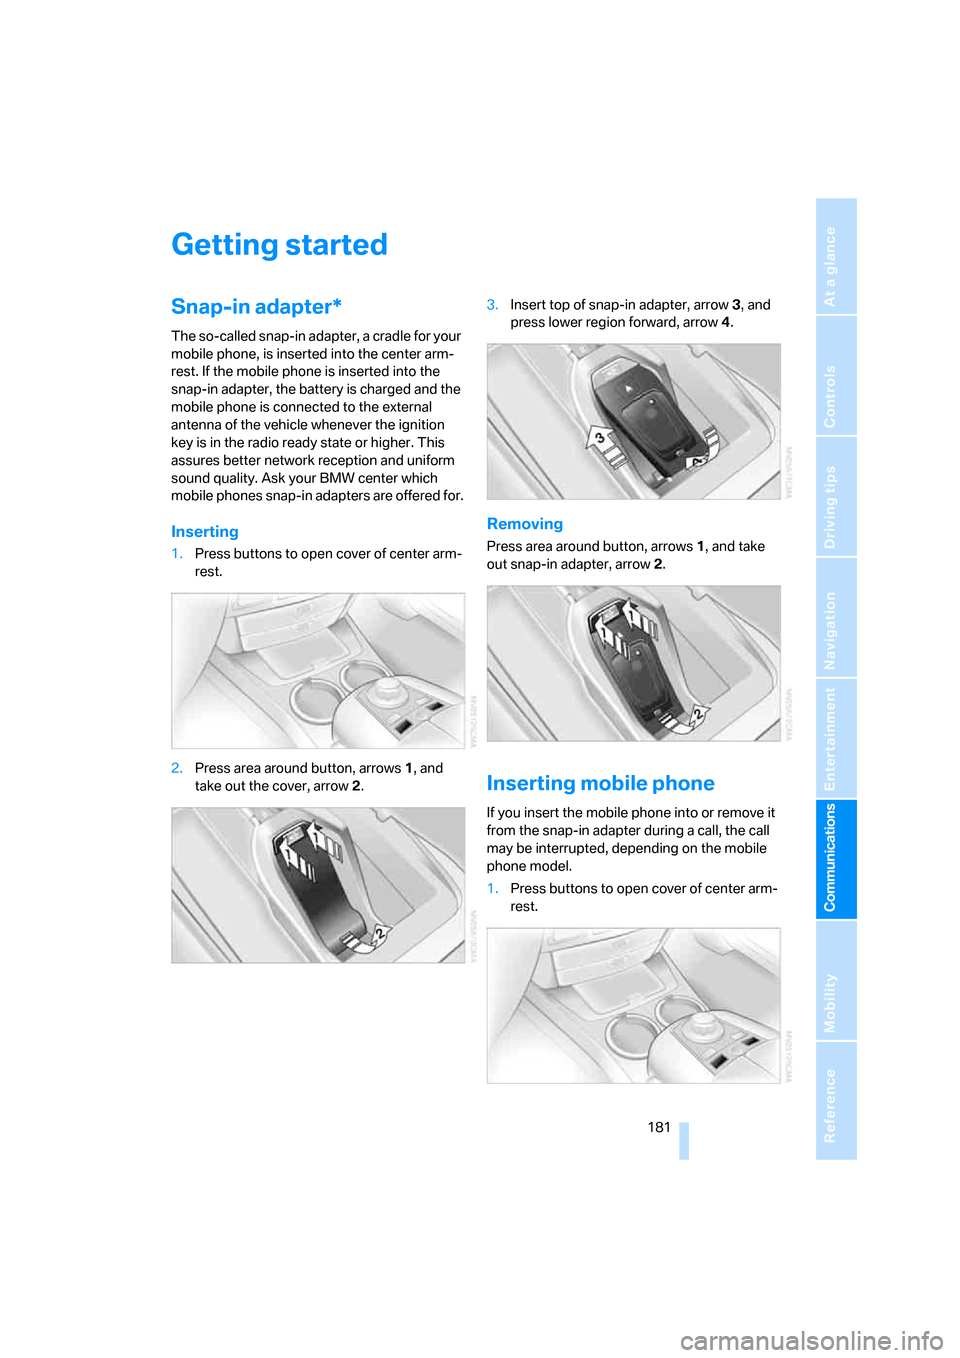
Inserting
1.Press buttons to open cover of center arm-
rest.
2.Press area around button, arrows1, and
take out the cover, arrow2.3.Insert top of snap-in adapter, arrow3, and
press lower region forward, arrow4.
Removing
Press area around button, arrows1, and take
out snap-in adapter, arrow2.
Inserting mobile phone
If you insert the mobile phone into or remove it
from the snap-in adapter during a call, the call
may be interrupted, depending on the mobile
phone model.
1.Press buttons to open cover of center arm-
rest.
Page 184 of 254
Getting started
182 2.Remove the protective cap from the mobile
phone's antenna connector if necessary, so
that the mobile phone can engage in the
snap-in adapter.
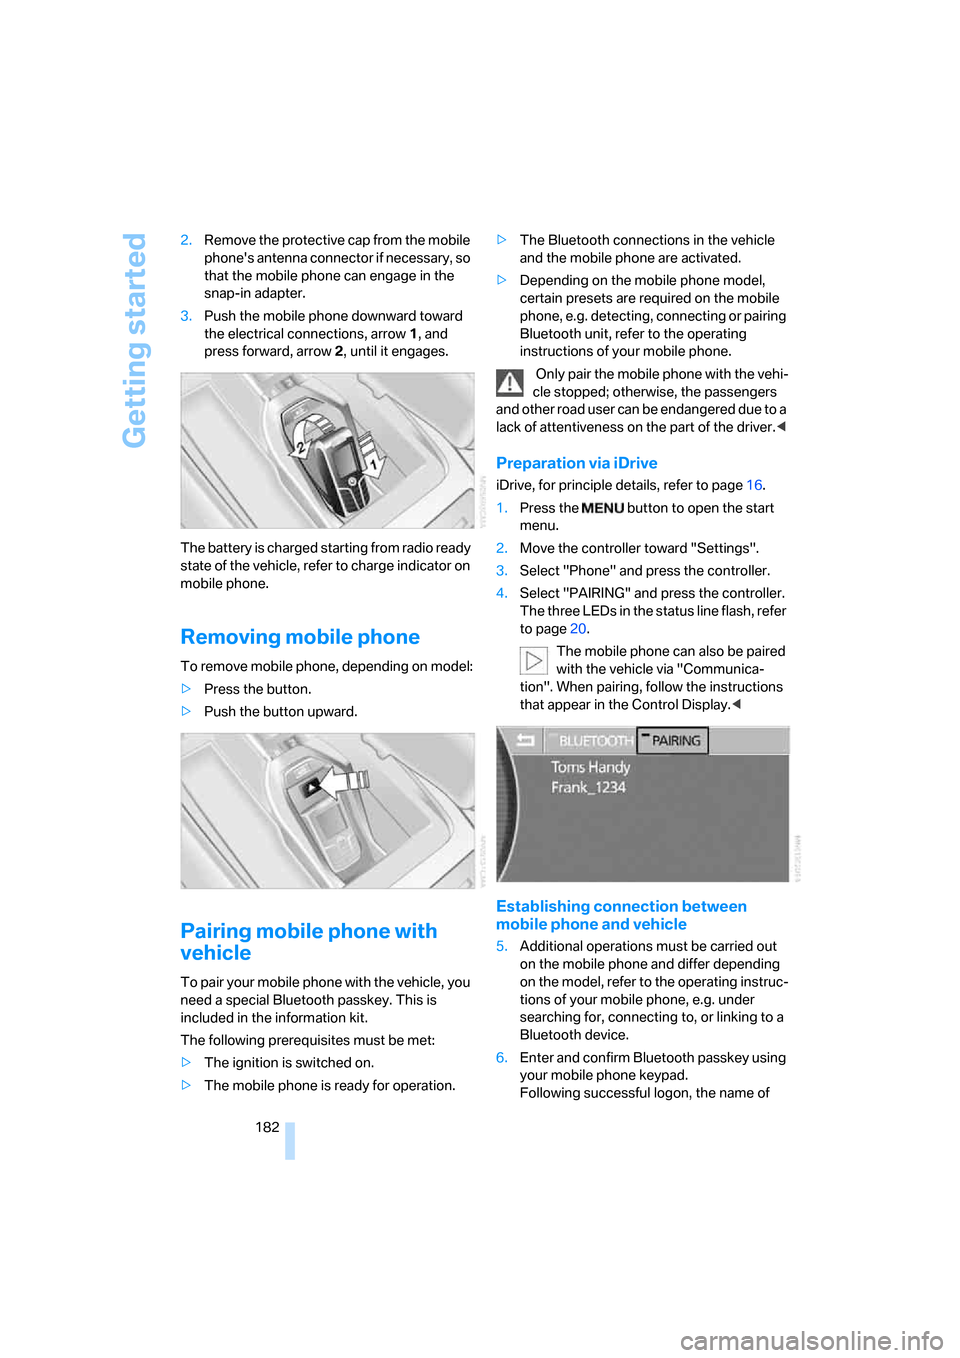
3.Push the mobile phone downward toward
the electrical connections, arrow1, and
press forward, arrow2, until it engages.
The battery is charged starting from radio ready
state of the vehicle, refer to charge indicator on
mobile phone.
Removing mobile phone
To remove mobile phone, depending on model:
>Press the button.
>Push the button upward.
Pairing mobile phone with
vehicle
To pair your mobile phone with the vehicle, you
need a special Bluetooth passkey. This is
included in the information kit.
The following prerequisites must be met:
>The ignition is switched on.
>The mobile phone is ready for operation.>The Bluetooth connections in the vehicle
and the mobile phone are activated.
>Depending on the mobile phone model,
certain presets are required on the mobile
phone, e.g. detecting, connecting or pairing
Bluetooth unit, refer to the operating
instructions of your mobile phone.
Only pair the mobile phone with the vehi-
cle stopped; otherwise, the passengers
and other road user can be endangered due to a
lack of attentiveness on the part of the driver.<
Preparation via iDrive
iDrive, for principle details, refer to page16.
1.Press the button to open the start
menu.
2.Move the controller toward "Settings".
3.Select "Phone" and press the controller.
4.Select "PAIRING" and press the controller.
The three LEDs in the status line flash, refer
to page20.
The mobile phone can also be paired
with the vehicle via "Communica-
tion". When pairing, follow the instructions
that appear in the Control Display.<
Establishing connection between
mobile phone and vehicle
5.Additional operations must be carried out
on the mobile phone and differ depending
on the model, refer to the operating instruc-
tions of your mobile phone, e.g. under
searching for, connecting to, or linking to a
Bluetooth device.
6.Enter and confirm Bluetooth passkey using
your mobile phone keypad.
Following successful logon, the name of