seats BMW 760I 2007 E65 User Guide
[x] Cancel search | Manufacturer: BMW, Model Year: 2007, Model line: 760I, Model: BMW 760I 2007 E65Pages: 254, PDF Size: 7.98 MB
Page 57 of 254
Controls
55Reference
At a glance
Driving tips
Communications
Navigation
Entertainment
Mobility
Unlocking safety belt
1.Open the belt buckle.
2.Remove the child restraint system.
3.Allow the belt webbing to be pulled in com-
pletely.
LATCH child restraint fixing
system*
LATCH: Lower Anchor and Tethers for CHil-
dren.
For installation and use of LATCH child
restraint systems, follow the operating
and safety instructions of the system manufac-
turer.<
If the vehicle is equipped with power seats in
the rear, return these to their standard positions
before using LATCH child restraint systems,
refer to page45.
Before installing the LATCH child's seat, pull
the belt away from the region of the child
restraint fixing system.
Make sure that the LATCH anchors have
properly engaged and that the child
restraint system is resting snugly against the
backrest.<
Rear seats
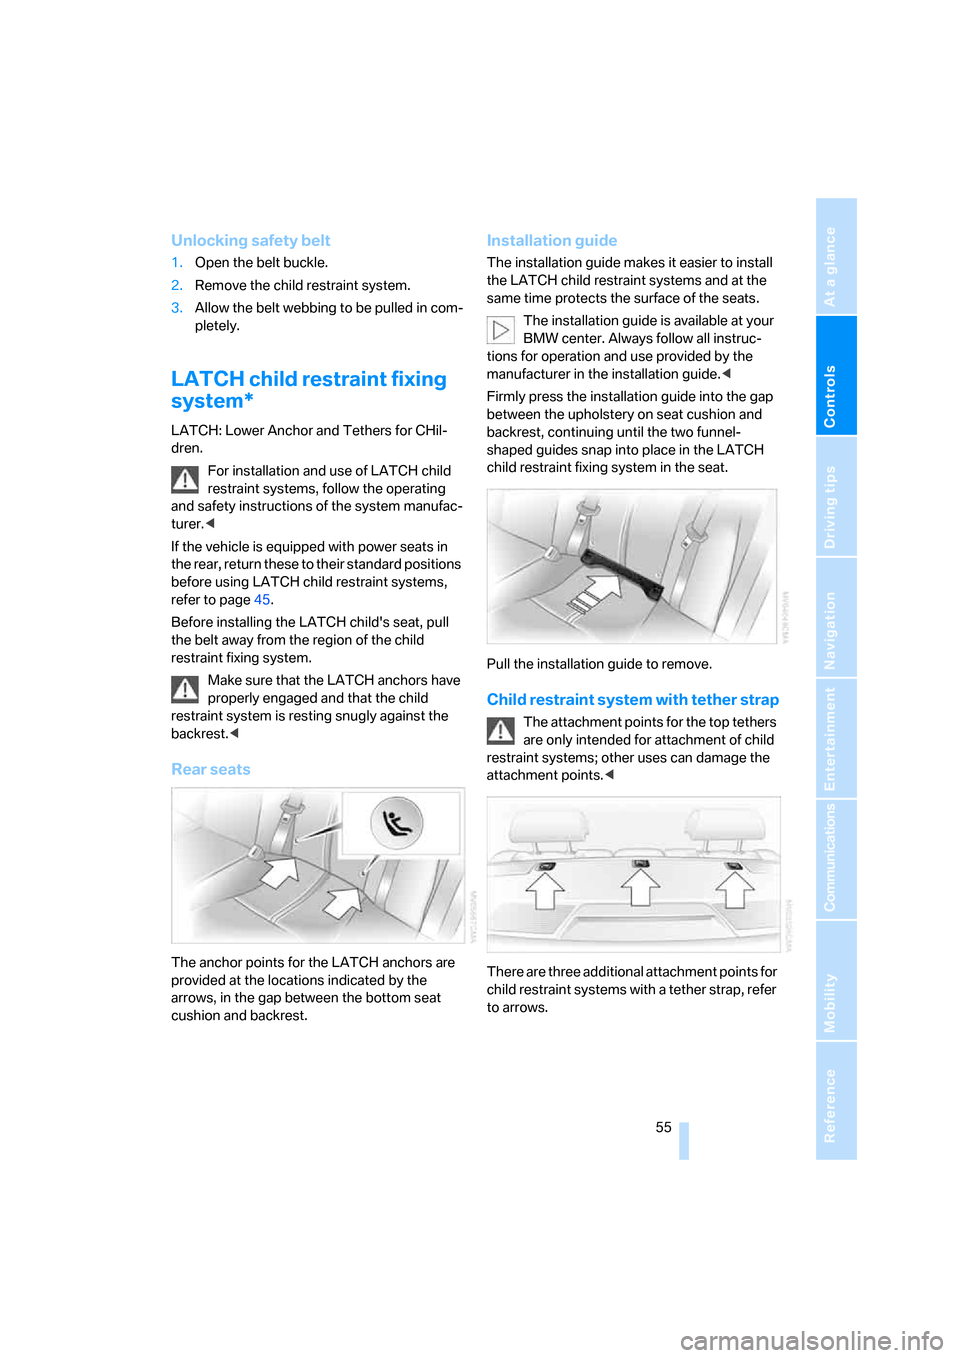
The anchor points for the LATCH anchors are
provided at the locations indicated by the
arrows, in the gap between the bottom seat
cushion and backrest.
Installation guide
The installation guide makes it easier to install
the LATCH child restraint systems and at the
same time protects the surface of the seats.
The installation guide is available at your
BMW center. Always follow all instruc-
tions for operation and use provided by the
manufacturer in the installation guide.<
Firmly press the installation guide into the gap
between the upholstery on seat cushion and
backrest, continuing until the two funnel-
shaped guides snap into place in the LATCH
child restraint fixing system in the seat.
Pull the installation guide to remove.
Child restraint system with tether strap
The attachment points for the top tethers
are only intended for attachment of child
restraint systems; other uses can damage the
attachment points.<
There are three additional attachment points for
child restraint systems with a tether strap, refer
to arrows.
Page 58 of 254
Transporting children safely
56
Routing of the tether strap
Make sure that the tether strap is not
routed over sharp edges and does not
twist on its way to the attachment point; other-
wise, the belt can fail to properly secure the
child restraint system in the event of an acci-
dent.<
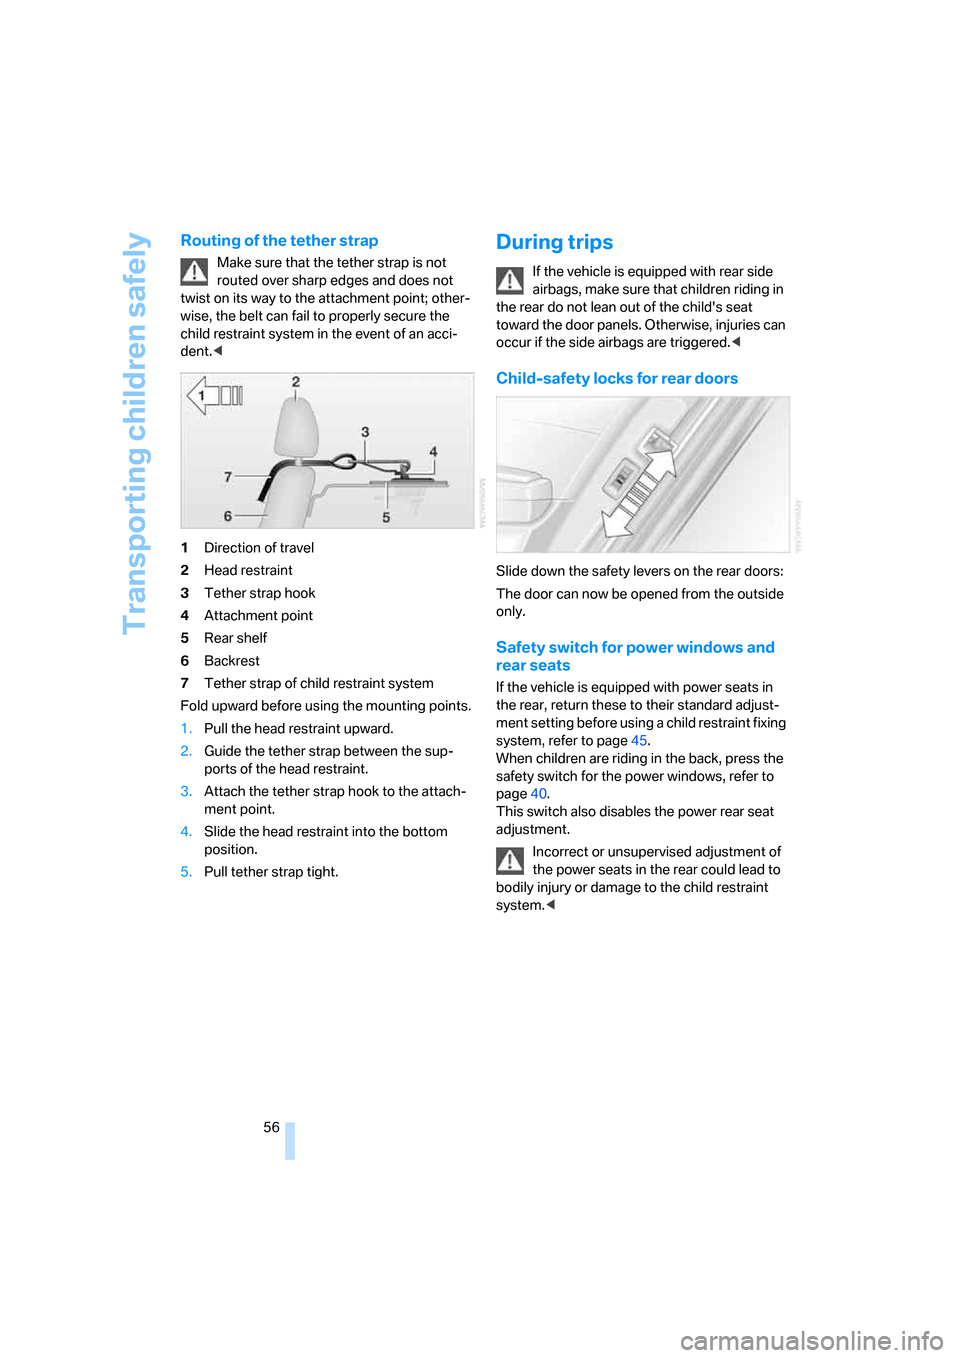
1Direction of travel
2Head restraint
3Tether strap hook
4Attachment point
5Rear shelf
6Backrest
7Tether strap of child restraint system
Fold upward before using the mounting points.
1.Pull the head restraint upward.
2.Guide the tether strap between the sup-
ports of the head restraint.
3.Attach the tether strap hook to the attach-
ment point.
4.Slide the head restraint into the bottom
position.
5.Pull tether strap tight.
During trips
If the vehicle is equipped with rear side
airbags, make sure that children riding in
the rear do not lean out of the child's seat
toward the door panels. Otherwise, injuries can
occur if the side airbags are triggered.<
Child-safety locks for rear doors
Slide down the safety levers on the rear doors:
The door can now be opened from the outside
only.
Safety switch for power windows and
rear seats
If the vehicle is equipped with power seats in
the rear, return these to their standard adjust-
ment setting before using a child restraint fixing
system, refer to page45.
When children are riding in the back, press the
safety switch for the power windows, refer to
page40.
This switch also disables the power rear seat
adjustment.
Incorrect or unsupervised adjustment of
the power seats in the rear could lead to
bodily injury or damage to the child restraint
system.<
Page 98 of 254
Technology for comfort, convenience and safety
96 refer to page54.
In certain sitting positions, teenagers and adults
can deactivate the front, knee and side airbag
on the front passenger side; when this occurs,
the indicator lamp for the front passenger air-
bags lights up. In these cases, change the sit-
ting position so that the front passenger airbags
are activated and the indicator lamp goes out.
If the desired status cannot be produced by
changing the sitting position, have the person
ride in the back. Do not place slip covers, seat
cushions, beaded mats, or other objects on the
passenger seat that are not specifically recom-
mended by BMW. Do not lay objects under the
seat which could press against the seat from
below. Otherwise, a correct evaluation of the
occupied seat surface cannot be assured.<
Operating state of front passenger
airbags
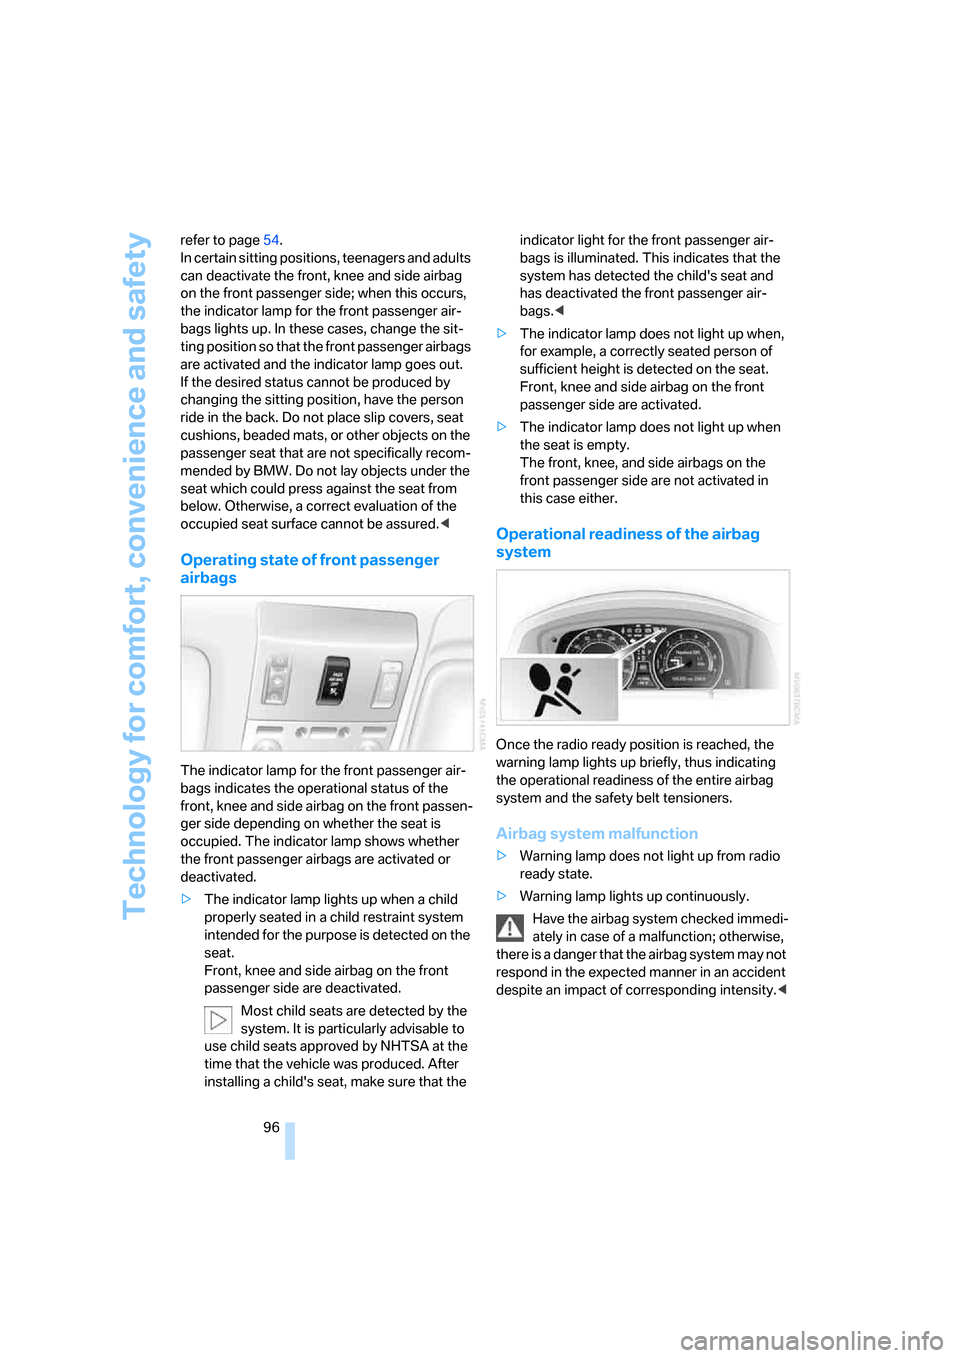
The indicator lamp for the front passenger air-
bags indicates the operational status of the
front, knee and side airbag on the front passen-
ger side depending on whether the seat is
occupied. The indicator lamp shows whether
the front passenger airbags are activated or
deactivated.
>The indicator lamp lights up when a child
properly seated in a child restraint system
intended for the purpose is detected on the
seat.
Front, knee and side airbag on the front
passenger side are deactivated.
Most child seats are detected by the
system. It is particularly advisable to
use child seats approved by NHTSA at the
time that the vehicle was produced. After
installing a child's seat, make sure that the indicator light for the front passenger air-
bags is illuminated. This indicates that the
system has detected the child's seat and
has deactivated the front passenger air-
bags.<
>The indicator lamp does not light up when,
for example, a correctly seated person of
sufficient height is detected on the seat.
Front, knee and side airbag on the front
passenger side are activated.
>The indicator lamp does not light up when
the seat is empty.
The front, knee, and side airbags on the
front passenger side are not activated in
this case either.
Operational readiness of the airbag
system
Once the radio ready position is reached, the
warning lamp lights up briefly, thus indicating
the operational readiness of the entire airbag
system and the safety belt tensioners.
Airbag system malfunction
>Warning lamp does not light up from radio
ready state.
>Warning lamp lights up continuously.
Have the airbag system checked immedi-
ately in case of a malfunction; otherwise,
there is a danger that the airbag system may not
respond in the expected manner in an accident
despite an impact of corresponding intensity.<
Page 115 of 254
Controls
113Reference
At a glance
Driving tips
Communications
Navigation
Entertainment
Mobility
4Switching to the other side
Briefly press the corresponding button with the
ignition in radio ready state or higher.
The side window blind can not be
extended unless the side window is
closed. If the side window is open, the blind will
rise slightly prior to immediately retracting to its
original position.<
To avoid injuries, make sure that the clos-
ing region of the roller blind is clear.
Press the safety switch on the driver's door,
refer to page40. The LED must light up. This
precaution prevents children from operating
the sun blinds using the rear switches, etc.
When leaving the vehicle parked, remove the
remote control from the ignition lock and close
the doors; this precaution prevents children
from operating the roller sun blinds and injuring
themselves.<
Automatically extending and retracting
sun blinds
You can run the sun blinds up and down
together when you press and hold the button3
longer.
Glove compartment
Releasing
Press button. The glove compartment opens
automatically and the light comes on.
Closing
Fold the cover up.
To prevent injury in the event of an acci-
dent while the vehicle is being driven,
close the glove compartment immediately after
use.<
Rechargeable flashlight
The flashlight is located on the left side of the
glove compartment.
The flashlight can remain plugged in continu-
ously. Remove the flashlight from the socket
when needed.
Be sure that the flashlight is switched off
when it is inserted into its holder. Failure
to comply with this precaution could lead to
overcharging and damage.<
Front center armrest
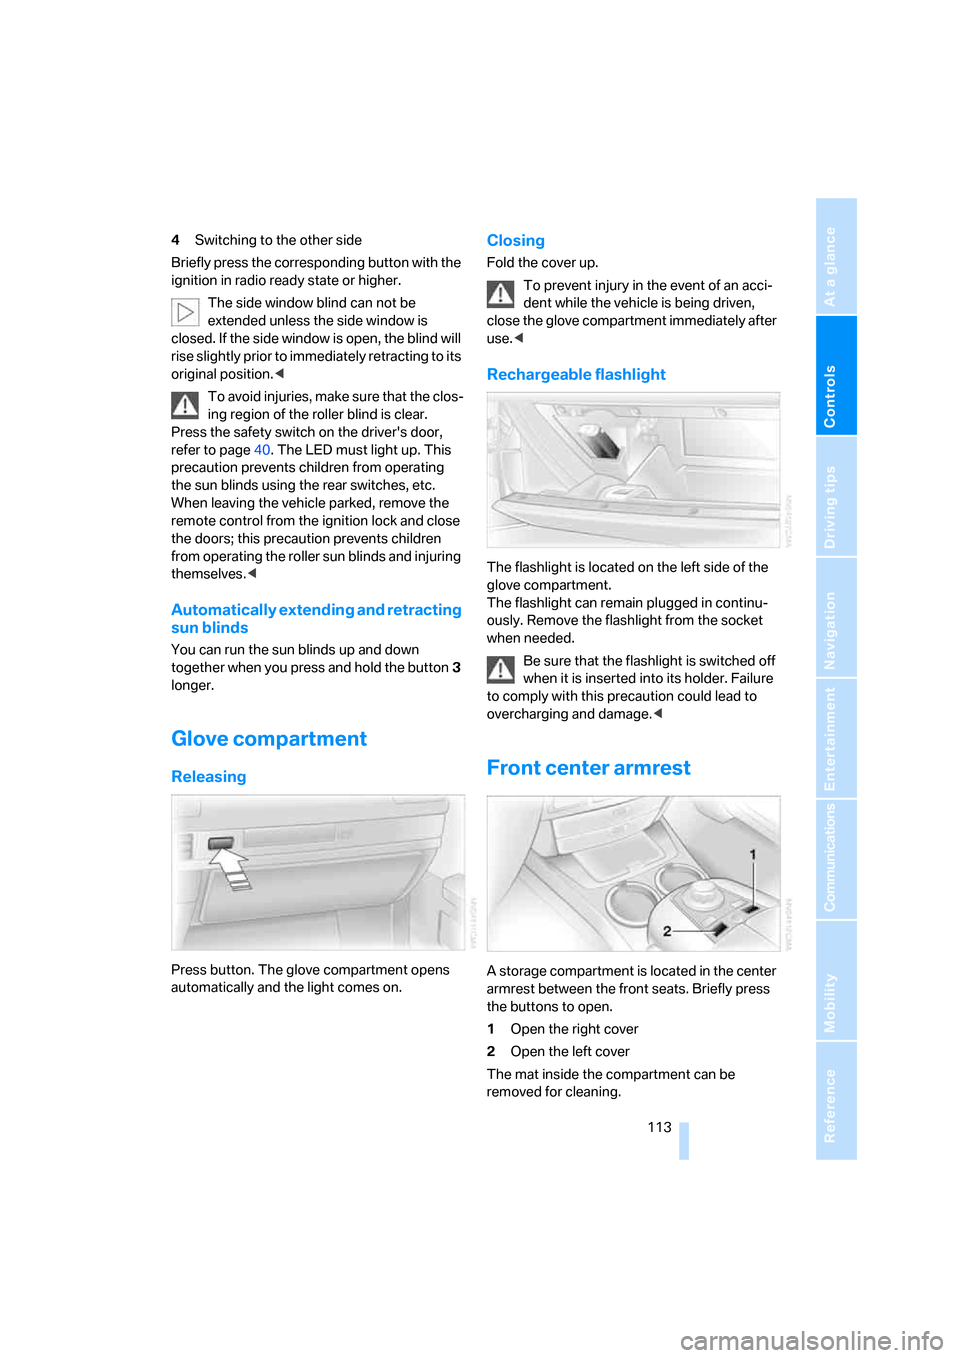
A storage compartment is located in the center
armrest between the front seats. Briefly press
the buttons to open.
1Open the right cover
2Open the left cover
The mat inside the compartment can be
removed for cleaning.
Page 119 of 254
Controls
117Reference
At a glance
Driving tips
Communications
Navigation
Entertainment
Mobility
Rear refrigerator*
The rear refrigerator is located behind the rear
seats' center armrest.
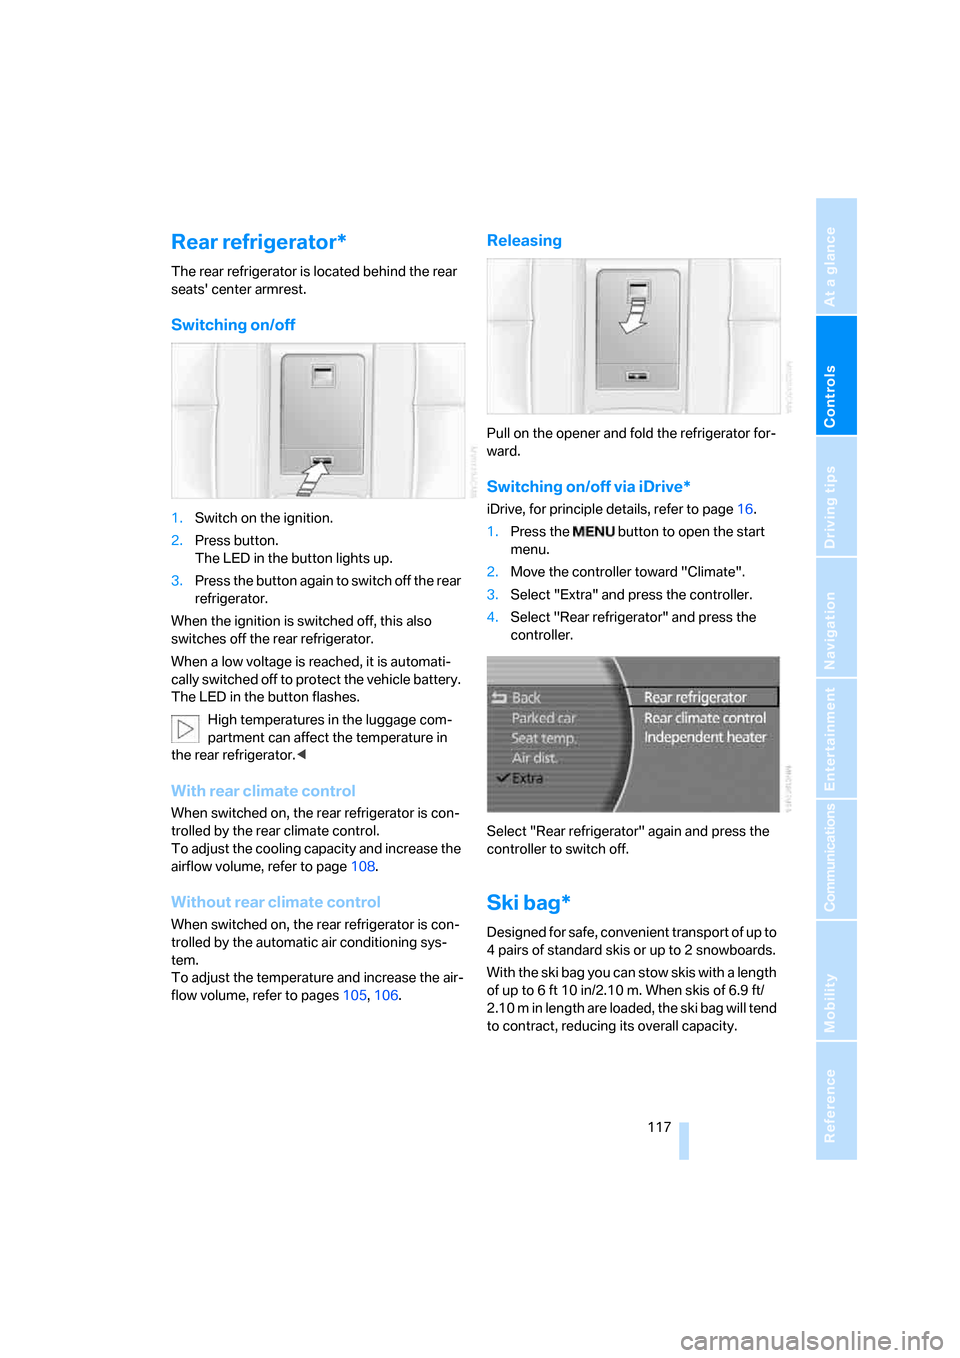
Switching on/off
1.Switch on the ignition.
2.Press button.
The LED in the button lights up.
3.Press the button again to switch off the rear
refrigerator.
When the ignition is switched off, this also
switches off the rear refrigerator.
When a low voltage is reached, it is automati-
cally switched off to protect the vehicle battery.
The LED in the button flashes.
High temperatures in the luggage com-
partment can affect the temperature in
the rear refrigerator.<
With rear climate control
When switched on, the rear refrigerator is con-
trolled by the rear climate control.
To adjust the cooling capacity and increase the
airflow volume, refer to page108.
Without rear climate control
When switched on, the rear refrigerator is con-
trolled by the automatic air conditioning sys-
tem.
To adjust the temperature and increase the air-
flow volume, refer to pages105, 106.
Releasing
Pull on the opener and fold the refrigerator for-
ward.
Switching on/off via iDrive*
iDrive, for principle details, refer to page16.
1.Press the button to open the start
menu.
2.Move the controller toward "Climate".
3.Select "Extra" and press the controller.
4.Select "Rear refrigerator" and press the
controller.
Select "Rear refrigerator" again and press the
controller to switch off.
Ski bag*
Designed for safe, convenient transport of up to
4 pairs of standard skis or up to 2 snowboards.
With the ski bag you can stow skis with a length
of up to 6ft 10in/2.10m. When skis of 6.9ft/
2.10 m in length are loaded, the ski bag will tend
to contract, reducing its overall capacity.
Page 120 of 254
Practical interior accessories
118
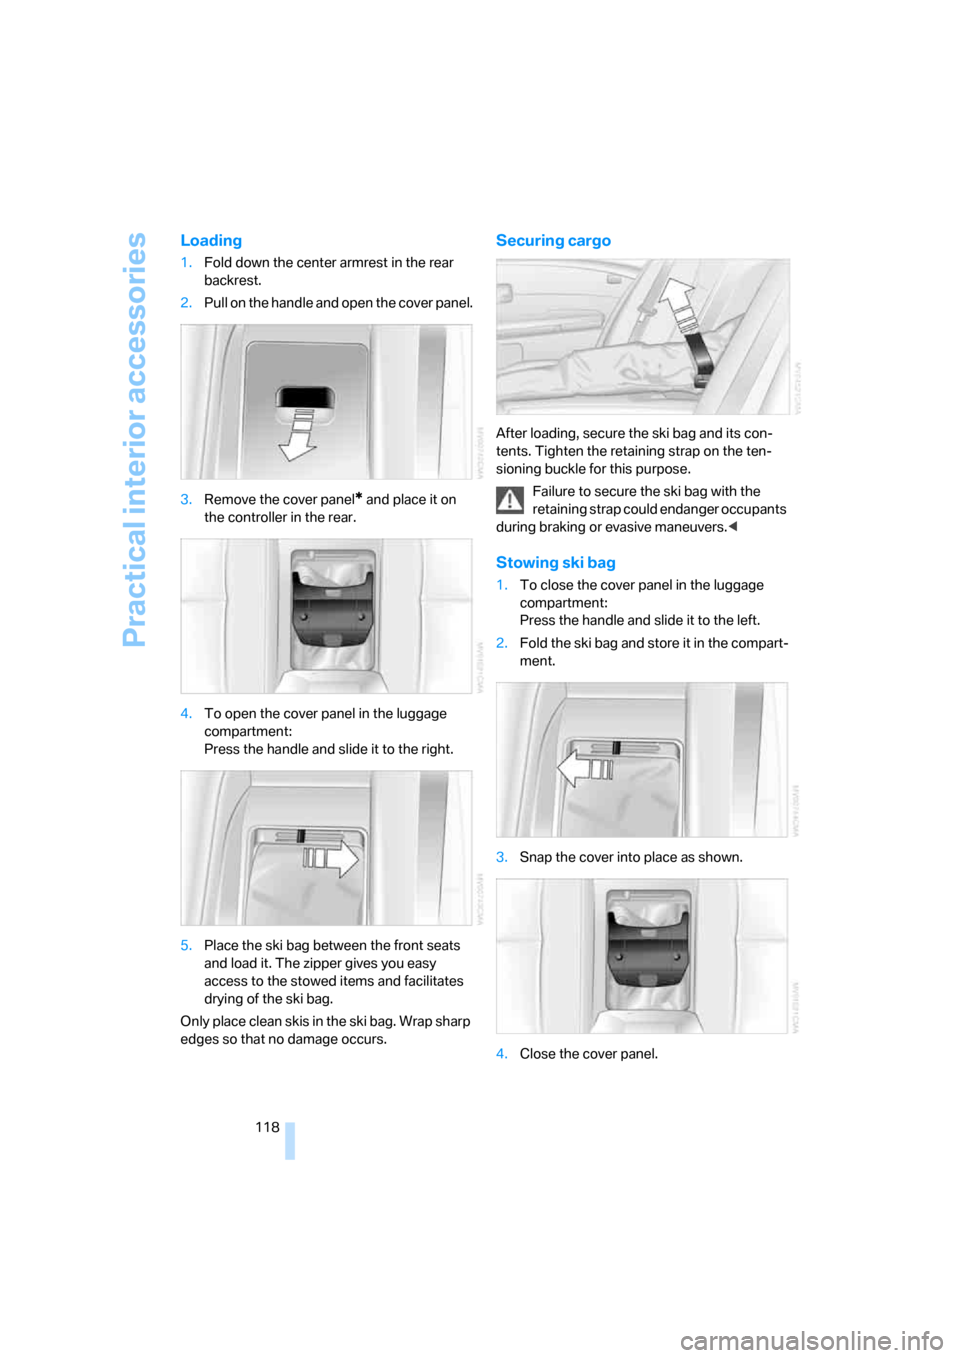
Loading
1.Fold down the center armrest in the rear
backrest.
2.Pull on the handle and open the cover panel.
3.Remove the cover panel
* and place it on
the controller in the rear.
4.To open the cover panel in the luggage
compartment:
Press the handle and slide it to the right.
5.Place the ski bag between the front seats
and load it. The zipper gives you easy
access to the stowed items and facilitates
drying of the ski bag.
Only place clean skis in the ski bag. Wrap sharp
edges so that no damage occurs.
Securing cargo
After loading, secure the ski bag and its con-
tents. Tighten the retaining strap on the ten-
sioning buckle for this purpose.
Failure to secure the ski bag with the
retaining strap could endanger occupants
during braking or evasive maneuvers.<
Stowing ski bag
1.To close the cover panel in the luggage
compartment:
Press the handle and slide it to the left.
2.Fold the ski bag and store it in the compart-
ment.
3.Snap the cover into place as shown.
4.Close the cover panel.
Page 121 of 254
Controls
119Reference
At a glance
Driving tips
Communications
Navigation
Entertainment
Mobility
Luggage compartment
Net*
You can use the net to stow smaller objects
against the bulkhead separating the luggage
compartment from the rear seats.
Do not stow objects behind the side trim
panels on the left and right in the luggage
compartment; otherwise, this could cause over-
heating and damage to the electrical parts
inside.<
Page 126 of 254
Things to remember when driving
124
Cargo loading
To avoid loading the tires beyond their
approved carrying capacity, never over-
load the vehicle. Overloading can lead to over-
heating of the tires and increases the rate at
which damage develops inside them. The ulti-
mate result can come in the form of a sudden
blow-out.<
Determining loading limit
1.Locate the following statement on your
vehicle's placard
*:
The combined weight of occupants
and cargo should never exceed
XXX lbs. or YYY kg; otherwise, the vehicle
may be damaged and unstable driving con-
ditions may result.<
2.Determine the combined weight of the
driver and passengers that will be riding in
your vehicle.
3.Subtract the combined weight of the driver
and passenger from XXX lbs. or YYY kg.
4.The resulting figure equals the available
amount of cargo and luggage load capacity.
For example, if the XXX amount equals
1400 lbs. and there will be five 150-lb. pas-
sengers in your vehicle, the amount of avail-
able cargo and luggage load capacity is
650 lbs.:
1400 lbs. minus 750 lbs. = 650 lbs.
5.Determine the combined weight of luggage
and cargo being loaded into the vehicle.
This weight may not safely exceed the avail-
able cargo and luggage load capacity calcu-
lated in step 4.6.If your vehicle will be towing a trailer, part of
the load from your trailer will be transferred
to your vehicle. Consult the manual for
transporting a trailer to determine how this
may reduce the available cargo and luggage
load capacity of the vehicle.
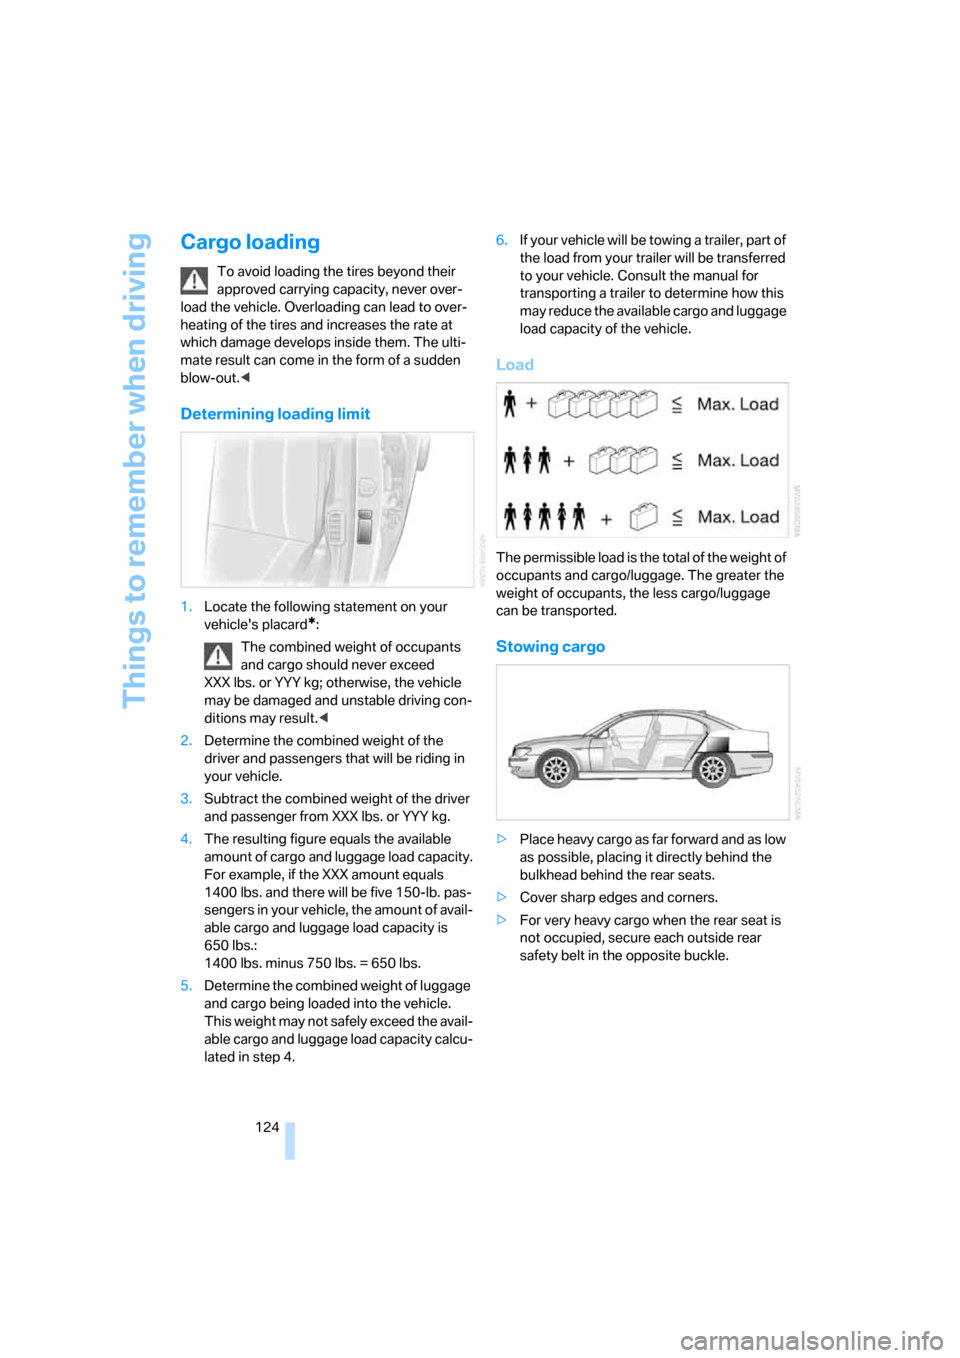
Load
The permissible load is the total of the weight of
occupants and cargo/luggage. The greater the
weight of occupants, the less cargo/luggage
can be transported.
Stowing cargo
>Place heavy cargo as far forward and as low
as possible, placing it directly behind the
bulkhead behind the rear seats.
>Cover sharp edges and corners.
>For very heavy cargo when the rear seat is
not occupied, secure each outside rear
safety belt in the opposite buckle.
Page 237 of 254
Reference 235
At a glance
Controls
Driving tips
Communications
Navigation
Entertainment
Mobility
Changes, technical, refer to
For your own safety5
Changing scale, map view in
navigation145
Changing settings on Control
Display84
Changing time display84
Changing units of measure on
Control Display84
Changing wheels215
– run-flat tires205
"Channels", radio160
Check Control80
– "CHECK"81
– CHECK button81
Child's seats, refer to
Installing child restraint
systems54
Child restraint fixing system
LATCH55
Child restraint systems54
Child-safety lock56
Chrome parts, refer to Caring
for your vehicle brochure
Chrome-plated parts, care,
refer to Caring for your
vehicle brochure
Cigarette lighter116
"City / Postal Code",
navigation133
Cleaning, vehicle, refer to
Caring for your vehicle
brochure
Cleaning headlamps, tank
capacity, refer to Wiper fluid
filler neck66
Cleaning windshield65
"Climate"
– activating activation time for
parked car ventilation110
– preselecting activation time
for parked car
ventilation109
– rear climate control108
– rear refrigerator117
– switching parked car
ventilation on and off
directly109Climate comfort
windshield126
Clock75
– 12/24-hour mode84
– also refer to Assistance
window21
– display format84
– setting84
"Clock", settings84
Closing
– from inside34
– from outside32
Clothes hooks114
Cockpit10
Cold start, refer to Starting
engine57
"Color", DVD changer172
Combined instrument, refer to
Info Display12
"Comfort", EDC Electronic
Damper Control
90
Comfort Access38
– before driving into a car
wash39
– changing battery39
Comfort features14
Comfort program, EDC
Electronic Damper
Control90
Comfort seat44
– in rear45
"Communication", phone184
Compact Disc
– refer to CD changer165
– refer to CD player163
Compartments, refer to
Storage compartments113
Compressed audio files,
CD changer166
Computer76
– displays on Control
Display77
– units of measure and display
format84
"Concierge", BMW Assist192
Condensation, refer to When
vehicle is parked123Condition Based Service
CBS211
Connecting car vacuum
cleaner, refer to Power
socket116
Consumption, refer to
Average fuel
consumption77
Consumption statistics, refer
to Average fuel
consumption77
"Continue route guidance?",
navigation144
"Contrast"
– BMW Night Vision98
– DVD changer172
Control Center, refer to
iDrive16
Control Display
– rear seat screen21
– refer to iDrive16
– setting brightness85
Controller
– programmable button52
– rear seat screen21
– refer to iDrive16
Controls and displays10,14
Coolant210
– level210
– temperature76
Cooler, refer to Rear
refrigerator117
Cooling
– maximum106,108
– refer to AUTO program
104
– refer to Rear climate
control108
– refer to Rear refrigerator117
– refer to Switching cooling
function on and off
manually107
Copyright2
Cornering Brake Control
CBC87
Cradle for mobile phone, refer
to Using snap-in
adapter178
Page 241 of 254
Reference 239
At a glance
Controls
Driving tips
Communications
Navigation
Entertainment
Mobility
H
Handbrake, refer to Parking
brake58
– Automatic Hold59
– manual operation58
Hands-free system179
Hazard warning flashers15
"HD", High Definition
Radio162
Head airbags95
Headlamp control,
automatic100
Headlamp flasher65
– indicator lamp13
Headlamps100
– care, refer to Caring for your
vehicle brochure
– cleaning, refer to Wiper
system65
– replacing bulbs213
Head light, refer to Adaptive
Head Light100
Headphones22
Head restraints46
– front head restraints,
active47
– installation, front47
– removal, front46
– sitting safely43
Heating103
– exterior mirrors51
– mirrors51
– rear window, refer to Rear
window defroster107
– residual heat106
– seats49
– steering wheel52
– when parked, refer to
Residual heat106
– windshield, refer to
Defrosting windows and
removing condensation106
– windshield washer
nozzles66
Heating and ventilation103Heavy cargo, refer to Stowing
cargo124
Height, refer to
Dimensions227
Height adjustment
– seats44
– steering wheel51
"Help"
– assistance window21
– menu guidance19
"Help text", assistance
window21
Help text on Control
Display21
"Hide map icons",
navigation137
"high", automatic climate
control105
High beams101
– headlamp flasher101
– indicator lamp11
High Definition Radio162
Hills123
Holder for cups115
Home address
– selecting141
– storing140
Hood207
Horn11
Hotel function, refer to
Locking separately35
Hot exhaust system122
Hour signal activation85
"House number",
navigation134
Hydraulic brake assistant,
refer to Brake assistant87
Hydroplaning123
I
ID3 tag, refer to Displaying
track information167
iDrive16
– assistance window20
– automatic climate
control104
– changing date and time84
– changing language84
– changing settings84
– changing units of measure
and display format84
– confirming selection or
entry19
– controller16
– controls16
– displays, menus17
– menus17
– rear seat screen21
– selecting menu item19
– setting brightness85
– showing help text21
– start menu18
– status lines20
– symbols19
Ignition key30
Ignition lock57
Illuminated vanity mirror51
Imitation leather, refer to
Caring for your vehicle
brochure
"Indep. ventil.", automatic
climate control109
Indicator/warning lamps13
– airbags96
– alarm system37
– DSC88
– DTC88
– Flat Tire Monitor91
– fog lamps101
– safety belt warning48
– Tire Pressure Monitor93
Individually programmable
buttons11,52
Individual settings, refer to
Key Memory31