navigation system BMW 760I 2007 E65 Repair Manual
[x] Cancel search | Manufacturer: BMW, Model Year: 2007, Model line: 760I, Model: BMW 760I 2007 E65Pages: 254, PDF Size: 7.98 MB
Page 150 of 254
Route guidance
148
Correcting current position
If the navigation system cannot place the cur-
rent position, e.g. if you are currently in a park-
ing structure, then in addition to the country and
city, only longitude and latitude are displayed.
You can then correct your current position, e.g.
by entering the name of the adjacent street or
intersection.
1.Select "Dest. input" and press the control-
ler.
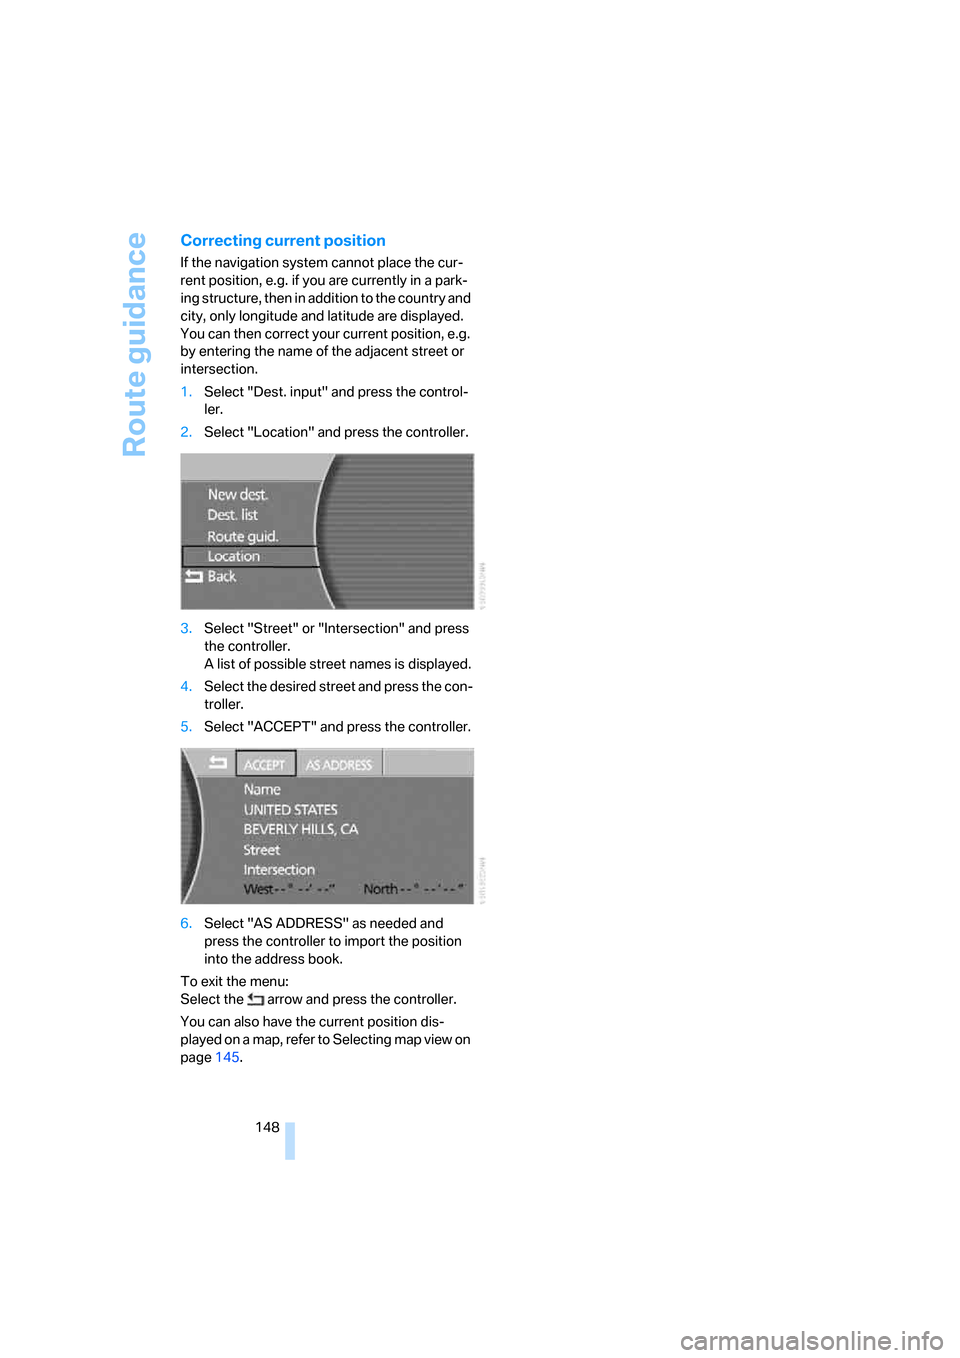
2.Select "Location" and press the controller.
3.Select "Street" or "Intersection" and press
the controller.
A list of possible street names is displayed.
4.Select the desired street and press the con-
troller.
5.Select "ACCEPT" and press the controller.
6.Select "AS ADDRESS" as needed and
press the controller to import the position
into the address book.
To exit the menu:
Select the arrow and press the controller.
You can also have the current position dis-
played on a map, refer to Selecting map view on
page145.
Page 151 of 254
Navigation
Driving tips
149Reference
At a glance
Controls
Communications
Entertainment
Mobility
What to do if …
What to do if …
>a navigation DVD is inserted, but an instruc-
tion to insert the DVD appears on the Con-
trol Display?
The navigation DVD may not be the right
DVD for the navigation system. The DVD is
labeled accordingly.
>you request the current position of your
vehicle, but do not receive a precise dis-
play?
The system is unable to receive enough
GPS signals at your current position due to
obstructions, your position is not yet avail-
able on your navigation DVD, or the system
is in the process of calculating your posi-
tion. Please wait and then try again a little
later.
>the route guidance does not accept a desti-
nation?
The data of the destination is not stored on
the navigation DVD that is loaded. Select a
destination that is as close as possible to
the original.
>the route guidance does not accept a desti-
nation without the street?
On the navigation DVD, no downtown area
can be determined for the city or town
entered. Enter any street, or a destination
such as the railway station etc., then start
the route guidance.
>you want to enter a destination for the route
guidance, but it is not possible to select the
letters for your desired entry?
The data of the destination is not stored on
the navigation DVD that is loaded. In this
case, the system will not offer you any let-
ters to choose from. Select a destination
that is as close as possible to the original.>the system stops furnishing directions on
which way to turn as you approach intersec-
tions?
You are driving in an area that has not yet
been completely recorded on the naviga-
tion DVD. Instead of an arrow indicating a
turn, you will see an arrow which indicates
the general direction of your planned route.
Or you have left the recommended route
and the system requires a few seconds to
calculate a new recommended route.
>the navigation system does not react to
entries?
If the battery was disconnected, it then
takes up to 10 minutes before the system is
once again operational.
Page 155 of 254
Navigation
Entertainment
Driving tips
153Reference
At a glance
Controls
Communications
Mobility
wheel, refer to page11, and via the voice com-
mand system
*, refer to page23.
Switching on/off
In order to switch the Entertainment sound out-
put on/off: press the knob.
The system selects the most recently used
audio or video source, radio, CD, external audio
device, or DVD.
Using the voice command system:
Using with ignition off
The audio and video functions remain available
for use for a period of approx. 30 minutes after
you switch off the ignition.
Switch the sound output back on to enjoy this
function.
Adjusting volume
Turn the knob to the desired volume level.
The sound system automatically reverts
to its mute mode whenever you initiate or
accept a phone call.
Tone control
You can change various tone settings, e.g. tre-
ble and bass or the speed-dependent volume
control. The tone settings are set globally for all
of the audio sources.
Speakers, headsets in the rear, and external
audio devices can be adjusted separately. The
sound settings of the headphones are made on
the rear seat screen with the headphones con-
nected. Only treble, bass and balance can be
adjusted.
The setting is stored for the remote control cur-
rently in use.
Tone adjustment
iDrive, for principle details, refer to page16.
1.Press the button to open the start
menu.
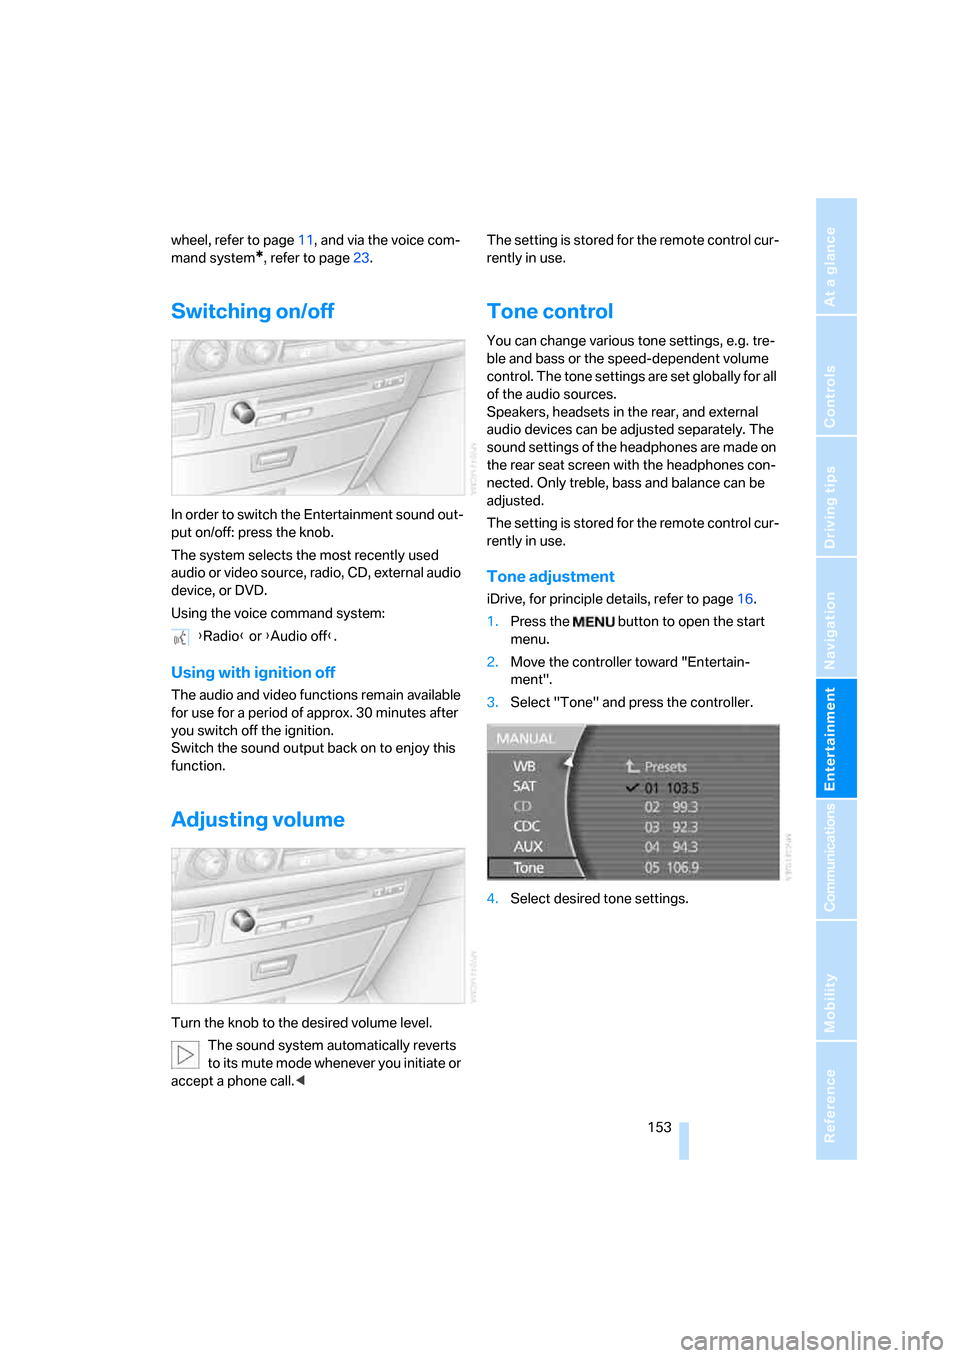
2.Move the controller toward "Entertain-
ment".
3.Select "Tone" and press the controller.
4.Select desired tone settings. {Radio} or {Audio off}.
Page 159 of 254
Navigation
Entertainment
Driving tips
157Reference
At a glance
Controls
Communications
Mobility
3.Turn the controller to select a station and
press the controller.
Sampling stations, scan
The system automatically plays a brief sample
from each of the stations on the current wave-
band.
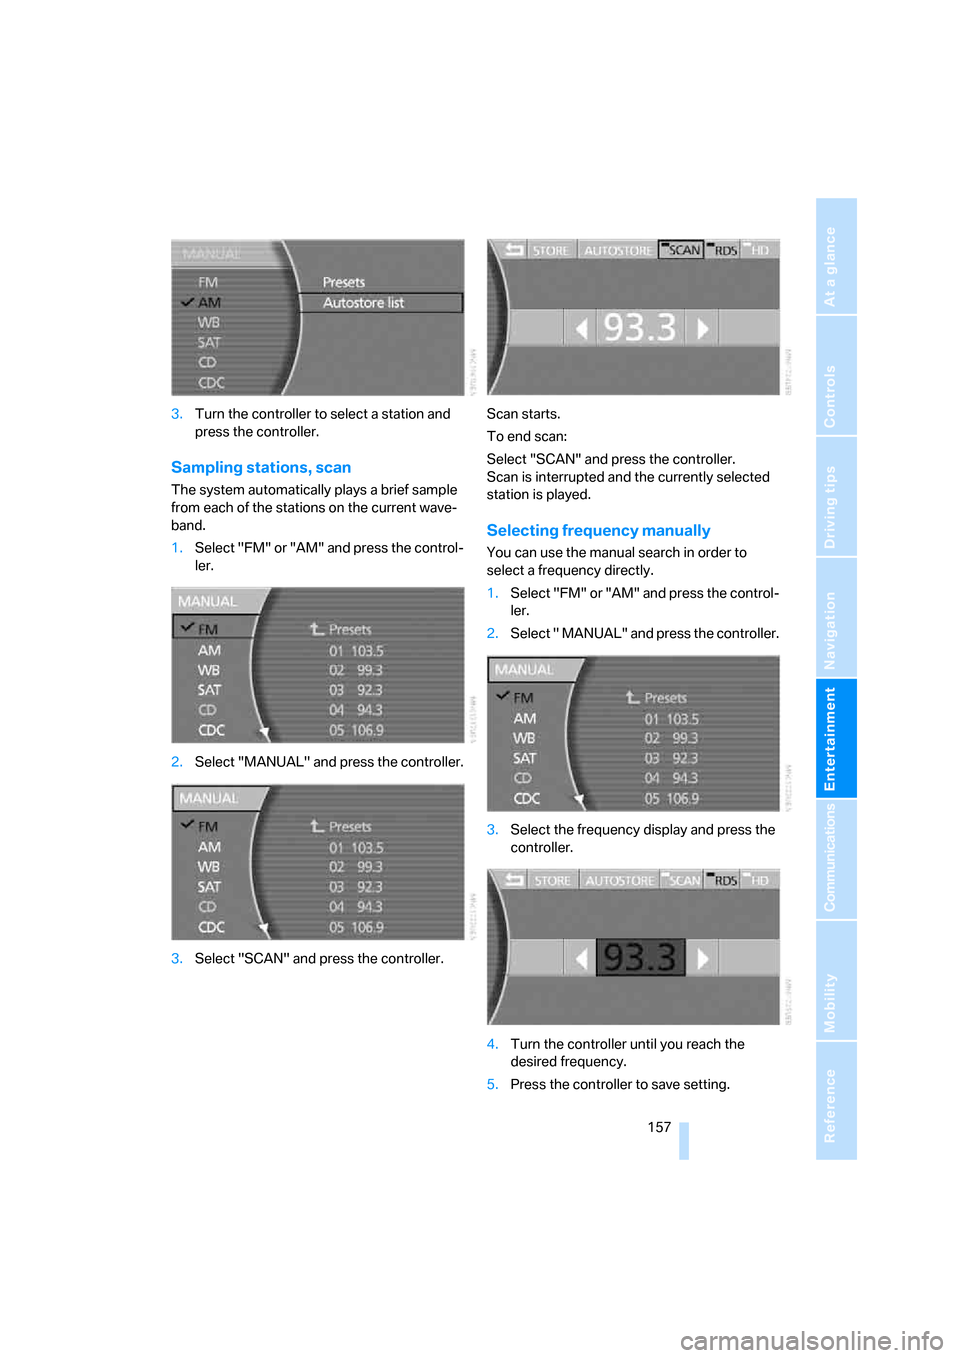
1.Select "FM" or "AM" and press the control-
ler.
2.Select "MANUAL" and press the controller.
3.Select "SCAN" and press the controller.Scan starts.
To end scan:
Select "SCAN" and press the controller.
Scan is interrupted and the currently selected
station is played.
Selecting frequency manually
You can use the manual search in order to
select a frequency directly.
1.Select "FM" or "AM" and press the control-
ler.
2.Select " MANUAL" and press the controller.
3.Select the frequency display and press the
controller.
4.Turn the controller until you reach the
desired frequency.
5.Press the controller to save setting.
Page 161 of 254
Navigation
Entertainment
Driving tips
159Reference
At a glance
Controls
Communications
Mobility
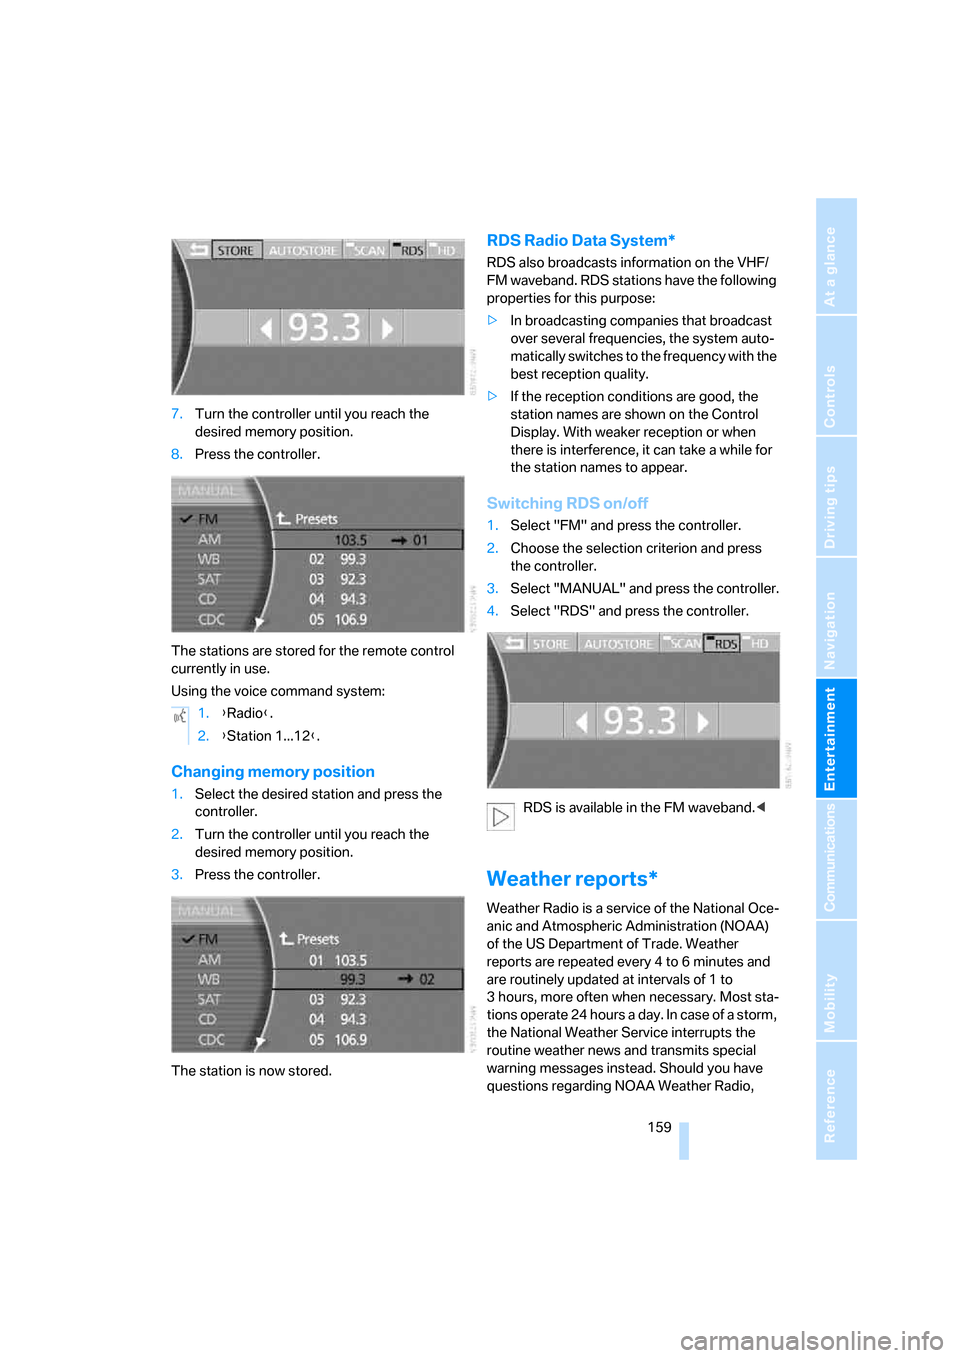
7.Turn the controller until you reach the
desired memory position.
8.Press the controller.
The stations are stored for the remote control
currently in use.
Using the voice command system:
Changing memory position
1.Select the desired station and press the
controller.
2.Turn the controller until you reach the
desired memory position.
3.Press the controller.
The station is now stored.
RDS Radio Data System*
RDS also broadcasts information on the VHF/
FM waveband. RDS stations have the following
properties for this purpose:
>In broadcasting companies that broadcast
over several frequencies, the system auto-
matically switches to the frequency with the
best reception quality.
>If the reception conditions are good, the
station names are shown on the Control
Display. With weaker reception or when
there is interference, it can take a while for
the station names to appear.
Switching RDS on/off
1.Select "FM" and press the controller.
2.Choose the selection criterion and press
the controller.
3.Select "MANUAL" and press the controller.
4.Select "RDS" and press the controller.
RDS is available in the FM waveband.<
Weather reports*
Weather Radio is a service of the National Oce-
anic and Atmospheric Administration (NOAA)
of the US Department of Trade. Weather
reports are repeated every 4 to 6 minutes and
are routinely updated at intervals of 1 to
3 hours, more often when necessary. Most sta-
tions operate 24 hours a day. In case of a storm,
the National Weather Service interrupts the
routine weather news and transmits special
warning messages instead. Should you have
questions regarding NOAA Weather Radio, 1.{Radio}.
2.{Station 1...12}.
Page 163 of 254
Navigation
Entertainment
Driving tips
161Reference
At a glance
Controls
Communications
Mobility
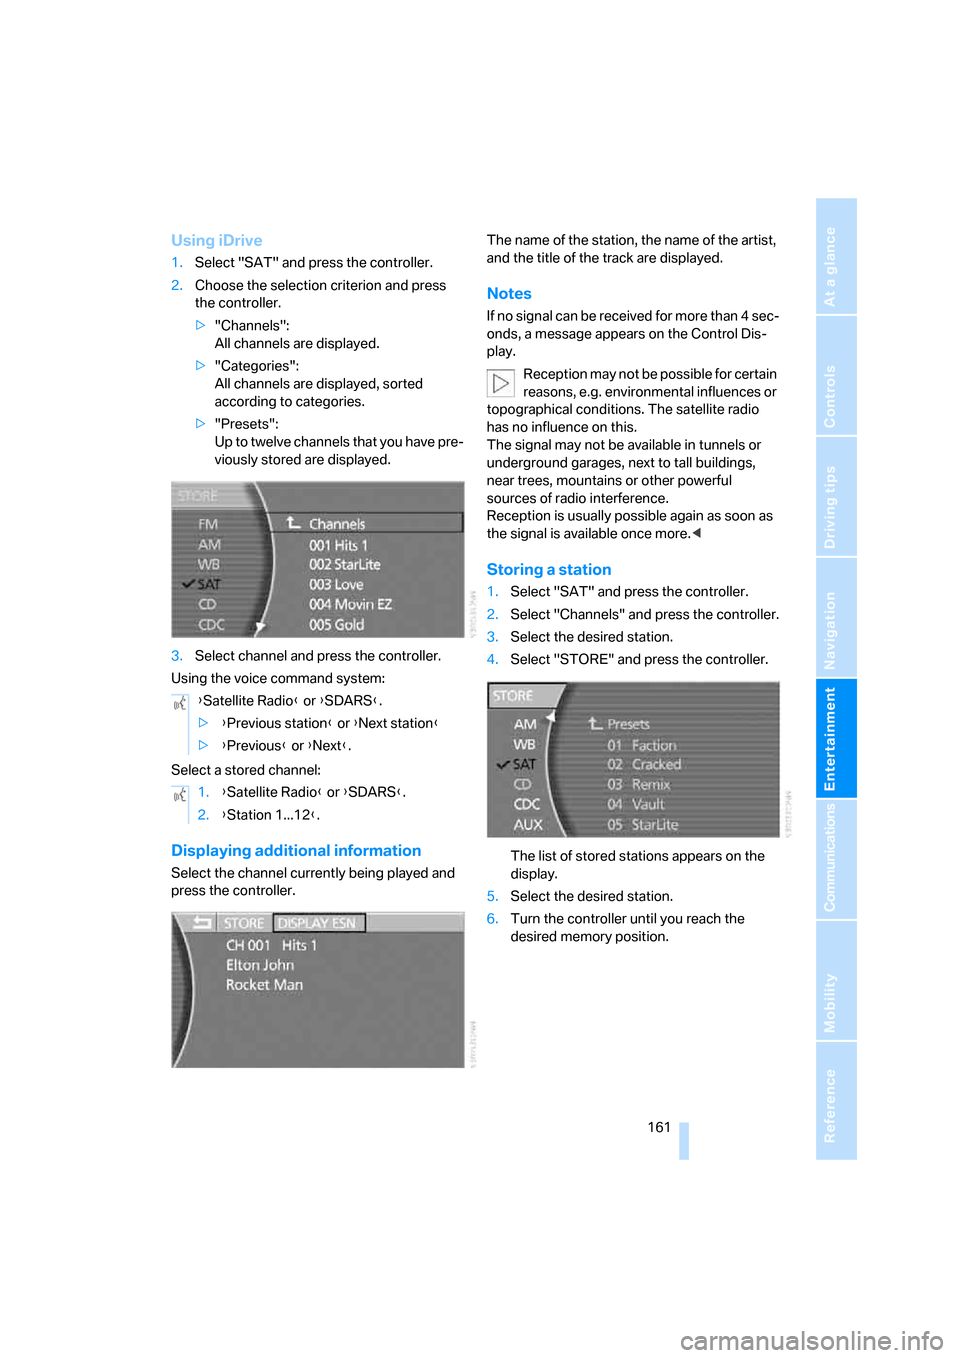
Using iDrive
1.Select "SAT" and press the controller.
2.Choose the selection criterion and press
the controller.
>"Channels":
All channels are displayed.
>"Categories":
All channels are displayed, sorted
according to categories.
>"Presets":
Up to twelve channels that you have pre-
viously stored are displayed.
3.Select channel and press the controller.
Using the voice command system:
Select a stored channel:
Displaying additional information
Select the channel currently being played and
press the controller.The name of the station, the name of the artist,
and the title of the track are displayed.
Notes
If no signal can be received for more than 4 sec-
onds, a message appears on the Control Dis-
play.
Reception may not be possible for certain
reasons, e.g. environmental influences or
topographical conditions. The satellite radio
has no influence on this.
The signal may not be available in tunnels or
underground garages, next to tall buildings,
near trees, mountains or other powerful
sources of radio interference.
Reception is usually possible again as soon as
the signal is available once more.<
Storing a station
1.Select "SAT" and press the controller.
2.Select "Channels" and press the controller.
3.Select the desired station.
4.Select "STORE" and press the controller.
The list of stored stations appears on the
display.
5.Select the desired station.
6.Turn the controller until you reach the
desired memory position. {Satellite Radio} or {SDARS}.
>{Previous station} or {Next station}
>{Previous} or {Next}.
1.{Satellite Radio} or {SDARS}.
2.{Station 1...12}.
Page 165 of 254
Navigation
Entertainment
Driving tips
163Reference
At a glance
Controls
Communications
Mobility
CD player
Listening to CDs
1.Switch Entertainment sound output on,
refer to page153.
2.Insert the CD with the labeled side up.
The CD is automatically pulled in.
To start playback when a CD is already in
the player:
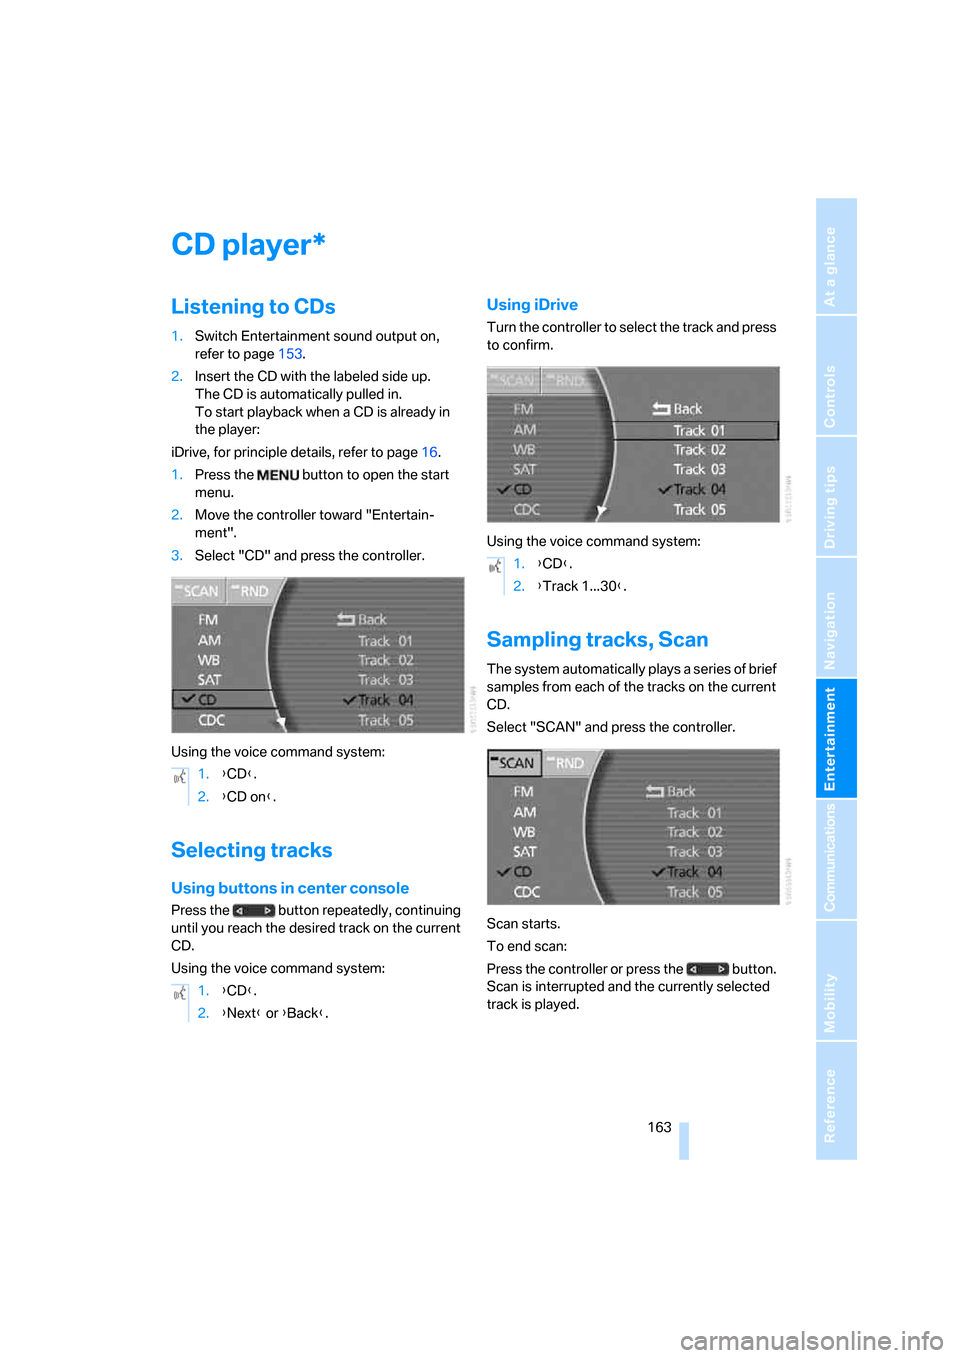
iDrive, for principle details, refer to page16.
1.Press the button to open the start
menu.
2.Move the controller toward "Entertain-
ment".
3.Select "CD" and press the controller.
Using the voice command system:
Selecting tracks
Using buttons in center console
Press the button repeatedly, continuing
until you reach the desired track on the current
CD.
Using the voice command system:
Using iDrive
Turn the controller to select the track and press
to confirm.
Using the voice command system:
Sampling tracks, Scan
The system automatically plays a series of brief
samples from each of the tracks on the current
CD.
Select "SCAN" and press the controller.
Scan starts.
To end scan:
Press the controller or press the button.
Scan is interrupted and the currently selected
track is played.
*
1.{CD}.
2.{CD on}.
1.{CD}.
2.{Next} or {Back}.
1.{CD}.
2.{Track 1...30}.
Page 169 of 254
Navigation
Entertainment
Driving tips
167Reference
At a glance
Controls
Communications
Mobility
Using the voice command system:
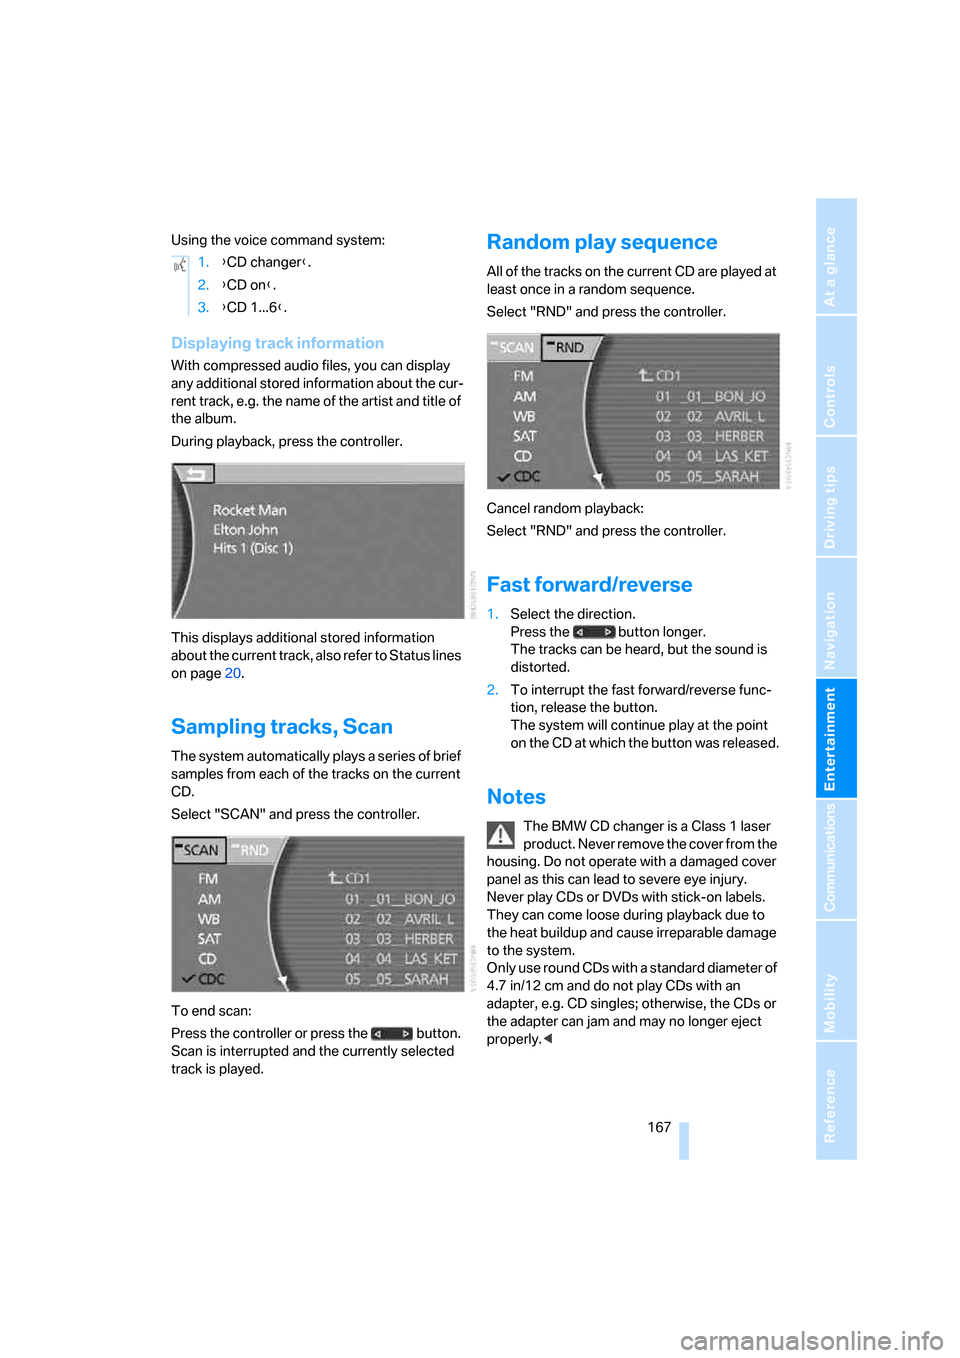
Displaying track information
With compressed audio files, you can display
any additional stored information about the cur-
rent track, e.g. the name of the artist and title of
the album.
During playback, press the controller.
This displays additional stored information
about the current track, also refer to Status lines
on page20.
Sampling tracks, Scan
The system automatically plays a series of brief
samples from each of the tracks on the current
CD.
Select "SCAN" and press the controller.
To end scan:
Press the controller or press the button.
Scan is interrupted and the currently selected
track is played.
Random play sequence
All of the tracks on the current CD are played at
least once in a random sequence.
Select "RND" and press the controller.
Cancel random playback:
Select "RND" and press the controller.
Fast forward/reverse
1.Select the direction.
Press the button longer.
The tracks can be heard, but the sound is
distorted.
2.To interrupt the fast forward/reverse func-
tion, release the button.
The system will continue play at the point
on the CD at which the button was released.
Notes
The BMW CD changer is a Class 1 laser
product. Never remove the cover from the
housing. Do not operate with a damaged cover
panel as this can lead to severe eye injury.
Never play CDs or DVDs with stick-on labels.
They can come loose during playback due to
the heat buildup and cause irreparable damage
to the system.
Only use round CDs with a standard diameter of
4.7 in/12 cm and do not play CDs with an
adapter, e.g. CD singles; otherwise, the CDs or
the adapter can jam and may no longer eject
properly.< 1.{CD changer}.
2.{CD on}.
3.{CD 1...6}.
Page 171 of 254
Navigation
Entertainment
Driving tips
169Reference
At a glance
Controls
Communications
Mobility
External audio device
You can connect an external audio device, for
instance an MP3 player, and output the sound
to vehicle's speaker system. You can adjust the
tone using iDrive.
It is recommended that the external audio
device be set to a mid-level volume and neutral
tone settings. The tone may depend on the
quality of the audio data.
Connecting
Fold the cover of the center armrest upward.
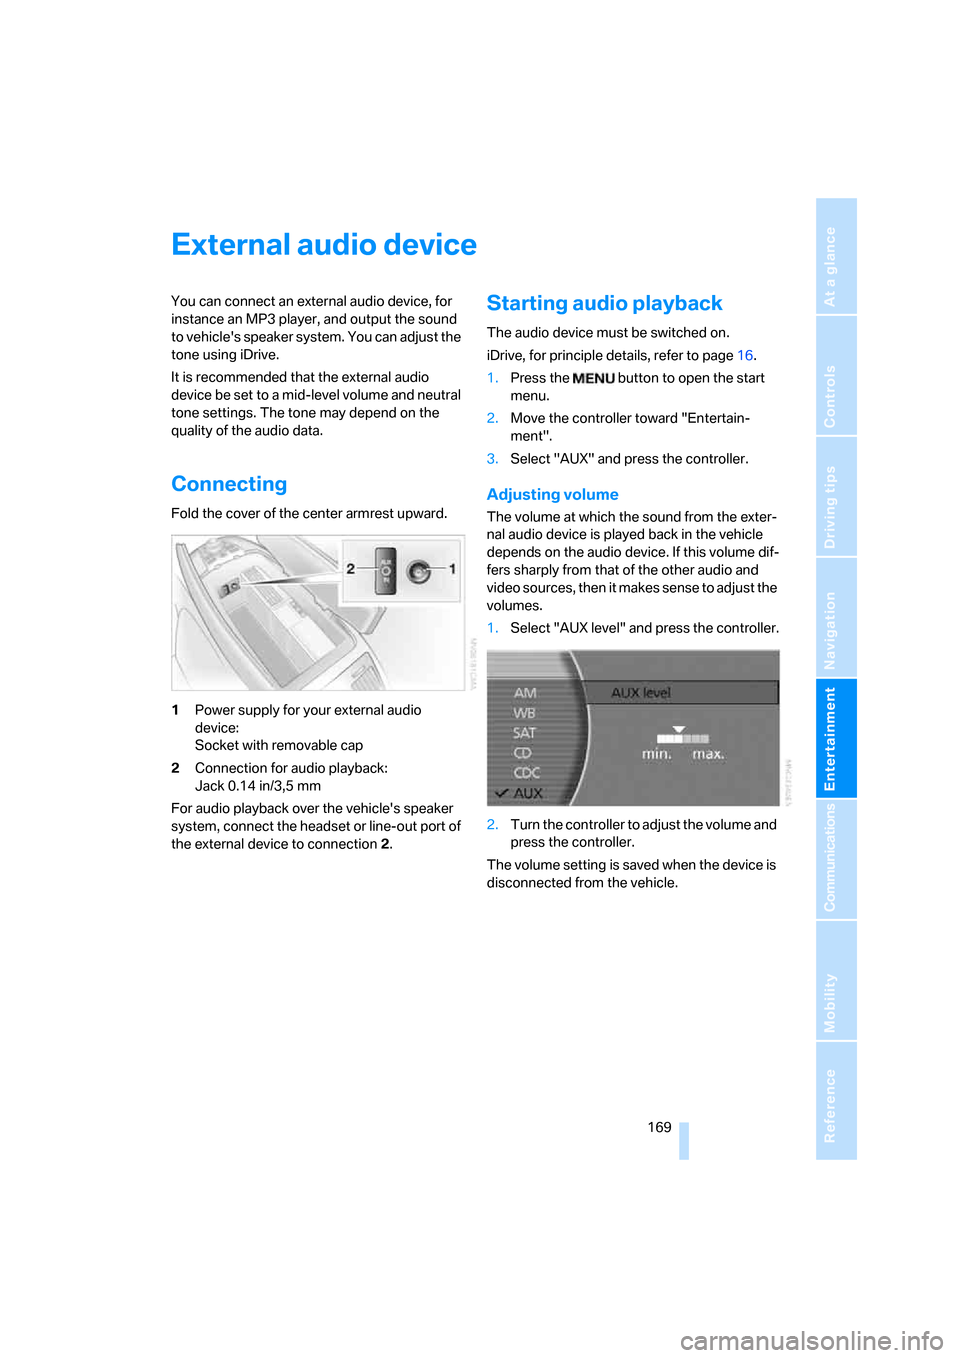
1Power supply for your external audio
device:
Socket with removable cap
2Connection for audio playback:
Jack 0.14 in/3,5 mm
For audio playback over the vehicle's speaker
system, connect the headset or line-out port of
the external device to connection 2.
Starting audio playback
The audio device must be switched on.
iDrive, for principle details, refer to page16.
1.Press the button to open the start
menu.
2.Move the controller toward "Entertain-
ment".
3.Select "AUX" and press the controller.
Adjusting volume
The volume at which the sound from the exter-
nal audio device is played back in the vehicle
depends on the audio device. If this volume dif-
fers sharply from that of the other audio and
video sources, then it makes sense to adjust the
volumes.
1.Select "AUX level" and press the controller.
2.Turn the controller to adjust the volume and
press the controller.
The volume setting is saved when the device is
disconnected from the vehicle.
Page 173 of 254
Navigation
Entertainment
Driving tips
171Reference
At a glance
Controls
Communications
Mobility
DVD country codes
Your DVD changer will only play back DVDs
coded for your home region, e.g. USA,
Canada = 1. The country code supported by
your DVD is indicated in the information sup-
plied with the DVD. This coding cannot be
changed. An overview of the six coding zones:
DVDs with the Code 0 can be played on
all devices.<
Playing DVDs
Playback is only possible on the rear seat
screen, refer to Rear seat screen
* on page21.
1.If necessary, switch on the Entertainment
sound output, refer to page153.
2.If necessary, fill and insert the DVD maga-
zine.
3.Press the button to open the start
menu.
4.Move the controller toward "Entertain-
ment".
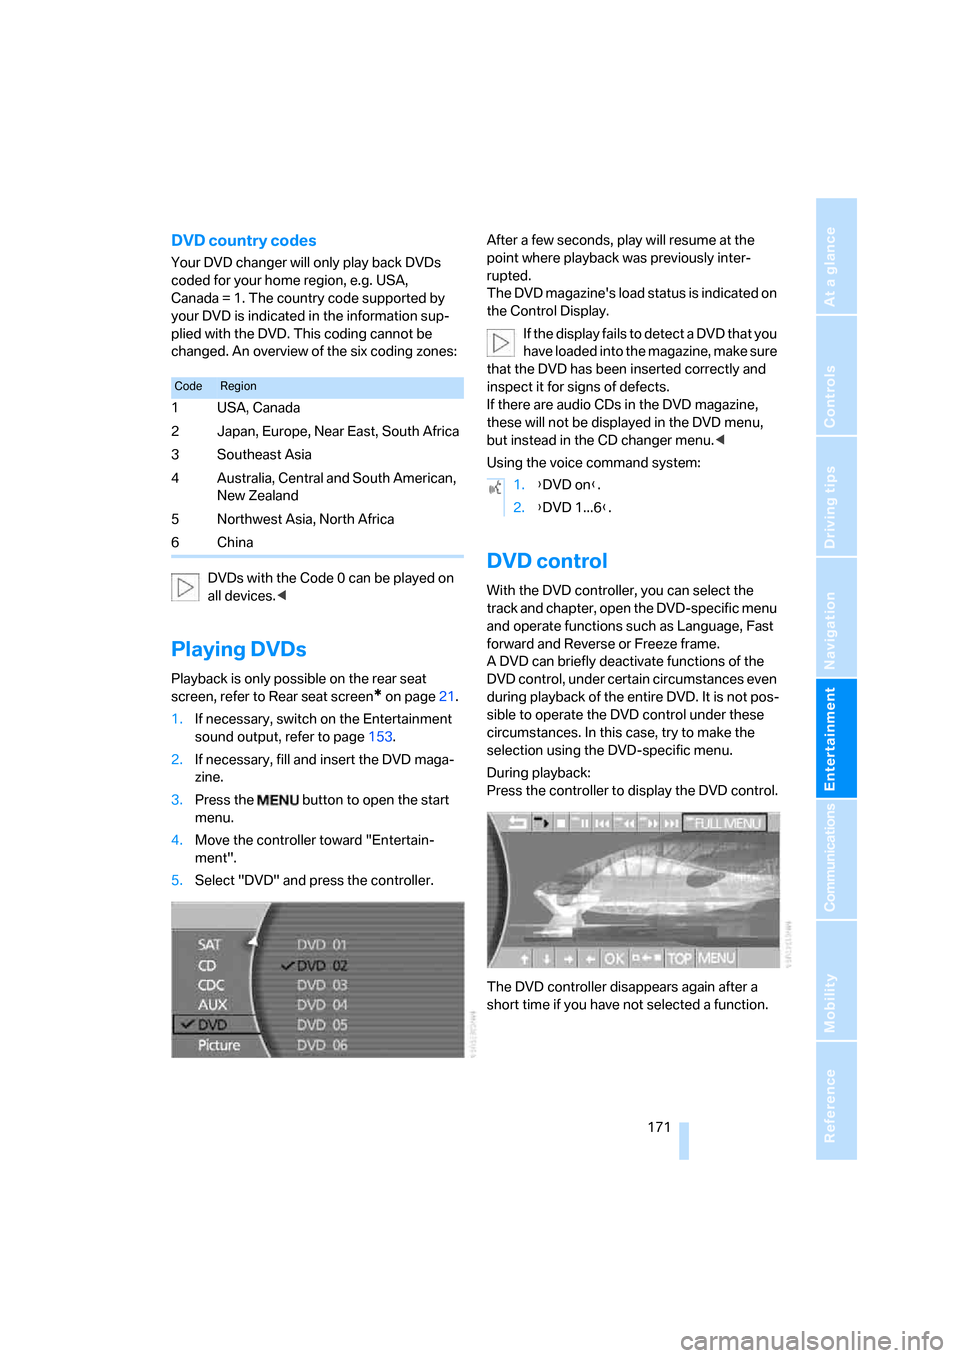
5.Select "DVD" and press the controller.After a few seconds, play will resume at the
point where playback was previously inter-
rupted.
The DVD magazine's load status is indicated on
the Control Display.
If the display fails to detect a DVD that you
have loaded into the magazine, make sure
that the DVD has been inserted correctly and
inspect it for signs of defects.
If there are audio CDs in the DVD magazine,
these will not be displayed in the DVD menu,
but instead in the CD changer menu.<
Using the voice command system:
DVD control
With the DVD controller, you can select the
track and chapter, open the DVD-specific menu
and operate functions such as Language, Fast
forward and Reverse or Freeze frame.
A DVD can briefly deactivate functions of the
DVD control, under certain circumstances even
during playback of the entire DVD. It is not pos-
sible to operate the DVD control under these
circumstances. In this case, try to make the
selection using the DVD-specific menu.
During playback:
Press the controller to display the DVD control.
The DVD controller disappears again after a
short time if you have not selected a function.
CodeRegion
1USA, Canada
2 Japan, Europe, Near East, South Africa
3Southeast Asia
4 Australia, Central and South American,
New Zealand
5Northwest Asia, North Africa
6China
1.{DVD on}.
2.{DVD 1...6}.