phone BMW 760I 2008 E65 User Guide
[x] Cancel search | Manufacturer: BMW, Model Year: 2008, Model line: 760I, Model: BMW 760I 2008 E65Pages: 254, PDF Size: 7.98 MB
Page 26 of 254
Voice command system
24 numerous options are often available, such as
{Scale 100 miles} instead of {Scale}.
Short commands
In the {Main menu} level, you can run certain
functions directly with brief commands, refer to
page230, without having to open an equipment
level first.
For example, if you want to dial a phone num-
ber, you can directly
without previously opening
Identification in Owner's Manual
Special commands are available for specific
systems. In this Owner's Manual you will find
these commands in the sections describing the
individual systems.
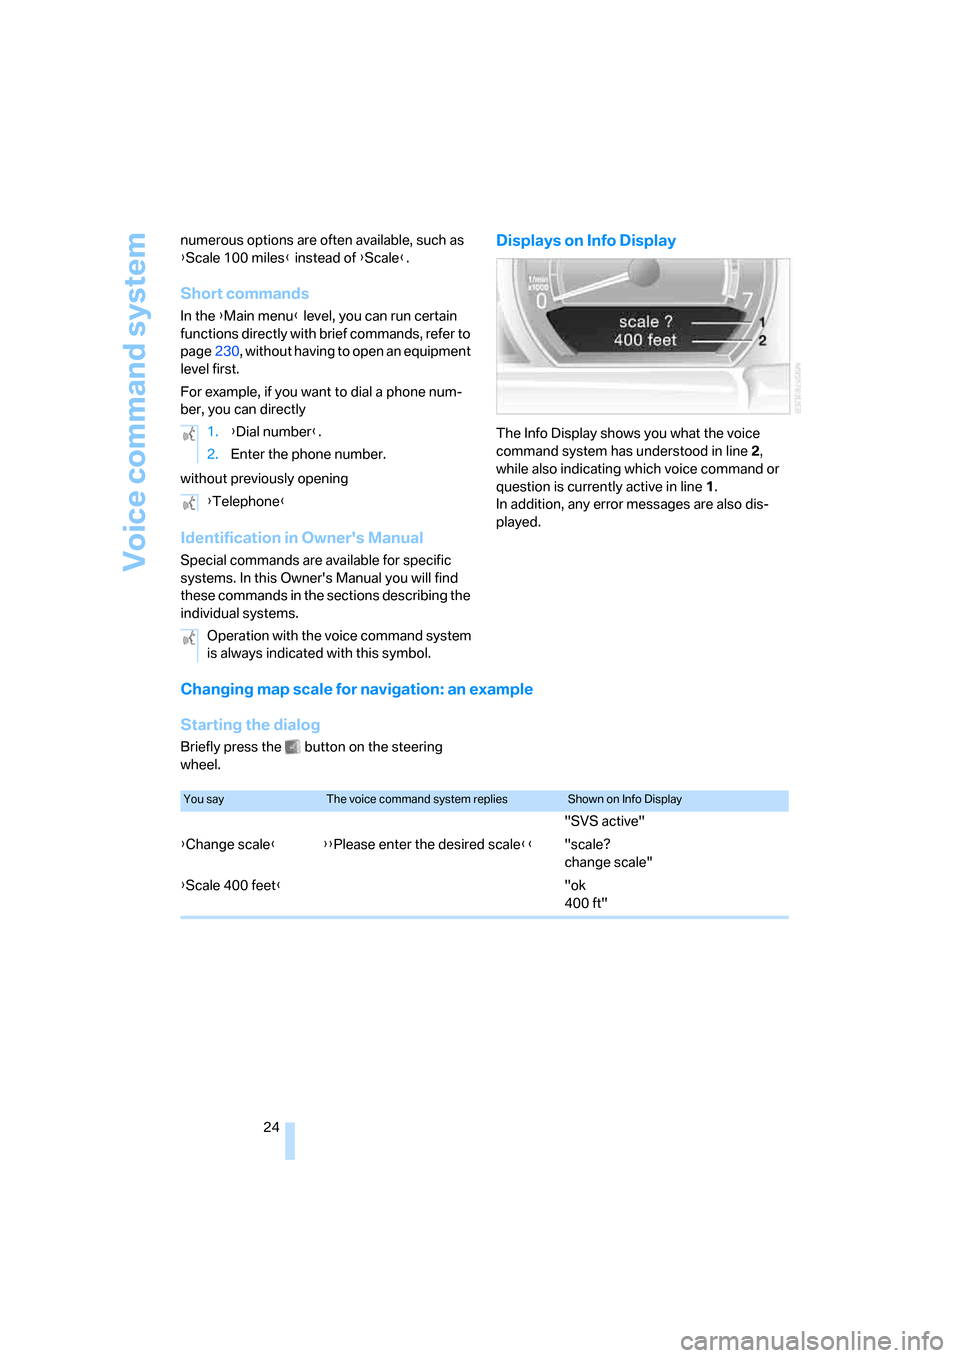
Displays on Info Display
The Info Display shows you what the voice
command system has understood in line2,
while also indicating which voice command or
question is currently active in line1.
In addition, any error messages are also dis-
played.
Changing map scale for navigation: an example
Starting the dialog
Briefly press the button on the steering
wheel.1.{Dial number}.
2.Enter the phone number.
{Telephone}
Operation with the voice command system
is always indicated with this symbol.
You sayThe voice command system repliesShown on Info Display
"SVS active"
{Change scale}{{Please enter the desired scale}}"scale?
change scale"
{Scale 400 feet}"ok
400 ft"
Page 27 of 254
At a glance
25Reference
Controls
Driving tips
Communications
Navigation
Entertainment
Mobility
Adjusting volume
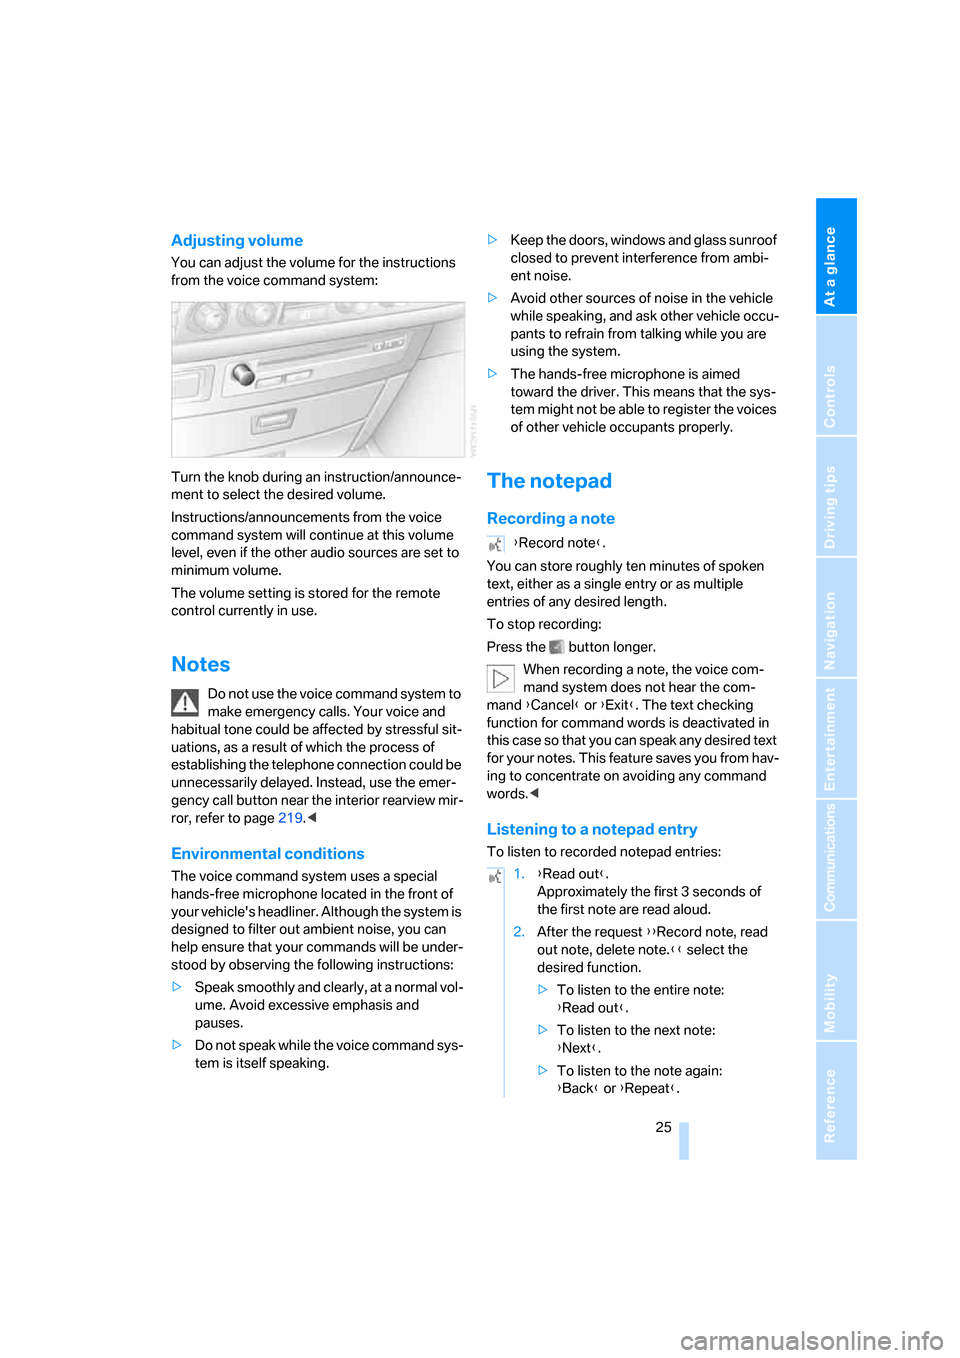
You can adjust the volume for the instructions
from the voice command system:
Turn the knob during an instruction/announce-
ment to select the desired volume.
Instructions/announcements from the voice
command system will continue at this volume
level, even if the other audio sources are set to
minimum volume.
The volume setting is stored for the remote
control currently in use.
Notes
Do not use the voice command system to
make emergency calls. Your voice and
habitual tone could be affected by stressful sit-
uations, as a result of which the process of
establishing the telephone connection could be
unnecessarily delayed. Instead, use the emer-
gency call button near the interior rearview mir-
ror, refer to page219.<
Environmental conditions
The voice command system uses a special
hands-free microphone located in the front of
your vehicle's headliner. Although the system is
designed to filter out ambient noise, you can
help ensure that your commands will be under-
stood by observing the following instructions:
>Speak smoothly and clearly, at a normal vol-
ume. Avoid excessive emphasis and
pauses.
>Do not speak while the voice command sys-
tem is itself speaking.>Keep the doors, windows and glass sunroof
closed to prevent interference from ambi-
ent noise.
>Avoid other sources of noise in the vehicle
while speaking, and ask other vehicle occu-
pants to refrain from talking while you are
using the system.
>The hands-free microphone is aimed
toward the driver. This means that the sys-
tem might not be able to register the voices
of other vehicle occupants properly.
The notepad
Recording a note
You can store roughly ten minutes of spoken
text, either as a single entry or as multiple
entries of any desired length.
To stop recording:
Press the button longer.
When recording a note, the voice com-
mand system does not hear the com-
mand {Cancel} or {Exit}. The text checking
function for command words is deactivated in
this case so that you can speak any desired text
for your notes. This feature saves you from hav-
ing to concentrate on avoiding any command
words.<
Listening to a notepad entry
To listen to recorded notepad entries:
{Record note}.
1.{Read out}.
Approximately the first 3 seconds of
the first note are read aloud.
2.After the request {{Record note, read
out note, delete note.}} select the
desired function.
>To listen to the entire note:
{Read out}.
>To listen to the next note:
{Next}.
>To listen to the note again:
{Back} or {Repeat}.
Page 33 of 254
Controls
31Reference
At a glance
Driving tips
Communications
Navigation
Entertainment
Mobility
Adapter for spare key
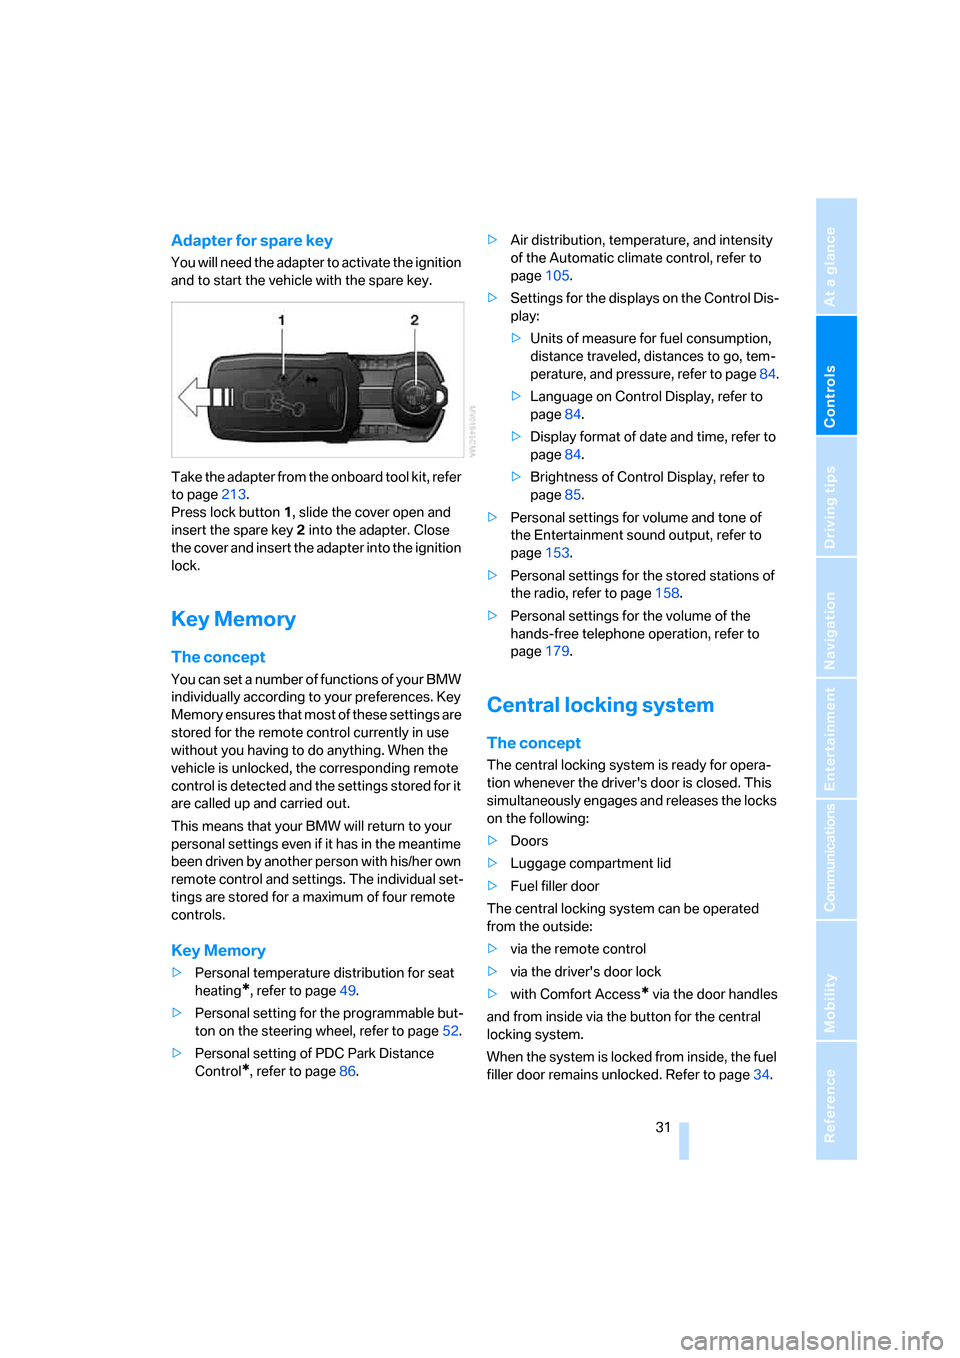
You will need the adapter to activate the ignition
and to start the vehicle with the spare key.
Take the adapter from the onboard tool kit, refer
to page213.
Press lock button1, slide the cover open and
insert the spare key2 into the adapter. Close
the cover and insert the adapter into the ignition
lock.
Key Memory
The concept
You can set a number of functions of your BMW
individually according to your preferences. Key
Memory ensures that most of these settings are
stored for the remote control currently in use
without you having to do anything. When the
vehicle is unlocked, the corresponding remote
control is detected and the settings stored for it
are called up and carried out.
This means that your BMW will return to your
personal settings even if it has in the meantime
been driven by another person with his/her own
remote control and settings. The individual set-
tings are stored for a maximum of four remote
controls.
Key Memory
>Personal temperature distribution for seat
heating
*, refer to page49.
>Personal setting for the programmable but-
ton on the steering wheel, refer to page52.
>Personal setting of PDC Park Distance
Control
*, refer to page86.>Air distribution, temperature, and intensity
of the Automatic climate control, refer to
page105.
>Settings for the displays on the Control Dis-
play:
>Units of measure for fuel consumption,
distance traveled, distances to go, tem-
perature, and pressure, refer to page84.
>Language on Control Display, refer to
page84.
>Display format of date and time, refer to
page84.
>Brightness of Control Display, refer to
page85.
>Personal settings for volume and tone of
the Entertainment sound output, refer to
page153.
>Personal settings for the stored stations of
the radio, refer to page158.
>Personal settings for the volume of the
hands-free telephone operation, refer to
page179.
Central locking system
The concept
The central locking system is ready for opera-
tion whenever the driver's door is closed. This
simultaneously engages and releases the locks
on the following:
>Doors
>Luggage compartment lid
>Fuel filler door
The central locking system can be operated
from the outside:
>via the remote control
>via the driver's door lock
>with Comfort Access
* via the door handles
and from inside via the button for the central
locking system.
When the system is locked from inside, the fuel
filler door remains unlocked. Refer to page34.
Page 100 of 254
Technology for comfort, convenience and safety
98 BMW Night Vision is not a substitute or replace-
ment for driver responsibility or for adapting to
the visibility conditions and the traffic situation.
The forward view illuminated by the headlamps
must always be the basis for making safe driv-
ing decisions; otherwise, a safety risk will
result.<
Activating BMW Night Vision
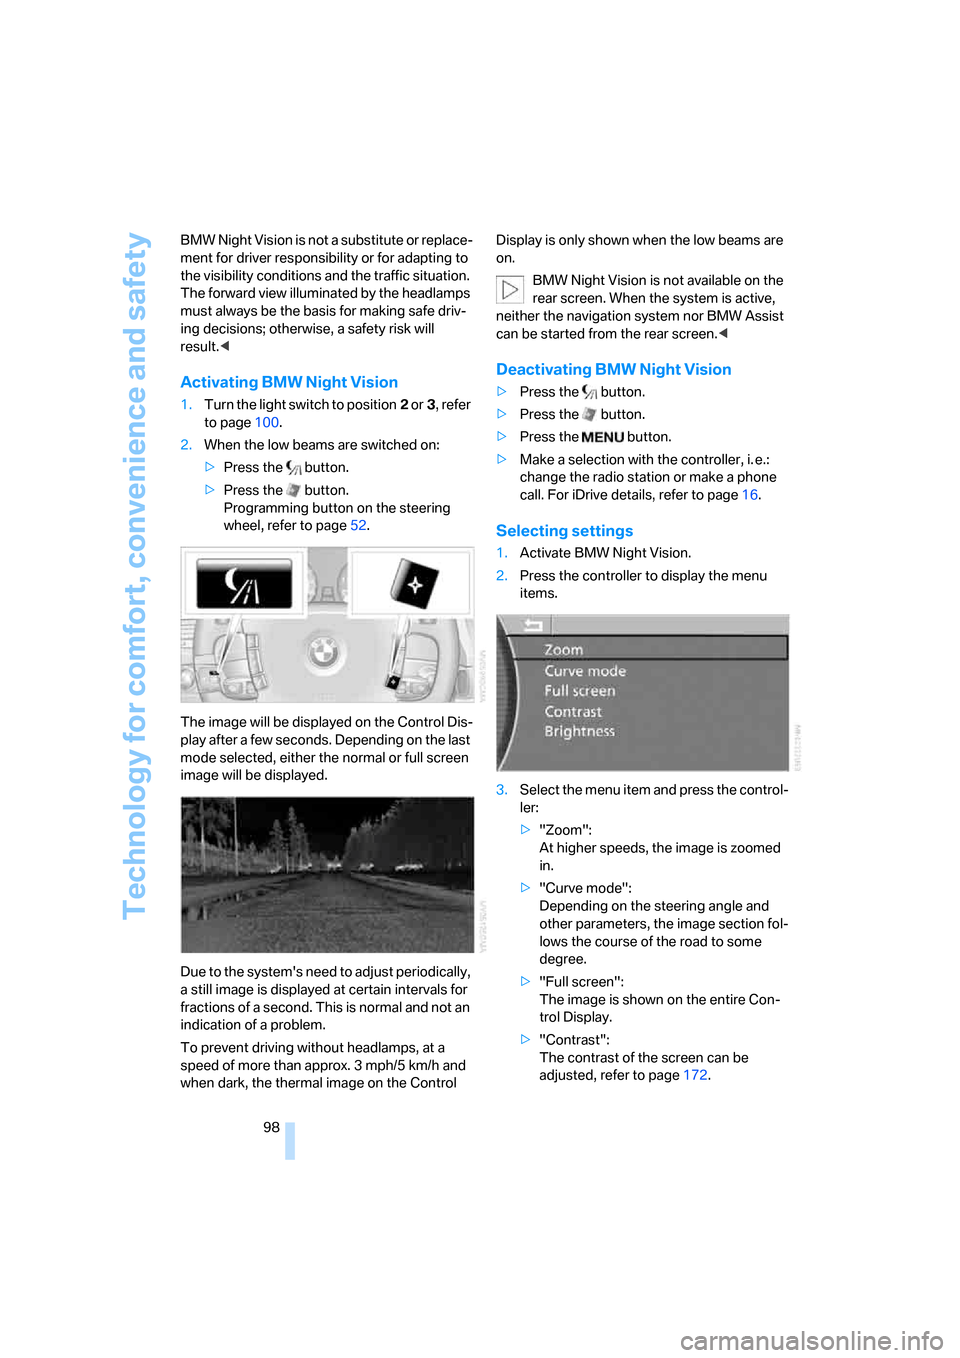
1.Turn the light switch to position2 or3, refer
to page100.
2.When the low beams are switched on:
>Press the button.
>Press the button.
Programming button on the steering
wheel, refer to page52.
The image will be displayed on the Control Dis-
play after a few seconds. Depending on the last
mode selected, either the normal or full screen
image will be displayed.
Due to the system's need to adjust periodically,
a still image is displayed at certain intervals for
fractions of a second. This is normal and not an
indication of a problem.
To prevent driving without headlamps, at a
speed of more than approx. 3 mph/5 km/h and
when dark, the thermal image on the Control Display is only shown when the low beams are
on.
BMW Night Vision is not available on the
rear screen. When the system is active,
neither the navigation system nor BMW Assist
can be started from the rear screen.<
Deactivating BMW Night Vision
>Press the button.
>Press the button.
>Press the button.
>Make a selection with the controller, i. e.:
change the radio station or make a phone
call. For iDrive details, refer to page16.
Selecting settings
1.Activate BMW Night Vision.
2.Press the controller to display the menu
items.
3.Select the menu item and press the control-
ler:
>"Zoom":
At higher speeds, the image is zoomed
in.
>"Curve mode":
Depending on the steering angle and
other parameters, the image section fol-
lows the course of the road to some
degree.
>"Full screen":
The image is shown on the entire Con-
trol Display.
>"Contrast":
The contrast of the screen can be
adjusted, refer to page172.
Page 116 of 254
Practical interior accessories
114 Depending upon your equipment package, any
of the following may be located in the storage
compartment:
>Removable CD holder
*
>Folding, removable storage compartment*,
e.g. for glasses or mobile phone
>Folding, removable waste receptacle
*
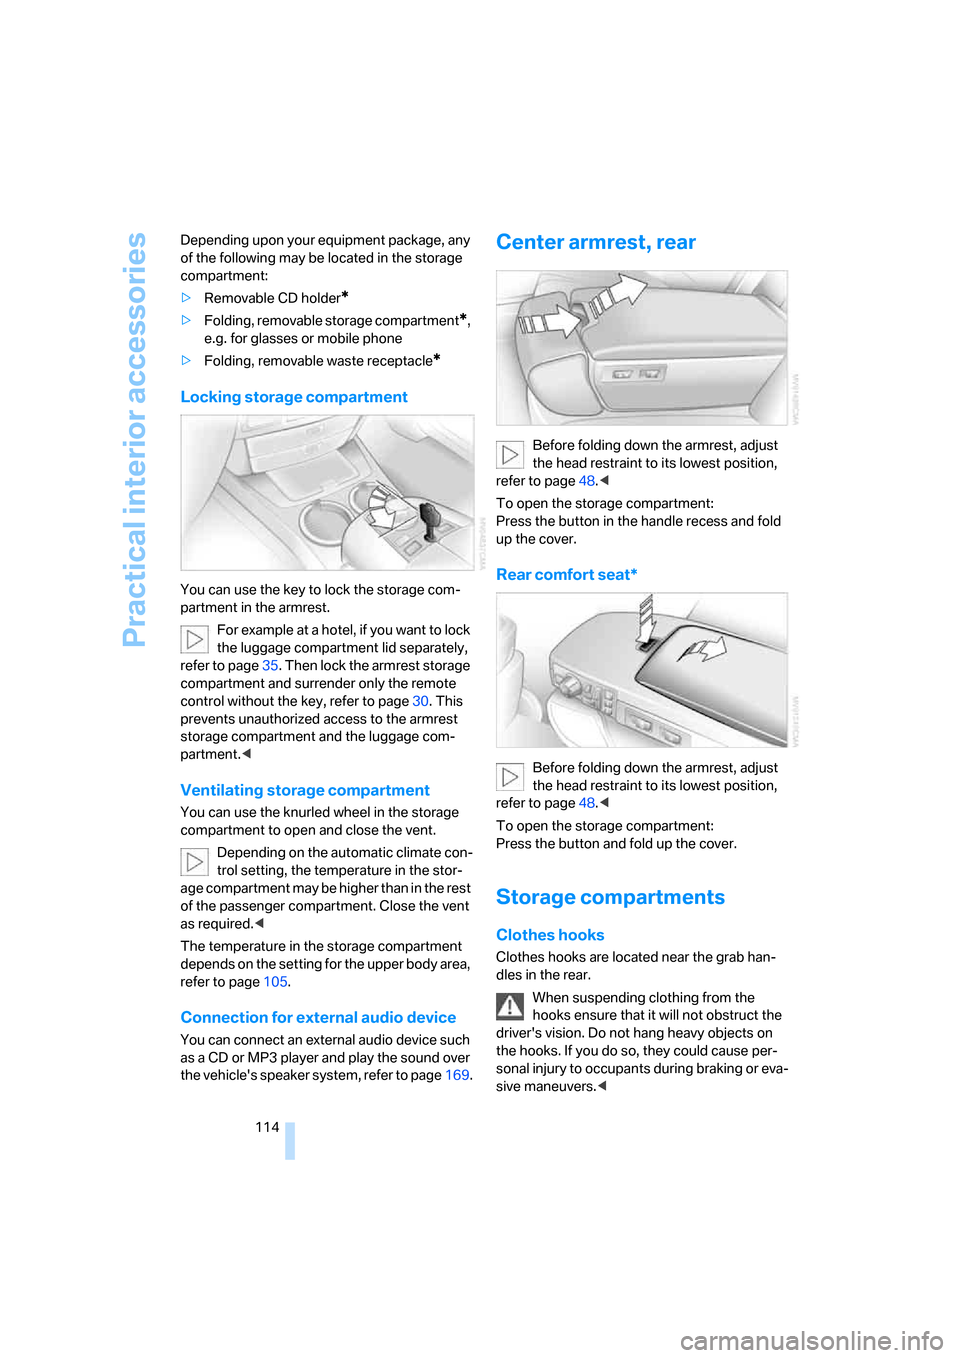
Locking storage compartment
You can use the key to lock the storage com-
partment in the armrest.
For example at a hotel, if you want to lock
the luggage compartment lid separately,
refer to page35. Then lock the armrest storage
compartment and surrender only the remote
control without the key, refer to page30. This
prevents unauthorized access to the armrest
storage compartment and the luggage com-
partment.<
Ventilating storage compartment
You can use the knurled wheel in the storage
compartment to open and close the vent.
Depending on the automatic climate con-
trol setting, the temperature in the stor-
age compartment may be higher than in the rest
of the passenger compartment. Close the vent
as required.<
The temperature in the storage compartment
depends on the setting for the upper body area,
refer to page105.
Connection for external audio device
You can connect an external audio device such
as a CD or MP3 player and play the sound over
the vehicle's speaker system, refer to page169.
Center armrest, rear
Before folding down the armrest, adjust
the head restraint to its lowest position,
refer to page48.<
To open the storage compartment:
Press the button in the handle recess and fold
up the cover.
Rear comfort seat*
Before folding down the armrest, adjust
the head restraint to its lowest position,
refer to page48.<
To open the storage compartment:
Press the button and fold up the cover.
Storage compartments
Clothes hooks
Clothes hooks are located near the grab han-
dles in the rear.
When suspending clothing from the
hooks ensure that it will not obstruct the
driver's vision. Do not hang heavy objects on
the hooks. If you do so, they could cause per-
sonal injury to occupants during braking or eva-
sive maneuvers.<
Page 124 of 254
Things to remember when driving
122
Things to remember when driving
Breaking-in
Moving parts need time to adjust to one
another. To ensure that your vehicle continues
to furnish optimized economy of operation
throughout an extended service life, we request
that you devote careful attention to the follow-
ing information.
Engine and differential
Always obey all official speed limits.
Up to 1,200 miles/2,000 km
Drive with changing engine and vehicle speeds,
but do not exceed:
4500 rpm or 100 mph/160 km/h
Avoid full-throttle operation and use of the
transmission's kick-down mode during these
initial miles.
After 1,200 miles/2,000 km
The engine and vehicle speed can gradually be
increased.
Tires
Due to technical factors associated with their
manufacture, tires do not achieve their full trac-
tion potential until after an initial break-in
period. Therefore, drive reservedly during the
first 200 miles/300 km.
Brake system
Brakes require an initial break-in period of
approx. 300 miles/500 km to achieve optimized
contact and wear patterns between brake pads
and rotors.
Following component replacements
Follow the break-in sequence again if compo-
nents addressed above must be replaced again
during subsequent driving.
General driving notes
Closing luggage compartment lid
Operate the vehicle only when the lug-
gage compartment lid is completely
closed. Otherwise, exhaust fumes could pene-
trate into the passenger compartment.<
If special circumstances should make it abso-
lutely necessary to operate the vehicle with the
luggage compartment lid open:
1.Close all windows and the glass sunroof.
2.Adjust the automatic climate control's
blower to supply a high rate of airflow, refer
to page106.
Hot exhaust system
As in all vehicles, extremely high temper-
atures are generated in the exhaust sys-
tem. Do not remove the heat shields installed
adjacent to it, and never apply undercoating to
them. When driving, standing at idle, and park-
ing, take care to avoid possible contact
between the hot exhaust system and any highly
flammable materials such as hay, leaves, grass,
etc. Such contact could lead to a fire, accompa-
nied by the risk of serious property damage and
personal injury.<
Mobile communications devices in
vehicle
BMW does not recommend using mobile
communications devices, e.g. mobile
phones, inside the vehicle without a direct con-
nection to an outside antenna. Otherwise, the
vehicle electronics and mobile communications
device can interfere with each other. In addition,
there is no assurance that the radiation which
results during transmission will be discharged
from the vehicle interior.<
Page 155 of 254
Navigation
Entertainment
Driving tips
153Reference
At a glance
Controls
Communications
Mobility
wheel, refer to page11, and via the voice com-
mand system
*, refer to page23.
Switching on/off
In order to switch the Entertainment sound out-
put on/off: press the knob.
The system selects the most recently used
audio or video source, radio, CD, external audio
device, or DVD.
Using the voice command system:
Using with ignition off
The audio and video functions remain available
for use for a period of approx. 30 minutes after
you switch off the ignition.
Switch the sound output back on to enjoy this
function.
Adjusting volume
Turn the knob to the desired volume level.
The sound system automatically reverts
to its mute mode whenever you initiate or
accept a phone call.
Tone control
You can change various tone settings, e.g. tre-
ble and bass or the speed-dependent volume
control. The tone settings are set globally for all
of the audio sources.
Speakers, headsets in the rear, and external
audio devices can be adjusted separately. The
sound settings of the headphones are made on
the rear seat screen with the headphones con-
nected. Only treble, bass and balance can be
adjusted.
The setting is stored for the remote control cur-
rently in use.
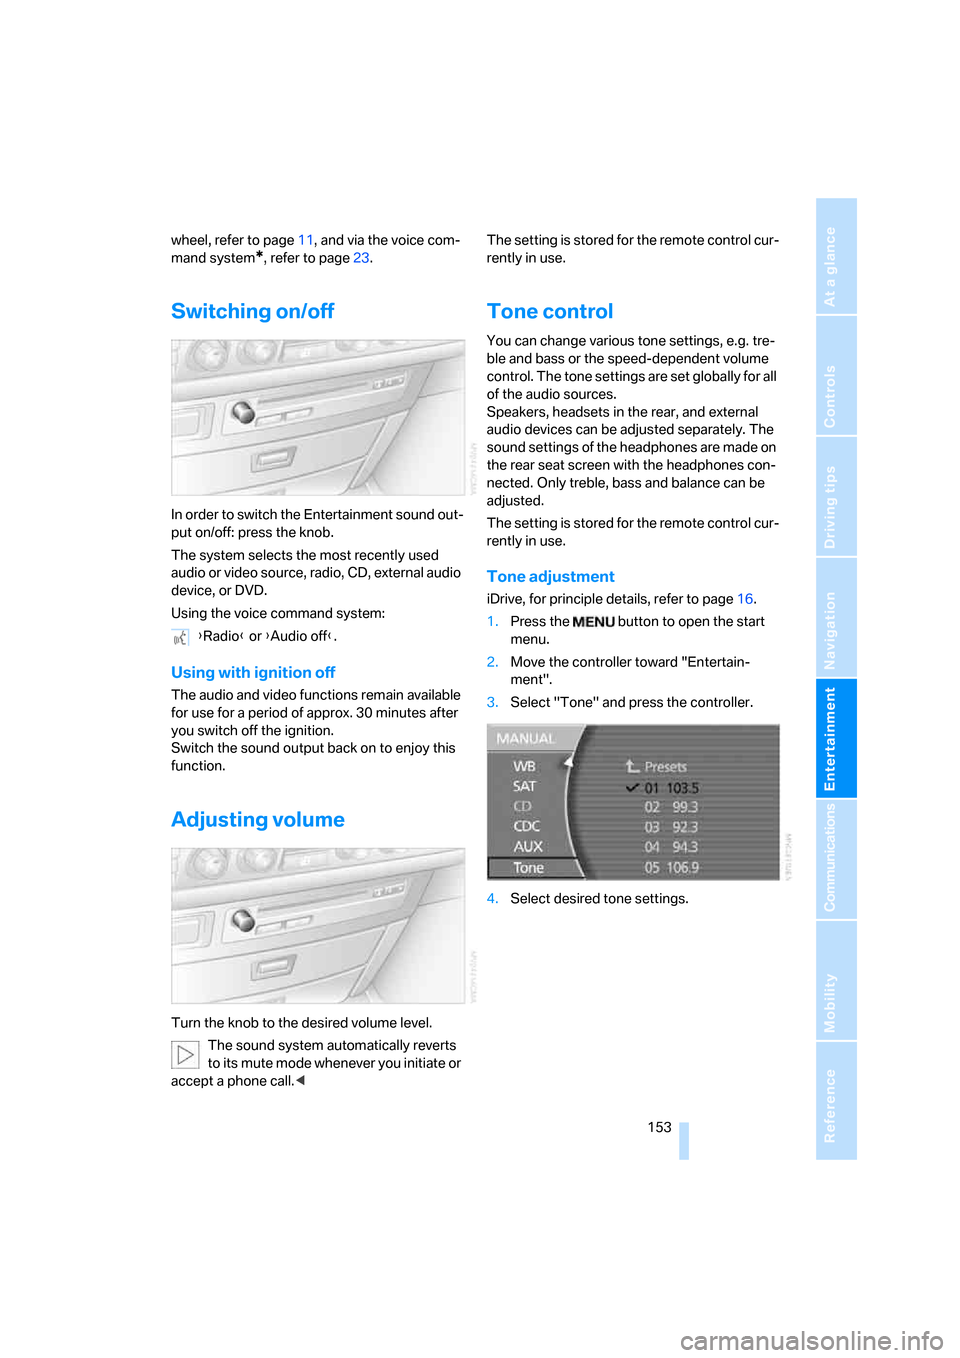
Tone adjustment
iDrive, for principle details, refer to page16.
1.Press the button to open the start
menu.
2.Move the controller toward "Entertain-
ment".
3.Select "Tone" and press the controller.
4.Select desired tone settings. {Radio} or {Audio off}.
Page 162 of 254
Radio
160 please contact the nearest office of the National
Weather Service or write to the National
Weather Service at: W/OM1, National Oceanic
and Atmospheric Administration, 1325 East-
West Highway, Silver Spring, MD 20910.
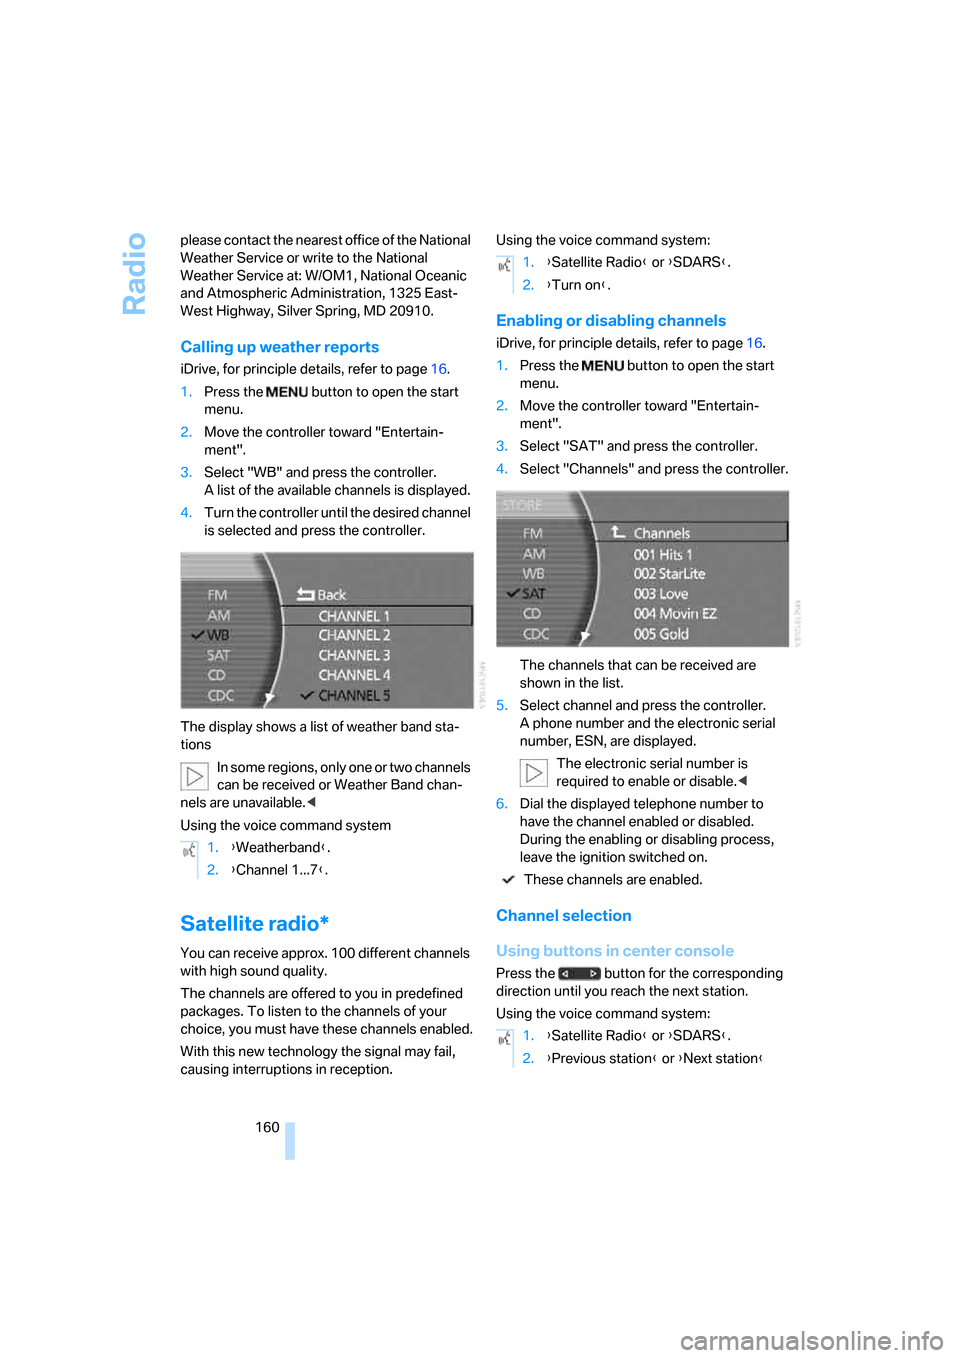
Calling up weather reports
iDrive, for principle details, refer to page16.
1.Press the button to open the start
menu.
2.Move the controller toward "Entertain-
ment".
3.Select "WB" and press the controller.
A list of the available channels is displayed.
4.Turn the controller until the desired channel
is selected and press the controller.
The display shows a list of weather band sta-
tions
In some regions, only one or two channels
can be received or Weather Band chan-
nels are unavailable.<
Using the voice command system
Satellite radio*
You can receive approx. 100 different channels
with high sound quality.
The channels are offered to you in predefined
packages. To listen to the channels of your
choice, you must have these channels enabled.
With this new technology the signal may fail,
causing interruptions in reception.Using the voice command system:
Enabling or disabling channels
iDrive, for principle details, refer to page16.
1.Press the button to open the start
menu.
2.Move the controller toward "Entertain-
ment".
3.Select "SAT" and press the controller.
4.Select "Channels" and press the controller.
The channels that can be received are
shown in the list.
5.Select channel and press the controller.
A phone number and the electronic serial
number, ESN, are displayed.
The electronic serial number is
required to enable or disable.<
6.Dial the displayed telephone number to
have the channel enabled or disabled.
During the enabling or disabling process,
leave the ignition switched on.
These channels are enabled.
Channel selection
Using buttons in center console
Press the button for the corresponding
direction until you reach the next station.
Using the voice command system: 1.{Weatherband}.
2.{Channel 1...7}.
1.{Satellite Radio} or {SDARS}.
2.{Turn on}.
1.{Satellite Radio} or {SDARS}.
2.{Previous station} or {Next station}
Page 180 of 254
Telephone overview
178
Telephone overview
The concept
Your BMW is equipped with a mobile phone
preparation package. After a suitable mobile
phone has been paired with the vehicle once,
you can operate the mobile phone via iDrive, via
the button on the steering wheel, via the phone
keypad and by voice
*.
A mobile phone that has been paired with the
vehicle once is automatically detected again
with the engine running or the ignition switched
on as soon as it is brought inside the vehicle.
The logon data of up to four mobile phones can
be stored simultaneously. If several mobile
phones are detected simultaneously, then the
vehicle can be used to operate the mobile
phone that was most recently paired with it.
Using a phone in your vehicle
Using snap-in adapter*
The so-called snap-in adapter, a cradle for your
mobile phone, is inserted into the center arm-
rest. If the mobile phone is inserted into the
snap-in adapter, the battery is charged and the
mobile phone is connected to the external
antenna of the vehicle whenever the ignition
key is in the radio ready state or higher. This
assures better network reception and uniform
sound quality. Ask your BMW center which
mobile phones snap-in adapters are offered for.
To use the snap-in adapter, refer to page181.
BMW discourages the use of mobile
phones or other mobile communications
devices inside the vehicle without a direct con-
nection to an outside antenna. Otherwise, the
vehicle electronics and mobile communications
device can interfere with each other. In addition,
there is no assurance that the radiation gener-
ated during transmission will be discharged
from the vehicle interior.
phone; otherwise, malfunctions can occur.
The mobile phone can be operated by means
of:
>the button on the steering wheel, refer to
page11
>the retracting telephone keypad, refer to
page179
>iDrive, refer to Initiating communication,
page184
>the voice command system
*, refer to
page23
For information on operating your mobile
phone, please consult the separate operating
instructions.
For your safety
Only make entries when the traffic situa-
tion allows you to do so. Do not hold the
mobile phone in your hand while you are driving;
use the hands-free system instead. If you do
not comply with this precaution, your being dis-
tracted can endanger vehicle occupants and
other road users.<
Suitable mobile phones
Ask your BMW center which mobile phones
with a Bluetooth interface are supported by the
mobile phone preparation package or which
mobile phones snap-in adapters are available
for. These mobile phones support the functions
described in this Owner's Manual with a certain
software version. Malfunctions can occur with
other mobile phones.
*
Page 181 of 254
179
Entertainment
Reference
At a glance
Controls
Driving tips Communications
Navigation
Mobility
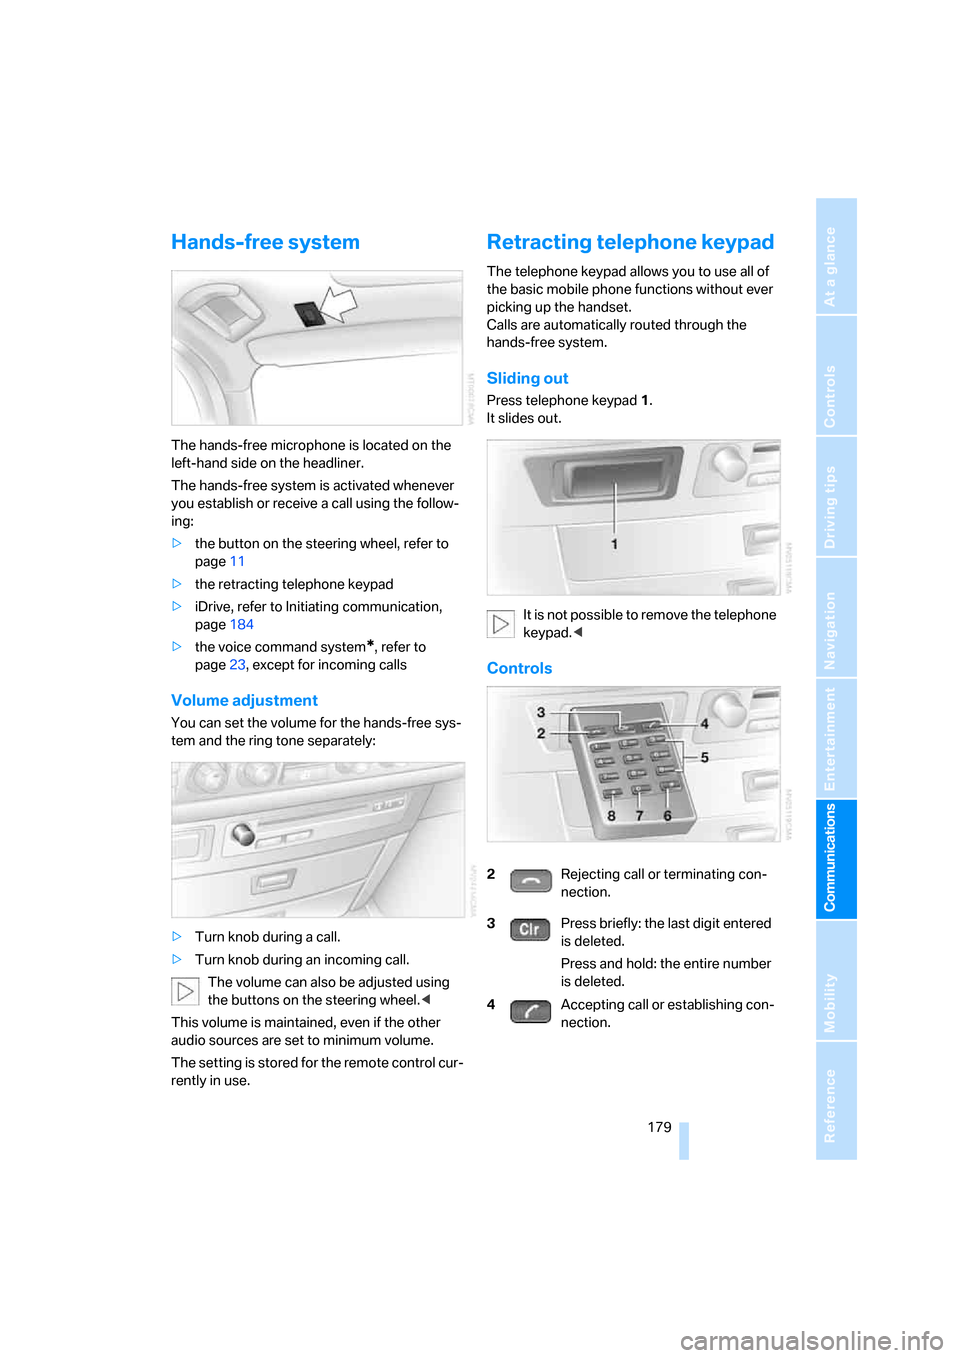
Hands-free system
The hands-free microphone is located on the
left-hand side on the headliner.
The hands-free system is activated whenever
you establish or receive a call using the follow-
ing:
>the button on the steering wheel, refer to
page11
>the retracting telephone keypad
>iDrive, refer to Initiating communication,
page184
>the voice command system
*, refer to
page23, except for incoming calls
Volume adjustment
You can set the volume for the hands-free sys-
tem and the ring tone separately:
>Turn knob during a call.
>Turn knob during an incoming call.
The volume can also be adjusted using
the buttons on the steering wheel.<
This volume is maintained, even if the other
audio sources are set to minimum volume.
The setting is stored for the remote control cur-
rently in use.
Retracting telephone keypad
The telephone keypad allows you to use all of
the basic mobile phone functions without ever
picking up the handset.
Calls are automatically routed through the
hands-free system.
Sliding out
Press telephone keypad1.
It slides out.
It is not possible to remove the telephone
keypad.<
Controls
2Rejecting call or terminating con-
nection.
3Press briefly: the last digit entered
is deleted.
Press and hold: the entire number
is deleted.
4Accepting call or establishing con-
nection.