CD player BMW 760LI 2012 F02 User Guide
[x] Cancel search | Manufacturer: BMW, Model Year: 2012, Model line: 760LI, Model: BMW 760LI 2012 F02Pages: 299, PDF Size: 8.49 MB
Page 198 of 299
The previous version may only be restored when
the vehicle is stationary.
1.
"Settings"
2. "Software update"
3. "Restore previous version"
4. "OK" Double-click.
All listed software updates are removed.
Note
While the software is being updated or a previ‐
ous version is being restoredBMW Assist*, Of‐
fice functions* and the connected devices are
temporarily unavailable. Wait several minutes
for the functions to become available again.
Rear audio remote control*
The concept
The rear audio remote control can be used to
control
the following audio functions in the front:
▷ "Radio"
▷ "CD/Multimedia"
The unit is operated in the same manner as the
corresponding buttons on the
CD/DVD* player.
In the center armrest in the rear Storage is possible in a vertical or horizontal po‐
sition in the center armrest. Menu navigation Press the button Function
Turn the wheel: adjusts the
volume.
Press the center knob:
switches the sound on/off.
Changes the entertainment
source.
Changes the station, track
or chapter.
Press and hold the button:
fast forward/reverse.
The transmission time of the remote control is
limited by law. To execute a function again,
press or turn the required button again.
Replacing the batteries
No rechargeable batteries
Do not use rechargeable batteries, as
damage may result from the substances in the
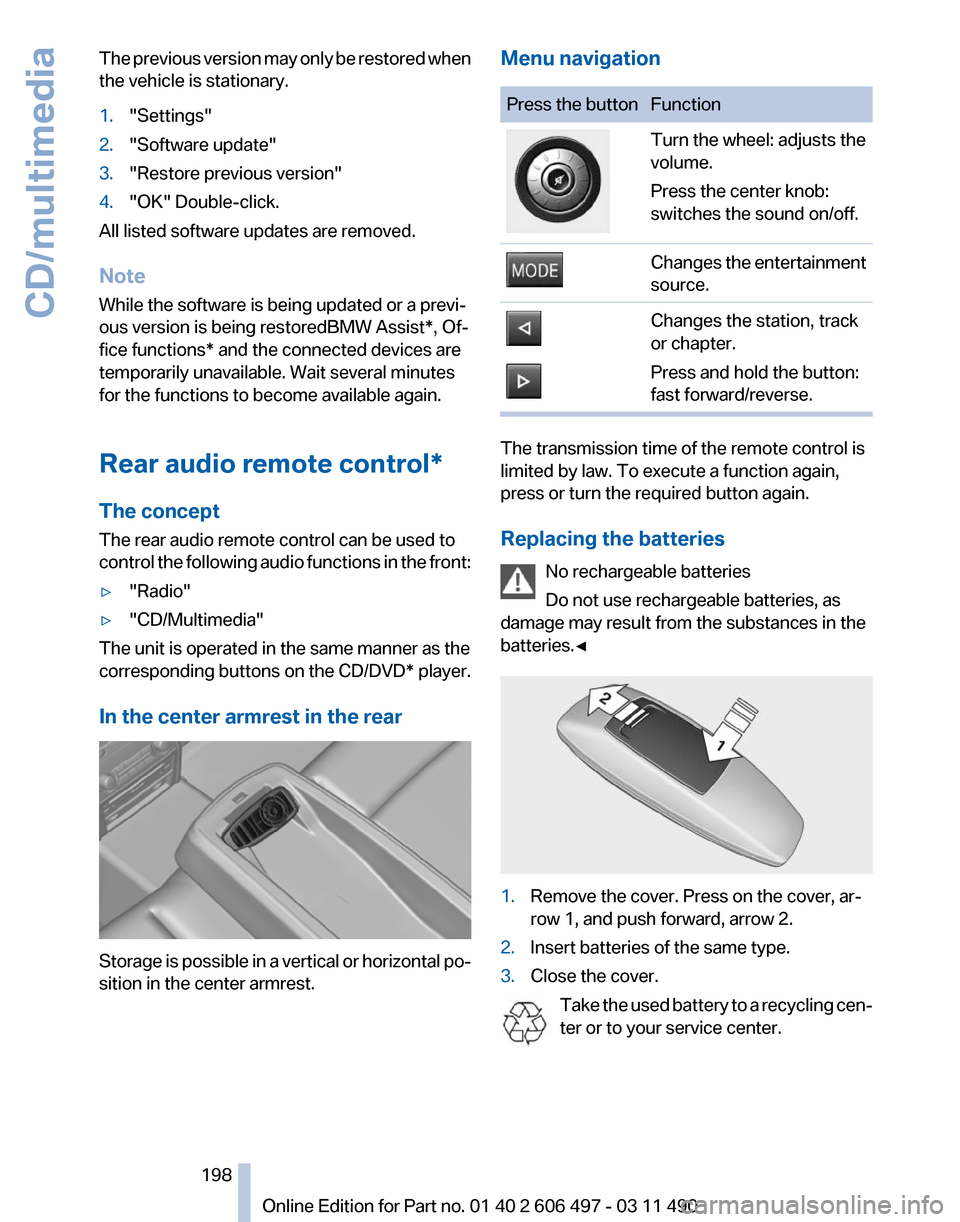
batteries.◀ 1.
Remove the cover. Press on the cover, ar‐
row 1, and push forward, arrow 2.
2. Insert batteries of the same type.
3. Close the cover.
Take the used battery to a recycling cen‐
ter or to your service center. Seite 198
198 Online Edition for Part no. 01 40 2 606 497 - 03 11 490
CD/multimedia
Page 199 of 299
Rear entertainment*
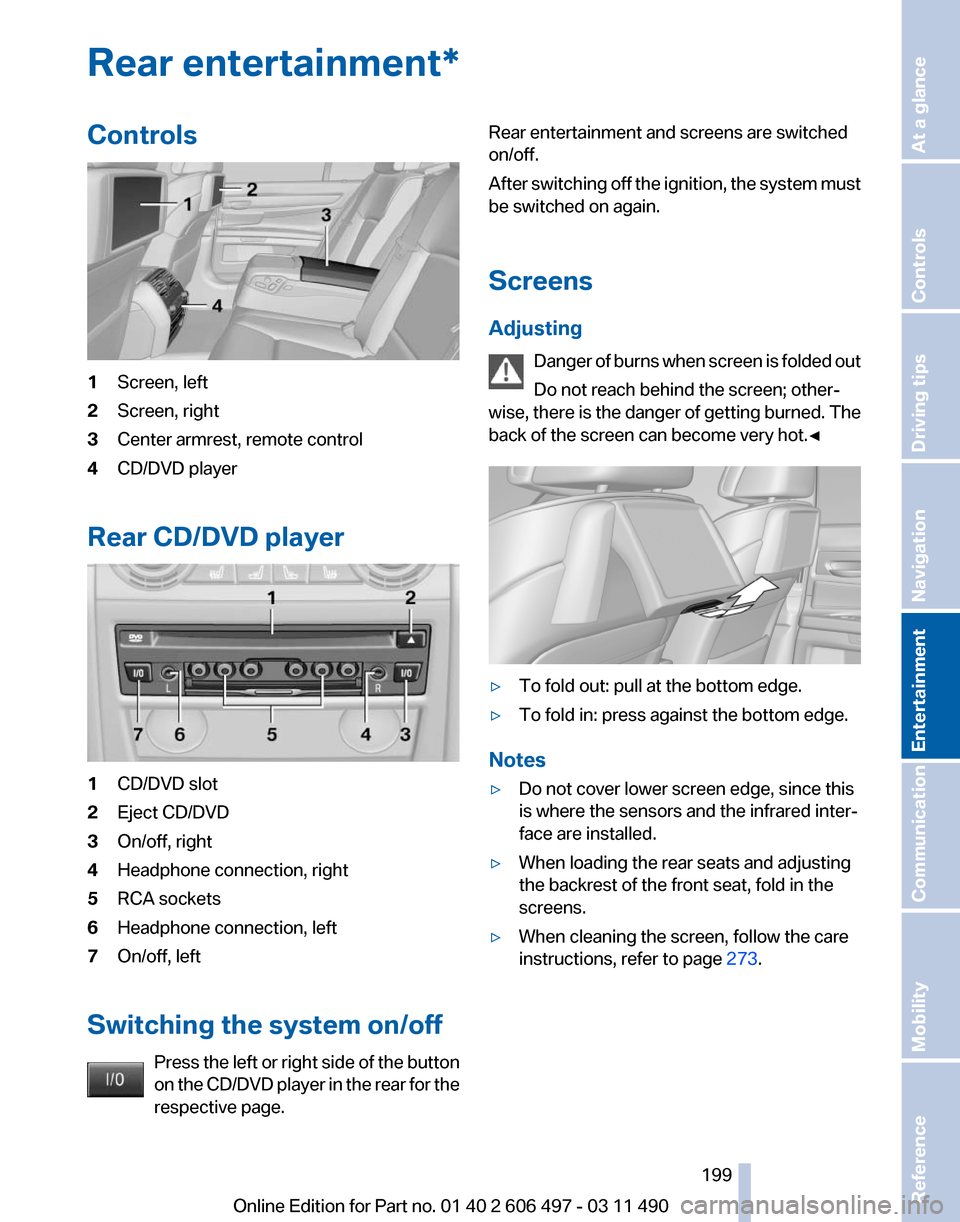
Controls
1
Screen, left
2 Screen, right
3 Center armrest, remote control
4 CD/DVD player
Rear CD/DVD player 1
CD/DVD slot
2 Eject CD/DVD
3 On/off, right
4 Headphone connection, right
5 RCA sockets
6 Headphone connection, left
7 On/off, left
Switching the system on/off Press the left or right side of the button
on the CD/DVD player in the rear for the
respective page. Rear entertainment and screens are switched
on/off.
After
switching off the ignition, the system must
be switched on again.
Screens
Adjusting
Danger of burns when screen is folded out
Do not reach behind the screen; other‐
wise, there is the danger of getting burned. The
back of the screen can become very hot.◀ ▷
To fold out: pull at the bottom edge.
▷ To fold in: press against the bottom edge.
Notes
▷ Do not cover lower screen edge, since this
is where the sensors and the infrared inter‐
face are installed.
▷ When loading the rear seats and adjusting
the backrest of the front seat, fold in the
screens.
▷ When cleaning the screen, follow the care
instructions, refer to page 273. Seite 199
199Online Edition for Part no. 01 40 2 606 497 - 03 11 490
Reference Mobility Communication
Entertainment Navigation Driving tips Controls At a glance
Page 201 of 299
▷
DVD changer*.
▷ Rear CD/DVD player.
▷ External device in rear.
If a video image is being played back in the rear,
the rear CD/DVD player cannot be selected in
the front.
Operation
is the same as for the front video play‐
back, refer to page 181.
Radio
When the same radio source is selected in the
front and rear (e.g., FM/AM), the same radio sta‐
tion is played.
Operation is the same as for the front radio, refer
to page 172.
CD/multimedia
CD/DVD
When the same audio source (front CD/DVD
player, rear CD/DVD player, DVD changer) is se‐
lected in the front and rear, the same material is
played.
Operation is the same as for the front CD/DVD,
refer to page 179.
Notes on CDs/DVDs, refer to page 185.
Music collection*
Music can only be stored and data can only be
exported and imported via the front CD/DVD
player or the USB interface in the glove com‐
partment.
When music collections are selected in the front
and rear, they are played back separately.
Operation is the same as for the front music col‐
lection, refer to page 186.
Tone
Only treble and bass can be set in the rear. The
settings are made separately for the left and
right headphones.
Operation is the same as for the front tone, refer
to page 170. Adjusting
The following settings are available:
▷
"Rear displays"
▷ "Language/Units": language can be set
globally for all screens.
▷ "Tone"
Options menu
The split screen is not available and there is no
Integrated Owner's Manual.
Operation
is the same as for the front menu op‐
tions, refer to page 21.
Enabling
Enabling operation in the rear
Only possible via the iDrive in the front.
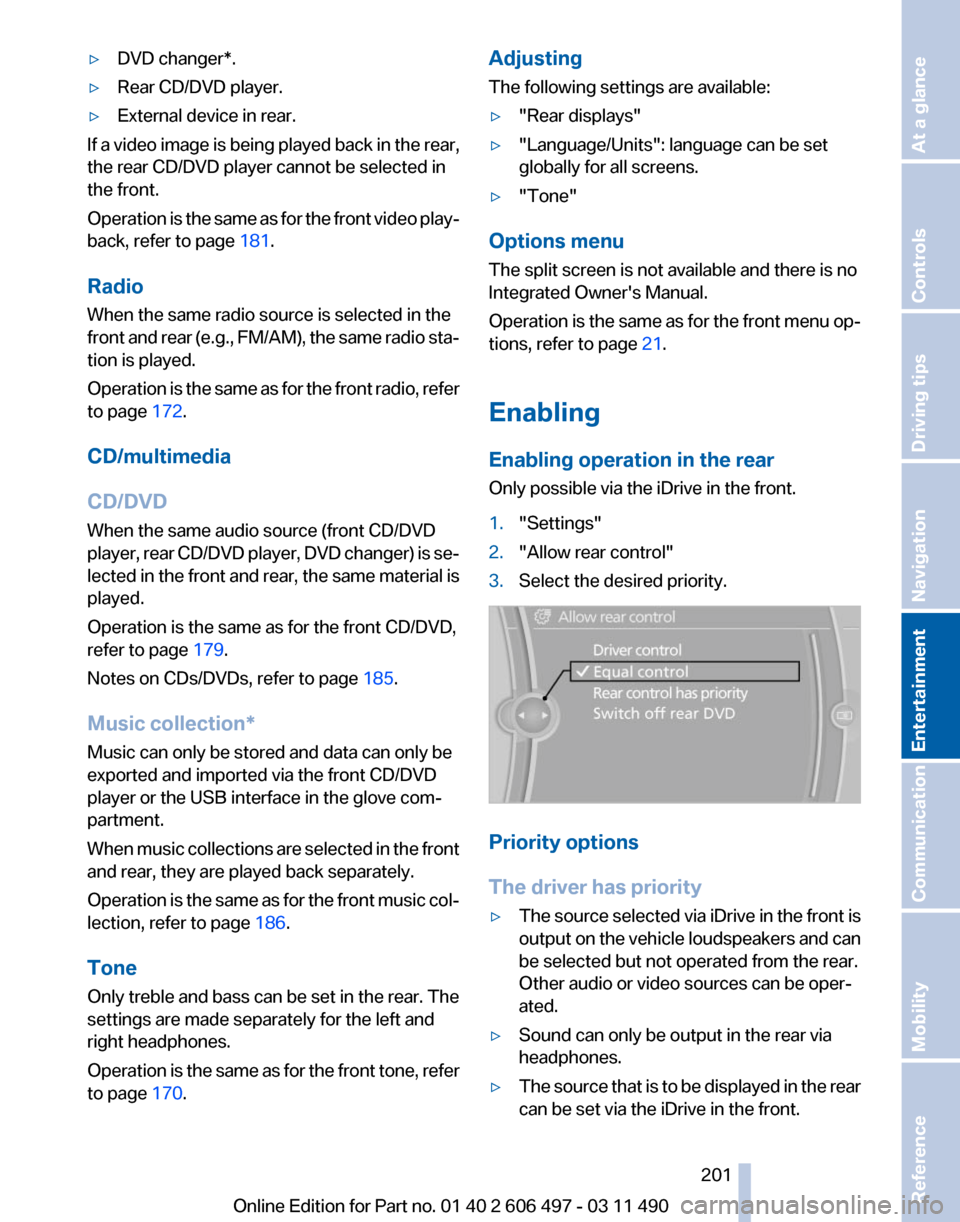
1. "Settings"
2. "Allow rear control"
3. Select the desired priority. Priority options
The driver has priority
▷
The source selected via iDrive in the front is
output
on the vehicle loudspeakers and can
be selected but not operated from the rear.
Other audio or video sources can be oper‐
ated.
▷ Sound can only be output in the rear via
headphones.
▷ The source that is to be displayed in the rear
can be set via the iDrive in the front.
Seite 201
201Online Edition for Part no. 01 40 2 606 497 - 03 11 490
Reference Mobility Communication
Entertainment Navigation Driving tips Controls At a glance
Page 202 of 299
To set the source in the rear via the iDrive in the
front:
1.
"CD/Multimedia" or"Radio"
2. Open "Options".
3. "Select rear source"
4. Select the desired audio or video source.
Same priority
▷ All audio and video sources can be operated
via the iDrive in the front and rear.
▷ Sound is output in the rear via headphones:
the
source selected via the iDrive in the front
is output on the vehicle loudspeakers.
▷ Sound is output via loudspeakers: the
source
selected last via the iDrive in the front
or rear is output via the vehicle loudspeak‐
ers.
The rear has priority
▷ When the source selected in the rear is
played on headphones, it can be selected
but
not operated via iDrive in the front. Other
audio or video sources can be operated.
▷ Sound is output in the rear via headphones:
the
source selected via the iDrive in the front
is output on the vehicle loudspeakers.
▷ Sound is output via loudspeakers: the
source selected in the rear is output on the
vehicle loudspeakers. Audio or video sour‐
ces cannot be selected via the iDrive in the
front.
Switching off the rear DVD
▷ Rear entertainment is switched off.
▷ To switch rear entertainment back on: select
a different priority via the iDrive in the front
and switch on the system, refer to
page 199. Headphones, vehicle
loudspeakers
Connecting the headphones
Normal headphones
Connect via the jack 1/8"/3.5 mm, refer to
page
199, on the rear CD/DVD player.
Infrared headphones
Connection via the infrared interface on the
lower edge of the screen.
Fitting infrared headphones and information on
which headphones are supported can be ob‐
tained from your service center.
When using infrared headphones, ensure that
the connection between the headphones and
the infrared interface is not disrupted:
▷ Do not place an obstacle between the inter‐
face and headphones.
▷ Do not cover the interface.
▷ Do not scratch the interface.
Fold up display screens for interference-free re‐
ception.
Unfavorable light conditions such as bright am‐
bient light can impair reception.
Sound output on the headphones or
vehicle loudspeakers
Operation is only possible in the rear.
1. Open "Options".
2. "Headphones" or "Loudspeakers"
With the following setting, sound output in the
rear is not possible via the vehicle speakers:
"Driver control".
External devices
General information
External audio and video devices and digital
cameras
can be connected to cinch sockets, re‐
fer to page 199, on the CD/DVD player. Opera‐
tion takes place on the external device.
Seite 202
202 Online Edition for Part no. 01 40 2 606 497 - 03 11 490
Rear entertainment
Page 203 of 299
Due to the large number of different audio and
video devices available on the market, it cannot
be ensured that every audio and video device
will be displayed correctly on the screen.
Connecting an external device
1.
Fold down the cover in front of the cinch
sockets on the CD/DVD player.
2. Connect the external device to the RCA
sockets.
▷Video: yellow socket.
▷ Audio: white and red socket.
Starting playback
1. "CD/Multimedia"
2. "External devices"
3. Select the or symbol.
Volume
The volume of the sound output is dependent
on the audio device. If this volume differs mark‐
edly
from the volume of the other audio sources,
it is advisable to adjust the volumes.
Adjusting the volume
The volume can only be adjusted if no external
video device is connected.
1. "CD/Multimedia"
2. "External devices"
3. Select the or symbol.
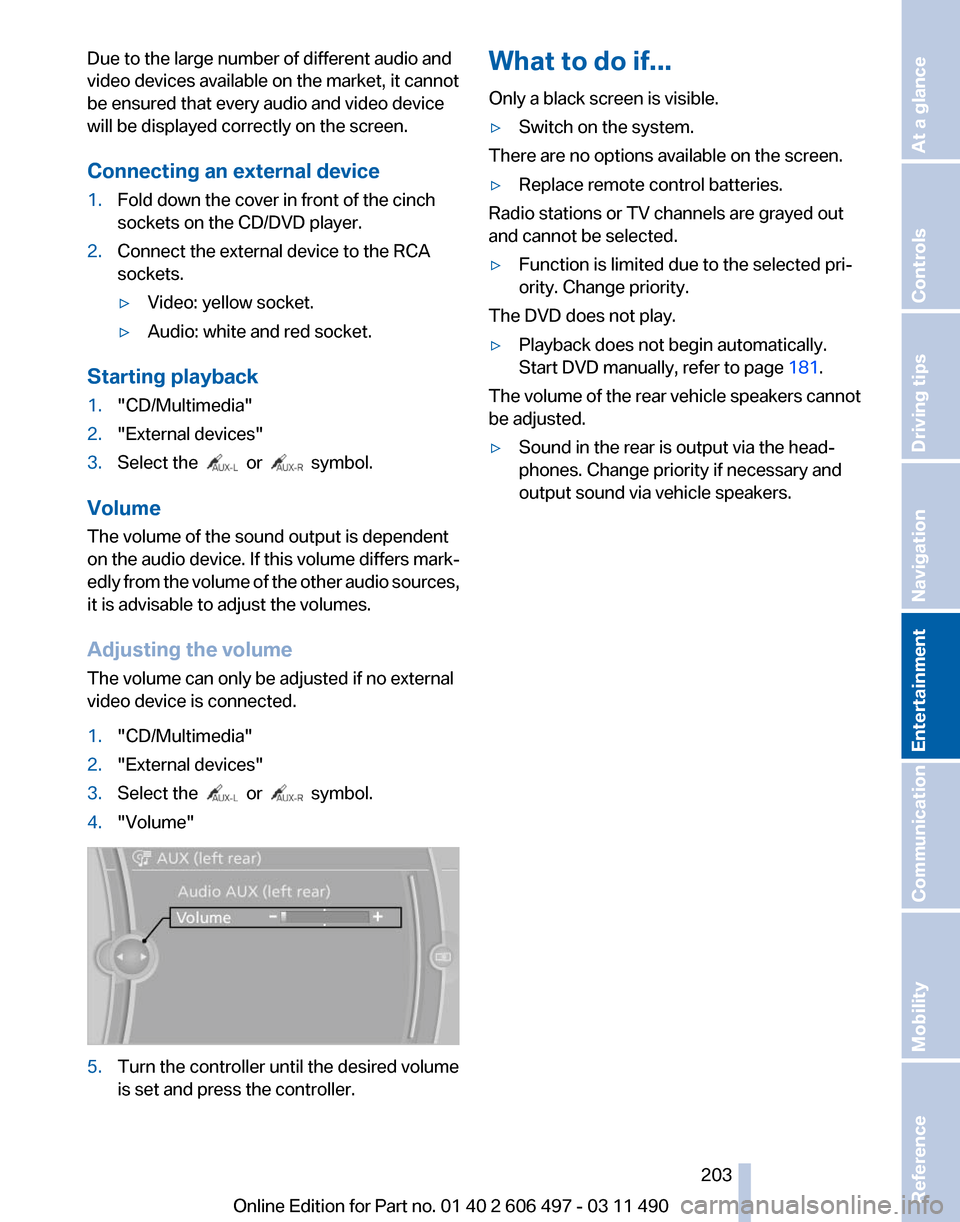
4. "Volume" 5.
Turn the controller until the desired volume
is set and press the controller. What to do if...
Only a black screen is visible.
▷
Switch on the system.
There are no options available on the screen.
▷ Replace remote control batteries.
Radio stations or TV channels are grayed out
and cannot be selected.
▷ Function is limited due to the selected pri‐
ority. Change priority.
The DVD does not play.
▷ Playback does not begin automatically.
Start DVD manually, refer to page 181.
The volume of the rear vehicle speakers cannot
be adjusted.
▷ Sound in the rear is output via the head‐
phones. Change priority if necessary and
output sound via vehicle speakers.
Seite 203
203Online Edition for Part no. 01 40 2 606 497 - 03 11 490
Reference Mobility Communication
Entertainment Navigation Driving tips Controls At a glance
Page 204 of 299

Professional rear entertainment*
Controls
1
Screen, left
2 Screen, right
3 Controller with buttons
4 CD/DVD player
Rear CD/DVD player 1
CD/DVD slot
2 Eject CD/DVD
3 On/off, right
4 Headphone connection, right
5 RCA sockets
6 Headphone connection, left
7 On/off, left
Switching the system on/off Press the left or right side of the button
on the CD/DVD player in the rear for the
respective page. Rear entertainment and screens are switched
on/off.
After
switching off the ignition, the system must
be switched on again.
Screens
Adjusting
Danger of burns when screen is folded out
Do not reach behind the screen; other‐
wise, there is the danger of getting burned. The
back of the screen can become very hot.◀ ▷
To fold out: pull at the bottom edge.
▷ To fold in: press against the bottom edge.
Notes
▷ Do not cover lower screen edge, since this
is where the sensors and the infrared inter‐
face are installed.
▷ When loading the rear seats and adjusting
the backrest of the front seat, fold in the
screens.
▷ When cleaning the screen, follow the care
instructions, refer to page 273. Seite 204
204 Online Edition for Part no. 01 40 2 606 497 - 03 11 490
Professional rear entertainment
Page 205 of 299
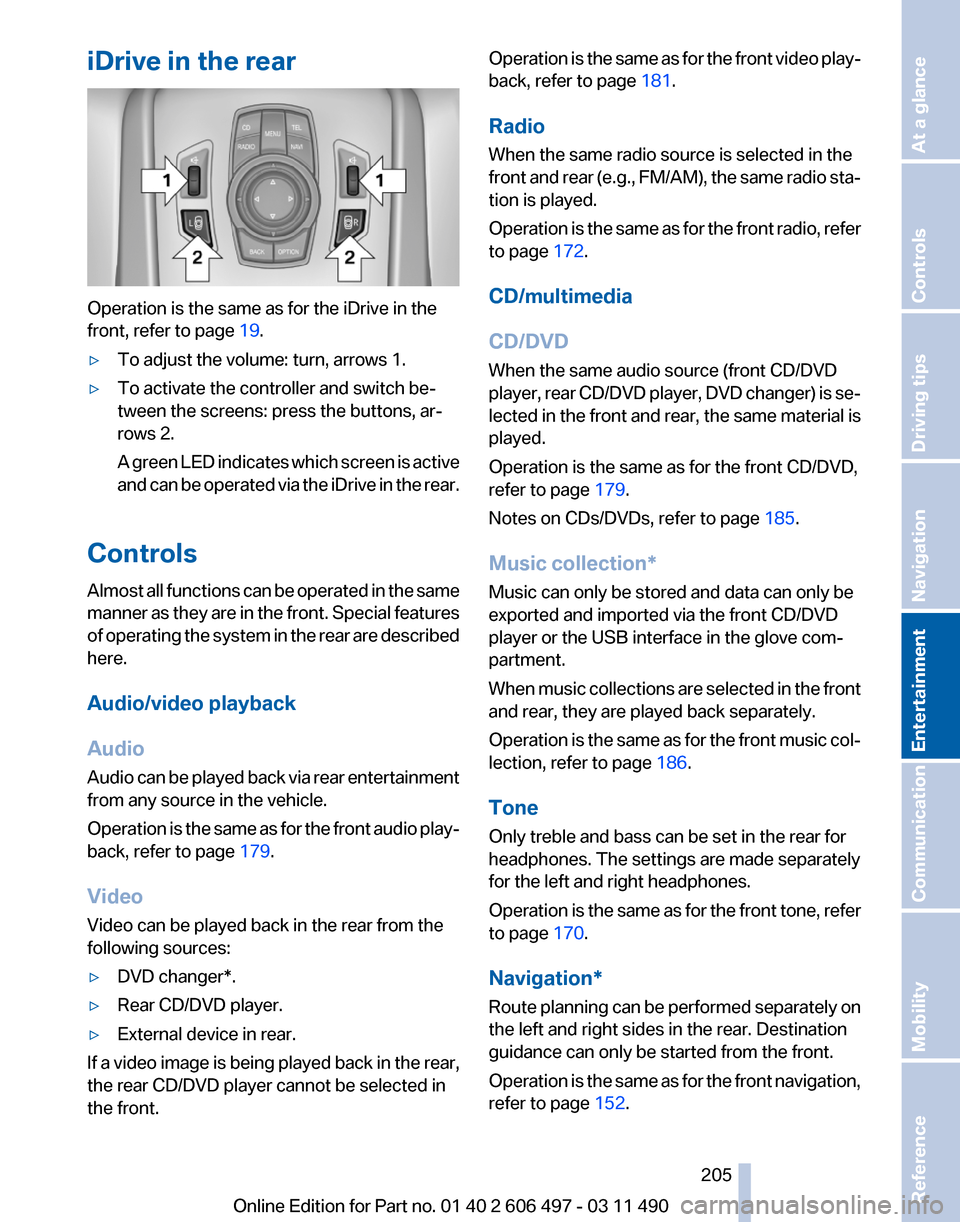
iDrive in the rear
Operation is the same as for the iDrive in the
front, refer to page
19.
▷ To adjust the volume: turn, arrows 1.
▷ To activate the controller and switch be‐
tween the screens: press the buttons, ar‐
rows 2.
A
green LED indicates which screen is active
and can be operated via the iDrive in the rear.
Controls
Almost
all functions can be operated in the same
manner as they are in the front. Special features
of operating the system in the rear are described
here.
Audio/video playback
Audio
Audio can be played back via rear entertainment
from any source in the vehicle.
Operation is the same as for the front audio play‐
back, refer to page 179.
Video
Video can be played back in the rear from the
following sources:
▷ DVD changer*.
▷ Rear CD/DVD player.
▷ External device in rear.
If a video image is being played back in the rear,
the rear CD/DVD player cannot be selected in
the front. Operation is the same as for the front video play‐
back, refer to page
181.
Radio
When the same radio source is selected in the
front
and rear (e.g., FM/AM), the same radio sta‐
tion is played.
Operation is the same as for the front radio, refer
to page 172.
CD/multimedia
CD/DVD
When the same audio source (front CD/DVD
player, rear CD/DVD player, DVD changer) is se‐
lected in the front and rear, the same material is
played.
Operation is the same as for the front CD/DVD,
refer to page 179.
Notes on CDs/DVDs, refer to page 185.
Music collection*
Music can only be stored and data can only be
exported and imported via the front CD/DVD
player or the USB interface in the glove com‐
partment.
When music collections are selected in the front
and rear, they are played back separately.
Operation is the same as for the front music col‐
lection, refer to page 186.
Tone
Only treble and bass can be set in the rear for
headphones. The settings are made separately
for the left and right headphones.
Operation is the same as for the front tone, refer
to page 170.
Navigation*
Route planning can be performed separately on
the left and right sides in the rear. Destination
guidance can only be started from the front.
Operation is the same as for the front navigation,
refer to page 152.
Seite 205
205Online Edition for Part no. 01 40 2 606 497 - 03 11 490
Reference Mobility Communication
Entertainment Navigation Driving tips Controls At a glance
Page 207 of 299
The rear has priority
▷
When the source selected in the rear is
played on headphones, it can be selected
but
not operated via iDrive in the front. Other
audio or video sources can be operated.
▷ Sound is output in the rear via headphones:
the
source selected via the iDrive in the front
is output on the vehicle loudspeakers.
▷ Sound is output via loudspeakers: the
source selected in the rear is output on the
vehicle loudspeakers. Audio or video sour‐
ces cannot be selected via the iDrive in the
front.
Switching off the rear DVD
▷ Rear entertainment is switched off.
▷ To switch rear entertainment back on: select
a different priority via the iDrive in the front
and switch on the system, refer to
page 204.
Headphones, vehicle
loudspeakers
Connecting the headphones
Normal headphones
Connect via the jack 1/8"/3.5 mm, refer to
page 204, on the rear CD/DVD player.
Infrared headphones
Connection via the infrared interface on the
lower edge of the screen.
Fitting infrared headphones and information on
which headphones are supported can be ob‐
tained from your service center.
When using infrared headphones, ensure that
the connection between the headphones and
the infrared interface is not disrupted:
▷ Do not place an obstacle between the inter‐
face and headphones.
▷ Do not cover the interface.
▷ Do not scratch the interface. Fold up display screens for interference-free re‐
ception.
Unfavorable light conditions such as bright am‐
bient light can impair reception.
Sound output on the headphones or
vehicle loudspeakers
Operation is only possible in the rear.
1.
Open "Options".
2. "Headphones" or "Loudspeakers"
With the following setting, sound output in the
rear is not possible via the vehicle speakers:
"Driver control".
External devices
General information
External audio and video devices and digital
cameras
can be connected to cinch sockets, re‐
fer to page 204, on the CD/DVD player. Opera‐
tion takes place on the external device.
Due to the large number of different audio and
video devices available on the market, it cannot
be ensured that every audio and video device
will be displayed correctly on the screen.
Connecting an external device
1. Fold down the cover in front of the cinch
sockets on the CD/DVD player.
2. Connect the external device to the RCA
sockets.
▷Video: yellow socket.
▷ Audio: white and red socket.
Starting playback
1. "CD/Multimedia"
2. "External devices"
3. Select the or symbol.
Volume
The volume of the sound output is dependent
on the audio device. If this volume differs mark‐
Seite 207
207Online Edition for Part no. 01 40 2 606 497 - 03 11 490
Reference Mobility Communication
Entertainment Navigation Driving tips Controls At a glance
Page 212 of 299
Telephone*
At a glance
The concept
Mobile
phones or other external devices such as
audio players can be connected to the vehicle
via Bluetooth.
After these devices are paired once, they are
recognized automatically when the ignition is
switched on as soon as they are inside the ve‐
hicle and can be operated via iDrive, the buttons
on the steering wheel, and via voice activation*.
Depending on their functionality, external devi‐
ces can be used via the vehicle as a telephone
or as an audio source.
The telephone functions are described in the
following. Operating the audio functions, refer to
page 194.
Up to four external devices can be paired.
Certain functions may need to be enabled by the
mobile phone provider or service provider.
Using the mobile phone while driving
Make entries only when traffic and road
conditions allow. Do not hold the mobile phone
in your hand while you are driving; use the
hands-free system instead. If you do not ob‐
serve this precaution, you can endanger the ve‐
hicle occupants and other road users.◀
Snap-in adapter*
The snap-in adapter is used to:
▷ Hold the mobile phone.
▷ Recharge the battery.
▷ Connect the mobile phone to an outside an‐
tenna of the vehicle.
This provides for better network reception
and consistent sound quality.
Approved mobile phones
Details on which mobile phones and external
devices with a Bluetooth interface are sup‐
ported by the mobile phone preparation pack‐ age can be obtained at www.bmwusa.com/blue‐
tooth.
Displaying the vehicle identification
number and software part number
The vehicle identification number and software
part
number are needed to determine which mo‐
bile phones are supported by the mobile phone
preparation package. The software version of
the mobile phone may also be required.
1. "Telephone"
2. Open "Options".
3. "Bluetooth® info"
4. "Display system information"
These approved mobile phones with a certain
software version, support the vehicle functions
described below.
Malfunctions may occur with other mobile
phones or software versions.
Do
not operate a mobile phone that is connected
to the vehicle on the mobile phone keypad, as
this may lead to a malfunction.
A software update can be performed if neces‐
sary.
Pairing/unpairing the mobile
phone
General information
The following functions are available:
▷ Use of a mobile phone as a telephone.
▷ Use of a mobile phone as an additional tele‐
phone.
▷ Use of a mobile phone as an audio source.
▷ Use of an audio device as an audio source,
refer to page 194.
Requirements
▷ The mobile phone is suitable.
Seite 212
212 Online Edition for Part no. 01 40 2 606 497 - 03 11 490
Telephone
Page 289 of 299
Battery replacement, audio re‐
mote control 198
Battery replacement, remote control, rear entertain‐
ment 200
Battery replacement, vehicle battery 265
Battery replacement, vehicle remote control 32
Battery, vehicle 265
Before entering the car wash 271
Belts, safety belts 53
Beverage holder, cu‐ pholder 140
Blinds, sun protection 45
Bluetooth audio 194
BMW Apps 238
BMW Apps, video play‐ back 193
BMW Assist 234
BMW EfficientDynamics, refer to Saving fuel 148
BMW homepage 6
BMW Internet page 6
BMW Maintenance Sys‐ tem 258
BMW Online 236
Bottle holder, refer to Cu‐ pholder 140
Brake assistant 98
Brake assistant, adaptive 98
Brake discs, breaking in 144
Brake force display 97
Brake lamps, brake force dis‐ play 97
Brake lamps, bulb replace‐ ment 263
Brake lights, adaptive 97
Brake pads, breaking in 144
Braking, notes 145
Breakdown assis‐ tance 266, 267
Breaking in 144
Brightness of Control Dis‐ play 81
Bulb replacement 260
Bulb replacement, front 261 Bulb replacement, rear
263
Bulbs and lamps 260
Button, RES 107
Button, Start/Stop 65
Bypassing, refer to starting aid 267
C
Calendar 228
California Proposition 65 Warning 7
Camera, backup camera 118
Camera, care 273
Camera, Side View 119
Camera, Top View 120
Can holder, refer to Cu‐ pholder 140
Car battery 265
Car care products 272
Care, displays 273
Care, vehicle 272
Cargo 146
Cargo area lid 39
Cargo area, storage compart‐ ments 140
Cargo straps, securing cargo 147
Car key, refer to Remote con‐ trol 32
Carpet, care 273
Car wash 271
Catalytic converter, refer to Hot exhaust system 144
CBS Condition Based Serv‐ ice 258
CD/DVD 179
CD/DVD player, rear 199, 204
CDs, storing 186
Cell phone 212
Center armrest 139
Center console 17
Central locking system 35
Central
screen, refer to Control
Display 19
Changes, technical, refer to Safety 7
Changing parts 260 Changing wheels/tires 250
Check Control 82
Children, seating position 61
Children, transporting safely 61
Child restraint fixing sys‐ tem 61
Child restraint fixing system LATCH 62
Child restraint fixing systems, mounting 61
Child-safety locks 64
Child seat, mounting 61
Child seats 61
Chrome parts, care 272
Cigarette lighter 134
Cleaning, displays 273
Climate control 125
Climate control on head‐ liner 130
Climate control wind‐ shield 145
Clock 77
Closing/opening from in‐ side 39
Closing/opening via door lock 38
Closing/opening with remote control 36
Clothes hooks 140
Collision warning 110
Combination instrument 14
Combination
instrument, elec‐
tronic displays 16
Combination switch, refer to Turn signals 70
Combination switch, refer to Wiper system 70
Comfort Access 42
COMFORT program, Dynamic Driving Control 103
Computer 77
Concierge service 235
Condensation on win‐ dows 126
Condensation under the vehi‐ cle 146
Seite 289
289Online Edition for Part no. 01 40 2 606 497 - 03 11 490
Reference Mobility Communication Entertainment Navigation Driving tips Controls At a glance