turn signal BMW 760LI 2012 F02 User Guide
[x] Cancel search | Manufacturer: BMW, Model Year: 2012, Model line: 760LI, Model: BMW 760LI 2012 F02Pages: 299, PDF Size: 8.49 MB
Page 95 of 299
▷
When braking hard.
▷ When using the turn signal.
System limits Personal responsibility
The system cannot serve as a substitute
for
the driver's personal judgment of the course
of the road and the traffic situation.
In the event of a warning, do not jerk the steering
wheel, as you may lose control of the vehicle.◀
The system may not be fully functional in the
following situations:
▷ In heavy fog, rain or snowfall.
▷ In the event of worn, poorly visible, merging,
diverging,
or multiple lane markings such as
in construction areas.
▷ When lane markings are covered in snow,
ice, dirt or water.
▷ In tight curves or on narrow lanes.
▷ When the lane markings are covered by ob‐
jects.
▷ When driving very close to the vehicle in
front of you.
▷ When driving toward bright lights.
▷ When the windshield in front of the interior
rearview mirror is fogged over, dirty or cov‐
ered with stickers, etc.
Malfunctions
Steering wheel vibration
Frequent
activation of the steering wheel vibra‐
tion causes the system to overheat.
This causes the lane departure warning to be‐
come deactivated.
Let the system cool and reactivate it by pressing
the button. Camera
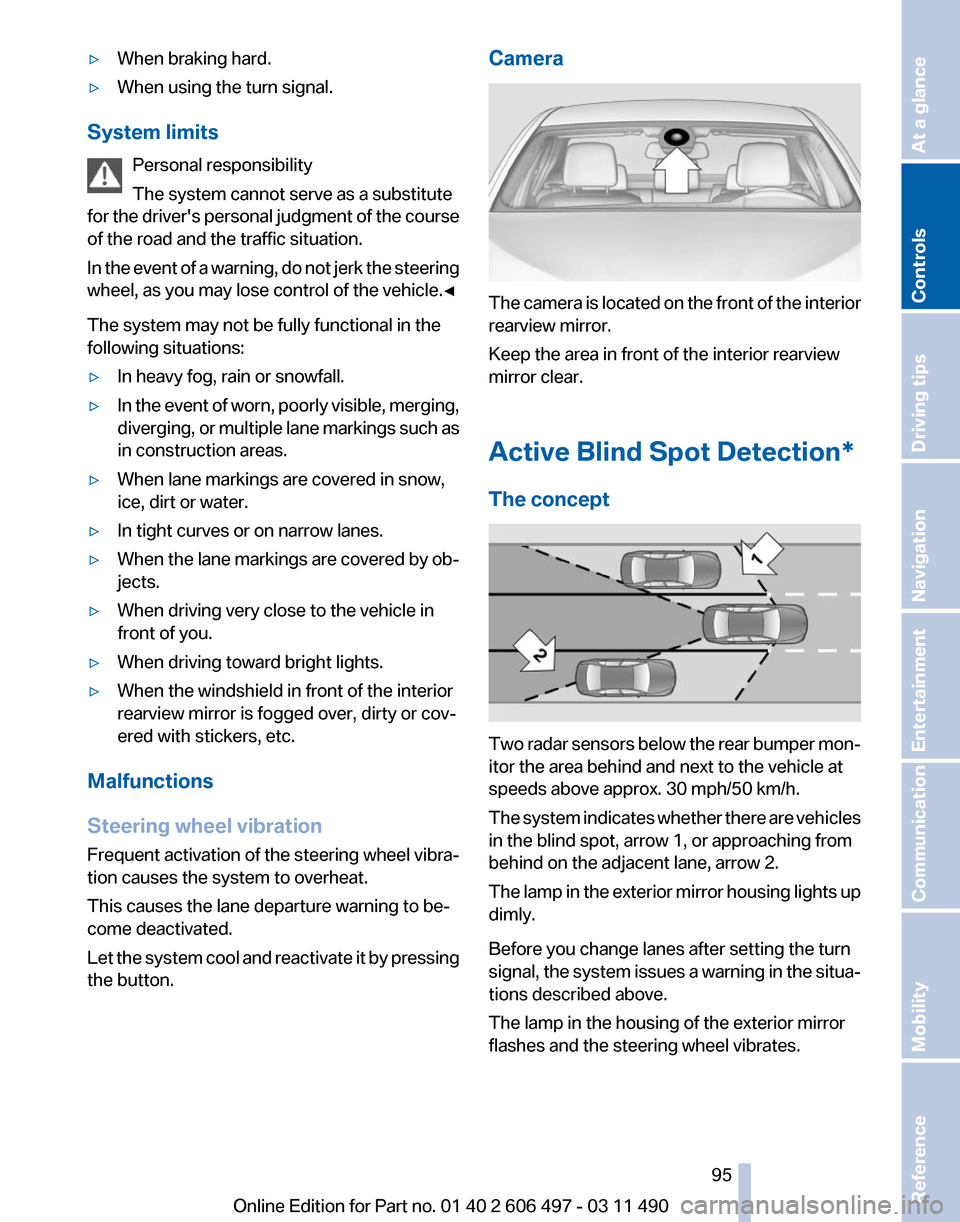
The camera is located on the front of the interior
rearview mirror.
Keep the area in front of the interior rearview
mirror clear.
Active Blind Spot Detection
*
The concept Two radar sensors below the rear bumper mon‐
itor the area behind and next to the vehicle at
speeds above approx. 30 mph/50 km/h.
The
system indicates whether there are vehicles
in the blind spot, arrow 1, or approaching from
behind on the adjacent lane, arrow 2.
The lamp in the exterior mirror housing lights up
dimly.
Before you change lanes after setting the turn
signal, the system issues a warning in the situa‐
tions described above.
The lamp in the housing of the exterior mirror
flashes and the steering wheel vibrates.
Seite 95
95Online Edition for Part no. 01 40 2 606 497 - 03 11 490
Reference Mobility Communication Entertainment Navigation Driving tips
Controls At a glance
Page 96 of 299
Switching on/off
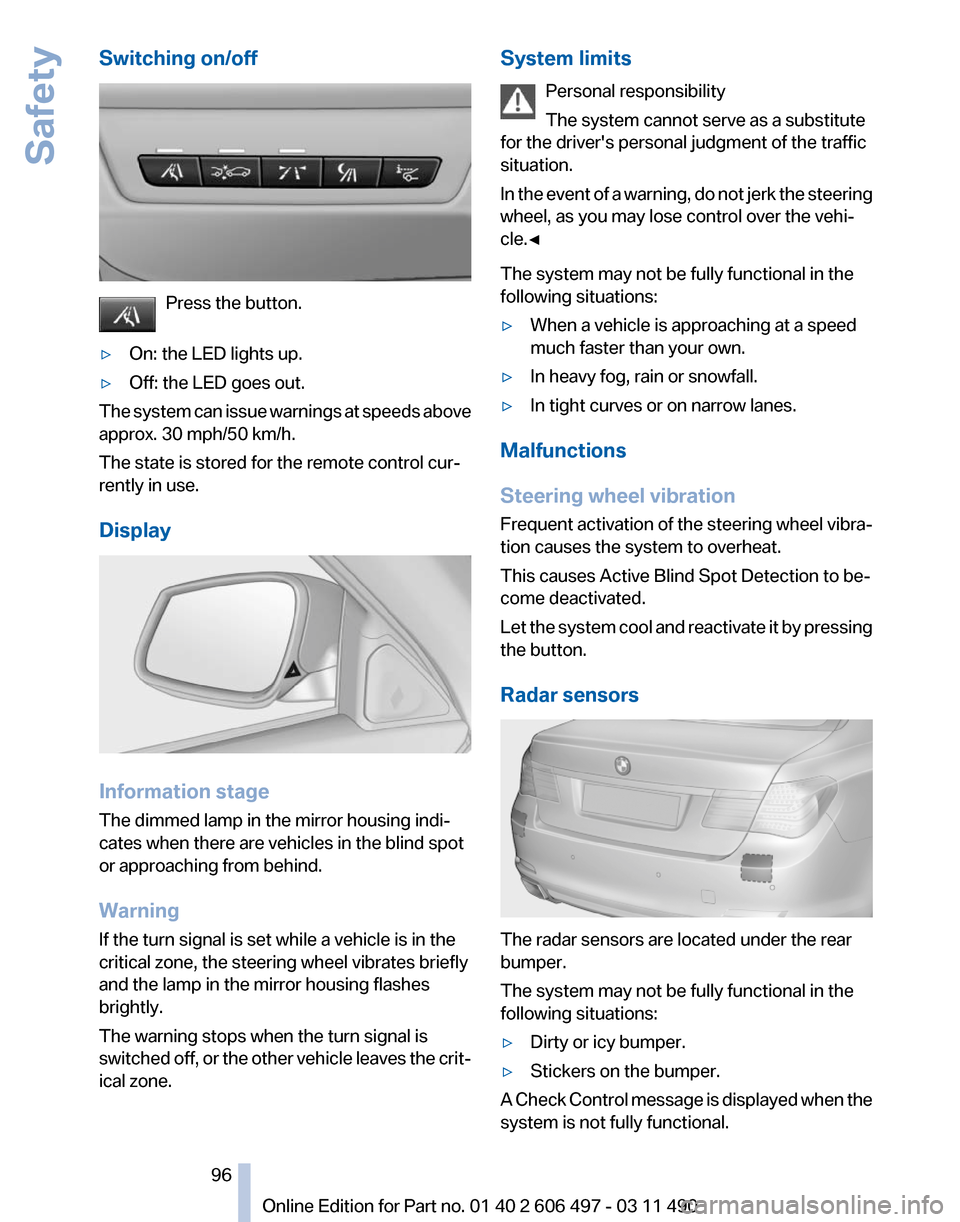
Press the button.
▷ On: the LED lights up.
▷ Off: the LED goes out.
The system can issue warnings at speeds above
approx. 30 mph/50 km/h.
The state is stored for the remote control cur‐
rently in use.
Display Information stage
The dimmed lamp in the mirror housing indi‐
cates when there are vehicles in the blind spot
or approaching from behind.
Warning
If the turn signal is set while a vehicle is in the
critical zone, the steering wheel vibrates briefly
and the lamp in the mirror housing flashes
brightly.
The warning stops when the turn signal is
switched
off, or the other vehicle leaves the crit‐
ical zone. System limits
Personal responsibility
The system cannot serve as a substitute
for the driver's personal judgment of the traffic
situation.
In
the event of a warning, do not jerk the steering
wheel, as you may lose control over the vehi‐
cle.◀
The system may not be fully functional in the
following situations:
▷ When a vehicle is approaching at a speed
much faster than your own.
▷ In heavy fog, rain or snowfall.
▷ In tight curves or on narrow lanes.
Malfunctions
Steering wheel vibration
Frequent
activation of the steering wheel vibra‐
tion causes the system to overheat.
This causes Active Blind Spot Detection to be‐
come deactivated.
Let the system cool and reactivate it by pressing
the button.
Radar sensors The radar sensors are located under the rear
bumper.
The system may not be fully functional in the
following situations:
▷
Dirty or icy bumper.
▷ Stickers on the bumper.
A Check Control message is displayed when the
system is not fully functional. Seite 96
96 Online Edition for Part no. 01 40 2 606 497 - 03 11 490
Safety
Page 171 of 299
When surround is activated, multi-channel play‐
back is simulated when a stereo audio track is
played.
Volume
▷
"Speed volume": speed-dependent volume
control.
▷ "PDC": volume of the PDC signal* com‐
pared to the entertainment sound output.
▷ "Gong": volume of the signal, such as the
safety belt reminder, compared to the en‐
tertainment sound output.
▷ "Microphone": volume of the microphone*
during a phone call.
▷ "Loudspeak.":
volume of the loudspeakers*
during a phone call.
The following volumes are only stored for the
respective paired telephone:
"Microphone",
"Loudspeak.".
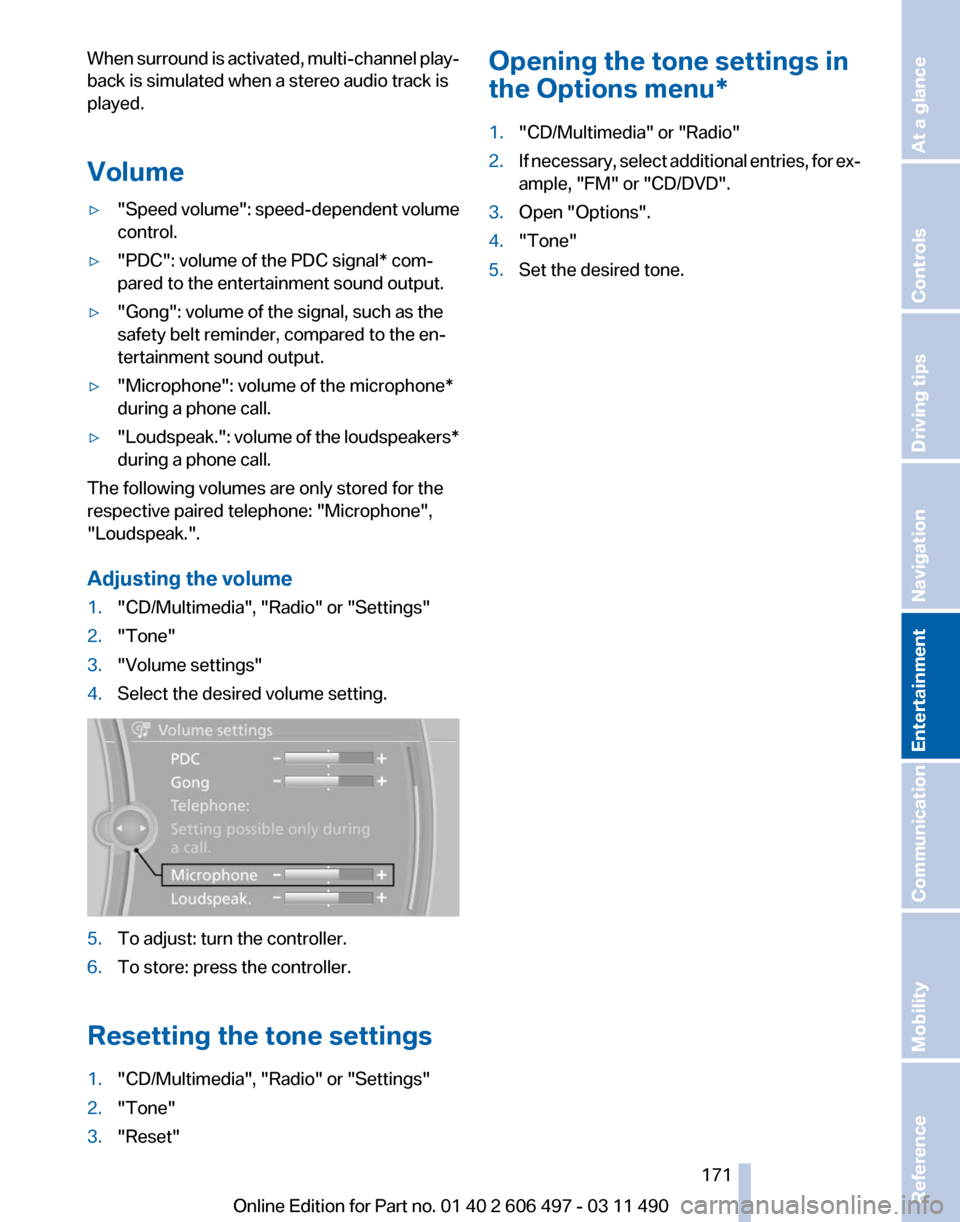
Adjusting the volume
1. "CD/Multimedia", "Radio" or "Settings"
2. "Tone"
3. "Volume settings"
4. Select the desired volume setting. 5.
To adjust: turn the controller.
6. To store: press the controller.
Resetting the tone settings
1. "CD/Multimedia", "Radio" or "Settings"
2. "Tone"
3. "Reset" Opening the tone settings in
the Options menu
*
1. "CD/Multimedia" or "Radio"
2. If necessary, select additional entries, for ex‐
ample, "FM" or
"CD/DVD".
3. Open "Options".
4. "Tone"
5. Set the desired tone.
Seite 171
171Online Edition for Part no. 01 40 2 606 497 - 03 11 490
Reference Mobility Communication
Entertainment Navigation Driving tips Controls At a glance
Page 173 of 299
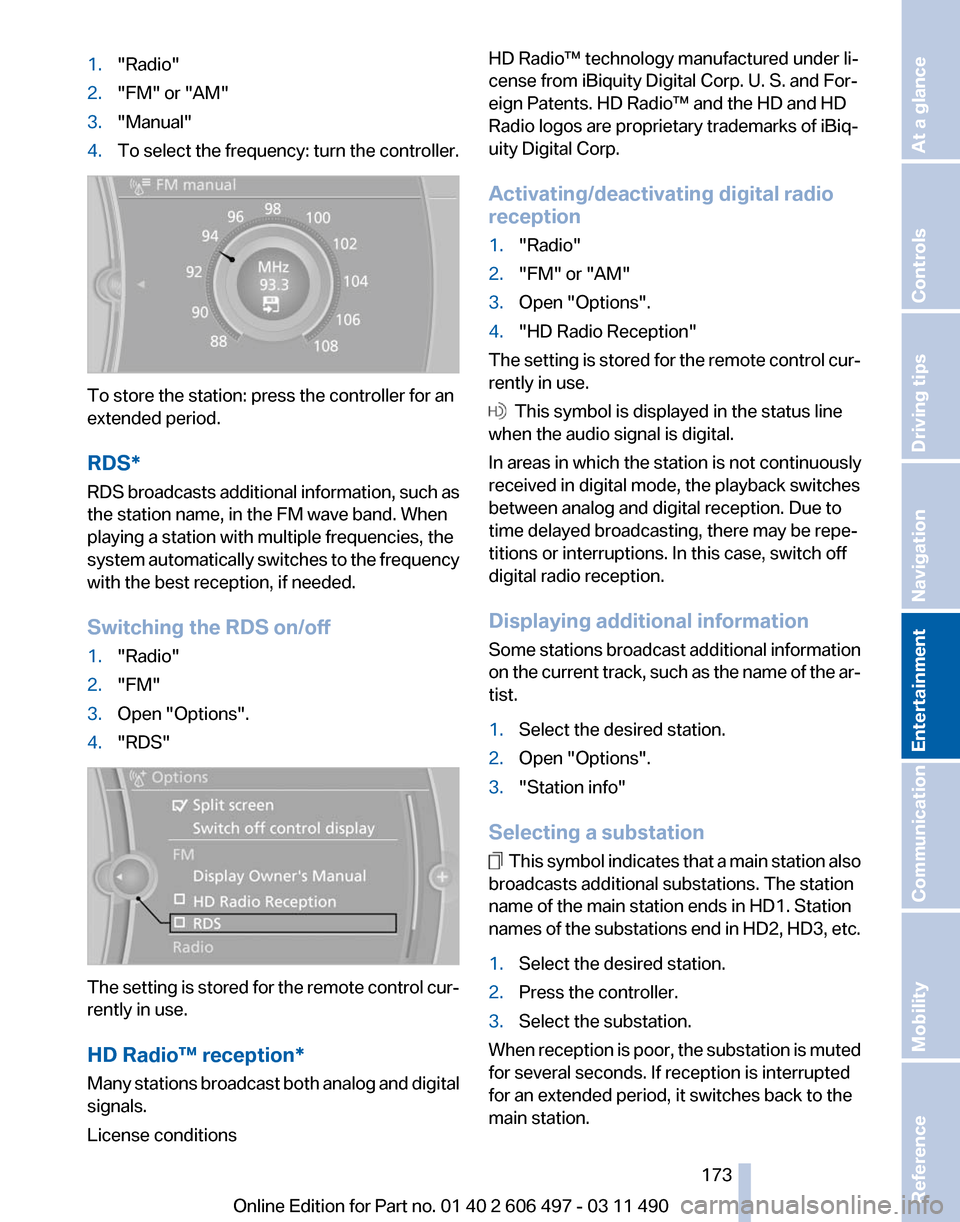
1.
"Radio"
2. "FM" or "AM"
3. "Manual"
4. To select the frequency: turn the controller. To store the station: press the controller for an
extended period.
RDS*
RDS
broadcasts additional information, such as
the station name, in the FM wave band. When
playing a station with multiple frequencies, the
system automatically switches to the frequency
with the best reception, if needed.
Switching the RDS on/off
1. "Radio"
2. "FM"
3. Open "Options".
4. "RDS" The setting is stored for the remote control cur‐
rently in use.
HD Radio™ reception
*
Many stations broadcast both analog and digital
signals.
License conditions HD Radio™ technology manufactured under li‐
cense from iBiquity Digital Corp. U. S. and For‐
eign Patents. HD Radio™ and the HD and HD
Radio logos are proprietary trademarks of iBiq‐
uity Digital Corp.
Activating/deactivating digital radio
reception
1.
"Radio"
2. "FM" or "AM"
3. Open "Options".
4. "HD Radio Reception"
The setting is stored for the remote control cur‐
rently in use. This symbol is displayed in the status line
when the audio signal is digital.
In areas in which the station is not continuously
received in digital mode, the playback switches
between analog and digital reception. Due to
time delayed broadcasting, there may be repe‐
titions or interruptions. In this case, switch off
digital radio reception.
Displaying additional information
Some
stations broadcast additional information
on the current track, such as the name of the ar‐
tist.
1. Select the desired station.
2. Open "Options".
3. "Station info"
Selecting a substation This symbol indicates that a main station also
broadcasts additional substations. The station
name of the main station ends in HD1. Station
names
of the substations end in HD2, HD3, etc.
1. Select the desired station.
2. Press the controller.
3. Select the substation.
When reception is poor, the substation is muted
for several seconds. If reception is interrupted
for an extended period, it switches back to the
main station.
Seite 173
173Online Edition for Part no. 01 40 2 606 497 - 03 11 490
Reference Mobility Communication
Entertainment Navigation Driving tips Controls At a glance
Page 215 of 299
The mobile phone could not be paired or con‐
nected.
▷
Is Bluetooth activated in the vehicle and on
the
mobile phone? Activate Bluetooth in the
vehicle and on the mobile phone.
▷ Do the Bluetooth passkeys on the mobile
phone and the vehicle match? Enter the
same passkey on the mobile phone and via
iDrive.
▷ Did it take longer than 30 seconds to enter
the
passkey? Repeat the pairing procedure.
▷ Are too many Bluetooth devices connected
to
the mobile phone or vehicle? Delete con‐
nections with other devices if necessary.
▷ Is the audio connection activated? Deacti‐
vate the audio connection.
▷ Is the mobile phone in power-save mode or
does
it have only a limited remaining battery
life? Charge the mobile phone in the snap-
in adapter* or via the charging cable.
▷ Depending on the mobile phone, it is possi‐
ble that only one device can be connected
to the vehicle. Unpair the connected device
from the vehicle and pair and connect only
one device.
▷ The mobile phone no longer reacts? Switch
the mobile phone off and on again. Repeat
the pairing procedure.
The telephone functions are not available.
▷ Is the mobile phone paired as an additional
telephone and is the additional telephone
function
deactivated? Activate the function.
▷ Is an outgoing call not possible? Connect
the mobile phone as a telephone.
No or not all phone book entries are displayed,
or they are incomplete.
▷ Transmission of the phone book entries is
not yet complete.
▷ It is possible that only the phone book en‐
tries of the mobile phone or the
SIM card*
are transmitted.
▷ It may not be possible to display phone book
entries with special characters. ▷
The number of phone book entries being
stored is too high.
▷ Is the data volume of the contact too large,
e.g., due to stored information such as
notes? Reduce the data volume of the con‐
tact.
▷ Is the mobile phone connected as an audio
source
or additional telephone? The mobile
phone must be connected as a telephone.
The phone connection quality is poor.
▷ The strength of the Bluetooth signal on the
mobile phone can be adjusted, depending
on the mobile phone.
▷ Insert the mobile phone into the snap-in
adapter* or place it in the area of the center
console.
▷ Adjust the volume of the microphone and
loudspeakers separately.
If all points in this list have been checked and the
required function is still not available, please
contact the hotline or service center.
Controls
Adjusting the volume
Turn the knob until the desired volume is se‐
lected.
The setting is stored for the remote con‐
trol currently in use.
The vehicle automatically adjusts the volume of
the microphone on the telephone and the vol‐
ume of the called party. Depending on the mo‐
bile phone, the volumes may need to be ad‐
justed. The settings can only be created during
a call and must be adjusted separately for each
telephone. The settings are deleted when the
telephone is unpaired.
1. "Settings"
2. "Tone"
3. "Volume settings"
4. Select the desired setting: "Microphone" or
"Loudspeak."
5. To adjust: turn the controller.
6. To store: press the controller.
Seite 215
215Online Edition for Part no. 01 40 2 606 497 - 03 11 490
Reference Mobility
Communication Entertainment Navigation Driving tips Controls At a glance
Page 217 of 299
must be supported by the mobile phone and
service provider.
Accepting a call while speaking to
another party
This function might have to be activated by the
service provider and the mobile phone must be
adjusted accordingly.
If
a second call comes in during an ongoing call,
a call waiting signal is sounded where appropri‐
ate. "Accept"
The call is accepted and the existing call is put
on hold.
Establishing a second call
Establish
an additional call during an active call.
1. "Telephone"
2. "Active calls"
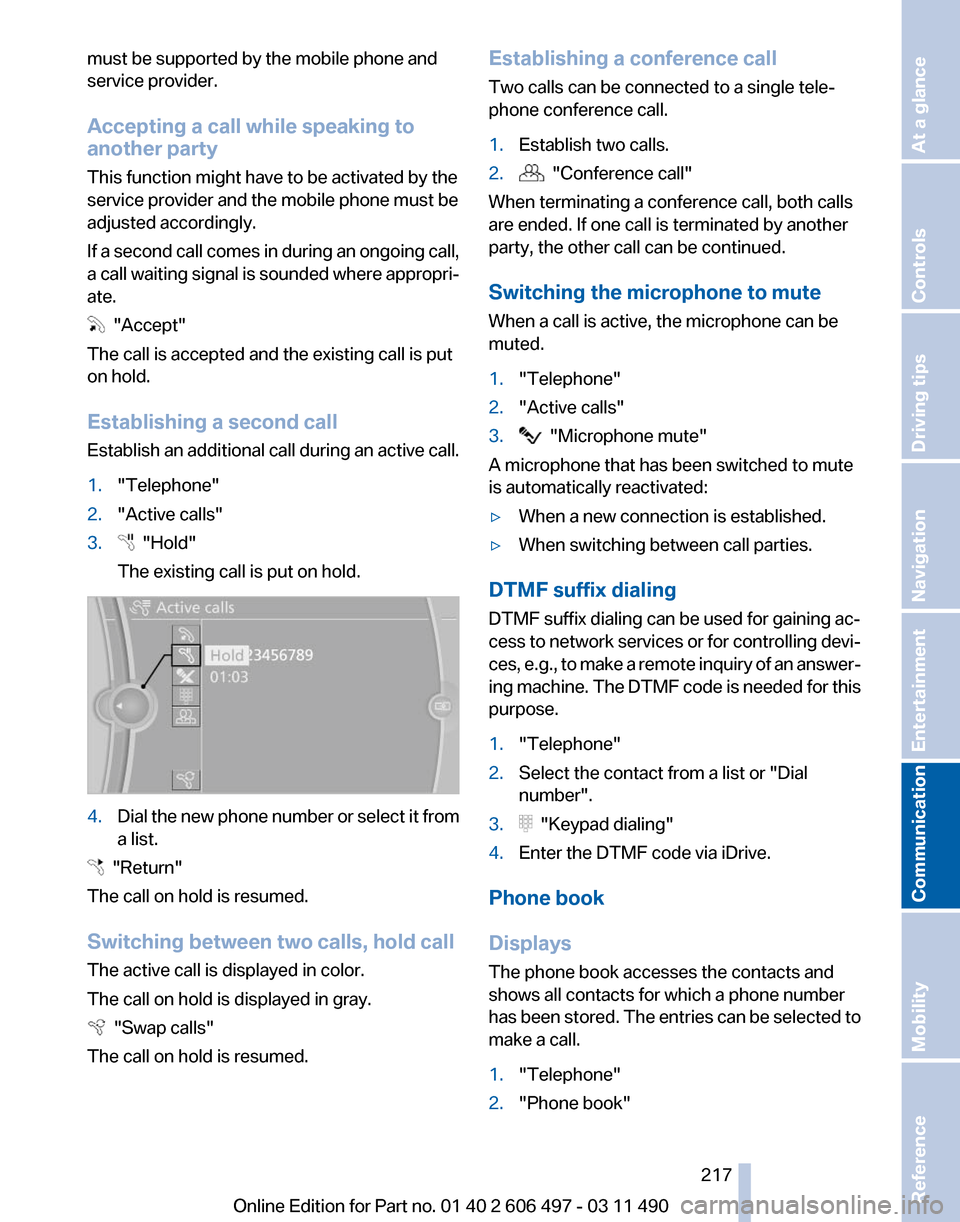
3. "Hold"
The existing call is put on hold. 4.
Dial the new phone number or select it from
a list. "Return"
The call on hold is resumed.
Switching between two calls, hold call
The active call is displayed in color.
The call on hold is displayed in gray. "Swap calls"
The call on hold is resumed. Establishing a conference call
Two calls can be connected to a single tele‐
phone conference call.
1.
Establish two calls.
2. "Conference call"
When terminating a conference call, both calls
are ended. If one call is terminated by another
party, the other call can be continued.
Switching the microphone to mute
When a call is active, the microphone can be
muted.
1. "Telephone"
2. "Active calls"
3. "Microphone mute"
A microphone that has been switched to mute
is automatically reactivated:
▷ When a new connection is established.
▷ When switching between call parties.
DTMF suffix dialing
DTMF suffix dialing can be used for gaining ac‐
cess
to network services or for controlling devi‐
ces, e.g., to make a remote inquiry of an answer‐
ing machine. The DTMF code is needed for this
purpose.
1. "Telephone"
2. Select the contact from a list or "Dial
number".
3. "Keypad dialing"
4. Enter the DTMF code via iDrive.
Phone book
Displays
The phone book accesses the contacts and
shows all contacts for which a phone number
has
been stored. The entries can be selected to
make a call.
1. "Telephone"
2. "Phone book"
Seite 217
217Online Edition for Part no. 01 40 2 606 497 - 03 11 490
Reference Mobility
Communication Entertainment Navigation Driving tips Controls At a glance
Page 261 of 299
Do not touch the bulbs
Do not touch the glass of new bulbs with
your bare hands, as even minute amounts of
contamination will burn into the bulb's surface
and reduce its service life.
Use
a clean tissue, cloth or something similar, or
hold the bulb by its base.◀
Light-emitting diodes (LEDs)
Light-emitting diodes installed behind a cover
serve as the light source for controls, display el‐
ements and other equipment.
These light-emitting diodes, which are related
to conventional lasers, are officially designated
as Class 1 light-emitting diodes.
Do not remove the covers
Do not remove the covers, and never stare
into the unfiltered light for several hours; other‐
wise, irritation of the retina could result.◀
Headlamp glass
Condensation can form on the inside of the ex‐
ternal lamps in cool or humid weather. When the
light is switched on, the condensation evapo‐
rates after a short time. The headlamp glasses
do not need to be changed.
If there is a large amount of moisture, e.g., water
droplets form in the lamp, have it checked by
your service center.
Front lamps, bulb replacement
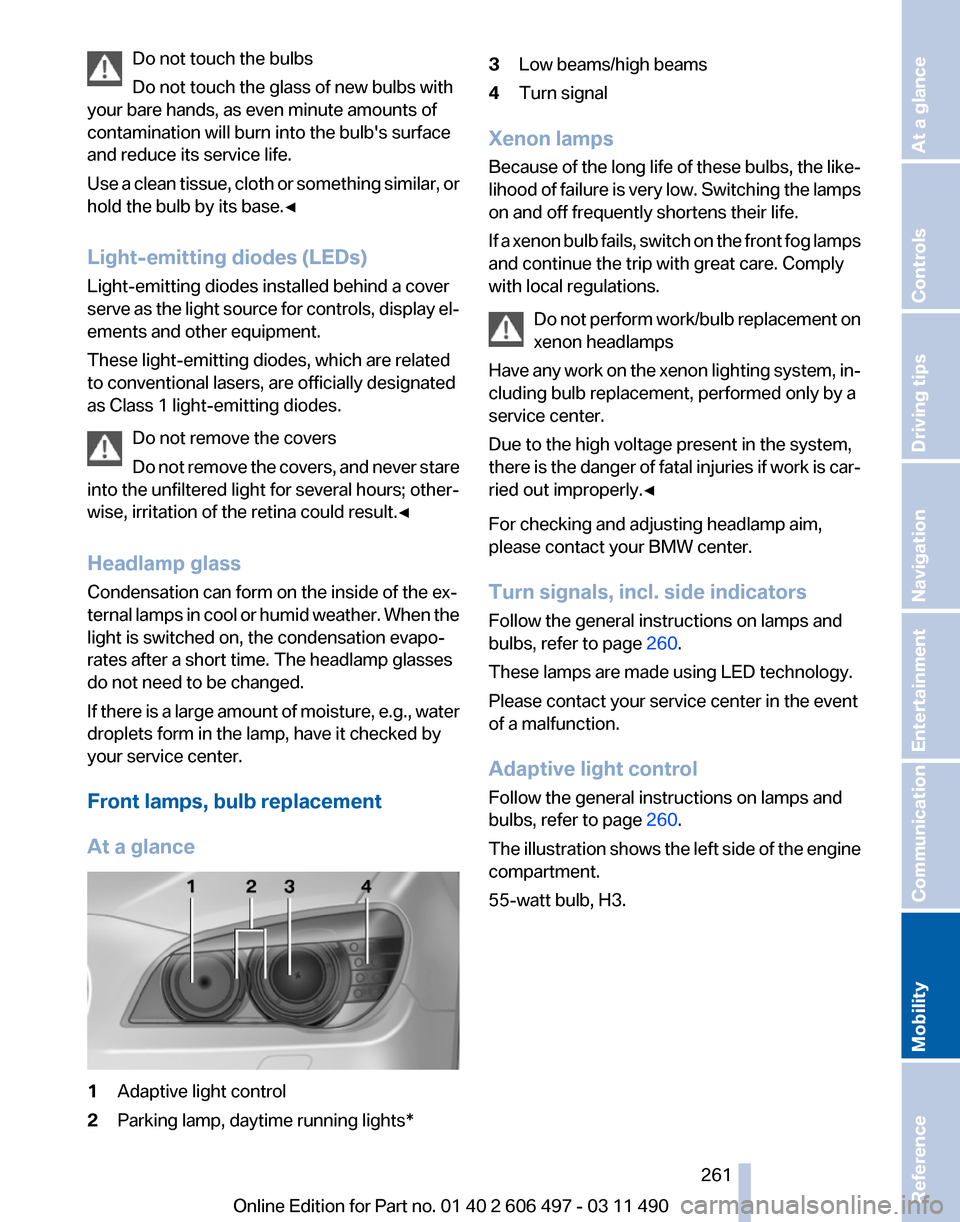
At a glance 1
Adaptive light control
2 Parking lamp, daytime running lights* 3
Low beams/high beams
4 Turn signal
Xenon lamps
Because
of the long life of these bulbs, the like‐
lihood of failure is very low. Switching the lamps
on and off frequently shortens their life.
If a xenon bulb fails, switch on the front fog lamps
and continue the trip with great care. Comply
with local regulations.
Do not perform work/bulb replacement on
xenon headlamps
Have any work on the xenon lighting system, in‐
cluding bulb replacement, performed only by a
service center.
Due to the high voltage present in the system,
there is the danger of fatal injuries if work is car‐
ried out improperly.◀
For checking and adjusting headlamp aim,
please contact your BMW center.
Turn signals, incl. side indicators
Follow the general instructions on lamps and
bulbs, refer to page 260.
These lamps are made using LED technology.
Please contact your service center in the event
of a malfunction.
Adaptive light control
Follow the general instructions on lamps and
bulbs, refer to page 260.
The illustration shows the left side of the engine
compartment.
55-watt bulb, H3. Seite 261
261Online Edition for Part no. 01 40 2 606 497 - 03 11 490
Reference
Mobility Communication Entertainment Navigation Driving tips Controls At a glance
Page 263 of 299
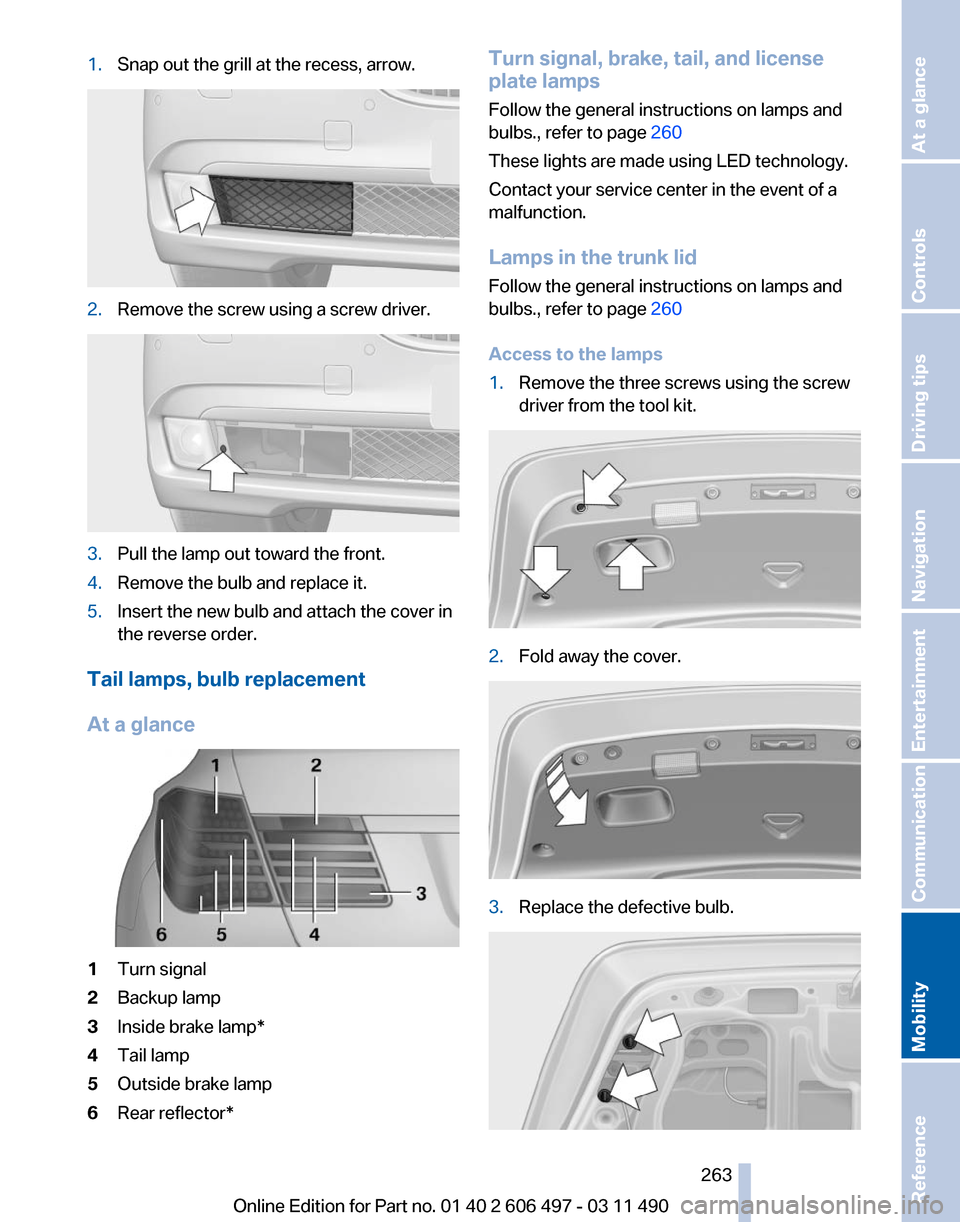
1.
Snap out the grill at the recess, arrow. 2.
Remove the screw using a screw driver. 3.
Pull the lamp out toward the front.
4. Remove the bulb and replace it.
5. Insert the new bulb and attach the cover in
the reverse order.
Tail lamps, bulb replacement
At a glance 1
Turn signal
2 Backup lamp
3 Inside brake lamp*
4 Tail lamp
5 Outside brake lamp
6 Rear reflector* Turn signal, brake, tail, and license
plate lamps
Follow the general instructions on lamps and
bulbs., refer to page
260
These lights are made using LED technology.
Contact your service center in the event of a
malfunction.
Lamps in the trunk lid
Follow the general instructions on lamps and
bulbs., refer to page 260
Access to the lamps
1. Remove the three screws using the screw
driver from the tool kit. 2.
Fold away the cover. 3.
Replace the defective bulb. Seite 263
263Online Edition for Part no. 01 40 2 606 497 - 03 11 490
Reference
Mobility Communication Entertainment Navigation Driving tips Controls At a glance
Page 289 of 299
Battery replacement, audio re‐
mote control 198
Battery replacement, remote control, rear entertain‐
ment 200
Battery replacement, vehicle battery 265
Battery replacement, vehicle remote control 32
Battery, vehicle 265
Before entering the car wash 271
Belts, safety belts 53
Beverage holder, cu‐ pholder 140
Blinds, sun protection 45
Bluetooth audio 194
BMW Apps 238
BMW Apps, video play‐ back 193
BMW Assist 234
BMW EfficientDynamics, refer to Saving fuel 148
BMW homepage 6
BMW Internet page 6
BMW Maintenance Sys‐ tem 258
BMW Online 236
Bottle holder, refer to Cu‐ pholder 140
Brake assistant 98
Brake assistant, adaptive 98
Brake discs, breaking in 144
Brake force display 97
Brake lamps, brake force dis‐ play 97
Brake lamps, bulb replace‐ ment 263
Brake lights, adaptive 97
Brake pads, breaking in 144
Braking, notes 145
Breakdown assis‐ tance 266, 267
Breaking in 144
Brightness of Control Dis‐ play 81
Bulb replacement 260
Bulb replacement, front 261 Bulb replacement, rear
263
Bulbs and lamps 260
Button, RES 107
Button, Start/Stop 65
Bypassing, refer to starting aid 267
C
Calendar 228
California Proposition 65 Warning 7
Camera, backup camera 118
Camera, care 273
Camera, Side View 119
Camera, Top View 120
Can holder, refer to Cu‐ pholder 140
Car battery 265
Car care products 272
Care, displays 273
Care, vehicle 272
Cargo 146
Cargo area lid 39
Cargo area, storage compart‐ ments 140
Cargo straps, securing cargo 147
Car key, refer to Remote con‐ trol 32
Carpet, care 273
Car wash 271
Catalytic converter, refer to Hot exhaust system 144
CBS Condition Based Serv‐ ice 258
CD/DVD 179
CD/DVD player, rear 199, 204
CDs, storing 186
Cell phone 212
Center armrest 139
Center console 17
Central locking system 35
Central
screen, refer to Control
Display 19
Changes, technical, refer to Safety 7
Changing parts 260 Changing wheels/tires 250
Check Control 82
Children, seating position 61
Children, transporting safely 61
Child restraint fixing sys‐ tem 61
Child restraint fixing system LATCH 62
Child restraint fixing systems, mounting 61
Child-safety locks 64
Child seat, mounting 61
Child seats 61
Chrome parts, care 272
Cigarette lighter 134
Cleaning, displays 273
Climate control 125
Climate control on head‐ liner 130
Climate control wind‐ shield 145
Clock 77
Closing/opening from in‐ side 39
Closing/opening via door lock 38
Closing/opening with remote control 36
Clothes hooks 140
Collision warning 110
Combination instrument 14
Combination
instrument, elec‐
tronic displays 16
Combination switch, refer to Turn signals 70
Combination switch, refer to Wiper system 70
Comfort Access 42
COMFORT program, Dynamic Driving Control 103
Computer 77
Concierge service 235
Condensation on win‐ dows 126
Condensation under the vehi‐ cle 146
Seite 289
289Online Edition for Part no. 01 40 2 606 497 - 03 11 490
Reference Mobility Communication Entertainment Navigation Driving tips Controls At a glance
Page 290 of 299
Condition Based Service
CBS 258
Confirmation signal 37
Contacts 223, 232
Control Display 19
Control Display, settings 80
Controller 19
Control systems, driving sta‐ bility 98
Convenient opening 36
Coolant 256
Coolant temperature 76
Cooler 135
Cooling function 127
Cooling, maximum 126
Cooling system 256
Corrosion on brake discs 146
Cruise control 111
Cruise control, active with Stop & Go 105
Cruising range 75
Cupholder 140
Curb weight 278
Current fuel consumption 76
Current location, storing 154
Customer Relations 237
D
Damage, tires 249
Damping control, dy‐ namic 100
Data, technical 276
Date 77
Daytime running lights 85
Defrosting, refer to Windows, defrosting 126
Destination distance 78
Destination guidance 159
Destination guidance with in‐ termediate destinations 158
Destination input, naviga‐ tion 152
Digital clock 77
Digital radio 173
Dimensions 276
Dimmable interior rearview mirror 59 Direction indicator, refer to
Turn signals 70
Display in front wind‐ shield 123
Display,
instrument cluster 75
Display lighting, refer to Instru‐ ment lighting 87
Displays 14
Displays, cleaning 273
Disposal, coolant 257
Disposal, vehicle battery 265
Distance control, refer to PDC 113
Distance, selecting for ACC 106
Distance to destination 78
Divided screen view, split screen 23
Door lock, refer to Remote control 32
Doors, Automatic Soft Clos‐ ing 39
Downhill control 99
Drive-off assistant 98
Drive-off assistant, refer to DSC 98
Driving instructions, breaking in 144
Driving notes, general 144
Driving stability control sys‐ tems 98
Driving tips 144
DSC Dynamic Stability Con‐ trol 98
DTC Dynamic Traction Con‐ trol 99
DVD/CD 179
DVD/CD notes 185
DVD/CD player, rear 199, 204
DVD changer 183
DVD settings 182
DVDs, storing 186
DVD, video 181
Dynamic Damping Con‐ trol 100
Dynamic destination guid‐ ance 165
Dynamic Drive 100 Dynamic Driving Control
102
Dynamic Stability Control DSC 98
Dynamic Traction Control DTC 99
E
EfficientDynamics, refer to Saving fuel 148
Electronic displays, instru‐ ment cluster 16
Electronic engine oil level check 255
Electronic Stability Program ESP, refer to DSC 98
Emergency detection, remote control 33
Emergency release, door lock 38
Emergency release, fuel filler flap 242
Emergency release, parking brake 67
Emergency Request 266
Emergency service, refer to Roadside Assistance 267
Emergency start function, en‐ gine start 33
Emergency unlocking, trunk lid 42
Energy Control 76
Energy recovery 77
Engine compartment 253
Engine compartment, working in 253
Engine coolant 256
Engine oil 255
Engine oil, adding 255
Engine oil additives 256
Engine oil filler neck 255
Engine oil temperature 76
Engine oil types, alterna‐ tive 256
Engine oil types, ap‐ proved 256
Engine start during malfunc‐ tion 33
Seite 290
290 Online Edition for Part no. 01 40 2 606 497 - 03 11 490
Everything from A to Z