child restraint BMW 760LI SEDAN 2006 Owners Manual
[x] Cancel search | Manufacturer: BMW, Model Year: 2006, Model line: 760LI SEDAN, Model: BMW 760LI SEDAN 2006Pages: 247, PDF Size: 8.66 MB
Page 42 of 247
Opening and closing
40
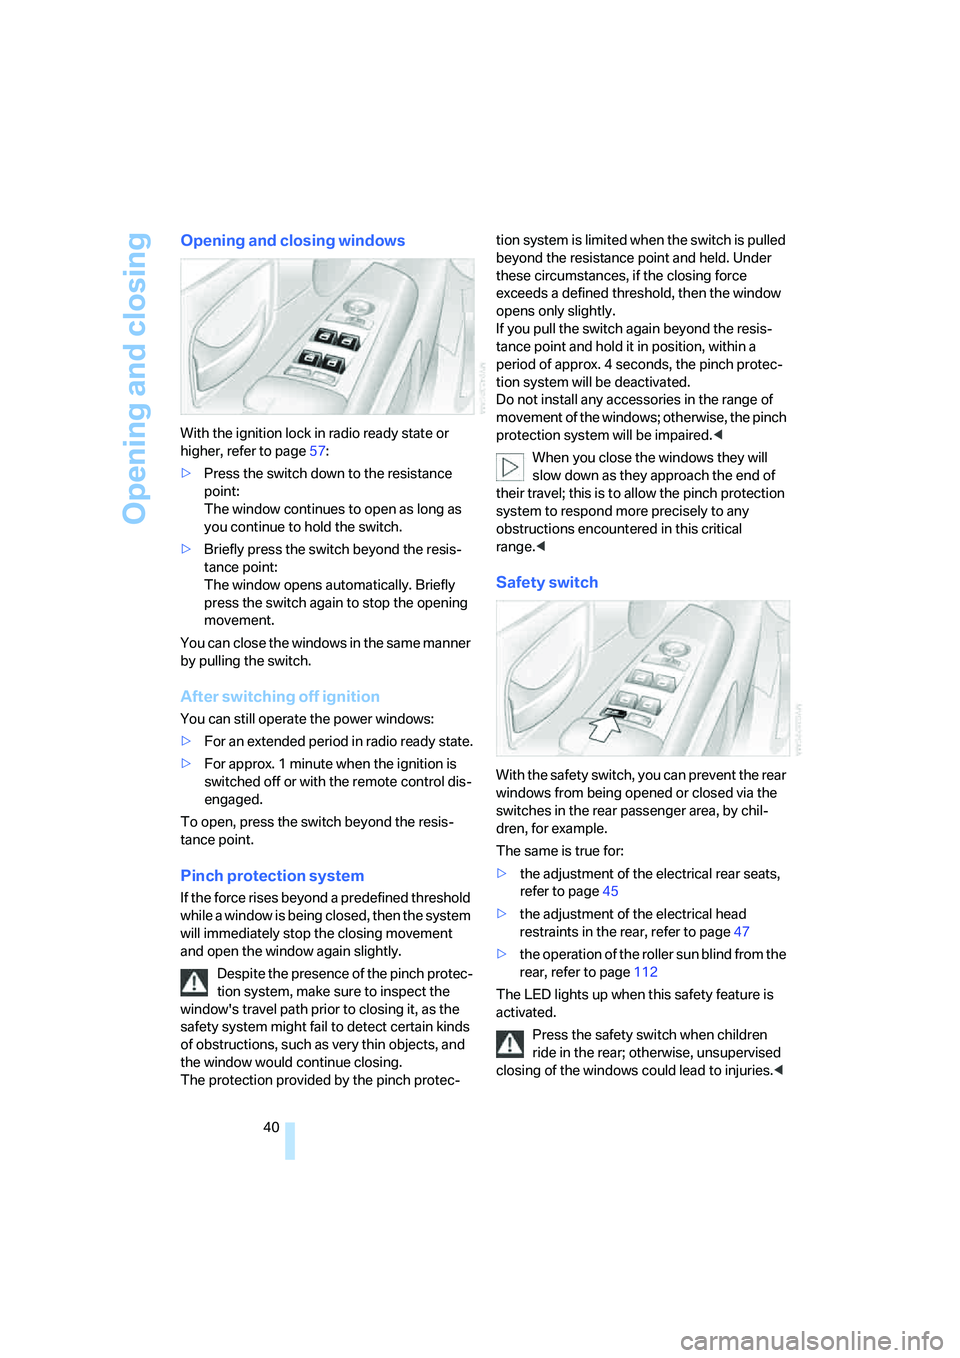
Opening and closing windows
With the ignition lock in radio ready state or
higher, refer to page57:
>Press the switch down to the resistance
point:
The window continues to open as long as
you continue to hold the switch.
>Briefly press the switch beyond the resis-
tance point:
The window opens automatically. Briefly
press the switch again to stop the opening
movement.
You can close the windows in the same manner
by pulling the switch.
After switching off ignition
You can still operate the power windows:
>For an extended period in radio ready state.
>For approx. 1 minute when the ignition is
switched off or with the remote control dis-
engaged.
To open, press the switch beyond the resis-
tance point.
Pinch protection system
If the force rises beyond a predefined threshold
while a window is being closed, then the system
will immediately stop the closing movement
and open the window again slightly.
Despite the presence of the pinch protec-
tion system, make sure to inspect the
window's travel path prior to closing it, as the
safety system might fail to detect certain kinds
of obstructions, such as very thin objects, and
the window would continue closing.
The protection provided by the pinch protec-tion system is limited when the switch is pulled
beyond the resistance point and held. Under
these circumstances, if the closing force
exceeds a defined threshold, then the window
opens only slightly.
If you pull the switch again beyond the resis-
tance point and hold it in position, within a
period of approx. 4 seconds, the pinch protec-
tion system will be deactivated.
Do not install any accessories in the range of
movement of the windows; otherwise, the pinch
protection system will be impaired.<
When you close the windows they will
slow down as they approach the end of
their travel; this is to allow the pinch protection
system to respond more precisely to any
obstructions encountered in this critical
range.<
Safety switch
With the safety switch, you can prevent the rear
windows from being opened or closed via the
switches in the rear passenger area, by chil-
dren, for example.
The same is true for:
>the adjustment of the electrical rear seats,
refer to page45
>the adjustment of the electrical head
restraints in the rear, refer to page47
>the operation of the roller sun blind from the
rear, refer to page112
The LED lights up when this safety feature is
activated.
Press the safety switch when children
ride in the rear; otherwise, unsupervised
closing of the windows could lead to injuries.<
Page 45 of 247
Controls
43Reference
At a glance
Driving tips
Communications
Navigation
Entertainment
Mobility
Adjusting
Sitting safely
The ideal sitting position can make a vital con-
tribution to relaxed driving that is as fatigue-free
as possible. Together with the safety belts and
airbags, the sitting position plays an important
role in the event of an accident. To ensure that
the safety systems operate with optimized effi-
ciency, we strongly urge you to follow the
instructions contained in the section below.
For additional information on transporting chil-
dren safely, refer to page54.
Airbags
Always maintain an adequate distance
between yourself and the airbags. Always
hold the steering wheel by its rim with hands at
the 9 o'clock and 3 o'clock positions, to mini-
mize the risk of injuries to your hands and arms
in the event of airbag deployment. No one and
nothing is to come between the airbags and the
seat occupant.
Do not use the cover of the front airbag on the
front passenger side as a storage area. Make
sure that the front passenger is sitting correctly
and does not rest feet or legs on the instrument
panel; otherwise, leg injuries can occur if the
front airbag is triggered. Make sure that occu-
pants do not rest their head against the side or
head airbag; otherwise, injuries can occur if the
airbags are triggered.<
Even if you adhere to all of the instructions, inju-
ries resulting from contact with airbags cannot
be entirely ruled out, depending on the circum-
stances. The ignition and inflation noise may
provoke a mild – usually temporary – hearing
loss in extremely sensitive individuals.
For airbag locations and additional information
on airbags, refer to page94.
Head restraint
A correctly adjusted head restraint reduces the
risk of injury to cervical vertebrae in the event of
an accident.
Adjust the head restraint so that its center
is approx. at ear level. Otherwise, there is
increased danger of injury in the event of an
accident.<
Adjusting the head restraint, refer to page46.
Safety belt
Fasten safety belts on all occupied seats before
every trip. Although airbags enhance safety by
providing added protection, they are not a sub-
stitute for safety belts.
Your vehicle has five seats that are each
equipped with a safety belt.
Never allow more than one person to
wear a single safety belt. Never allow
infants or small children to ride on a passen-
ger's lap. Make sure that the belt lies low around
the hips in the lap area and does not press on
the abdomen. The safety belt must not lie
across the neck, rub on sharp edges, be routed
over solid or breakable objects or be pinched.
Wear the safety belt without twisting, snugly
across the lap and shoulders, as close to the
body as possible. Otherwise, the belt can slip
over the hips in the lap area in a frontal impact
and injure the abdomen. Avoid wearing clothing
that prevents the belt from fitting properly and
pull the shoulder belt periodically to readjust
the tension across your lap in order to avoid a
reduction in the retention effect of the safety
belt.<
For instructions on operating safety belts, refer
to page48.
Page 48 of 247
Adjusting
46 It will be necessary to return the rear seats
to their standard position before using a
child restraint system, for instance, refer to
page54.<
Seat, mirror and steering
wheel memory
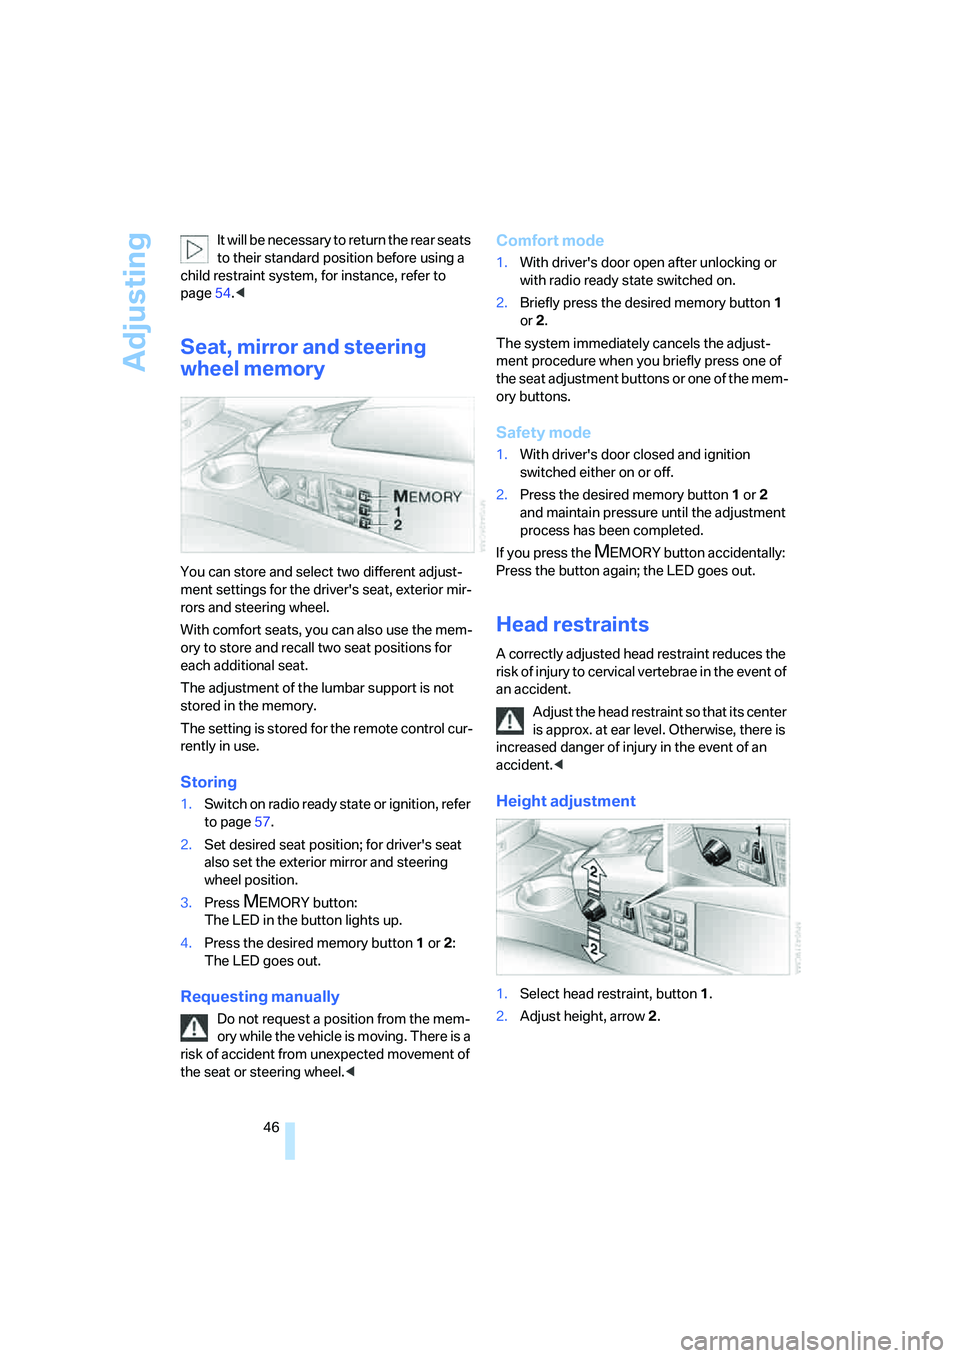
You can store and select two different adjust-
ment settings for the driver's seat, exterior mir-
rors and steering wheel.
With comfort seats, you can also use the mem-
ory to store and recall two seat positions for
each additional seat.
The adjustment of the lumbar support is not
stored in the memory.
The setting is stored for the remote control cur-
rently in use.
Storing
1.Switch on radio ready state or ignition, refer
to page57.
2.Set desired seat position; for driver's seat
also set the exterior mirror and steering
wheel position.
3.Press
MEMORY button:
The LED in the button lights up.
4.Press the desired memory button1 or2:
The LED goes out.
Requesting manually
Do not request a position from the mem-
ory while the vehicle is moving. There is a
risk of accident from unexpected movement of
the seat or steering wheel.<
Comfort mode
1.With driver's door open after unlocking or
with radio ready state switched on.
2.Briefly press the desired memory button 1
or2.
The system immediately cancels the adjust-
ment procedure when you briefly press one of
the seat adjustment buttons or one of the mem-
ory buttons.
Safety mode
1.With driver's door closed and ignition
switched either on or off.
2.Press the desired memory button 1or2
and maintain pressure until the adjustment
process has been completed.
If you press the
MEMORY button accidentally:
Press the button again; the LED goes out.
Head restraints
A correctly adjusted head restraint reduces the
risk of injury to cervical vertebrae in the event of
an accident.
Adjust the head restraint so that its center
is approx. at ear level. Otherwise, there is
increased danger of injury in the event of an
accident.<
Height adjustment
1.Select head restraint, button1.
2.Adjust height, arrow2.
Page 56 of 247
Transporting children safely
54
Transporting children safely
The right place for children
Do not leave children unattended in the
vehicle; otherwise, they could endanger
themselves and other persons, e.g. by opening
the doors.<
Children always in the rear
Accident research shows that the safest place
for children is on the back seat.
Children younger than 13 years of age or
with a height under 5 ft/150 cm may only
be transported in the rear in child restraint sys-
tems which correspond to the age, weight and
height of the child. Otherwise, there is an
increased danger of injury in an accident.<
Children 13 years of age or older must wear a
safety belt as soon as a suitable child restraint
system can no longer be used due to their age,
weight and size.
With the exception of the driver's seat, all seats
in your BMW comply with the recommenda-
tions of the standard SAE J1819 for the safe
securing of child restraint systems in motor
vehicles.
Exception for front passenger seat
Should it be necessary to use a child
restraint system on the front passenger
seat, the front, knee and side airbag on the front
passenger side must be deactivated. Other-
wise, there is an increased risk of injury for the
child if the airbags are triggered, even with a
child restraint system. Your BMW center will be
glad to advise you.<
More information on Automatic deactivation of
front passenger airbags, refer to page95.
Installing child restraint
systems
In order to avoid reducing their protective
action, follow all instructions of the child
restraint system manufacturer for the selection,
installation, and use of child restraint sys-
tems.<
Backrest width* on front passenger's
seat
Before mounting a child restraint system
on the front passengers seat, the back-
rest width adjustment must be open com-
pletely. After installing the child's seat, no
memory position may be called up; otherwise,
the stability of the child's seat on the front pas-
senger seat is reduced.<
1.Open backrest width completely, refer to
Front comfort seat adjustment on page44.
2.Mount child's seat.
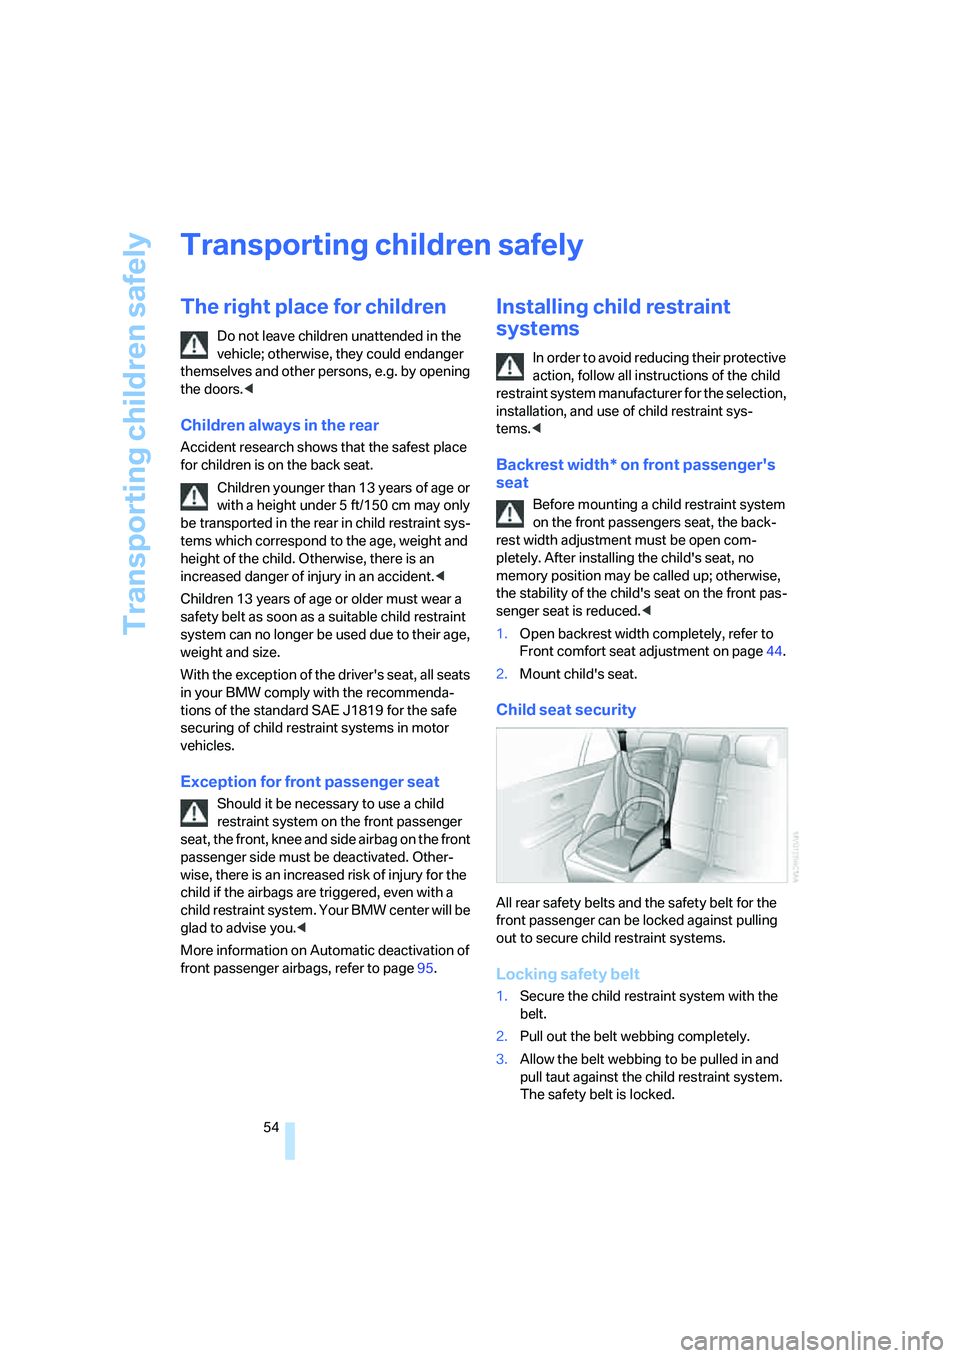
Child seat security
All rear safety belts and the safety belt for the
front passenger can be locked against pulling
out to secure child restraint systems.
Locking safety belt
1.Secure the child restraint system with the
belt.
2.Pull out the belt webbing completely.
3.Allow the belt webbing to be pulled in and
pull taut against the child restraint system.
The safety belt is locked.
Page 57 of 247
Controls
55Reference
At a glance
Driving tips
Communications
Navigation
Entertainment
Mobility
Unlocking safety belt
1.Open the belt buckle.
2.Remove the child restraint system.
3.Allow the belt webbing to be pulled in com-
pletely.
Child restraint system with tether strap
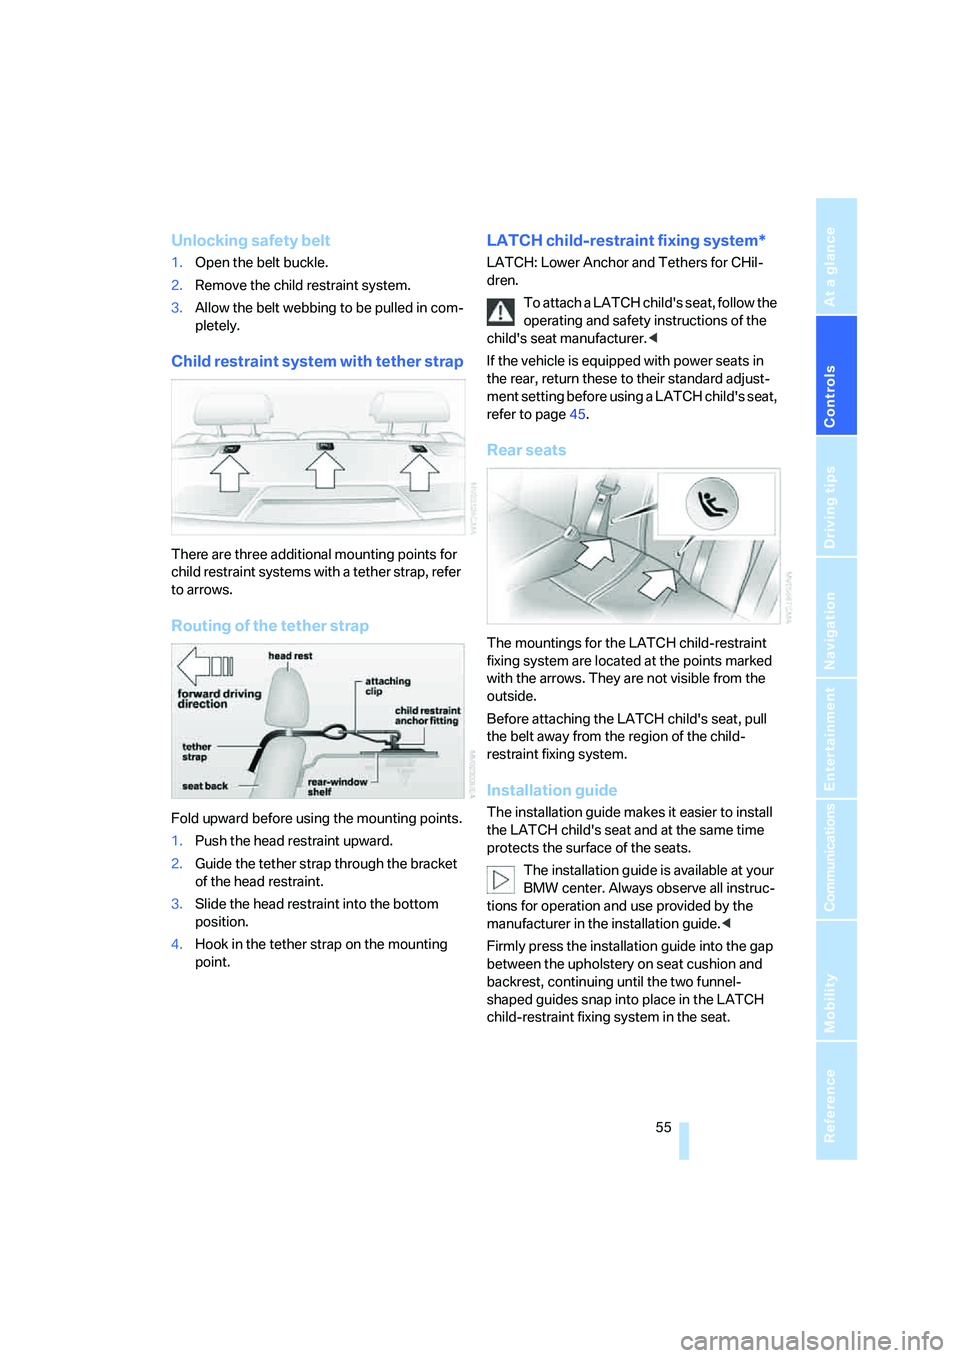
There are three additional mounting points for
child restraint systems with a tether strap, refer
to arrows.
Routing of the tether strap
Fold upward before using the mounting points.
1.Push the head restraint upward.
2.Guide the tether strap through the bracket
of the head restraint.
3.Slide the head restraint into the bottom
position.
4.Hook in the tether strap on the mounting
point.
LATCH child-restraint fixing system*
LATCH: Lower Anchor and Tethers for CHil-
dren.
To attach a LATCH child's seat, follow the
operating and safety instructions of the
child's seat manufacturer.<
If the vehicle is equipped with power seats in
the rear, return these to their standard adjust-
ment setting before using a LATCH child's seat,
refer to page45.
Rear seats
The mountings for the LATCH child-restraint
fixing system are located at the points marked
with the arrows. They are not visible from the
outside.
Before attaching the LATCH child's seat, pull
the belt away from the region of the child-
restraint fixing system.
Installation guide
The installation guide makes it easier to install
the LATCH child's seat and at the same time
protects the surface of the seats.
The installation guide is available at your
BMW center. Always observe all instruc-
tions for operation and use provided by the
manufacturer in the installation guide.<
Firmly press the installation guide into the gap
between the upholstery on seat cushion and
backrest, continuing until the two funnel-
shaped guides snap into place in the LATCH
child-restraint fixing system in the seat.
Page 58 of 247
Transporting children safely
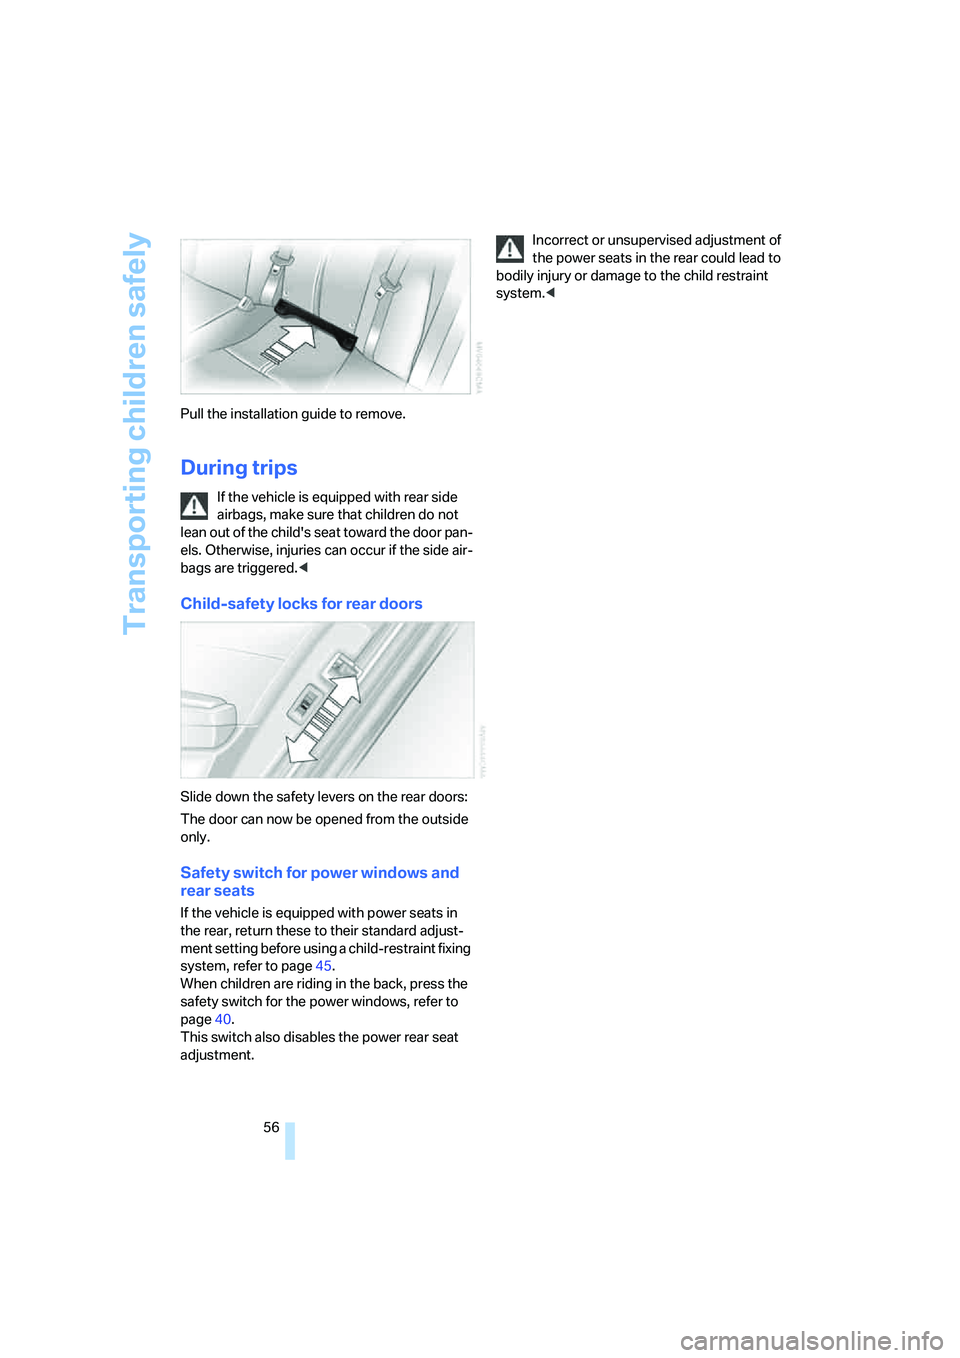
56 Pull the installation guide to remove.
During trips
If the vehicle is equipped with rear side
airbags, make sure that children do not
lean out of the child's seat toward the door pan-
els. Otherwise, injuries can occur if the side air-
bags are triggered.<
Child-safety locks for rear doors
Slide down the safety levers on the rear doors:
The door can now be opened from the outside
only.
Safety switch for power windows and
rear seats
If the vehicle is equipped with power seats in
the rear, return these to their standard adjust-
ment setting before using a child-restraint fixing
system, refer to page45.
When children are riding in the back, press the
safety switch for the power windows, refer to
page40.
This switch also disables the power rear seat
adjustment.Incorrect or unsupervised adjustment of
the power seats in the rear could lead to
bodily injury or damage to the child restraint
system.<
Page 97 of 247
Controls
95Reference
At a glance
Driving tips
Communications
Navigation
Entertainment
Mobility
the airbag restraint system, have the testing,
repair, removal, and disposal of airbag genera-
tors executed only by a BMW center or a work-
shop that works according to BMW repair pro-
cedures with correspondingly trained
personnel and has the required explosives
licenses. Unprofessional attempts to service
the system could lead to failure in an emer-
gency or undesired airbag activation, either of
which could result in personal injury.<
Warnings and information on the airbags is also
provided on the sun visors.
Automatic deactivation of front
passenger airbags
The occupation of the seat is detected by eval-
uating the impression on the occupied seat sur-
face of the front passenger seat. The system
appropriately activates or deactivates the front,
knee, and side airbag on the front passenger
side.
The current status of the front passenger
airbag, i.e. deactivated or activated, is
indicated by the indicator lamp over the interior
rearview mirror, refer to Operating state of front
passenger airbags in the following.<
Before transporting a child on the front
passenger seat, observe the safety infor-
mation and handling instructions under Trans-
porting children safely, refer to page54.
The front, knee and side airbag on the front pas-
senger side can be deactivated for teenagers
and adults in certain seat positions; then the
indicator lamp for the front passenger airbags
lights up. In these cases, change the seat posi-
tion so that the front passenger airbags are acti-
vated and the indicator lamp goes out. If the
desired status cannot be produced by changing
the seat position, have the person ride in the
back. Do not place slip covers, seat cushions,
beaded mats, or other objects on the passenger
seat that are not specifically recommended by
BMW. Do not lay objects under the seat which
could press against the seat from below. Other-
wise, a correct evaluation of the occupied seat
surface cannot be ensured.<
Operating state of front passenger
airbags
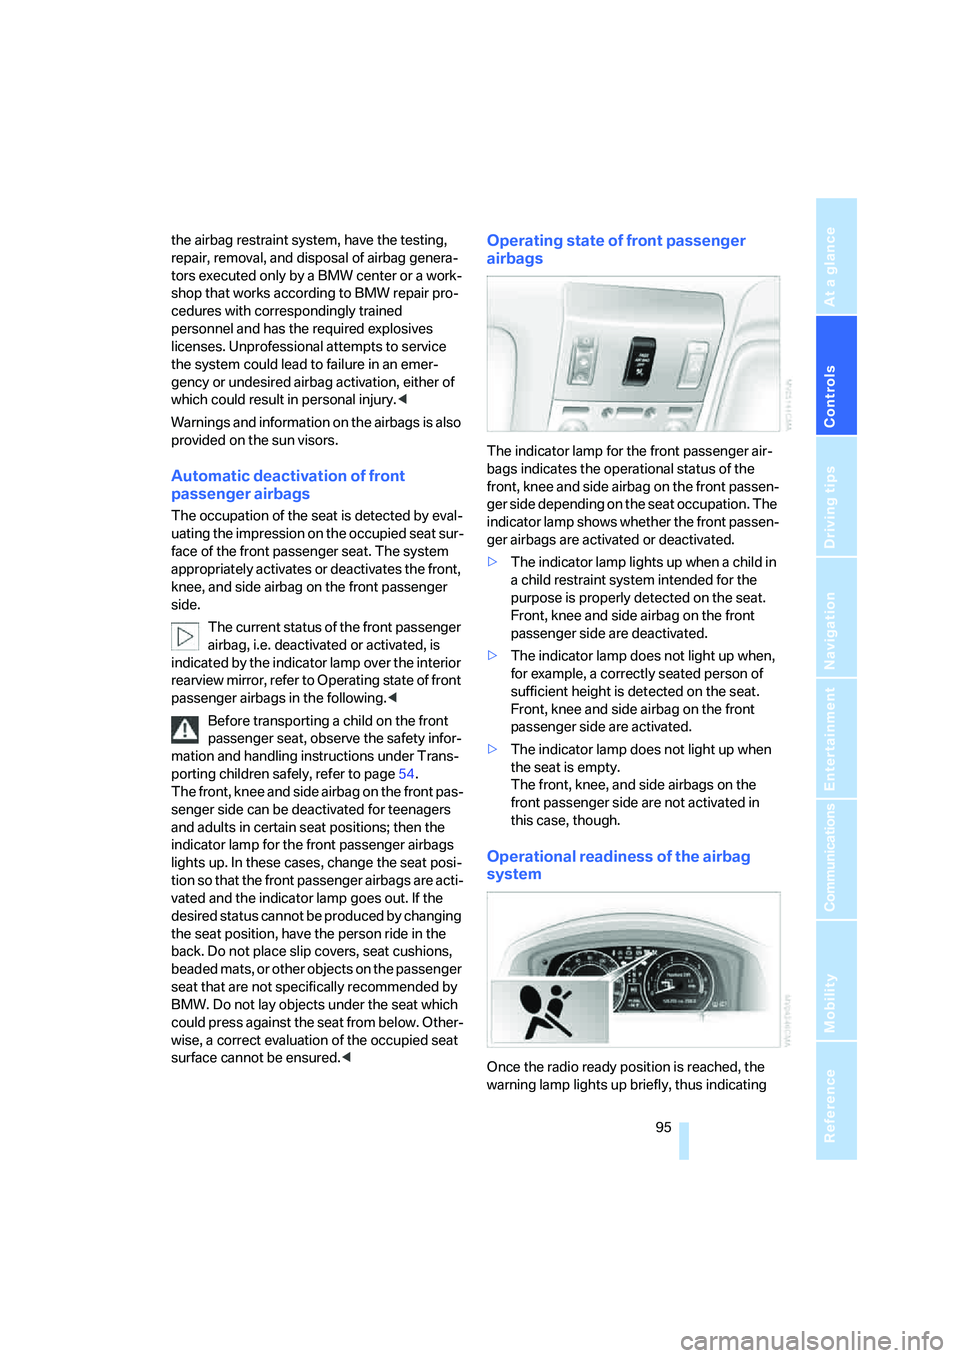
The indicator lamp for the front passenger air-
bags indicates the operational status of the
front, knee and side airbag on the front passen-
ger side depending on the seat occupation. The
indicator lamp shows whether the front passen-
ger airbags are activated or deactivated.
>The indicator lamp lights up when a child in
a child restraint system intended for the
purpose is properly detected on the seat.
Front, knee and side airbag on the front
passenger side are deactivated.
>The indicator lamp does not light up when,
for example, a correctly seated person of
sufficient height is detected on the seat.
Front, knee and side airbag on the front
passenger side are activated.
>The indicator lamp does not light up when
the seat is empty.
The front, knee, and side airbags on the
front passenger side are not activated in
this case, though.
Operational readiness of the airbag
system
Once the radio ready position is reached, the
warning lamp lights up briefly, thus indicating
Page 229 of 247
Reference 227
At a glance
Controls
Driving tips
Communications
Navigation
Entertainment
Mobility
Changing settings on Control
Display84
Changing time display84
Changing units of measure on
Control Display84
Changing wheels209
– run-flat tires200
"Channels", radio160
Check Control80
– "CHECK"81
– CHECK button81
Child's seats, refer to
Installing child restraint
systems54
Child-restraint fixing system
LATCH55
Child restraint systems54
Child-safety lock56
Chrome parts, refer to Caring
for your vehicle brochure
Chrome-plated parts, care,
refer to Caring for your
vehicle brochure
Cigarette lighter116
Cleaning, vehicle, refer to
Caring for your vehicle
brochure
Cleaning headlamps66
– reservoir capacity, refer to
Windshield and headlamp
washer system67
– washer fluid66
Cleaning windshield65
"Climate"
– parked car ventilation109
– preselecting activation
time109
– rear compartment air
conditioning108
– rear refrigerator117
– setting activation times110
Clock75
– 12/24-hour mode84
– setting84
"Clock", settings84Closing
– from inside34
– from outside32
Clothes hooks115
Cockpit10
Coin holder, refer to Center
armrest, front114
Cold start, refer to Starting
engine57
"Color", DVD changer170
Combined instrument, refer to
Info Display12
"Comfort", EDC Electronic
Damper Control90
Comfort Access38
– changing battery39
– observing in car wash39
Comfort features
14
Comfort program, EDC
Electronic Damper
Control90
Comfort seat44
– in rear45
Comfort starting, refer to
Starting engine57
"Communication",
telephone182
Compact Disc
– refer to CD changer164
– refer to CD player162
Compartments, refer to
Storage compartments113
Compressed audio files, CD
changer165
Computer76
– displays on Control
Display77
– units of measure and display
format84
Condensation, refer to When
vehicle is parked124
Condition Based Service
CBS205
Connecting car vacuum
cleaner, refer to Power
socket116Consumption, refer to
Average fuel
consumption77
Consumption display, refer to
– Average fuel
consumption77
– Displays on Info Display76
Consumption statistics, refer
to Average fuel
consumption77
"Continue route guidance?",
navigation143
"Contrast"
– BMW Night Vision98
– DVD changer170
Control Center, refer to
iDrive16
Control Display
– rear seat screen21
– refer to iDrive16
– setting brightness85
Controller
– programmable button52
– rear seat screen21
– refer to iDrive16
Controls and displays10,14
Coolant203
– level204
Coolant temperature76
Cooler, refer to Rear
refrigerator117
Cooling
– maximum106,108
– refer to AUTO program104
– refer to Rear air
conditioner108
– refer to Rear refrigerator117
– refer to Switching cooling
function on and off
manually107
Cornering Brake Control
CBC87
"Country", navigation132
Cradle for mobile phone, refer
to Using snap-in
adapter176
Page 234 of 247
Everything from A to Z
232 Instructions, navigation
system, refer to Route
guidance by voice
instructions145
Instrument cluster, refer to
Info Display12
Instrument lighting101
Instrument panel, refer to
Cockpit10
– all around the steering
wheel10
– comfort features14
Integrated universal remote
control111
Interior lamps102
– switching on with remote
control33
Interior motion sensor38
– switching off38
Interior rearview mirror,
automatic dimming
feature123
Interlock, refer to Switching
off engine58
"INTERM. TIME",
stopwatch83
Interval Display, refer to
Service requirements78
J
Joystick, refer to iDrive16
Jump starting213
K
Keyless-Go, refer to Comfort
Access38
Keyless opening and closing,
refer to Comfort Access38
Key Memory31
Keys30
– adapter for spare key30
– key-related settings, refer to
Key Memory31
Kick-down63
Knock control193
L
Lamps and bulbs207
"Language", settings84
Lashing eyes, refer to
Securing cargo125
"Last", telephone184
"Last dest.", navigation137
LATCH child-restraint fixing
system55
Leather care, refer to Caring
for your vehicle brochure
LEDs light-emitting
diodes207
"Left", seat heating49
Length, refer to
Dimensions219
Level control system89
Light
– refer to High-beam
assistant100
– refer to Parking lamps/low
beams99
– refer to Roadside parking
lamps/low beams100
Light alloy wheels, care and
maintenance, refer to Caring
for your vehicle brochure
Light-emitting diodes
LEDs207
Lighter116
Lighter socket, refer to Power
socket116
Lighting
– of instruments101
– of vehicle99
Light switch99
"Limit"82
Limit, refer to Speed limit82
"Limited", rear seat screen22
Load, refer to Loading124
Loading
– securing cargo125
– vehicle124
"LOC.", navigation140
"Location",
navigation139,146,147Lock buttons in the doors,
refer to Locking34
Locking
– from inside34
– from outside33
Locking without key, refer to
Comfort Access38
Locking without remote
control, refer to Comfort
Access38
"LOGIC7", tone control154
Longlife oils, approved
oils203
Long wave, LW155
– High Definition Radio161
"low", automatic climate
control105
Low beams99
– automatic99
– indicator lamp, defective
lamp80
Lower back support, refer to
Lumbar support
adjustment45
Low-fuel warning light, refer to
Fuel gauge76
Lows, refer to Tone
adjustment153
Lug bolts
– refer to Preparing for a wheel
change210
– tightening torque, refer to
After mounting211
– wrench, refer to What you
will need209
Luggage compartment119
– capacity220
– Comfort Access39
– opening/closing, refer to
Luggage compartment
lid35
– opening from inside36
– opening from outside35
– opening with remote
control33
Page 238 of 247
Everything from A to Z
236 "RDS", Radio159
RDS Radio Data System158
Reading lamps102
"Rear", rear seat screen22
Rear air conditioner108
– cooling adjustment108
– switching off108
– switching on108
– switching on/off via
iDrive108
Rear armrest, refer to Center
armrest114
"Rear climate control", rear
compartment air
conditioning108
Rear-compartment air condi-
tioning, rear refrigerator117
Rear lamps208
– refer to Tail lamps208
– replacing bulbs208
Rear lock, rear seat screen22
"Rear refrigerator"117
Rear refrigerator117
Rear-seat area ventilation107
Rear seat backrests, electric,
refer to Rear comfort seat
adjustment45
Rear seats
– adjusting45
– adjusting passenger seat
from rear45
– head restraint adjustment47
– heating50
Rear seat screen21
Rearview mirror50
Rear window blind, refer to
Sun blinds112
Rear window defroster107
Rear window safety switch40
Recent numbers in mobile
phone184
Reception, radio
– refer to Changing
station155
– refer to Updating stations in
receiving range157
Rechargeable flashlight113"Recirc. air", programmable
buttons52
Recirculated-air mode105
– automatic climate
control105
Reclining seat
– refer to Comfort seat
adjustment44
– refer to Power seat
adjustment44
Redialing list, displaying
persons not reached184
Reflectors, refer to Tail
lamps208
Refueling
192
Remaining distance
– for service required78
– refer to Cruising range77
– to destination77
Remote control30
– changing battery39
– Comfort Access38
– garage door opener111
– luggage compartment lid33
– malfunction33
Removing fog on the
windows106
Removing head restraints,
rear seats47
Replacement fuses212
Replacement key, refer to
New remote controls30
Replacement of tires199
– changing wheels209
– tire replacement199
Replacing bulbs, refer to
Lamps and bulbs207
Replacing windshield
wipers207
Reporting an accident, refer
Initiating an emergency
call178
Reservoir for washer
systems67
"RESET"
– Tire Pressure Monitor92
– tone control154Reset, resetting tone
settings154
Residual heat106
Restraint systems
– for children54
– refer to Safety belts48
Retaining straps, refer to
Securing cargo125
Retracting telephone
keypad177
Reverse
– CD changer166
– CD player163
– DVD changer169
Reverse gear, automatic
transmission with
Steptronic63
"Right", seat heating49
"RND"
– CD changer166
– CD player163
Road map134
Roadside Assistance187
Roadside parking lamps100
Roadside service, refer to
Roadside Assistance187
Roller sun blind, refer to Sun
blinds112
Roof load capacity220
Roof-mounted luggage
rack125
Rope, refer to Towing
methods215
Rotary pushbutton, refer to
iDrive16
Route
– altering145
– bypassing sections146
– changing145
– displaying143
– displaying arrow display143
– displaying map143
– displaying town144
– list144
– selecting141
– selecting criteria141
"Route guid.",
navigation138,143