battery BMW 760LI SEDAN 2015 Owners Manual
[x] Cancel search | Manufacturer: BMW, Model Year: 2015, Model line: 760LI SEDAN, Model: BMW 760LI SEDAN 2015Pages: 314, PDF Size: 7.9 MB
Page 8 of 314
BMW warrants genuine BMW parts and acces‐
sories.
BMW does not evaluate whether each individ‐
ual product from another manufacturer can be
used with BMW vehicles without presenting a
safety hazard, even if a country-specific official
approval was issued. BMW does not evaluate
whether these products are suitable for BMW
vehicles under all usage conditions.
California Proposition 65 Warning California laws require us to state the following
warning:
Engine exhaust and a wide variety of automo‐
bile components and parts, including compo‐
nents found in the interior furnishings in a vehi‐
cle, contain or emit chemicals known to the
State of California to cause cancer and birth
defects and reproductive harm. In addition,
certain fluids contained in vehicles and certain
products of component wear contain or emit
chemicals known to the State of California to
cause cancer and birth defects or other repro‐
ductive harm. Battery posts, terminals and re‐
lated accessories contain lead and lead com‐
pounds. Wash your hands after handling. Used
engine oil contains chemicals that have caused
cancer in laboratory animals. Always protect
your skin by washing thoroughly with soap and
water.
Service and warranty
We recommend that you read this publication
thoroughly. Your vehicle is covered by the fol‐
lowing warranties:▷New Vehicle Limited Warranty.▷Rust Perforation Limited Warranty.▷Federal Emissions System Defect War‐
ranty.▷Federal Emissions Performance Warranty.▷California Emission Control System Lim‐
ited Warranty.
Detailed information about these warranties is
listed in the Service and Warranty Information
Booklet for US models or in the Warranty and
Service Guide Booklet for Canadian models.
Your vehicle has been specifically adapted and
designed to meet the particular operating con‐
ditions and homologation requirements in your
country and continental region in order to de‐
liver the full driving pleasure while the vehicle
is operated under those conditions. If you wish
to operate your vehicle in another country or
region, you may be required to adapt your ve‐
hicle to meet different prevailing operating
conditions and homologation requirements.
You should also be aware of any applicable
warranty limitations or exclusions for such
country or region. In such case, please contact
Customer Relations for further information.
Maintenance
Maintain the vehicle regularly to sustain the
road safety, operational reliability and the New
Vehicle Limited Warranty.
Specifications for required maintenance meas‐
ures:▷BMW Maintenance system▷Service and Warranty Information Booklet
for US models▷Warranty and Service Guide Booklet for
Canadian models
If the vehicle is not maintained according to
these specifications, this could result in seri‐
ous damage to the vehicle. Such damage is
not covered by the BMW New Vehicle Limited
Warranty.
Data memory
Many electronic components on your vehicle
are equipped with data memories that tempo‐
rarily or permanently store technical informa‐
tion about the condition of the vehicle, events
and faults. This technical information generally
records the state of a component, a module, a system or the environment:
Seite 8Information8
Online Edition for Part no. 0140 2 964 330 - VI/15
Page 36 of 314
BMW Touch CommandVehicle features and options
This chapter describes all standard, country-
specific and optional features offered with the
series. It also describes features that are not
necessarily available in your car, e. g., due to
the selected options or country versions. This
also applies to safety-related functions and
systems. The respectively applicable country
provisions must be observed when using the
respective features and systems.
BMW Touch Command The concept
Important functions of the vehicle can be used
via BMW Touch Command.▷Seat adjustments for front passenger seat
and seats in the rear.▷Climate control in the rear.▷Sun protection.▷Ambient light.▷Ambient light accent.▷Bowers & Wilkins loudspeaker lighting.▷Audio sources front.▷Rear entertainment.▷Some functions of the telephone in the
rear.
General information
Depending on the vehicle's equipment, BMW
Touch Command is located in the rear console
or in the center armrest in the rear.
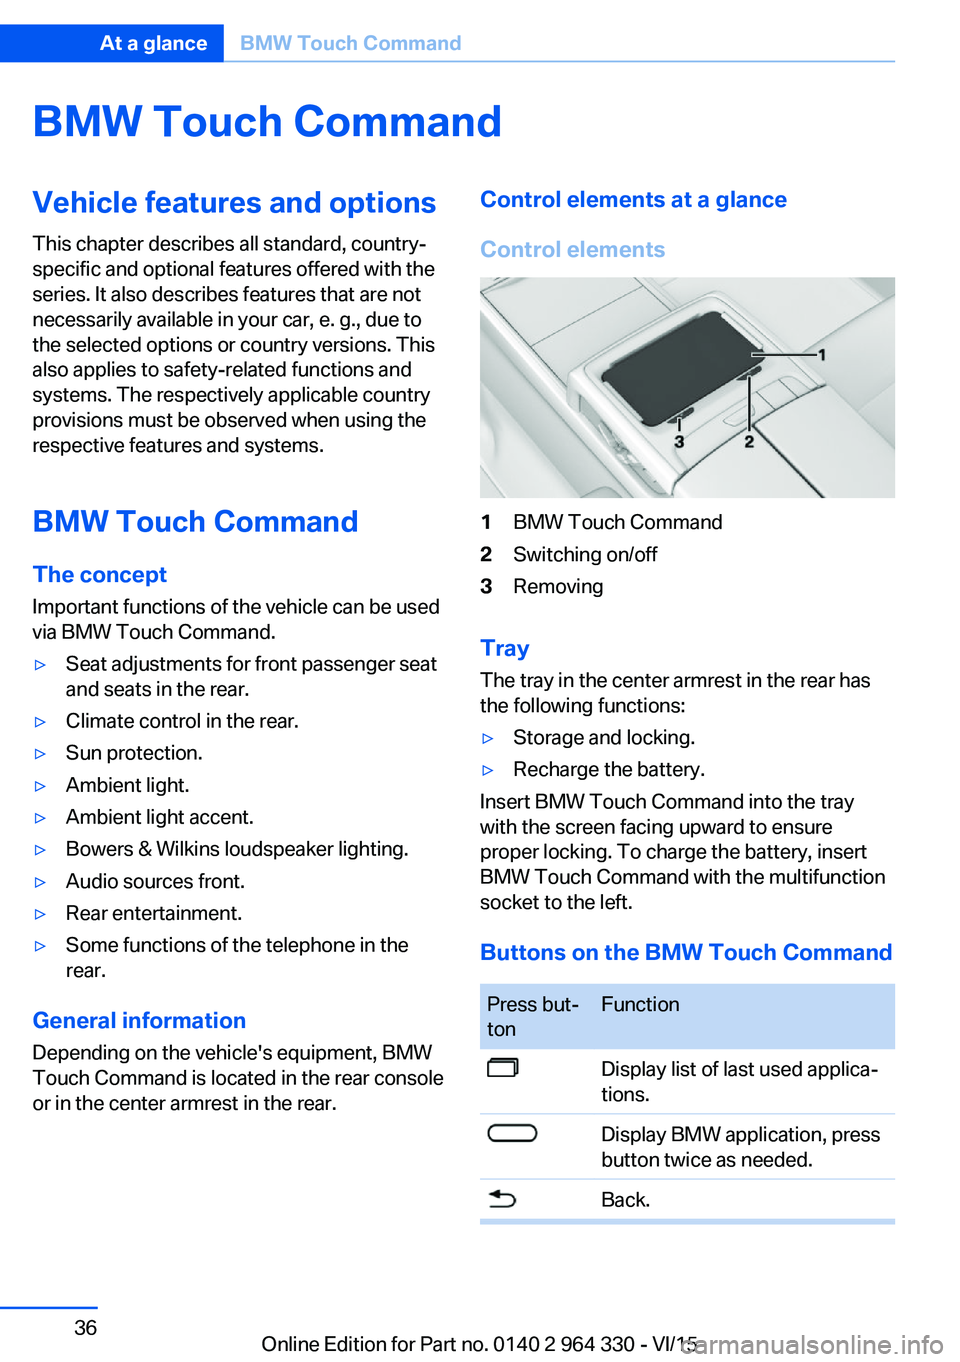
Control elements at a glance
Control elements1BMW Touch Command2Switching on/off3Removing
Tray
The tray in the center armrest in the rear has
the following functions:
▷Storage and locking.▷Recharge the battery.
Insert BMW Touch Command into the tray
with the screen facing upward to ensure
proper locking. To charge the battery, insert
BMW Touch Command with the multifunction
socket to the left.
Buttons on the BMW Touch Command
Press but‐
tonFunctionDisplay list of last used applica‐
tions.Display BMW application, press
button twice as needed.Back.Seite 36At a glanceBMW Touch Command36
Online Edition for Part no. 0140 2 964 330 - VI/15
Page 55 of 314
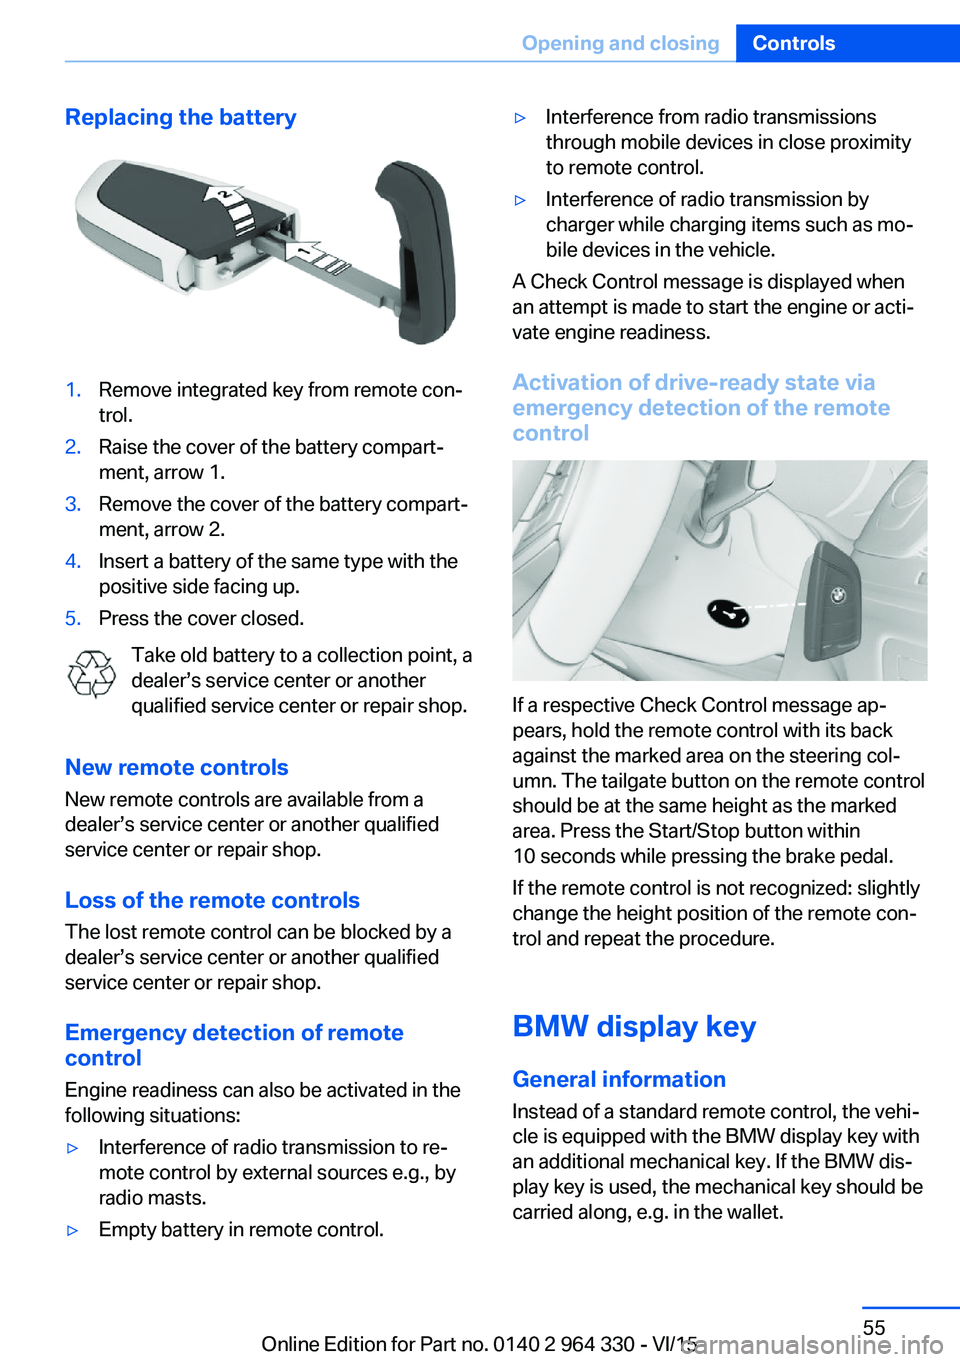
Replacing the battery1.Remove integrated key from remote con‐
trol.2.Raise the cover of the battery compart‐
ment, arrow 1.3.Remove the cover of the battery compart‐
ment, arrow 2.4.Insert a battery of the same type with the
positive side facing up.5.Press the cover closed.
Take old battery to a collection point, a
dealer’s service center or another
qualified service center or repair shop.
New remote controls New remote controls are available from a
dealer’s service center or another qualified
service center or repair shop.
Loss of the remote controls
The lost remote control can be blocked by a
dealer’s service center or another qualified
service center or repair shop.
Emergency detection of remote
control
Engine readiness can also be activated in the
following situations:
▷Interference of radio transmission to re‐
mote control by external sources e.g., by
radio masts.▷Empty battery in remote control.▷Interference from radio transmissions
through mobile devices in close proximity
to remote control.▷Interference of radio transmission by
charger while charging items such as mo‐
bile devices in the vehicle.
A Check Control message is displayed when
an attempt is made to start the engine or acti‐
vate engine readiness.
Activation of drive-ready state via
emergency detection of the remote
control
If a respective Check Control message ap‐
pears, hold the remote control with its back
against the marked area on the steering col‐
umn. The tailgate button on the remote control
should be at the same height as the marked
area. Press the Start/Stop button within
10 seconds while pressing the brake pedal.
If the remote control is not recognized: slightly
change the height position of the remote con‐
trol and repeat the procedure.
BMW display key
General information
Instead of a standard remote control, the vehi‐
cle is equipped with the BMW display key with
an additional mechanical key. If the BMW dis‐
play key is used, the mechanical key should be
carried along, e.g. in the wallet.
Seite 55Opening and closingControls55
Online Edition for Part no. 0140 2 964 330 - VI/15
Page 56 of 314
The BMW display key supports all functions of
the standard remote control. Beyond that, the
following functions are available.▷Display status of doors and windows.▷Display status of the alarm system.▷With parked-car heating: operate parked-
car heating.
Without parked-car heating: operate
parked-car ventilation.▷Call up range with available fuel.▷Display service information.
Emergency detection of the BMW
display key
The description for the emergency detection
of the remote control, refer to page 55, also
applies for the BMW display key. However, the
locking button should be at the height of the
marking.
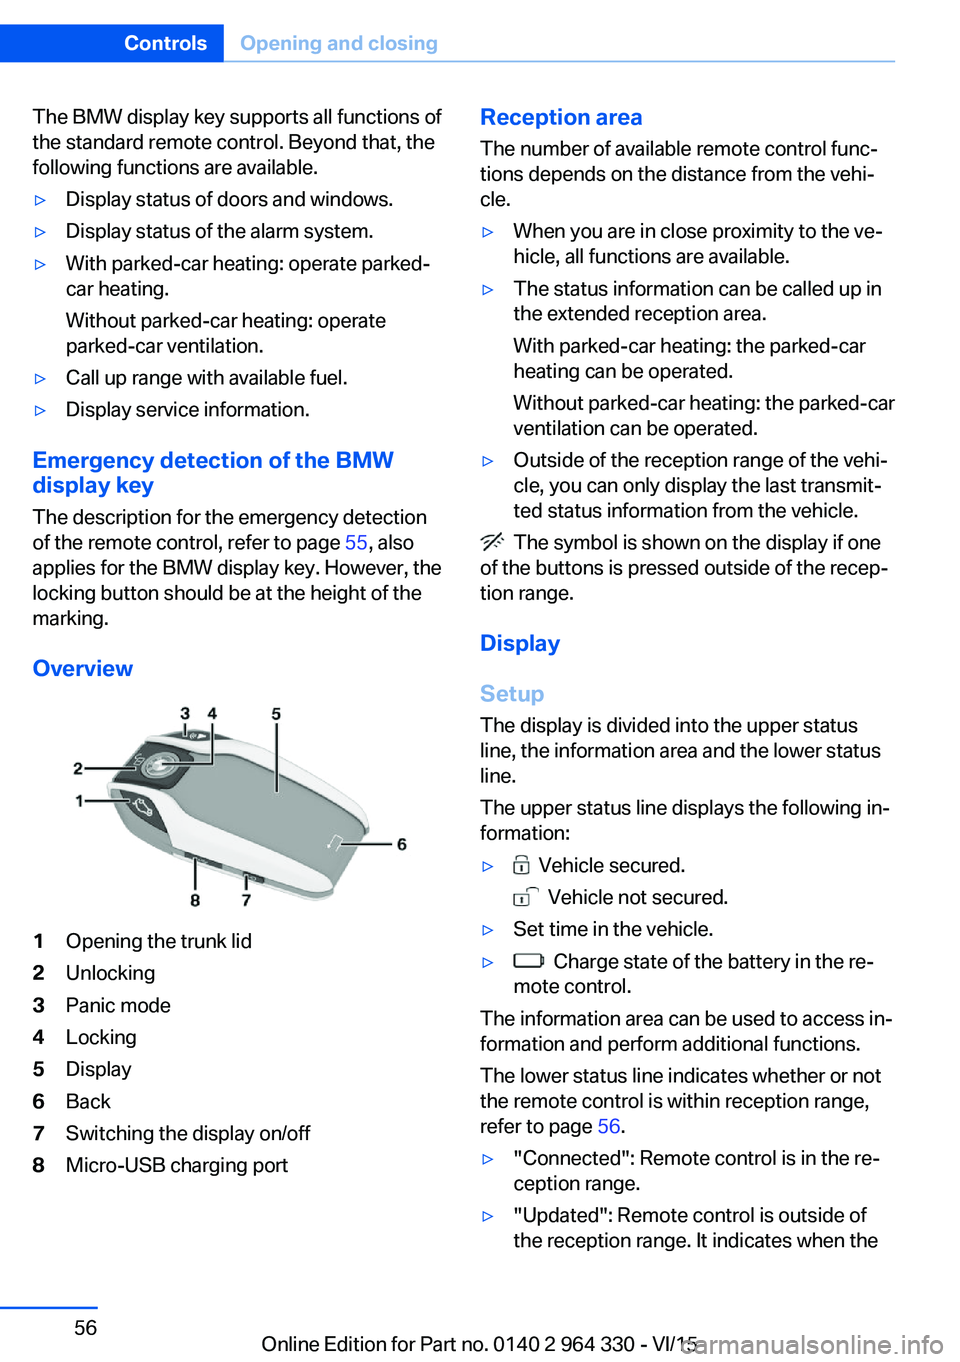
Overview
1Opening the trunk lid2Unlocking3Panic mode4Locking5Display6Back7Switching the display on/off8Micro-USB charging portReception area
The number of available remote control func‐
tions depends on the distance from the vehi‐
cle.▷When you are in close proximity to the ve‐
hicle, all functions are available.▷The status information can be called up in
the extended reception area.
With parked-car heating: the parked-car
heating can be operated.
Without parked-car heating: the parked-car
ventilation can be operated.▷Outside of the reception range of the vehi‐
cle, you can only display the last transmit‐
ted status information from the vehicle.
The symbol is shown on the display if one
of the buttons is pressed outside of the recep‐
tion range.
Display
Setup The display is divided into the upper status
line, the information area and the lower status
line.
The upper status line displays the following in‐
formation:
▷ Vehicle secured.
Vehicle not secured.
▷Set time in the vehicle.▷ Charge state of the battery in the re‐
mote control.
The information area can be used to access in‐
formation and perform additional functions.
The lower status line indicates whether or not
the remote control is within reception range,
refer to page 56.
▷"Connected": Remote control is in the re‐
ception range.▷"Updated": Remote control is outside of
the reception range. It indicates when theSeite 56ControlsOpening and closing56
Online Edition for Part no. 0140 2 964 330 - VI/15
Page 57 of 314
last data transfer from the vehicle took
place.
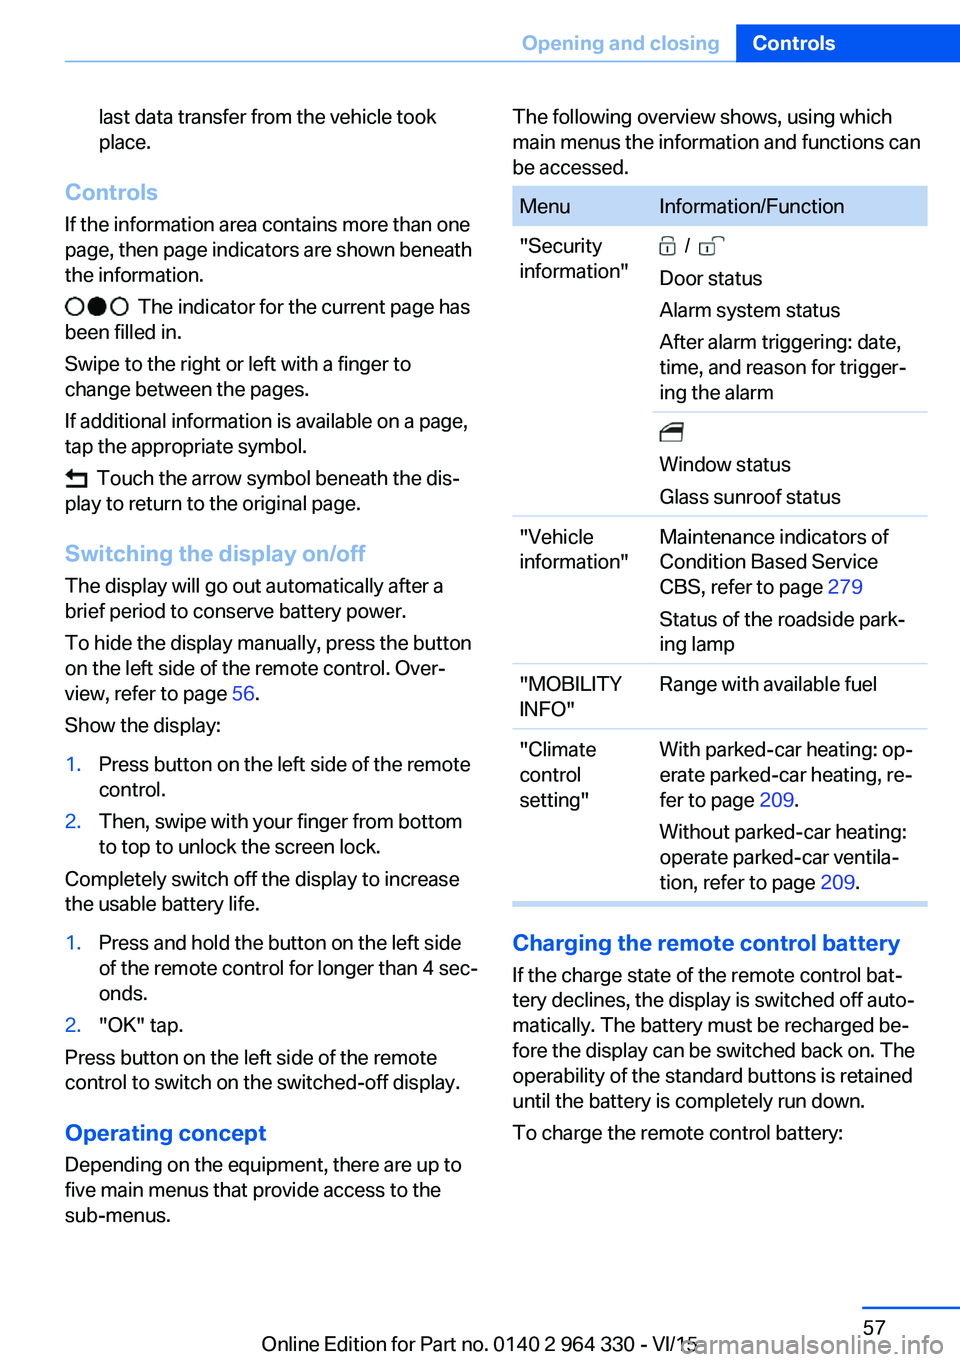
Controls
If the information area contains more than one
page, then page indicators are shown beneath
the information.
The indicator for the current page has
been filled in.
Swipe to the right or left with a finger to
change between the pages.
If additional information is available on a page,
tap the appropriate symbol.
Touch the arrow symbol beneath the dis‐
play to return to the original page.
Switching the display on/off
The display will go out automatically after a
brief period to conserve battery power.
To hide the display manually, press the button
on the left side of the remote control. Over‐
view, refer to page 56.
Show the display:
1.Press button on the left side of the remote
control.2.Then, swipe with your finger from bottom
to top to unlock the screen lock.
Completely switch off the display to increase
the usable battery life.
1.Press and hold the button on the left side
of the remote control for longer than 4 sec‐
onds.2."OK" tap.
Press button on the left side of the remote
control to switch on the switched-off display.
Operating concept
Depending on the equipment, there are up to
five main menus that provide access to the
sub-menus.
The following overview shows, using which
main menus the information and functions can
be accessed.MenuInformation/Function"Security
information" /
Door status
Alarm system status
After alarm triggering: date,
time, and reason for trigger‐
ing the alarm
Window status
Glass sunroof status"Vehicle
information"Maintenance indicators of
Condition Based Service
CBS, refer to page 279
Status of the roadside park‐
ing lamp"MOBILITY
INFO"Range with available fuel"Climate
control
setting"With parked-car heating: op‐
erate parked-car heating, re‐
fer to page 209.
Without parked-car heating:
operate parked-car ventila‐
tion, refer to page 209.
Charging the remote control battery
If the charge state of the remote control bat‐
tery declines, the display is switched off auto‐
matically. The battery must be recharged be‐
fore the display can be switched back on. The
operability of the standard buttons is retained
until the battery is completely run down.
To charge the remote control battery:
Seite 57Opening and closingControls57
Online Edition for Part no. 0140 2 964 330 - VI/15
Page 62 of 314
Malfunction
Remote control detection by the vehicle can
among others be malfunctioning under the fol‐
lowing circumstances:▷The battery of the remote control is dis‐
charged. Replace the battery, refer to
page 55.▷Interference of the radio connection from
transmission towers or other equipment
with high transmit power.▷Shielding of the remote control due to
metal objects.▷Interference of the radio connection from
mobile phones or other electronic devices
in direct proximity.
Do not transport the remote control together
with metal objects or electronic devices.
In the case of interference, the vehicle can also
be unlocked and locked from the outside with‐
out remote control, refer to page 62.
For US owners only
The transmitter and receiver units comply with
part 15 of the FCC/Federal Communication
Commission regulations. Operation is gov‐
erned by the following:
FCC ID:
▷LX8766S.▷LX8766E.▷LX8CAS.▷LX8CAS2.▷MYTCAS4.
Compliance statement:
This device complies with part 15 of the FCC
Rules. Operation is subject to the following
two conditions:
▷This device may not cause harmful inter‐
ference, and▷this device must accept any interference
received, including interference that may
cause undesired operation.Any unauthorized modifications or changes to
these devices could void the user's authority to
operate this equipment.
Without remote control
From the outside WARNING
For some country-specific variants, un‐
locking from the inside is only possible with
special knowledge.
If people must spend a longer time in the vehi‐
cle while it is very hot or cold outside, there is
risk of injuries or danger to life. Do not lock the
vehicle from the outside when there are people
in it.◀
CAUTION
The door lock is permanently joined with
the door. The door handle can be moved.
When pulling the door handle with the
integrated key inserted, paint or key can be damaged. There is risk of property damage.
Remove the integrated key before pulling the
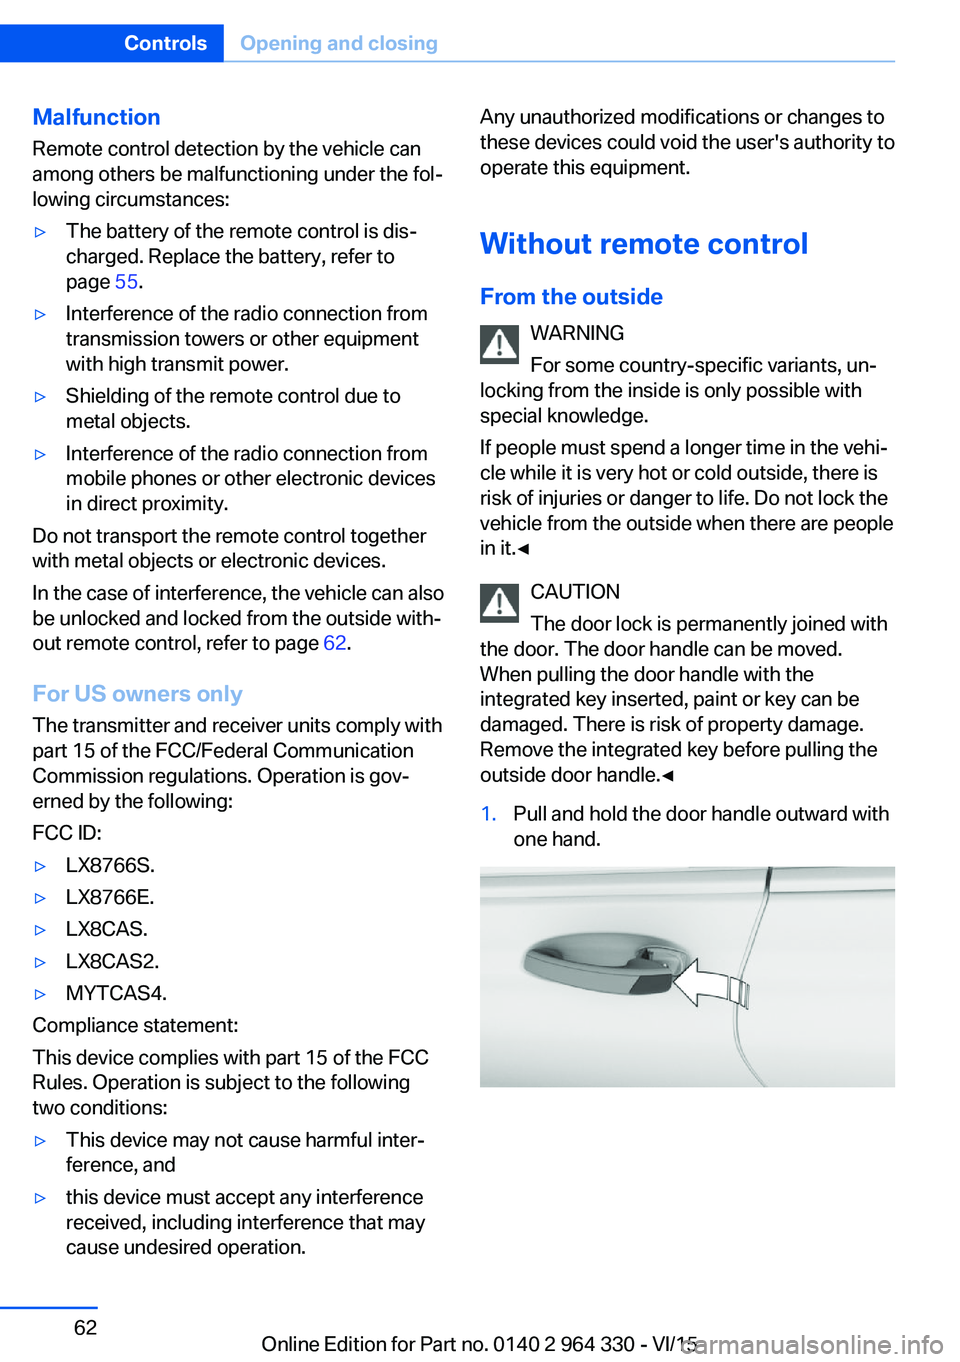
outside door handle.◀1.Pull and hold the door handle outward with
one hand.Seite 62ControlsOpening and closing62
Online Edition for Part no. 0140 2 964 330 - VI/15
Page 67 of 314
If the remote control is in the sensor area, the
tailgate can be closed or opened inadvertently
by an unconscious or alleged recognized foot
movement.
The sensor range reaches approx. 5 ft/1.50 m
behind the area at the rear of the car.
WARNING
Body parts can be jammed when operat‐
ing the tailgate. There is risk of injuries. Make
sure that the area of movement of the tailgate
is clear during opening and closing.◀
CAUTION
During opening, the trunk lid pivots back
and up. There is risk of property damage. Make
sure that the area of movement of the tailgate
is clear during opening and closing.◀
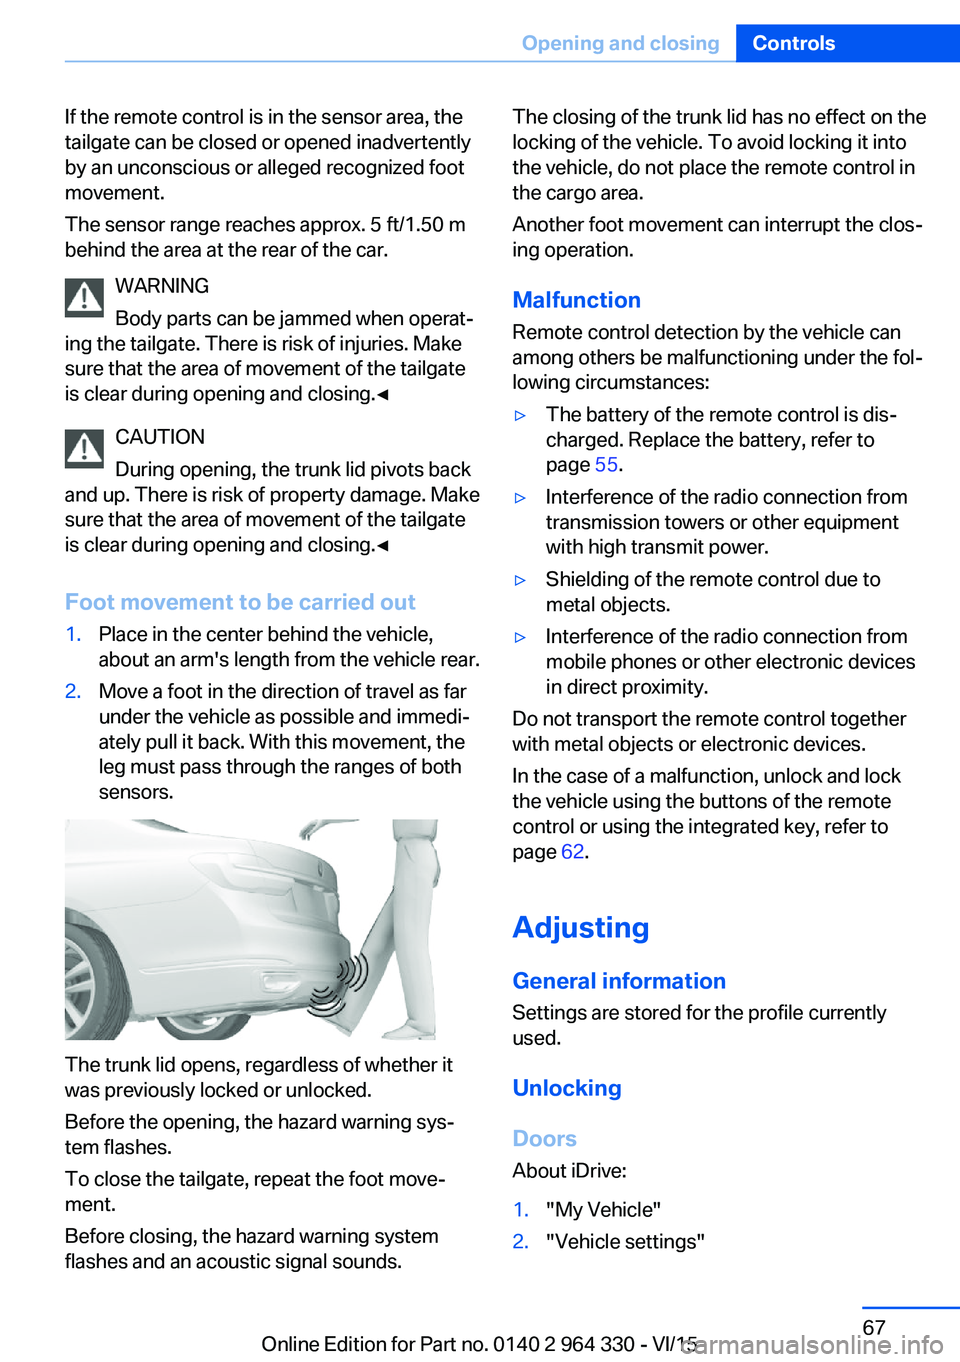
Foot movement to be carried out1.Place in the center behind the vehicle,
about an arm's length from the vehicle rear.2.Move a foot in the direction of travel as far
under the vehicle as possible and immedi‐
ately pull it back. With this movement, the
leg must pass through the ranges of both
sensors.
The trunk lid opens, regardless of whether it
was previously locked or unlocked.
Before the opening, the hazard warning sys‐
tem flashes.
To close the tailgate, repeat the foot move‐
ment.
Before closing, the hazard warning system
flashes and an acoustic signal sounds.
The closing of the trunk lid has no effect on the
locking of the vehicle. To avoid locking it into
the vehicle, do not place the remote control in
the cargo area.
Another foot movement can interrupt the clos‐
ing operation.
Malfunction
Remote control detection by the vehicle can
among others be malfunctioning under the fol‐
lowing circumstances:▷The battery of the remote control is dis‐
charged. Replace the battery, refer to
page 55.▷Interference of the radio connection from
transmission towers or other equipment
with high transmit power.▷Shielding of the remote control due to
metal objects.▷Interference of the radio connection from
mobile phones or other electronic devices
in direct proximity.
Do not transport the remote control together
with metal objects or electronic devices.
In the case of a malfunction, unlock and lock
the vehicle using the buttons of the remote
control or using the integrated key, refer to
page 62.
Adjusting
General information
Settings are stored for the profile currently
used.
Unlocking
Doors About iDrive:
1."My Vehicle"2."Vehicle settings"Seite 67Opening and closingControls67
Online Edition for Part no. 0140 2 964 330 - VI/15
Page 69 of 314
About iDrive:1."My Vehicle"2."Driver profiles"3.Select profile.4."Last seat position automatic"
The adjustment procedure is interrupted:
▷When a seat position switch is pressed.▷When a button of the seat, mirror, and
steering wheel memory is pressed briefly.
Alarm system
The conceptWhen the vehicle is locked, the vehicle alarm
system responds to:
▷Opening a door, the hood or the trunk lid.▷Movements in the interior.▷Changes in the vehicle tilt, e. g., during at‐
tempts at stealing a wheel or when towing
the car.▷Disconnected battery voltage.
The alarm system briefly signals tampering:
▷By sounding an acoustic alarm.▷By switching on the hazard warning sys‐
tem.▷By flashing the high beams.
Arming and disarming the alarm
system
When you unlock or lock the vehicle, either
with the remote control or via the Comfort Ac‐
cess, the alarm system is disarmed or armed at
the same time.
Door lock and armed alarm systemThe alarm system is triggered when the door is
opened, when the vehicle is unlocked via the
door lock.
Trunk lid and armed alarm system
The trunk lid can be opened even when the
alarm system is armed.
After the trunk lid is closed, it is locked and
monitored again when the doors are locked.
The hazard warning system flashes once.
Panic mode
You can trigger the alarm system if you find
yourself in a dangerous situation.
Press button on the remote control
and hold for at least 3 seconds.
To switch off the alarm: press any button.
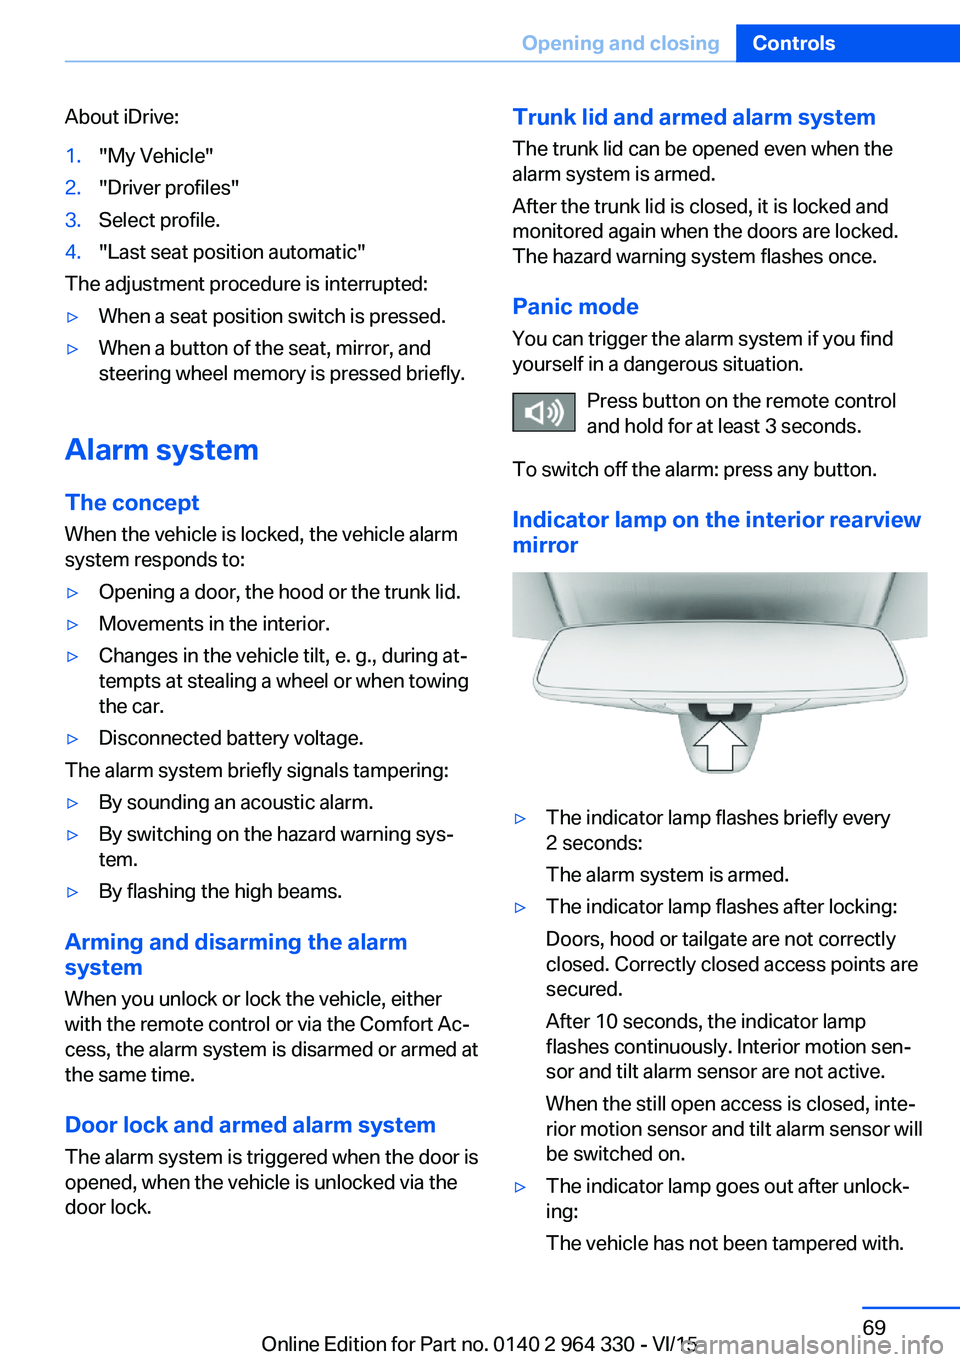
Indicator lamp on the interior rearview
mirror▷The indicator lamp flashes briefly every
2 seconds:
The alarm system is armed.▷The indicator lamp flashes after locking:
Doors, hood or tailgate are not correctly
closed. Correctly closed access points are
secured.
After 10 seconds, the indicator lamp
flashes continuously. Interior motion sen‐
sor and tilt alarm sensor are not active.
When the still open access is closed, inte‐
rior motion sensor and tilt alarm sensor will
be switched on.▷The indicator lamp goes out after unlock‐
ing:
The vehicle has not been tampered with.Seite 69Opening and closingControls69
Online Edition for Part no. 0140 2 964 330 - VI/15
Page 98 of 314
3.Set the parking brake.
Before driving into a car wash
So that the vehicle can roll into a car wash ob‐
serve instructions for going into an automatic
car wash, refer to page 291.
Auto Start/Stop function
The concept The Auto Start/Stop function helps save fuel.
The system switches off the engine during a
stop, e.g., in traffic congestion or at traffic lights. Drive readiness remains switched on.
The engine starts again automatically for driv‐
ing off.
Information After every engine start via the Start/Stop but‐
ton, the Auto Start/Stop function is activated or
deactivated, according to the last setting, refer
to page 99. If the Auto Start/Stop function is
active, it is available as soon as a speed of ap‐
prox. 3 mph, approx. 5 km/h is exceeded.
Engine stop
The engine is switched off automatically dur‐
ing a stop under the following conditions:
▷The selector lever is in selector lever posi‐
tion D.▷The brake pedal remains pressed while the
vehicle is stationary or the vehicle is held
by Automatic Hold.▷The driver's safety belt is buckled or the
driver's door is closed.
The air flow from the air conditioner is reduced
when the engine is switched off.
Displays in the instrument cluster
The display in the tachometer
indicates that the Auto Start/
Stop function is ready for an Au‐
tomatic engine start.
The display indicates that the
conditions for an automatic en‐
gine stop have not been met.
Functional limitations The engine is not switched off automatically in
the following situations:▷In case of a steep downhill grade.▷Brake not engaged strongly enough.▷The external temperature is high and auto‐
matic climate control is running.▷The car's interior has not yet been heated
or cooled to the required level.▷If window condensation is imminent.▷Engine or other parts not at operating tem‐
perature.▷Engine cooling is required.▷The wheels are at a sharp angle or the
steering wheel is being turned.▷Vehicle battery is heavily discharged.▷At higher elevations.▷The engine compartment lid is unlocked.▷HDC Hill Descent Control is activated.▷The parking assistant is activated.▷Stop-and-go traffic.▷Selector lever position in N or R.▷After driving in reverse.▷Use of fuel with high ethanol content.
Starting the engine
The engine starts automatically under the fol‐
lowing conditions:
Seite 98ControlsDriving98
Online Edition for Part no. 0140 2 964 330 - VI/15
Page 99 of 314
▷By releasing the brake pedal.▷When Automatic Hold is activated: press
the accelerator pedal.
After the engine starts, accelerate as usual.
Safety mode
After the engine switches off automatically, it
will not start again automatically if any one of
the following conditions are met:
▷The driver's safety belt is unbuckled and
the driver's door is open.▷The hood was unlocked.
Some indicator lights light up for a varied
length of time.
The engine can only be started via the Start/
Stop button.
Functional limitations
Even if driving off was not intended, the deacti‐
vated engine starts up automatically in the fol‐
lowing situations:
▷Excessive warming of the car's interior
when the cooling function is switched on.▷Excessive cooling of the car's interior when
the heating is switched on.▷If window condensation is imminent.▷The steering wheel is turned.▷Change from selector lever position D to N
or R.▷Change from selector lever position P to N,
D or R.▷Vehicle battery is heavily discharged.▷Start of an oil level measurement.Activating/deactivating the system
manually
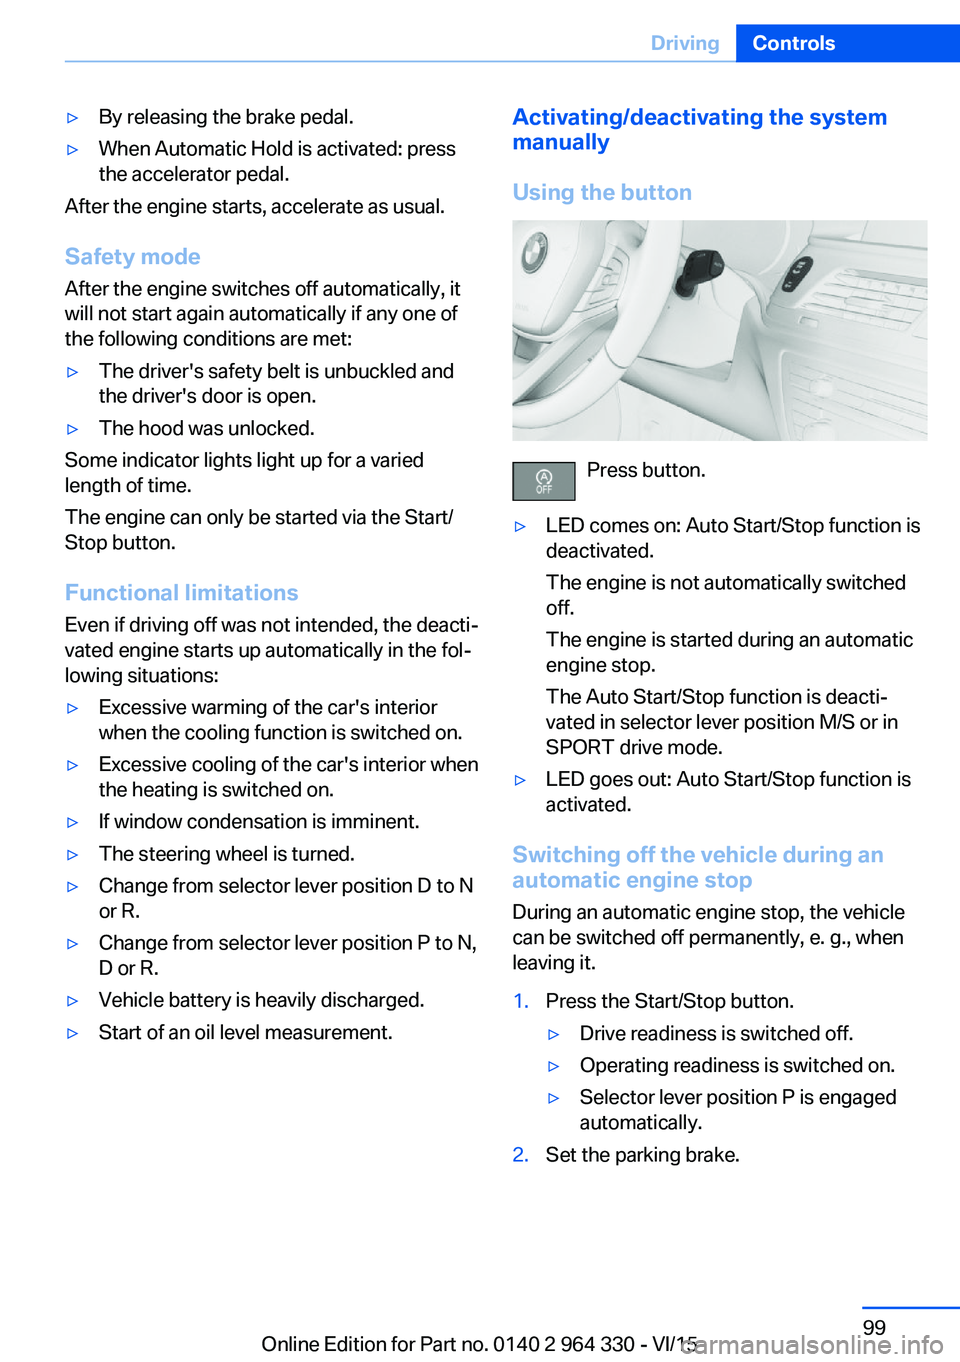
Using the button
Press button.
▷LED comes on: Auto Start/Stop function is
deactivated.
The engine is not automatically switched
off.
The engine is started during an automatic
engine stop.
The Auto Start/Stop function is deacti‐
vated in selector lever position M/S or in
SPORT drive mode.▷LED goes out: Auto Start/Stop function is
activated.
Switching off the vehicle during an
automatic engine stop
During an automatic engine stop, the vehicle
can be switched off permanently, e. g., when
leaving it.
1.Press the Start/Stop button.▷Drive readiness is switched off.▷Operating readiness is switched on.▷Selector lever position P is engaged
automatically.2.Set the parking brake.Seite 99DrivingControls99
Online Edition for Part no. 0140 2 964 330 - VI/15