headlight bulb BMW ACTIVE HYBRID 3 2014 F30H Owner's Manual
[x] Cancel search | Manufacturer: BMW, Model Year: 2014, Model line: ACTIVE HYBRID 3, Model: BMW ACTIVE HYBRID 3 2014 F30HPages: 247, PDF Size: 6.04 MB
Page 7 of 247
Addendum
manufacturer of your vehicle and
are determined by the manufacturer
of your vehicle to be road safe and
are recommended by the
manufacturer of your vehicle.
Information about recommended
snow chains is available from a
service center.
13.At page 199, under the heading
“Hood,” the sentence beginning, “If
you are unfamiliar” should be
disregarded.
14.At page 202, under the heading:
“Approved oil types,” the references
to “Approved” should be read as
“Suitable.” Where it reads: “You
can add oils with the following
specifications,” that text should be
disregarded, and the following text
read in lieu thereof: “Add engine
oils that meet the following oil rating
standards: . . .”
15.At page 202, under the heading:
“Alternative oil types,” the text
preceding the chart should be
disregarded, and in lieu thereof
should be read as follows: “If an
engine oil suitable for continuous
use is not available, up to 1 US
quart/liter of an engine oil with the
following oil rating can be added: . .
.” The reference to “specification”
should be read as “rating.”
16.At page 202, under the heading:
“Engine oil change,” the text should
be disregarded and in lieu thereof
should be read as follows:
BMW recommends that you have
the oil changed at your BMW
dealer’s service center or at another
service center that has trained
personnel that can perform the work
in accordance with BMW
specifications.
17.At page 204, under the heading:
“Service and Warranty Information
Booklet for US models and
Warranty and Service Guide
Booklet for Canadian models,” the
second paragraph should be
disregarded and the following text
read in lieu thereof:
The manufacturer of your vehicle
recommends that you have
maintenance and repair performed
by your BMW dealer’s service
center or another service center or
repair shop that employs trained
personnel that can perform
maintenance and repair work on
your vehicle in accordance with
BMW specifications. The
manufacturer of your vehicle
recommends that you maintain
records of all maintenance and
repair work performed on your
vehicle.
18.At page 207 and page 210, where it
reads: “Do not perform work/bulb
replacement on xenon headlights,”
that text should be disregarded and
in lieu thereof the following text
should be read: “Xenon headlamp
work or replacement can cause
serious and fatal injuries.” In the
text that follows, where it reads:
“[h]ave any work on the xenon
lighting system . . . ,” the following
Page 76 of 247
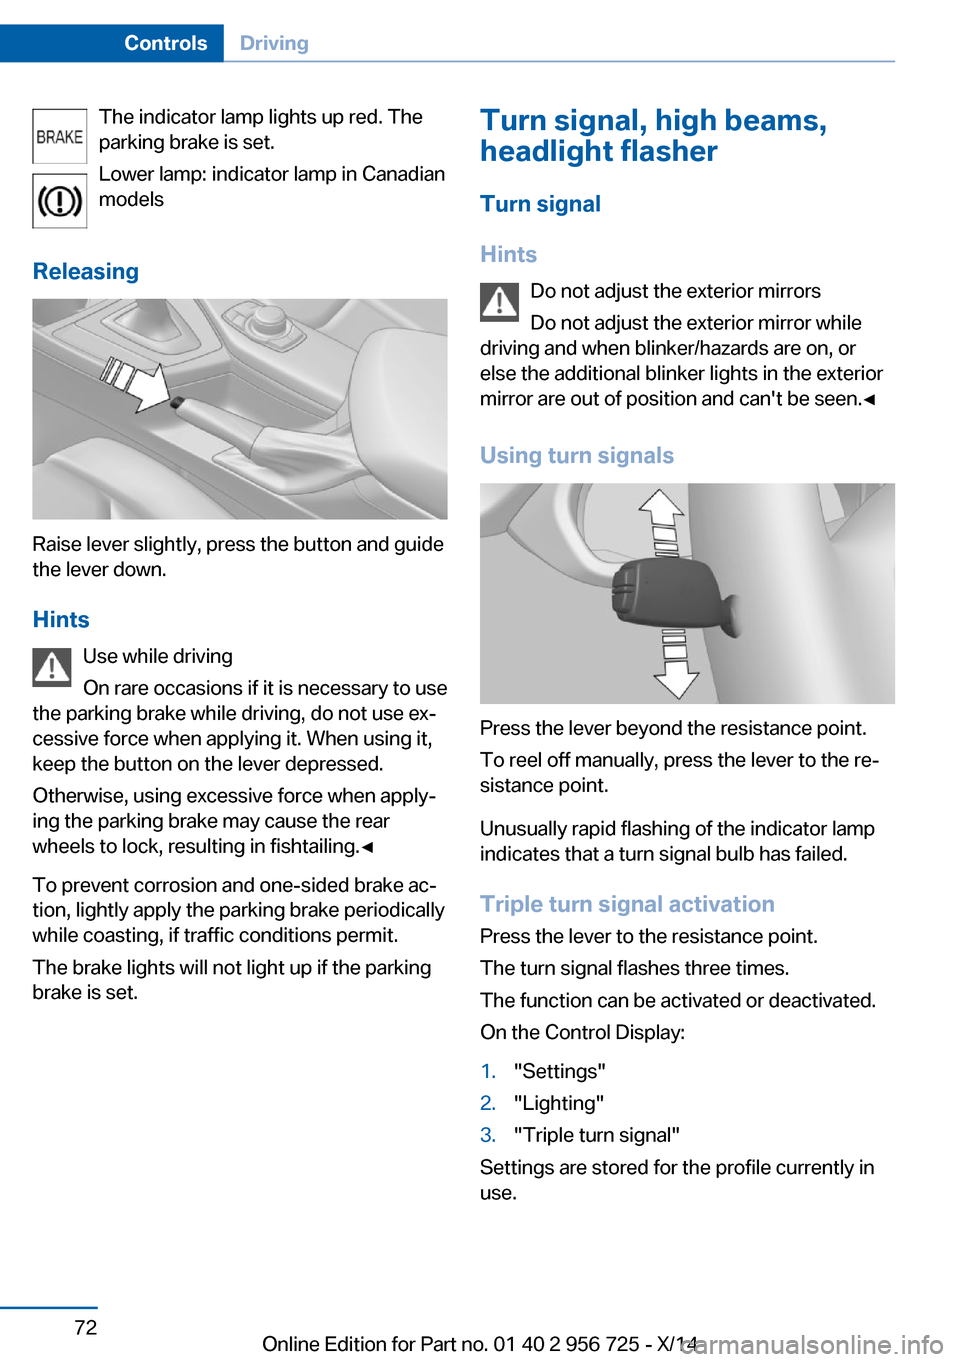
The indicator lamp lights up red. The
parking brake is set.
Lower lamp: indicator lamp in Canadian
models
Releasing
Raise lever slightly, press the button and guide
the lever down.
Hints Use while driving
On rare occasions if it is necessary to use
the parking brake while driving, do not use ex‐
cessive force when applying it. When using it,
keep the button on the lever depressed.
Otherwise, using excessive force when apply‐
ing the parking brake may cause the rear
wheels to lock, resulting in fishtailing.◀
To prevent corrosion and one-sided brake ac‐
tion, lightly apply the parking brake periodically
while coasting, if traffic conditions permit.
The brake lights will not light up if the parking
brake is set.
Turn signal, high beams,
headlight flasher
Turn signal
Hints Do not adjust the exterior mirrors
Do not adjust the exterior mirror while
driving and when blinker/hazards are on, or
else the additional blinker lights in the exterior
mirror are out of position and can't be seen.◀
Using turn signals
Press the lever beyond the resistance point.
To reel off manually, press the lever to the re‐
sistance point.
Unusually rapid flashing of the indicator lamp
indicates that a turn signal bulb has failed.
Triple turn signal activation Press the lever to the resistance point.
The turn signal flashes three times.
The function can be activated or deactivated.
On the Control Display:
1."Settings"2."Lighting"3."Triple turn signal"
Settings are stored for the profile currently in
use.
Seite 72ControlsDriving72
Online Edition for Part no. 01 40 2 956 725 - X/14
Page 89 of 247
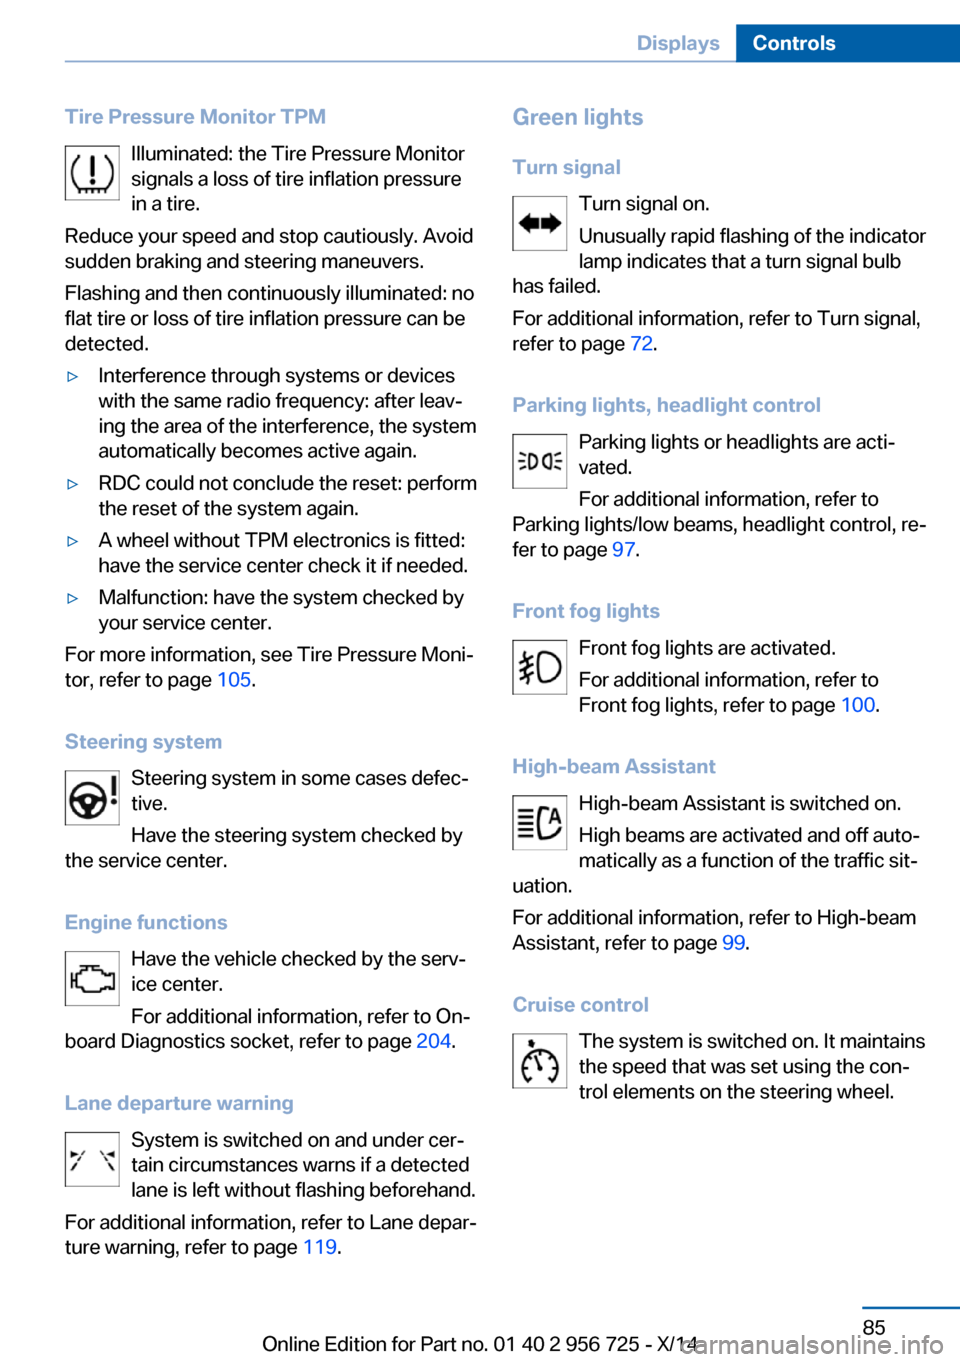
Tire Pressure Monitor TPMIlluminated: the Tire Pressure Monitorsignals a loss of tire inflation pressure
in a tire.
Reduce your speed and stop cautiously. Avoid
sudden braking and steering maneuvers.
Flashing and then continuously illuminated: no
flat tire or loss of tire inflation pressure can be
detected.▷Interference through systems or devices
with the same radio frequency: after leav‐
ing the area of the interference, the system
automatically becomes active again.▷RDC could not conclude the reset: perform
the reset of the system again.▷A wheel without TPM electronics is fitted:
have the service center check it if needed.▷Malfunction: have the system checked by
your service center.
For more information, see Tire Pressure Moni‐
tor, refer to page 105.
Steering system Steering system in some cases defec‐
tive.
Have the steering system checked by
the service center.
Engine functions Have the vehicle checked by the serv‐ice center.
For additional information, refer to On-
board Diagnostics socket, refer to page 204.
Lane departure warning System is switched on and under cer‐
tain circumstances warns if a detected
lane is left without flashing beforehand.
For additional information, refer to Lane depar‐
ture warning, refer to page 119.
Green lights
Turn signal Turn signal on.
Unusually rapid flashing of the indicator
lamp indicates that a turn signal bulb
has failed.
For additional information, refer to Turn signal, refer to page 72.
Parking lights, headlight control Parking lights or headlights are acti‐
vated.
For additional information, refer to
Parking lights/low beams, headlight control, re‐
fer to page 97.
Front fog lights Front fog lights are activated.
For additional information, refer to
Front fog lights, refer to page 100.
High-beam Assistant High-beam Assistant is switched on.
High beams are activated and off auto‐
matically as a function of the traffic sit‐
uation.
For additional information, refer to High-beam
Assistant, refer to page 99.
Cruise control The system is switched on. It maintains
the speed that was set using the con‐
trol elements on the steering wheel.Seite 85DisplaysControls85
Online Edition for Part no. 01 40 2 956 725 - X/14
Page 211 of 247
Danger of burns
Only change bulbs when they are cool;
otherwise, there is a danger of getting
burned.◀
Working on the lighting system
When working on the lighting system,
you should always reel off the lights affected to
prevent short circuits.
To avoid possible injury or equipment damage
when replacing bulbs, observe any instructions
provided by the bulb manufacturer.◀
Do not perform work/bulb replacement
on xenon headlights
Have any work on the xenon lighting system,
including bulb replacement, performed only by
a service center. Due to the high voltage
present in the system, there is a danger of fatal
injuries if work is carried out improperly.◀
Do not touch the bulbs
Do not touch the glass of new bulbs with
your bare hands, as even minute amounts of
contamination will burn into the bulb's surface
and reduce its service life.
Use a clean tissue, cloth or something similar,
or hold the bulb by its base.◀
Light-emitting diodes (LEDs)
Some items of equipment use light-emitting
diodes installed behind a cover as a light
source.
These light-emitting diodes, which are related
to conventional lasers, are officially designated as Class 1 light-emitting diodes.
Do not remove the covers
Do not remove the covers, and never
stare into the unfiltered light for several hours;
otherwise, irritation of the retina could result.◀Headlight glass
Condensation can form on the inside of the ex‐
ternal lights in cool or humid weather. When
driving with the light switched on, the conden‐
sation evaporates after a short time. The head‐
light glass does not need to be changed.
If the headlights do not dim despite driving
with the light switched on, increasing humidity
forms, e. g. water droplets in the light, have the service center check this.
Headlight setting The headlight adjustments can be affected by
changing lights and bulbs. Have the head‐
lights' settings checked and corrected by serv‐
ice after a replacement.
Front lights, bulb replacement
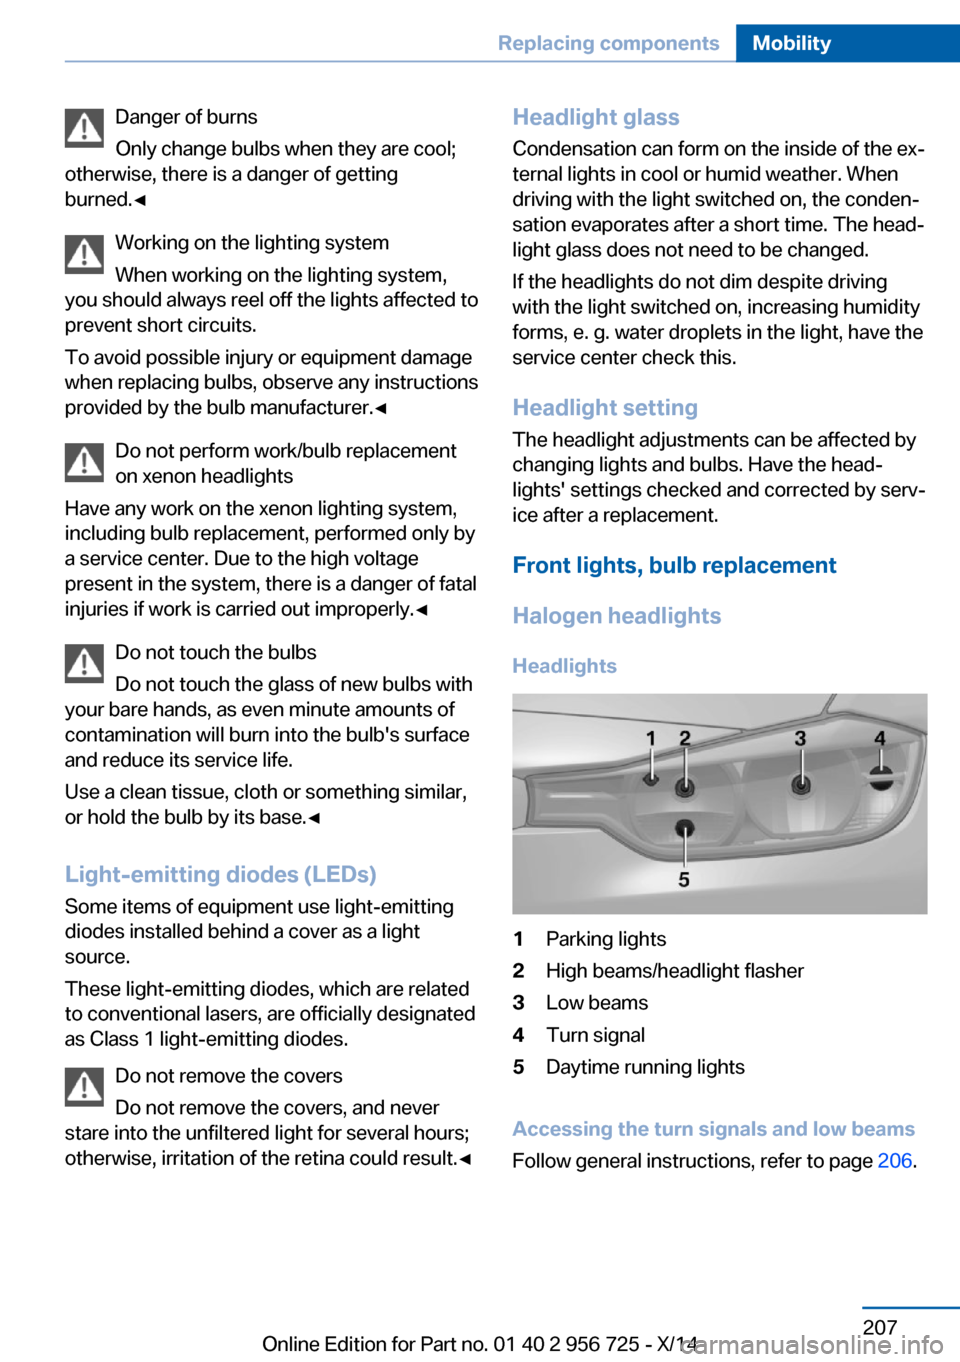
Halogen headlights
Headlights1Parking lights2High beams/headlight flasher3Low beams4Turn signal5Daytime running lights
Accessing the turn signals and low beams
Follow general instructions, refer to page 206.
Seite 207Replacing componentsMobility207
Online Edition for Part no. 01 40 2 956 725 - X/14
Page 212 of 247
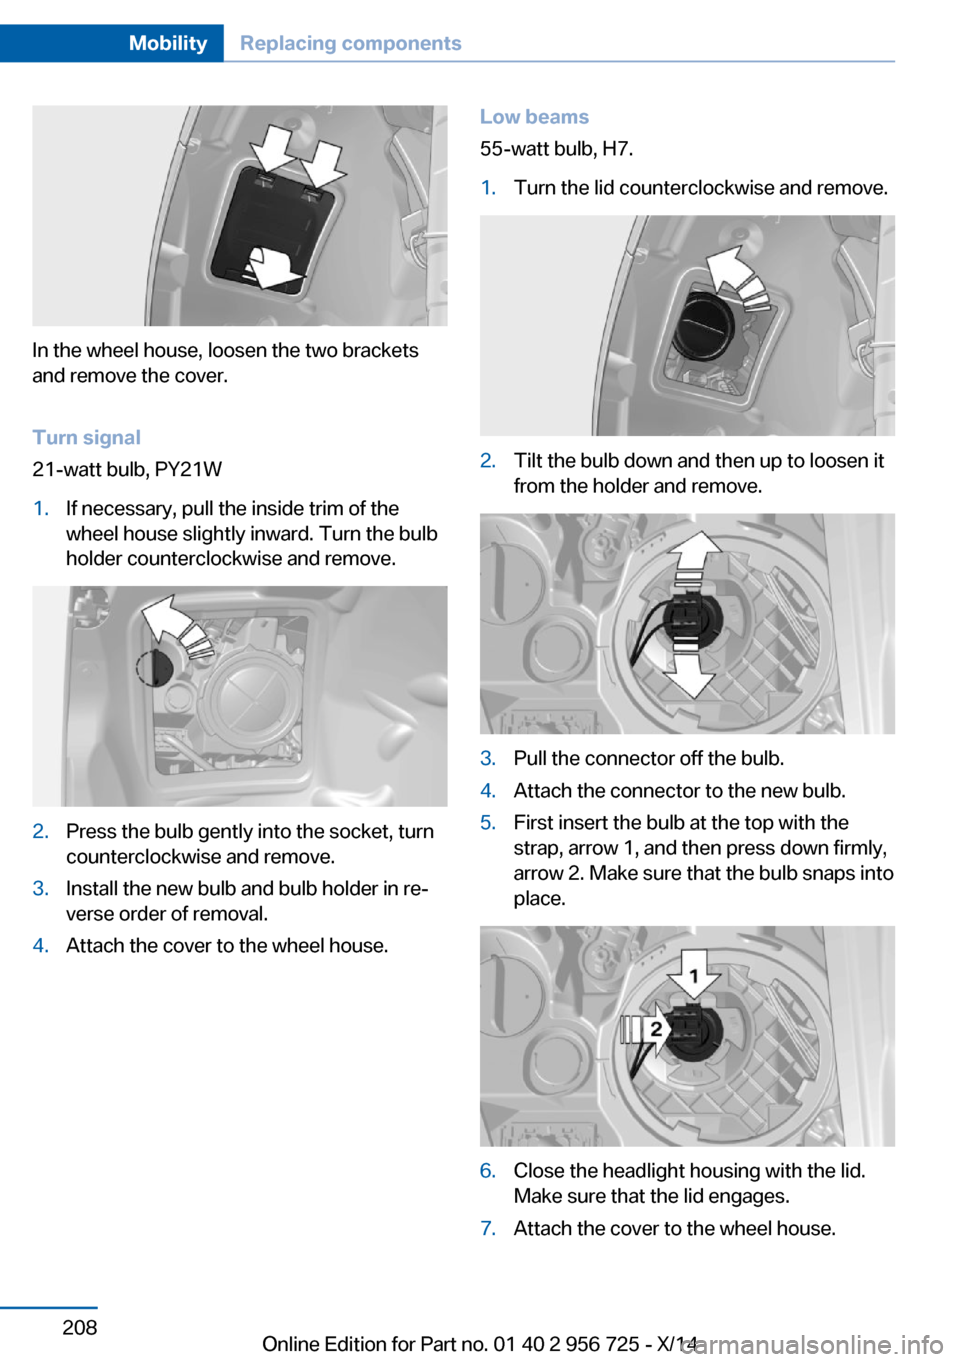
In the wheel house, loosen the two brackets
and remove the cover.
Turn signal
21-watt bulb, PY21W
1.If necessary, pull the inside trim of the
wheel house slightly inward. Turn the bulb
holder counterclockwise and remove.2.Press the bulb gently into the socket, turn
counterclockwise and remove.3.Install the new bulb and bulb holder in re‐
verse order of removal.4.Attach the cover to the wheel house.Low beams
55-watt bulb, H7.1.Turn the lid counterclockwise and remove.2.Tilt the bulb down and then up to loosen it
from the holder and remove.3.Pull the connector off the bulb.4.Attach the connector to the new bulb.5.First insert the bulb at the top with the
strap, arrow 1, and then press down firmly,
arrow 2. Make sure that the bulb snaps into
place.6.Close the headlight housing with the lid.
Make sure that the lid engages.7.Attach the cover to the wheel house.Seite 208MobilityReplacing components208
Online Edition for Part no. 01 40 2 956 725 - X/14
Page 213 of 247
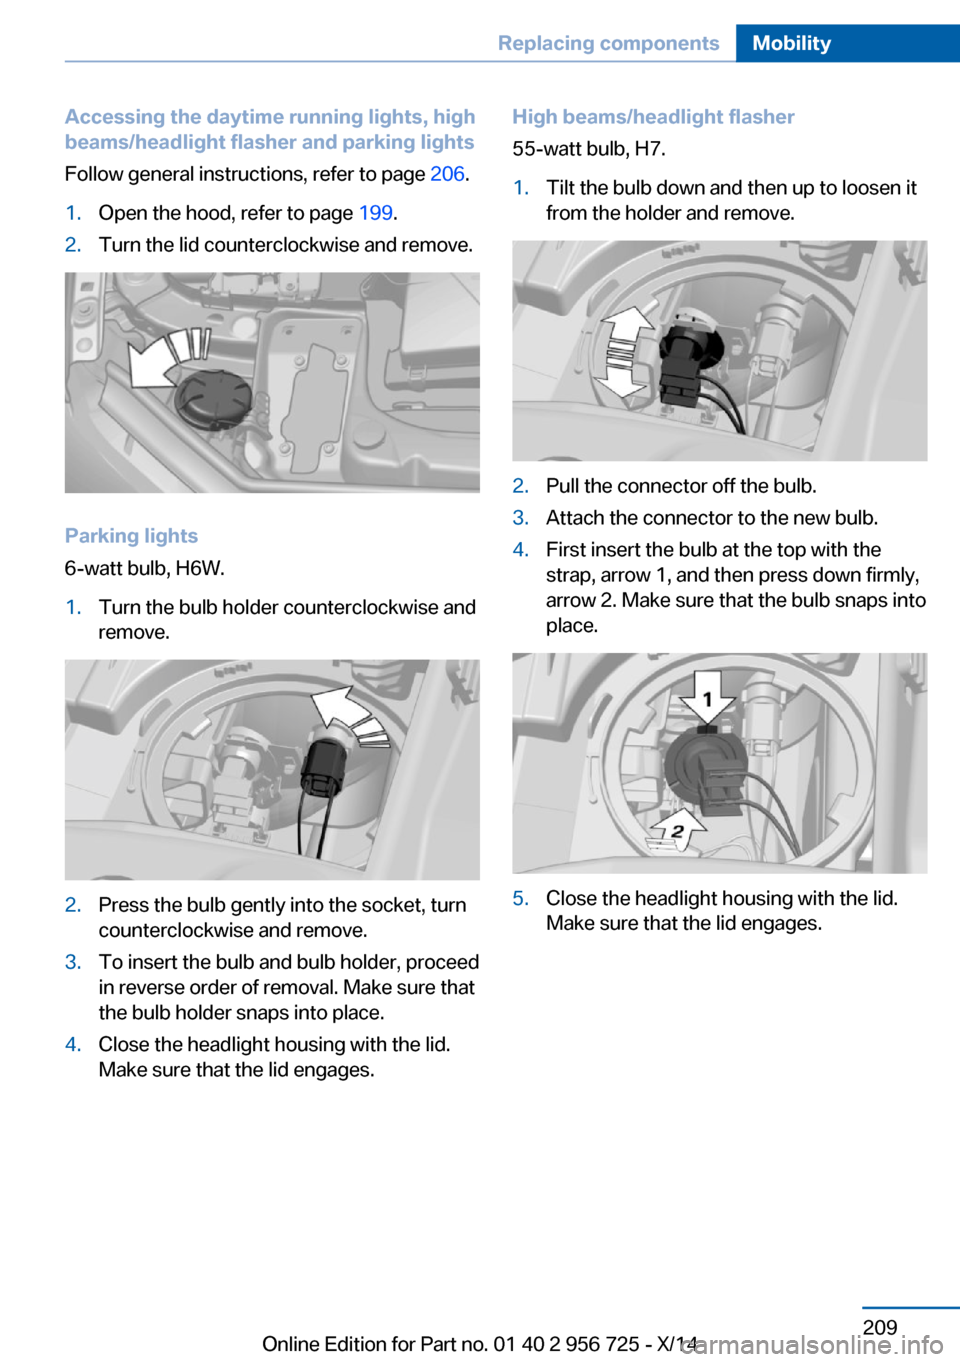
Accessing the daytime running lights, high
beams/headlight flasher and parking lights
Follow general instructions, refer to page 206.1.Open the hood, refer to page 199.2.Turn the lid counterclockwise and remove.
Parking lights
6-watt bulb, H6W.
1.Turn the bulb holder counterclockwise and
remove.2.Press the bulb gently into the socket, turn
counterclockwise and remove.3.To insert the bulb and bulb holder, proceed
in reverse order of removal. Make sure that
the bulb holder snaps into place.4.Close the headlight housing with the lid.
Make sure that the lid engages.High beams/headlight flasher
55-watt bulb, H7.1.Tilt the bulb down and then up to loosen it
from the holder and remove.2.Pull the connector off the bulb.3.Attach the connector to the new bulb.4.First insert the bulb at the top with the
strap, arrow 1, and then press down firmly,
arrow 2. Make sure that the bulb snaps into
place.5.Close the headlight housing with the lid.
Make sure that the lid engages.Seite 209Replacing componentsMobility209
Online Edition for Part no. 01 40 2 956 725 - X/14
Page 214 of 247
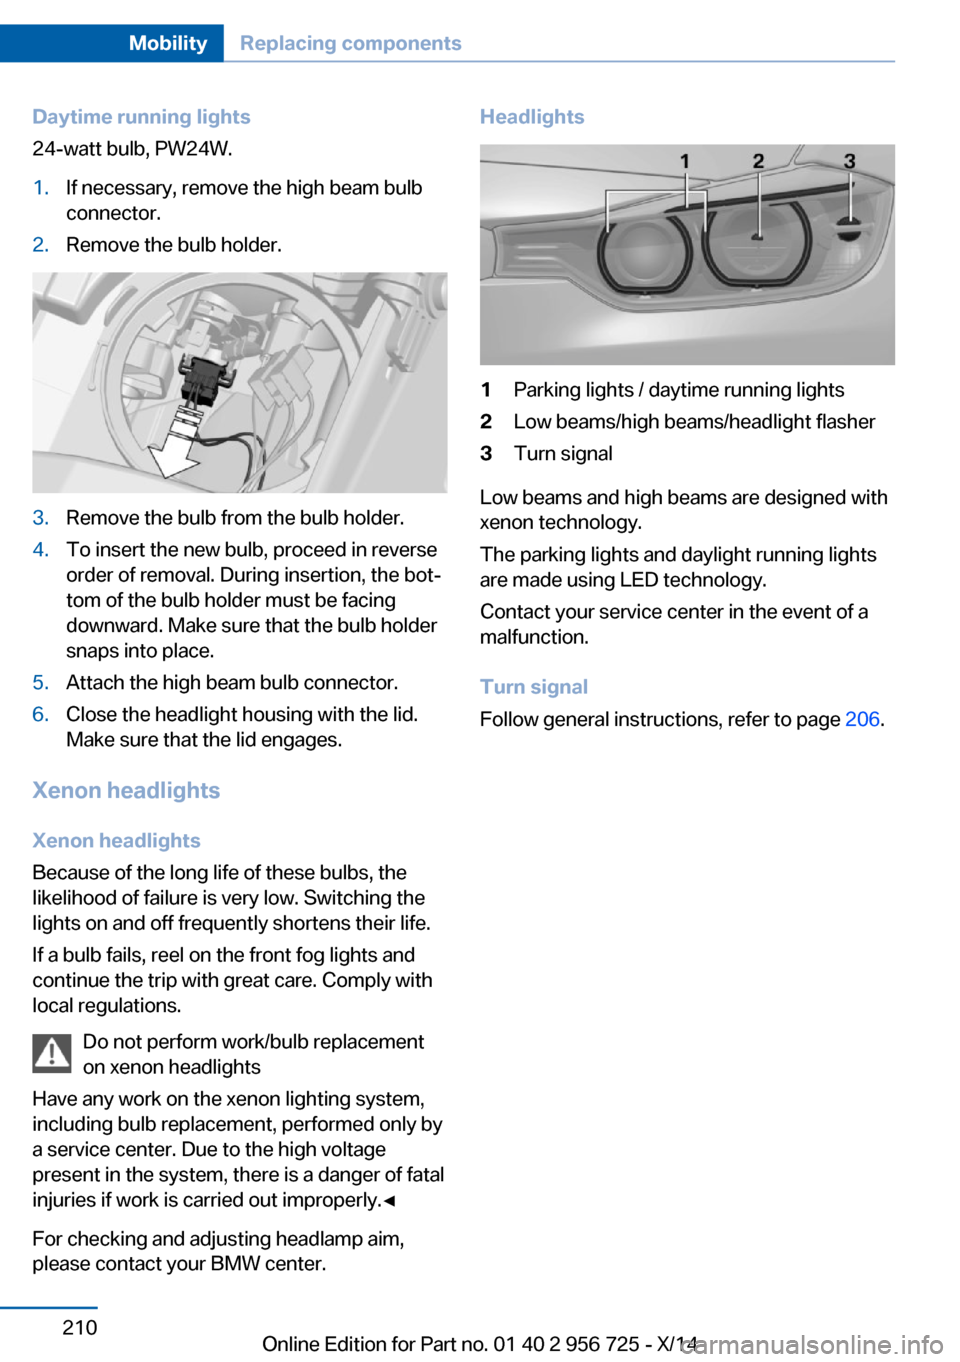
Daytime running lights
24-watt bulb, PW24W.1.If necessary, remove the high beam bulb
connector.2.Remove the bulb holder.3.Remove the bulb from the bulb holder.4.To insert the new bulb, proceed in reverse
order of removal. During insertion, the bot‐
tom of the bulb holder must be facing
downward. Make sure that the bulb holder
snaps into place.5.Attach the high beam bulb connector.6.Close the headlight housing with the lid.
Make sure that the lid engages.
Xenon headlights
Xenon headlights
Because of the long life of these bulbs, the
likelihood of failure is very low. Switching the
lights on and off frequently shortens their life.
If a bulb fails, reel on the front fog lights and
continue the trip with great care. Comply with
local regulations.
Do not perform work/bulb replacement
on xenon headlights
Have any work on the xenon lighting system,
including bulb replacement, performed only by
a service center. Due to the high voltage
present in the system, there is a danger of fatal
injuries if work is carried out improperly.◀
For checking and adjusting headlamp aim,
please contact your BMW center.
Headlights1Parking lights / daytime running lights2Low beams/high beams/headlight flasher3Turn signal
Low beams and high beams are designed with
xenon technology.
The parking lights and daylight running lights
are made using LED technology.
Contact your service center in the event of a
malfunction.
Turn signal
Follow general instructions, refer to page 206.
Seite 210MobilityReplacing components210
Online Edition for Part no. 01 40 2 956 725 - X/14
Page 237 of 247
BMW maintenance sys‐tem 204
Bonus range, ECO PRO 180
Bottle holder, refer to Cu‐ pholders 166
Brake assistant 124
Brake discs, break-in 170
Brake force display 122
Brake lights, adaptive 122
Brake lights, brake force dis‐ play 122
Brake pads, break-in 170
Braking, hints 173
Breakdown assis‐ tance 217, 218
Break-in 170
Brightness of Control Dis‐ play 95
Bulb replacement 206
Bulb replacement, front 207
Bulb replacement, halogen headlights 207
Bulb replacement, rear 212
Bulb replacement, xenon headlights 210
Bulbs and lights 206
Button, RES 132
Button, Start/Stop 67
Bypassing, refer to Jump- starting 218
C
California Proposition 65 Warning 8
Camera, care 226
Camera, rearview cam‐ era 140
Camera, Side View 143
Camera, Top View 144
Can holder, refer to Cuphold‐ ers 166
Car battery 215
Car care products 224
Care, displays 226
Care, vehicle 224 Cargo 175
Cargo area, enlarging 162
Cargo area, storage compart‐ ments 166
Cargo, securing 176
Cargo straps, securing cargo 176
Car key, refer to Remote con‐ trol 36
Carpet, care 226
Car wash 223
Catalytic converter, refer to Hot exhaust system 172
CBS Condition Based Serv‐ ice 204
CD/Multimedia, see user's manual for Navigation, En‐
tertainment and Communi‐
cation
Center armrest 165
Center console 16
Central locking system 41
Central screen, refer to Con‐ trol Display 18
Changes, technical, refer to Safety 7
Changing parts 206
Changing wheels 214
Changing wheels/tires 195
CHARGE, energy recov‐ ery 71
Charge indicator, high-volt‐ age battery 81
Chassis number, see vehicle identification number 10
Check Control 83
Checking the engine oil level electronically 200
Checking the oil level elec‐ tronically 200
Children, seating position 62
Children, transporting safely 62
Child restraint fixing sys‐ tem 62 Child restraint fixing system
LATCH 64
Child restraint fixing systems, mounting 62
Child safety locks 66
Child seat, mounting 62
Child seats 62
Chrome parts, care 225
Cigarette lighter 160
Cleaning displays 226
Climate control 150
Clock 87
Closing/opening via door lock 41
Closing/opening with remote control 39
Clothes hooks 166
Coasting 70
Cockpit 14
Combination reel, refer to Turn signals 72
Combination reel, refer to Wiper system 73
Combustion engine, start‐ ing 68
Comfort Access 43
COMFORT program, Dy‐ namic Driving Control 127
Compartments in the doors 165
Compass 158
Computer 91
Condensation on win‐ dows 152
Condensation under the vehi‐ cle 174
Condition Based Service CBS 204
Confirmation signal 45
ConnectedDrive, see user's manual for Navigation, En‐
tertainment and Communi‐
cation
ConnectedDrive Services
Connecting electrical devi‐ ces 160 Seite 233Everything from A to ZReference233
Online Edition for Part no. 01 40 2 956 725 - X/14
Page 239 of 247
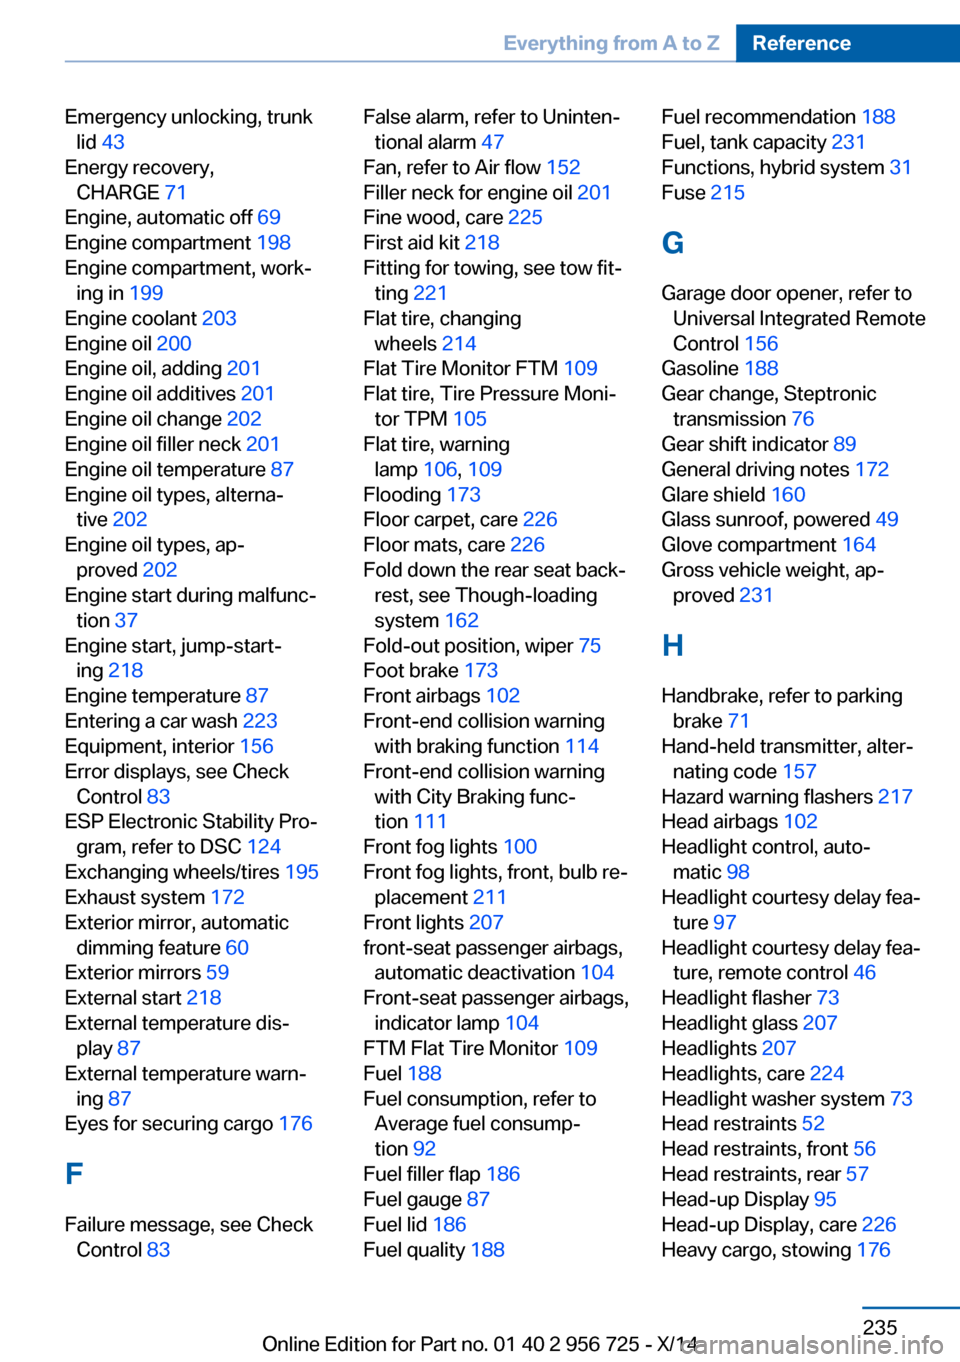
Emergency unlocking, trunklid 43
Energy recovery, CHARGE 71
Engine, automatic off 69
Engine compartment 198
Engine compartment, work‐ ing in 199
Engine coolant 203
Engine oil 200
Engine oil, adding 201
Engine oil additives 201
Engine oil change 202
Engine oil filler neck 201
Engine oil temperature 87
Engine oil types, alterna‐ tive 202
Engine oil types, ap‐ proved 202
Engine start during malfunc‐ tion 37
Engine start, jump-start‐ ing 218
Engine temperature 87
Entering a car wash 223
Equipment, interior 156
Error displays, see Check Control 83
ESP Electronic Stability Pro‐ gram, refer to DSC 124
Exchanging wheels/tires 195
Exhaust system 172
Exterior mirror, automatic dimming feature 60
Exterior mirrors 59
External start 218
External temperature dis‐ play 87
External temperature warn‐ ing 87
Eyes for securing cargo 176
F
Failure message, see Check Control 83 False alarm, refer to Uninten‐
tional alarm 47
Fan, refer to Air flow 152
Filler neck for engine oil 201
Fine wood, care 225
First aid kit 218
Fitting for towing, see tow fit‐ ting 221
Flat tire, changing wheels 214
Flat Tire Monitor FTM 109
Flat tire, Tire Pressure Moni‐ tor TPM 105
Flat tire, warning lamp 106, 109
Flooding 173
Floor carpet, care 226
Floor mats, care 226
Fold down the rear seat back‐ rest, see Though-loading
system 162
Fold-out position, wiper 75
Foot brake 173
Front airbags 102
Front-end collision warning with braking function 114
Front-end collision warning with City Braking func‐
tion 111
Front fog lights 100
Front fog lights, front, bulb re‐ placement 211
Front lights 207
front-seat passenger airbags, automatic deactivation 104
Front-seat passenger airbags, indicator lamp 104
FTM Flat Tire Monitor 109
Fuel 188
Fuel consumption, refer to Average fuel consump‐
tion 92
Fuel filler flap 186
Fuel gauge 87
Fuel lid 186
Fuel quality 188 Fuel recommendation 188
Fuel, tank capacity 231
Functions, hybrid system 31
Fuse 215
G
Garage door opener, refer to Universal Integrated Remote
Control 156
Gasoline 188
Gear change, Steptronic transmission 76
Gear shift indicator 89
General driving notes 172
Glare shield 160
Glass sunroof, powered 49
Glove compartment 164
Gross vehicle weight, ap‐ proved 231
H
Handbrake, refer to parking brake 71
Hand-held transmitter, alter‐ nating code 157
Hazard warning flashers 217
Head airbags 102
Headlight control, auto‐ matic 98
Headlight courtesy delay fea‐ ture 97
Headlight courtesy delay fea‐ ture, remote control 46
Headlight flasher 73
Headlight glass 207
Headlights 207
Headlights, care 224
Headlight washer system 73
Head restraints 52
Head restraints, front 56
Head restraints, rear 57
Head-up Display 95
Head-up Display, care 226
Heavy cargo, stowing 176 Seite 235Everything from A to ZReference235
Online Edition for Part no. 01 40 2 956 725 - X/14
Page 241 of 247
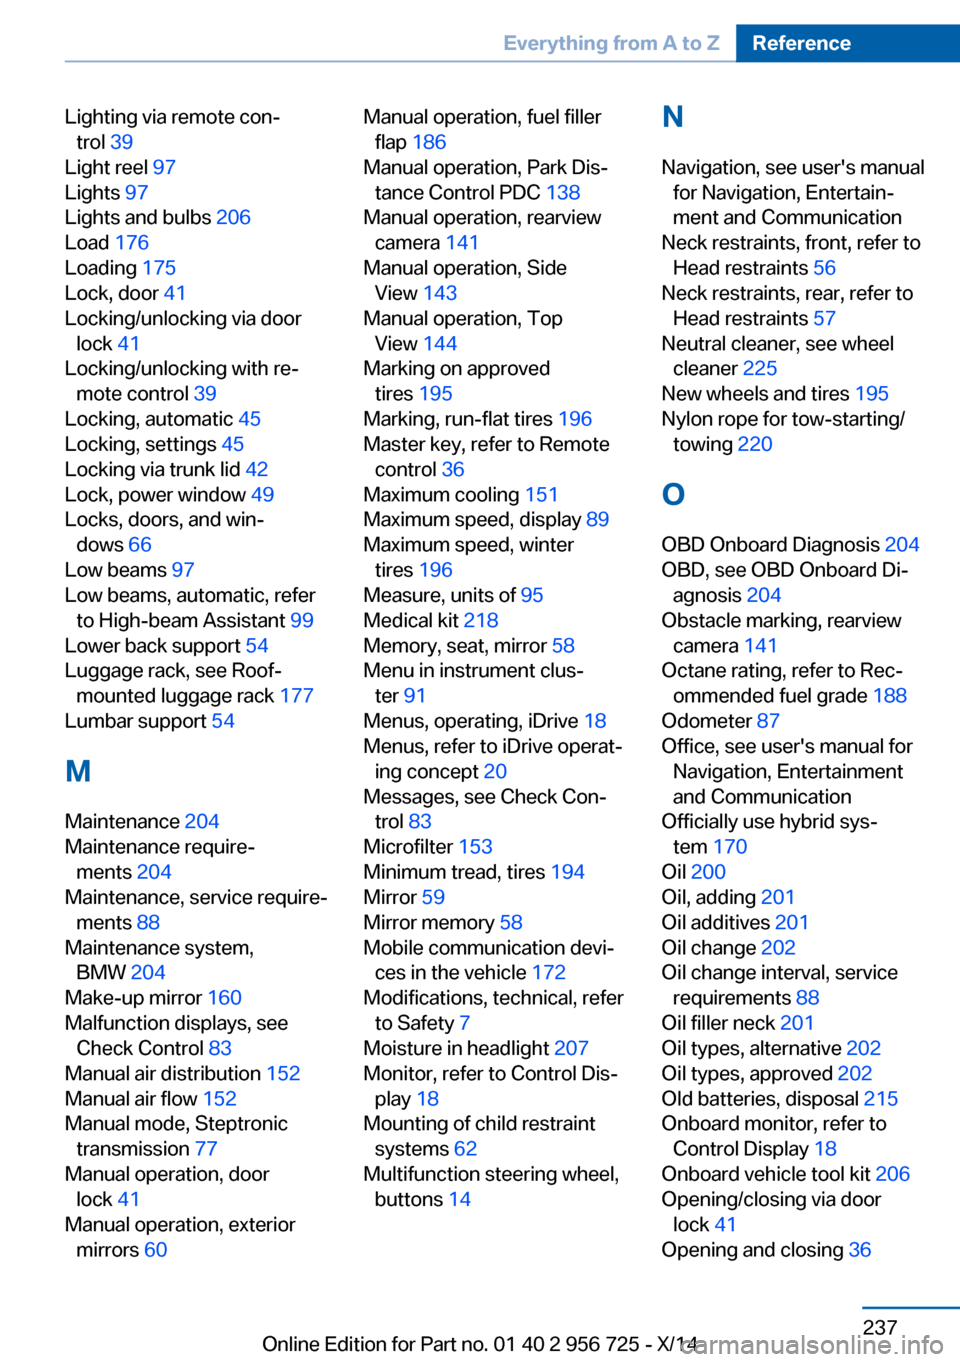
Lighting via remote con‐trol 39
Light reel 97
Lights 97
Lights and bulbs 206
Load 176
Loading 175
Lock, door 41
Locking/unlocking via door lock 41
Locking/unlocking with re‐ mote control 39
Locking, automatic 45
Locking, settings 45
Locking via trunk lid 42
Lock, power window 49
Locks, doors, and win‐ dows 66
Low beams 97
Low beams, automatic, refer to High-beam Assistant 99
Lower back support 54
Luggage rack, see Roof- mounted luggage rack 177
Lumbar support 54
M
Maintenance 204
Maintenance require‐ ments 204
Maintenance, service require‐ ments 88
Maintenance system, BMW 204
Make-up mirror 160
Malfunction displays, see Check Control 83
Manual air distribution 152
Manual air flow 152
Manual mode, Steptronic transmission 77
Manual operation, door lock 41
Manual operation, exterior mirrors 60 Manual operation, fuel filler
flap 186
Manual operation, Park Dis‐ tance Control PDC 138
Manual operation, rearview camera 141
Manual operation, Side View 143
Manual operation, Top View 144
Marking on approved tires 195
Marking, run-flat tires 196
Master key, refer to Remote control 36
Maximum cooling 151
Maximum speed, display 89
Maximum speed, winter tires 196
Measure, units of 95
Medical kit 218
Memory, seat, mirror 58
Menu in instrument clus‐ ter 91
Menus, operating, iDrive 18
Menus, refer to iDrive operat‐ ing concept 20
Messages, see Check Con‐ trol 83
Microfilter 153
Minimum tread, tires 194
Mirror 59
Mirror memory 58
Mobile communication devi‐ ces in the vehicle 172
Modifications, technical, refer to Safety 7
Moisture in headlight 207
Monitor, refer to Control Dis‐ play 18
Mounting of child restraint systems 62
Multifunction steering wheel, buttons 14 N
Navigation, see user's manual for Navigation, Entertain‐
ment and Communication
Neck restraints, front, refer to Head restraints 56
Neck restraints, rear, refer to Head restraints 57
Neutral cleaner, see wheel cleaner 225
New wheels and tires 195
Nylon rope for tow-starting/ towing 220
O OBD Onboard Diagnosis 204
OBD, see OBD Onboard Di‐ agnosis 204
Obstacle marking, rearview camera 141
Octane rating, refer to Rec‐ ommended fuel grade 188
Odometer 87
Office, see user's manual for Navigation, Entertainment
and Communication
Officially use hybrid sys‐ tem 170
Oil 200
Oil, adding 201
Oil additives 201
Oil change 202
Oil change interval, service requirements 88
Oil filler neck 201
Oil types, alternative 202
Oil types, approved 202
Old batteries, disposal 215
Onboard monitor, refer to Control Display 18
Onboard vehicle tool kit 206
Opening/closing via door lock 41
Opening and closing 36 Seite 237Everything from A to ZReference237
Online Edition for Part no. 01 40 2 956 725 - X/14