warning BMW ACTIVE HYBRID 7 2015 F01H Owner's Manual
[x] Cancel search | Manufacturer: BMW, Model Year: 2015, Model line: ACTIVE HYBRID 7, Model: BMW ACTIVE HYBRID 7 2015 F01HPages: 262, PDF Size: 5.34 MB
Page 12 of 262
be exposed on BMW vehicles. Such products
could conceivably fail to comply with BMW's
own stringent quality standards.
California Proposition 65 Warning California laws require us to state the following
warning:
Engine exhaust and a wide variety of automo‐
bile components and parts, including compo‐
nents found in the interior furnishings in a vehi‐
cle, contain or emit chemicals known to the
State of California to cause cancer and birth
defects and reproductive harm. In addition,
certain fluids contained in vehicles and certain
products of component wear contain or emit
chemicals known to the State of California to
cause cancer and birth defects or other repro‐
ductive harm. Battery posts, terminals and re‐
lated accessories contain lead and lead com‐
pounds. Wash your hands after handling. Used
engine oil contains chemicals that have caused
cancer in laboratory animals. Always protect
your skin by washing thoroughly with soap and
water.
Service and warranty
We recommend that you read this publication
thoroughly. Your vehicle is covered by the fol‐
lowing warranties:▷New Vehicle Limited Warranty.▷Rust Perforation Limited Warranty.▷Federal Emissions System Defect War‐
ranty.▷Federal Emissions Performance Warranty.▷California Emission Control System Lim‐
ited Warranty.
Detailed information about these warranties is
listed in the Service and Warranty Information
Booklet for US models or in the Warranty and
Service Guide Booklet for Canadian models.
Your vehicle has been specifically adapted and
designed to meet the particular operating con‐
ditions and homologation requirements in your
country and continental region in order to de‐
liver the full driving pleasure while the vehicle
is operated under those conditions. If you wish
to operate your vehicle in another country or
region, you may be required to adapt your ve‐
hicle to meet different prevailing operating
conditions and homologation requirements.
You should also be aware of any applicable
warranty limitations or exclusions for such
country or region. In such case, please contact
Customer Relations for further information.
Maintenance
Maintain the vehicle regularly to sustain the
road safety, operational reliability and the New
Vehicle Limited Warranty.
Specifications for required maintenance meas‐
ures:▷BMW Maintenance system▷Service and Warranty Information Booklet
for US models▷Warranty and Service Guide Booklet for
Canadian models
If the vehicle is not maintained according to
these specifications, this could result in seri‐
ous damage to the vehicle. Such damage is
not covered by the BMW New Vehicle Limited
Warranty.
Data memory
Many electronic components on your vehicle
are equipped with data memories that tempo‐
rarily or permanently store technical informa‐
tion about the condition of the vehicle, events
and faults. This technical information generally
records the state of a component, a module, a system or the environment:
▷Operating mode of system components, fill
levels for instance.▷Status messages for the vehicle and from
its individual components, e.g., wheel rota‐
tion speed/vehicle speed, deceleration,
transverse acceleration.Seite 8Notes8
Online Edition for Part no. 01 40 2 954 204 - II/15
Page 18 of 262
CockpitVehicle features and options
This chapter describes all standard, country-
specific and optional features offered with the
series. It also describes features that are not
necessarily available in your car, e. g., due tothe selected options or country versions. This
also applies to safety-related functions and
systems. The respectively applicable country
provisions must be observed when using the
respective features and systems.
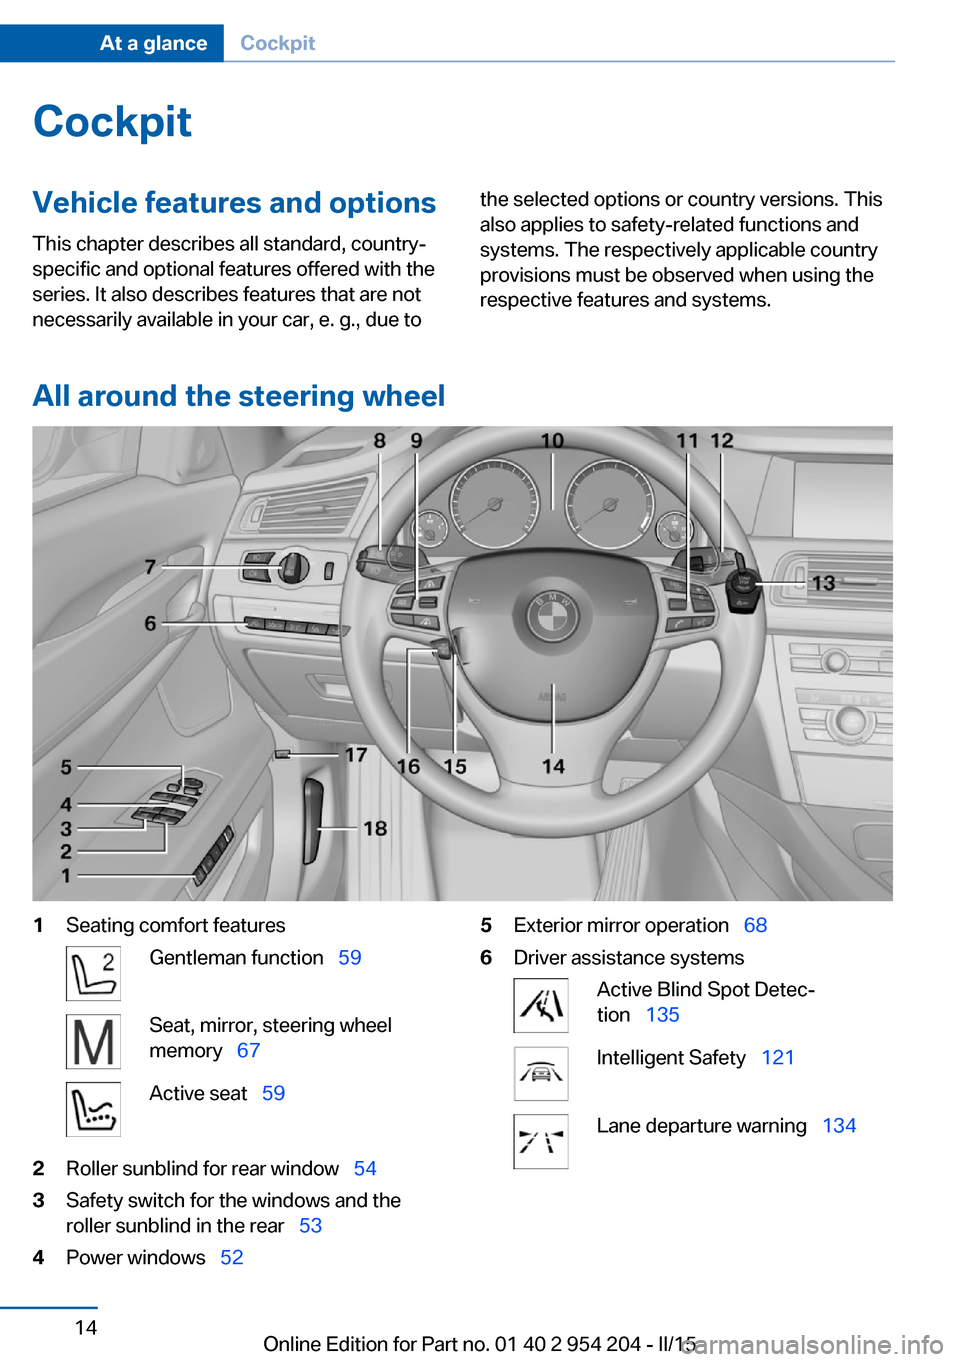
All around the steering wheel
1Seating comfort featuresGentleman function 59Seat, mirror, steering wheel
memory 67Active seat 592Roller sunblind for rear window 543Safety switch for the windows and the
roller sunblind in the rear 534Power windows 525Exterior mirror operation 686Driver assistance systemsActive Blind Spot Detec‐
tion 135Intelligent Safety 121Lane departure warning 134Seite 14At a glanceCockpit14
Online Edition for Part no. 01 40 2 954 204 - II/15
Page 20 of 262
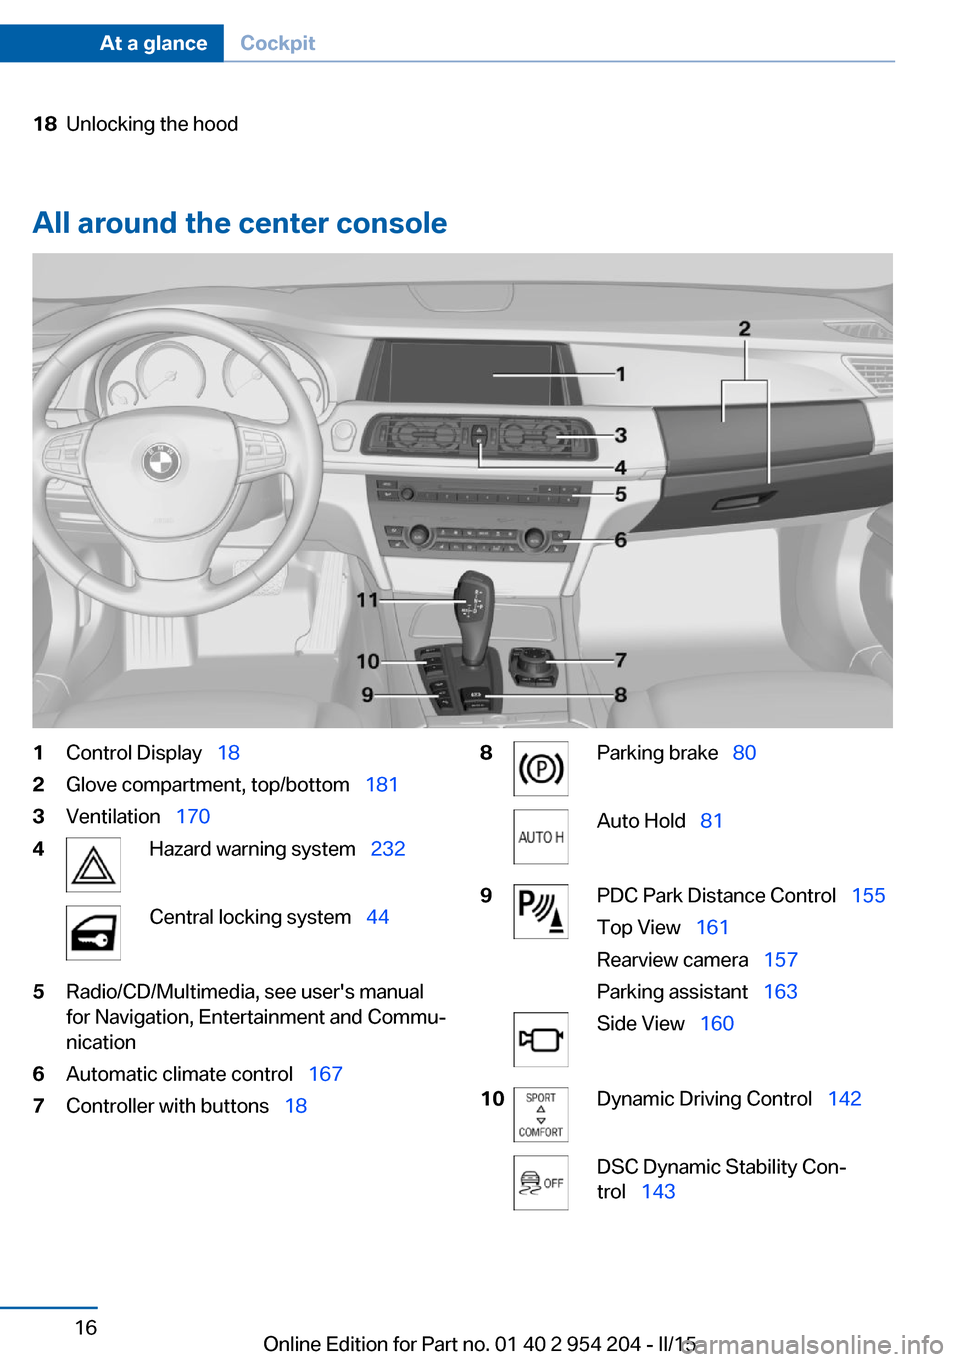
18Unlocking the hood
All around the center console
1Control Display 182Glove compartment, top/bottom 1813Ventilation 1704Hazard warning system 232Central locking system 445Radio/CD/Multimedia, see user's manual
for Navigation, Entertainment and Commu‐
nication6Automatic climate control 1677Controller with buttons 188Parking brake 80Auto Hold 819PDC Park Distance Control 155
Top View 161
Rearview camera 157
Parking assistant 163Side View 16010Dynamic Driving Control 142DSC Dynamic Stability Con‐
trol 143Seite 16At a glanceCockpit16
Online Edition for Part no. 01 40 2 954 204 - II/15
Page 46 of 262
The windows and the glass sunroof are
opened, as long as the button on the remote
control is pressed.
Locking Locking from the outside
Do not lock the vehicle from the outside
with people inside the car, as the vehicle can‐
not be unlocked from inside without special knowledge.◀
The driver's door must be closed. Press button on the remote control.
All doors, the tailgate, and the fuel filler flap are
being locked.
Anti-theft protection is switched on. It pre‐
vents the doors from being unlocked using the
lock buttons or the door openers.
The alarm system, refer to page 51, is armed.
Switching on interior lights and
courtesy lights
Press button on the remote control with
the vehicle locked.
This function is not available, if the interior
lamps were switched off manually.
If the button is pressed again within 10 sec‐
onds after vehicle was locked, the interior mo‐
tion sensor and tilt alarm sensor of the anti-
theft warning system, refer to page 52, are
turned off. After locking, wait 10 seconds be‐
fore pressing the button again.
Panic mode
You can trigger the alarm system if you find
yourself in a dangerous situation.
Press button on the remote control for
at least 3 seconds.
To reel off the alarm: press any button.Opening the trunk lid Press button on the remote control for
approx. 1 second.
The trunk lid opens, regardless of whether the
vehicle was previously locked or unlocked.
During opening, the trunk lid pivots back and
up. Ensure that adequate clearance is available
before opening.
Depending on the features and the country
version, it is also possible to have door un‐
locked. Create the settings, refer to page 50.
If the doors were not unlocked, the trunk lid is
locked again as soon as it closes.
Do not place the remote control in the
cargo area
Take the remote control with you and do not
leave it in the cargo area; otherwise, the re‐
mote control is locked inside the vehicle when
the trunk lid is closed.◀
Switching on the headlight courtesy
delay feature
The headlight courtesy delay feature function
must be set for the remote control button. For
Settings, refer to page 50.
Briefly press the button on the remote
control.
The duration can be set in the Control Display. Malfunction
Remote control detection by the vehicle can
among others be malfunctioning under the fol‐
lowing circumstances:▷The battery of the remote control is dis‐
charged. Replace the battery, refer to
page 39.▷Interference of the radio connection from
transmission towers or other equipment
with high transmit power.Seite 42ControlsOpening and closing42
Online Edition for Part no. 01 40 2 954 204 - II/15
Page 48 of 262
From the inside
Unlocking and locking
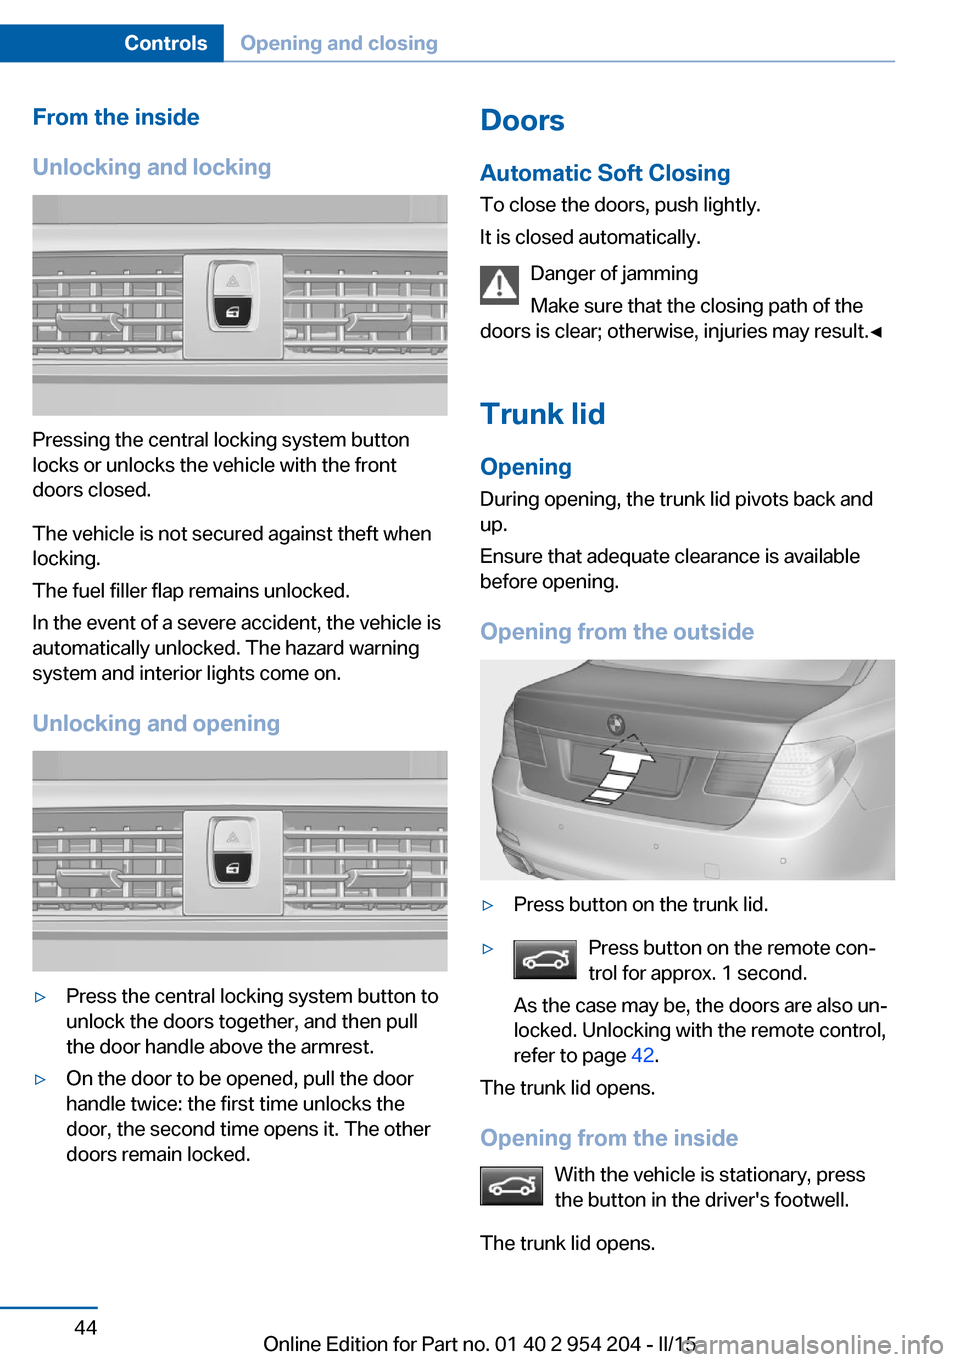
Pressing the central locking system button
locks or unlocks the vehicle with the front
doors closed.
The vehicle is not secured against theft when
locking.
The fuel filler flap remains unlocked.
In the event of a severe accident, the vehicle is
automatically unlocked. The hazard warning
system and interior lights come on.
Unlocking and opening
▷Press the central locking system button to
unlock the doors together, and then pull
the door handle above the armrest.▷On the door to be opened, pull the door
handle twice: the first time unlocks the
door, the second time opens it. The other
doors remain locked.Doors
Automatic Soft Closing
To close the doors, push lightly.
It is closed automatically.
Danger of jamming
Make sure that the closing path of the
doors is clear; otherwise, injuries may result.◀
Trunk lidOpening
During opening, the trunk lid pivots back and
up.
Ensure that adequate clearance is available
before opening.
Opening from the outside▷Press button on the trunk lid.▷Press button on the remote con‐
trol for approx. 1 second.
As the case may be, the doors are also un‐
locked. Unlocking with the remote control,
refer to page 42.
The trunk lid opens.
Opening from the inside With the vehicle is stationary, press
the button in the driver's footwell.
The trunk lid opens.
Seite 44ControlsOpening and closing44
Online Edition for Part no. 01 40 2 954 204 - II/15
Page 53 of 262
Opening and closing trunk lid with no-
touch activation
The trunk lid can be opened with no-touch ac‐
tivation using the remote control you are carry‐
ing. With automatic tailgate operation, it can
also be closed with no-touch activation. Two
sensors detect a forward-directed foot motion
in the center of the area at the rear of the car
and the trunk lid opens and/or closes.
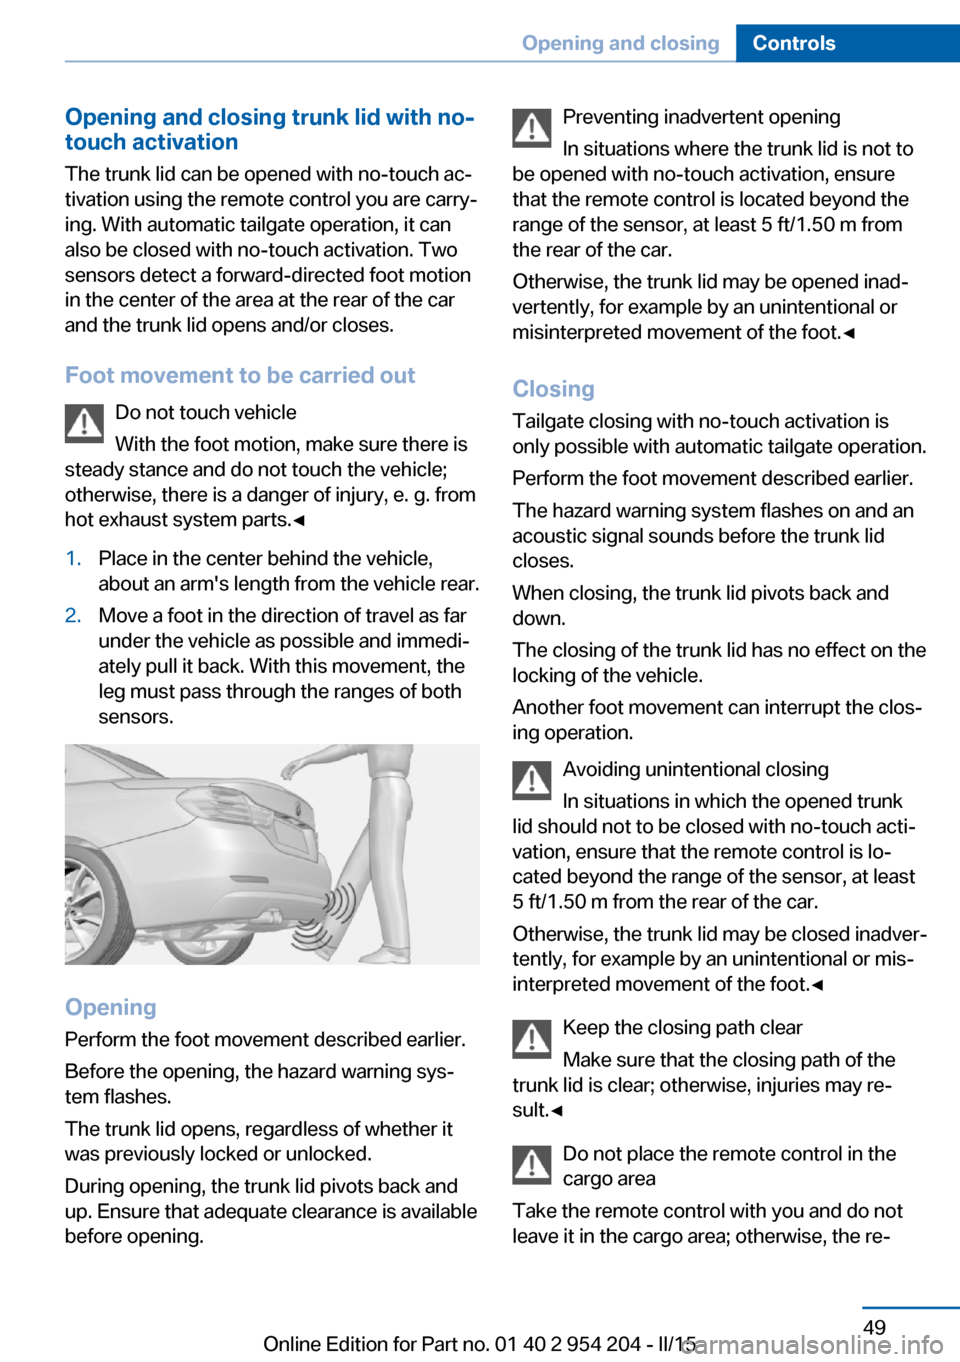
Foot movement to be carried out Do not touch vehicle
With the foot motion, make sure there is
steady stance and do not touch the vehicle;
otherwise, there is a danger of injury, e. g. from
hot exhaust system parts.◀1.Place in the center behind the vehicle,
about an arm's length from the vehicle rear.2.Move a foot in the direction of travel as far
under the vehicle as possible and immedi‐
ately pull it back. With this movement, the
leg must pass through the ranges of both
sensors.
Opening
Perform the foot movement described earlier.
Before the opening, the hazard warning sys‐
tem flashes.
The trunk lid opens, regardless of whether it
was previously locked or unlocked.
During opening, the trunk lid pivots back and
up. Ensure that adequate clearance is available
before opening.
Preventing inadvertent opening
In situations where the trunk lid is not to
be opened with no-touch activation, ensure
that the remote control is located beyond the
range of the sensor, at least 5 ft/1.50 m from
the rear of the car.
Otherwise, the trunk lid may be opened inad‐
vertently, for example by an unintentional or
misinterpreted movement of the foot.◀
Closing Tailgate closing with no-touch activation is
only possible with automatic tailgate operation.
Perform the foot movement described earlier.
The hazard warning system flashes on and an
acoustic signal sounds before the trunk lid closes.
When closing, the trunk lid pivots back and
down.
The closing of the trunk lid has no effect on the
locking of the vehicle.
Another foot movement can interrupt the clos‐
ing operation.
Avoiding unintentional closing
In situations in which the opened trunk
lid should not to be closed with no-touch acti‐
vation, ensure that the remote control is lo‐
cated beyond the range of the sensor, at least
5 ft/1.50 m from the rear of the car.
Otherwise, the trunk lid may be closed inadver‐
tently, for example by an unintentional or mis‐
interpreted movement of the foot.◀
Keep the closing path clear
Make sure that the closing path of the
trunk lid is clear; otherwise, injuries may re‐
sult.◀
Do not place the remote control in the
cargo area
Take the remote control with you and do not
leave it in the cargo area; otherwise, the re‐Seite 49Opening and closingControls49
Online Edition for Part no. 01 40 2 954 204 - II/15
Page 55 of 262
Headlamp courtesy delay feature/standing climate control
The settings are saved in the active profile, re‐fer to page 39.1."Settings"2."Doors/key"3. Select the symbol.4.Select the desired function:▷"Pathway lighting"
Headlight courtesy delay feature▷"Comfort cooling"
Stationary climate control
Retrieving the seat, mirror, and
steering wheel settings
The driver's seat, exterior mirror, and steering
wheel position adjusted last will be stored for
the active profile.
When the vehicle is unlocked, these positions
are automatically retrieved if this function was
activated.
Pinch hazard when moving back the seat
If this function is used, first make sure
that the footwell behind the driver's seat is
empty. Otherwise, people might get injured or
objects damaged when the seat is moved
back.◀
The adjustment procedure is interrupted:
▷When a seat position reel is pressed.▷When a button of the seat, mirror, and
steering wheel memory is pressed briefly.
Activating the setting
1."Settings"2."Doors/key"3."Last seat position autom."Alarm system
The conceptWhen the vehicle is locked, the vehicle alarm
system responds to:▷Opening a door, the hood or the trunk lid.▷Movements in the interior.▷Changes in the vehicle tilt, e. g., during at‐
tempts at stealing a wheel or when towing
the car.▷Disconnected battery voltage.
The alarm system briefly signals tampering:
▷By sounding an acoustic alarm.▷By switching on the hazard warning sys‐
tem.▷By flashing the daytime running lights.
Arming and disarming the alarm
system
When you unlock or lock the vehicle, either
with the remote control, Comfort Access or at
the door lock the alarm system is disarmed or
armed at the same time.
Door lock and armed alarm systemUnlocking via the door lock will trigger the
alarm on some country-specific versions.
Trunk lid and armed alarm system The trunk lid can be opened even when the
alarm system is armed.
After the trunk lid is closed, it is locked and
monitored again when the doors are locked.
The hazard warning system flashes once.
Panic mode
You can trigger the alarm system if you find
yourself in a dangerous situation.
Press button on the remote control for
at least 3 seconds.
To switch off the alarm: press any button.
Seite 51Opening and closingControls51
Online Edition for Part no. 01 40 2 954 204 - II/15
Page 80 of 262
DrivingVehicle features and options
This chapter describes all standard, country-
specific and optional features offered with the
series. It also describes features that are not
necessarily available in your car, e. g., due to
the selected options or country versions. This
also applies to safety-related functions and
systems. The respectively applicable country
provisions must be observed when using the
respective features and systems.
Start/Stop button, drive readiness
The concept The following ready states can
be attained by pressing the
Start/Stop button:▷Radio ready state on/off.▷Ignition on/off.▷Activating/deactivating drive readiness.
To activate drive readiness, press the brake
pedal.
Switching radio-ready state on/off
The radio-ready state is activated by pressing
the Start/Stop button in the following situa‐
tions:
▷When the engine is running.▷When drive readiness is activated.▷When the engine is switched off automati‐
cally using the Auto Start/Stop function
and the brake is not applied.
Some electronic systems/power consumers
remain ready for operation.
Radio ready state is switched off automatically:
▷After approx. 8 minutes.▷When the vehicle is locked using the cen‐
tral locking system.▷Shortly before the battery is discharged
completely, so that the engine can still be
started.
If the engine is switched off and the ignition is
switched on, the system automatically
switches to the radio-ready state if the lights
are turned off or, if correspondingly equipped,
the daytime running lights are activated.
Ignition on Press the Start/Stop button, and do not press
on the brake pedal at the same time.
All vehicle systems are ready for operation.
Most of the indicator and warning lights in the
instrument cluster light up for a varied length
of time.
To save battery power when the engine is off,
switch off the ignition and any unnecessary
electronic systems/power consumers.
Ignition offPress the Start/Stop button again without
stepping on the brake.
All indicator lights in the instrument cluster go
out.
To save battery power when the engine is off,
switch off the ignition and any unnecessary
electronic systems/power consumers.
P when the ignition is switched off
P is engaged automatically when the ig‐
nition is switched off. When in an automatic car
wash, e.g., ensure that the ignition is not
switched off accidentally.◀
The ignition is switched off automatically in the
following situations while the vehicle is station‐
ary and the engine is off:
Seite 76ControlsDriving76
Online Edition for Part no. 01 40 2 954 204 - II/15
Page 88 of 262
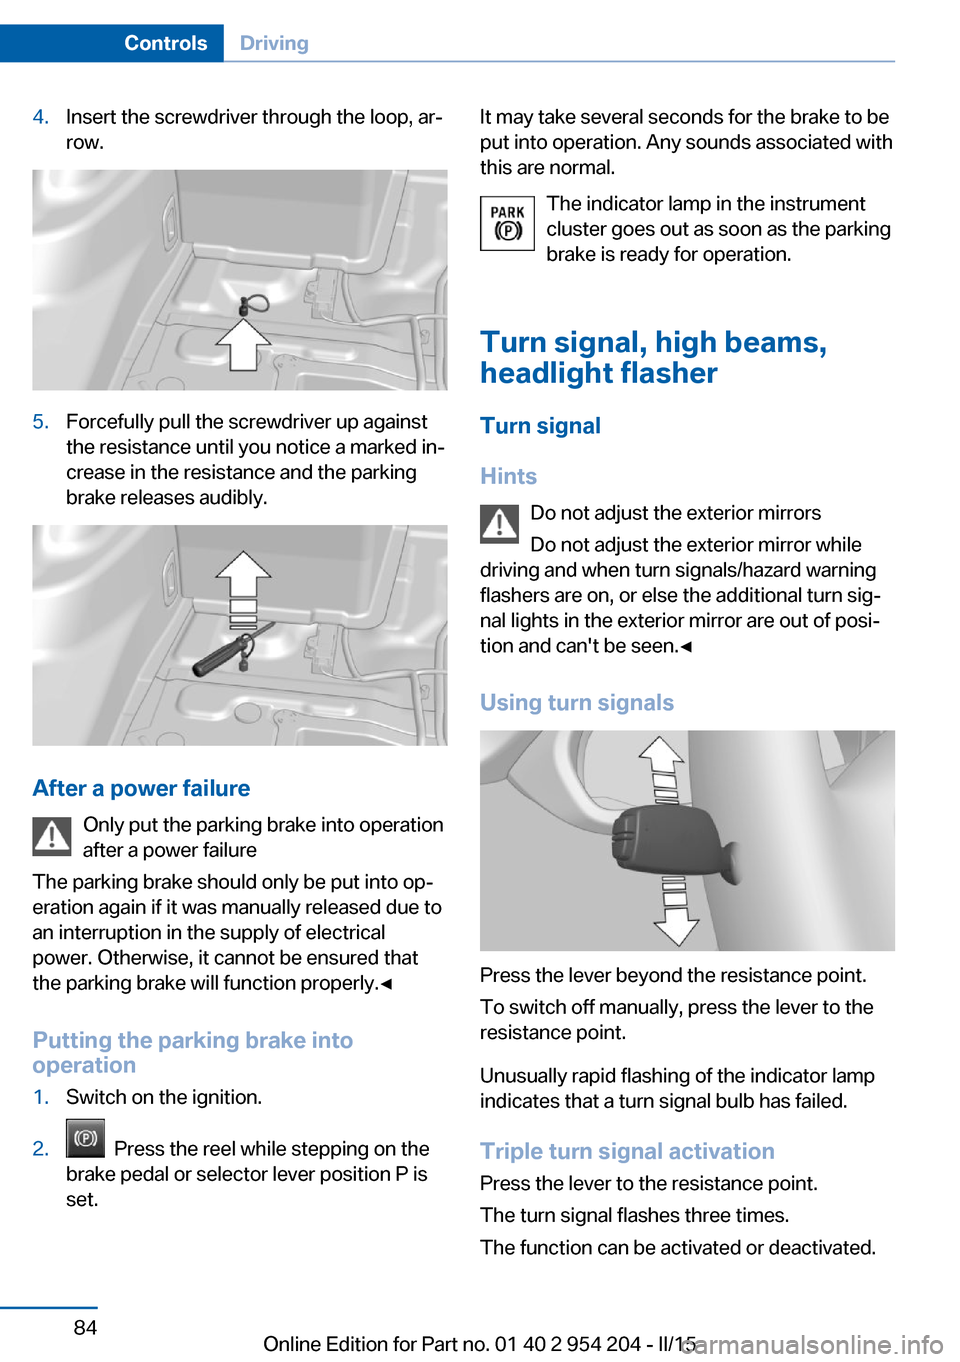
4.Insert the screwdriver through the loop, ar‐
row.5.Forcefully pull the screwdriver up against
the resistance until you notice a marked in‐
crease in the resistance and the parking
brake releases audibly.
After a power failure
Only put the parking brake into operation
after a power failure
The parking brake should only be put into op‐
eration again if it was manually released due to
an interruption in the supply of electrical
power. Otherwise, it cannot be ensured that
the parking brake will function properly.◀
Putting the parking brake into
operation
1.Switch on the ignition.2. Press the reel while stepping on the
brake pedal or selector lever position P is
set.It may take several seconds for the brake to be
put into operation. Any sounds associated with
this are normal.
The indicator lamp in the instrument
cluster goes out as soon as the parking
brake is ready for operation.
Turn signal, high beams,
headlight flasher
Turn signal
Hints Do not adjust the exterior mirrors
Do not adjust the exterior mirror while
driving and when turn signals/hazard warning
flashers are on, or else the additional turn sig‐
nal lights in the exterior mirror are out of posi‐
tion and can't be seen.◀
Using turn signals
Press the lever beyond the resistance point.
To switch off manually, press the lever to the
resistance point.
Unusually rapid flashing of the indicator lamp
indicates that a turn signal bulb has failed.
Triple turn signal activation Press the lever to the resistance point.
The turn signal flashes three times.
The function can be activated or deactivated.
Seite 84ControlsDriving84
Online Edition for Part no. 01 40 2 954 204 - II/15
Page 98 of 262
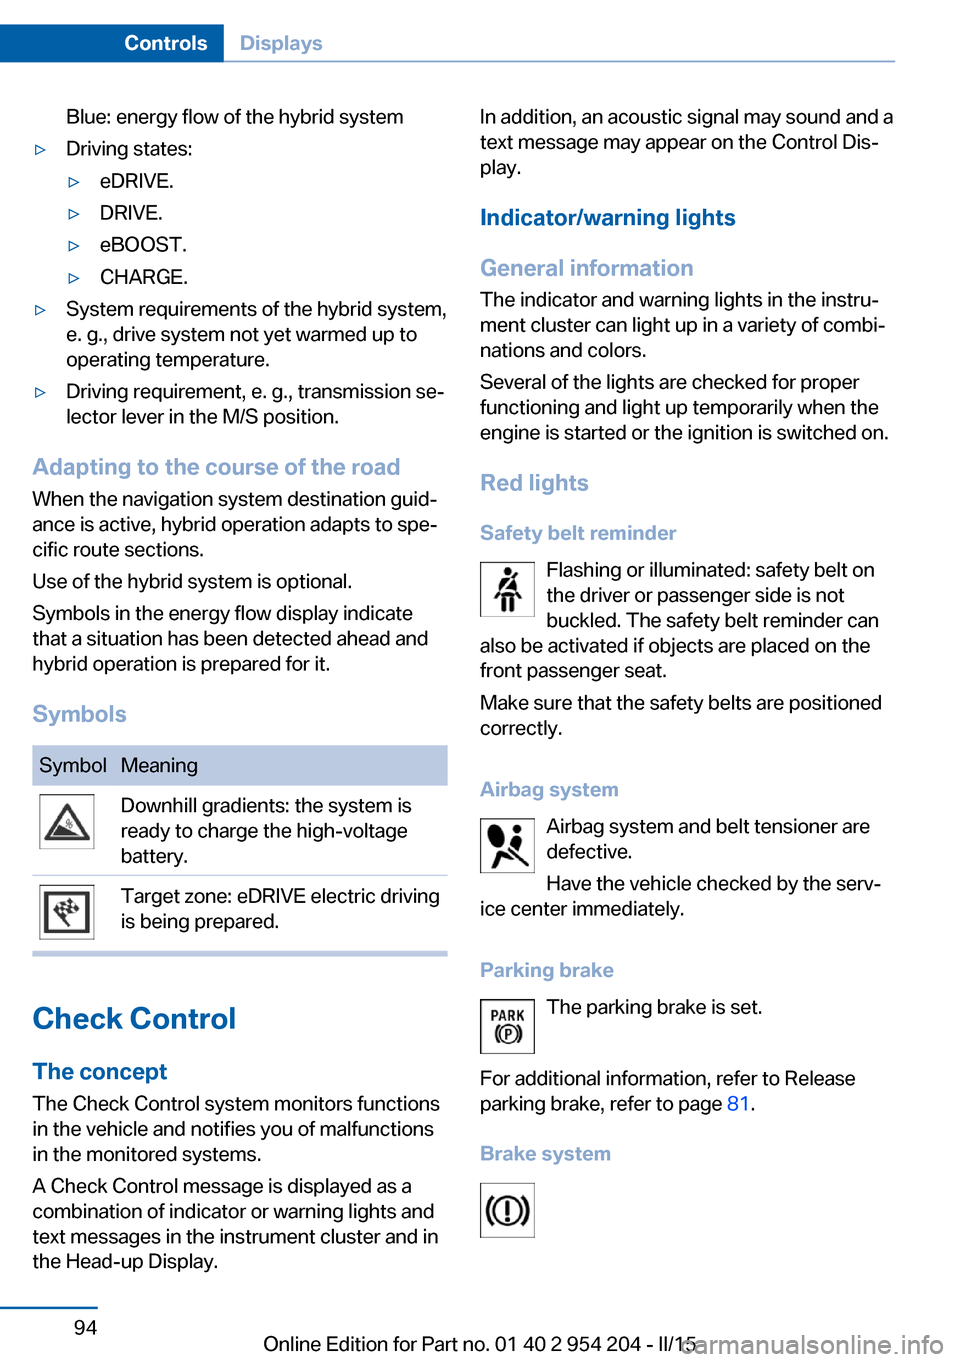
Blue: energy flow of the hybrid system▷Driving states:▷eDRIVE.▷DRIVE.▷eBOOST.▷CHARGE.▷System requirements of the hybrid system,
e. g., drive system not yet warmed up to
operating temperature.▷Driving requirement, e. g., transmission se‐
lector lever in the M/S position.
Adapting to the course of the road
When the navigation system destination guid‐
ance is active, hybrid operation adapts to spe‐
cific route sections.
Use of the hybrid system is optional.
Symbols in the energy flow display indicate
that a situation has been detected ahead and
hybrid operation is prepared for it.
Symbols
SymbolMeaningDownhill gradients: the system is
ready to charge the high-voltage
battery.Target zone: eDRIVE electric driving
is being prepared.
Check Control
The concept The Check Control system monitors functions
in the vehicle and notifies you of malfunctions
in the monitored systems.
A Check Control message is displayed as a
combination of indicator or warning lights and
text messages in the instrument cluster and in
the Head-up Display.
In addition, an acoustic signal may sound and a text message may appear on the Control Dis‐
play.
Indicator/warning lights
General information
The indicator and warning lights in the instru‐
ment cluster can light up in a variety of combi‐
nations and colors.
Several of the lights are checked for proper
functioning and light up temporarily when the
engine is started or the ignition is switched on.
Red lights Safety belt reminder Flashing or illuminated: safety belt onthe driver or passenger side is not
buckled. The safety belt reminder can
also be activated if objects are placed on the
front passenger seat.
Make sure that the safety belts are positioned
correctly.
Airbag system Airbag system and belt tensioner aredefective.
Have the vehicle checked by the serv‐
ice center immediately.
Parking brake The parking brake is set.
For additional information, refer to Release
parking brake, refer to page 81.
Brake systemSeite 94ControlsDisplays94
Online Edition for Part no. 01 40 2 954 204 - II/15