ignition BMW ACTIVEHYBRID X6 2010 Owners Manual
[x] Cancel search | Manufacturer: BMW, Model Year: 2010, Model line: ACTIVEHYBRID X6, Model: BMW ACTIVEHYBRID X6 2010Pages: 54, PDF Size: 3.16 MB
Page 15 of 54
Reference
At a glance
Controls
Driving tips
Mobility
13
Functions of the hybrid system
The hybrid system of your BMW ActiveHybrid
X6 offers the following functions.
Electric driving: eDRIVE
Under certain conditions, refer to page15, the
vehicle is powered exclusively by its electric
motors.
Driving with combustion engine: DRIVE
The combustion engine supplies the drive out-
put for moving the vehicle. The high-voltage
battery is charged at the same time.
The hybrid system always starts the combus-
tion engine automatically, refer to page16.
Assisted combustion engine: eBOOST
The combustion engine supplies the main drive
output for moving the vehicle.
In this mode, the electric motors assist the
combustion engine with additional power as
needed.
Energy recovery: CHARGE
When reducing vehicle speed, the kinetic
energy can be converted into electrical energy,
refer to page16.
Start/Stop button, ready
modes
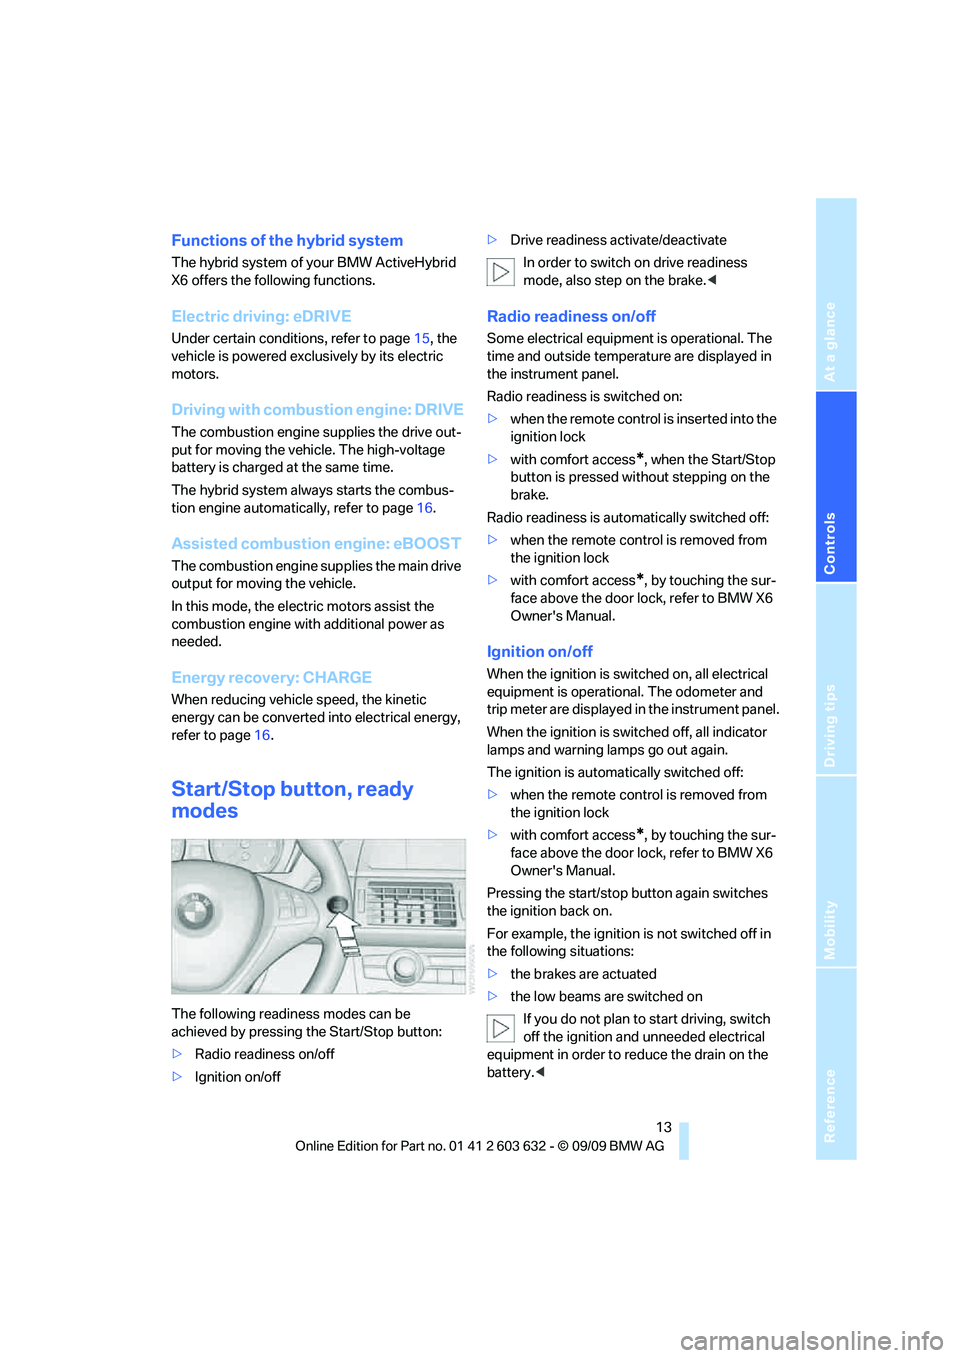
The following readiness modes can be
achieved by pressing the Start/Stop button:
>Radio readiness on/off
>Ignition on/off>Drive readiness activate/deactivate
In order to switch on drive readiness
mode, also step on the brake.<
Radio readiness on/off
Some electrical equipment is operational. The
time and outside temperature are displayed in
the instrument panel.
Radio readiness is switched on:
>when the remote control is inserted into the
ignition lock
>with comfort access
*, when the Start/Stop
button is pressed without stepping on the
brake.
Radio readiness is automatically switched off:
>when the remote control is removed from
the ignition lock
>with comfort access
*, by touching the sur-
face above the door lock, refer to BMW X6
Owner's Manual.
Ignition on/off
When the ignition is switched on, all electrical
equipment is operational. The odometer and
trip meter are displayed in the instrument panel.
When the ignition is switched off, all indicator
lamps and warning lamps go out again.
The ignition is automatically switched off:
>when the remote control is removed from
the ignition lock
>with comfort access
*, by touching the sur-
face above the door lock, refer to BMW X6
Owner's Manual.
Pressing the start/stop button again switches
the ignition back on.
For example, the ignition is not switched off in
the following situations:
>the brakes are actuated
>the low beams are switched on
If you do not plan to start driving, switch
off the ignition and unneeded electrical
equipment in order to reduce the drain on the
battery.<
Page 16 of 54
Driving
14
Drive readiness
With drive readiness activated, the vehicle is
ready to drive.
Switching on drive readiness corresponds to
starting the engine in conventional vehicles.
Drive readiness can take the following forms:
>Electric driving
The combustion engine is not switched on.
>Driving with combustion engine
The vehicle is driven by the combustion
engine.
Drive readiness in detail
Never leave the vehicle unattended with
drive readiness activated; such a vehicle
represents a potential safety hazard.<
Activating drive readiness
1.Close the driver's door.
2.Insert the remote control as far as possible
into the ignition lock. With comfort access
*,
place the remote control into the vehicle,
refer to BMW X6 Owner's Manual.
3.Depress brake pedal.
To initialize the brake system, the
brake pedal travel is longer than usual
during activation of drive readiness. After
the brake pedal is released, the pedal travel
returns to normal.<
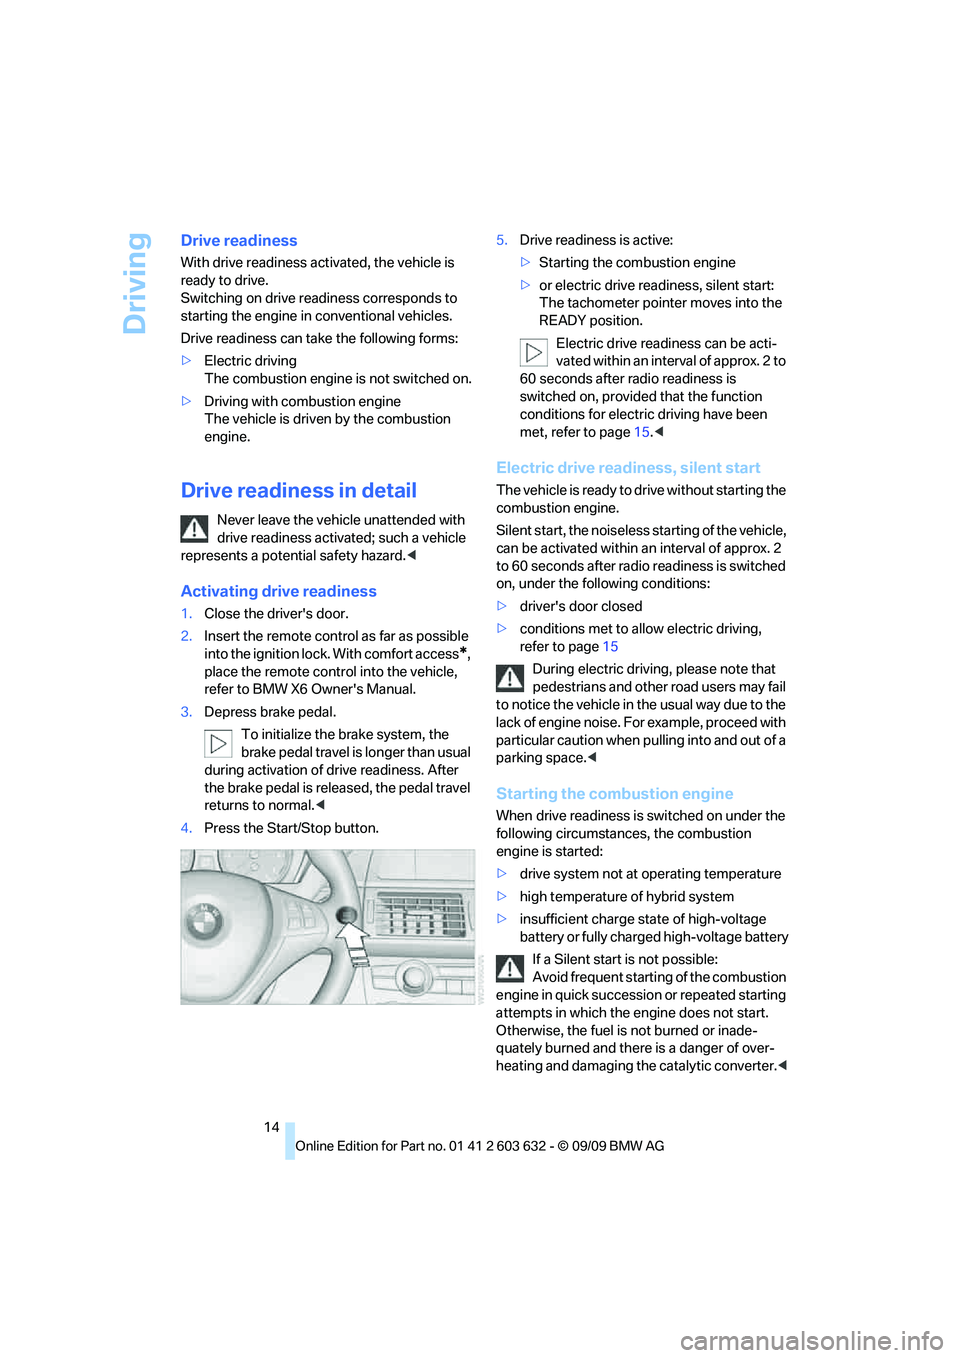
4.Press the Start/Stop button.5.Drive readiness is active:
>Starting the combustion engine
>or electric drive readiness, silent start:
The tachometer pointer moves into the
READY position.
Electric drive readiness can be acti-
vated within an interval of approx. 2 to
60 seconds after radio readiness is
switched on, provided that the function
conditions for electric driving have been
met, refer to page15.<
Electric drive readiness, silent start
The vehicle is ready to drive without starting the
combustion engine.
Silent start, the noiseless starting of the vehicle,
can be activated within an interval of approx. 2
to 60 seconds after radio readiness is switched
on, under the following conditions:
>driver's door closed
>conditions met to allow electric driving,
refer to page15
During electric driving, please note that
pedestrians and other road users may fail
to notice the vehicle in the usual way due to the
lack of engine noise. For example, proceed with
particular caution when pulling into and out of a
parking space.<
Starting the combustion engine
When drive readiness is switched on under the
following circumstances, the combustion
engine is started:
>drive system not at operating temperature
>high temperature of hybrid system
>insufficient charge state of high-voltage
battery or fully charged high-voltage battery
If a Silent start is not possible:
Avoid frequent starting of the combustion
engine in quick succession or repeated starting
attempts in which the engine does not start.
Otherwise, the fuel is not burned or inade-
quately burned and there is a danger of over-
heating and damaging the catalytic converter.<
Page 17 of 54
Reference
At a glance
Controls
Driving tips
Mobility
15
Do not run the combustion engine in
enclosed spaces; otherwise, the inhala-
tion of toxic exhaust gases can cause loss of
consciousness and death. The exhaust gases
contain carbon monoxide, an odorless and col-
orless, but highly toxic gas.
Never leave the vehicle unattended with the
combustion engine running; such a vehicle rep-
resents a potential safety hazard.<
Deactivating drive readiness
When drive readiness is switched off, the
tachometer pointer is in the OFF position.
When leaving the vehicle, always take
along the remote control.
Set the parking brake firmly when parking; oth-
erwise, the vehicle could roll.<
After the vehicle is switched off, audible operat-
ing sounds may issue from the hybrid system,
e.g. the cooling of the high-voltage battery.
Procedure
1.Select transmission position P with the
vehicle stationary.
2.Press the Start/Stop button.
3.Set the parking brake.
4.Remove the remote control from the igni-
tion lock.
Before removing the remote control, first
press it in as far as possible to release the
locking device.
Before driving into a car wash
The vehicle can roll if you proceed according to
the following steps:
1.With comfort access
*: insert the remote
control into the ignition lock.
2.Depress brake pedal.
3.Select transmission position N.
4.Release the parking brake or deactivate
Automatic Hold.
5.Press the Start/Stop button to deactivate
drive readiness.
Transmission position P will be selected:
>automatically after approx. 30 minutes>if you remove the remote control from the
ignition lock
Starting to drive
1.Activate drive readiness.
2.Select transmission position D, M/S, or R.
3.Release the parking brake.
4.Start to drive.
Driving
Electric driving: eDRIVE
Requirements
Electric driving is possible under the following
conditions:
>driving speed:
a maximum of approx. 37 mph/60 km/h
>charge state display of the high-voltage
battery: at least 15%
>transmission in position D or R, refer to
page17
>drive system at operating temperature
>accelerator pedal not pressed down too far
>driver's door closed
Possible driving speed
The possible speed that can be reached in elec-
tric driving depends on the charge state of the
high-voltage battery.
>charge state display 15% to 40%:
maximum driving speed is approx. 25 mph/
40 km/h
>charge state display 40% to 100%:
maximum driving speed is approx. 40 mph/
65 km/h
When accelerating past a speed of 25 mph/
40 km/h, the combustion engine is started
briefly in order to assure smooth acceleration.
Indicators of electric driving in the instrument
panel, refer to page22.
Page 19 of 54
Reference
At a glance
Controls
Driving tips
Mobility
17
The transmission position and the currently
engaged gear are displayed.
Selecting transmission position
>You can select transmission positions D, R
or N only when drive readiness is activated.
>With the vehicle stationary, depress the
brake pedal before shifting out of P or N;
otherwise the shift command will not be
executed: shiftlock.
Hold the brake pedal down until start-
ing to drive; otherwise, the vehicle can
begin to move.<
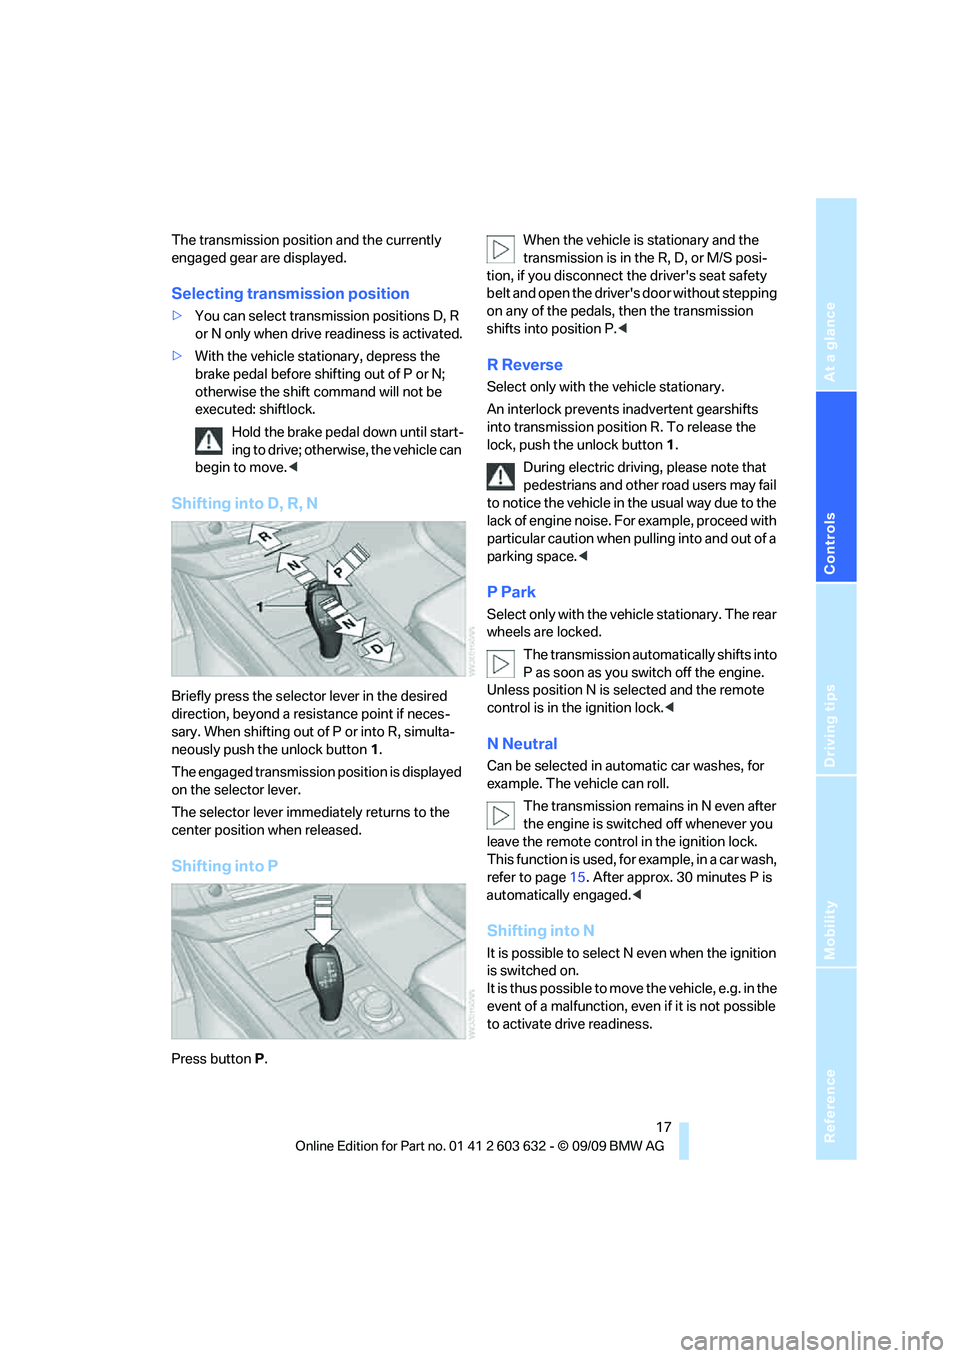
Shifting into D, R, N
Briefly press the selector lever in the desired
direction, beyond a resistance point if neces-
sary. When shifting out of P or into R, simulta-
neously push the unlock button1.
The engaged transmission position is displayed
on the selector lever.
The selector lever immediately returns to the
center position when released.
Shifting into P
Press buttonP.When the vehicle is stationary and the
transmission is in the R, D, or M/S posi-
tion, if you disconnect the driver's seat safety
belt and open the driver's door without stepping
on any of the pedals, then the transmission
shifts into position P.<
R Reverse
Select only with the vehicle stationary.
An interlock prevents inadvertent gearshifts
into transmission position R. To release the
lock, push the unlock button1.
During electric driving, please note that
pedestrians and other road users may fail
to notice the vehicle in the usual way due to the
lack of engine noise. For example, proceed with
particular caution when pulling into and out of a
parking space.<
P Park
Select only with the vehicle stationary. The rear
wheels are locked.
The transmission automatically shifts into
P as soon as you switch off the engine.
Unless position N is selected and the remote
control is in the ignition lock.<
N Neutral
Can be selected in automatic car washes, for
example. The vehicle can roll.
The transmission remains in N even after
the engine is switched off whenever you
leave the remote control in the ignition lock.
This function is used, for example, in a car wash,
refer to page15. After approx. 30 minutes P is
automatically engaged.<
Shifting into N
It is possible to select N even when the ignition
is switched on.
I t i s t h u s p o s s i b l e t o m o v e t h e v e h i c l e , e . g . i n t h e
event of a malfunction, even if it is not possible
to activate drive readiness.
Page 22 of 54
Driving
20 >when braking
>when transmission position N is engaged
>when DTC is activated or DSC is deacti-
vated
>when HDC is activated
>when the parking brake is set
>when driving stability control systems inter-
vene
Accelerating does not deactivate the cruise
control. After releasing the accelerator pedal,
the stored speed is reached and maintained
again.
Warning lamp
The warning lamp lights up if the
cruise control has been deactivated
automatically, e.g. by a control inter-
vention of the DSC. A message appears on the
Control Display.
Resuming stored speed
Briefly press the button, arrow4. The stored
speed is resumed and maintained.
With the ignition switched off, the stored speed
value is deleted and cannot be resumed again.
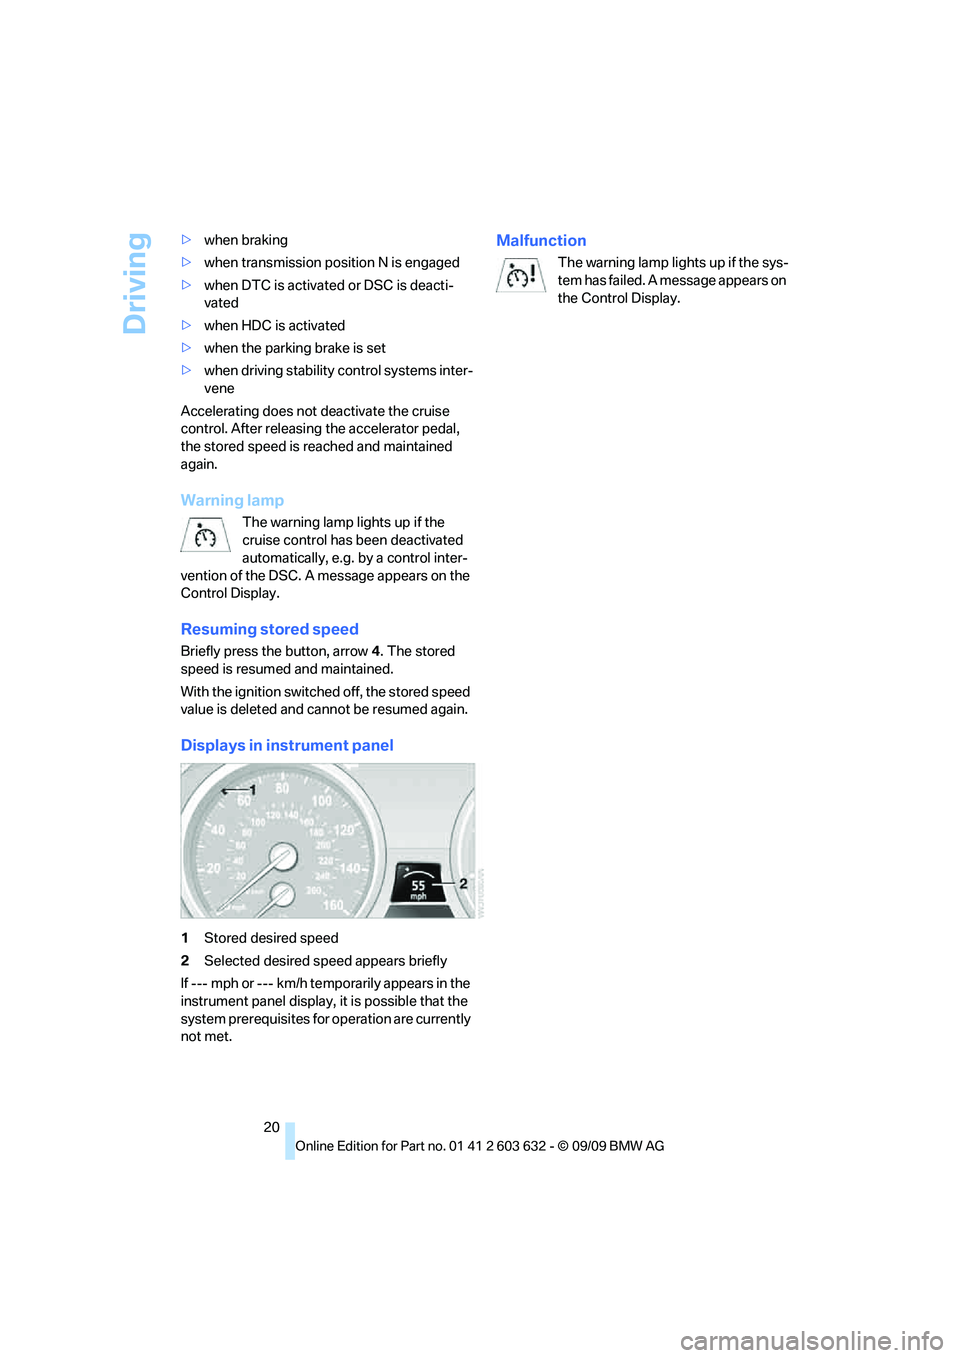
Displays in instrument panel
1Stored desired speed
2Selected desired speed appears briefly
If --- mph or --- km/h temporarily appears in the
instrument panel display, it is possible that the
system prerequisites for operation are currently
not met.
Malfunction
The warning lamp lights up if the sys-
tem has failed. A message appears on
the Control Display.
Page 25 of 54
Reference
At a glance
Controls
Driving tips
Mobility
23
Climate
Air-conditioning functions, refer to BMW X6
Owner's Manual.
Special features of the automatic air-
conditioning system
The automatic air-conditioning system of your
BMW with an electric air-conditioning com-
pressor is independent of the combustion
engine.
It is thus pos sible to have a comf orta ble climate
in the vehicle interior even when the combus-
tion engine is switched off.
Automatic air-conditioning system
with drive readiness
The automatic air-conditioning system can be
used as usual whenever drive readiness is
switched on, for example during electric driving.
If there is no longer a sufficient charge in the
high-voltage battery, then the combustion
engine is switched on.
Cooling function while stationary
The cooling function can be acti-
vated while stationary if the ignition
is switched on.
1.Switch on the ignition.
2.Press the button.
The cooling function is switched on.
If there is no longer a sufficient charge in the
high-voltage battery, then the cooling function
is switched off.
More information can be found in the BMW X6
Owner's Manual.
Cooling of the high-voltage system
The automatic air-conditioning system is also
used to cool the high-voltage system.
Therefore the air-conditioning compressor can
automatically switch on, even when the cooling
function of the automatic air-conditioning sys-
tem is switched off.After the vehicle is switched off, audible operat-
ing sounds may issue from the hybrid system,
e.g. the cooling of the high-voltage battery.
Page 39 of 54
Reference
At a glance
Controls
Driving tips
Mobility
37
Giving and receiving assistance
Jump starting, charging
high-voltage battery
Your BMW ActiveHybrid X6 is equipped with
two types of battery:
>12 Volt battery
>High-voltage battery
If the 12 Volt battery or high-voltage battery is
dead, the combustion engine can be started
with the aid of another vehicle using two jumper
cables.
Only use jumper cables with fully insulated ter-
minal clamps and do not deviate from the
described procedure.
To avoid the risk of potentially fatal injury,
always avoid all contact with electrical
components while the engine is running. Care-
fully adhere to the following sequence, both to
prevent damage to one or both vehicles, and to
guard against possible personal injuries.<
Identifying the dead battery
>Dead 12 Volt battery: Ignition cannot be
switched on.
>Dead high-voltage battery: Ignition can be
switched on. Drive readiness cannot be
activated.
A message appears on the Control Display.
Preparation
1.Check whether the battery of the other
vehicle is a 12 Volt battery and has approxi-
mately the same capacitance in Ah. This
information can be found on the battery.
2.Switch off the engine of the assisting vehi-
cle.
3.Switch off any electrical systems and com-
ponents in both vehicles.
There must not be any contact between
the bodies of the two vehicles, otherwise
there is a danger of shorting.<
Connecting jumper cables
To avoid personal injury from sparks, fol-
low this sequence when connecting
jumper cables.<
In your BMW, the so-called jump-starting termi-
nal in the engine compartment functions as the
positive battery terminal, also refer to the
engine compartment overview on page35. The
cover cap is marked with a + symbol.
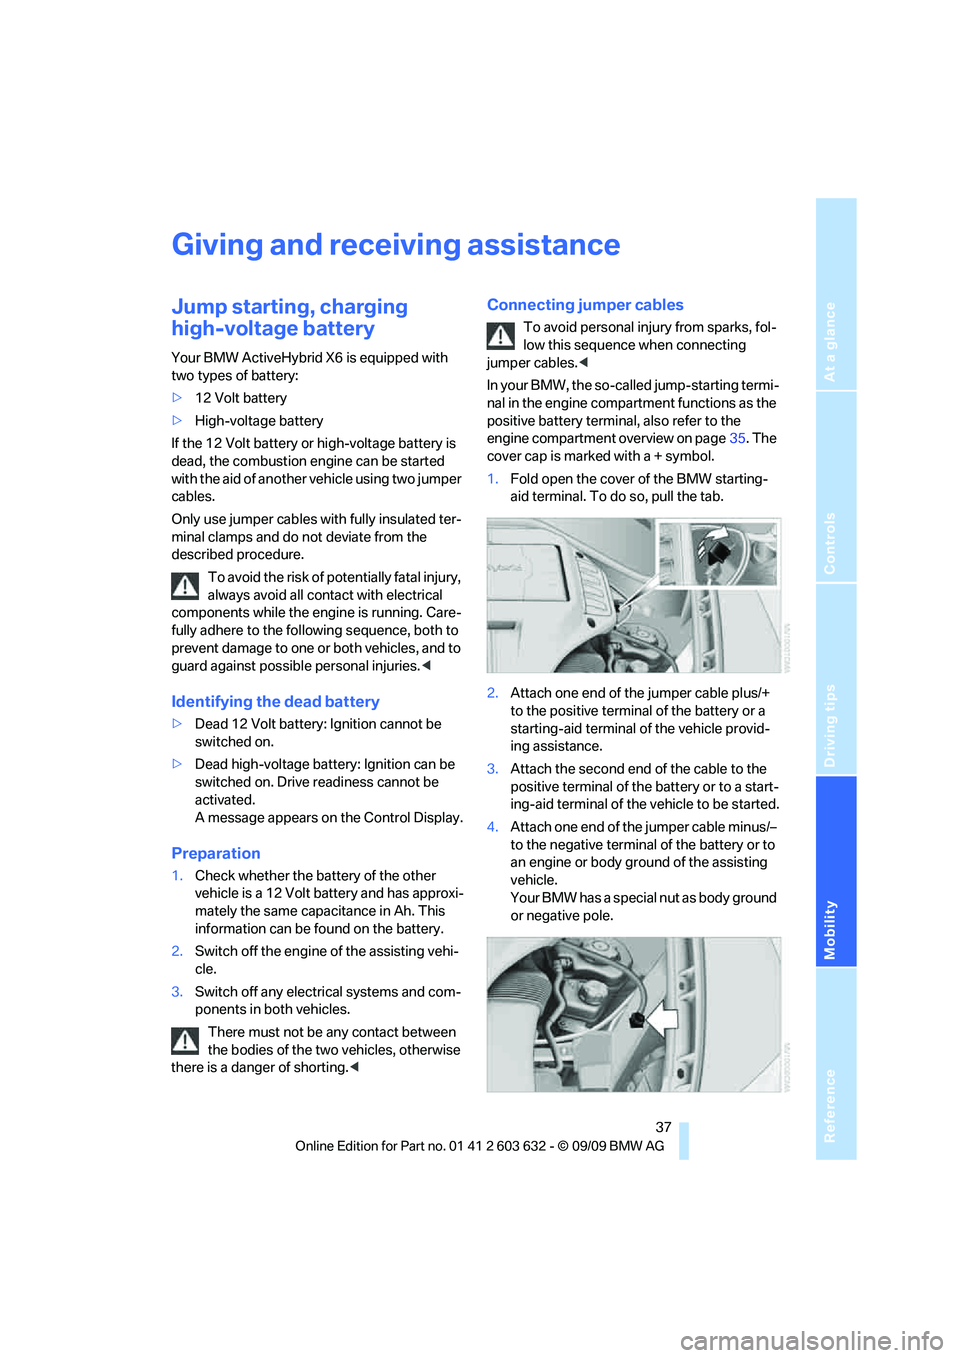
1.Fold open the cover of the BMW starting-
aid terminal. To do so, pull the tab.
2.Attach one end of the jumper cable plus/+
to the positive terminal of the battery or a
starting-aid terminal of the vehicle provid-
ing assistance.
3.Attach the second end of the cable to the
positive terminal of the battery or to a start-
ing-aid terminal of the vehicle to be started.
4.Attach one end of the jumper cable minus/–
to the negative terminal of the battery or to
an engine or body ground of the assisting
vehicle.
Your BMW has a special nut as body ground
or negative pole.
Page 40 of 54
Giving and receiving assistance
38 5.Attach the second end of the cable to the
negative terminal of the battery or to the
engine or body ground of the vehicle to be
started.
Charging: 12 Volt battery
1.Start the engine on the assisting vehicle
and activate drive readiness, allowing the
assisting vehicle to run at idle for several
minutes at slightly increased speed.
2.Start the engine on your vehicle in the usual
way.
If the first starting attempt is not successful,
wait a few minutes before another attempt
in order to allow the discharged battery to
recharge.
3.Let the engines run for a few minutes.
4.Disconnect the jumper cables by reversing
the connection sequence.
Have the battery checked if necessary.
Never use spray fluids to start the
engine.<
Charging: High-voltage battery
1.Start the engine on the assisting vehicle
and activate drive readiness, allowing the
assisting vehicle to run at idle for several
minutes at slightly increased speed.
2.Switch on the ignition of your vehicle when
prompted by the corresponding message
on the Control Display. The charging
begins.
3.The charging is concluded when this is
prompted by a corresponding message on
the Control Display.
4.Start the combustion engine of your own
vehicle.
5.Disconnect the jumper cables by reversing
the connection sequence.
Have the hybrid system checked if necessary.
Never use spray fluids to start the
engine.<
Charging interrupted
The charging may be interrupted, for example if
the battery power of the assisting vehicle is
insufficient.
Disconnect the jumper cables in the reverse of
the sequence described above and contact
your BMW Sports Activity Vehicle Center.
Tow-starting and towing
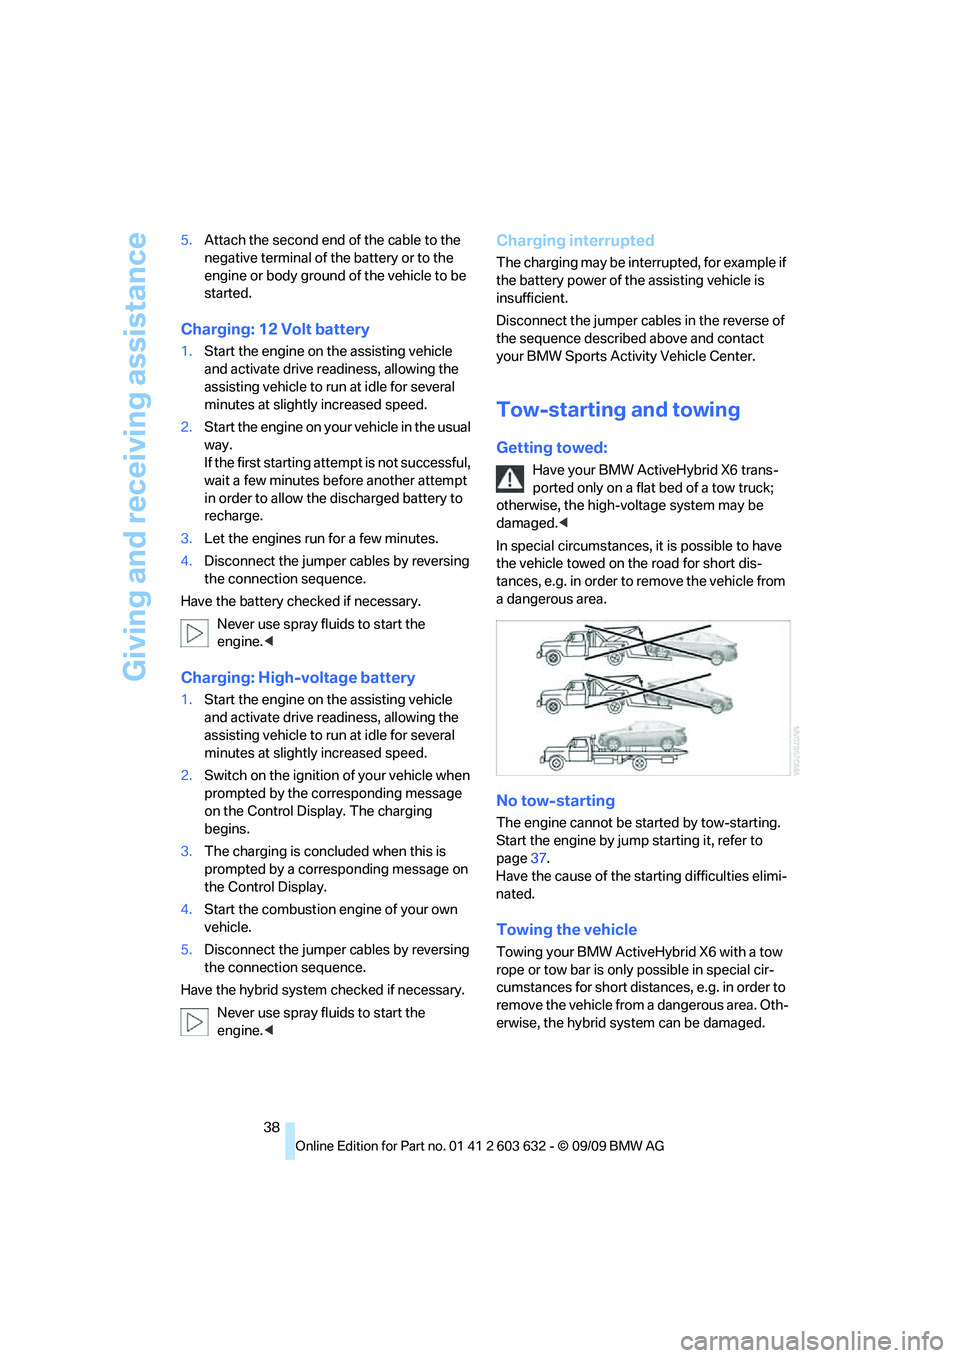
Getting towed:
Have your BMW ActiveHybrid X6 trans-
ported only on a flat bed of a tow truck;
otherwise, the high-voltage system may be
damaged.<
In special circumstances, it is possible to have
the vehicle towed on the road for short dis-
tances, e.g. in order to remove the vehicle from
a dangerous area.
No tow-starting
The engine cannot be started by tow-starting.
Start the engine by jump starting it, refer to
page37.
Have the cause of the starting difficulties elimi-
nated.
Towing the vehicle
Towing your BMW ActiveHybrid X6 with a tow
rope or tow bar is only possible in special cir-
cumstances for short distances, e.g. in order to
remove the vehicle from a dangerous area. Oth-
erwise, the hybrid system can be damaged.
Page 51 of 54
Reference
At a glance
Controls
Driving tips
Mobility
49
Fuel33
– capacity46
– display22
– high-quality brands33
– quality33
– saving26
– specifications33
Fuel clock, refer to Fuel
gauge22
Fuel display, refer to Fuel
gauge22
Fuel filler door32
– closing32
– releasing manually32
G
Gasoline, refer to Required
fuel33
Gasoline display, refer to Fuel
gauge22
General driving notes26,27
Getting towed38
Gross vehicle weight, refer to
Weights46
H
Height, refer to
Dimensions45
High-voltage battery36
High-voltage system
– components12
High water, refer to Driving
through water27
Hills27
Homepage4
Hybrid system
– air-conditioning
functions23
– components12
– contact with water40
– deactivation40
– display21
– functions13
– safety39
Hybrid system safety39
I
Ignition13
– switched on13
Ignition key position 1, refer to
Radio readiness13
Ignition key position 2, refer to
Ignition on13
Imprint2
Inflation pressure, refer to Tire
inflation pressure34
Instrument cluster, refer to
Instrument panel8
Instrument panel8
J
Jumpering, refer to Jump
starting37
Jump starting37
K
Knock control33
L
Length, refer to
Dimensions45
Luggage compartment
capacity, refer to Cargo bay
capacity46
M
Malfunction
– fuel filler door32
Manual operation
– fuel filler door32
N
Noises, refer to Cooling of the
high-voltage system23
Nylon rope, refer to Tow-
starting and towing38
O
Octane ratings, refer to Fuel
specifications33
P
Power, refer to Drive
system44
Pressure, tires34
Pressure compensation,
refueling32
R
Radio position, refer to Radio
readiness13
Radio readiness13
– switched on13
Refueling32
– preparation32
– pressure compensation32
Regeneration, refer to Energy
recovery16
Reserve warning, refer to Fuel
gauge22
Roof load capacity46
Rope, refer to Tow-starting
and towing38
S
Safety5
Screw thread for tow fitting39
Silent start14
Speedometer8
Sport program, manual mode
M/S18
Start/Stop button13
Starting, refer to Starting
engine14
Starting assistance, refer to
Jump starting37
Starting difficulties, jump
starting37
Status of this Owner's Manual
at time of printing5
Summer tires, refer to Wheels
and tires34