rear entertainment BMW ACTIVEHYBRID X6 2011 Owner's Manual
[x] Cancel search | Manufacturer: BMW, Model Year: 2011, Model line: ACTIVEHYBRID X6, Model: BMW ACTIVEHYBRID X6 2011Pages: 312, PDF Size: 8.91 MB
Page 109 of 312
Controls
107Reference
At a glance
Driving tips
Communications
Navigation
Entertainment
Mobility
Airbags
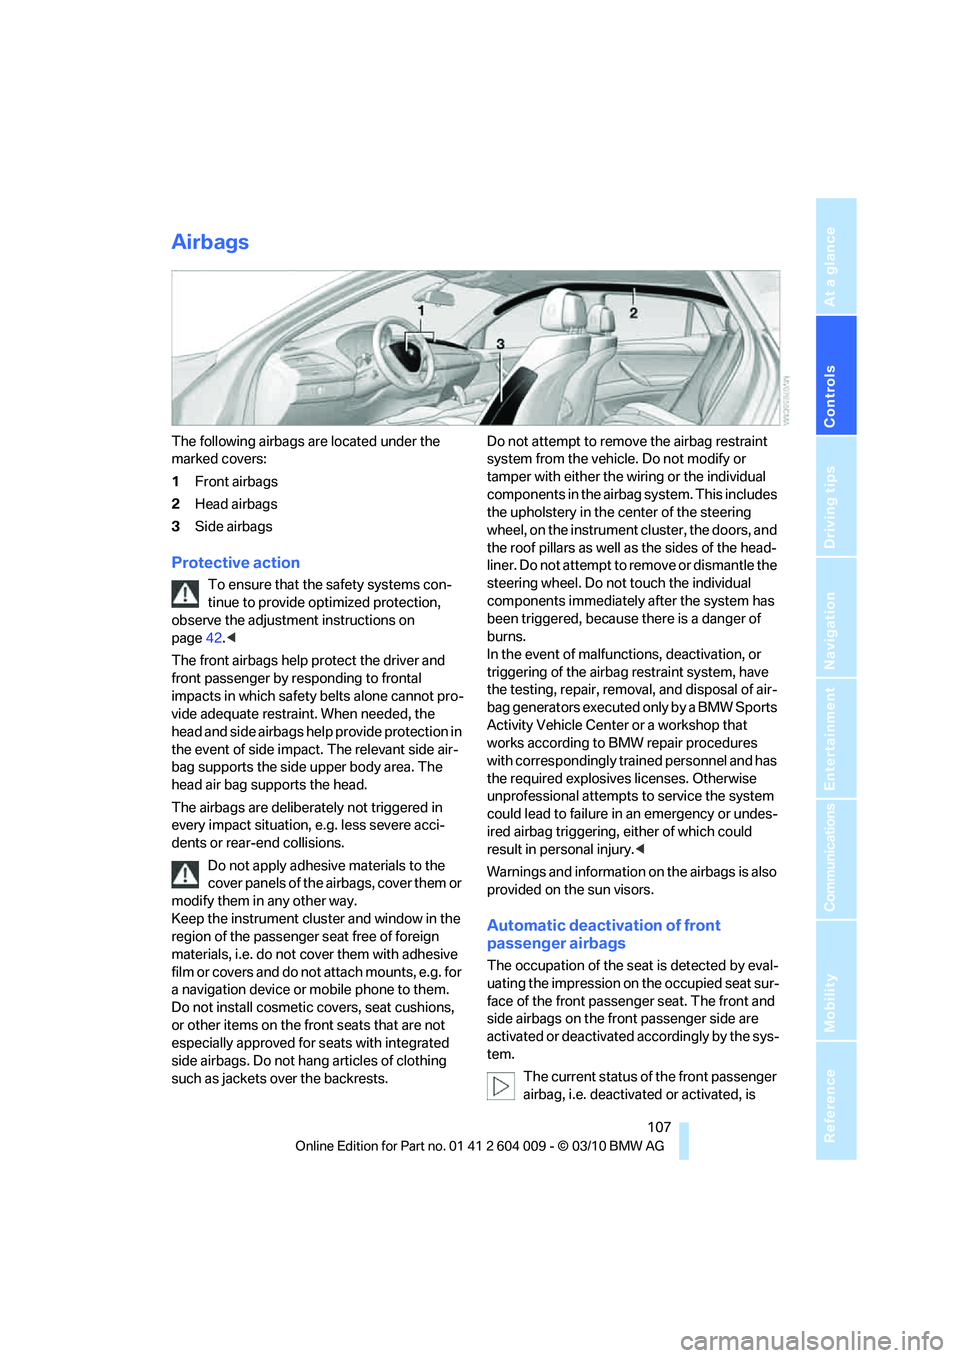
The following airbags are located under the
marked covers:
1Front airbags
2Head airbags
3Side airbags
Protective action
To ensure that the safety systems con-
tinue to provide optimized protection,
observe the adjustment instructions on
page42.<
The front airbags help protect the driver and
front passenger by responding to frontal
impacts in which safety belts alone cannot pro-
vide adequate restraint. When needed, the
head and side airbags help provide protection in
the event of side impact. The relevant side air-
bag supports the side upper body area. The
head air bag supports the head.
The airbags are deliberately not triggered in
every impact situation, e.g. less severe acci-
dents or rear-end collisions.
Do not apply adhesive materials to the
cover panels of the airbags, cover them or
modify them in any other way.
Keep the instrument cluster and window in the
region of the passenger seat free of foreign
materials, i.e. do not cover them with adhesive
film or covers and do not attach mounts, e.g. for
a navigation device or mobile phone to them.
Do not install cosmetic covers, seat cushions,
or other items on the front seats that are not
especially approved for seats with integrated
side airbags. Do not hang articles of clothing
such as jackets over the backrests.Do not attempt to remove the airbag restraint
system from the vehicle. Do not modify or
tamper with either the wiring or the individual
components in the airbag system. This includes
the upholstery in the center of the steering
wheel, on the instrument cluster, the doors, and
the roof pillars as well as the sides of the head-
liner. Do not attempt to remove or dismantle the
steering wheel. Do not touch the individual
components immediately after the system has
been triggered, because there is a danger of
burns.
In the event of malfunctions, deactivation, or
triggering of the airbag restraint system, have
the testing, repair, removal, and disposal of air-
bag generators executed only by a BMW Sports
Activity Vehicle Center or a workshop that
works according to BMW repair procedures
with correspondingly trained personnel and has
the required explosives licenses. Otherwise
unprofessional attempts to service the system
could lead to failure in an emergency or undes-
ired airbag triggering, either of which could
result in personal injury.<
Warnings and information on the airbags is also
provided on the sun visors.
Automatic deactivation of front
passenger airbags
The occupation of the seat is detected by eval-
uating the impression on the occupied seat sur-
face of the front passenger seat. The front and
side airbags on the front passenger side are
activated or deactivated accordingly by the sys-
tem.
The current status of the front passenger
airbag, i.e. deactivated or activated, is
Page 113 of 312
Controls
111Reference
At a glance
Driving tips
Communications
Navigation
Entertainment
Mobility
Lamps
Parking lamps/low beams
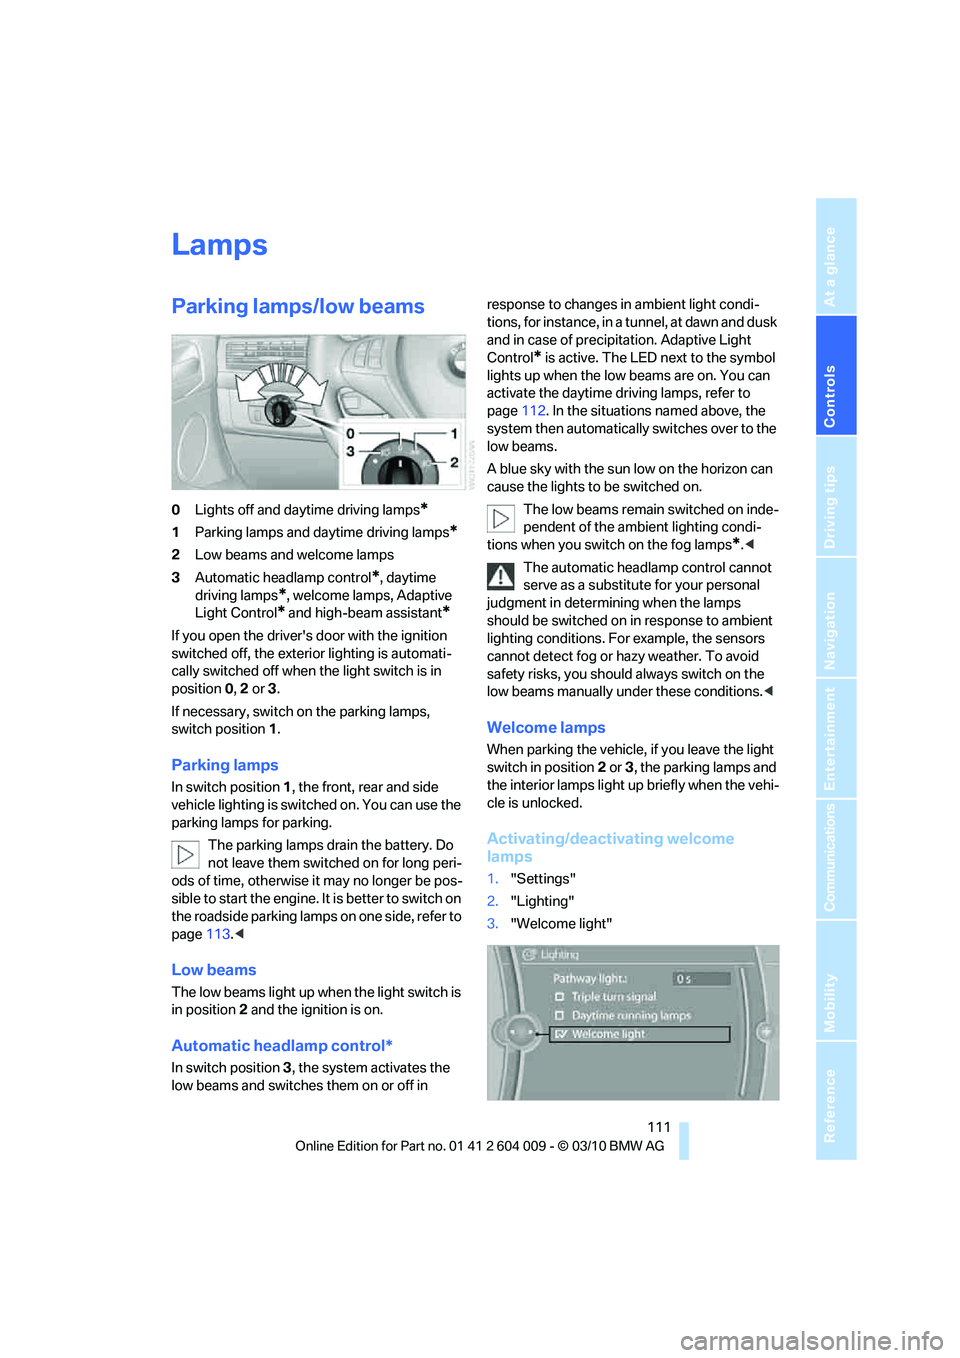
0Lights off and daytime driving lamps*
1Parking lamps and daytime driving lamps*
2Low beams and welcome lamps
3Automatic headlamp control
*, daytime
driving lamps
*, welcome lamps, Adaptive
Light Control
* and high-beam assistant*
If you open the driver's door with the ignition
switched off, the exterior lighting is automati-
cally switched off when the light switch is in
position0, 2 or 3.
If necessary, switch on the parking lamps,
switch position1.
Parking lamps
In switch position1, the front, rear and side
vehicle lighting is switched on. You can use the
parking lamps for parking.
The parking lamps drain the battery. Do
not leave them switched on for long peri-
ods of time, otherwise it may no longer be pos-
sible to start the engine. It is better to switch on
the roadside parking lamps on one side, refer to
page113.<
Low beams
The low beams light up when the light switch is
in position 2 and the ignition is on.
Automatic headlamp control*
In switch position3, the system activates the
low beams and switches them on or off in response to changes in ambient light condi-
tions, for instance, in a tunnel, at dawn and dusk
and in case of precipitation. Adaptive Light
Control
* is active. The LED next to the symbol
lights up when the low beams are on. You can
activate the daytime driving lamps, refer to
page112. In the situations named above, the
system then automatically switches over to the
low beams.
A blue sky with the sun low on the horizon can
cause the lights to be switched on.
The low beams remain switched on inde-
pendent of the ambient lighting condi-
tions when you switch on the fog lamps
*.<
The automatic headlamp control cannot
serve as a substitute for your personal
judgment in determining when the lamps
should be switched on in response to ambient
lighting conditions. For example, the sensors
cannot detect fog or hazy weather. To avoid
safety risks, you should always switch on the
low beams manually under these conditions.<
Welcome lamps
When parking the vehicle, if you leave the light
switch in position2 or3, the parking lamps and
the interior lamps light up briefly when the vehi-
cle is unlocked.
Activating/deactivating welcome
lamps
1."Settings"
2."Lighting"
3."Welcome light"
Page 115 of 312
Controls
113Reference
At a glance
Driving tips
Communications
Navigation
Entertainment
Mobility
High beams/
roadside parking lamps
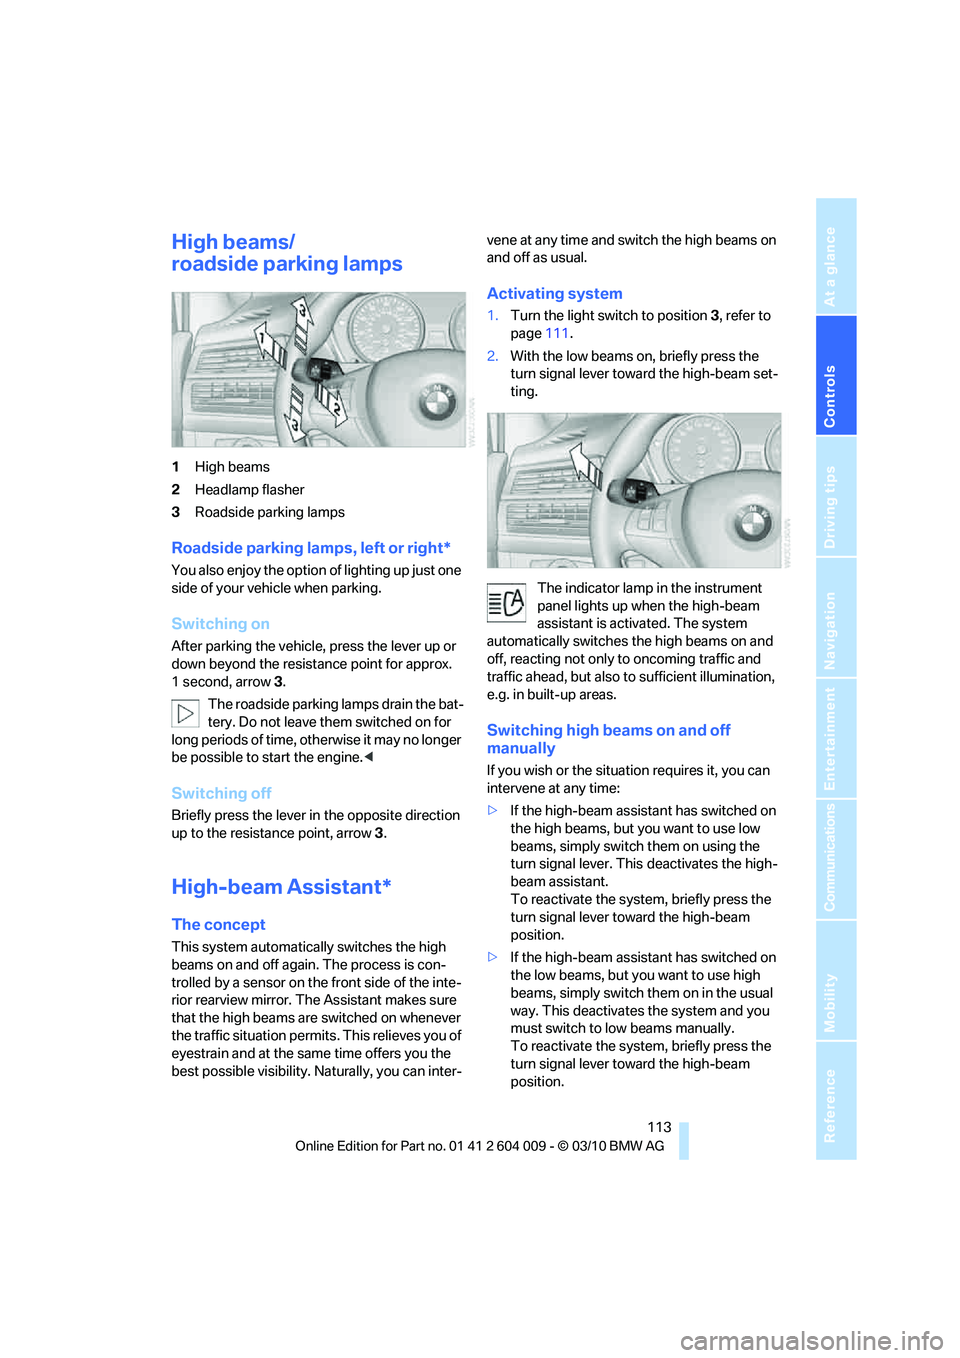
1High beams
2Headlamp flasher
3Roadside parking lamps
Roadside parking lamps, left or right*
You also enjoy the option of lighting up just one
side of your vehicle when parking.
Switching on
After parking the vehicle, press the lever up or
down beyond the resistance point for approx.
1 second, arrow3.
The roadside parking lamps drain the bat-
tery. Do not leave them switched on for
long periods of time, otherwise it may no longer
be possible to start the engine.<
Switching off
Briefly press the lever in the opposite direction
up to the resistance point, arrow 3.
High-beam Assistant*
The concept
This system automatically switches the high
beams on and off again. The process is con-
trolled by a sensor on the front side of the inte-
rior rearview mirror. The Assistant makes sure
that the high beams are switched on whenever
the traffic situation permits. This relieves you of
eyestrain and at the same time offers you the
best possible visibility. Naturally, you can inter-vene at any time and switch the high beams on
and off as usual.
Activating system
1.Turn the light switch to position3, refer to
page111.
2.With the low beams on, briefly press the
turn signal lever toward the high-beam set-
ting.
The indicator lamp in the instrument
panel lights up when the high-beam
assistant is activated. The system
automatically switches the high beams on and
off, reacting not only to oncoming traffic and
traffic ahead, but also to sufficient illumination,
e.g. in built-up areas.
Switching high beams on and off
manually
If you wish or the situation requires it, you can
intervene at any time:
>If the high-beam assistant has switched on
the high beams, but you want to use low
beams, simply switch them on using the
turn signal lever. This deactivates the high-
beam assistant.
To reactivate the system, briefly press the
turn signal lever toward the high-beam
position.
>If the high-beam assistant has switched on
the low beams, but you want to use high
beams, simply switch them on in the usual
way. This deactivates the system and you
must switch to low beams manually.
To reactivate the system, briefly press the
turn signal lever toward the high-beam
position.
Page 117 of 312
Controls
115Reference
At a glance
Driving tips
Communications
Navigation
Entertainment
Mobility
Instrument lighting
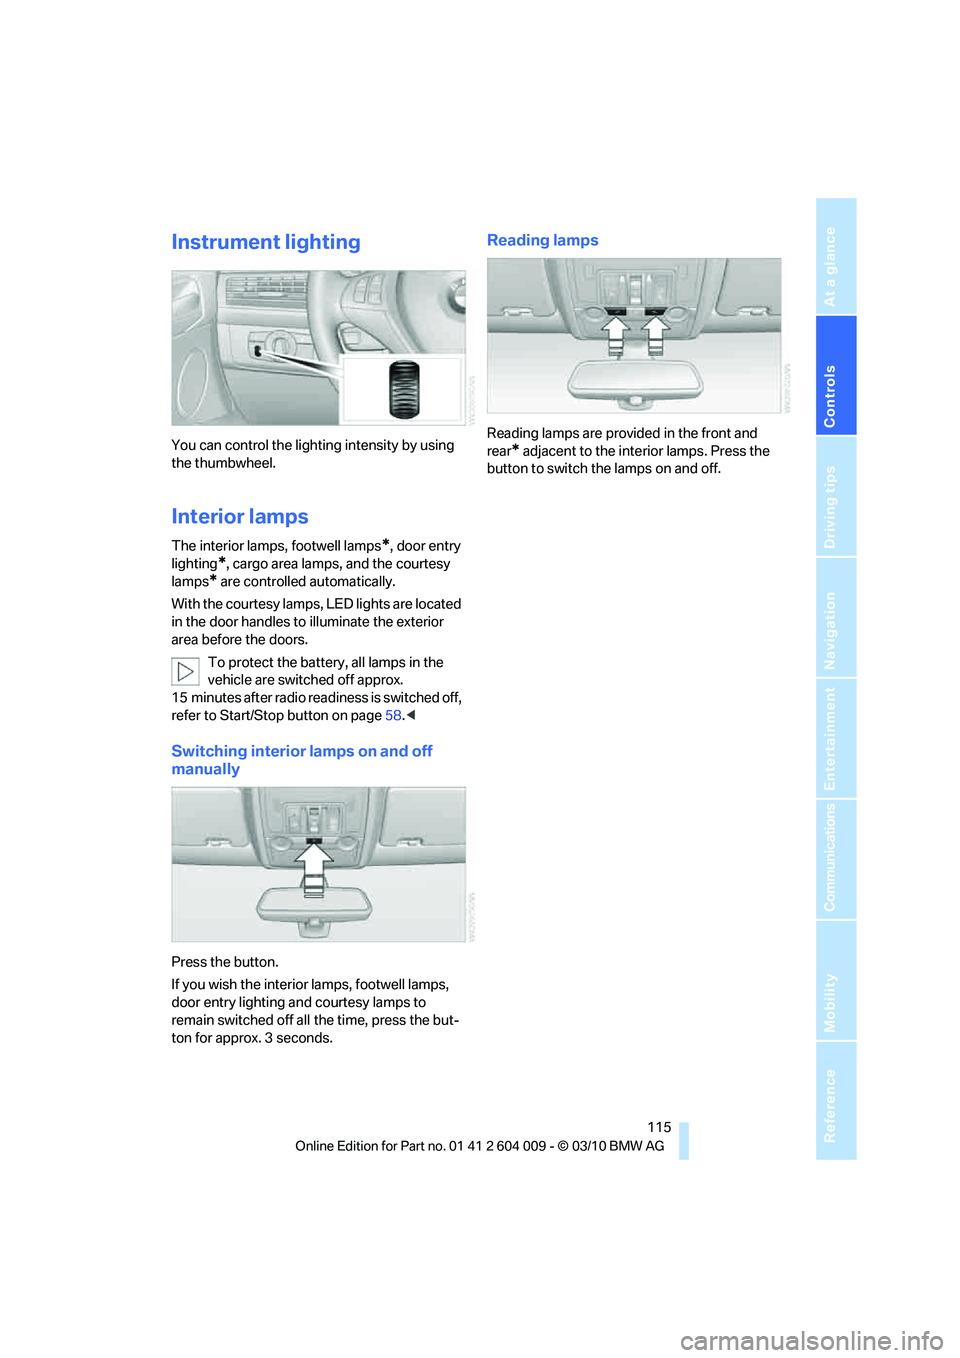
You can control the lighting intensity by using
the thumbwheel.
Interior lamps
The interior lamps, footwell lamps*, door entry
lighting
*, cargo area lamps, and the courtesy
lamps
* are controlled automatically.
With the courtesy lamps, LED lights are located
in the door handles to illuminate the exterior
area before the doors.
To protect the battery, all lamps in the
vehicle are switched off approx.
15 minutes after radio readiness is switched off,
refer to Start/Stop button on page58.<
Switching interior lamps on and off
manually
Press the button.
If you wish the interior lamps, footwell lamps,
door entry lighting and courtesy lamps to
remain switched off all the time, press the but-
ton for approx. 3 seconds.
Reading lamps
Reading lamps are provided in the front and
rear
* adjacent to the interior lamps. Press the
button to switch the lamps on and off.
Page 119 of 312
Controls
117Reference
At a glance
Driving tips
Communications
Navigation
Entertainment
Mobility
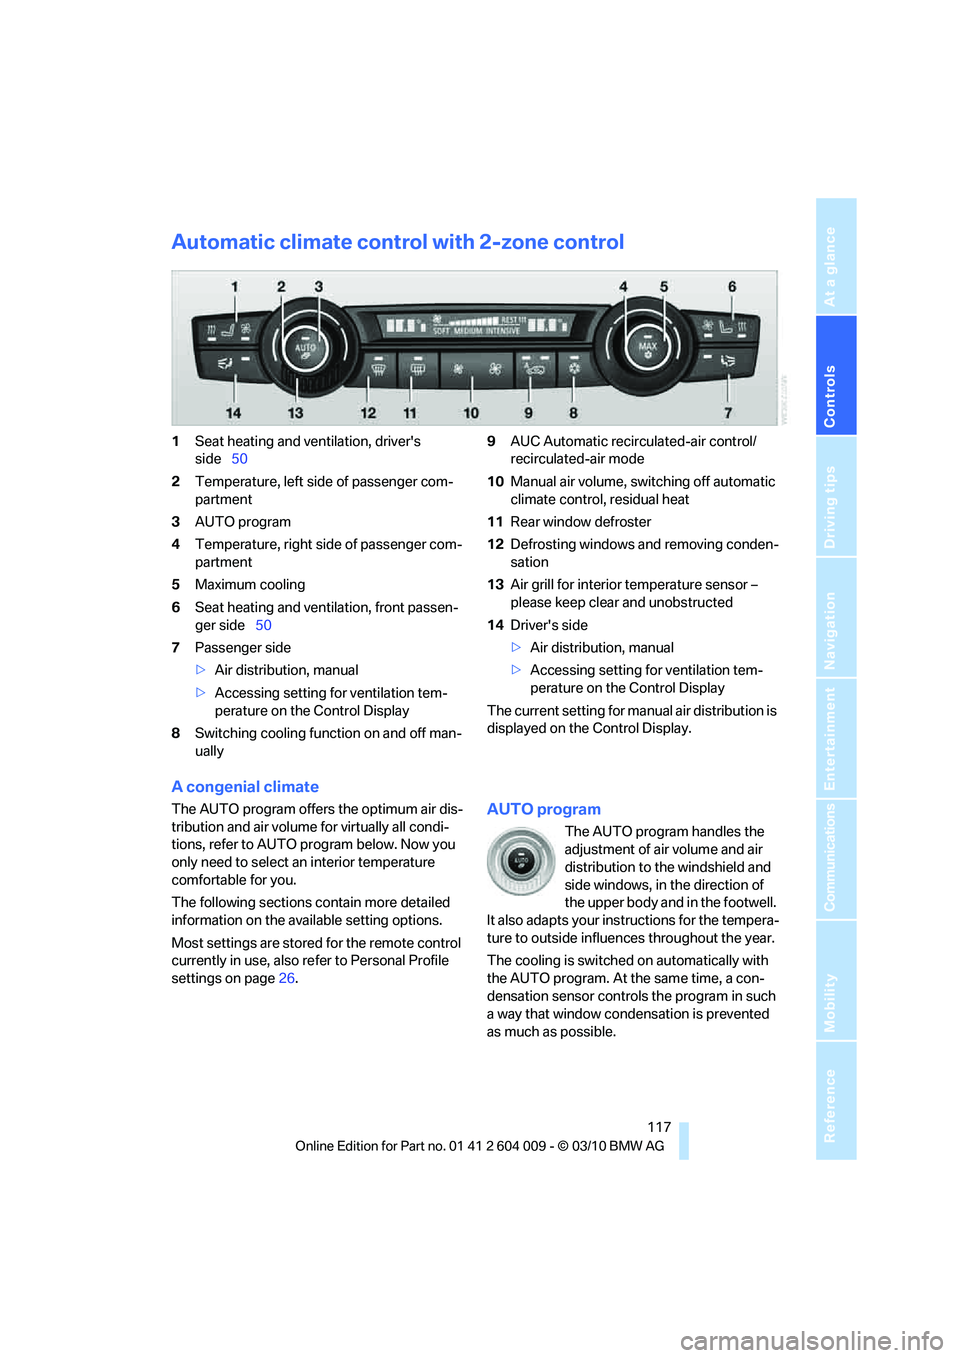
Automatic climate control with 2-zone control
1Seat heating and ventilation, driver's
side50
2Temperature, left side of passenger com-
partment
3AUTO program
4Temperature, right side of passenger com-
partment
5Maximum cooling
6Seat heating
and ventilation, front passen-
ger side50
7Passenger side
>Air distribution, manual
>Accessing setting for ventilation tem-
perature on the Control Display
8Switching cooling function on and off man-
ually9AUC Automatic recirculated-air control/
recirculated-air mode
10Manual air volume, switching off automatic
climate control, residual heat
11Rear window defroster
12Defrosting windows and removing conden-
sation
13Air grill for interior temperature sensor –
please keep clear and unobstructed
14Driver's side
>Air distribution, manual
>Accessing setting for ventilation tem-
perature on the Control Display
The current setting for manual air distribution is
displayed on the Control Display.
A congenial climate
The AUTO program offers the optimum air dis-
tribution and air volume for virtually all condi-
tions, refer to AUTO program below. Now you
only need to select an interior temperature
comfortable for you.
The following sections contain more detailed
information on the available setting options.
Most settings are stored for the remote control
currently in use, also refer to Personal Profile
settings on page26.AUTO program
The AUTO program handles the
adjustment of air volume and air
distribution to the windshield and
side windows, in the direction of
the upper body and in the footwell.
It also adapts your instructions for the tempera-
ture to outside influences throughout the year.
The cooling is switched on automatically with
the AUTO program. At the same time, a con-
densation sensor controls the program in such
a way that window condensation is prevented
as much as possible.
Page 123 of 312
Controls
121Reference
At a glance
Driving tips
Communications
Navigation
Entertainment
Mobility
to recirculate the air within the vehicle, e.g. at
high temperatures. To do this, turn the
thumbwheel1 toward the rear and switch on
the blower, button2.<
Microfilter/activated-charcoal filter
The microfilter removes dust and pollen from
the incoming air. The activated-charcoal filter
provides additional protection by filtering gas-
eous pollutants from the outside air. This com-
bined filter is changed during maintenance by
your BMW Sports Activity Vehicle Center.
You can select a display of more detailed infor-
mation on the Control Display, refer to page79.
Automatic climate control
with 4-zone control*
Front operation
Corresponds to the operation of the automatic
climate control with 2-zone control, refer to
page117.
Rear operation
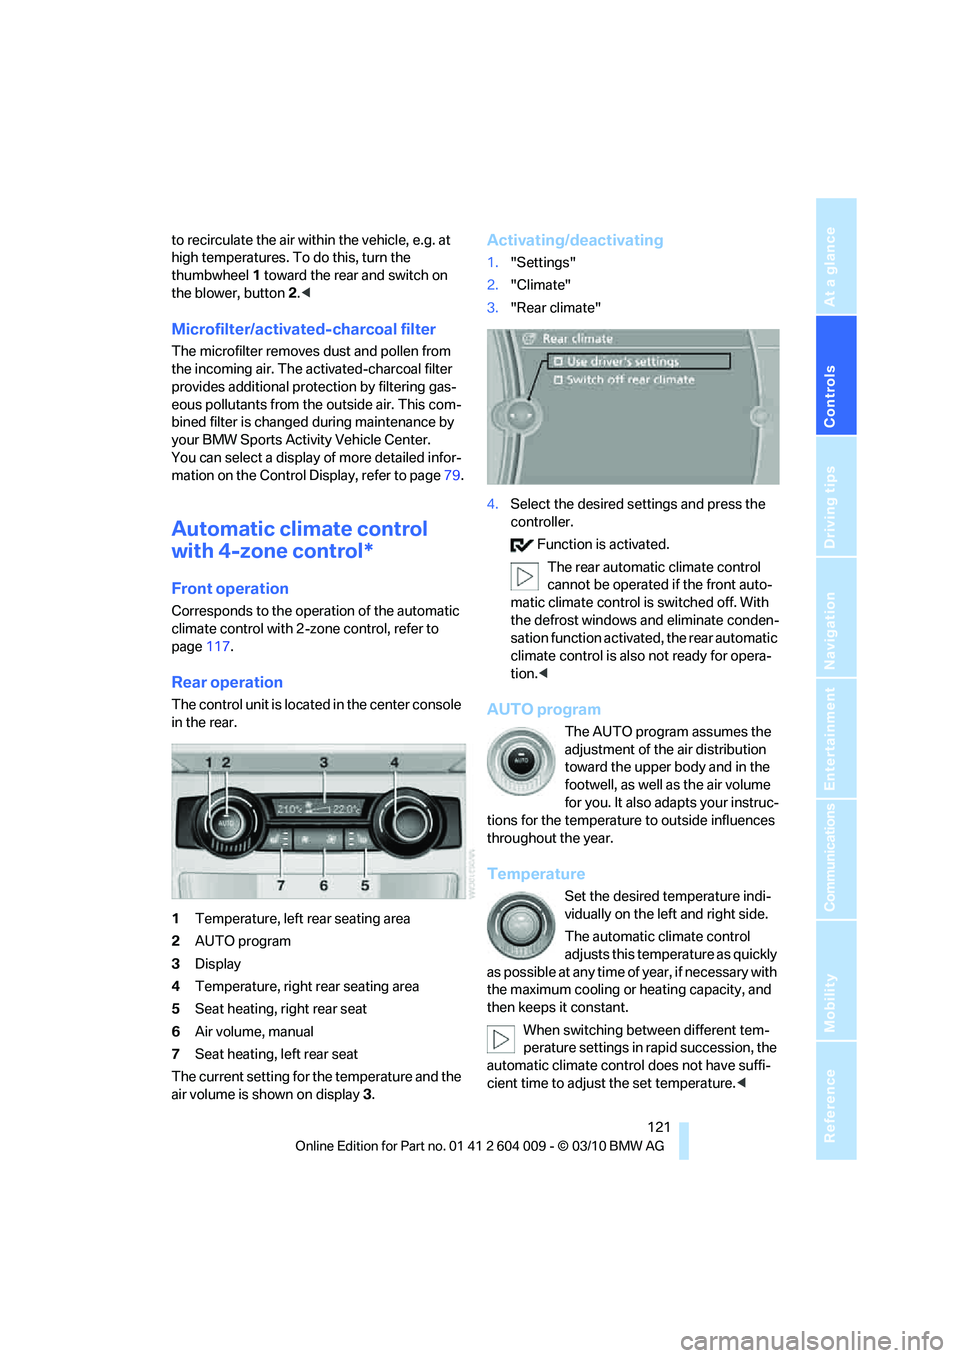
The control unit is located in the center console
in the rear.
1Temperature, left rear seating area
2AUTO program
3Display
4Temperature, right rear seating area
5Seat heating, right rear seat
6Air volume, manual
7Seat heating, left rear seat
The current setting for the temperature and the
air volume is shown on display3.
Activating/deactivating
1."Settings"
2."Climate"
3."Rear climate"
4.Select the desired settings and press the
controller.
Function is activated.
The rear automatic climate control
cannot be operated if the front auto-
matic climate control is switched off. With
the defrost windows and eliminate conden-
sation function activated, the rear automatic
climate control is also not ready for opera-
tion.<
AUTO program
The AUTO program assumes the
adjustment of the air distribution
toward the upper body and in the
footwell, as well as the air volume
for you. It also adapts your instruc-
tions for the temperature to outside influences
throughout the year.
Temperature
Set the desired temperature indi-
vidually on the left and right side.
The automatic climate control
adjusts this temperature as quickly
as possible at any time of year, if necessary with
the maximum cooling or heating capacity, and
then keeps it constant.
When switching between different tem-
perature settings in rapid succession, the
automatic climate control does not have suffi-
cient time to adjust the set temperature.<
Page 129 of 312
Controls
127Reference
At a glance
Driving tips
Communications
Navigation
Entertainment
Mobility
Procedure
1.Make sure that there are no large metal
objects or overhead power lines in the vicin-
ity of your vehicle and that you have enough
space to drive in a circle.
2.Enter the currently applicable compass
zone.
3.Press the adjustment button for approx. 6-
7 seconds to display C. Then drive in a
complete circle at least once at a maximum
speed of 4 mph/7 km/h.
If the calibration is successful, display C is
replaced with the points of the compass.
Setting right/left-hand drive vehicle
Your digital compass is already set to right or
left-hand drive vehicle to match your vehicle at
the factory.
Setting language
You can set the language of the display:
Press the adjustment button for approx. 12-
13 seconds. Briefly press the adjustment but-
ton again to change between English "E" and
German "O".
The setting is automatically stored after approx.
10 seconds.
Roller sun blinds for rear side
windows*
Pull the loop of the roller sun blind and hook
onto bracket.
Do not open the window with the roller
blind raised, as otherwise there is a dan-
ger of damage, and therefore a danger of inju-
ries at higher speeds.<
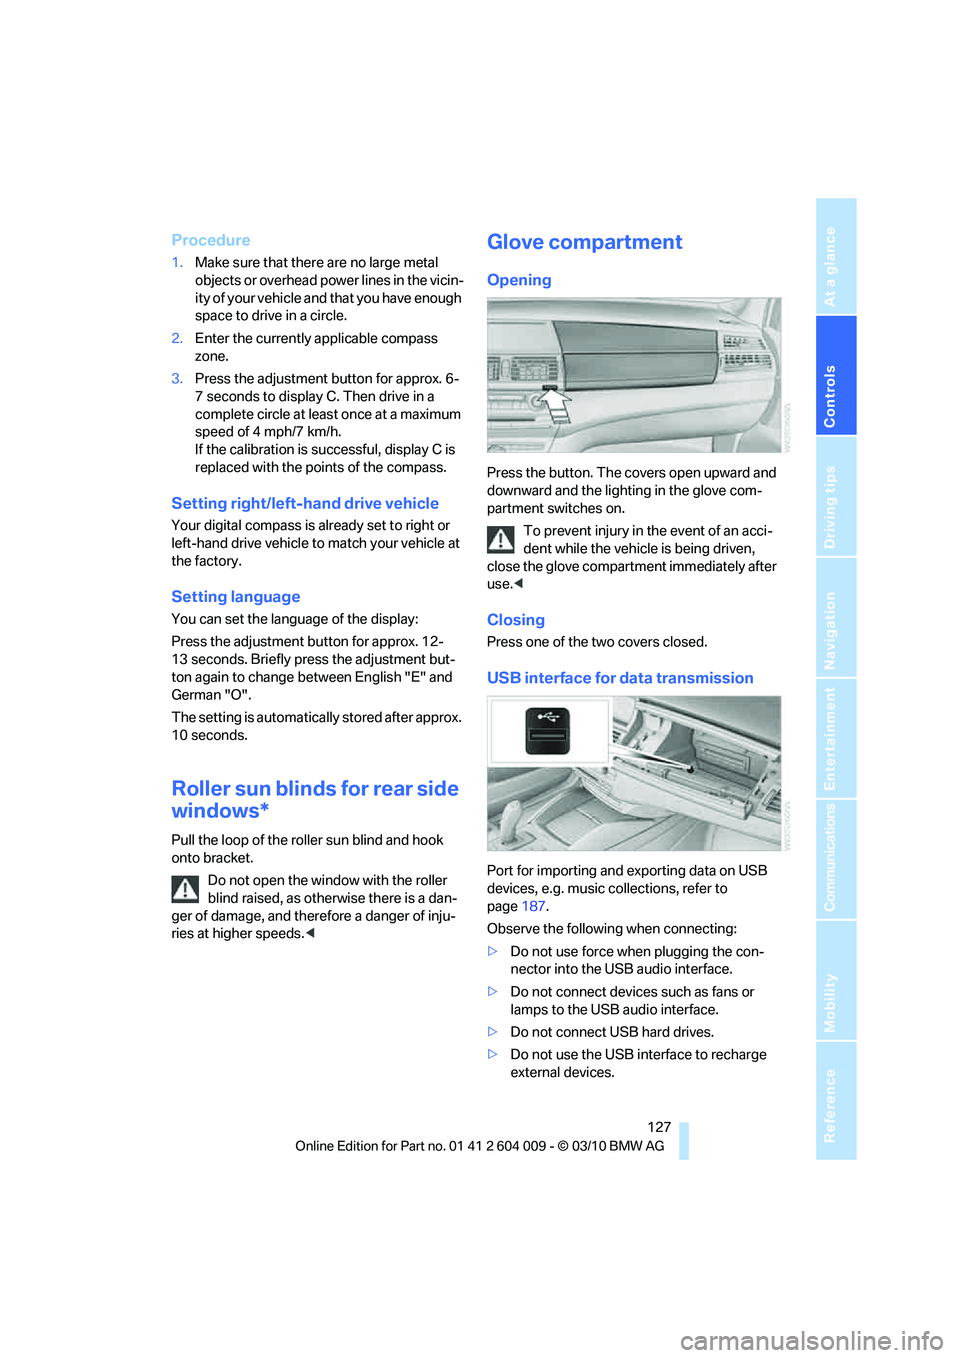
Glove compartment
Opening
Press the button. The covers open upward and
downward and the lighting in the glove com-
partment switches on.
To prevent injury in the event of an acci-
dent while the vehicle is being driven,
close the glove compartment immediately after
use.<
Closing
Press one of the two covers closed.
USB interface for data transmission
Port for importing and exporting data on USB
devices, e.g. music collections, refer to
page187.
Observe the following when connecting:
>Do not use force when plugging the con-
nector into the USB audio interface.
>Do not connect devices such as fans or
lamps to the USB audio interface.
>Do not connect USB hard drives.
>Do not use the USB interface to recharge
external devices.
Page 131 of 312
Controls
129Reference
At a glance
Driving tips
Communications
Navigation
Entertainment
Mobility
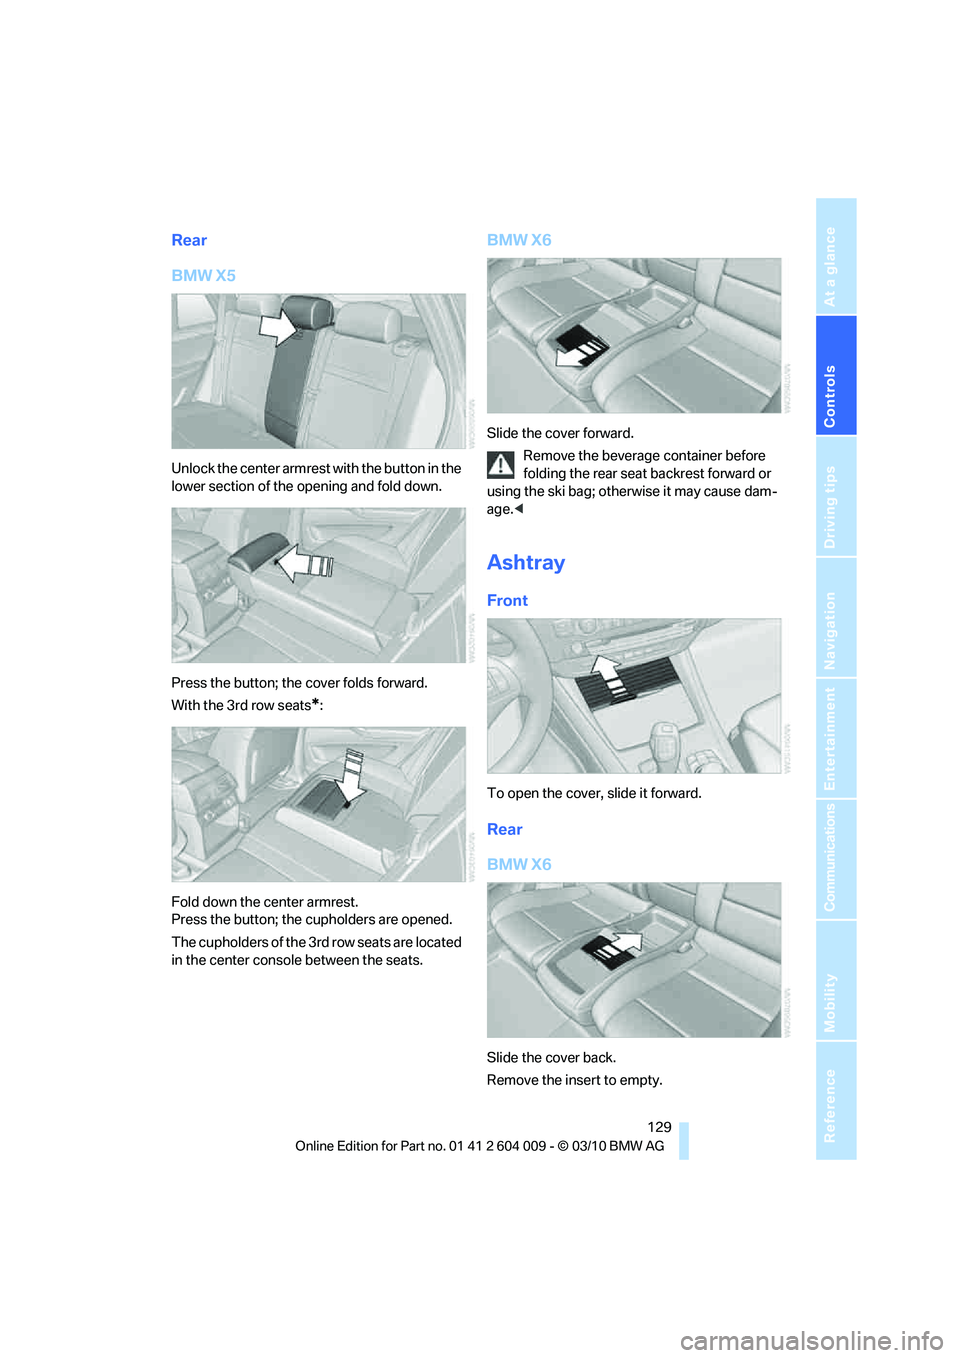
Rear
BMW X5
Unlock the center armrest with the button in the
lower section of the opening and fold down.
Press the button; the cover folds forward.
With the 3rd row seats
*:
Fold down the center armrest.
Press the button; the cupholders are opened.
The cupholders of the 3rd row seats are located
in the center console between the seats.
BMW X6
Slide the cover forward.
Remove the beverage container before
folding the rear seat backrest forward or
using the ski bag; otherwise it may cause dam-
age.<
Ashtray
Front
To open the cover, slide it forward.
Rear
BMW X6
Slide the cover back.
Remove the insert to empty.
Page 133 of 312
Controls
131Reference
At a glance
Driving tips
Communications
Navigation
Entertainment
Mobility
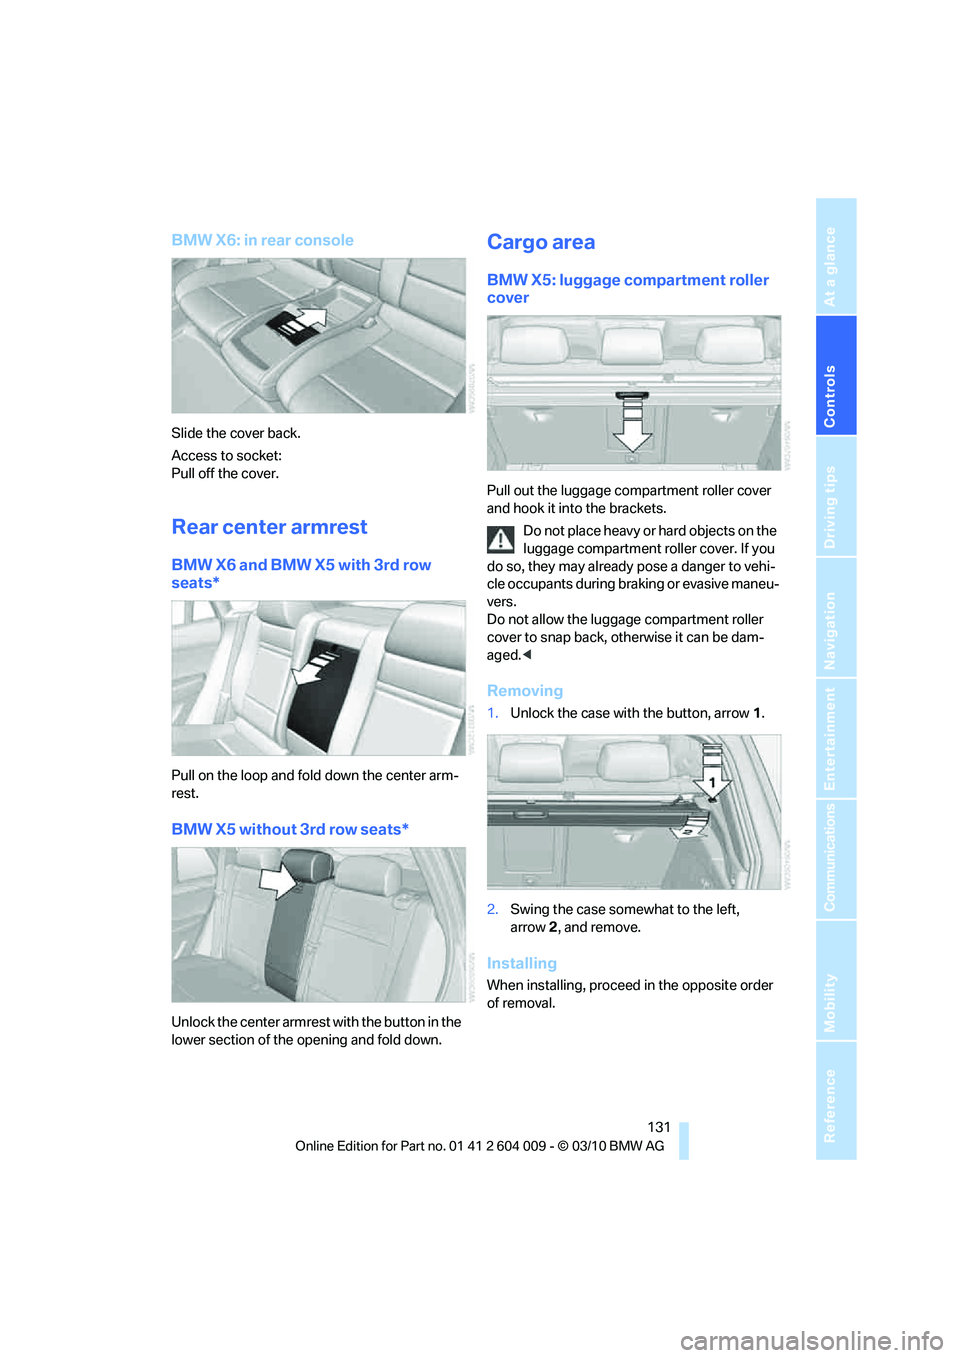
BMW X6: in rear console
Slide the cover back.
Access to socket:
Pull off the cover.
Rear center armrest
BMW X6 and BMW X5 with 3rd row
seats*
Pull on the loop and fold down the center arm-
rest.
BMW X5 without 3rd row seats*
Unlock the center armrest with the button in the
lower section of the opening and fold down.
Cargo area
BMW X5: luggage compartment roller
cover
Pull out the luggage compartment roller cover
and hook it into the brackets.
Do not place heavy or hard objects on the
luggage compartment roller cover. If you
do so, they may already pose a danger to vehi-
cle occupants during braking or evasive maneu-
vers.
Do not allow the luggage compartment roller
cover to snap back, otherwise it can be dam-
aged.<
Removing
1.Unlock the case with the button, arrow1.
2.Swing the case somewhat to the left,
arrow2, and remove.
Installing
When installing, proceed in the opposite order
of removal.
Page 135 of 312
Controls
133Reference
At a glance
Driving tips
Communications
Navigation
Entertainment
Mobility
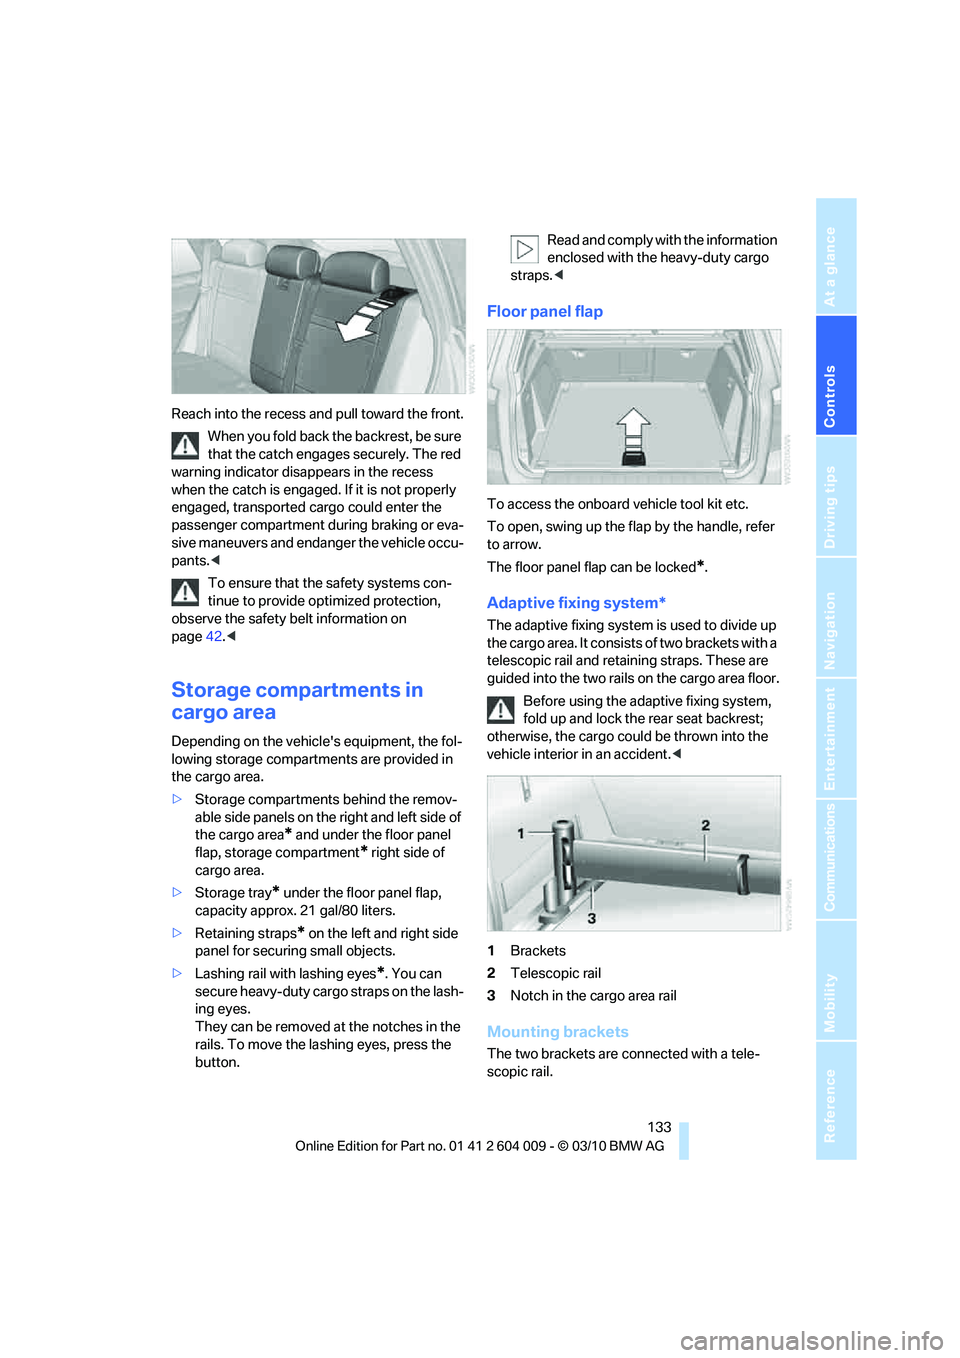
Reach into the recess and pull toward the front.
When you fold back the backrest, be sure
that the catch engages securely. The red
warning indicator disappears in the recess
when the catch is engaged. If it is not properly
engaged, transported cargo could enter the
passenger compartment during braking or eva-
sive maneuvers and endanger the vehicle occu-
pants.<
To ensure that the safety systems con-
tinue to provide optimized protection,
observe the safety belt information on
page42.<
Storage compartments in
cargo area
Depending on the vehicle's equipment, the fol-
lowing storage compartments are provided in
the cargo area.
>Storage compartments behind the remov-
able side panels on the right and left side of
the cargo area
* and under the floor panel
flap, storage compartment
* right side of
cargo area.
>Storage tray
* under the floor panel flap,
capacity approx. 21 gal/80 liters.
>Retaining straps
* on the left and right side
panel for securing small objects.
>Lashing rail with lashing eyes
*. You can
secure heavy-duty cargo straps on the lash-
ing eyes.
They can be removed at the notches in the
rails. To move the lashing eyes, press the
button.Read and comply with the information
enclosed with the heavy-duty cargo
straps.<
Floor panel flap
To access the onboard vehicle tool kit etc.
To open, swing up the flap by the handle, refer
to arrow.
The floor panel flap can be locked
*.
Adaptive fixing system*
The adaptive fixing system is used to divide up
the cargo area. It consists of two brackets with a
telescopic rail and retaining straps. These are
guided into the two rails on the cargo area floor.
Before using the adaptive fixing system,
fold up and lock the rear seat backrest;
otherwise, the cargo could be thrown into the
vehicle interior in an accident.<
1Brackets
2Telescopic rail
3Notch in the cargo area rail
Mounting brackets
The two brackets are connected with a tele-
scopic rail.