ad blue BMW ACTIVEHYBRID3 2013 Owners Manual
[x] Cancel search | Manufacturer: BMW, Model Year: 2013, Model line: ACTIVEHYBRID3, Model: BMW ACTIVEHYBRID3 2013Pages: 220, PDF Size: 5.09 MB
Page 22 of 220
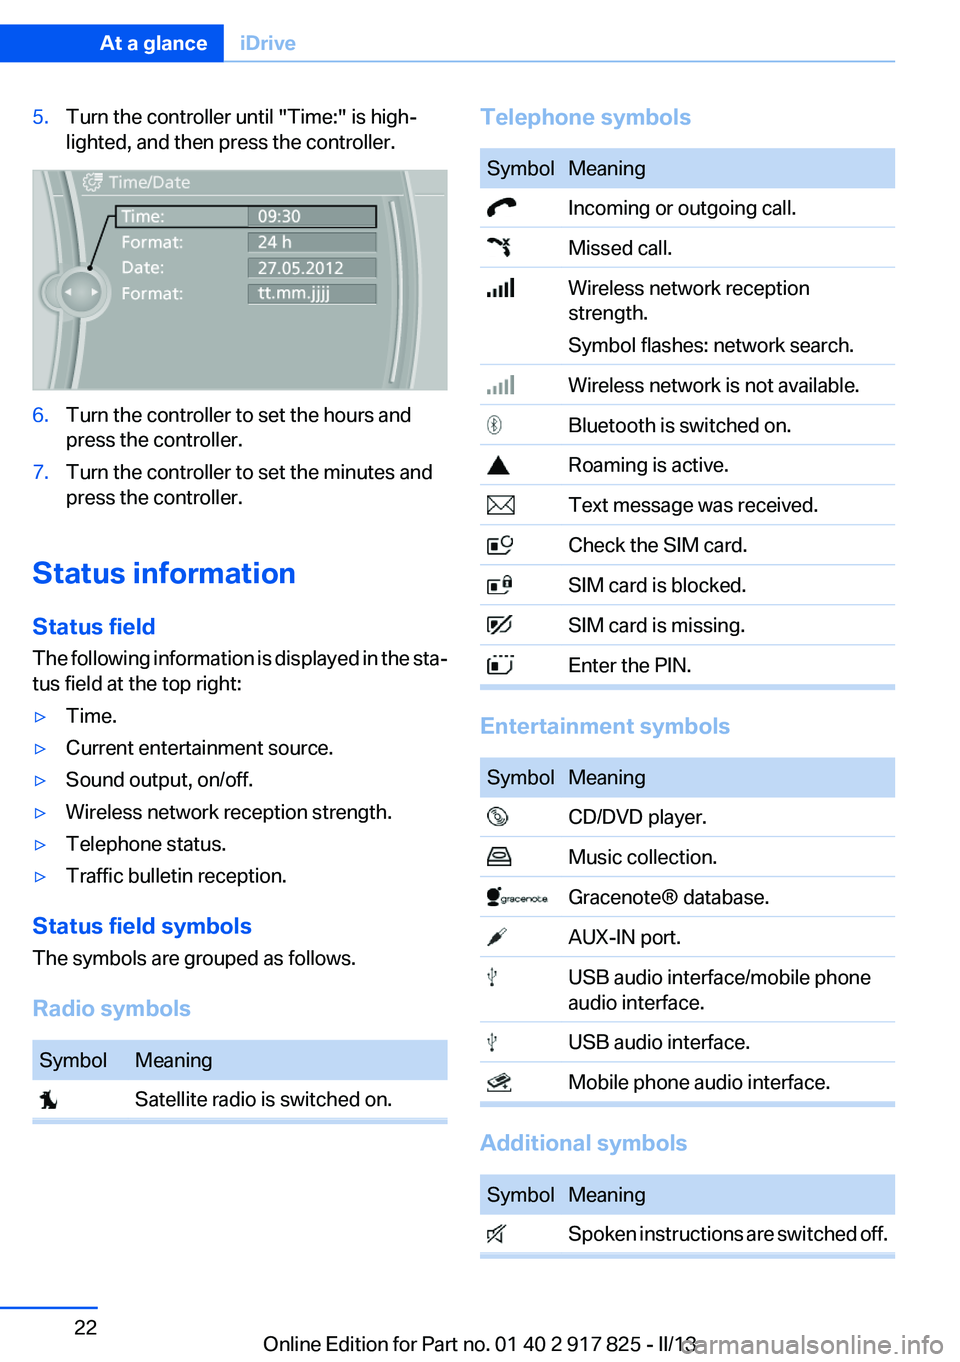
5.Turn the controller until "Time:" is high‐
lighted, and then press the controller.6.Turn the controller to set the hours and
press the controller.7.Turn the controller to set the minutes and
press the controller.
Status information
Status field
The following information is displayed in the sta‐
tus field at the top right:
▷Time.▷Current entertainment source.▷Sound output, on/off.▷Wireless network reception strength.▷Telephone status.▷Traffic bulletin reception.
Status field symbols
The symbols are grouped as follows.
Radio symbols
SymbolMeaning Satellite radio is switched on.Telephone symbolsSymbolMeaning Incoming or outgoing call. Missed call. Wireless network reception
strength.
Symbol flashes: network search. Wireless network is not available. Bluetooth is switched on. Roaming is active. Text message was received. Check the SIM card. SIM card is blocked. SIM card is missing. Enter the PIN.
Entertainment symbols
SymbolMeaning CD/DVD player. Music collection. Gracenote® database. AUX-IN port. USB audio interface/mobile phone
audio interface. USB audio interface. Mobile phone audio interface.
Additional symbols
SymbolMeaning Spoken instructions are switched off.Seite 22At a glanceiDrive22
Online Edition for Part no. 01 40 2 917 825 - II/13
Page 80 of 220
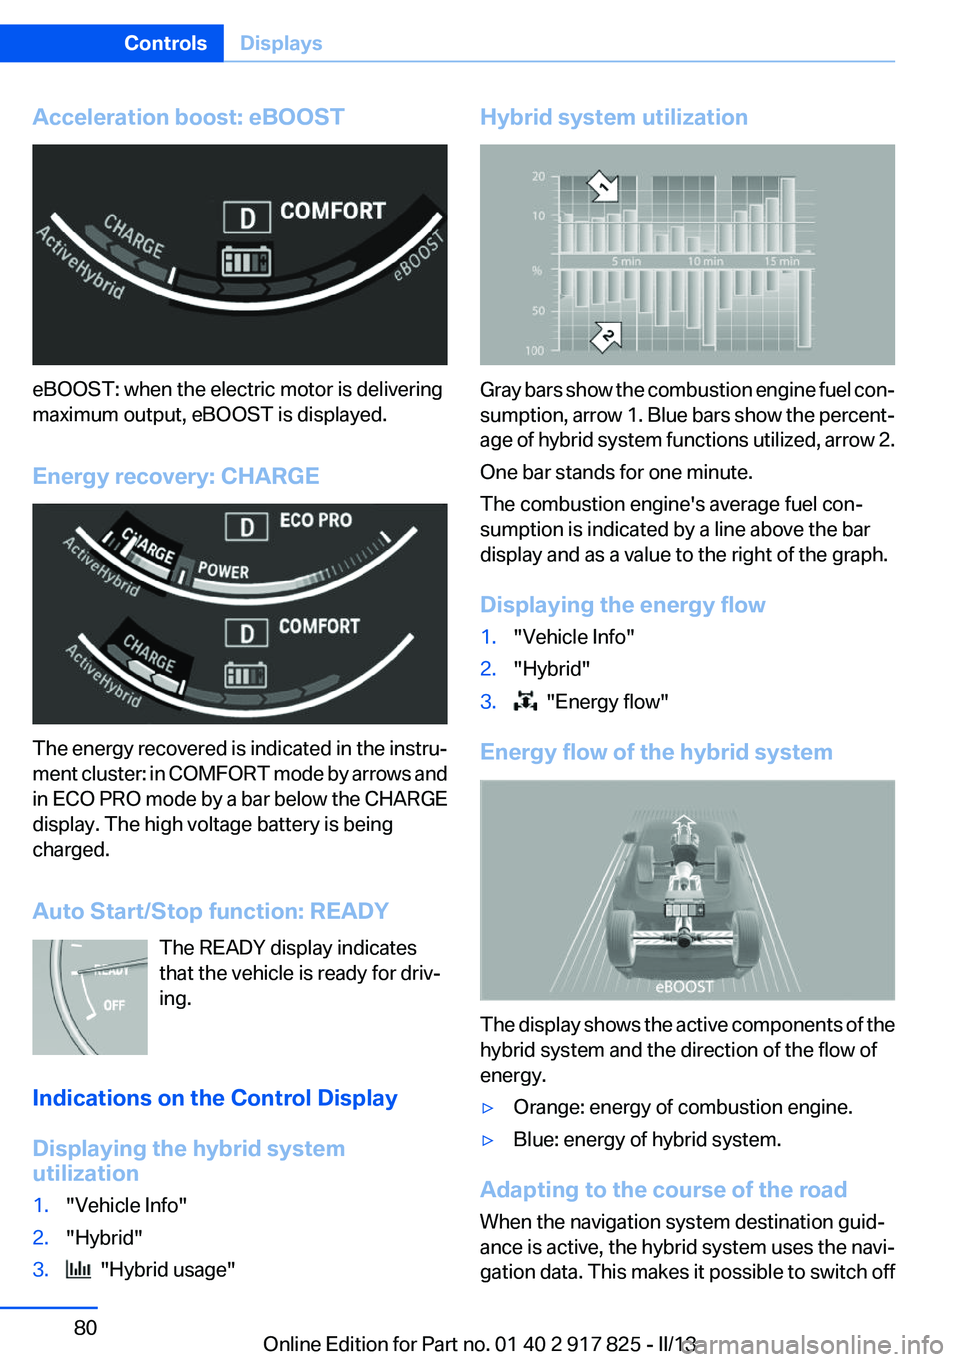
Acceleration boost: eBOOST
eBOOST: when the electric motor is delivering
maximum output, eBOOST is displayed.
Energy recovery: CHARGE
The energy recovered is indicated in the instru‐
ment cluster: in COMFORT mode by arrows and
in ECO PRO mode by a bar below the CHARGE
display. The high voltage battery is being
charged.
Auto Start/Stop function: READY The READY display indicates
that the vehicle is ready for driv‐
ing.
Indications on the Control Display
Displaying the hybrid system
utilization
1."Vehicle Info"2."Hybrid"3. "Hybrid usage"Hybrid system utilization
Gray bars show the combustion engine fuel con‐
sumption, arrow 1. Blue bars show the percent‐
age of hybrid system functions utilized, arrow 2.
One bar stands for one minute.
The combustion engine's average fuel con‐
sumption is indicated by a line above the bar
display and as a value to the right of the graph.
Displaying the energy flow
1."Vehicle Info"2."Hybrid"3. "Energy flow"
Energy flow of the hybrid system
The display shows the active components of the
hybrid system and the direction of the flow of
energy.
▷Orange: energy of combustion engine.▷Blue: energy of hybrid system.
Adapting to the course of the road
When the navigation system destination guid‐
ance is active, the hybrid system uses the navi‐
gation data. This makes it possible to switch off
Seite 80ControlsDisplays80
Online Edition for Part no. 01 40 2 917 825 - II/13
Page 91 of 220
Headlamp courtesy delay feature
The low beams stay lit for a short while if the
headlamp flasher is switched on after the igni‐
tion is switched off.
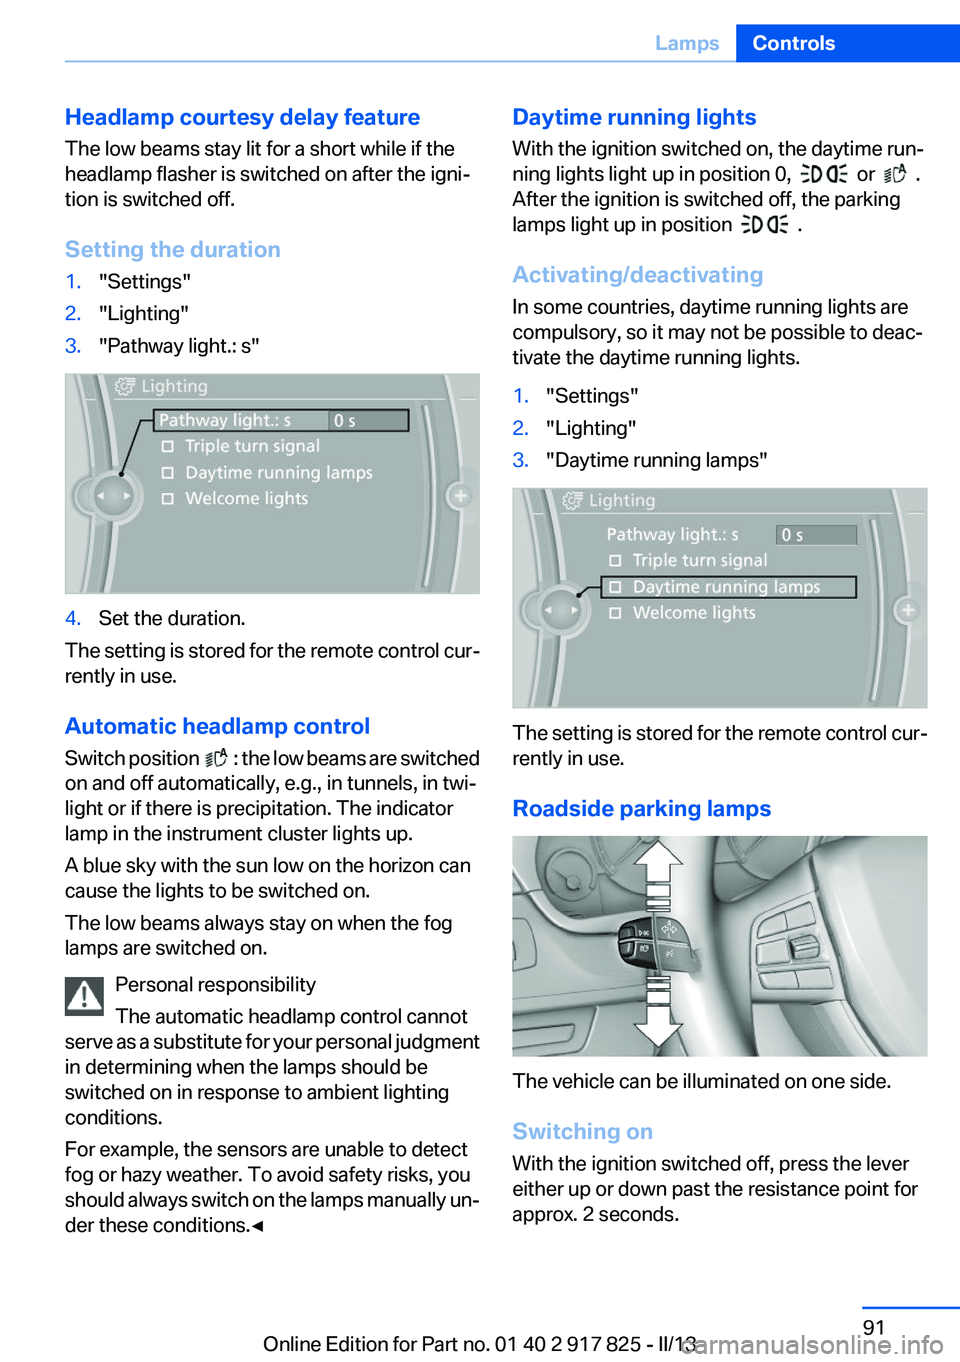
Setting the duration1."Settings"2."Lighting"3."Pathway light.: s"4.Set the duration.
The setting is stored for the remote control cur‐
rently in use.
Automatic headlamp control
Switch position
: the low beams are switched
on and off automatically, e.g., in tunnels, in twi‐
light or if there is precipitation. The indicator
lamp in the instrument cluster lights up.
A blue sky with the sun low on the horizon can
cause the lights to be switched on.
The low beams always stay on when the fog
lamps are switched on.
Personal responsibility
The automatic headlamp control cannot
serve as a substitute for your personal judgment
in determining when the lamps should be
switched on in response to ambient lighting
conditions.
For example, the sensors are unable to detect
fog or hazy weather. To avoid safety risks, you
should always switch on the lamps manually un‐
der these conditions.◀
Daytime running lights
With the ignition switched on, the daytime run‐
ning lights light up in position 0,
or .
After the ignition is switched off, the parking
lamps light up in position
.
Activating/deactivating
In some countries, daytime running lights are
compulsory, so it may not be possible to deac‐
tivate the daytime running lights.
1."Settings"2."Lighting"3."Daytime running lamps"
The setting is stored for the remote control cur‐
rently in use.
Roadside parking lamps
The vehicle can be illuminated on one side.
Switching on
With the ignition switched off, press the lever
either up or down past the resistance point for
approx. 2 seconds.
Seite 91LampsControls91
Online Edition for Part no. 01 40 2 917 825 - II/13
Page 92 of 220
Switching off
Briefly press the lever to the resistance point in
the opposite direction.
Adaptive light control
The concept
Adaptive Light Control is a variable headlamp
control system that enables dynamic illumina‐
tion of the road surface.
Depending on the steering angle and other pa‐
rameters, the light from the headlamp follows
the course of the road.
In tight curves, e.g., on mountainous roads or
when turning, one of the two front fog lamps is
switched on as a turning lamp. As a result the
inside of the curve is better lighted.
Activating
Switch position
with the ignition switched
on.
The turning lamps are automatically switched
on depending on the steering angle or the use
of turn signals.
To avoid blinding oncoming traffic, the Adaptive
Light Control does not swivel to the driver's side
when the vehicle is at a standstill.
When driving in reverse, only the turning lamp is
active.
Malfunction
A Check Control message is displayed.
Adaptive light control is malfunctioning or has
failed. Have the system checked as soon as pos‐
sible.
High-beam Assistant
The concept
When the low beams are switched on, this sys‐
tem automatically switches the high beams on
and off or suppresses the light in the areas that
blind oncoming traffic. The procedure is con‐
trolled by a sensor on the front of the interior
rearview mirror. The assistant ensures that the
high beams are switched on whenever the traffic
situation allows. The driver can intervene at any
time and switch the high beams on and off as
usual.
Activating
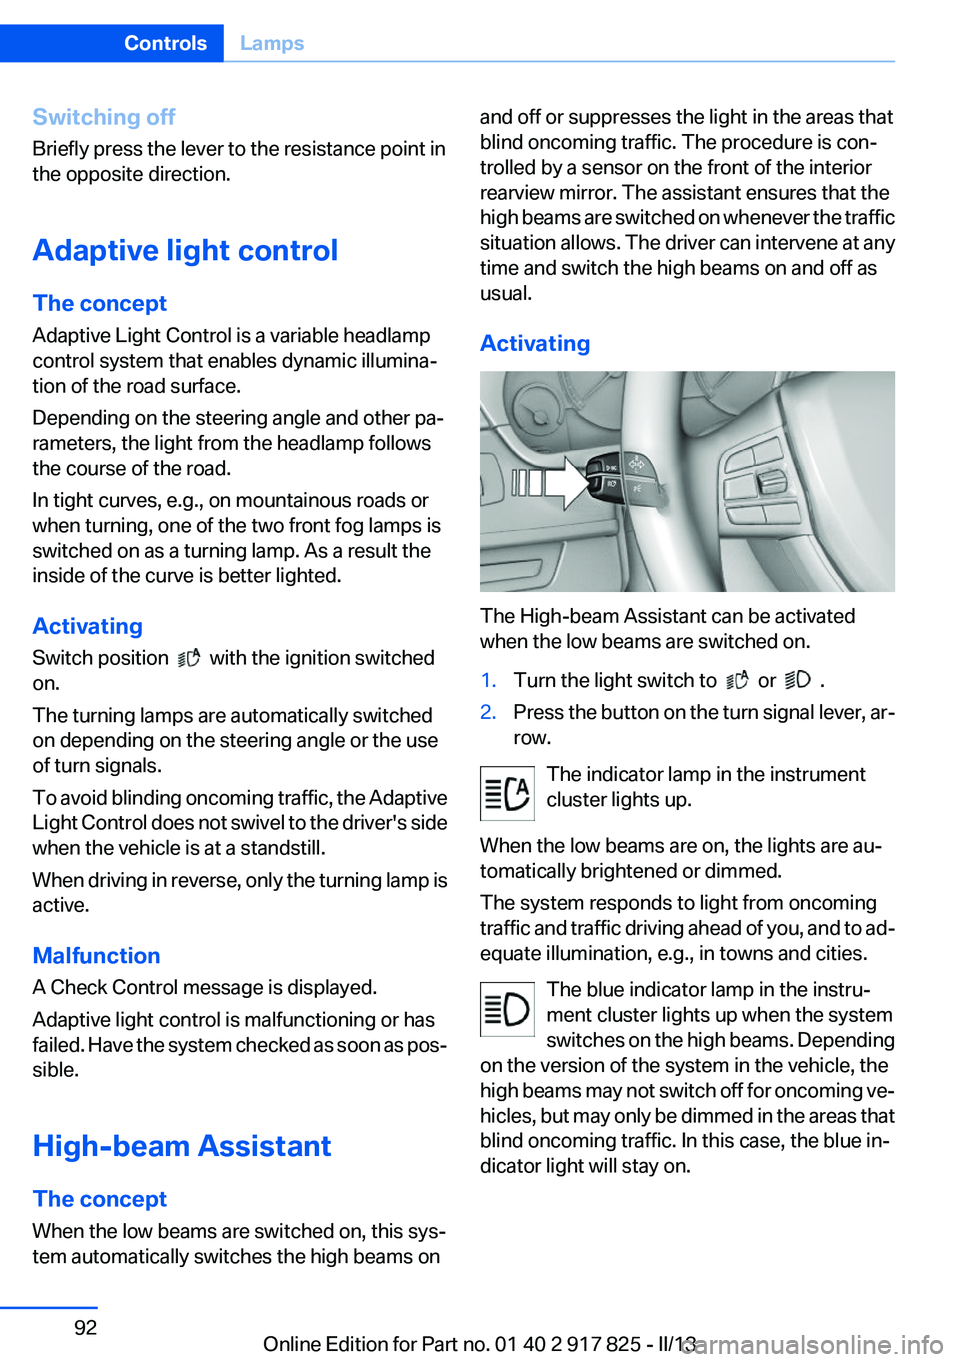
The High-beam Assistant can be activated
when the low beams are switched on.
1.Turn the light switch to or .2.Press the button on the turn signal lever, ar‐
row.
The indicator lamp in the instrument
cluster lights up.
When the low beams are on, the lights are au‐
tomatically brightened or dimmed.
The system responds to light from oncoming
traffic and traffic driving ahead of you, and to ad‐
equate illumination, e.g., in towns and cities.
The blue indicator lamp in the instru‐
ment cluster lights up when the system
switches on the high beams. Depending
on the version of the system in the vehicle, the
high beams may not switch off for oncoming ve‐
hicles, but may only be dimmed in the areas that
blind oncoming traffic. In this case, the blue in‐
dicator light will stay on.
Seite 92ControlsLamps92
Online Edition for Part no. 01 40 2 917 825 - II/13
Page 129 of 220
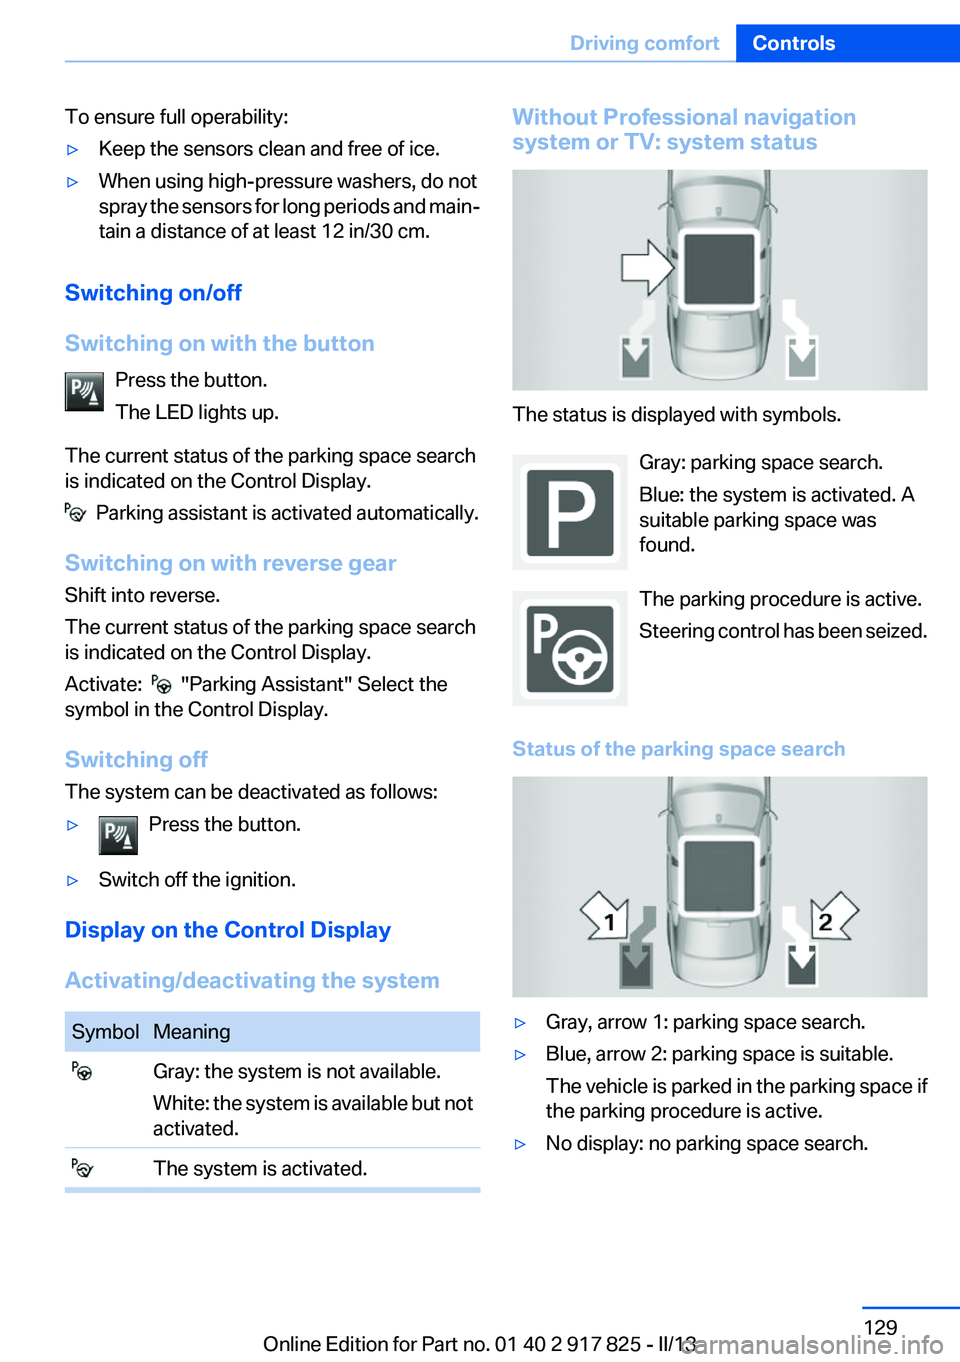
To ensure full operability:▷Keep the sensors clean and free of ice.▷When using high-pressure washers, do not
spray the sensors for long periods and main‐
tain a distance of at least 12 in/30 cm.
Switching on/off
Switching on with the button Press the button.
The LED lights up.
The current status of the parking space search
is indicated on the Control Display.
Parking assistant is activated automatically.
Switching on with reverse gear
Shift into reverse.
The current status of the parking space search
is indicated on the Control Display.
Activate:
"Parking Assistant" Select the
symbol in the Control Display.
Switching off
The system can be deactivated as follows:
▷Press the button.▷Switch off the ignition.
Display on the Control Display
Activating/deactivating the system
SymbolMeaning Gray: the system is not available.
White: the system is available but not
activated. The system is activated.Without Professional navigation
system or TV: system status
The status is displayed with symbols.
Gray: parking space search.
Blue: the system is activated. A
suitable parking space was
found.
The parking procedure is active.
Steering control has been seized.
Status of the parking space search
▷Gray, arrow 1: parking space search.▷Blue, arrow 2: parking space is suitable.
The vehicle is parked in the parking space if
the parking procedure is active.▷No display: no parking space search.Seite 129Driving comfortControls129
Online Edition for Part no. 01 40 2 917 825 - II/13
Page 135 of 220
Ventilation
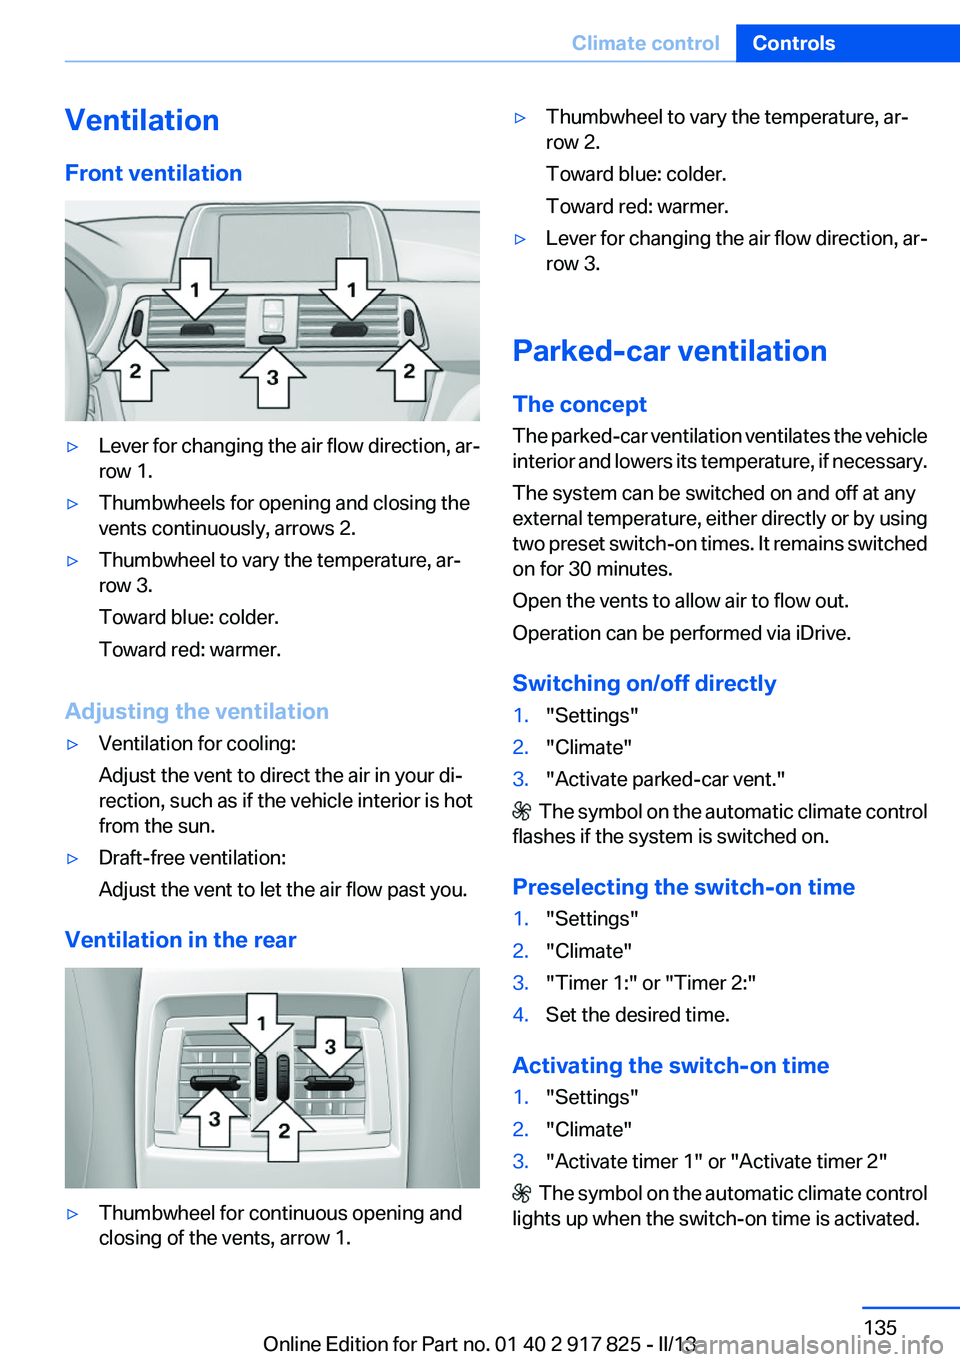
Front ventilation▷Lever for changing the air flow direction, ar‐
row 1.▷Thumbwheels for opening and closing the
vents continuously, arrows 2.▷Thumbwheel to vary the temperature, ar‐
row 3.
Toward blue: colder.
Toward red: warmer.
Adjusting the ventilation
▷Ventilation for cooling:
Adjust the vent to direct the air in your di‐
rection, such as if the vehicle interior is hot
from the sun.▷Draft-free ventilation:
Adjust the vent to let the air flow past you.
Ventilation in the rear
▷Thumbwheel for continuous opening and
closing of the vents, arrow 1.▷Thumbwheel to vary the temperature, ar‐
row 2.
Toward blue: colder.
Toward red: warmer.▷Lever for changing the air flow direction, ar‐
row 3.
Parked-car ventilation
The concept
The parked-car ventilation ventilates the vehicle
interior and lowers its temperature, if necessary.
The system can be switched on and off at any
external temperature, either directly or by using
two preset switch-on times. It remains switched
on for 30 minutes.
Open the vents to allow air to flow out.
Operation can be performed via iDrive.
Switching on/off directly
1."Settings"2."Climate"3."Activate parked-car vent."
The symbol on the automatic climate control
flashes if the system is switched on.
Preselecting the switch-on time
1."Settings"2."Climate"3."Timer 1:" or "Timer 2:"4.Set the desired time.
Activating the switch-on time
1."Settings"2."Climate"3."Activate timer 1" or "Activate timer 2"
The symbol on the automatic climate control
lights up when the switch-on time is activated.
Seite 135Climate controlControls135
Online Edition for Part no. 01 40 2 917 825 - II/13
Page 162 of 220
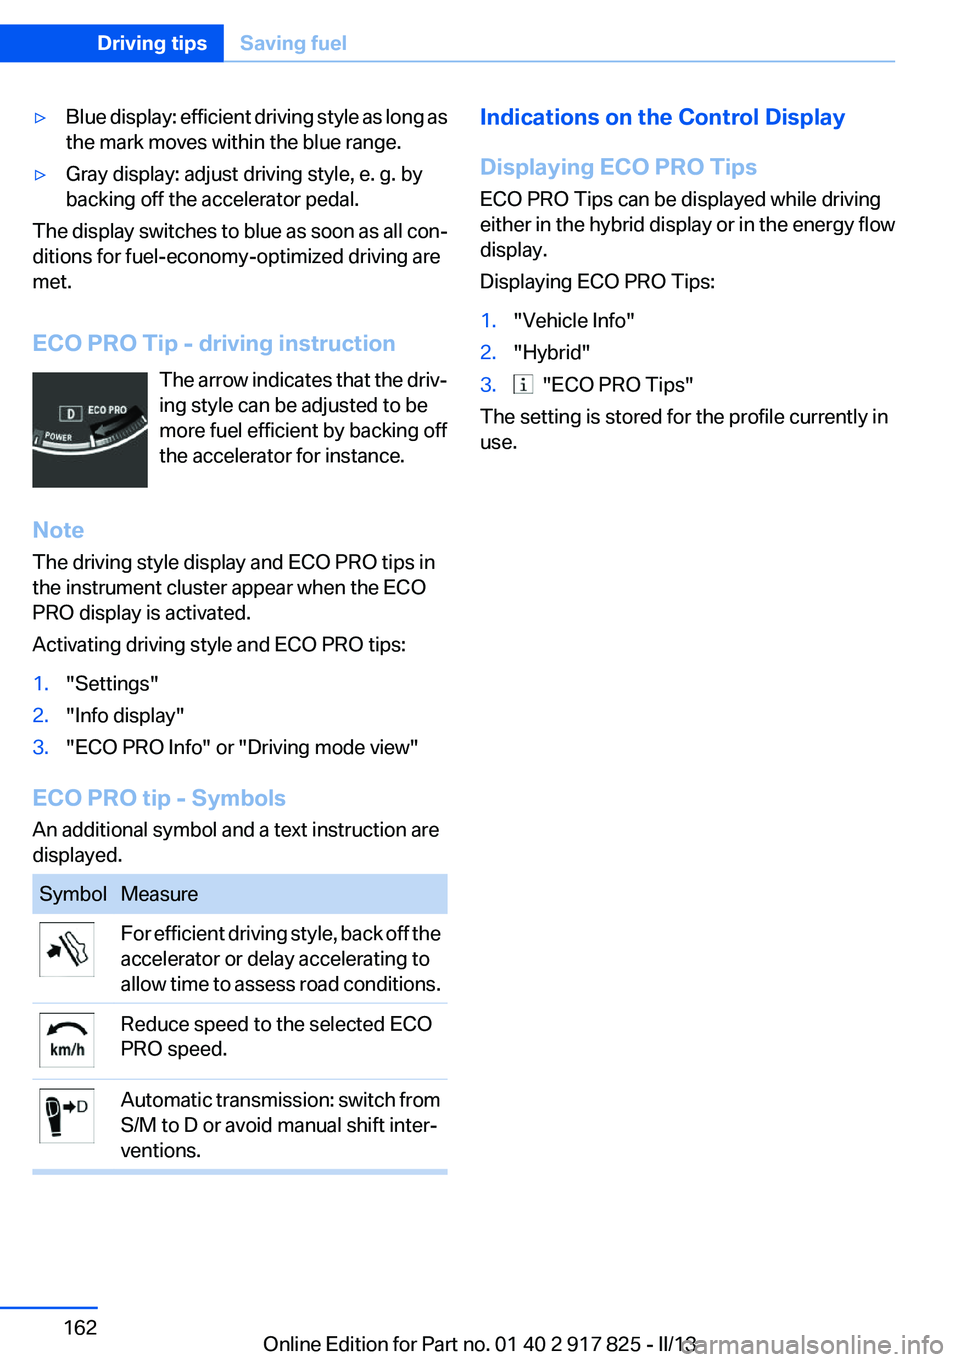
▷Blue display: efficient driving style as long as
the mark moves within the blue range.▷Gray display: adjust driving style, e. g. by
backing off the accelerator pedal.
The display switches to blue as soon as all con‐
ditions for fuel-economy-optimized driving are
met.
ECO PRO Tip - driving instruction The arrow indicates that the driv‐
ing style can be adjusted to be
more fuel efficient by backing off
the accelerator for instance.
Note
The driving style display and ECO PRO tips in
the instrument cluster appear when the ECO
PRO display is activated.
Activating driving style and ECO PRO tips:
1."Settings"2."Info display"3."ECO PRO Info" or "Driving mode view"
ECO PRO tip - Symbols
An additional symbol and a text instruction are
displayed.
SymbolMeasureFor efficient driving style, back off the
accelerator or delay accelerating to
allow time to assess road conditions.Reduce speed to the selected ECO
PRO speed.Automatic transmission: switch from
S/M to D or avoid manual shift inter‐
ventions.Indications on the Control Display
Displaying ECO PRO Tips
ECO PRO Tips can be displayed while driving
either in the hybrid display or in the energy flow
display.
Displaying ECO PRO Tips:1."Vehicle Info"2."Hybrid"3. "ECO PRO Tips"
The setting is stored for the profile currently in
use.
Seite 162Driving tipsSaving fuel162
Online Edition for Part no. 01 40 2 917 825 - II/13