technical data BMW CONVERTIBLE 1998 Repair Manual
[x] Cancel search | Manufacturer: BMW, Model Year: 1998, Model line: CONVERTIBLE, Model: BMW CONVERTIBLE 1998Pages: 179, PDF Size: 3.51 MB
Page 130 of 179
12 9
At a glanceControlsCar careRepairsTechnicalDataIndex
High steering effort:
Check oil level, refer to previous page.
High steering effort during sudden tran-
sitions:
Please contact your BMW Retailer for
an immediate inspection.a
If the power steering fails, in-
creased effort will be required to steer
the vehicle.c
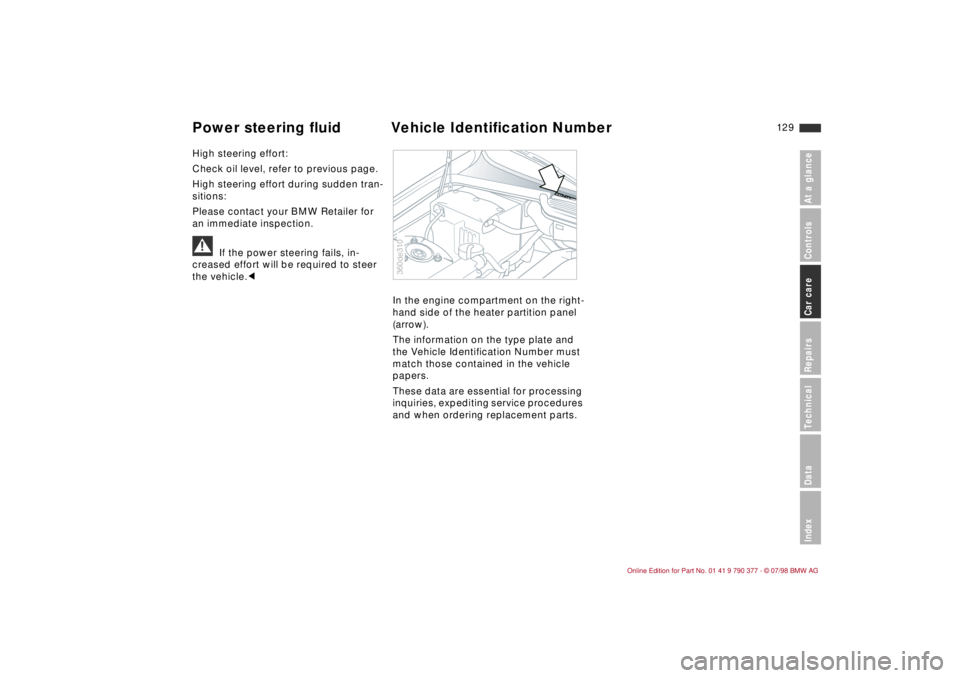
In the engine compartment on the right-
hand side of the heater partition panel
(arrow).
The information on the type plate and
the Vehicle Identification Number must
match those contained in the vehicle
papers.
These data are essential for processing
inquiries, expediting service procedures
and when ordering replacement parts.
360de310
Power steering fluid Vehicle Identification Number
Page 132 of 179

13 1
At a glanceControlsCar careRepairsTechnicalDataIndex
Washing your carRight from the start, you can wash your
new BMW either by hand or in an auto-
matic car wash. BMW Convertible: For
instructions on cleaning and care of the
convertible top, refer to page 136 ff.
To prevent spots, avoid washing when
the hood is still warm, or immediately
after and during exposure to strong
sunlight.
When using an automatic car wash,
ensure that
dno damage occurs to vehicles with
add-on body elements (e.g., spoilers,
telephone aerials). Consult the car
wash operator if necessary
dthe vehicle is cleaned with minimum
brush pressure, and that ample water
is available for washing and rinsing.
Loosen and remove stubborn dirt and
dead insects before washing the car.
a
Always maintain an adequate dis-
tance between the spray source and the
vehicle's surface when using spray
wands and high-pressure washers. In-
adequate distance and excessive pres-
sure can damage or weaken the finish,
making it more susceptible to subse-
quent attack. In addition, moisture could
penetrate to vehicle components, lead-
ing to long-term damage.c
Parts of the car which are inaccessible
to the automatic washer - such as door
sills, door and hood edges, etc. -
should be cleaned by hand.
b
Please observe the following
when cleaning the headlamp covers:
dDo not clean by wiping with a dry
cloth (scratches). Never use abra-
sives or strong solvents to clean the
covers.
dRemove dirt and contamination (such
as insects) by soaking with BMW Car
Shampoo and then rinsing with
plenty of water.
dAlways use a de-icer spray to remove
accumulated ice and snow Ð Never
use a scraper!cIn the winter months, it is especially
important to ensure that the car is
washed on a regular basis. Large quan-
tities of dirt and road salt are difficult to
remove, and they also cause damage to
the vehicle.
a
After washing, the brakes may be
wet and thus less effective! Apply the
brakes briefly to dry them.c
Caring for your car
Page 134 of 179
13 3
At a glanceControlsCar careRepairsTechnicalDataIndex
Waxing your carProtect the finish using carnauba or
synthetic-based waxes only.
The best way to determine when the
finish needs to be waxed is by noting
when water stops beading on the sur-
face.
You can use a glass cleaner to remove
any wax or silicone that may have been
left on the windows during waxing.b
A full range of car-care products is
available from your BMW Retailer.c
Paint damageYou can touch up small areas of dam-
age with BMW spray paint, a BWM
touch-up stick or BMW paint tape.
The paint color code for your car is pro-
vided on a sticker located next to the
type plate and on the first page of your
Service and Warranty Information book-
let.
Damage caused by flying stones,
scratches, etc. must be touched up
without delay to prevent rust from form-
ing.
If corrosion has started to form in an
area with paint damage, remove all rust
and clean the area, then prime the area
with a BMW Primer Stick. Finally, apply
the finish coat. Wait a few days, then
polish the repaired area. Finish by
applying a wax preservative.
More extensive paint damage should be
professionally repaired in accordance
with the manufacturer's instructions.
Your BMW Retailer uses original BMW
finish materials in accordance with offi-
cial repair procedures.
Caring for other vehicle compo-
nents and materialsLight-alloy wheels
* should be treated
with alloy wheel cleaner, particularly dur-
ing the winter months. Refrain from using
aggressive products containing acids,
strong alkalis or abrasives. Alloy wheels
should not be cleaned with a steam jet
operating at temperatures in excess of
140 5F (606) (note manufacturer's
instructions).
You can use window and glass cleaner to
clean inside window surfaces and mir-
rors without smearing and streaking.
Never use polishing pastes or abrasive
(quartz) cleansers on mirror lenses.
Clean plastic parts, imitation leather sur-
faces, the roof lining, the lenses of lamps,
the glass cover of the instrument panel
and all dull black sprayed parts with
water or products for the care of plastics.
Avoid soaking the headliner. Never use
solvents such as lacquer thinner, heavy-
duty grease remover, fuels, etc.
Rubber components should be cleaned
with water only; a rubber treatment or sil-
icone spray may also be applied.
Clean the wiper blades with soapy water.
The wiper blades should be replaced
twice a year, before and after the cold
season.
Caring for your car
Page 136 of 179

13 5
At a glanceControlsCar careRepairsTechnicalDataIndex
Leather careThe leather upholstery
* used by BMW
is a natural product of the highest qual-
ity, processed using state-of-the-art
methods to ensure that it will maintain
its high quality for years to come, pro-
vided that it is properly cared for.
Because this product is manufactured
using natural materials, you must make
allowance for its special characteristics
as well as for the peculiarities of its use
and care.
Regular periodic cleaning and care are
essential, as dust and road dirt act as
abrasives in the pores and creases of
the material. This leads to wear spots
and premature brittleness on the sur-
face of the leather. We therefore sug-
gest that you clean the leather with a
vacuum cleaner or dust cloth at frequent
intervals.
For cleaning, use BMW leather cleaning
foam.
As dirt and grease can slowly attack the
protective layer of the leather, the
cleaned leather surfaces must be
treated with BMW Leather Care. This
serves also as an anti-static agent.
To protect against moisture and water
you can treat the leather with BMW
Impregnating Agent.We recommend that you perform this
procedure twice a year on leather ex-
posed to normal use.
Spills should be wiped up immediately.
Remove grease and oil stains without
rubbing, but rather by dabbing with
spot remover.
If the upholstery is to be exposed to
intense sunlight or if the vehicle is to be
stored for an extended period, cover all
leather surfaces (or, better yet, the win-
dows) to prevent fading.
a
Cleaning agents can contain dan-
gerous or unhealthy ingredients. There-
fore always observe the warnings and
danger notices on the package.
Open the doors or windows on your ve-
hicle when cleaning the interior.
Never clean your vehicle with solvents
or other materials not specifically in-
tended for this application.c
Caring for your car
Page 138 of 179

13 7
At a glanceControlsCar careRepairsTechnicalDataIndex
Never use spot remover, paint thinner,
solvents, gasoline etc. to remove spots
from the convertible top and from the
rear window, as these substances
destroy the rubber seals and lead to
leaks. Use only BMW-approved clean-
ers.
In addition to the advantage of being
extremely flexible, the rear window also
has the disadvantage of having a rela-
tively soft surface. For this reason, only
clean the rear window with a soft, anti-
static cloth or with BMW Convertible
Rear Window Cleaner.
If you wash the vehicle frequently in
brush car washes, and in particular in
those with hard brushes, faint scratches
in the rear window may result. With the
window replacement system you can
replace a heavily scratched window at a
relatively low price. Please contact your
authorized BMW Retailer for additional
information. b
A full range of car-care products is
available from your BMW Retailer.c
a
Cleaning agents can contain sub-
stances that are dangerous or bad for
your health. Therefore always observe
the warnings and danger notices on the
package.
Open the doors or windows on your ve-
hicle when cleaning the interior.
Never clean your vehicle with solvents
or other materials not specifically in-
tended for this application.c
Hardtop:Please follow the instructions for car
care from page 131.If the vehicle is to be temporarily stored
for more than three months, have the
following maintenance performed by
your BMW Retailer:
1 Cleaning, preservation and retreat-
ment of the engine, engine compart-
ment, underbody, axles and
subassemblies in accordance with
the factory speciÞcations. Vehicle
washing with interior cleaning fol-
lowed by paint and chrome care.
Clean rubber seals of the hood, lug-
gage compartment lid and doors and
rub with either talcum powder or
glycerine oil.
2 Change engine oil and oil Þlter at
operating temperature. As an addi-
tional corrosion protection measure,
an anti-corrosive agent can be added
to the engine in accordance with the
manufacturer's instructions.
3 Check the coolant level and concen-
tration and top up if necessary.
4 Check the acid level in the battery
cells and add distilled water if neces-
sary.
5 Increase the tire inßation pressure to
50.9 psi (3.5 bar).
Cleaning and care of the convertible top Vehicle storage
Page 140 of 179
At a glance
Controls and featuresCare and maintenanceAdvanced technology
Technical data
Owner service procedure
At a glanceControlsCar careRepairsTechnicalDataIndex
Index
13 9
Replacement procedures:
Onboard tool kit140
Windshield wiper blades140
Lamp and bulbs141
Master key with battery lamp145
Changing tires146
Battery149
Fuses151
In case of electrical
malfunction:
Fuel filler door 152
Sliding/tilt sunroof 152
Assistance, giving and receiving:
Jump-starting153
Towing the vehicle154
Towing154
Page 142 of 179
14 1
At a glanceControlsCar careRepairsTechnicalDataIndex
The lamps and bulbs on your car play a
vital role in ensuring road safety, a fact
which you should always bear in mind
in caring for them. Carefully observe the
following instructions during bulb
replacement, referring any procedures
with which you are not familiar to your
BMW Retailer.b
Never touch the bulb glass of a
new lamp with your bare hands. Use a
clean cloth, paper napkin, etc. or hold
the bulb by its metallic base.c
A replacement bulb set is available from
your BMW Retailer.
a
To prevent short circuits, always
switch off all electrical systems and
components, or disconnect the negative
terminal of the battery, before working
on them.
To prevent injuries and damage, always
observe any instructions provided by
the bulb manufacturer.c
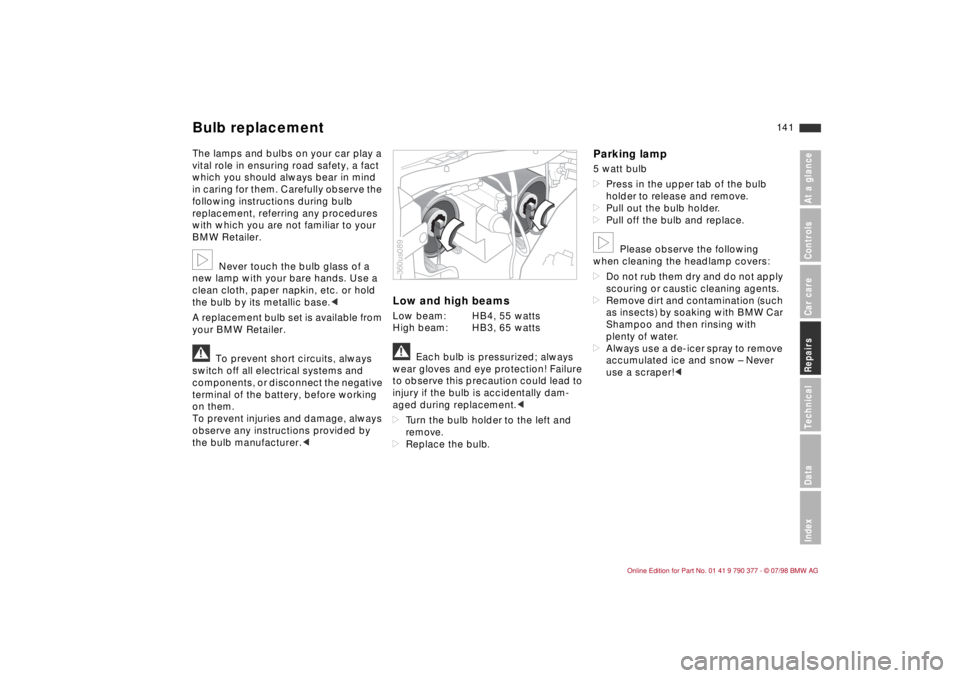
Low and high beamsLow beam: HB4, 55 watts
High beam: HB3, 65 wattsa
Each bulb is pressurized; always
wear gloves and eye protection! Failure
to observe this precaution could lead to
injury if the bulb is accidentally dam-
aged during replacement.c
dTurn the bulb holder to the left and
remove.
dReplace the bulb.
Parking lamp 5 watt bulb
dPress in the upper tab of the bulb
holder to release and remove.
dPull out the bulb holder.
dPull off the bulb and replace.b
Please observe the following
when cleaning the headlamp covers:
dDo not rub them dry and do not apply
scouring or caustic cleaning agents.
dRemove dirt and contamination (such
as insects) by soaking with BMW Car
Shampoo and then rinsing with
plenty of water.
dAlways use a de-icer spray to remove
accumulated ice and snow Ð Never
use a scraper!c
360us089
Bulb replacement
Page 144 of 179
14 3
At a glanceControlsCar careRepairsTechnicalDataIndex
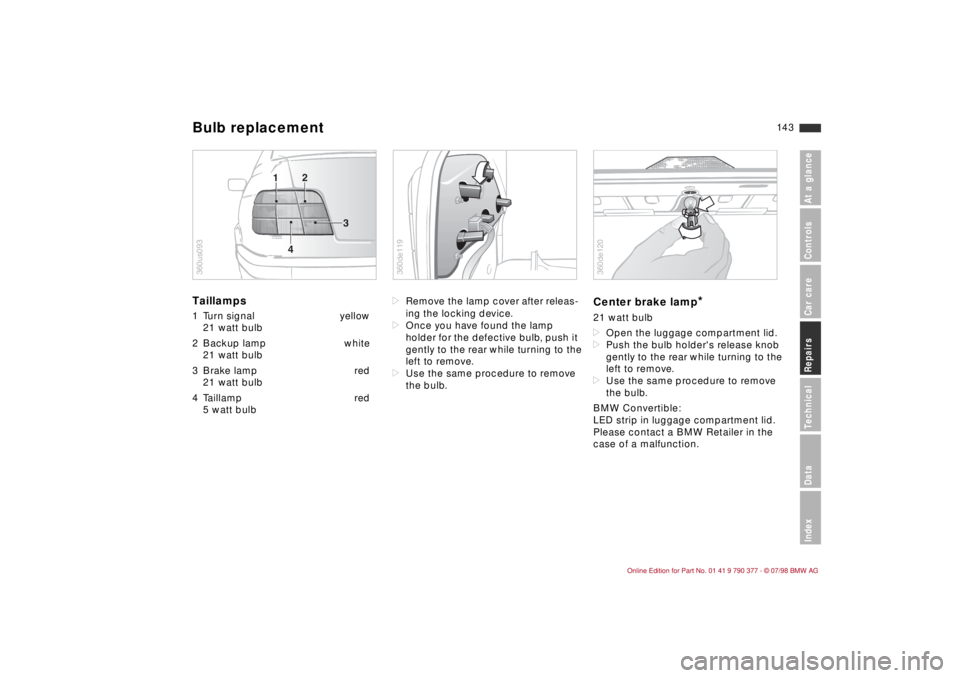
Taillamps 1 Turn signal yellow
21 watt bulb
2 Backup lamp white
21 watt bulb
3 Brake lamp red
21 watt bulb
4 Taillamp red
5 watt bulbdRemove the lamp cover after releas-
ing the locking device.
dOnce you have found the lamp
holder for the defective bulb, push it
gently to the rear while turning to the
left to remove.
dUse the same procedure to remove
the bulb.
Center brake lamp
*
21 watt bulb
dOpen the luggage compartment lid.
dPush the bulb holder's release knob
gently to the rear while turning to the
left to remove.
dUse the same procedure to remove
the bulb.
BMW Convertible:
LED strip in luggage compartment lid.
Please contact a BMW Retailer in the
case of a malfunction.
12
3
4
360us093
360de119
360de120
Bulb replacement
Page 146 of 179
14 5
At a glanceControlsCar careRepairsTechnicalDataIndex
Luggage compartment lamps BMW Sedan, Coupe
10 watt bulb
Lamp on underside of rear shelf:
dUse a screwdriver to pry out the lamp
at the recess.
dReplace bulb.
BMW Convertible:
5 watt bulbs
There is one lamp each in the bulb cov-
ers of the rear lamps.
dUse a screwdriver to pry out the lamp
at the recess.
dReplace bulb.Glove compartment lamp 5 watt bulb
dUse a screwdriver to pry out the lamp
forward.
dReplace bulb.Footwell lamps
*
5 watt bulb
dUse a screwdriver to pry the lamp out
of the lower instrument panel trim.
dReplace bulb.
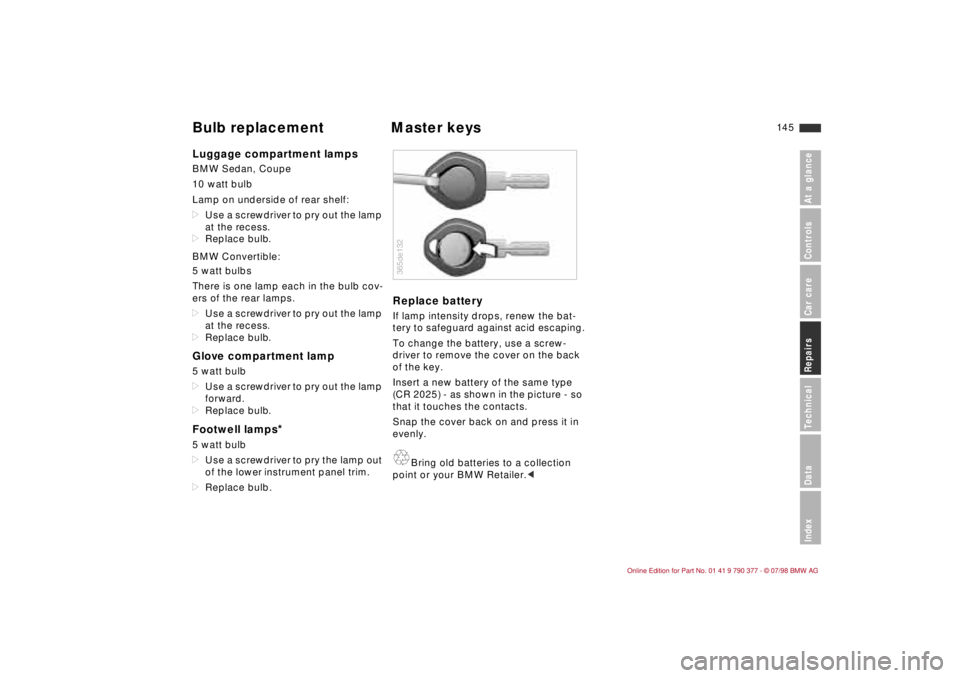
Replace batteryIf lamp intensity drops, renew the bat-
tery to safeguard against acid escaping.
To change the battery, use a screw-
driver to remove the cover on the back
of the key.
Insert a new battery of the same type
(CR 2025) - as shown in the picture - so
that it touches the contacts.
Snap the cover back on and press it in
evenly.A
Bring old batteries to a collection
point or your BMW Retailer.c365de132
Bulb replacement Master keys
Page 148 of 179
14 7
At a glanceControlsCar careRepairsTechnicalDataIndex
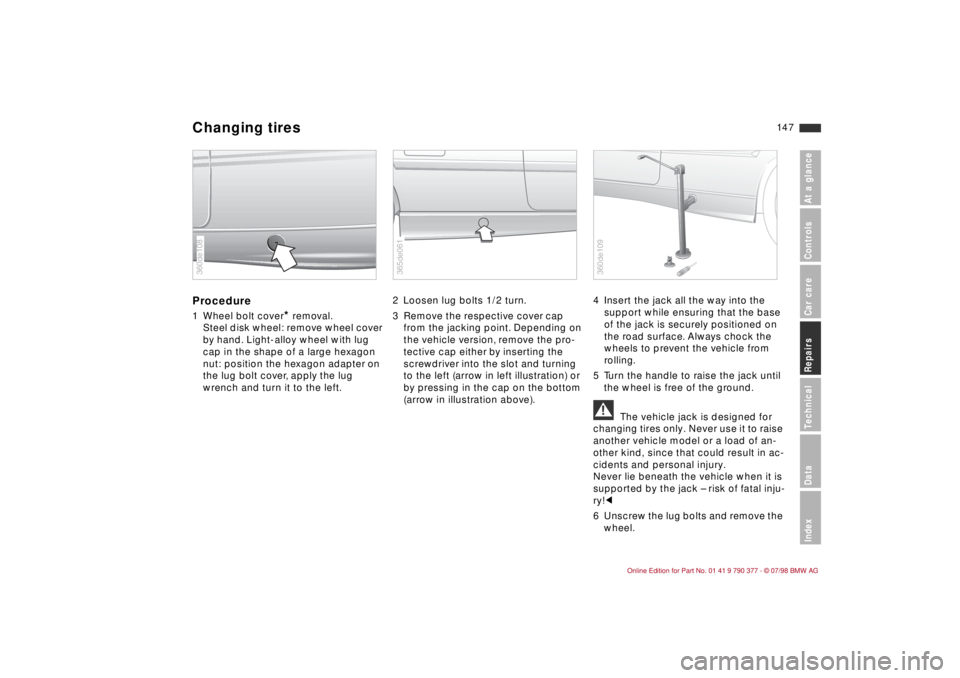
Procedure1 Wheel bolt cover
* removal.
Steel disk wheel: remove wheel cover
by hand. Light-alloy wheel with lug
cap in the shape of a large hexagon
nut: position the hexagon adapter on
the lug bolt cover, apply the lug
wrench and turn it to the left.2 Loosen lug bolts 1/2 turn.
3 Remove the respective cover cap
from the jacking point. Depending on
the vehicle version, remove the pro-
tective cap either by inserting the
screwdriver into the slot and turning
to the left (arrow in left illustration) or
by pressing in the cap on the bottom
(arrow in illustration above).4 Insert the jack all the way into the
support while ensuring that the base
of the jack is securely positioned on
the road surface. Always chock the
wheels to prevent the vehicle from
rolling.
5 Turn the handle to raise the jack until
the wheel is free of the ground.
a
The vehicle jack is designed for
changing tires only. Never use it to raise
another vehicle model or a load of an-
other kind, since that could result in ac-
cidents and personal injury.
Never lie beneath the vehicle when it is
supported by the jack Ð risk of fatal inju-
ry!c
6 Unscrew the lug bolts and remove the
wheel.
360de108
365de061
360de109
Changing tires