brake light BMW CONVERTIBLE 1998 Owners Manual
[x] Cancel search | Manufacturer: BMW, Model Year: 1998, Model line: CONVERTIBLE, Model: BMW CONVERTIBLE 1998Pages: 179, PDF Size: 3.51 MB
Page 12 of 179
11
Contents
Controls and features
Care and maintenance
Lamps:
Parking lamps/low beams85
Instrument panel lighting85
Foglamps86
Interior lamps86
Reading lamps86
An inviting climate:
Heated seats87
Independent ventilation
system87
Automatic climate control88
Cabin convenience:
BMW Hi-Fi System93
Glove compartment93
Ashtray94
Coin box, cup holder94
Cigarette lighter94
Center arm rest, rear95
Through-loading system95
Ski bag95
Cargo loading98
Special operating instructions:
Break-in procedures100
Driving notes100
Catalytic converter102
Antilock Brake System
(ABS)103
Disc brakes104
Brake system105
Winter driving105
Roof-mounted luggage rack107
Radio reception108
Mobile phones108
Hardtop Ð Convertible109
Technical modifications
to the vehicle110
Wheels and tires:
Tire inflation pressures111
Tire tread111
Tire replacement112
Interaxle tire changes112
The right choice113
Winter tires114
Approved wheels and tires115
Under the hood:
Hood118
Engine compartment 120
Washer fluids124
Engine oil124
Coolant127
Brake fluid128
Power steering fluid128
Vehicle Identification Number129
Care and maintenance:
The BMW Maintenance
System130
Caring for your car131
Cleaning and care
of the convertible top136
Vehicle storage137
Page 21 of 179

20
Turn signal left/right, green
k
Flashes when the turn signals
are in operation.
Battery charge current, red
v
Goes out after the engine has
started.
If the lamp comes on during
normal vehicle operation:
The battery is no longer being charged.
Indicates a defect in the generator drive
belt or the charging circuit.
a
If the V-belt is defective, do not run
the coolant pump; overheating and
potential engine damage would result.
Contact your BMW Retailer.
c
High beam, blue
l
Lights up when the high beams
are switched on or the head-
lamp flashers are activated.
Engine oil pressure, redw
Goes out after the engine has
started. May come on briefly at
idle when the engine is hot,
but must go out again at higher engine
speed.
If the lamp comes on during normal vehi-
cle operation: stop vehicle and switch off
engine immediately. Check engine oil
level; if necessary, add oil. If oil level is
correct: contact your BMW Retailer.
Foglamps
*, green
t
Lights up whenever you switch
on the foglamps.
Airbags, redp
This lamp turns on for an oper-
ational check when you turn the
ignition key to position 1. If, at
the operation check, it does not go on,
or goes on while driving, have it checked
at your BMW Retailer.
Additional notes: Page 50
Automatic transmission
*, yellow
O
Goes out after the engine has
started.
Additional notes: Page 58
ASC+T (Automatic Stability
Control plus Traction), yellows
Goes out shortly after the igni-
tion is switched on:
System OK.
Additional notes: Page 84
ABS (Antilock Brake System),
yellowo
Goes out after the engine has
started. If the lamp comes on
during normal vehicle opera-
tion: ABS has been deactivated in
response to a system malfunction. Con-
ventional braking force remains unim-
paired.
Additional notes: Page 103
Brake pad wear, yellow#
Lights up when starter is actu-
ated and goes out when the
engine is started.
If the lamp comes on during normal
vehicle operation: replace brake pads
immediately.
a
Use only original BMW-approved
brake pads otherwise the vehicle
authorization is no longer valid.c
Indicator and warning lamps
Page 22 of 179

At a glanceControls Car care Repairs Technical Data Index
21
Brake hydraulics, redn
Goes out after the engine has
started.
If the lamp comes on during
normal vehicle operation: low brake
fluid. Additional notes: Page 128
Parking brake, redm
Goes out after the engine has
started. Comes on when you
engage the parking brake.
Additional notes: Page 56
Emissions-related systemsY
Lamp goes out once engine
starts.
If this indicator lamp lights up
during normal vehicle operation, either
continuously or intermittently, this indi-
cates a fault in one of the emissions-
related electronic circuits. Although the
vehicle remains operational, you should
have the systems checked by a BMW
Retailer at the earliest possible opportu-
nity.
Please fasten safety belts
*, red
q
(With acoustic signal
if the
driverÕs belt is not buckled).
Lights up briefly when the
ignition key is turned, and then goes out
(in some models it goes out after you
fasten safety belts).
BMW Convertible
Rollover Protection System
*,
yellow
;
Goes out shortly after the igni-
tion is switched on:
System OK.
Indicator and warning lamps
Page 55 of 179
54
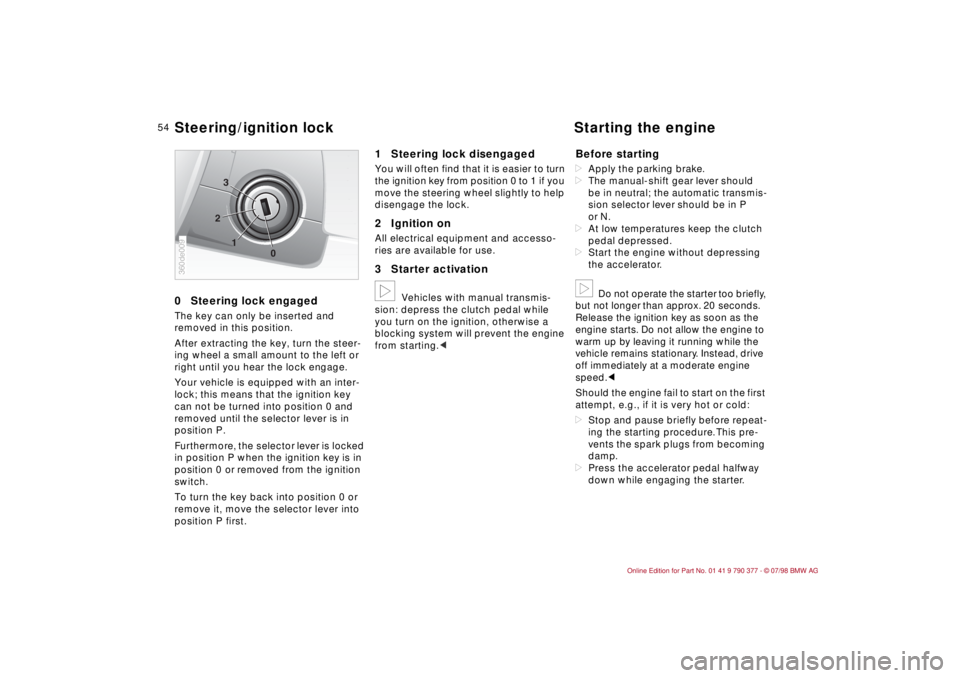
0Steering lock engagedThe key can only be inserted and
removed in this position.
After extracting the key, turn the steer-
ing wheel a small amount to the left or
right until you hear the lock engage.
Your vehicle is equipped with an inter-
lock; this means that the ignition key
can not be turned into position 0 and
removed until the selector lever is in
position P.
Furthermore, the selector lever is locked
in position P when the ignition key is in
position 0 or removed from the ignition
switch.
To turn the key back into position 0 or
remove it, move the selector lever into
position P first.
1 Steering lock disengagedYou will often find that it is easier to turn
the ignition key from position 0 to 1 if you
move the steering wheel slightly to help
disengage the lock.2 Ignition onAll electrical equipment and accesso-
ries are available for use.3 Starter activationb
Vehicles with manual transmis-
sion: depress the clutch pedal while
you turn on the ignition, otherwise a
blocking system will prevent the engine
from starting.c
Before startingdApply the parking brake.
dThe manual-shift gear lever should
be in neutral; the automatic transmis-
sion selector lever should be in P
or N.
dAt low temperatures keep the clutch
pedal depressed.
dStart the engine without depressing
the accelerator.b
Do not operate the starter too briefly,
but not longer than approx. 20 seconds.
Release the ignition key as soon as the
engine starts. Do not allow the engine to
warm up by leaving it running while the
vehicle remains stationary. Instead, drive
off immediately at a moderate engine
speed.c
Should the engine fail to start on the first
attempt, e.g., if it is very hot or cold:
dStop and pause briefly before repeat-
ing the starting procedure. This pre-
vents the spark plugs from becoming
damp.
dPress the accelerator pedal halfway
down while engaging the starter.
1 2
03
360de009Steering/ignition lock Starting the engine
Page 57 of 179
56
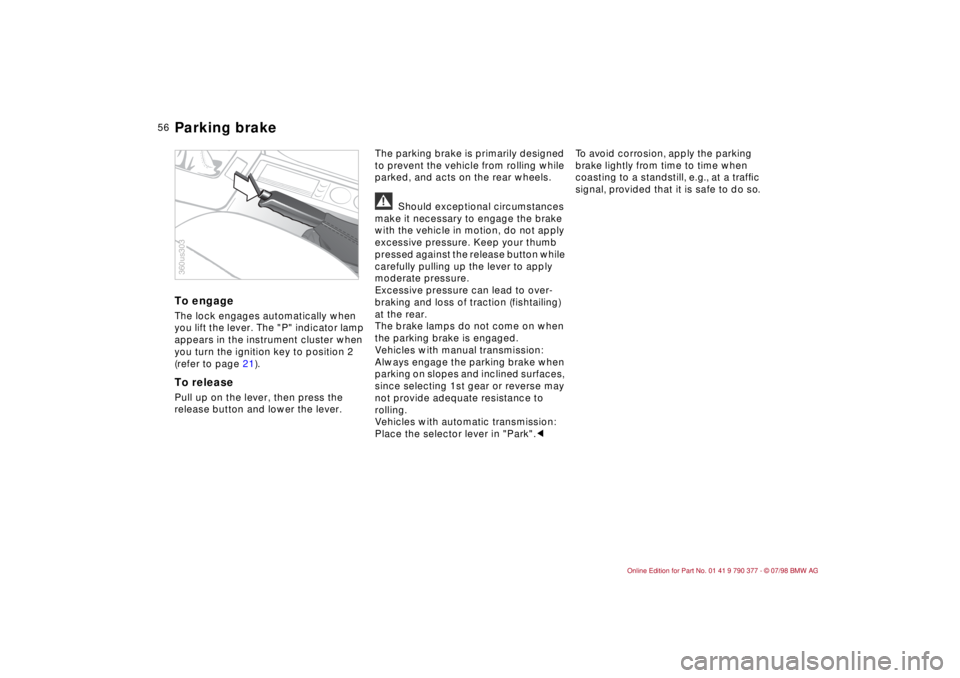
To engageThe lock engages automatically when
you lift the lever. The "P" indicator lamp
appears in the instrument cluster when
you turn the ignition key to position 2
(refer to page 21).To releasePull up on the lever, then press the
release button and lower the lever.The parking brake is primarily designed
to prevent the vehicle from rolling while
parked, and acts on the rear wheels.
a
Should exceptional circumstances
make it necessary to engage the brake
with the vehicle in motion, do not apply
excessive pressure. Keep your thumb
pressed against the release button while
carefully pulling up the lever to apply
moderate pressure.
Excessive pressure can lead to over-
braking and loss of traction (fishtailing)
at the rear.
The brake lamps do not come on when
the parking brake is engaged.
Vehicles with manual transmission:
Always engage the parking brake when
parking on slopes and inclined surfaces,
since selecting 1st gear or reverse may
not provide adequate resistance to
rolling.
Vehicles with automatic transmission:
Place the selector lever in "Park".cTo avoid corrosion, apply the parking
brake lightly from time to time when
coasting to a standstill, e.g., at a trafÞc
signal, provided that it is safe to do so.
360us303Parking brake
Page 58 of 179
57
At a glanceControls Car careRepairsTechnicalDataIndex
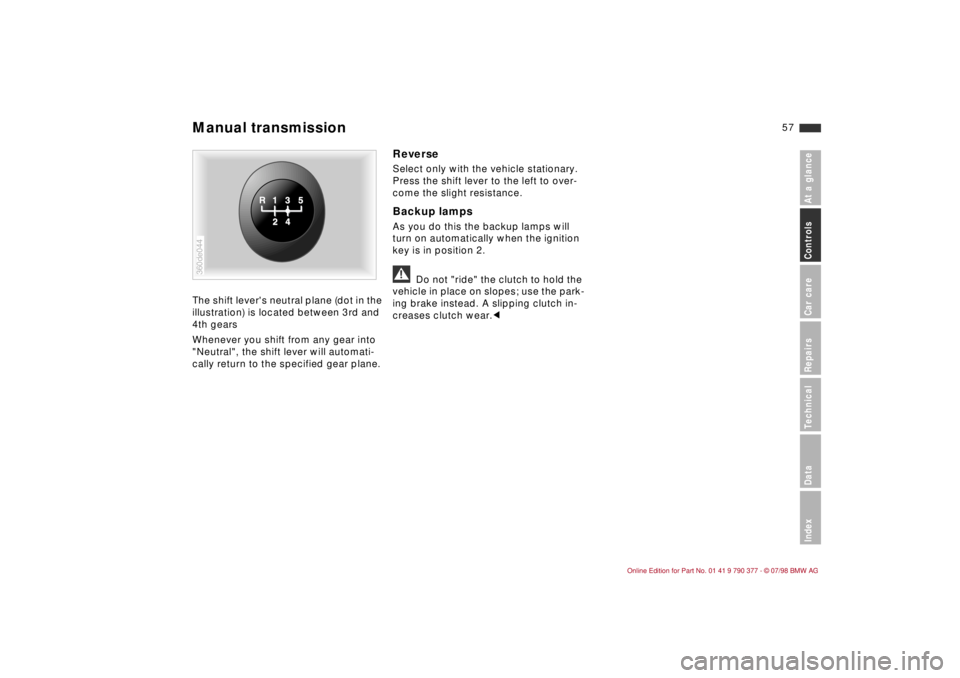
The shift lever's neutral plane (dot in the
illustration) is located between 3rd and
4th gears
Whenever you shift from any gear into
"Neutral", the shift lever will automati-
cally return to the specified gear plane.
ReverseSelect only with the vehicle stationary.
Press the shift lever to the left to over-
come the slight resistance.Backup lampsAs you do this the backup lamps will
turn on automatically when the ignition
key is in position 2.a
Do not "ride" the clutch to hold the
vehicle in place on slopes; use the park-
ing brake instead. A slipping clutch in-
creases clutch wear.c
360de044Manual transmission
Page 61 of 179
60
Indicator lamp for shift
electronicsdIf the lamp fails to go out or
dif it lights up during driving, there is a
malfunction in the shifting electronics
or in the transmission.
Bring the vehicle to a stop, select trans-
mission position "P", set the parking
brake and turn the engine off (ignition
key to position 0).
Wait a few seconds, then start the
engine.
If the indicator lamp goes out after a
few seconds, normal transmission per-
formance has been restored. Drive off
normally.
If the indicator lamp does not go out, all
selector lever positions can still be
selected, however in the forward posi-
tions the vehicle has limited perfor-
mances as it drives only in the 3rd or
4th gear.
If this happens, avoid extreme engine
loads and consult the nearest autho-
rized BMW Retailer.
a
Never carry out any work in the
engine compartment without first
ensuring that the transmission is in Park
or Neutral. Never leave children in the
vehicle unattended.c
For information on tow-starting, towing
and jump starting refer to pages 153
and 154.
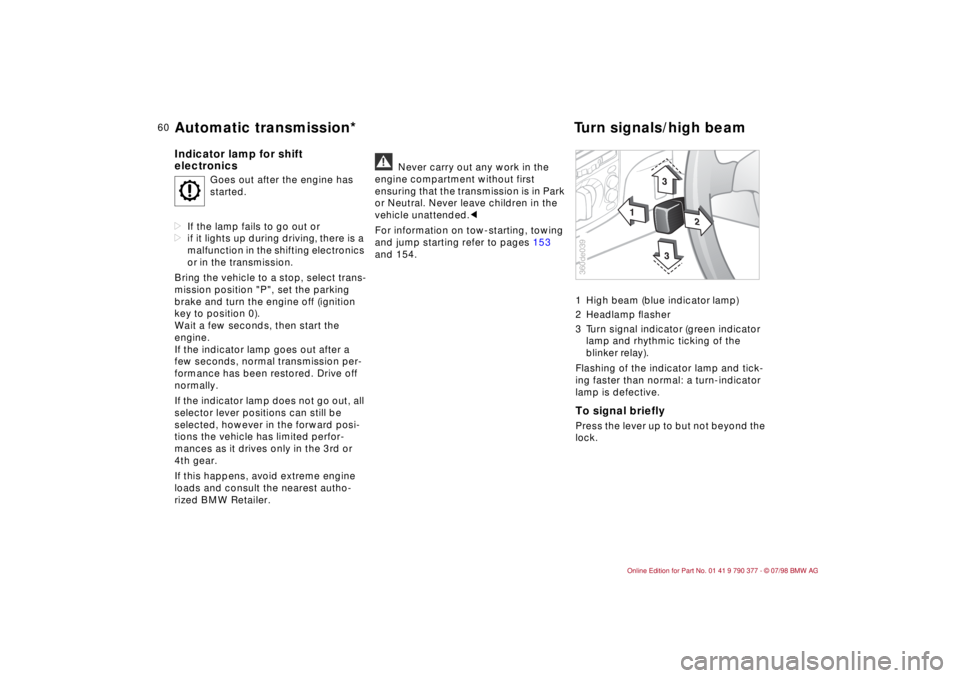
1 High beam (blue indicator lamp)
2 Headlamp ßasher
3 Turn signal indicator (green indicator
lamp and rhythmic ticking of the
blinker relay).
Flashing of the indicator lamp and tick-
ing faster than normal: a turn-indicator
lamp is defective.
To signal brieflyPress the lever up to but not beyond the
lock.
O
Goes out after the engine has
started.
1
2
3
3
360de039
Automatic transmission*Turn signals/high beam
Page 102 of 179

101
At a glanceControlsCar careRepairsTechnicalDataIndex
ClutchDepress the clutch throughout its com-
plete travel range to shift gears. Do not
"ride" the clutch by driving with your
foot resting against the pedal.a
Brakes:
Do not drive with your foot resting on the
brake pedal. Even light but consistent
pedal pressure can lead to high temper-
atures, brake wear and possibly even
brake failure.
Aquaplaning:
A wedge of water can form between
tires and road surface when you oper-
ate the vehicle on wet or slushy roads.
This phenomenon is referred to as
aquaplaning, or hydroplaning, and it is
characterized by a partial or complete
loss of contact between the tires and
the road surface. The ultimate results
are loss of steering and braking control.Water on the roads:
When driving through water (maximum
depth one foot = 30 cm) always drive at
walking speed, otherwise damage to
the engine, the electrical system and
the transmission can occur.
Rear window shelf:
Never use the rear window shelf to
store heavy or bulky objects. They
could pose a danger to the occupants
when the car is braked heavily.
Clothes hooks:
When suspending clothing from the
hooks, ensure that they will not obstruct
the driver's vision. Refrain from hanging
heavy objects from the hooks, as these
could cause personal injury when the
car is braked heavily.c
Driving notes
Page 104 of 179

10 3
At a glanceControlsCar careRepairsTechnicalDataIndex
ABS enhances active safety by helping
to prevent the wheels from locking under
braking. When the front wheels slide, the
driver loses steering control over the
vehicle. Traction loss at the rear wheels
can cause the rear end to break into
uncontrolled oversteer.
ABS is designed to meet two essential
requirements during every application:
dto help provide vehicle stability on all
types of road surface (asphalt,
cement, dirt, moisture, snow and ice).
dto help to retain steering and maneu-
vering capability under the same con-
ditions.
However, certain important consider-
ations must be borne in mind in connec-
tion with these requirements:
Not even ABS can suspend the normal
laws of physics. ABS alone can not pre-
vent accidents when the brakes are
applied without an adequate safety
interval between vehicles, when the car
reaches excessive rates of lateral accel-
eration in curves, or if aquaplaning
occurs. Responsibility for these types of
situations remains in the hands (and feet)
of the driver. You should never allow the
added safety of ABS to lull you into a
false sense of security, or mislead you
into taking increased risks that could
affect your own safety and that of others.
Driving with ABSThe yellow ABS warning in the instru-
ment panel goes out as soon as the
engine is started.
The system becomes operative once the
vehicle exceeds a speed of 5 mph
(8 km/h). The ABS is deactivated when-
ever the vehicle's speed drops below
approx. 2 mph (3 km/h). This means that
the wheels can lock in the Þnal phase of
a braking action - a factor of no signiÞ-
cance in actual practice.
The ABS system closed-loop control cir-
cuit cycles in fractions of a second. A
pulsation at the brake pedal indicates to
the driver that ABS is active, that is, that
the car is within its maximum braking
range. In addition, the audible pulsation
that accompanies the control operation
calls your attention to the reduced trac-
tion between tires and road surface
(marginal adhesion), and reminds you
that the vehicle's speed should be
reduced to adapt to road conditions.On road surfaces featuring a loose top
layer on a Þrmer substratum, e.g., on
gravel or snow, the braking distances
with ABS may be longer than with the
wheels locked. However, ABS continues
to provide enhanced vehicle and steer-
ing control under these conditions.
a
To ensure that the system remains
completely operational, never modify the
ABS. Service procedures on ABS are to
be performed by authorized technicians
only.c
ABS may fail to function with maximum
efÞciency when tires of different sizes
are mounted (e.g., winter tires/spare tire;
remount the correct tires at all wheels as
soon as possible).
In the event of a fault, the ABS warning
lamp in the instrument cluster lights up,
refer to page 18. The braking system
then reverts to conventional operation as
on a vehicle without ABS. However,
have the brake system checked by your
BMW Retailer as soon as possible. To
prevent undetected defects and cumu-
lative faults from adversely affecting the
brake system, refer any problems to
your authorized BMW Retailer at the
earliest opportunity.
Antilock Brake System (ABS)
Page 105 of 179

10 4
Disc brakes furnish optimum decelera-
tion and braking control as well as
greater fade resistance under heavy
use.
Limited vehicle use, extended periods
with the car parked or in storage and
light loading will increase the tendency
for corrosion to form on the rotors, and
dirt to accumulate on the pads. This
happens because the minimum pres-
sure between the pad and the disc
required for the self-cleaning function
of the disc brakes is not achieved.
If the brake rotors are corroded, they
will tend to respond to braking with a
pulsating effect which even extended
application will fail to cure.
a
Use only original BMW-approved
brake pads, as otherwise vehicle autho-
rization is no longer valid.c
Driving notes While driving in wet conditions and in
heavy rain, it is a good idea to apply
light pressure to the brake pedal every
few miles - Watch traffic conditions to
ensure that this maneuver does not
endanger other road users. The heat
generated in this braking process helps
dry the brake pads and rotors.
Maximum braking force is obtained
while the wheels continue to rotate,
peaking when the wheels remain on the
verge of locking without actually doing
so. ABS maintains this state automati-
cally. If the ABS fails, you should revert
to the staggered braking technique
described above (refer to page 106).
Extended or steep mountain descents
do not necessarily have to lead to
reduced braking efficiency; downshift
to a gear in which only minimal periodic
brake applications are required (you
can move the selector lever to the
appropriate lower range if your car is
equipped with an automatic transmis-
sion).
You can further increase the engine's
braking effect by selecting a lower gear,
downshifting as far as first gear or plac-
ing the selector lever in position 1 (2).Should engine braking prove inade-
quate, you should still avoid extended,
continuous braking. Instead of main-
taining low to moderate pressure over
an extended period of time, you should
decelerate the vehicle by applying more
substantial force at the pedal (watch for
following traffic!) and then pausing
before repeating the application. This
staggered braking technique allows the
brakes to cool in the intervals between
active braking phases, preventing over-
heating and ensuring that full braking
capacity remains available at all times.
a
Do not allow the vehicle to coast by
pressing down the clutch pedal or shift-
ing into neutral while underway. Never
drive with the engine switched
off (!). The engine provides no braking
effect when the clutch is disengaged or
the transmission is in neutral, and there
is no power-assist for brakes and steer-
ing when the engine is not running.
Never allow floor mats, carpets or other
objects to protrude into the area around
the accelerator, clutch and brake pedals
and obstruct their movement.c
Disc brakes