BMW I3 2014 I01 Owner's Manual
Manufacturer: BMW, Model Year: 2014, Model line: I3, Model: BMW I3 2014 I01Pages: 230, PDF Size: 29.93 MB
Page 141 of 230
The air flow from the air conditioner may be re‐
duced automatically to save battery power.
Switching the system on/off
Switch off Press and hold the left button until the
control switches off.
Switching on
Press any button except▷Rear window defroster.▷Seat heating.
Microfilter
In external and recirculated air mode the mi‐
crofilter filters dust and pollen from the air.
This filter should be replaced during scheduled
maintenance, refer to page 185, of your vehi‐
cle.
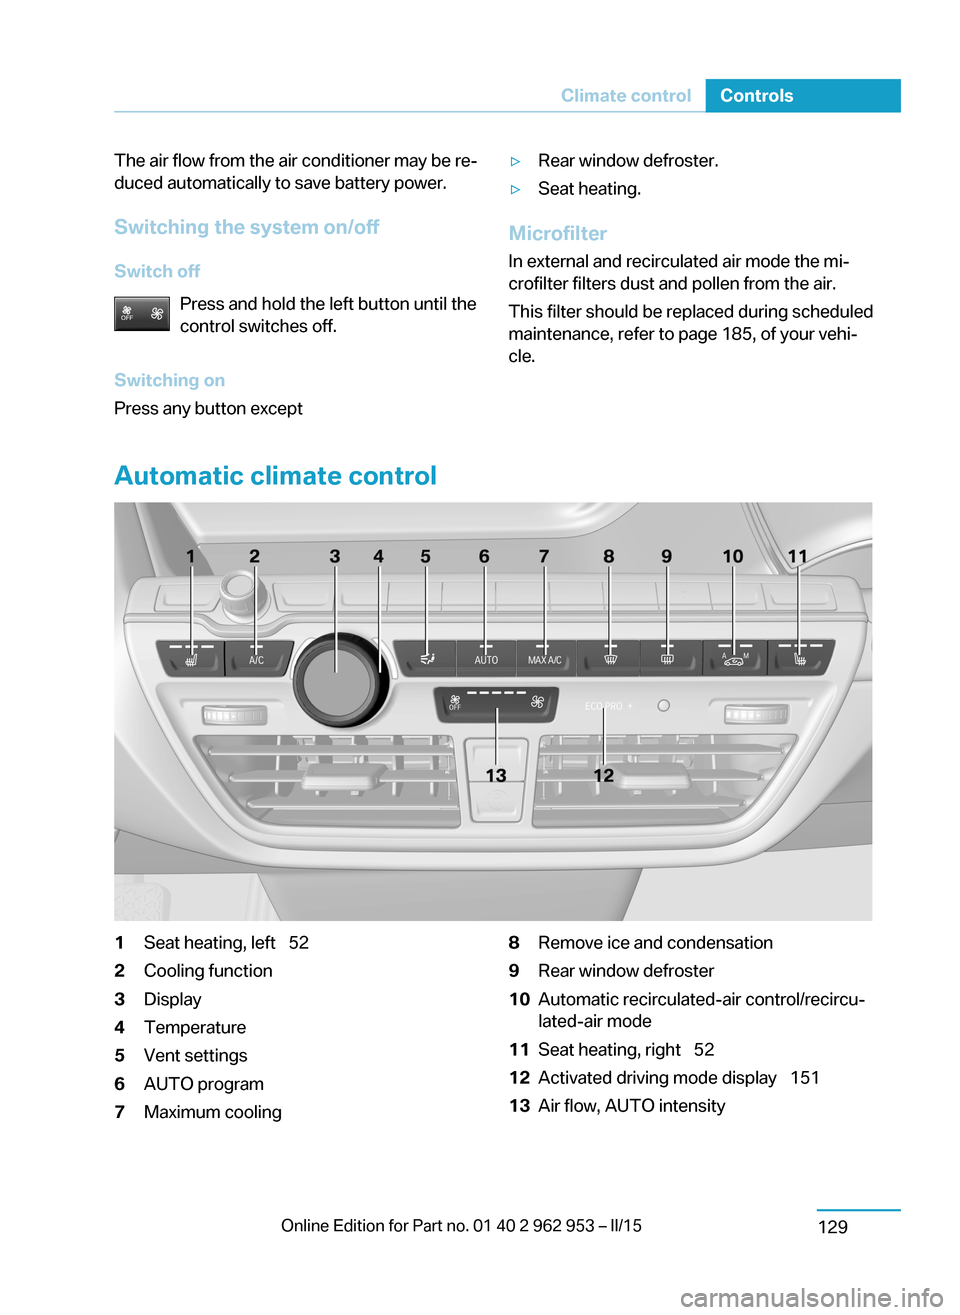
Automatic climate control
1Seat heating, left 522Cooling function3Display4Temperature5Vent settings6AUTO program7Maximum cooling8Remove ice and condensation9Rear window defroster10Automatic recirculated-air control/recircu‐
lated-air mode11Seat heating, right 5212Activated driving mode display 15113Air flow, AUTO intensitySeite 127Climate controlControls129
Page 142 of 230
HintsSufficient ventilation
When remaining in the vehicle for an ex‐
tended period of time, ensure sufficient exter‐
nal ventilation. Do not continuously use recir‐
culated-air mode; otherwise the air quality in
the interior continuously worsens.◀
Climate control functions in detail
Cooling function
The car's interior can be cooled with the sta‐
tionary climate control or via the A/C button
with drive readiness activated.
Press button.
The air will be cooled and dehumidi‐
fied and, depending on the temperature set‐
ting, warmed again.
Depending on the weather, the windshield and
side windows may fog up briefly when drive
readiness is activated.
The cooling function is switched on automati‐
cally with the AUTO program.
When using the automatic climate control,
condensation water, refer to page 147, devel‐
ops that exits underneath the vehicle.
Temperature Turn the ring to set the desired
temperature.
The selected temperature is shown on the dis‐
play of the automatic climate control.
The automatic climate control reaches this
temperature as quickly as possible, if needed
by increasing the cooling or heating output,
and then keeps it constant.
Do not rapidly switch between different tem‐
perature settings. Otherwise, the automatic cli‐mate control will not have sufficient time to ad‐
just the set temperature.
To reduce the energy consumption, the cool‐
ing or heating output is reduced or deactivated
as per ECO-PRO mode, refer to page 151.
Manual air distribution Press button repeatedly to select a
program:▷Windows.▷Upper body region.▷Footwell.▷Windows and upper body region.▷Windows and footwell.▷Upper body region and footwell.▷Windows, upper body region, and footwell.
The selected air distribution is shown on the
display of the automatic climate control.
If the windows are fogged over, press the
AUTO button to utilize the condensation sen‐
sor.
AUTO program Press button.
Air flow, air distribution and tempera‐
ture are controlled automatically.
Depending on the selected temperature,
AUTO intensity program and outside influen‐
ces, the air is directed to the windshield, side
windows, upper body, and into the footwell.
The cooling function, refer to page 130, is
switched on automatically with the AUTO pro‐
gram.
At the same time, a condensation sensor con‐
trols the program so as to prevent window
condensation as much as possible.
To reel off the program: press the button again
or manually adjust the air distribution.
Seite 128ControlsClimate control130
Page 143 of 230
Intensity of the AUTO program
With the AUTO program activated, the auto‐
matic intensity control can be changed.
Press the left or right side of the but‐
ton: decrease or increase the inten‐
sity.
The intensity level is indicated through LEDs.
Maximum cooling Press button.
The system is set to the lowest tem‐
perature, optimum air flow and air circulation
mode.
Air flows out of the vents to the upper body re‐
gion. The vents need to be open for this.
The function is available above an external
temperature of approx. 32 ℉/0 ℃ and when
drive readiness is indicated.
If ECO PRO+, refer to page 151, is activated,
this function is deactivated.
Adjust air flow with the program active.
Defrosts windows and removes
condensation
Press button.
Ice and condensation are quickly re‐
moved from the windshield and the front side
windows.
For this purpose, point the side vents onto the
side windows as needed.
Adjust air flow with the program active.
If the windows are fogged over, you can also
reel on the cooling function or press the AUTO
button to utilize the condensation sensor.
Rear window defroster Press button.
The rear window defroster switches
off automatically after a certain period of time.Automatic recirculated-air control/ recirculated-air mode
You may respond to unpleasant odors or pollu‐ tants in the immediate environment by tempo‐
rarily suspending the supply of outside air. The
system then recirculates the air currently
within the vehicle.
Press button repeatedly to select an
operating mode:▷LEDs off: outside air flows in continuously.▷Left LED on, automatic recirculated-air
control: a sensor detects pollutants in the
outside air and shuts off automatically.▷Right LED on, recirculated-air mode: the
supply of outside air into the vehicle is per‐
manently blocked.
To prevent window fogging, recirculated air
mode switches off automatically after a certain
amount of time, depending on the environ‐
mental conditions.
If the windows are fogged over, reel off the re‐
circulated-air mode and press the AUTO but‐
ton to utilize the condensation sensor. Make
sure that air can flow to the windshield.
Sufficient ventilation
When remaining in the vehicle for an ex‐
tended period of time, ensure sufficient exter‐
nal ventilation. Do not continuously use recir‐
culated-air mode; otherwise the air quality in
the interior continuously worsens.◀
Air flow, manual
To manually adjust air flow turn off AUTO pro‐
gram first.
Press the left or right side of the but‐
ton: decrease or increase air flow.
The intensity is indicated through LEDs. The
highest level is active when five LEDs are lit.
The air flow of the automatic climate control
may be reduced automatically to save battery
power.
Seite 129Climate controlControls131
Page 144 of 230
Switching the system on/off
Switch off Press and hold the left button until the
control switches off.
Switching on
Press any button except▷Rear window defroster.▷Seat heating.
Microfilter/activated-charcoal filter
In external and recirculated air mode the mi‐
crofilter/activated charcoal filter filters dust,
pollen, and gaseous pollutants out of the air.
This filter should be replaced during scheduled
maintenance, refer to page 185, of your vehi‐
cle.
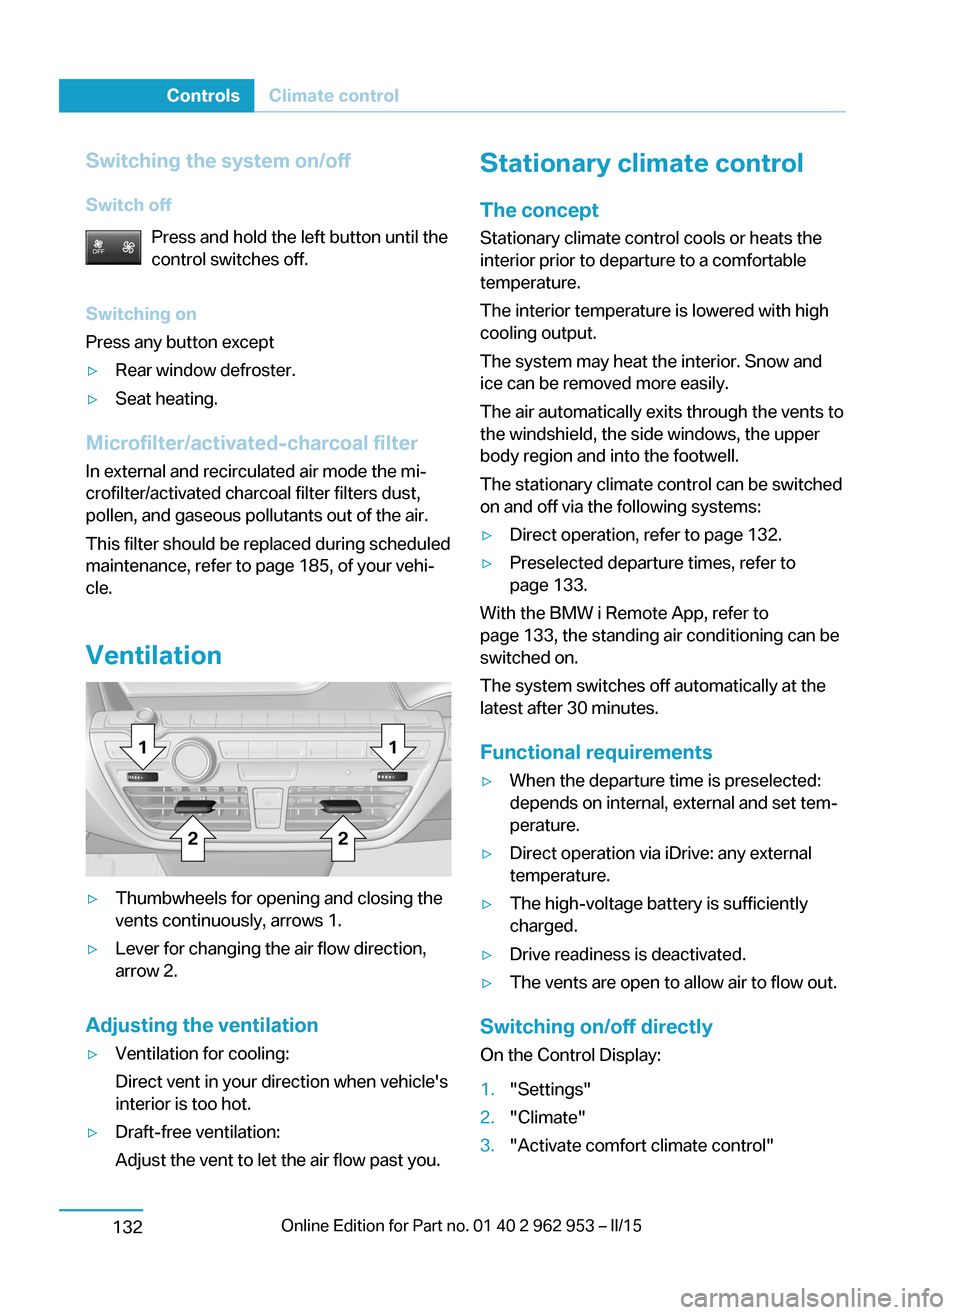
Ventilation
▷Thumbwheels for opening and closing the
vents continuously, arrows 1.▷Lever for changing the air flow direction,
arrow 2.
Adjusting the ventilation
▷Ventilation for cooling:
Direct vent in your direction when vehicle's
interior is too hot.▷Draft-free ventilation:
Adjust the vent to let the air flow past you.Stationary climate control
The concept Stationary climate control cools or heats the
interior prior to departure to a comfortable
temperature.
The interior temperature is lowered with high
cooling output.
The system may heat the interior. Snow and
ice can be removed more easily.
The air automatically exits through the vents to
the windshield, the side windows, the upper
body region and into the footwell.
The stationary climate control can be switched
on and off via the following systems:▷Direct operation, refer to page 132.▷Preselected departure times, refer to
page 133.
With the BMW i Remote App, refer to
page 133, the standing air conditioning can be
switched on.
The system switches off automatically at the
latest after 30 minutes.
Functional requirements
▷When the departure time is preselected:
depends on internal, external and set tem‐
perature.▷Direct operation via iDrive: any external
temperature.▷The high-voltage battery is sufficiently
charged.▷Drive readiness is deactivated.▷The vents are open to allow air to flow out.
Switching on/off directly
On the Control Display:
1."Settings"2."Climate"3."Activate comfort climate control"Seite 130ControlsClimate control132
Page 145 of 230
The symbol on the automatic climate con‐
trol flashes if the stationary climate control is
switched on.
Activate climate control at departuretime
The reel-on time is automatically determined
based on the temperature. The system
promptly switches on before the selected de‐
parture time.
On the Control Display:1."Settings"2."Departure time"3."Precondition for departure time"4."Departure 1:"5.Set and activate Desired departure time,
refer to page 163.
The symbol on the automatic climate con‐
trol lights up when the departure time is acti‐
vated.
The symbol on the automatic climate con‐
trol flashes when the stationary climate control
has been switched on.
If drive readiness is switched off, changes can
be made on the Control Display. Departure
time can only be changed once. Scheduled de‐
parture times are not adjusted. Settings for cli‐
mate control and charging operation are also
applied for scheduled departure times.
Activating with BMW i Remote app
With the BMW i remote app, refer to Owner's
Handbook regarding BMW i remote, the sys‐
tem can be switched on immediately or at a
preselected departure time.
Seite 131Climate controlControls133
Page 146 of 230
Interior equipmentVehicle features and optionsThis chapter describes all standard, country-
specific and optional features offered with the
series. It also describes features that are not
necessarily available in your car, e. g., due to
the selected options or country versions. This
also applies to safety-related functions and
systems.
Sun visorGlare shield
Fold the sun visor down or up.
Vanity mirror
A vanity mirror is located in the sun visor be‐
hind a cover. When the cover is opened, the
mirror lighting switches on.
Ashtray/cigarette lighterAshtray
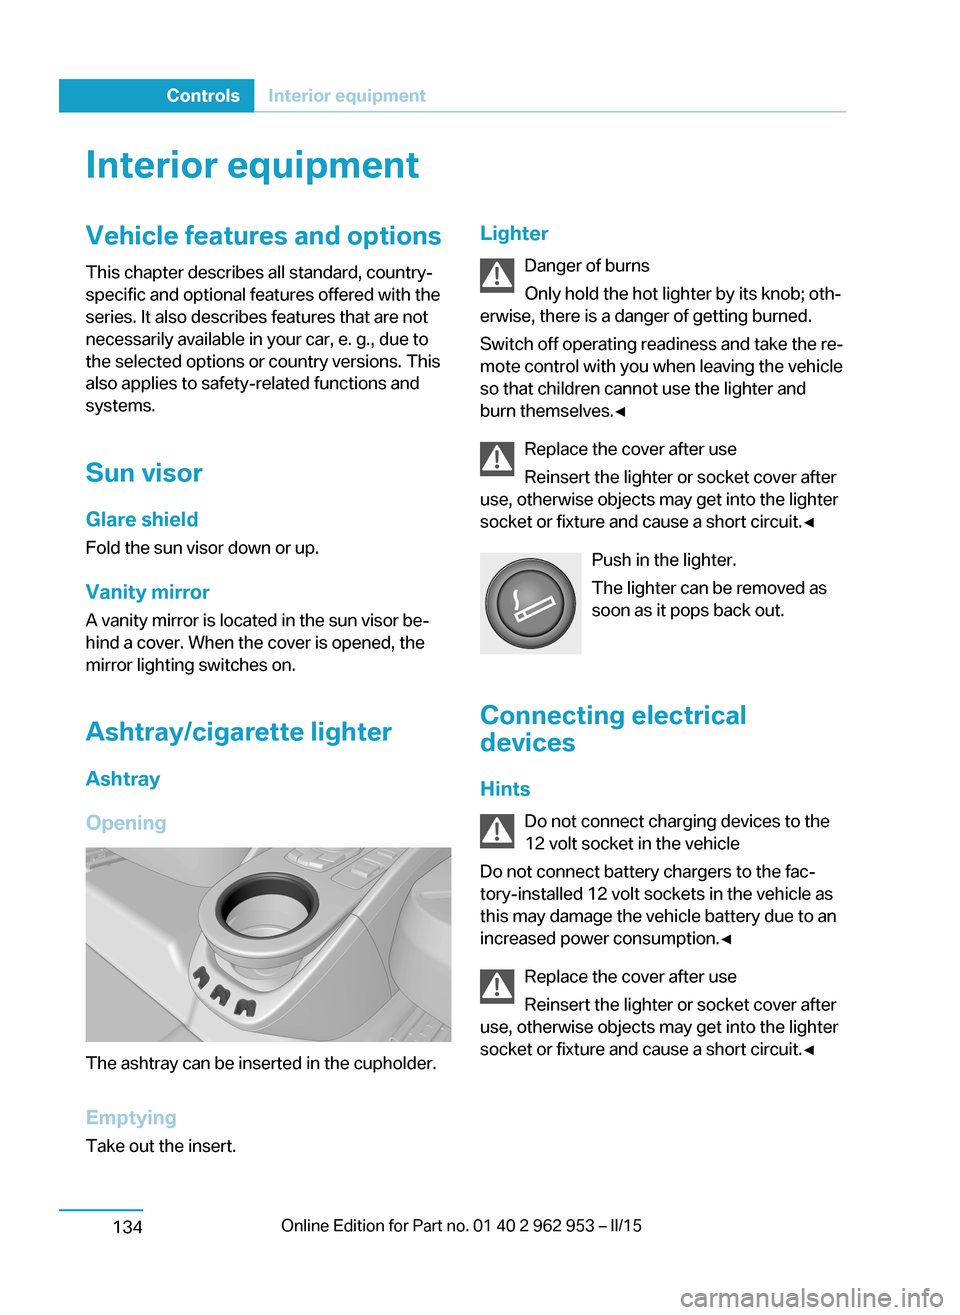
Opening
The ashtray can be inserted in the cupholder.
Emptying Take out the insert.
Lighter
Danger of burns
Only hold the hot lighter by its knob; oth‐
erwise, there is a danger of getting burned.
Switch off operating readiness and take the re‐
mote control with you when leaving the vehicle
so that children cannot use the lighter and
burn themselves.◀
Replace the cover after use
Reinsert the lighter or socket cover after
use, otherwise objects may get into the lighter
socket or fixture and cause a short circuit.◀
Push in the lighter.
The lighter can be removed as
soon as it pops back out.
Connecting electrical
devices
Hints Do not connect charging devices to the
12 volt socket in the vehicle
Do not connect battery chargers to the fac‐
tory-installed 12 volt sockets in the vehicle as
this may damage the vehicle battery due to an
increased power consumption.◀
Replace the cover after use
Reinsert the lighter or socket cover after
use, otherwise objects may get into the lighter
socket or fixture and cause a short circuit.◀Seite 132ControlsInterior equipment134
Page 147 of 230
Sockets
General information
The lighter socket can be used as a socket for
electrical equipment when operating and drive
readiness are activated.
Note
The total load of all sockets must not exceed
140 watts at 12 volts.
Do not damage the socket by using unsuitable
connectors.
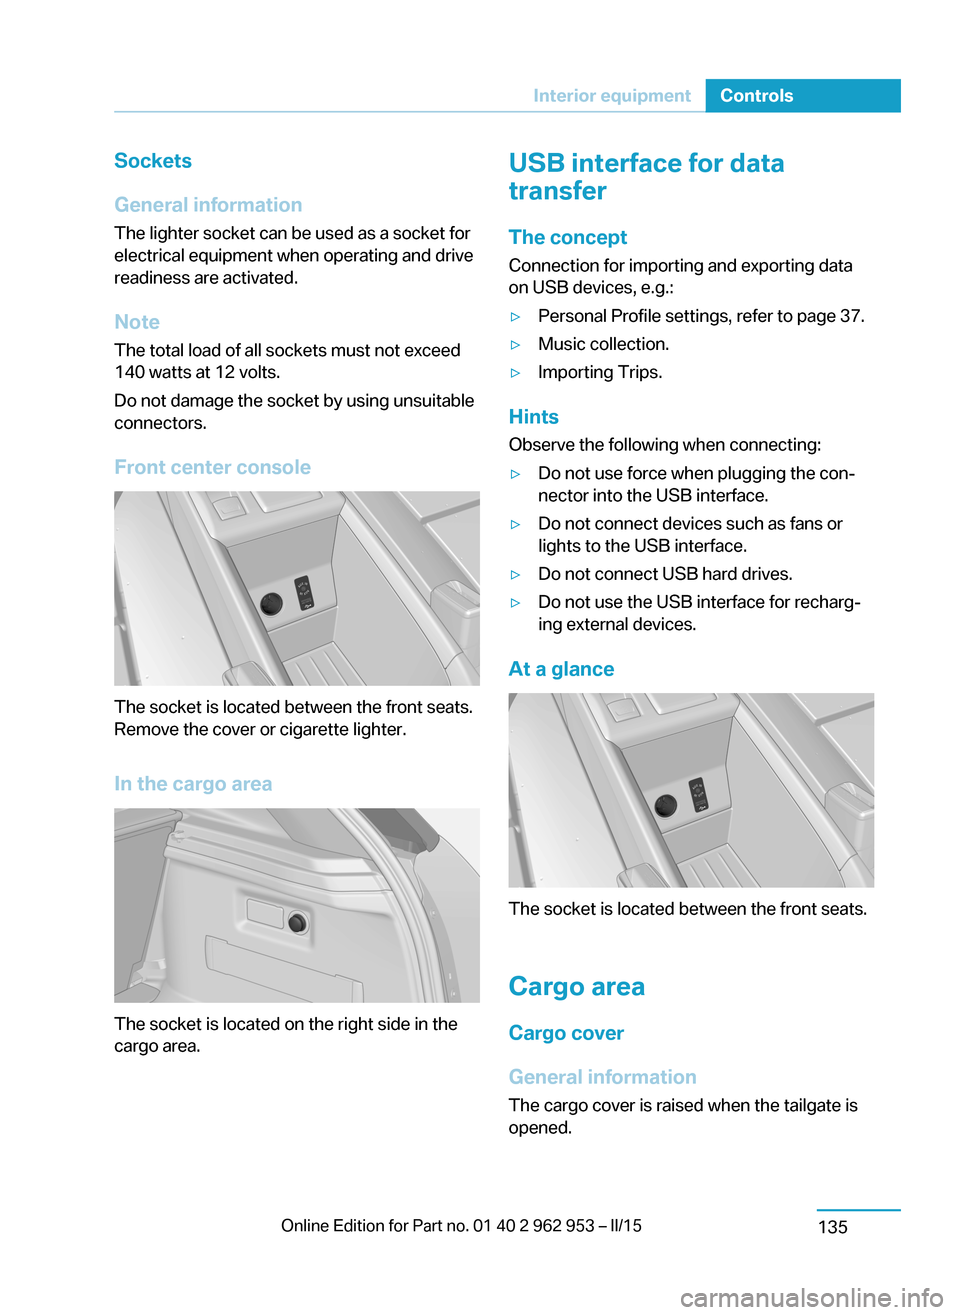
Front center console
The socket is located between the front seats.
Remove the cover or cigarette lighter.
In the cargo area
The socket is located on the right side in the
cargo area.
USB interface for data
transfer
The concept Connection for importing and exporting data
on USB devices, e.g.:▷Personal Profile settings, refer to page 37.▷Music collection.▷Importing Trips.
Hints
Observe the following when connecting:
▷Do not use force when plugging the con‐
nector into the USB interface.▷Do not connect devices such as fans or
lights to the USB interface.▷Do not connect USB hard drives.▷Do not use the USB interface for recharg‐
ing external devices.
At a glance
The socket is located between the front seats.
Cargo area
Cargo cover
General information The cargo cover is raised when the tailgate is
opened.
Seite 133Interior equipmentControls135
Page 148 of 230
NoteDo not deposit heavy objects
Do not deposit heavy or hard objects on
the cargo cover. Otherwise, they may pose a
risk to occupants, such as during braking and
evasive maneuvers.◀
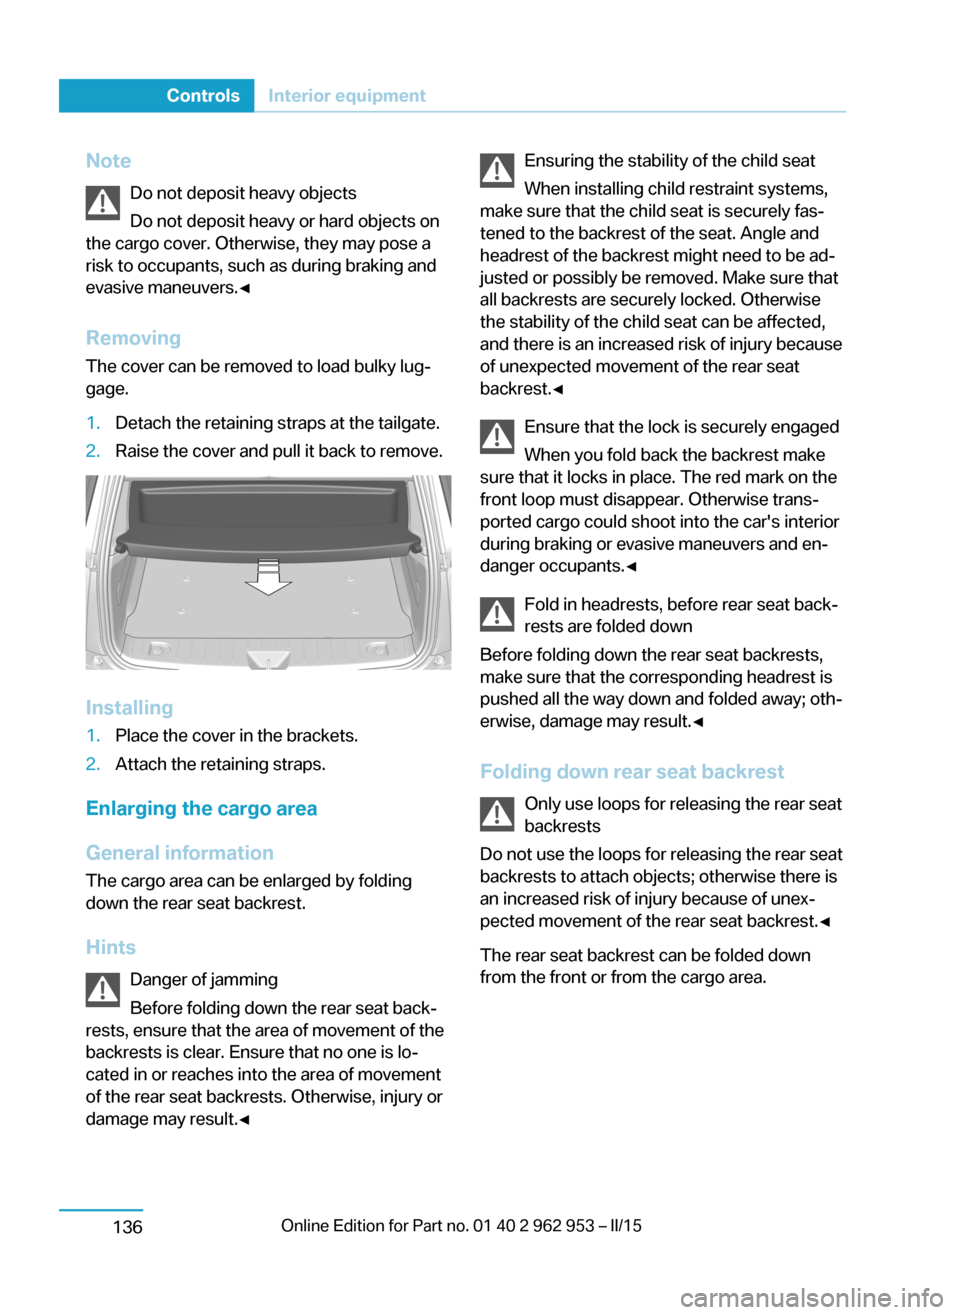
Removing The cover can be removed to load bulky lug‐
gage.1.Detach the retaining straps at the tailgate.2.Raise the cover and pull it back to remove.
Installing
1.Place the cover in the brackets.2.Attach the retaining straps.
Enlarging the cargo area
General information
The cargo area can be enlarged by folding
down the rear seat backrest.
Hints Danger of jamming
Before folding down the rear seat back‐
rests, ensure that the area of movement of the
backrests is clear. Ensure that no one is lo‐
cated in or reaches into the area of movement
of the rear seat backrests. Otherwise, injury or
damage may result.◀
Ensuring the stability of the child seat
When installing child restraint systems,
make sure that the child seat is securely fas‐
tened to the backrest of the seat. Angle and
headrest of the backrest might need to be ad‐
justed or possibly be removed. Make sure that
all backrests are securely locked. Otherwise
the stability of the child seat can be affected,
and there is an increased risk of injury because
of unexpected movement of the rear seat
backrest.◀
Ensure that the lock is securely engaged
When you fold back the backrest make
sure that it locks in place. The red mark on the
front loop must disappear. Otherwise trans‐
ported cargo could shoot into the car's interior
during braking or evasive maneuvers and en‐
danger occupants.◀
Fold in headrests, before rear seat back‐
rests are folded down
Before folding down the rear seat backrests,
make sure that the corresponding headrest is
pushed all the way down and folded away; oth‐
erwise, damage may result.◀
Folding down rear seat backrest Only use loops for releasing the rear seat
backrests
Do not use the loops for releasing the rear seat backrests to attach objects; otherwise there is
an increased risk of injury because of unex‐
pected movement of the rear seat backrest.◀
The rear seat backrest can be folded down
from the front or from the cargo area.Seite 134ControlsInterior equipment136
Page 149 of 230
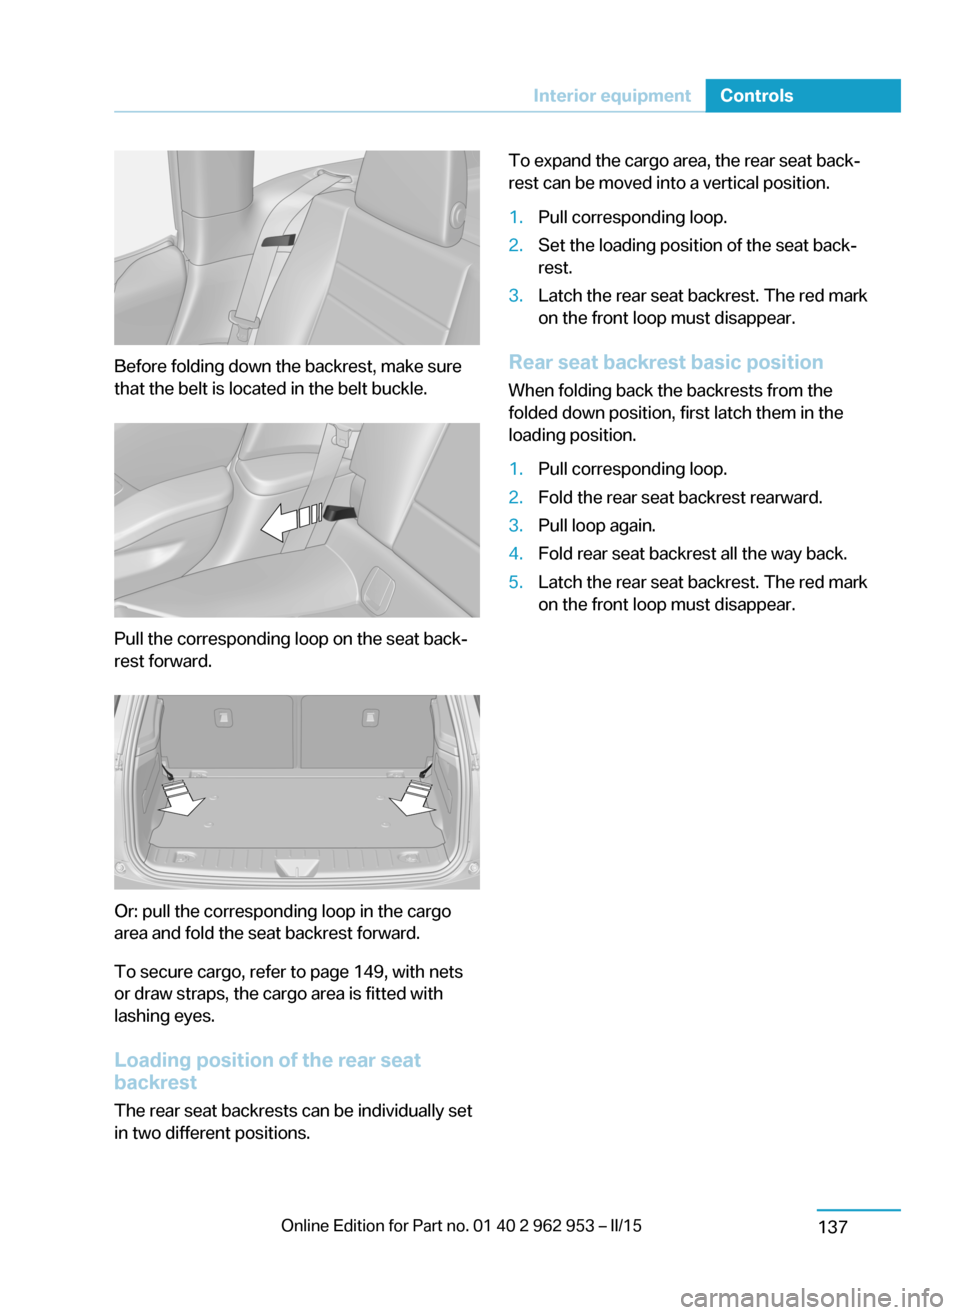
Before folding down the backrest, make sure
that the belt is located in the belt buckle.
Pull the corresponding loop on the seat back‐
rest forward.
Or: pull the corresponding loop in the cargo
area and fold the seat backrest forward.
To secure cargo, refer to page 149, with nets
or draw straps, the cargo area is fitted with
lashing eyes.
Loading position of the rear seat
backrest
The rear seat backrests can be individually set
in two different positions.
To expand the cargo area, the rear seat back‐
rest can be moved into a vertical position.1.Pull corresponding loop.2.Set the loading position of the seat back‐
rest.3.Latch the rear seat backrest. The red mark
on the front loop must disappear.
Rear seat backrest basic position
When folding back the backrests from the
folded down position, first latch them in the
loading position.
1.Pull corresponding loop.2.Fold the rear seat backrest rearward.3.Pull loop again.4.Fold rear seat backrest all the way back.5.Latch the rear seat backrest. The red mark
on the front loop must disappear.Seite 135Interior equipmentControls137
Page 150 of 230
Storage compartmentsVehicle features and optionsThis chapter describes all standard, country-
specific and optional features offered with the
series. It also describes features that are not
necessarily available in your car, e. g., due to
the selected options or country versions. This
also applies to safety-related functions and
systems.
Hints No loose objects in the car's interior
Do not stow any objects in the car's inte‐
rior without securing them; otherwise, they
may present a danger to occupants e.g., during
braking and evasive maneuvers.◀
Do not place anti-slip mats on the dash‐
board
Do not place anti-slip mats on the dashboard.
The mat materials could damage the dash‐
board.◀
Storage compartments The following storage compartments are avail‐
able in the vehicle interior:▷Glove compartment on the front passenger
side, refer to page 138.▷Storage compartment between the front
seats behind the cupholder.▷Storage compartment in the front center
armrest, refer to page 139.▷Compartments in the front doors, refer to
page 138.▷Storage compartment between the rear
seats.Glove compartment
Front passenger side
Note Close the glove compartment again im‐
mediately
Close the glove compartment immediately af‐
ter use while driving; otherwise, injury may oc‐
cur during accidents.◀
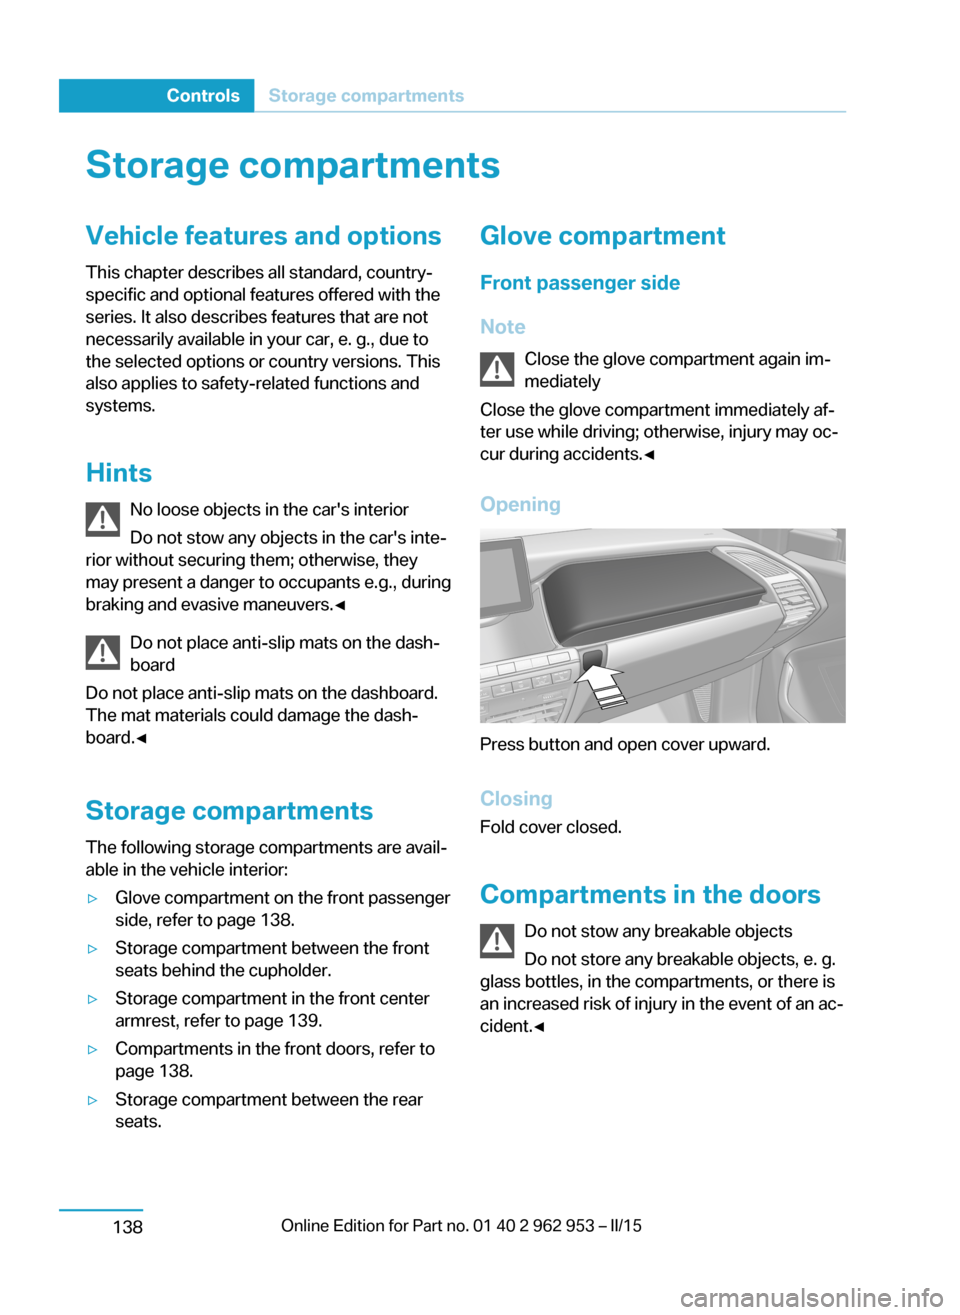
Opening
Press button and open cover upward.
ClosingFold cover closed.
Compartments in the doors Do not stow any breakable objects
Do not store any breakable objects, e. g.
glass bottles, in the compartments, or there is
an increased risk of injury in the event of an ac‐
cident.◀
Seite 136ControlsStorage compartments138