BMW I3 2014 I01 Owner's Manual
Manufacturer: BMW, Model Year: 2014, Model line: I3, Model: BMW I3 2014 I01Pages: 230, PDF Size: 29.93 MB
Page 211 of 230
Guide rails in car washes
Avoid car washes with guide rails higher
than 4 in/10 cm; otherwise, the vehicle body
could be damaged.◀
Before driving into a car wash In order to ensure that the vehicle can roll in a
car wash, take the following steps:1.Drive into the car wash.2.Engage selector lever position N.3.Remove foot from brake pedal.4.Press the Start/Stop button.
In this way, operating readiness remains
switched on, and a Check-Control mes‐
sage is displayed.
To activate drive readiness:
1.Depress the brake pedal.2.Press the Start/Stop button.
Pressing the Start/Stop button without step‐
ping on the brake turns operating readiness
off.
Selector lever position Selector lever position P is engaged automati‐
cally:
▷With operating readiness turned off.▷After approx. 15 minutes.
Headlights
▷Do not rub dry and do not use abrasive or
acidic cleansers.▷Soak areas that have been dirtied e. g.,
from insects, with shampoo and wash off
with water.▷Thaw ice with de-icing spray; do not use an
ice scraper.
After washing the vehicle
After washing the vehicle, apply the brakes
briefly to dry them; otherwise, braking action
can be reduced and corrosion of the brake
discs can occur.
Completely remove all residues on the win‐
dows, to minimize loss of visibility due to
smearing and to reduce wiper noises and
wiper blade wear.
Vehicle care Car care productsBMW recommends using care and cleaning
products from BMW, since these have been
tested and approved.
Car care and cleaning products
Follow the instructions on the container.
When cleaning the interior, open the doors or
windows.
Only use products intended for cleaning vehi‐
cles.
Cleansers can contain substances that are
dangerous and harmful to your health.◀
Vehicle paint
Regular care contributes to driving safety and
value retention. Environmental influences in
areas with elevated air pollution or natural con‐
taminants, such as tree resin or pollen can af‐
fect the vehicle's paintwork. Tailor the fre‐
quency and extent of your car care to these
influences.
Aggressive substances such as spilled fuel, oil,
grease or bird droppings, must be removed im‐
mediately to prevent the finish from being al‐
tered or discolored.
Leather care
Remove dust from the leather often, using a
cloth or vacuum cleaner.
Otherwise, particles of dust and road grime
chafe in pores and folds, and lead to increased wear and premature degradation of the leather
surface.Seite 197CareMobility199
Page 212 of 230
To guard against discoloration, such as from
clothing, provide leather care roughly every
two months.
Clean light-colored leather more frequently be‐
cause soiling on such surfaces is substantially
more visible.
Use leather care products; otherwise, dirt and
grease will gradually break down the protective
layer of the leather surface.
Suitable care products are available from the
service center.
Upholstery material care Vacuum regularly with a vacuum cleaner.
If upholstery is very dirty, e.g., with beverage
stains, use a soft sponge or microfiber cloth
with a suitable interior cleaner.
Clean the upholstery down to the seams using
large sweeping motions. Avoid rubbing the
material vigorously.
Damage from Velcro® fasteners
Open Velcro® fasteners on pants or
other articles of clothing can damage the seat
covers. Ensure that any Velcro® fasteners are
closed.◀
Caring for special components
Light-alloy wheels When cleaning the vehicle, use only neutral
wheel cleaners having a pH value from 5 to 9.
Do not use abrasive cleaning agents or steam
jets above 140 ℉/60 ℃. Follow the manufac‐
turer's instructions.
Aggressive, acidic or alkaline cleaning agents
can destroy the protective layer of adjacent
components, such as the brake disk.
Chrome surfaces Carefully clean components such as the radia‐
tor grille or door handles with an ample supply of water, possibly with shampoo added, partic‐ularly when they have been exposed to road
salt.
Rubber components Aside from water, treat only with rubber
cleansers.
When cleaning rubber seals, do not use any
silicon-containing car care products in order to
avoid damage or noises.
Fine wood partsClean fine wood facing and fine wood compo‐
nents only with a moist rag. Then dry with a
soft cloth.
Plastic components
These include:▷Imitation leather surfaces.▷Roofliner.▷Lamp lenses.▷Instrument cluster cover.▷Matt black spray-coated components.▷Painted parts in the interior.▷Carbon parts in the interior.
Clean with a microfiber cloth.
Dampen cloth lightly with water.
Do not soak the roofliner.
No cleansers that contain alcohol or sol‐
vents
Do not use cleansers that contain alcohol or
solvents, such as lacquer thinners, heavy-duty
grease removers, fuel, or such; this could lead
to surface damage.◀
Safety belts
Dirty belt straps impede the reeling action and
thus have a negative impact on safety.
Chemical cleaning
Do not clean chemically; this can destroy
the webbing.◀
Seite 198MobilityCare200
Page 213 of 230
Use only a mild soapy solution, with the safety
belts clipped into their buckles.
Do not allow the reels to retract the safety
belts until they are dry.
Carpets and floor mats No objects in the area around the pedals
Keep floor mats, carpets, and any other
objects out of the pedal area; otherwise, the
function of the pedals could be impeded while
driving and create the risk of an accident.
Do not place additional floor mats over existing
mats or other objects.
Only use floor mats that have been approved
for the vehicle and can be properly attached to
floor.
Ensure that the floor mats are securely fas‐
tened again after they were removed for clean‐
ing, e.g.◀
Floor mats can be removed from the car's inte‐
rior for cleaning.
If the floor carpets are very dirty, clean with a
microfiber cloth and water or a textile cleaner.
To prevent matting of the carpet, rub back and
forth in the direction of travel only.
Sensors/cameras
To clean sensors and cameras, use a cloth
moistened with a small amount of glass
cleaner.
Displays/monitors Cleaning displays and screens
Do not use any chemical or household
cleaning agents; otherwise, surfaces can be af‐
fected.◀
Keeping out moisture
Keep all fluids and moisture away from
the unit; otherwise, electrical components can
be damaged.◀Avoid pressure
Avoid pressing too hard when cleaning
and do not use abrasive materials; otherwise,
damage can result.◀
Clean with a clean, antistatic microfiber cloth.
Long idle times and long-term vehicle
storage
Do not allow the vehicle to sit idle for ex‐
tended periods with a low charging state
Before storing the vehicle for an extended pe‐
riod, check the battery charge indicator to en‐
sure that the high-voltage battery is fully
charged. For longer idle times, park the vehicle
with a charging plug plugged into a suitable
power source. Regularly check charging state.
Otherwise, the high-voltage battery can be
damaged when there is excessive discharge.◀
For idle phases that last several weeks, park
the vehicle with a fully charged battery if possi‐
ble.
Do not park the vehicle for longer than 14 days
if the electric range is less than 6 mls, approx.
10 km.
With storage times of up to three months, if
possible plug the vehicle into a suitable power
source or park it in a nearly fully charged state.
Note The service center can advise you on what to
consider when storing the vehicle for longer
than three months.Seite 199CareMobility201
Page 214 of 230

Page 215 of 230
Reference
This chapter contains the technical data and an
index that will quickly take you to the information you need.
Page 216 of 230
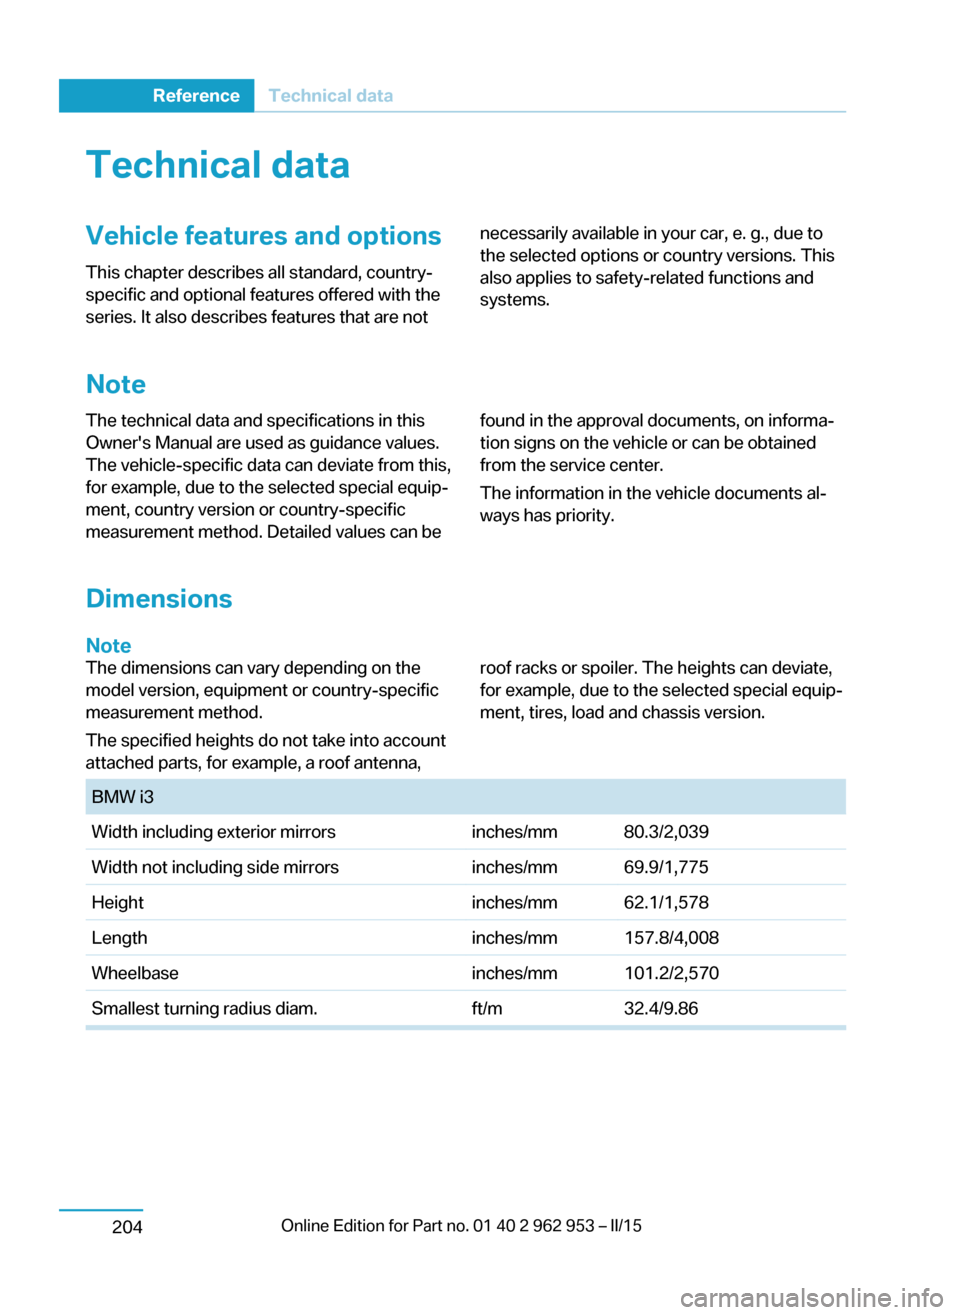
Technical dataVehicle features and options
This chapter describes all standard, country-
specific and optional features offered with the
series. It also describes features that are notnecessarily available in your car, e. g., due to
the selected options or country versions. This
also applies to safety-related functions and
systems.
Note
The technical data and specifications in this
Owner's Manual are used as guidance values.
The vehicle-specific data can deviate from this,
for example, due to the selected special equip‐
ment, country version or country-specific
measurement method. Detailed values can befound in the approval documents, on informa‐
tion signs on the vehicle or can be obtained
from the service center.
The information in the vehicle documents al‐
ways has priority.
Dimensions
Note
The dimensions can vary depending on the
model version, equipment or country-specific
measurement method.
The specified heights do not take into account
attached parts, for example, a roof antenna,roof racks or spoiler. The heights can deviate,
for example, due to the selected special equip‐
ment, tires, load and chassis version. BMW i3Width including exterior mirrorsinches/mm80.3/2,039 Width not including side mirrorsinches/mm69.9/1,775Heightinches/mm62.1/1,578Lengthinches/mm157.8/4,008Wheelbaseinches/mm101.2/2,570Smallest turning radius diam.ft/m32.4/9.86Seite 202ReferenceTechnical data204
Page 217 of 230
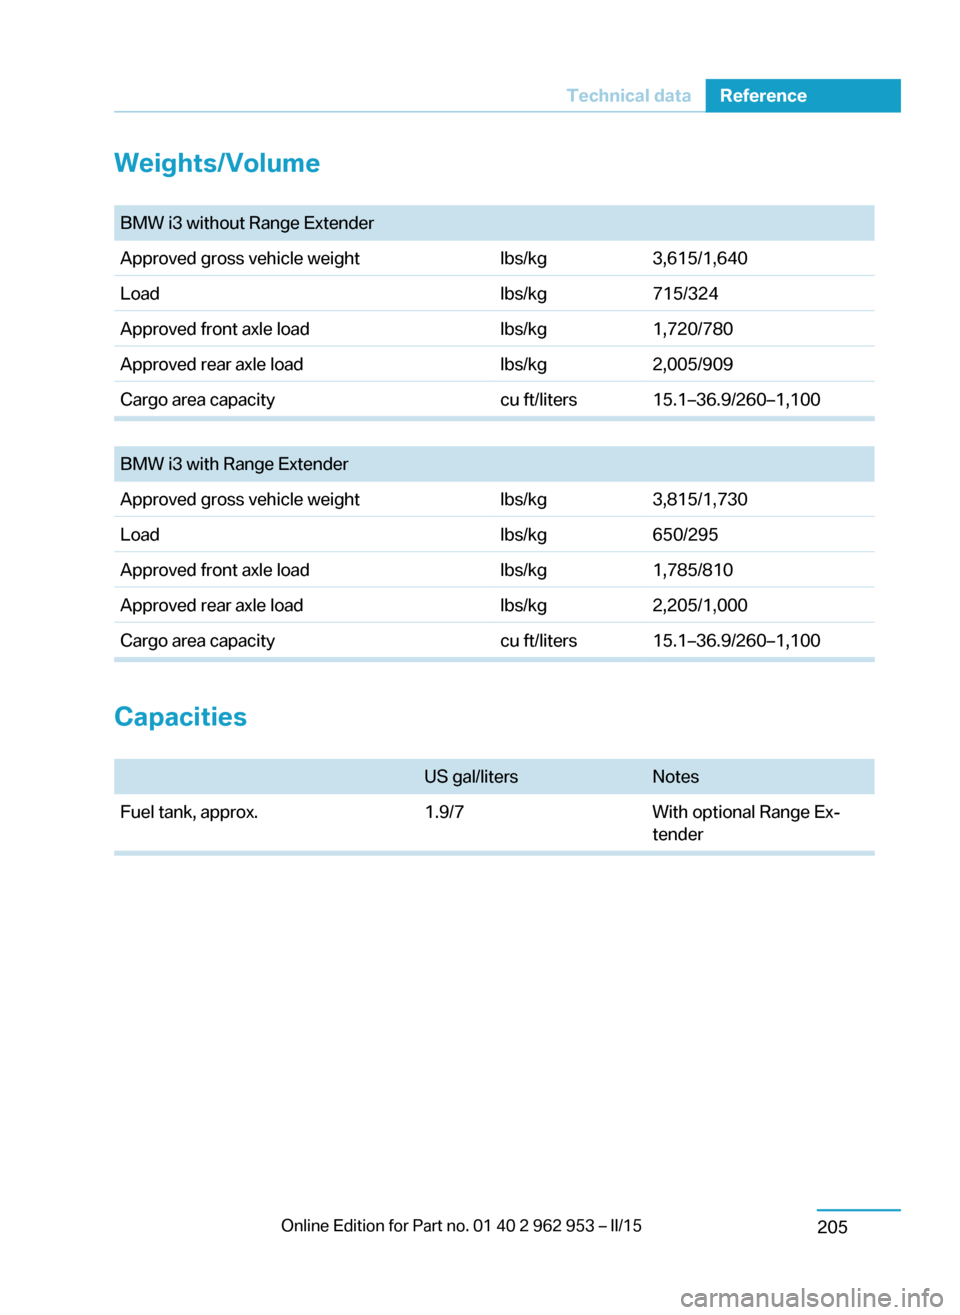
Weights/Volume BMW i3 without Range ExtenderApproved gross vehicle weightlbs/kg3,615/1,640Loadlbs/kg715/324Approved front axle loadlbs/kg1,720/780Approved rear axle loadlbs/kg2,005/909Cargo area capacitycu ft/liters15.1–36.9/260–1,100
BMW i3 with Range ExtenderApproved gross vehicle weightlbs/kg3,815/1,730Loadlbs/kg650/295Approved front axle loadlbs/kg1,785/810Approved rear axle loadlbs/kg2,205/1,000Cargo area capacitycu ft/liters15.1–36.9/260–1,100
Capacities
US gal/litersNotesFuel tank, approx.1.9/7With optional Range Ex‐
tenderSeite 203Technical dataReference205
Page 218 of 230
Appendix
Any updates to the Owner's Manual of the ve‐
hicle are listed here.
Correction to the Owner's
Manual
Opposite to the description in this Owner's
Manual, the following changes were imple‐
mented after the editorial deadline:
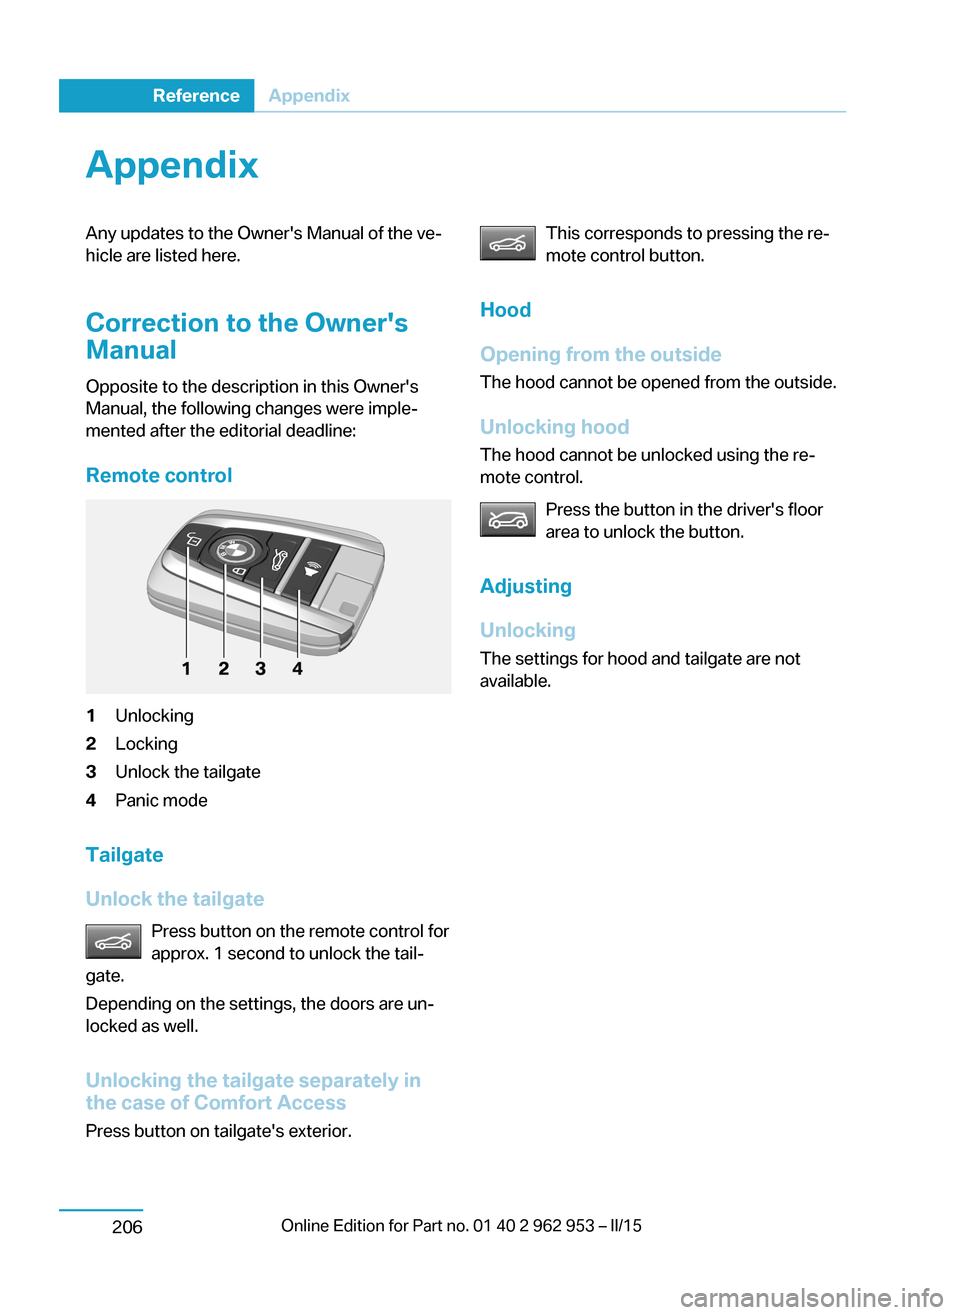
Remote control
1Unlocking
2Locking
3Unlock the tailgate
4Panic mode
Tailgate
Unlock the tailgate
Press button on the remote control for
approx. 1 second to unlock the tail‐
gate.
Depending on the settings, the doors are un‐
locked as well.
Unlocking the tailgate separately in
the case of Comfort Access
Press button on tailgate's exterior.
This corresponds to pressing the re‐
mote control button.
Hood
Opening from the outside
The hood cannot be opened from the outside.
Unlocking hood
The hood cannot be unlocked using the re‐
mote control.
Press the button in the driver's floor
area to unlock the button.
Adjusting
Unlocking
The settings for hood and tailgate are not
available.
Seite 202
ReferenceAppendix
206
Page 219 of 230

Seite 205AppendixReference207
Page 220 of 230
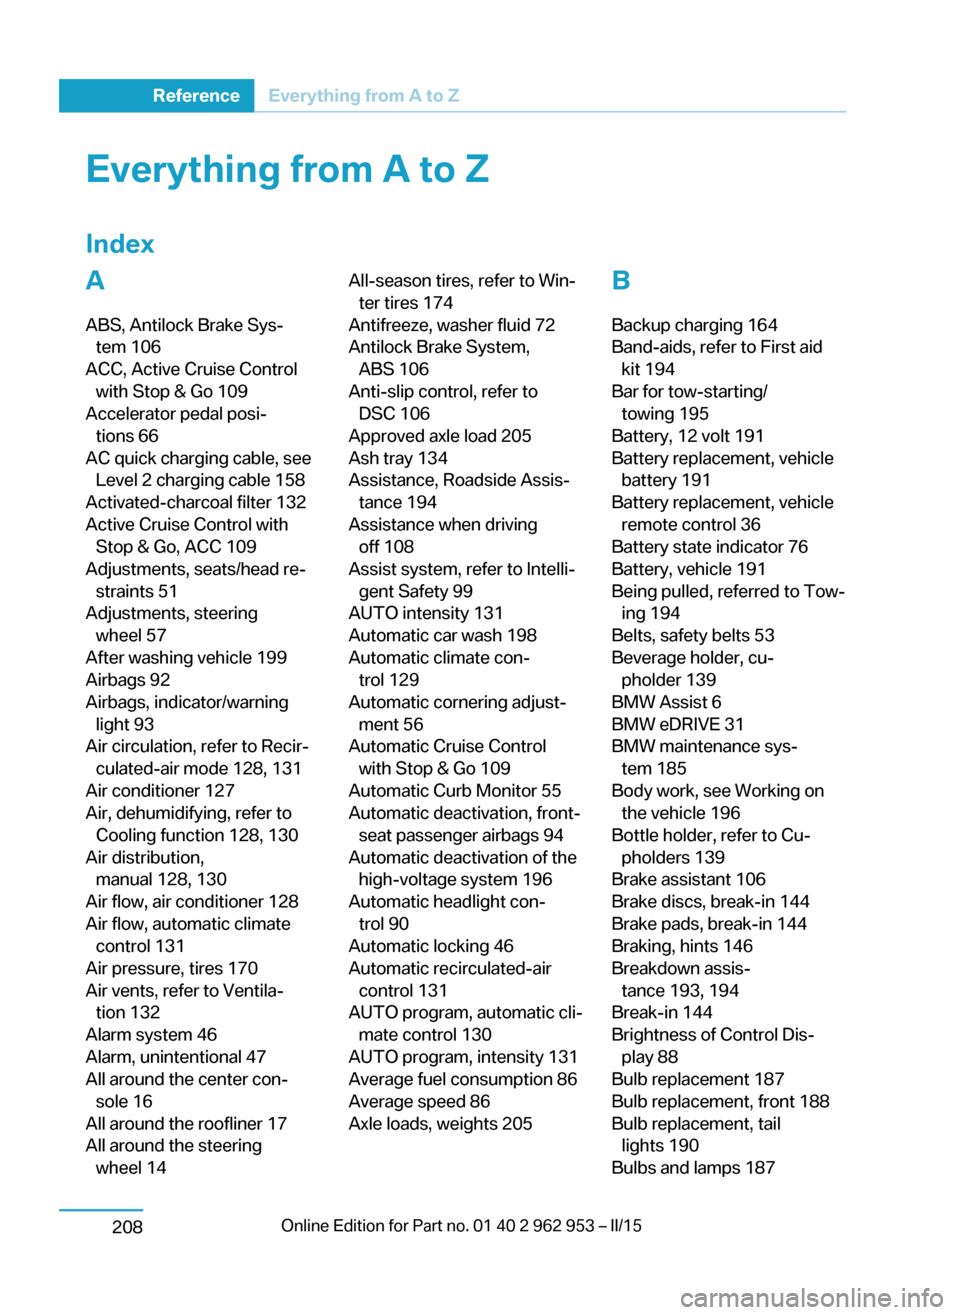
Everything from A to Z
IndexA ABS, Antilock Brake Sys‐ tem 106
ACC, Active Cruise Control with Stop & Go 109
Accelerator pedal posi‐ tions 66
AC quick charging cable, see Level 2 charging cable 158
Activated-charcoal filter 132
Active Cruise Control with Stop & Go, ACC 109
Adjustments, seats/head re‐ straints 51
Adjustments, steering wheel 57
After washing vehicle 199
Airbags 92
Airbags, indicator/warning light 93
Air circulation, refer to Recir‐ culated-air mode 128, 131
Air conditioner 127
Air, dehumidifying, refer to Cooling function 128, 130
Air distribution, manual 128, 130
Air flow, air conditioner 128
Air flow, automatic climate control 131
Air pressure, tires 170
Air vents, refer to Ventila‐ tion 132
Alarm system 46
Alarm, unintentional 47
All around the center con‐ sole 16
All around the roofliner 17
All around the steering wheel 14 All-season tires, refer to Win‐ter tires 174
Antifreeze, washer fluid 72
Antilock Brake System, ABS 106
Anti-slip control, refer to DSC 106
Approved axle load 205
Ash tray 134
Assistance, Roadside Assis‐ tance 194
Assistance when driving off 108
Assist system, refer to Intelli‐ gent Safety 99
AUTO intensity 131
Automatic car wash 198
Automatic climate con‐ trol 129
Automatic cornering adjust‐ ment 56
Automatic Cruise Control with Stop & Go 109
Automatic Curb Monitor 55
Automatic deactivation, front- seat passenger airbags 94
Automatic deactivation of the high-voltage system 196
Automatic headlight con‐ trol 90
Automatic locking 46
Automatic recirculated-air control 131
AUTO program, automatic cli‐ mate control 130
AUTO program, intensity 131
Average fuel consumption 86
Average speed 86
Axle loads, weights 205 B
Backup charging 164
Band-aids, refer to First aid kit 194
Bar for tow-starting/ towing 195
Battery, 12 volt 191
Battery replacement, vehicle battery 191
Battery replacement, vehicle remote control 36
Battery state indicator 76
Battery, vehicle 191
Being pulled, referred to Tow‐ ing 194
Belts, safety belts 53
Beverage holder, cu‐ pholder 139
BMW Assist 6
BMW eDRIVE 31
BMW maintenance sys‐ tem 185
Body work, see Working on the vehicle 196
Bottle holder, refer to Cu‐ pholders 139
Brake assistant 106
Brake discs, break-in 144
Brake pads, break-in 144
Braking, hints 146
Breakdown assis‐ tance 193, 194
Break-in 144
Brightness of Control Dis‐ play 88
Bulb replacement 187
Bulb replacement, front 188
Bulb replacement, tail lights 190
Bulbs and lamps 187 Seite 206ReferenceEverything from A to Z208