brake light BMW I3 2015 I01 Owner's Manual
[x] Cancel search | Manufacturer: BMW, Model Year: 2015, Model line: I3, Model: BMW I3 2015 I01Pages: 236, PDF Size: 17.6 MB
Page 25 of 236
Data memoryMany electronic components on your vehicle
are equipped with data memories that tempo‐
rarily or permanently store technical informa‐
tion about the condition of the vehicle, events
and faults. This technical information generally
records the state of a component, a module, a
system or the environment:▷Operating mode of system components, fill
levels for instance.▷Status messages for the vehicle and from
its individual components, e.g., wheel rota‐
tion speed/vehicle speed, deceleration,
transverse acceleration.▷Malfunctions and faults in important sys‐
tem components, e.g., lights and brakes.▷Responses by the vehicle to special situa‐
tions such as airbag deployment or engag‐
ing the stability control system.▷Ambient conditions, such as temperature.
This data is purely technical in nature and is
used to detect and correct faults and to opti‐
mize vehicle functions. Motion profiles over
routes traveled cannot be created from this
data. When service offerings are used, e.g., re‐
pair services, service processes, warranty
claims, quality assurance, this technical infor‐
mation can be read out from the event and
fault memories by the service personnel, in‐
cluding the manufacturer, using special diag‐
nostic tools. You can obtain further information
there if you need it. After an error is corrected,
the information in the fault memory is deleted
or overwritten on a continuous basis.
With the vehicle in use there are situations
where you can associate these technical data
with individuals if combined with other infor‐
mation, e.g., an accident report, damage to the
vehicle, eye witness accounts — possibly with
the assistance of an expert.
Additional functions that are contractually
agreed with the customer - such as vehicle
emergency locating - you can transmit certain
vehicle data from the vehicle.
Event Data Recorder EDR
This vehicle is equipped with an event data re‐
corder EDR. The main purpose of an EDR is to
record, in certain crash or near crash-like situa‐
tions, such as an air bag deployment or hitting
a road obstacle, data that will assist in under‐
standing how a vehicle’s systems performed.
The EDR is designed to record data related to
vehicle dynamics and safety systems for a
short period of time, typically 30 seconds or
less.
The EDR in this vehicle is designed to record
such data as:▷How various systems in your vehicle were
operating.▷Whether or not the driver and passenger
safety belts were fastened.▷How far, if at all, the driver was depressing
the accelerator and/or brake pedal.▷How fast the vehicle was traveling.
These data can help provide a better under‐
standing of the circumstances in which
crashes and injuries occur.
EDR data are recorded by your vehicle only if a
nontrivial crash situation occurs; no data are
recorded by the EDR under normal driving
conditions and no personal data, e.g., name,
gender, age, and crash location, are recorded.
However, other parties, such as law enforce‐
ment, could combine the EDR data with the
type of personally identifying data routinely ac‐
quired during a crash investigation.
To read data recorded by an EDR, special
equipment is required, and access to the vehi‐
cle or the EDR is needed. In addition to the ve‐
hicle manufacturer, other parties, such as law
enforcement, that have the special equipment,
can read the information if they have access to
the vehicle or the EDR.
Seite 9Notes9
Online Edition for Part no. 01 40 2 960 865 - II/15
Page 55 of 236
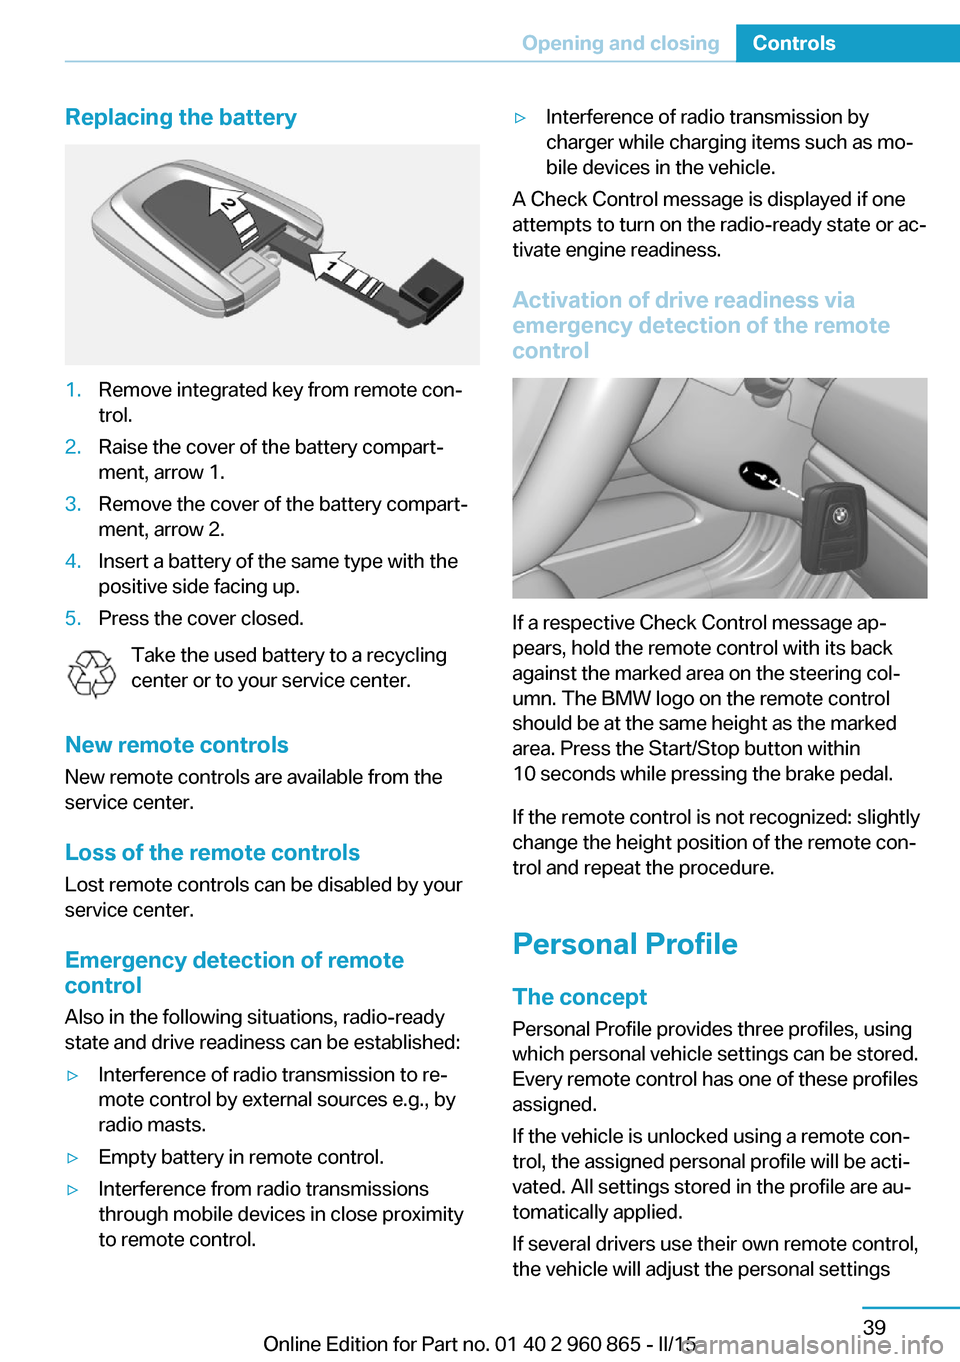
Replacing the battery1.Remove integrated key from remote con‐
trol.2.Raise the cover of the battery compart‐
ment, arrow 1.3.Remove the cover of the battery compart‐
ment, arrow 2.4.Insert a battery of the same type with the
positive side facing up.5.Press the cover closed.
Take the used battery to a recycling
center or to your service center.
New remote controls New remote controls are available from the
service center.
Loss of the remote controls Lost remote controls can be disabled by your
service center.
Emergency detection of remote
control
Also in the following situations, radio-ready
state and drive readiness can be established:
▷Interference of radio transmission to re‐
mote control by external sources e.g., by
radio masts.▷Empty battery in remote control.▷Interference from radio transmissions
through mobile devices in close proximity
to remote control.▷Interference of radio transmission by
charger while charging items such as mo‐
bile devices in the vehicle.
A Check Control message is displayed if one
attempts to turn on the radio-ready state or ac‐
tivate engine readiness.
Activation of drive readiness via
emergency detection of the remote
control
If a respective Check Control message ap‐
pears, hold the remote control with its back
against the marked area on the steering col‐
umn. The BMW logo on the remote control
should be at the same height as the marked
area. Press the Start/Stop button within
10 seconds while pressing the brake pedal.
If the remote control is not recognized: slightly
change the height position of the remote con‐
trol and repeat the procedure.
Personal Profile
The concept Personal Profile provides three profiles, using
which personal vehicle settings can be stored.
Every remote control has one of these profiles
assigned.
If the vehicle is unlocked using a remote con‐
trol, the assigned personal profile will be acti‐
vated. All settings stored in the profile are au‐
tomatically applied.
If several drivers use their own remote control,
the vehicle will adjust the personal settings
Seite 39Opening and closingControls39
Online Edition for Part no. 01 40 2 960 865 - II/15
Page 80 of 236
DrivingVehicle features and options
This chapter describes all standard, country-
specific and optional features offered with the
series. It also describes features that are not
necessarily available in your car, e. g., due to
the selected options or country versions. This
also applies to safety-related functions and
systems. The respectively applicable country
provisions must be observed when using the
respective features and systems.
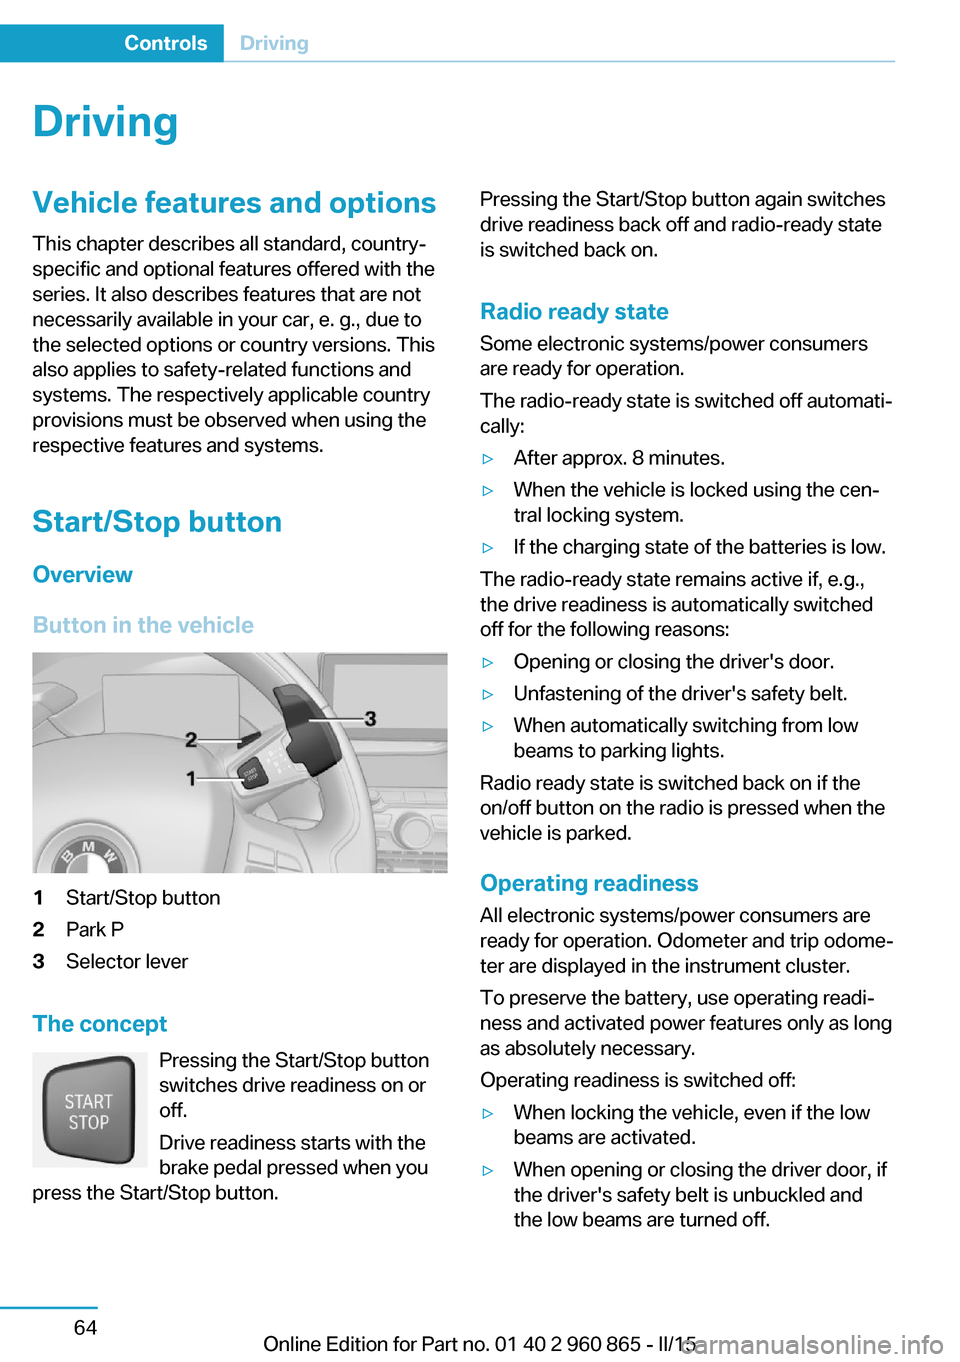
Start/Stop button Overview
Button in the vehicle1Start/Stop button2Park P3Selector lever
The concept Pressing the Start/Stop button
switches drive readiness on or
off.
Drive readiness starts with the
brake pedal pressed when you
press the Start/Stop button.
Pressing the Start/Stop button again switches
drive readiness back off and radio-ready state
is switched back on.
Radio ready state Some electronic systems/power consumers
are ready for operation.
The radio-ready state is switched off automati‐
cally:▷After approx. 8 minutes.▷When the vehicle is locked using the cen‐
tral locking system.▷If the charging state of the batteries is low.
The radio-ready state remains active if, e.g.,
the drive readiness is automatically switched
off for the following reasons:
▷Opening or closing the driver's door.▷Unfastening of the driver's safety belt.▷When automatically switching from low
beams to parking lights.
Radio ready state is switched back on if the
on/off button on the radio is pressed when the
vehicle is parked.
Operating readiness
All electronic systems/power consumers are
ready for operation. Odometer and trip odome‐
ter are displayed in the instrument cluster.
To preserve the battery, use operating readi‐
ness and activated power features only as long
as absolutely necessary.
Operating readiness is switched off:
▷When locking the vehicle, even if the low
beams are activated.▷When opening or closing the driver door, if
the driver's safety belt is unbuckled and
the low beams are turned off.Seite 64ControlsDriving64
Online Edition for Part no. 01 40 2 960 865 - II/15
Page 81 of 236
▷While the driver's safety belt is unbuckled
with driver's door open and low beams off.▷When the batteries' state of charge is low,
if the low beams are turned off.▷The low beams switch to parking lights af‐
ter approx. 15 minutes of no use.
Drive readiness
If drive readiness is switched on, the vehicle
ready to drive and the READY signal, refer to
page 65, is displayed in the instrument clus‐
ter.
All vehicle systems are ready for operation.
Most of the indicator and warning lights in the
instrument cluster light up for a varied length
of time.
Activated drive readiness is the equivalent of a
running engine in conventional vehicles. Deac‐
tivated engine readiness is equivalent to
switching the ignition off.
To save battery power when parking, switch
off drive readiness and any unnecessary elec‐
tronic systems/power consumers.
Drive readiness is switched off automatically:
▷When opening or closing the driver door, if
the driver's safety belt is unbuckled.
Note
If drive readiness is switched on, the system
automatically switches to the radio-ready state
when the door is opened and the driver's
safety belt is unbuckled, or if the lights are
turned off or the daytime running lights are ac‐
tivated.
Selector lever position P with drive readi‐
ness switched off
When drive readiness is switched off, selector
lever position P is automatically engaged.
When in an automatic car wash, e.g., ensure
that the drive readiness is not switched off ac‐
cidentally, otherwise, wheels can lock up.◀
Drive readiness in detail
Hints Do not leave the vehicle unattended
Do not leave the vehicle unattended with
drive readiness switched on; otherwise, it may
pose a risk.◀
Before leaving the vehicle
Before leaving the vehicle, with drive
readiness switched on engage lever in position
P P and set the parking brake; otherwise, the
vehicle is not secured against rolling away.◀
Switching on drive readiness1.Close the driver's door.2.Depress the brake pedal.3.Press the Start/Stop button.
Drive readiness is switched on.
Display in the instrument cluster The READY display indicates
that the vehicle is ready for driv‐
ing.
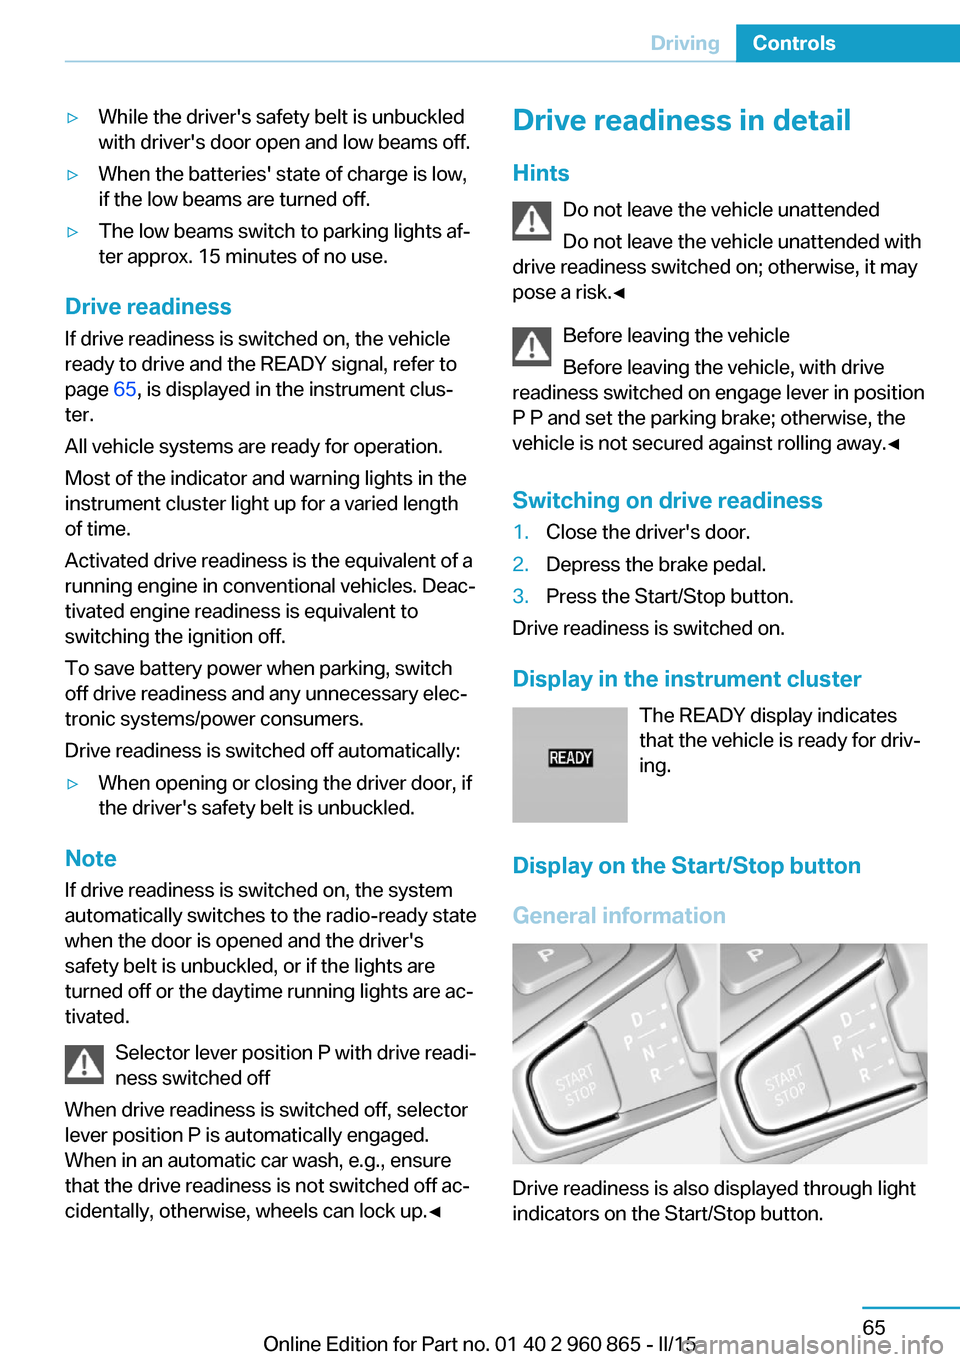
Display on the Start/Stop button
General information
Drive readiness is also displayed through light
indicators on the Start/Stop button.
Seite 65DrivingControls65
Online Edition for Part no. 01 40 2 960 865 - II/15
Page 82 of 236
Lighting pulses orange▷After unlocking and opening the door.▷After switching off drive readiness.
When the brake pedal is depressed, the light‐
ing becomes more intense.
Lighting lights up steady blue
After drive readiness is switched on, light turns
blue. The vehicle is ready to drive. The READY
indicator lights up in the instrument cluster. In
addition, a signal sounds.
Lighting off
Drive readiness, operating readiness and
radio-ready state are turned off. The vehicle is
in the idle state. The charging cable may be
connected.
Driving off
Requirements
Driving is possible under the following condi‐
tions:
▷The high-voltage battery is sufficiently
charged.▷The driver's door is closed.
Driving
1.Switch on drive readiness.2.Apply the brake and engage lever in posi‐
tion P D or R.3.Release the parking brake.4.Depress the accelerator pedal to drive.Selector lever positions
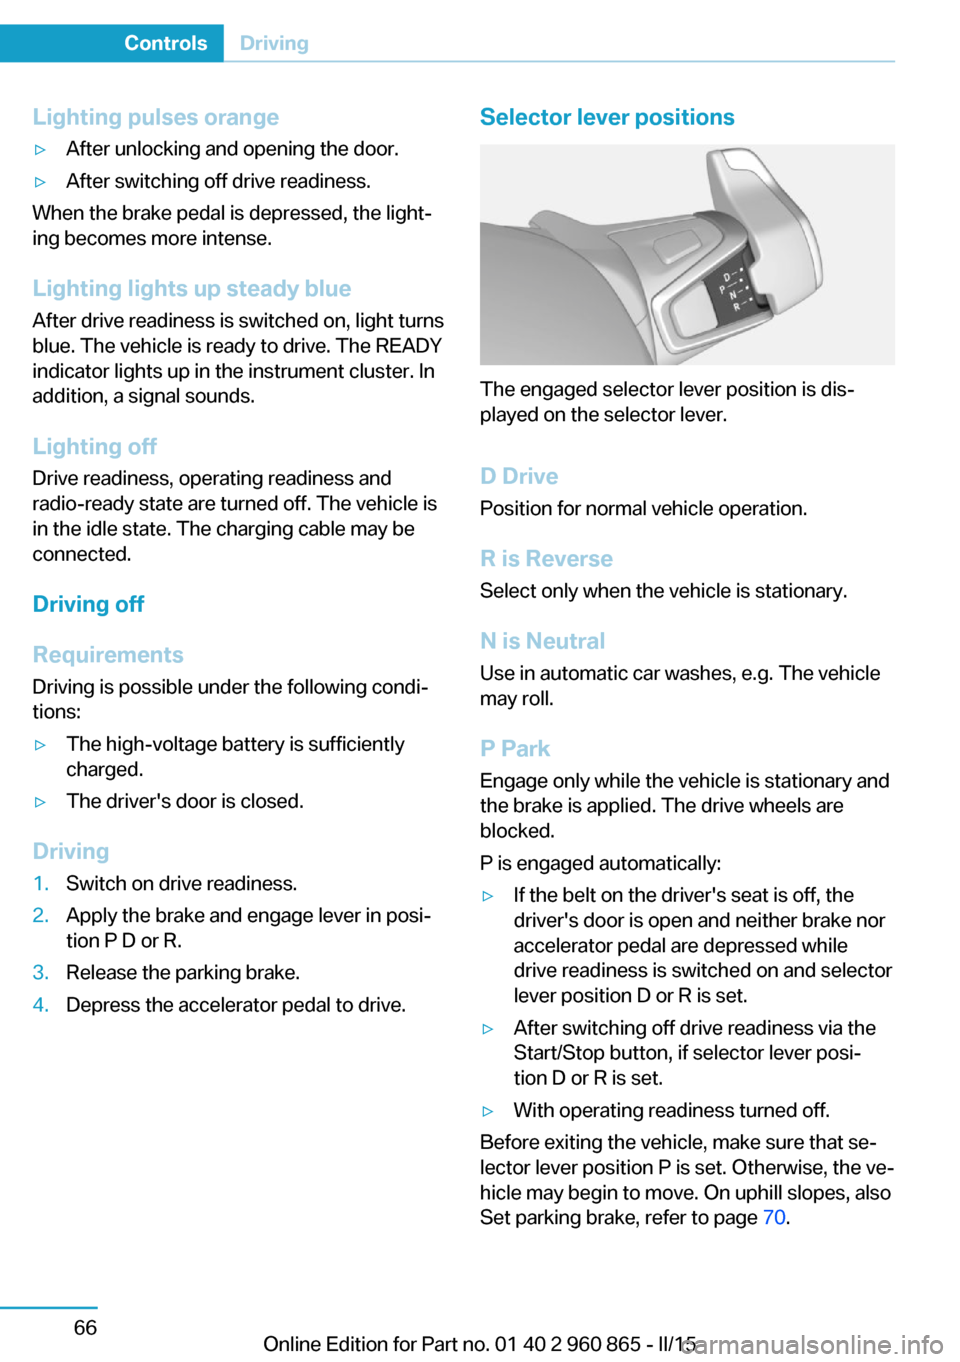
The engaged selector lever position is dis‐
played on the selector lever.
D Drive
Position for normal vehicle operation.
R is Reverse
Select only when the vehicle is stationary.
N is NeutralUse in automatic car washes, e.g. The vehicle
may roll.
P Park Engage only while the vehicle is stationary and
the brake is applied. The drive wheels are
blocked.
P is engaged automatically:
▷If the belt on the driver's seat is off, the
driver's door is open and neither brake nor
accelerator pedal are depressed while
drive readiness is switched on and selector
lever position D or R is set.▷After switching off drive readiness via the
Start/Stop button, if selector lever posi‐
tion D or R is set.▷With operating readiness turned off.
Before exiting the vehicle, make sure that se‐
lector lever position P is set. Otherwise, the ve‐
hicle may begin to move. On uphill slopes, also
Set parking brake, refer to page 70.
Seite 66ControlsDriving66
Online Edition for Part no. 01 40 2 960 865 - II/15
Page 84 of 236
Driving in detail: eDRIVE
Hints Awareness of vehicle reduced when
driven in electric mode
When driving in electric mode, note that, due
to the lack of engine noise, pedestrians and
other traffic might pay less attention to the ve‐
hicle due to missing engine noises. Please
take special care when parking or leaving a
parking space.◀
Cautiously remove your foot from the ac‐
celerator pedal
Cautiously remove your foot from the acceler‐
ator pedal because the braking effect of the
electric motor can be stronger than with a
combustion engine. Otherwise, abrupt braking
and slow-down may confuse other traffic.◀
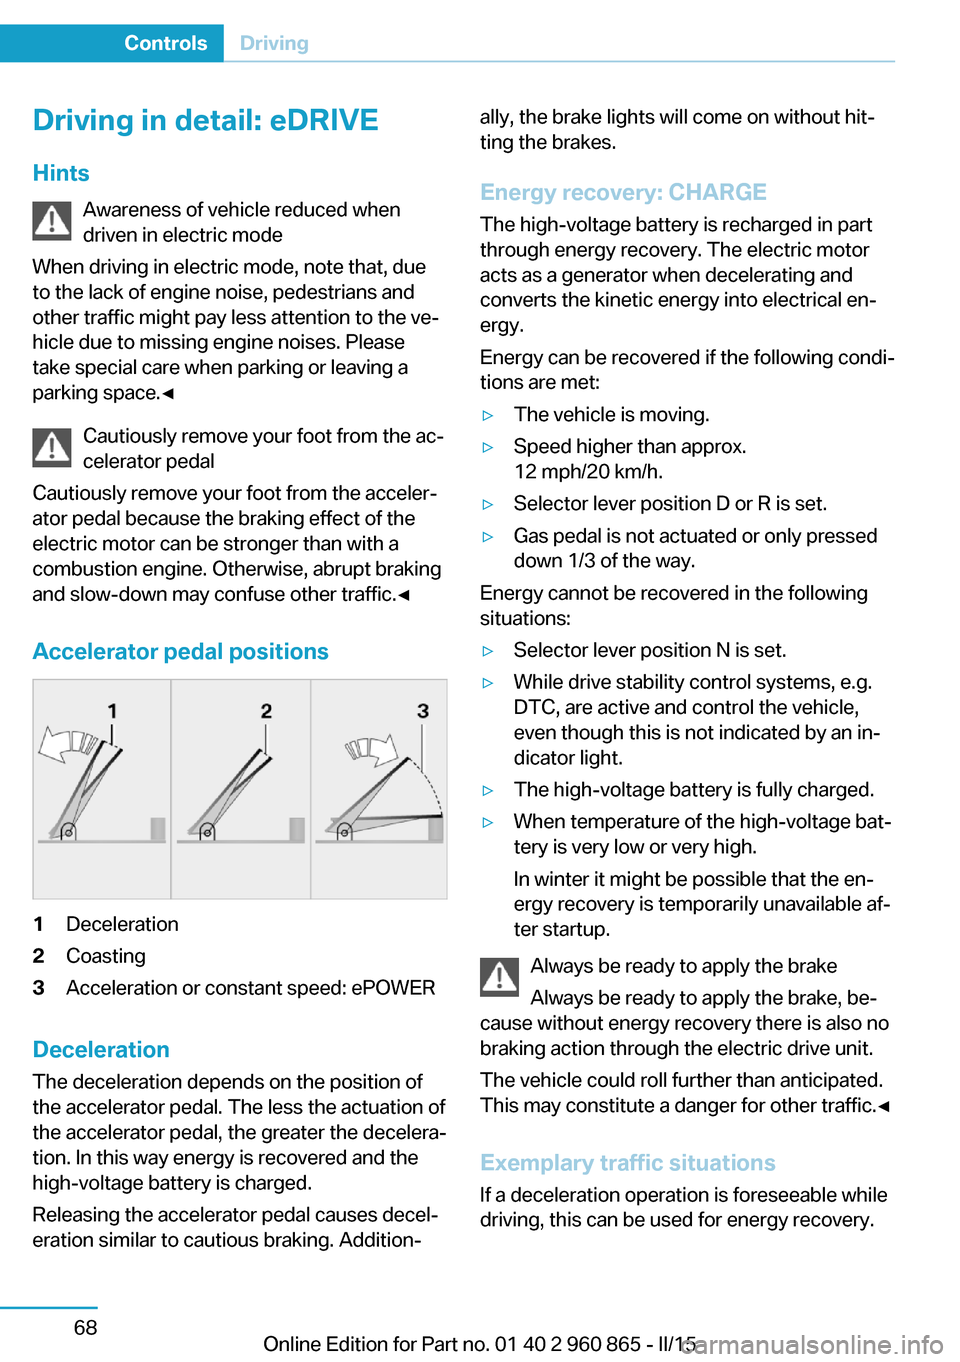
Accelerator pedal positions1Deceleration2Coasting3Acceleration or constant speed: ePOWER
Deceleration
The deceleration depends on the position of
the accelerator pedal. The less the actuation of
the accelerator pedal, the greater the decelera‐
tion. In this way energy is recovered and the
high-voltage battery is charged.
Releasing the accelerator pedal causes decel‐
eration similar to cautious braking. Addition‐
ally, the brake lights will come on without hit‐
ting the brakes.
Energy recovery: CHARGE The high-voltage battery is recharged in part
through energy recovery. The electric motor
acts as a generator when decelerating and
converts the kinetic energy into electrical en‐
ergy.
Energy can be recovered if the following condi‐
tions are met:▷The vehicle is moving.▷Speed higher than approx.
12 mph/20 km/h.▷Selector lever position D or R is set.▷Gas pedal is not actuated or only pressed
down 1/3 of the way.
Energy cannot be recovered in the following
situations:
▷Selector lever position N is set.▷While drive stability control systems, e.g.
DTC, are active and control the vehicle,
even though this is not indicated by an in‐
dicator light.▷The high-voltage battery is fully charged.▷When temperature of the high-voltage bat‐
tery is very low or very high.
In winter it might be possible that the en‐
ergy recovery is temporarily unavailable af‐
ter startup.
Always be ready to apply the brake
Always be ready to apply the brake, be‐
cause without energy recovery there is also no
braking action through the electric drive unit.
The vehicle could roll further than anticipated.
This may constitute a danger for other traffic.◀
Exemplary traffic situations
If a deceleration operation is foreseeable while
driving, this can be used for energy recovery.
Seite 68ControlsDriving68
Online Edition for Part no. 01 40 2 960 865 - II/15
Page 86 of 236
ness is switched off and the vehicle comes to a
stop.
Parking brake The conceptThe parking brake is used to prevent the vehi‐
cle from rolling when it is parked.
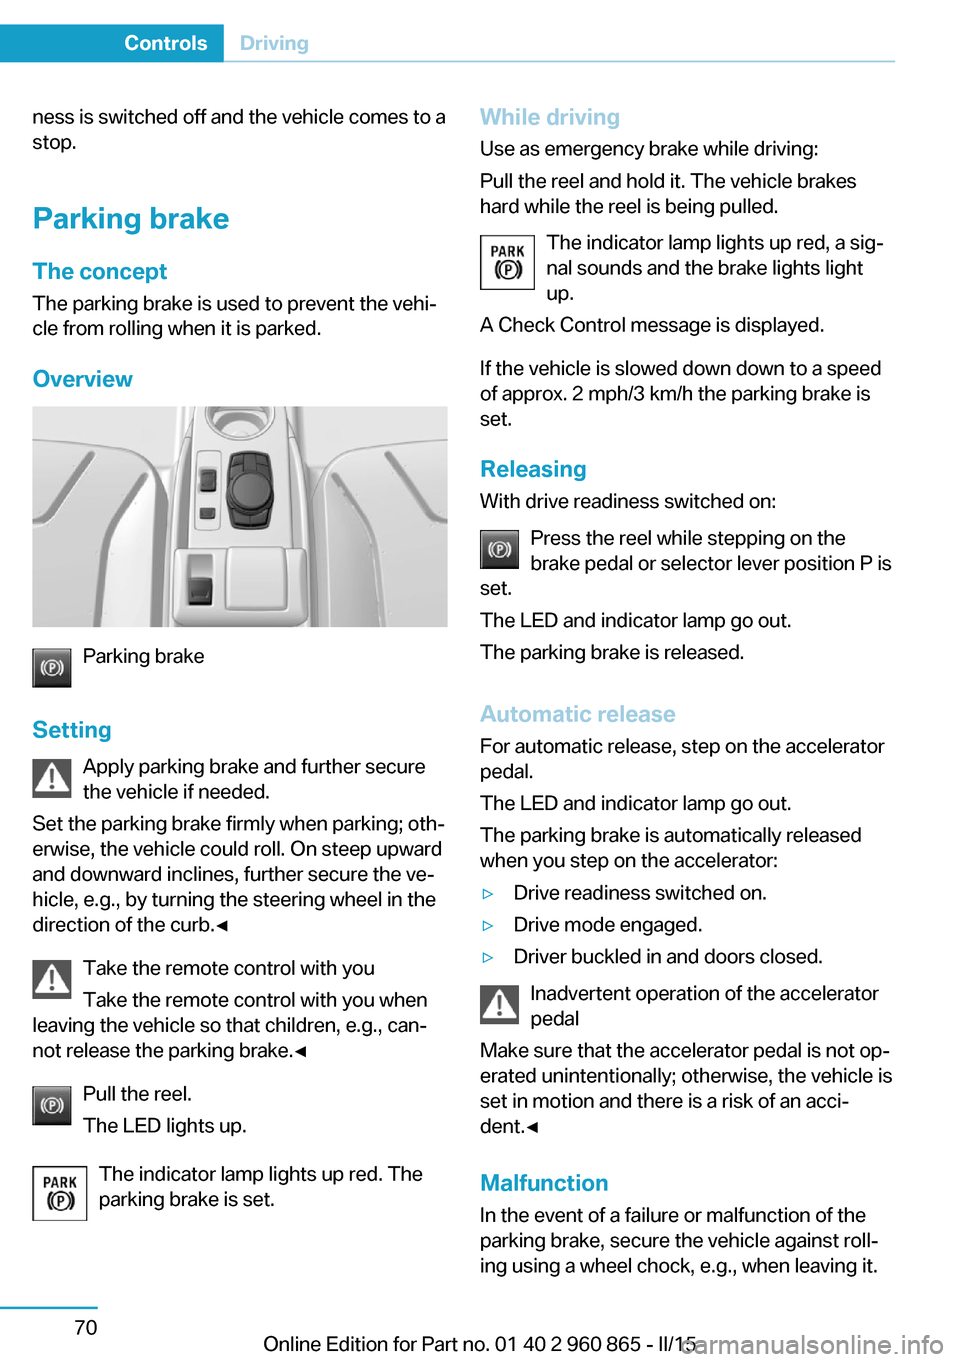
Overview
Parking brake
Setting Apply parking brake and further secure
the vehicle if needed.
Set the parking brake firmly when parking; oth‐
erwise, the vehicle could roll. On steep upward
and downward inclines, further secure the ve‐
hicle, e.g., by turning the steering wheel in the
direction of the curb.◀
Take the remote control with youTake the remote control with you when
leaving the vehicle so that children, e.g., can‐
not release the parking brake.◀
Pull the reel.
The LED lights up.
The indicator lamp lights up red. The
parking brake is set.
While driving
Use as emergency brake while driving:
Pull the reel and hold it. The vehicle brakes
hard while the reel is being pulled.
The indicator lamp lights up red, a sig‐
nal sounds and the brake lights light
up.
A Check Control message is displayed.
If the vehicle is slowed down down to a speed
of approx. 2 mph/3 km/h the parking brake is
set.
Releasing
With drive readiness switched on:
Press the reel while stepping on the
brake pedal or selector lever position P is
set.
The LED and indicator lamp go out.
The parking brake is released.
Automatic release For automatic release, step on the accelerator
pedal.
The LED and indicator lamp go out.
The parking brake is automatically released
when you step on the accelerator:▷Drive readiness switched on.▷Drive mode engaged.▷Driver buckled in and doors closed.
Inadvertent operation of the accelerator
pedal
Make sure that the accelerator pedal is not op‐
erated unintentionally; otherwise, the vehicle is
set in motion and there is a risk of an acci‐
dent.◀
Malfunction In the event of a failure or malfunction of the
parking brake, secure the vehicle against roll‐
ing using a wheel chock, e.g., when leaving it.
Seite 70ControlsDriving70
Online Edition for Part no. 01 40 2 960 865 - II/15
Page 87 of 236
After a power failure
Putting the parking brake into
operation1.Switch on the ignition.2. Press the reel while stepping on the
brake pedal or selector lever position P is
set.
It may take several seconds for the brake to be
put into operation. Any sounds associated with
this are normal.
The indicator lamp in the instrument
cluster goes out as soon as the parking
brake is ready for operation.
Hold function The concept
The system holds the vehicle automatically
when gear is engaged. This prevents rolling
against the direction of travel.
In selector lever position D, the vehicle cannot
roll backwards. In selector lever position R, it
cannot roll forward. The brake pedal does not
have to be pressed.
Hints
To reduce energy consumption when the hold
function is activated, activate the parking brake
or engage lever in position P P when the vehi‐
cle is stopped for long periods of time.
The hold function can be by the vehicle's load
and the road incline. If needed a Check Control
message will appear and position P will be se‐
lected automatically.
Turn signal, high beams,
headlight flasher
Turn signal
Hints Do not adjust the exterior mirrors
Do not adjust the exterior mirror while
driving and when turn signals/hazard warning
flashers are on, or else the additional turn sig‐
nal lights in the exterior mirror are out of posi‐ tion and can't be seen.◀
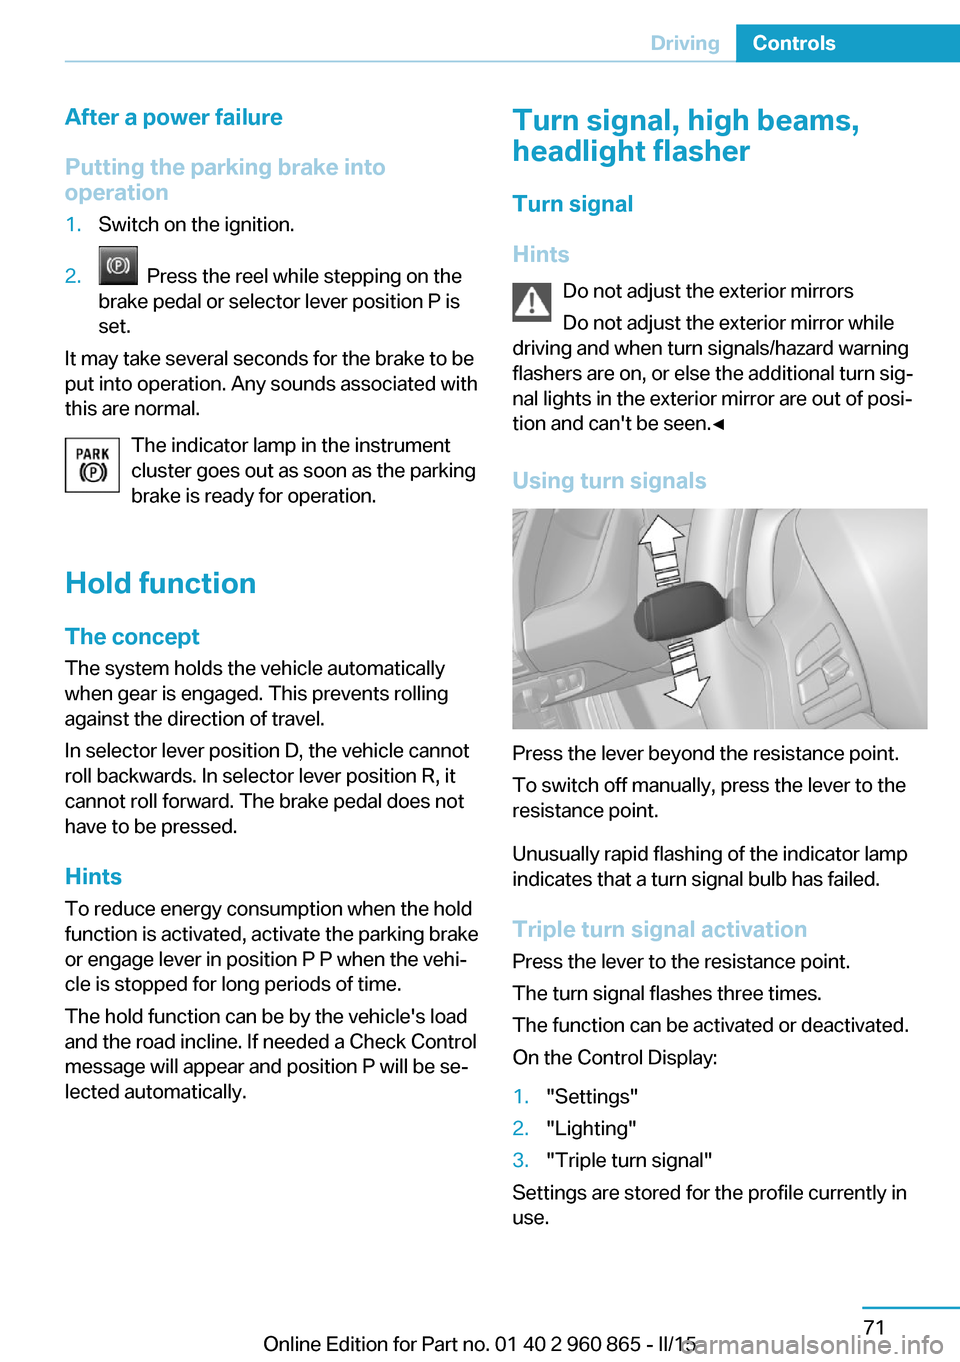
Using turn signals
Press the lever beyond the resistance point.
To switch off manually, press the lever to the
resistance point.
Unusually rapid flashing of the indicator lamp
indicates that a turn signal bulb has failed.
Triple turn signal activation Press the lever to the resistance point.
The turn signal flashes three times.
The function can be activated or deactivated.
On the Control Display:
1."Settings"2."Lighting"3."Triple turn signal"
Settings are stored for the profile currently in
use.
Seite 71DrivingControls71
Online Edition for Part no. 01 40 2 960 865 - II/15
Page 95 of 236
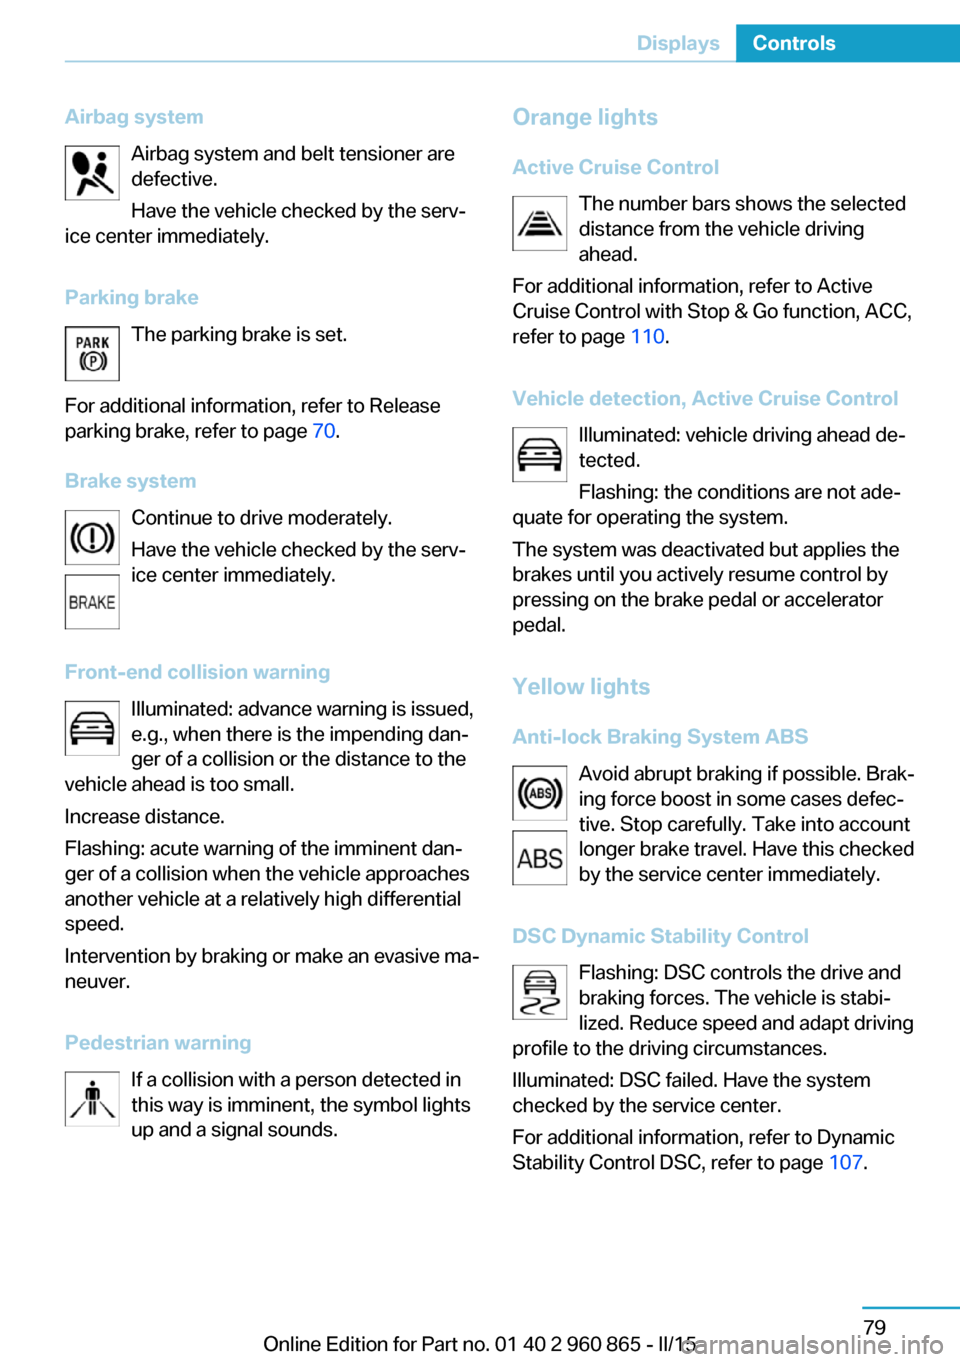
Airbag systemAirbag system and belt tensioner are
defective.
Have the vehicle checked by the serv‐
ice center immediately.
Parking brake The parking brake is set.
For additional information, refer to Release
parking brake, refer to page 70.
Brake system Continue to drive moderately.
Have the vehicle checked by the serv‐
ice center immediately.
Front-end collision warning Illuminated: advance warning is issued,
e.g., when there is the impending dan‐
ger of a collision or the distance to the
vehicle ahead is too small.
Increase distance.
Flashing: acute warning of the imminent dan‐
ger of a collision when the vehicle approaches
another vehicle at a relatively high differential
speed.
Intervention by braking or make an evasive ma‐
neuver.
Pedestrian warning If a collision with a person detected in
this way is imminent, the symbol lights
up and a signal sounds.Orange lights
Active Cruise Control The number bars shows the selected
distance from the vehicle driving
ahead.
For additional information, refer to Active
Cruise Control with Stop & Go function, ACC,
refer to page 110.
Vehicle detection, Active Cruise Control Illuminated: vehicle driving ahead de‐
tected.
Flashing: the conditions are not ade‐
quate for operating the system.
The system was deactivated but applies the
brakes until you actively resume control by
pressing on the brake pedal or accelerator
pedal.
Yellow lights
Anti-lock Braking System ABS Avoid abrupt braking if possible. Brak‐
ing force boost in some cases defec‐
tive. Stop carefully. Take into account
longer brake travel. Have this checked
by the service center immediately.
DSC Dynamic Stability Control Flashing: DSC controls the drive and
braking forces. The vehicle is stabi‐
lized. Reduce speed and adapt driving
profile to the driving circumstances.
Illuminated: DSC failed. Have the system
checked by the service center.
For additional information, refer to Dynamic
Stability Control DSC, refer to page 107.Seite 79DisplaysControls79
Online Edition for Part no. 01 40 2 960 865 - II/15
Page 117 of 236
cording to their respective set‐
tings.▷LED lights up orange or goes out respec‐
tive to their individual settings.
Adjust as needed. Individual settings are
stored for the profile currently in use.
Press button again:
▷All Intelligent Safety systems are
activated.▷The LED lights up green.
Hold down button:
▷All Intelligent Safety systems are
turned off.▷The LED goes out.
Front-end collision warning
with City Braking function
The concept The ystem can help prevent accidents. If an
accident cannot be prevented, the system will
help reduce the collision speed.
The system sounds a warning before an immi‐
nent collision and actuates brakes independ‐
ently if needed.
The automatic braking intervention is done
with limited force and duration.
A camera in the area of the rearview mirror
controls the system.
The front-end collision warning is available
even if cruise control has been deactivated.
With the vehicle approaching another vehicle
intentionally the collision warning is delayed
avoiding false alarm.
General information The system warns at two levels of an imminent
danger of collision at speeds from approx.
3 mph/5 km/h. Time of warnings may vary with
the current driving situation.
Appropriate braking kicks in at speeds of up to
35 mph/60 km/h.
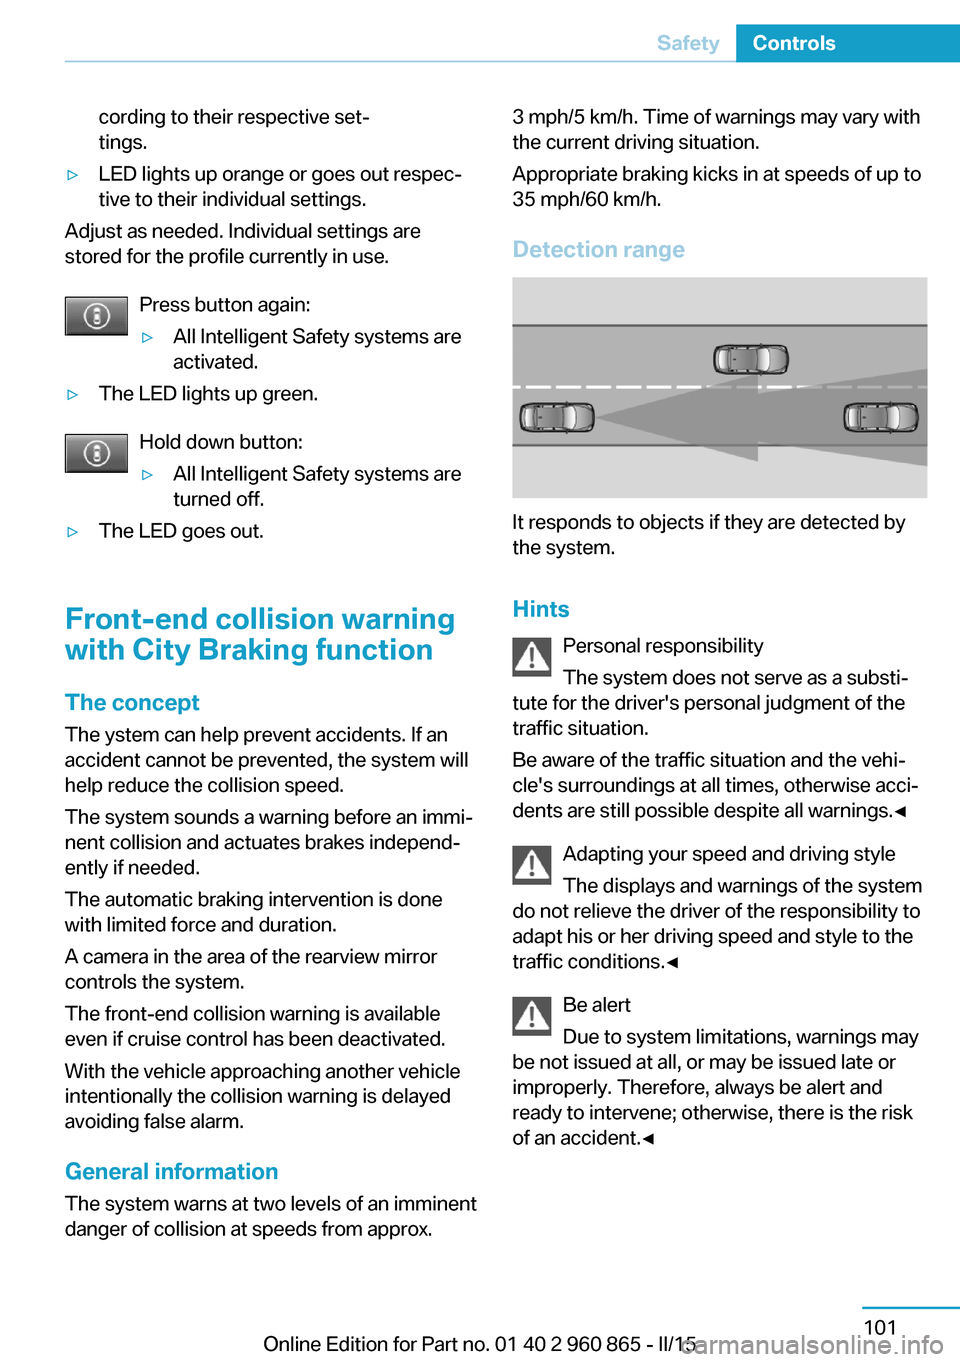
Detection range
It responds to objects if they are detected by
the system.
Hints Personal responsibility
The system does not serve as a substi‐
tute for the driver's personal judgment of the
traffic situation.
Be aware of the traffic situation and the vehi‐
cle's surroundings at all times, otherwise acci‐
dents are still possible despite all warnings.◀
Adapting your speed and driving style
The displays and warnings of the system
do not relieve the driver of the responsibility to
adapt his or her driving speed and style to the
traffic conditions.◀
Be alert
Due to system limitations, warnings may
be not issued at all, or may be issued late or
improperly. Therefore, always be alert and
ready to intervene; otherwise, there is the risk
of an accident.◀
Seite 101SafetyControls101
Online Edition for Part no. 01 40 2 960 865 - II/15