weight BMW I3 2015 I01 Owner's Manual
[x] Cancel search | Manufacturer: BMW, Model Year: 2015, Model line: I3, Model: BMW I3 2015 I01Pages: 236, PDF Size: 17.6 MB
Page 6 of 236
FOR OVER THREE QUARTERS OF
A CENTURY, THE BASIC IDEA BEHIND
THE CAR WAS LEFT UNTOUCHED.
Until now. Today, the BMW i3 introduces a wealth of new ways to create
the ultimate sustainable electric car. One key innovation is LifeDrive:
the first serial production passenger cell made of light and extremely
robust carbon fiber. It substantially reduces the weight of the vehicle
for maximum electric range. Moreover, streamflow aerodynamics
reduce drag and energy consumption.
The interior of the BMW i3 features natural-fiber based raw materials
in the instrument panel and door trim surfaces. Textiles for the seats
are made of up to 100% recycled materials. The leather components
are tanned with natural olive leaf extract, which gives the leather a
unique, fresh scent. The interior wood panels are made of open-pore
eucalyptus wood. All wood is sourced from responsible forestry and
certified by the Forest Stewardship Council® (FSC®).
Innovation is also built into the BMW i3 product development process
itself: To ensure a truly sustainable product, measurable targets were
already set in the early strategic phase of development to define envi-
ronmental guidelines for the entire product life cycle – from the sourcing
of raw materials to production, utilization and recycling. These were
agreed to and monitored throughout the development phase of the
vehicle. The life cycle assessment process and the results have been
certified by a third party according to ISO 14040/14044. Further
details can be found online at bmw-i.com.
01. DEVELOPMENT
BMW_i3_Bedienungseinleger_210x138mm_us_lektoriert_RZ.indd 422.01.14 15:19 Online Edition for Part no. 01 40 2 960 865 - II/15
Page 70 of 236
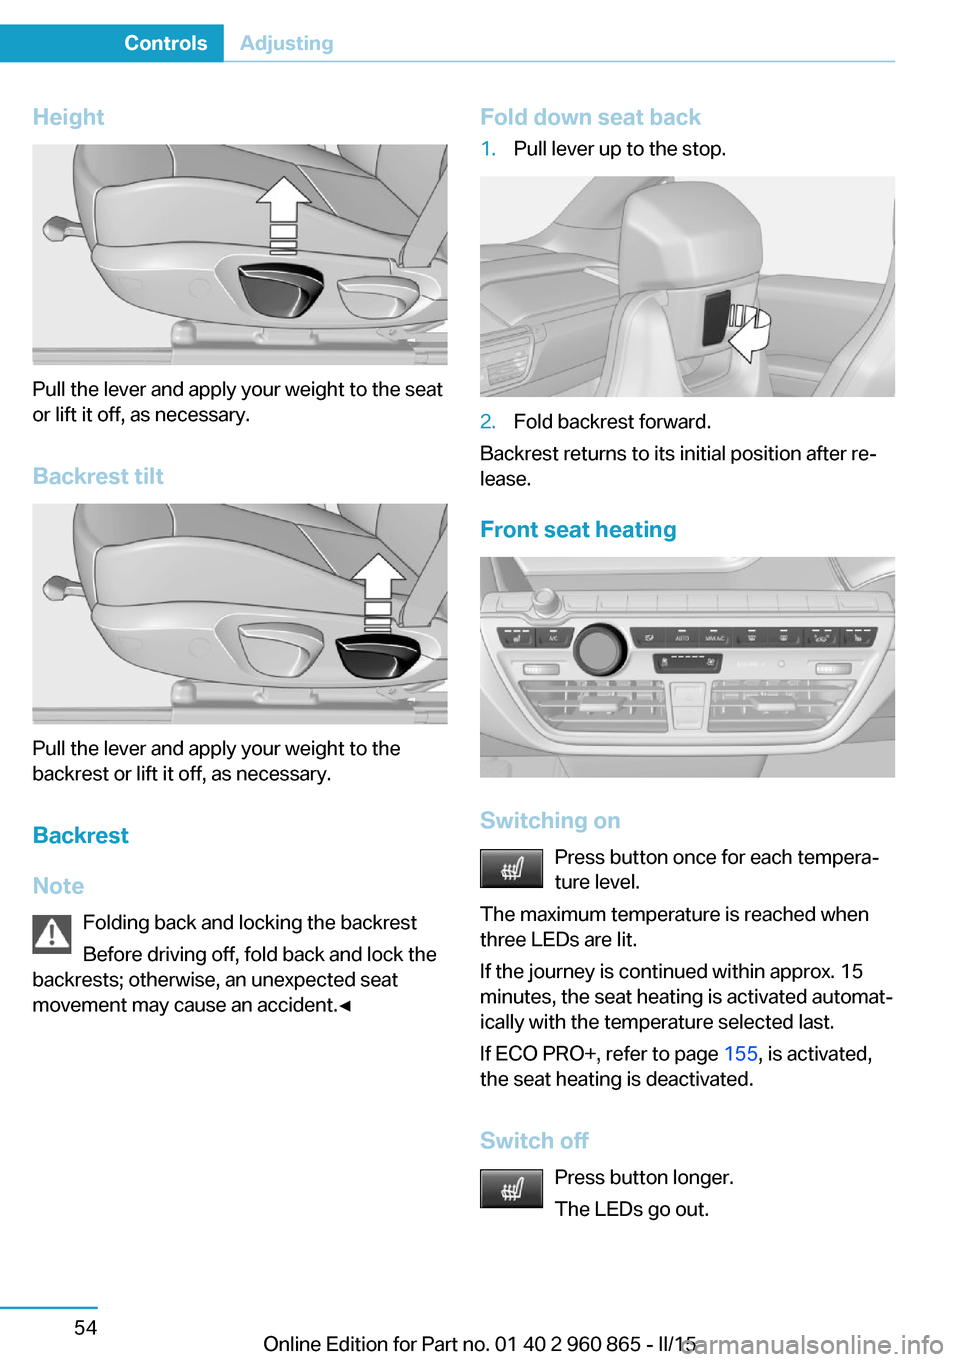
Height
Pull the lever and apply your weight to the seat
or lift it off, as necessary.
Backrest tilt
Pull the lever and apply your weight to the
backrest or lift it off, as necessary.
Backrest
Note Folding back and locking the backrest
Before driving off, fold back and lock the
backrests; otherwise, an unexpected seat
movement may cause an accident.◀
Fold down seat back1.Pull lever up to the stop.2.Fold backrest forward.
Backrest returns to its initial position after re‐
lease.
Front seat heating
Switching on Press button once for each tempera‐
ture level.
The maximum temperature is reached when
three LEDs are lit.
If the journey is continued within approx. 15
minutes, the seat heating is activated automat‐
ically with the temperature selected last.
If ECO PRO+, refer to page 155, is activated,
the seat heating is deactivated.
Switch off Press button longer.
The LEDs go out.
Seite 54ControlsAdjusting54
Online Edition for Part no. 01 40 2 960 865 - II/15
Page 76 of 236
Transporting children safelyVehicle features and optionsThis chapter describes all standard, country-
specific and optional features offered with the
series. It also describes features that are not
necessarily available in your car, e. g., due tothe selected options or country versions. This
also applies to safety-related functions and
systems. The respectively applicable country
provisions must be observed when using the
respective features and systems.
The right place for children
Note
Children in the vehicle
Do not leave children unattended in the
vehicle; otherwise, they could endanger them‐
selves and other persons, e.g., by opening the
doors.◀
Children should always be in the rear Accident research shows that the safest place
for children is in the back seat.
Transporting children in the rear
Only transport children younger than
13 years of age or shorter than 5 ft/150 cm in
the rear in child restraint systems provided in
accordance with the age, weight and size of
the child; otherwise, there is an increased risk
of injury in an accident.
Children 13 years of age or older must wear a
safety belt as soon as a suitable child restraint
system can no longer be used due to their age,
weight and size.◀
Children on the front passenger seat
Should it ever be necessary to use a child re‐
straint system in the front passenger seat,
make sure that the front, knee and side airbags
on the front passenger side are deactivated.
Automatic deactivation of front-seat passen‐
ger airbags, refer to page 95.Note
Deactivating the front-seat passenger
airbags
If a child restraint system is used in the front
passenger seat, deactivate the front-seat pas‐
senger airbags; otherwise, there is an in‐
creased risk of injury to the child when the air‐
bags are activated, even with a child restraint
system.◀
Installing child restraint
systems
Hints Manufacturer's information for child re‐straint systems
To select, mount and use child restraint sys‐
tems, observe the information provided by the
system manufacturer; otherwise, the protec‐
tive effect can be lost.◀
Ensuring the stability of the child seat
When installing child restraint systems,
make sure that the child seat is securely fas‐
tened to the backrest of the seat. Angle and
headrest of the backrest might need to be ad‐
justed or possibly be removed. Make sure that
all backrests are securely locked. Otherwise
the stability of the child seat can be affected,
and there is an increased risk of injury becauseSeite 60ControlsTransporting children safely60
Online Edition for Part no. 01 40 2 960 865 - II/15
Page 78 of 236
erwise, the level of protection may be re‐
duced.◀
Mounts for the lower LATCH anchors The lower anchors may be used to attach the
CRS to the vehicle seat up to a combined child
and CRS weight of 65 lb/30 kg when the child
is restrained by the internal harnesses.
Note Properly engage the lower LATCH an‐
chors
Make sure that the lower LATCH anchors have
properly engaged and that the child restraint
system is resting snugly against the backrest; otherwise, the degree of protection may be re‐duced.◀
Position The corresponding symbol shows the
mounts for the lower LATCH anchors.
Seats equipped with lower anchors are
marked with a pair, 2, of LATCH sym‐
bols. It is not recommended to use the
inner lower anchors of standard outer
LATCH positions to fasten a child restraint
system on the middle seat. Use the vehicle
seat belt instead for the middle seat.
Before installing LATCH child
restraint systems
Pull the belt away from the area of the child re‐
straint system.
Assembly of LATCH child restraint
systems1.Mount the child restraint system; refer to
the user's manual of the system.2.Ensure that both LATCH anchors are prop‐
erly connected.Child restraint fixing system with a
tether strap
Mounting points The respective symbol shows the an‐
chor for the upper retaining strap.
Seats with an upper Top Tether are
marked with this symbol. It can be found on
the rear seat backrest or the rear window shelf.
Note Mounting eyelets
Use the mounting eyes only for the up‐
per retaining strap to secure child restraint
systems; otherwise, the mounting eyes could
be damaged.◀
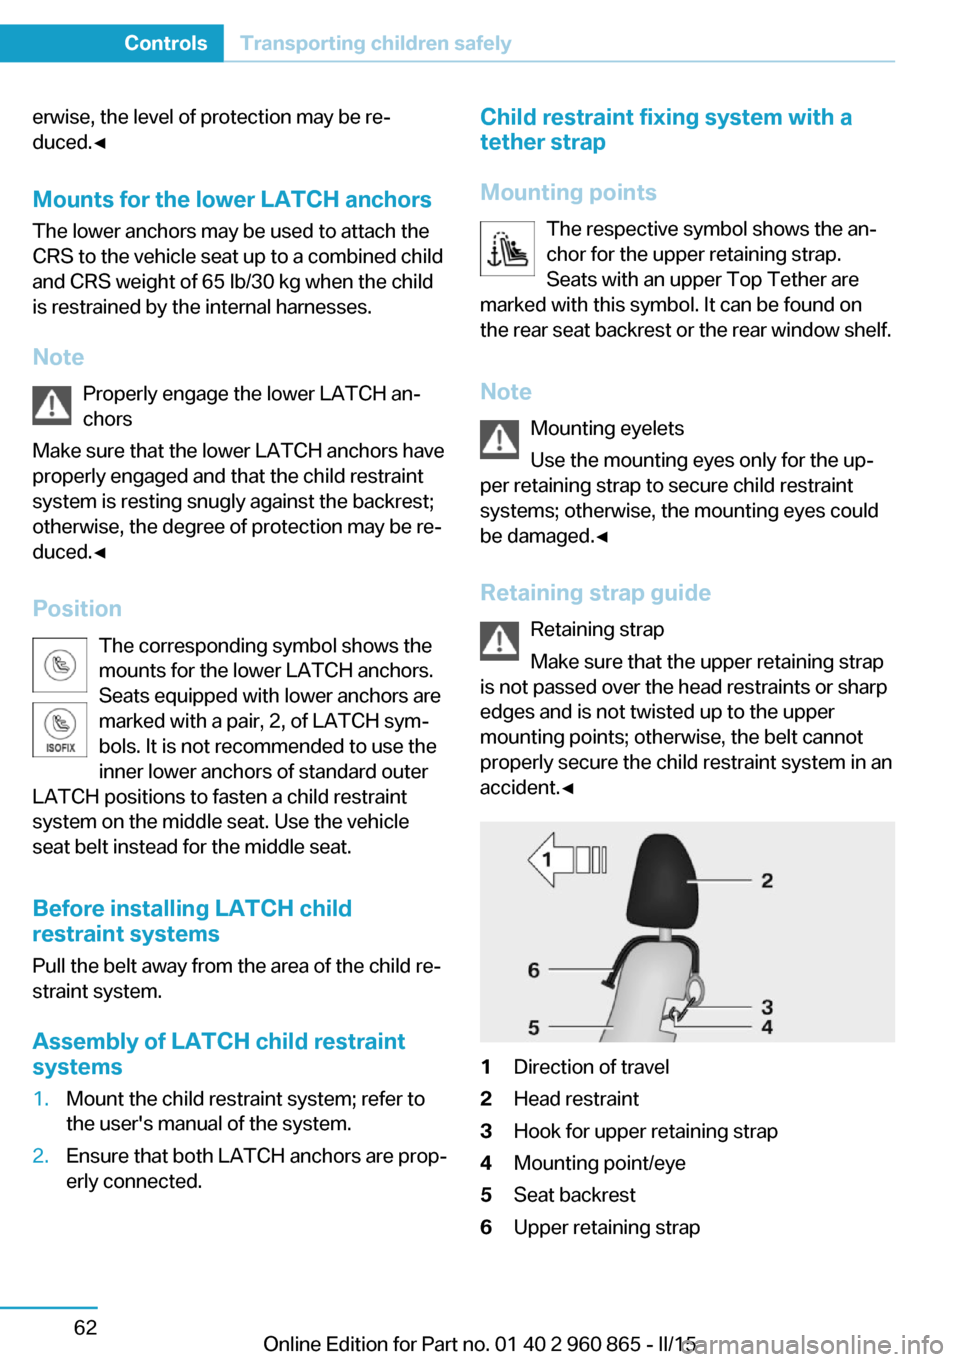
Retaining strap guide Retaining strap
Make sure that the upper retaining strap
is not passed over the head restraints or sharp
edges and is not twisted up to the upper
mounting points; otherwise, the belt cannot
properly secure the child restraint system in an
accident.◀1Direction of travel2Head restraint3Hook for upper retaining strap4Mounting point/eye5Seat backrest6Upper retaining strapSeite 62ControlsTransporting children safely62
Online Edition for Part no. 01 40 2 960 865 - II/15
Page 168 of 236
LoadingVehicle features and options
This chapter describes all standard, country-
specific and optional features offered with the
series. It also describes features that are not
necessarily available in your car, e. g., due to
the selected options or country versions. This
also applies to safety-related functions and
systems. The respectively applicable country
provisions must be observed when using the
respective features and systems.
Hints Overloading the vehicle
To avoid exceeding the approved ca‐
pacity of the tires, never overload the vehicle.
Overloading can lead to overheating and in‐
creases the rate at which damage develops in‐
side the tires. This could result in a sudden
loss of tire inflation pressure.◀
No fluids in the cargo area
Make sure that fluids do not leak into the
cargo area; otherwise, the vehicle may be dam‐
aged.◀
Heavy and hard objects
Do not stow any heavy and hard objects
in the car's interior without securing them; oth‐
erwise, they may present a danger to occu‐
pants, e.g., during braking and evasive maneu‐
vers.◀
Load cargo area only with the cargo area
floor installed
Load the cargo area only if the cargo area floor
is located in the cargo area. Otherwise, the
cover of the engine below it could be dam‐
aged.◀Only use loops for releasing the rear seat
backrests
Do not use the loops for releasing the rear seat
backrests to attach objects; otherwise there is
an increased risk of injury because of unex‐
pected movement of the rear seat backrest.◀
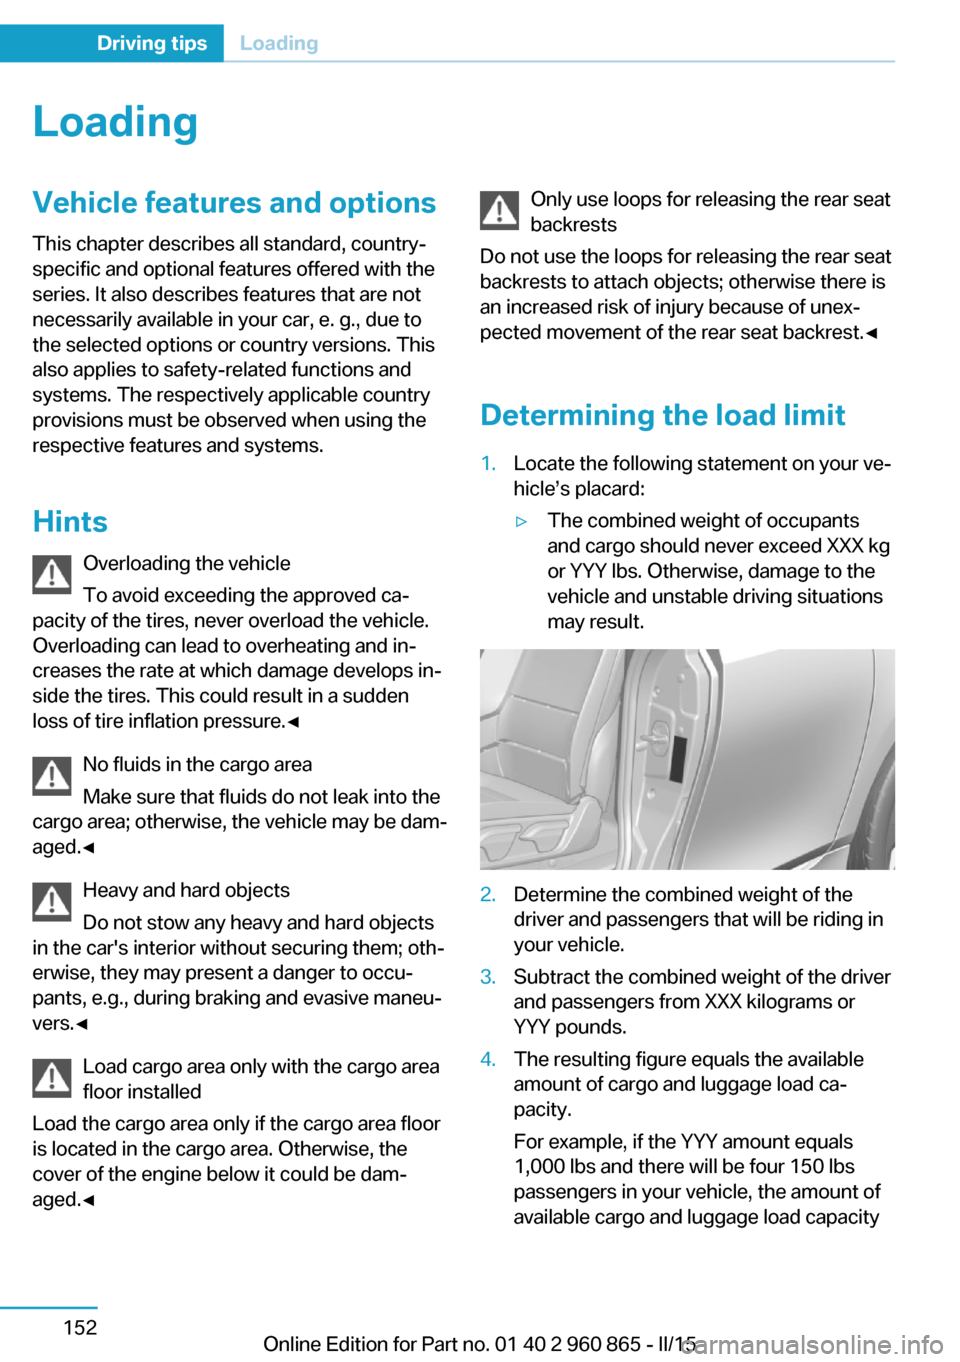
Determining the load limit1.Locate the following statement on your ve‐
hicle’s placard:▷The combined weight of occupants
and cargo should never exceed XXX kg
or YYY lbs. Otherwise, damage to the
vehicle and unstable driving situations
may result.2.Determine the combined weight of the
driver and passengers that will be riding in
your vehicle.3.Subtract the combined weight of the driver
and passengers from XXX kilograms or
YYY pounds.4.The resulting figure equals the available
amount of cargo and luggage load ca‐
pacity.
For example, if the YYY amount equals
1,000 lbs and there will be four 150 lbs
passengers in your vehicle, the amount of
available cargo and luggage load capacitySeite 152Driving tipsLoading152
Online Edition for Part no. 01 40 2 960 865 - II/15
Page 169 of 236
is 400 lbs: 1,000 lbs minus 600 lbs =
400 lbs.5.Determine the combined weight of lug‐
gage and cargo being loaded on the vehi‐
cle. That weight may not safely exceed the
available cargo and luggage load capacity
calculated in Step 4.
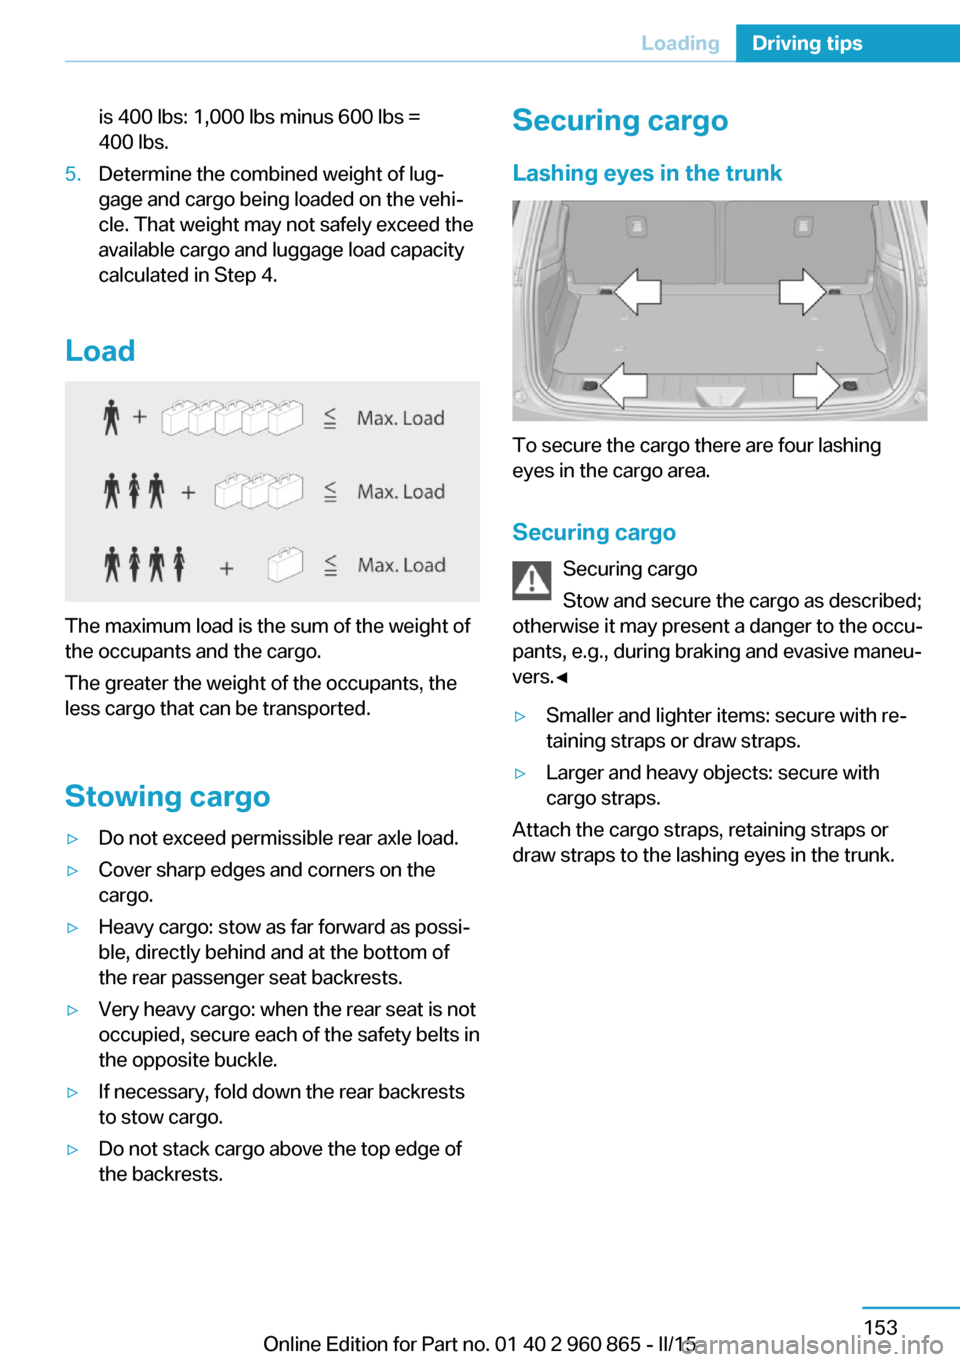
Load
The maximum load is the sum of the weight of
the occupants and the cargo.
The greater the weight of the occupants, the
less cargo that can be transported.
Stowing cargo
▷Do not exceed permissible rear axle load.▷Cover sharp edges and corners on the
cargo.▷Heavy cargo: stow as far forward as possi‐
ble, directly behind and at the bottom of
the rear passenger seat backrests.▷Very heavy cargo: when the rear seat is not
occupied, secure each of the safety belts in
the opposite buckle.▷If necessary, fold down the rear backrests
to stow cargo.▷Do not stack cargo above the top edge of
the backrests.Securing cargo
Lashing eyes in the trunk
To secure the cargo there are four lashing
eyes in the cargo area.
Securing cargo Securing cargo
Stow and secure the cargo as described;
otherwise it may present a danger to the occu‐
pants, e.g., during braking and evasive maneu‐
vers.◀
▷Smaller and lighter items: secure with re‐
taining straps or draw straps.▷Larger and heavy objects: secure with
cargo straps.
Attach the cargo straps, retaining straps or
draw straps to the lashing eyes in the trunk.
Seite 153LoadingDriving tips153
Online Edition for Part no. 01 40 2 960 865 - II/15
Page 170 of 236
Increase rangeGeneral informationThe vehicle contains comprehensive technolo‐
gies for reducing the energy consumption and
for maximizing the range.
The range depends on a number of different
factors.
The implementation of certain measures, driv‐
ing style and regular maintenance can increase
range and thereby also reduce the environ‐
mental impact.
Remove unnecessary cargo
Additional weight reduces the range.
Remove attached parts
following use
Attached parts on the vehicle impair the aero‐ dynamics and increase the energy consump‐
tion.
Close the windows and glass
sunroof
Driving with the glass sunroof and windows
open results in increased air resistance and
thereby reduces the range.
Tires
General information
Tires can affect energy consumption in various
ways, for instance energy consumption can be
influenced by tire size.Check the tire inflation pressure
regularly
Check and, if needed, correct the tire inflationpressure at least twice a month and before
starting on a long trip.
Low tire inflation pressure increases rolling re‐
sistance and thus raises energy consumption
and tire wear.
Standing air conditioning Run advance climate control, refer to
page 133, in the vehicle during charging if pos‐
sible before driving off.
Heating and cooling operations are very en‐
ergy intensive and substantially reduce the
electric range.
Look well ahead when
driving
Avoid unnecessary acceleration and braking.
By maintaining a suitable distance to the vehi‐
cle driving ahead of you.
Driving smoothly and proactively reduces en‐
ergy consumption.
Longer braking procedures result in more effi‐
cient charging of the high-voltage battery via
energy recovery from braking.
Use accelerator pedal for
deceleration and coasting
When approaching a red light, use accelerator
pedal for decelerating.
For going downhill use coasting function; for
this purpose, press accelerator pedal just
enough that the vehicle rolls.Seite 154Driving tipsIncrease range154
Online Edition for Part no. 01 40 2 960 865 - II/15
Page 223 of 236
Weights
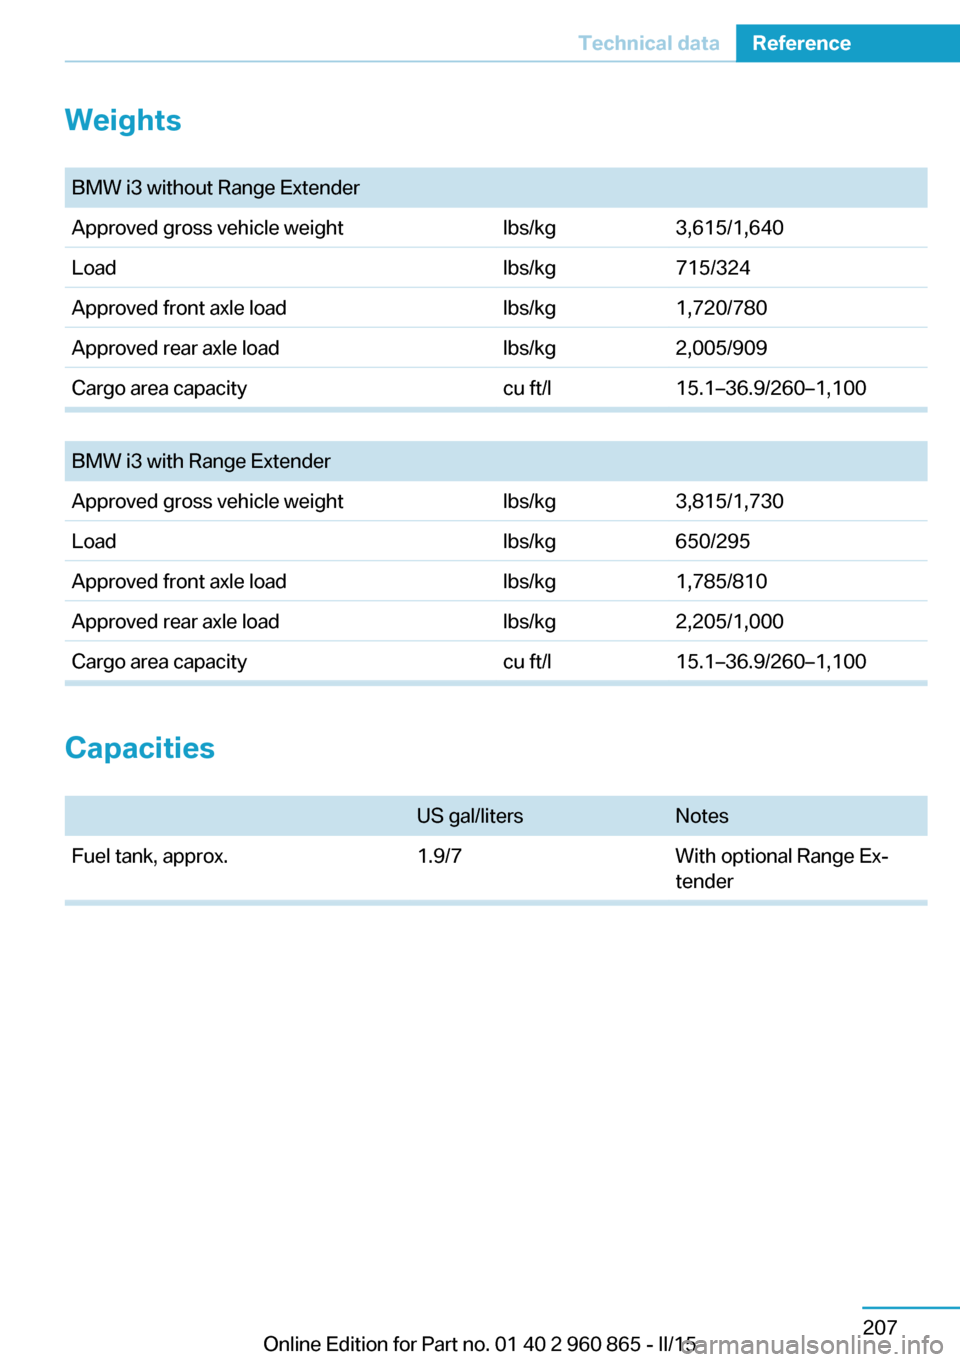
BMW i3 without Range ExtenderApproved gross vehicle weightlbs/kg3,615/1,640Loadlbs/kg715/324Approved front axle loadlbs/kg1,720/780Approved rear axle loadlbs/kg2,005/909Cargo area capacitycu ft/l15.1–36.9/260–1,100
BMW i3 with Range ExtenderApproved gross vehicle weightlbs/kg3,815/1,730Loadlbs/kg650/295Approved front axle loadlbs/kg1,785/810Approved rear axle loadlbs/kg2,205/1,000Cargo area capacitycu ft/l15.1–36.9/260–1,100
Capacities
US gal/litersNotesFuel tank, approx.1.9/7With optional Range Ex‐
tenderSeite 207Technical dataReference207
Online Edition for Part no. 01 40 2 960 865 - II/15
Page 226 of 236
Everything from A to Z
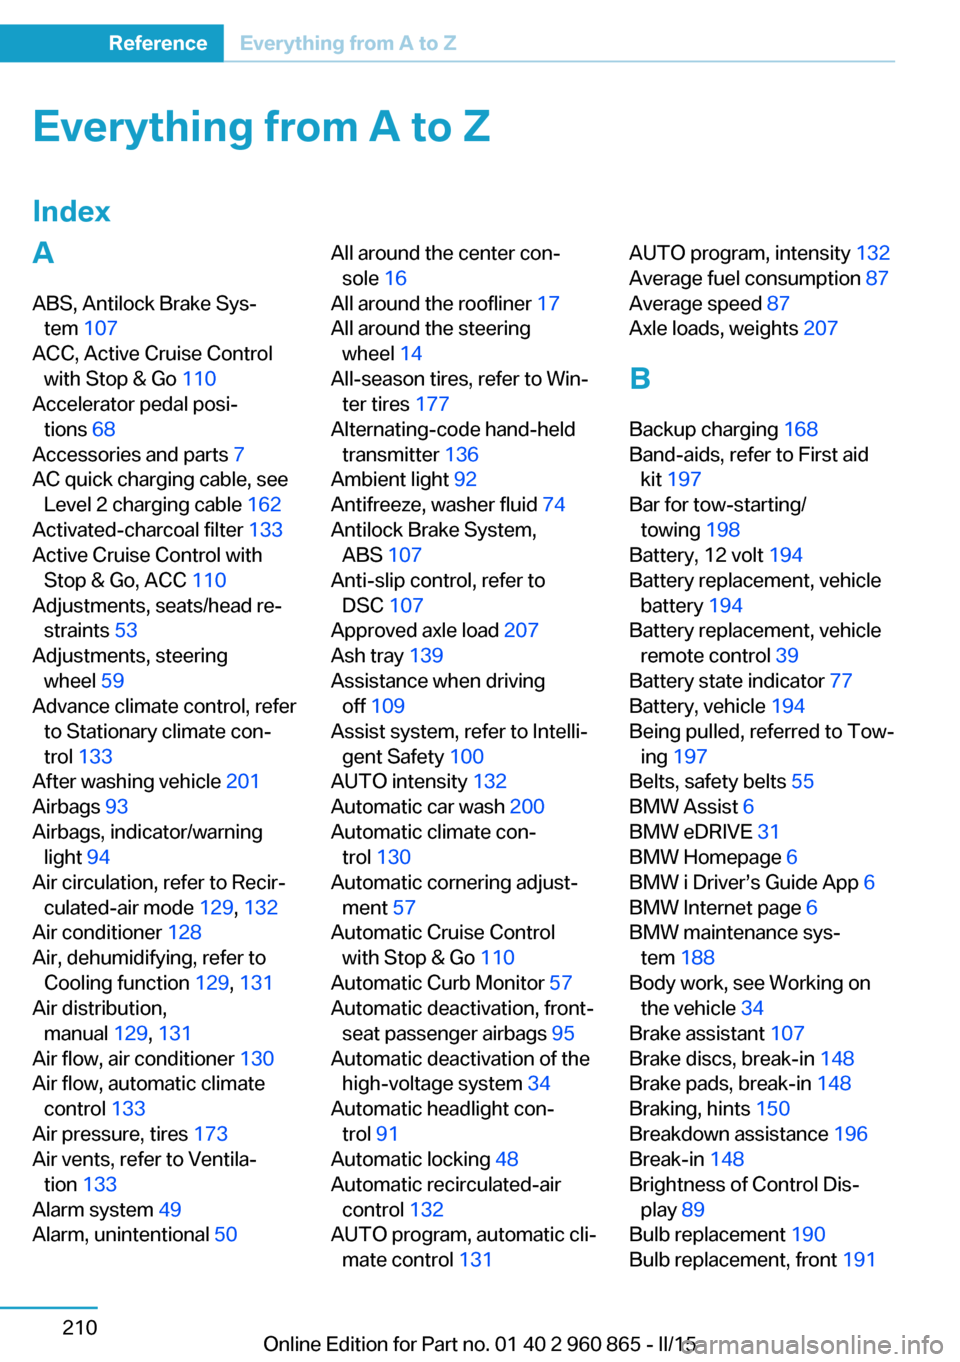
IndexA ABS, Antilock Brake Sys‐ tem 107
ACC, Active Cruise Control with Stop & Go 110
Accelerator pedal posi‐ tions 68
Accessories and parts 7
AC quick charging cable, see Level 2 charging cable 162
Activated-charcoal filter 133
Active Cruise Control with Stop & Go, ACC 110
Adjustments, seats/head re‐ straints 53
Adjustments, steering wheel 59
Advance climate control, refer to Stationary climate con‐
trol 133
After washing vehicle 201
Airbags 93
Airbags, indicator/warning light 94
Air circulation, refer to Recir‐ culated-air mode 129, 132
Air conditioner 128
Air, dehumidifying, refer to Cooling function 129, 131
Air distribution, manual 129, 131
Air flow, air conditioner 130
Air flow, automatic climate control 133
Air pressure, tires 173
Air vents, refer to Ventila‐ tion 133
Alarm system 49
Alarm, unintentional 50 All around the center con‐
sole 16
All around the roofliner 17
All around the steering wheel 14
All-season tires, refer to Win‐ ter tires 177
Alternating-code hand-held transmitter 136
Ambient light 92
Antifreeze, washer fluid 74
Antilock Brake System, ABS 107
Anti-slip control, refer to DSC 107
Approved axle load 207
Ash tray 139
Assistance when driving off 109
Assist system, refer to Intelli‐ gent Safety 100
AUTO intensity 132
Automatic car wash 200
Automatic climate con‐ trol 130
Automatic cornering adjust‐ ment 57
Automatic Cruise Control with Stop & Go 110
Automatic Curb Monitor 57
Automatic deactivation, front- seat passenger airbags 95
Automatic deactivation of the high-voltage system 34
Automatic headlight con‐ trol 91
Automatic locking 48
Automatic recirculated-air control 132
AUTO program, automatic cli‐ mate control 131 AUTO program, intensity 132
Average fuel consumption 87
Average speed 87
Axle loads, weights 207
B Backup charging 168
Band-aids, refer to First aid kit 197
Bar for tow-starting/ towing 198
Battery, 12 volt 194
Battery replacement, vehicle battery 194
Battery replacement, vehicle remote control 39
Battery state indicator 77
Battery, vehicle 194
Being pulled, referred to Tow‐ ing 197
Belts, safety belts 55
BMW Assist 6
BMW eDRIVE 31
BMW Homepage 6
BMW i Driver’s Guide App 6
BMW Internet page 6
BMW maintenance sys‐ tem 188
Body work, see Working on the vehicle 34
Brake assistant 107
Brake discs, break-in 148
Brake pads, break-in 148
Braking, hints 150
Breakdown assistance 196
Break-in 148
Brightness of Control Dis‐ play 89
Bulb replacement 190
Bulb replacement, front 191 Seite 210ReferenceEverything from A to Z210
Online Edition for Part no. 01 40 2 960 865 - II/15
Page 229 of 236
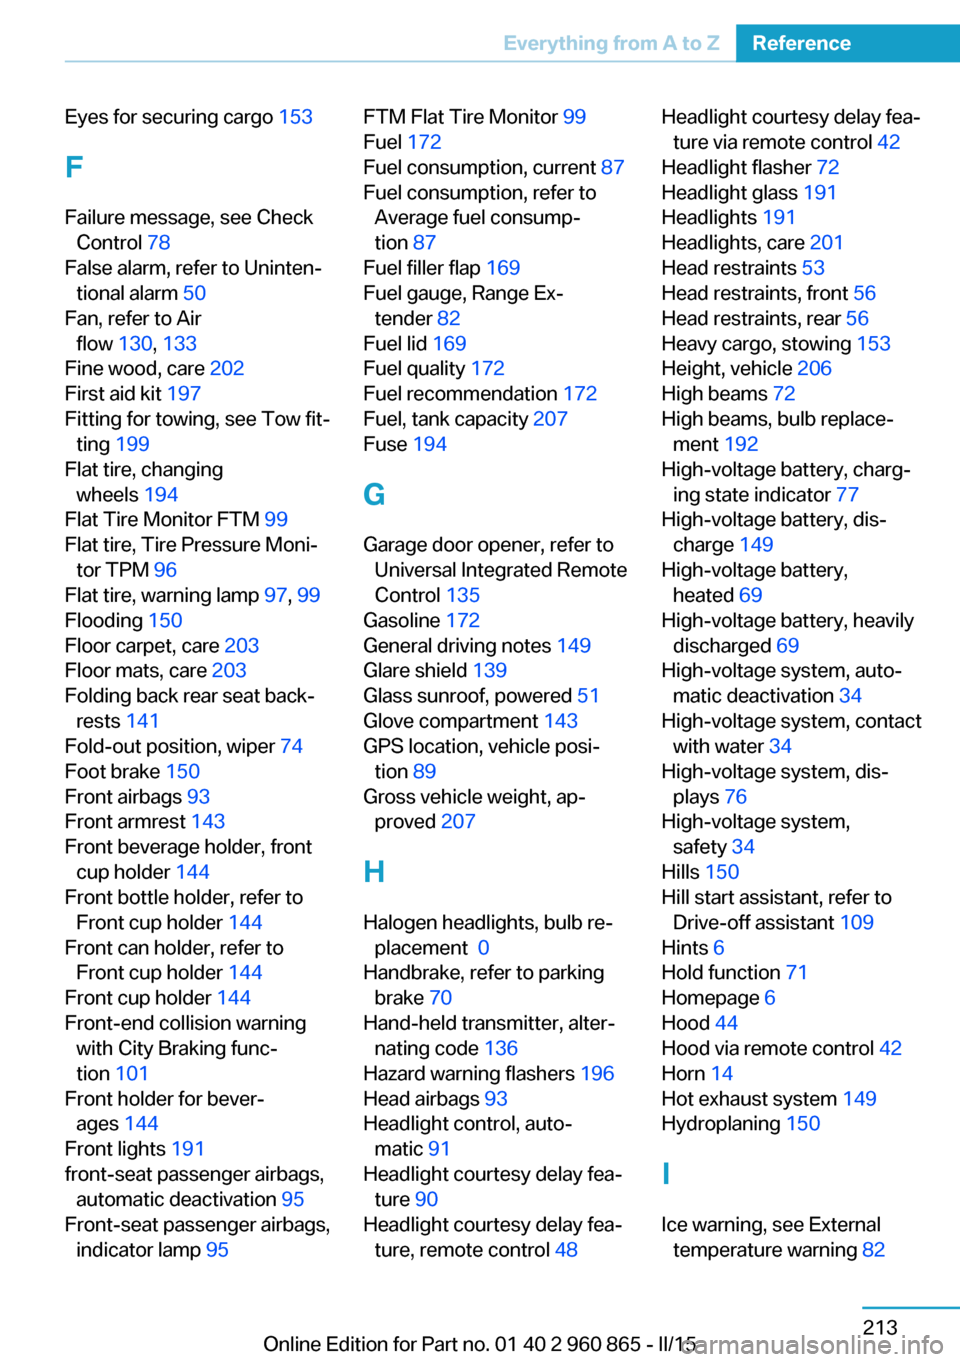
Eyes for securing cargo 153
F
Failure message, see Check Control 78
False alarm, refer to Uninten‐ tional alarm 50
Fan, refer to Air flow 130, 133
Fine wood, care 202
First aid kit 197
Fitting for towing, see Tow fit‐ ting 199
Flat tire, changing wheels 194
Flat Tire Monitor FTM 99
Flat tire, Tire Pressure Moni‐ tor TPM 96
Flat tire, warning lamp 97, 99
Flooding 150
Floor carpet, care 203
Floor mats, care 203
Folding back rear seat back‐ rests 141
Fold-out position, wiper 74
Foot brake 150
Front airbags 93
Front armrest 143
Front beverage holder, front cup holder 144
Front bottle holder, refer to Front cup holder 144
Front can holder, refer to Front cup holder 144
Front cup holder 144
Front-end collision warning with City Braking func‐
tion 101
Front holder for bever‐ ages 144
Front lights 191
front-seat passenger airbags, automatic deactivation 95
Front-seat passenger airbags, indicator lamp 95 FTM Flat Tire Monitor 99
Fuel 172
Fuel consumption, current 87
Fuel consumption, refer to Average fuel consump‐
tion 87
Fuel filler flap 169
Fuel gauge, Range Ex‐ tender 82
Fuel lid 169
Fuel quality 172
Fuel recommendation 172
Fuel, tank capacity 207
Fuse 194
G
Garage door opener, refer to Universal Integrated Remote
Control 135
Gasoline 172
General driving notes 149
Glare shield 139
Glass sunroof, powered 51
Glove compartment 143
GPS location, vehicle posi‐ tion 89
Gross vehicle weight, ap‐ proved 207
H
Halogen headlights, bulb re‐ placement 0
Handbrake, refer to parking brake 70
Hand-held transmitter, alter‐ nating code 136
Hazard warning flashers 196
Head airbags 93
Headlight control, auto‐ matic 91
Headlight courtesy delay fea‐ ture 90
Headlight courtesy delay fea‐ ture, remote control 48 Headlight courtesy delay fea‐
ture via remote control 42
Headlight flasher 72
Headlight glass 191
Headlights 191
Headlights, care 201
Head restraints 53
Head restraints, front 56
Head restraints, rear 56
Heavy cargo, stowing 153
Height, vehicle 206
High beams 72
High beams, bulb replace‐ ment 192
High-voltage battery, charg‐ ing state indicator 77
High-voltage battery, dis‐ charge 149
High-voltage battery, heated 69
High-voltage battery, heavily discharged 69
High-voltage system, auto‐ matic deactivation 34
High-voltage system, contact with water 34
High-voltage system, dis‐ plays 76
High-voltage system, safety 34
Hills 150
Hill start assistant, refer to Drive-off assistant 109
Hints 6
Hold function 71
Homepage 6
Hood 44
Hood via remote control 42
Horn 14
Hot exhaust system 149
Hydroplaning 150
I Ice warning, see External temperature warning 82 Seite 213Everything from A to ZReference213
Online Edition for Part no. 01 40 2 960 865 - II/15