clock BMW I8 2015 I12 Owner's Manual
[x] Cancel search | Manufacturer: BMW, Model Year: 2015, Model line: I8, Model: BMW I8 2015 I12Pages: 224, PDF Size: 12.46 MB
Page 37 of 224
Function is deactivated.
Touchpad Some iDrive functions can be operated using
the touchpad on the controller:
Selecting functions1."Settings"2."Touchpad"3.Select the desired function.▷"Speller": enter letters and numbers.▷"Interactive map": viewing the interac‐
tive map.▷"Browser": enter Internet addresses.▷"Audio feedback": pronounces entered
letters and numbers.
Entering letters and numbers
Entering letters requires some practice at the
beginning. When entering, pay attention to the
following:
▷For the input of upper/lower case letters
and numbers, it may be necessary to reel
via the controller to the corresponding In‐
put mode, refer to page 24, e.g. when the
spelling of upper and lower case letters is
identical.▷Enter characters as they are displayed on
the Control Display.▷Always enter associated characters, such
as accents or periods so that the letter can
be clearly recognized. Possible input de‐
pends on the set language. Where neces‐
sary, enter special characters via the con‐
troller.▷To delete a character, slide to the left on
the touchpad.▷To enter a blank space, slide to the right in
the center of the touchpad.▷To enter a hyphen, slide to the right in the
upper area of the touchpad.▷To enter an underscore, swipe to the right
in the lower area of the touchpad.
Using interactive map and Internet
Via touch-pad move the interactive map in the
navigation system and Internet sites.
FunctionControlsMove interactive map or
Internet sites.Swipe into re‐
spective direc‐
tion.Enlarge/shrink interactive
map or Internet sites.Drag in or out on
the touchpad with
fingers.Display the menu or open
a link in the Internet.Tap once.
Changing settings
You may change control display settings via
touchpad. Swipe left or right accordingly.
Example: setting the clock Setting the clock
On the Control Display:
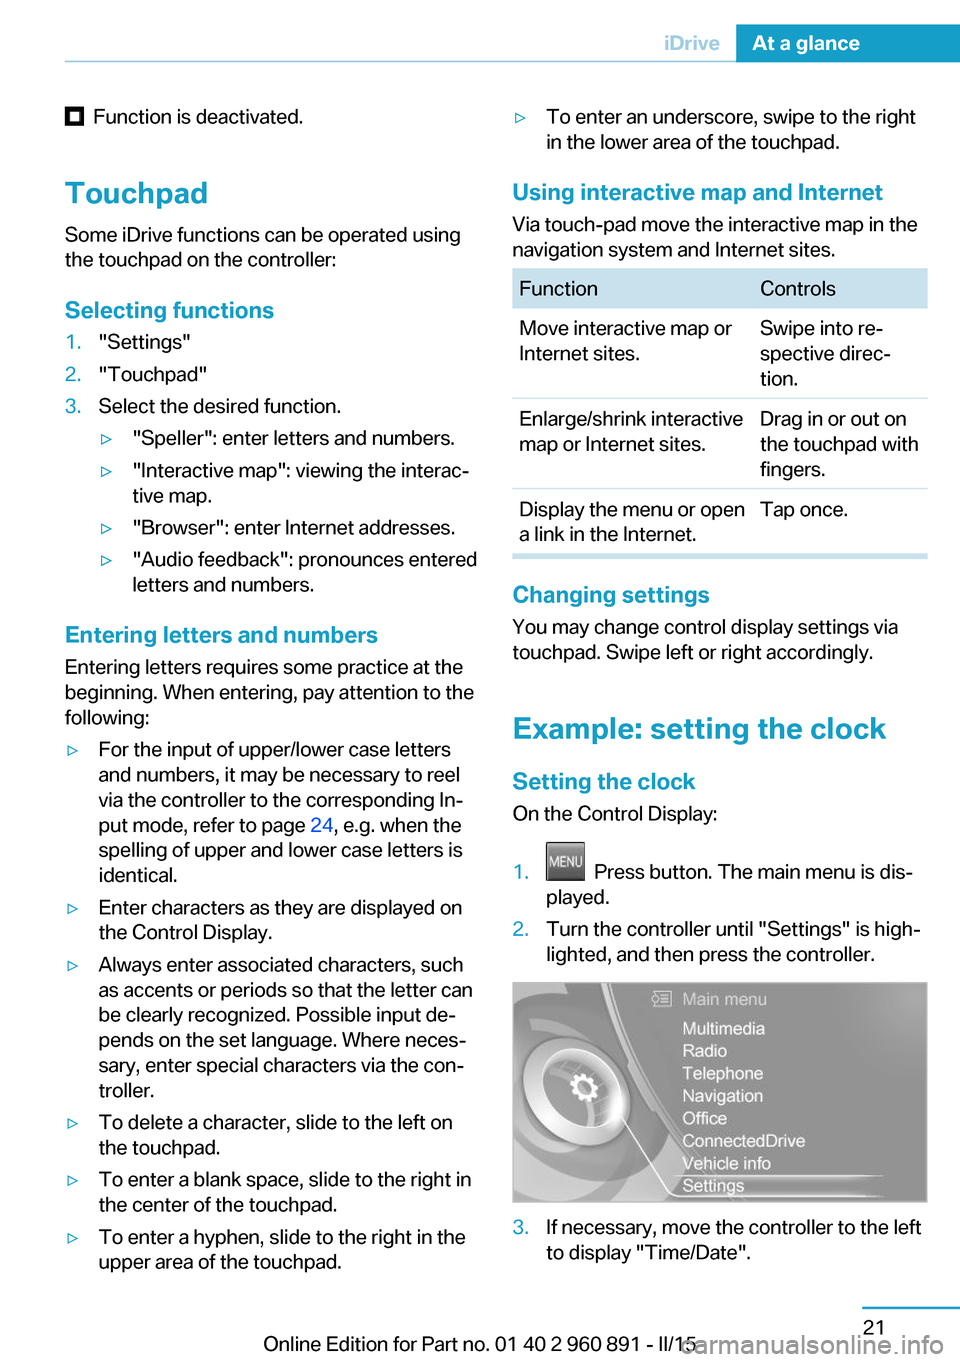
1. Press button. The main menu is dis‐
played.2.Turn the controller until "Settings" is high‐
lighted, and then press the controller.3.If necessary, move the controller to the left
to display "Time/Date".Seite 21iDriveAt a glance21
Online Edition for Part no. 01 40 2 960 891 - II/15
Page 113 of 224
Knee airbagThe knee airbag supports the legs in a frontal
impact.
Protective action
Airbags are not triggered in every impact situa‐
tion, e.g., in less severe accidents or rear-end
collisions.
Information on how to ensure the optimal
protective effect of the airbags▷Keep at a distance from the airbags.▷Always grasp the steering wheel on the
steering wheel rim, holding your hands at
the 3 o'clock and 9 o'clock positions, to
keep the risk of injury to your hands or
arms as low as possible when the airbag is
triggered.▷There should be no person, animals, or ob‐
jects between an airbag and a person.▷Do not use the cover of the front airbag on
the front passenger side as a storage area.▷Dashboard and windshield on the front
passenger side must stay clear - do not at‐
tach adhesive labels or coverings and do
not attach brackets or cables, e. g., for GPS
devices or' mobile phones.▷Make sure that the front passenger is sit‐
ting correctly, i.e., keeps his or her feet and
legs in the footwell; otherwise, leg injuries
might occur when front airbag is activated.▷Do not place slip covers, seat cushions or
other objects on the front passenger seat
that are not approved specifically for seats
with integrated side airbags.▷Do not hang pieces of clothing, such as
jackets, over the backrests.▷Make sure that occupants keep their heads
away from the side airbag and do not rest
against the head airbag; otherwise, injuries
might occur when airbag is activated.▷Do not remove the airbag system.▷Do not remove the steering wheel.▷Do not apply adhesive materials to the air‐
bag cover panels, do not cover them or
modify them in any way.▷Never modify either the individual compo‐
nents or the wiring in the airbag system.
This also applies to steering wheel covers,
the dashboard, the seats, the roof pillars
and the sides of the roofliner.◀
Even when you follow all instructions very
closely, injury from contact with the airbags
cannot be ruled out in certain situations.
The ignition and inflation noise may lead to
short-term and, in most cases, temporary
hearing impairment in sensitive individuals.
Malfunction, deactivation and after de‐
ploying the airbags
Do not touch the individual components imme‐
diately after the system has been triggered;
otherwise, you may risk burns.
Only have the airbags checked, repaired or dis‐
mantled and the airbag generator scrapped by
the service center or an authorized repair shop
for handling explosives.
Non-professional attempts to service the sys‐
tem could lead to failure in an emergency or
unintentional activation of the airbag - both
may lead to injury.◀
Warnings and information on the airbags are also found on the sun visors.
Functional readiness of the airbag
system
With operating readiness turned on
warning light in the instrument cluster
lights up briefly indicating airbag sys‐
tem and belt tension are functional.
Airbag system malfunctioning
▷Warning lamp does not come on when op‐
erating readiness is turned on.▷The warning lamp lights up continuously.Seite 97SafetyControls97
Online Edition for Part no. 01 40 2 960 891 - II/15
Page 171 of 224
4.Set rate begin. Turn the controller until the
desired time is set and press the controller.5.Set rate end. Turn the controller until the
desired time is set and press the controller.
Setting charging via a
Level 1 charging cable
Depending on the electrical mains, the vehicle
must be charged with a different charging cur‐
rent strength, refer to page 150.
1."Settings"2."Charging"3."AC charging power:"
Settings are stored. When you change charg‐
ing locations you also might need to change
the setting for charging.
Set the charge current strength at other
household sockets to "Low".
Stopping charging process The charging operation can be stopped at any
time by removing the charging cable and con‐
tinued at a later time by connecting the charg‐
ing cable in order to use other loads on the
power connection or to prevent simultaneous
high power from multiple loads.
The charging operation is interrupted when the
vehicle is unlocked and automatically resumed
after a brief time or when it is locked.
Continue charging operation If the charging operation is interrupted, e.g.,
through a temporary power failure, the charg‐
ing operation is automatically continued after
the interruption.
Terminating charging process
1.Removing the charging cable from the ve‐
hicle, refer to page 152.2.Stow the charging cable as required.3.Close the charging port flap.4.Lock vehicle if it is unlocked.Displays in the instrument
cluster
The charging state indicator light, refer to page 77, shows the charging state of the high-
voltage battery in the instrument cluster, if op‐
erating readiness is switched on. If all seg‐
ments are filled, the high-voltage battery is
fully charged.
Even if no segments are filled, the high-voltage
system is still under high voltage.
Information regarding the charging process are
shown on the charging screen, refer to
page 76.DisplayMeaningBlue plug: charging process active
or completed.
White plug: charging interruption.Running light: animated with active
charging operation.End of charging time or set depar‐
ture time.Charging progress bar.Indicator in blue: charged electrical
range.Indicator in white: maximum electri‐
cal range.White clock: departure time set.
Blue plug: charging process active
or completed.
White plug: charging interruption.Climate control activated at depar‐
ture time.Flashing: ventilation active.Seite 155Charging vehicleMobility155
Online Edition for Part no. 01 40 2 960 891 - II/15
Page 175 of 224
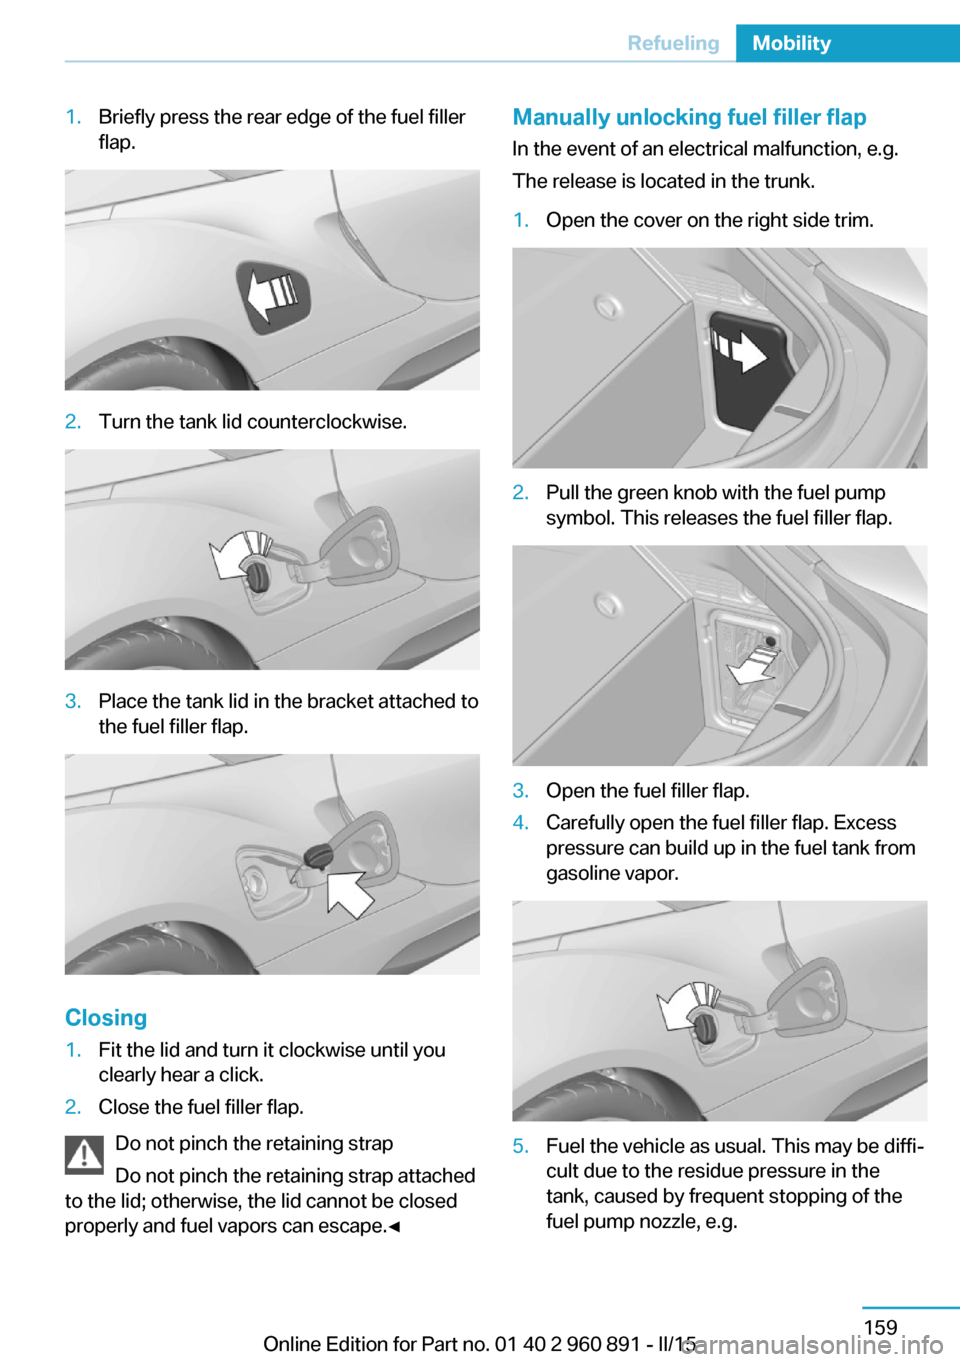
1.Briefly press the rear edge of the fuel filler
flap.2.Turn the tank lid counterclockwise.3.Place the tank lid in the bracket attached to
the fuel filler flap.
Closing
1.Fit the lid and turn it clockwise until you
clearly hear a click.2.Close the fuel filler flap.
Do not pinch the retaining strap
Do not pinch the retaining strap attached
to the lid; otherwise, the lid cannot be closed
properly and fuel vapors can escape.◀
Manually unlocking fuel filler flap
In the event of an electrical malfunction, e.g.
The release is located in the trunk.1.Open the cover on the right side trim.2.Pull the green knob with the fuel pump
symbol. This releases the fuel filler flap.3.Open the fuel filler flap.4.Carefully open the fuel filler flap. Excess
pressure can build up in the fuel tank from
gasoline vapor.5.Fuel the vehicle as usual. This may be diffi‐
cult due to the residue pressure in the
tank, caused by frequent stopping of the
fuel pump nozzle, e.g.Seite 159RefuelingMobility159
Online Edition for Part no. 01 40 2 960 891 - II/15
Page 190 of 224
If the engine oil level reaches the minimum
level, a check control message is displayed.
Diesel engine:
During the measurement, the idle speed is in‐
creased somewhat.
Requirements▷Vehicle is on level road.▷Drive readiness is established.▷Selector lever position N engaged and ac‐
celerator pedal not depressed.▷Engine is running and is at operating tem‐
perature.
Performing a detailed measurement
In order to perform a detailed measurement of
the engine oil level:
1."Vehicle info"2."Vehicle status"3. "Measure engine oil level"4."Start measurement"
The engine oil level is checked and displayed
via a scale.
Time: approx. 1 minute.
Engine compartment access The engine compartment is located under the
tailgate.
Working in the engine compartment
Never attempt to perform any service or
repair operations on your vehicle without the
necessary professional technical training.
If you are unfamiliar with the statutory guide‐
lines, have any work on the vehicle performed
only by a service center.
If work is not carried out properly, there is a
danger of subsequent damage and related
safety hazards.◀
Never reach into the engine compart‐
ment
Never reach into spaces or gaps in the engine
compartment; otherwise, there is a risk of in‐
jury, e.g., from rotating or hot parts.◀
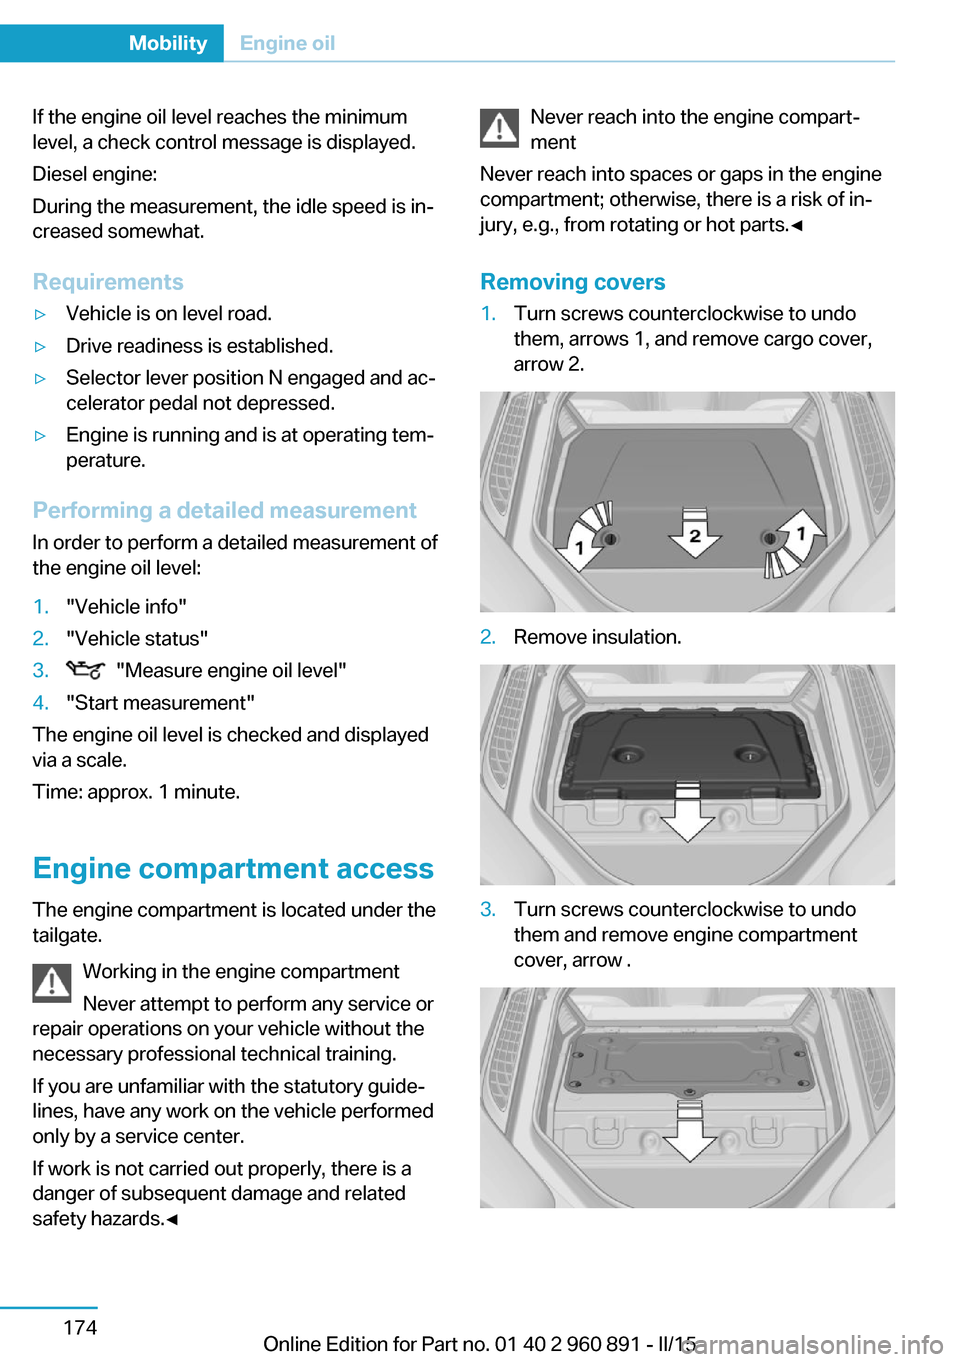
Removing covers1.Turn screws counterclockwise to undo
them, arrows 1, and remove cargo cover,
arrow 2.2.Remove insulation.3.Turn screws counterclockwise to undo
them and remove engine compartment
cover, arrow .Seite 174MobilityEngine oil174
Online Edition for Part no. 01 40 2 960 891 - II/15
Page 191 of 224
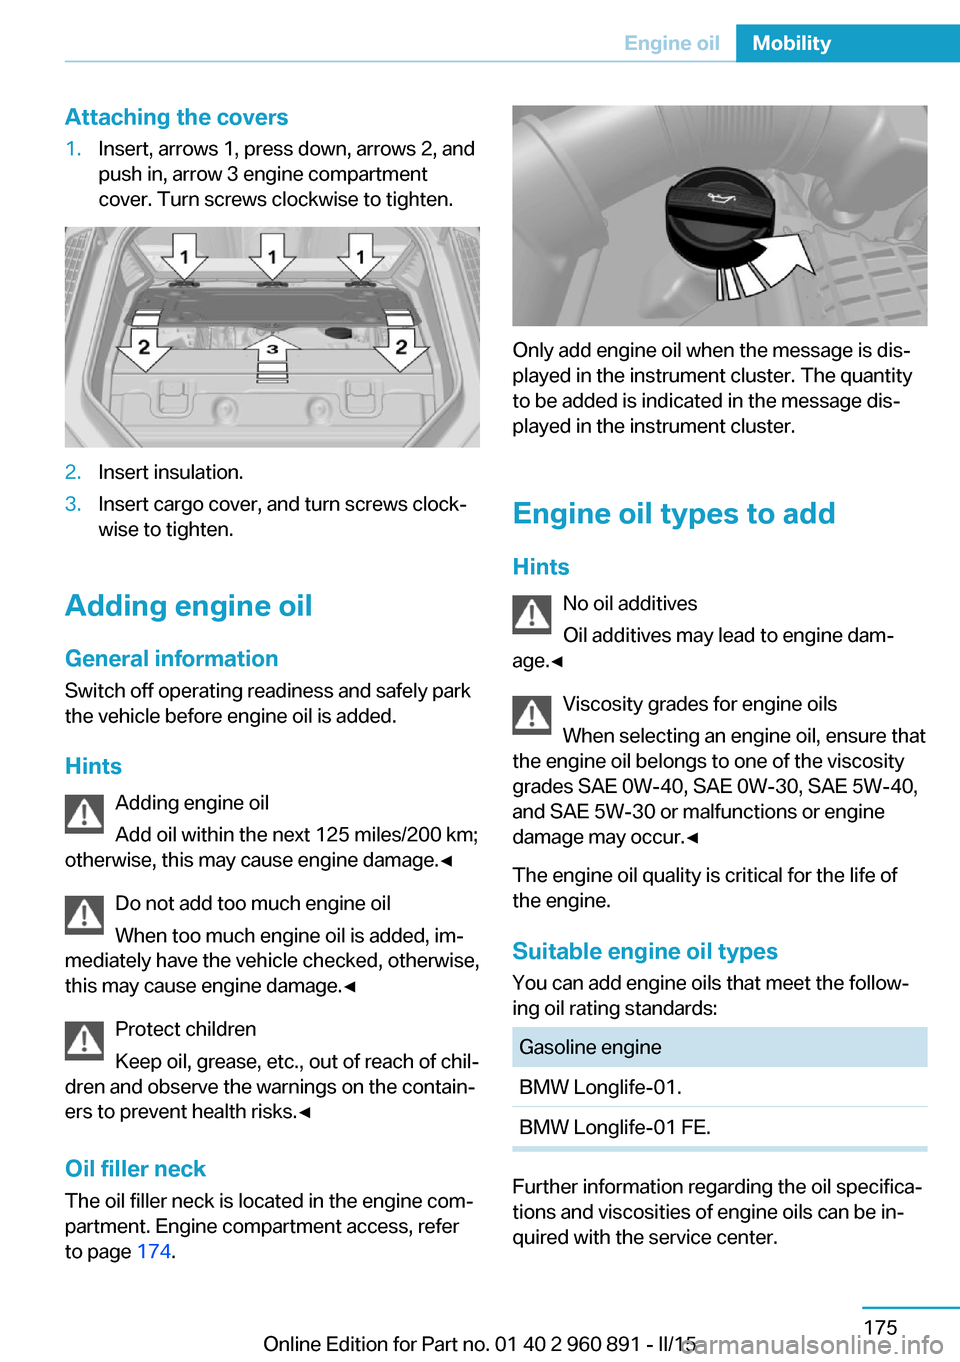
Attaching the covers1.Insert, arrows 1, press down, arrows 2, and
push in, arrow 3 engine compartment
cover. Turn screws clockwise to tighten.2.Insert insulation.3.Insert cargo cover, and turn screws clock‐
wise to tighten.
Adding engine oil
General information
Switch off operating readiness and safely park
the vehicle before engine oil is added.
Hints Adding engine oil
Add oil within the next 125 miles/200 km;
otherwise, this may cause engine damage.◀
Do not add too much engine oil
When too much engine oil is added, im‐
mediately have the vehicle checked, otherwise,
this may cause engine damage.◀
Protect children
Keep oil, grease, etc., out of reach of chil‐
dren and observe the warnings on the contain‐
ers to prevent health risks.◀
Oil filler neck
The oil filler neck is located in the engine com‐
partment. Engine compartment access, refer
to page 174.
Only add engine oil when the message is dis‐
played in the instrument cluster. The quantity
to be added is indicated in the message dis‐
played in the instrument cluster.
Engine oil types to add Hints No oil additives
Oil additives may lead to engine dam‐
age.◀
Viscosity grades for engine oils
When selecting an engine oil, ensure that
the engine oil belongs to one of the viscosity
grades SAE 0W-40, SAE 0W-30, SAE 5W-40,
and SAE 5W-30 or malfunctions or engine
damage may occur.◀
The engine oil quality is critical for the life of
the engine.
Suitable engine oil types You can add engine oils that meet the follow‐
ing oil rating standards:
Gasoline engineBMW Longlife-01.BMW Longlife-01 FE.
Further information regarding the oil specifica‐
tions and viscosities of engine oils can be in‐
quired with the service center.
Seite 175Engine oilMobility175
Online Edition for Part no. 01 40 2 960 891 - II/15
Page 215 of 224
Braking, hints 140
Breakdown assistance 183
Break-in 138
Brightness of Control Dis‐ play 90
Bulb replacement 180
Bulbs and lamps 180
Button, Start/Stop 61
Bypassing, refer to Jump- starting 184
C
California Proposition 65 Warning 8
Camera lenses, care 190
Camera, rearview cam‐ era 118
Camera, Side View 122
Camera, Top View 121
Car battery 181
Car care products 188
Care, displays 190
Care, vehicle 188
Cargo 142
Cargo area 132
Cargo cover 132
Car key, refer to Remote con‐ trol 38
Carpet, care 189
Car wash 187
Catalytic converter, refer to Hot exhaust system 140
CBS Condition Based Serv‐ ice 178
Center armrest 134
Center console 16
Central locking system 44
Central screen, refer to Con‐ trol Display 18
Changes, technical, refer to Safety 7
Changing wheels 181
Changing wheels/tires 167
CHARGE, energy recov‐ ery 66 Charging battery, see Vehicle
charging 150
Charging, refer to Charging vehicle 150
Charging, refer to Vehicle charging 150
Charging screen 76
Charging state indicator, high-voltage battery 77
Charging status, see display of the charging status 154
Charging vehicle 150
Charging vehicle, refer to Ve‐ hicle charging 150
Chassis number, see vehicle identification number 10
Check Control 79
Checking the engine oil level electronically 173
Checking the oil level elec‐ tronically 173
Children, seating position 57
Children, transporting safely 57
Child restraint fixing sys‐ tem 57
Child restraint fixing system LATCH 58
Child restraint fixing systems, mounting 57
Child seat, mounting 57
Child seats 57
Chrome parts, care 189
Cleaning displays 190
Climate control 124
Clock 83
Closing/opening via door lock 43
Closing/opening with remote control 41
Combination reel, refer to Turn signals 67
Combination switch, refer to Wiper system 68
Combustion engine, start‐ ing 63 Comfort Access 45
COMFORT program, Dy‐ namic Driving Control 111
Compressor 168
Computer, refer to On-board computer 87
Condensation on win‐ dows 127
Condensation under the vehi‐ cle 141
Condition Based Service CBS 178
Confirmation signal 47
ConnectedDrive 6
ConnectedDrive Services 6
Connecting electrical devi‐ ces 131
Contact with water, high-volt‐ age system 34
Control Display 18
Control Display, settings 89
Controller 18
Control systems, driving sta‐ bility 109
Convenient opening with the remote control 42
Coolant 177
Coolant temperature 83
Cooling function 125
Cooling, maximum 125
Cooling system 177
Corrosion on brake discs 141
Cosmetic mirror 131
Courtesy lamps during un‐ locking 41
Courtesy lamps with the vehi‐ cle locked 42
Cruise control 113
Cruising range 83
Current fuel consumption 87
D
Damage, tires 166
Data, technical 194
Date 83 Seite 199Everything from A to ZReference199
Online Edition for Part no. 01 40 2 960 891 - II/15
Page 216 of 224
Daytime running lights 93
Deactivating drive readi‐ ness 63
Defrosting, refer to Windows, defrosting 127
Dehumidifying, air 125
Deleting personal data 24
Deletion of personal data 24
Departure times, stationary climate control 128
Destination distance 88
Digital clock 83
Dimensions 194
Dimmable exterior mirrors 55
Dimmable interior rearview mirror 55
Direction indicator, refer to Turn signals 67
Display in windshield 90
Display lighting, refer to In‐ strument lighting 95
Displays 75
Displays, cleaning 190
Displays, hybrid system 77
Disposal, vehicle battery 182
Distance control, refer to PDC 115
Distance to destination 88
Divided screen view, split screen 23
Door lock 43
Door lock, refer to Remote control 38
Drive-off assistant 112
Drive-off assistant, refer to DSC 109
Driver's door, LED 41
Drive readiness 61
Drive readiness in detail 62
Drive readuness, deacti‐ vate 63
Driving Dynamics Con‐ trol 111
Driving instructions, break- in 138 Driving instructions, eDRIVE
drive system 138
Driving mode 111
Driving notes, general 139
Driving stability control sys‐ tems 109
Driving tips 139
Driving with combustion en‐ gine, POWER 65
DSC Dynamic Stability Con‐ trol 109
DTC Dynamic Traction Con‐ trol 110
Dynamic Stability Control DSC 109
Dynamic Traction Control DTC 110
E
eBOOST 65
ECO PRO 145
ECO PRO display 145
ECO PRO driving mode 145
ECO PRO mode 145
ECO PRO Tip - driving in‐ struction 146
eDRIVE drive system, driving instructions 138
eDRIVE, electric driving, see BMW eDRIVE 32
eDrive system, at a glance 31
EfficientDynamics 146
Electric drive readiness, Si‐ lent Start 63
Electric driving, ePOWER 64
Electric driving, max eDRIVE 64
Electric driving, see BMW eDRIVE 32
Electronic oil measure‐ ment 173
Electronic Stability Program ESP, refer to DSC 109
Emergency charging, refer to Backup charging 156 Emergency detection, remote
control 39
Emergency release, fuel filler flap 159
Emergency Request 183
Emergency start function, en‐ gine start 39
Emergency unlocking, tail‐ gate 45
Emergency unlocking, trans‐ mission lock 73
Energy Control 87
Energy recovery, CHARGE 66
Engine coolant 177
Engine noise, artificial 65
Engine oil 173
Engine oil, adding 175
Engine oil additives 175
Engine oil change 176
Engine oil filler neck 175
Engine oil temperature 83
Engine oil types, alterna‐ tive 176
Engine oil types, ap‐ proved 175
Engine start during malfunc‐ tion 39
Engine start, jump-start‐ ing 184
Engine temperature 83
Entering a car wash 187
ePOWER, electric driving 64
Equipment, interior 129
Error displays, see Check Control 79
ESP Electronic Stability Pro‐ gram, refer to DSC 109
Exchanging wheels/tires 167
Exhaust system 140
Exterior mirror, automatic dimming feature 55
Exterior mirrors 54
External start 184
External temperature dis‐ play 83 Seite 200ReferenceEverything from A to Z200
Online Edition for Part no. 01 40 2 960 891 - II/15