cruise control BMW I8 2015 I12 Owner's Manual
[x] Cancel search | Manufacturer: BMW, Model Year: 2015, Model line: I8, Model: BMW I8 2015 I12Pages: 224, PDF Size: 12.46 MB
Page 31 of 224
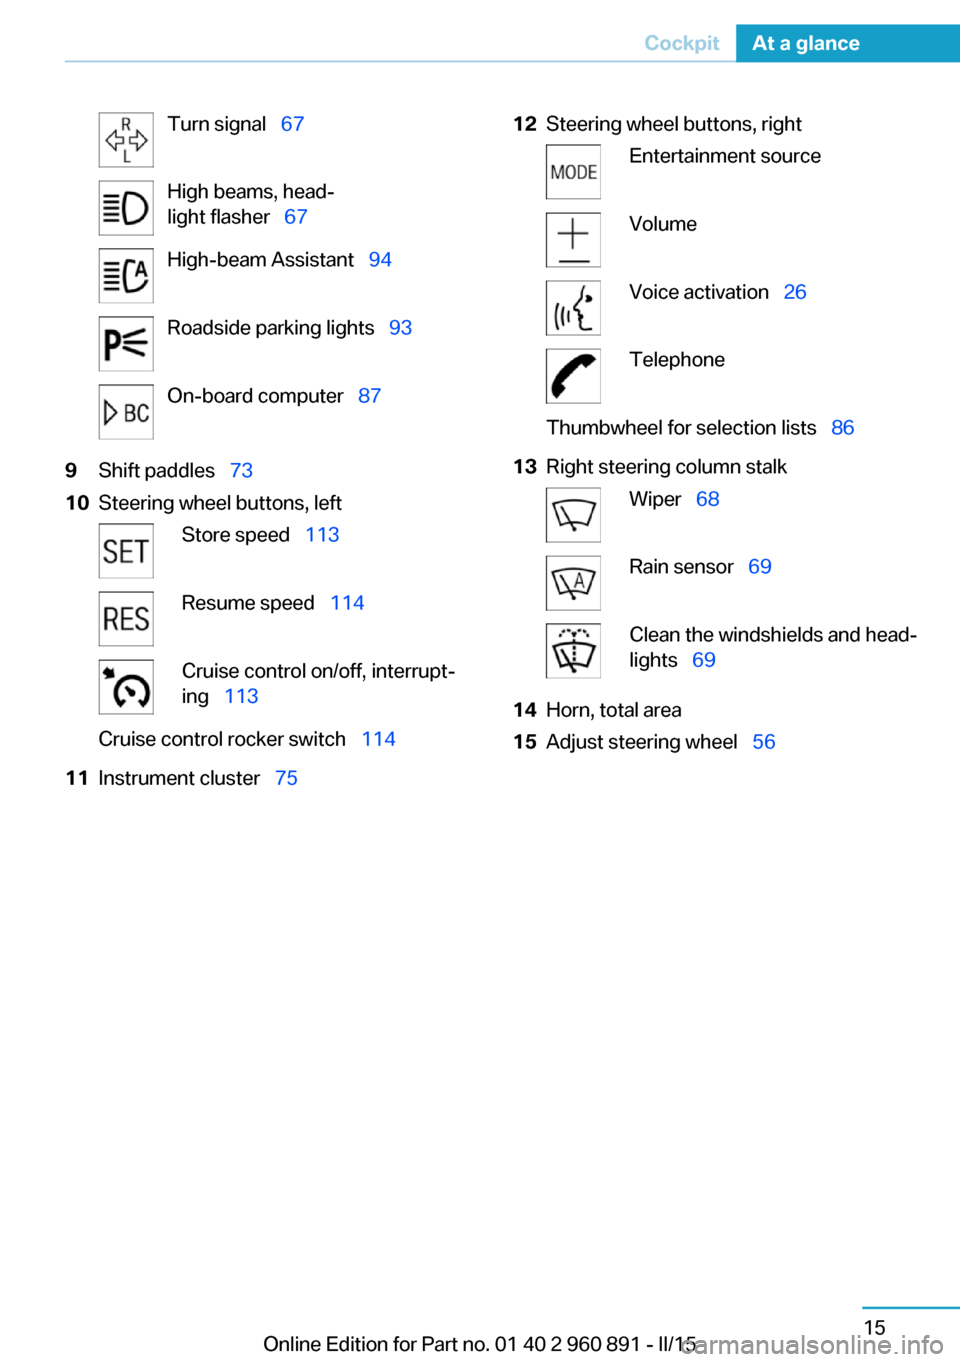
Turn signal 67High beams, head‐
light flasher 67High-beam Assistant 94Roadside parking lights 93On-board computer 879Shift paddles 7310Steering wheel buttons, leftStore speed 113Resume speed 114Cruise control on/off, interrupt‐
ing 113Cruise control rocker switch 11411Instrument cluster 7512Steering wheel buttons, rightEntertainment sourceVolumeVoice activation 26TelephoneThumbwheel for selection lists 8613Right steering column stalkWiper 68Rain sensor 69Clean the windshields and head‐
lights 6914Horn, total area15Adjust steering wheel 56Seite 15CockpitAt a glance15
Online Edition for Part no. 01 40 2 960 891 - II/15
Page 97 of 224
ing the area of the interference, the system
automatically becomes active again.▷TPM could not conclude the reset: perform
the reset of the system again.▷A wheel without TPM electronics is fitted:
have the service center check it if needed.▷Malfunction: have the system checked by
your service center.
For more information, see Tire Pressure Moni‐
tor, refer to page 99.
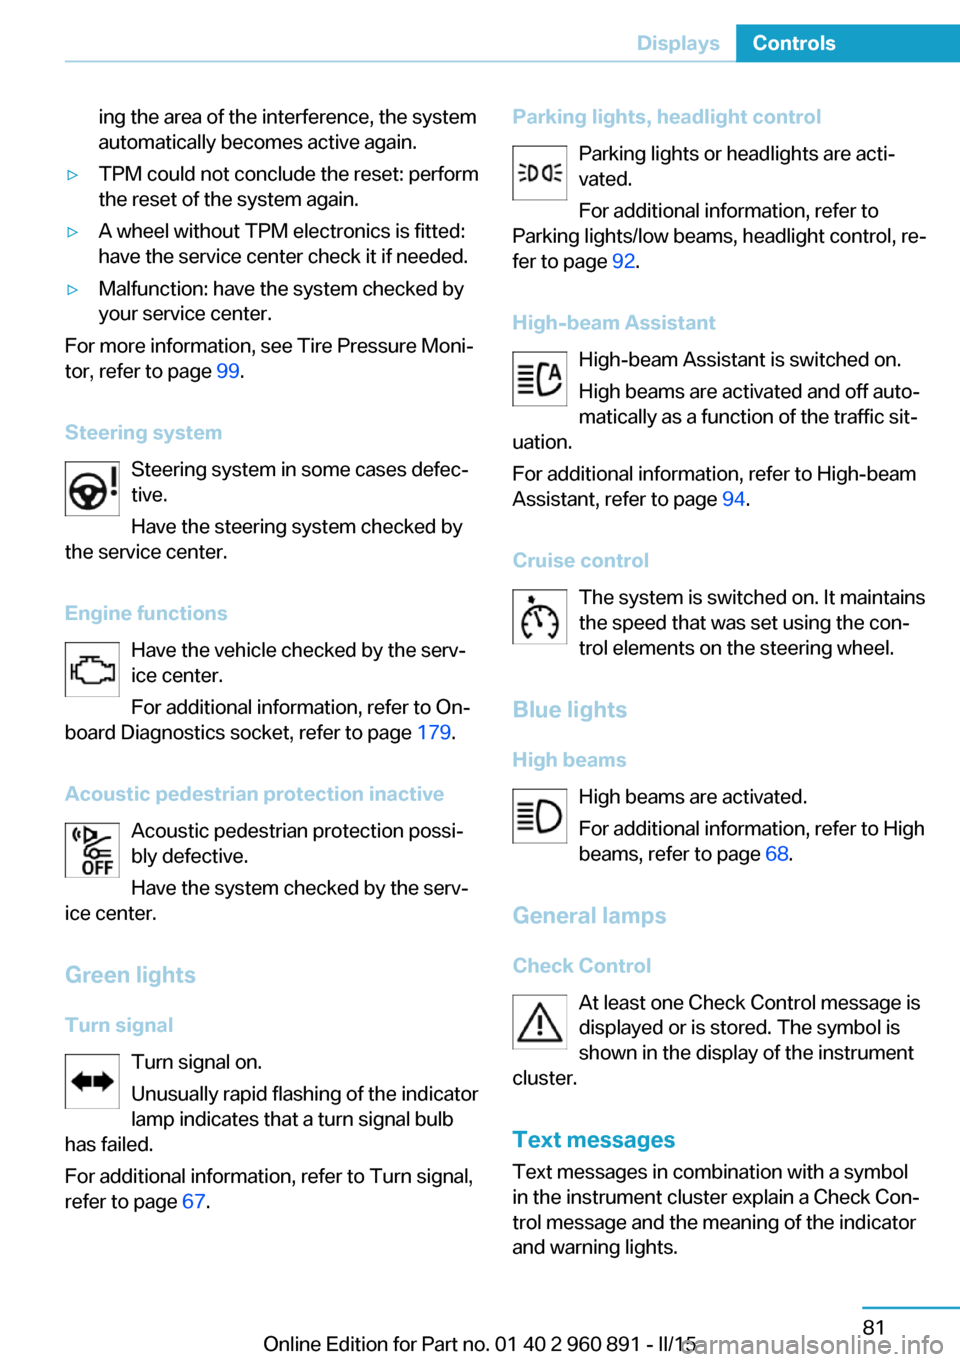
Steering system Steering system in some cases defec‐
tive.
Have the steering system checked by
the service center.
Engine functions Have the vehicle checked by the serv‐ice center.
For additional information, refer to On-
board Diagnostics socket, refer to page 179.
Acoustic pedestrian protection inactive Acoustic pedestrian protection possi‐
bly defective.
Have the system checked by the serv‐
ice center.
Green lights Turn signal Turn signal on.
Unusually rapid flashing of the indicator
lamp indicates that a turn signal bulb
has failed.
For additional information, refer to Turn signal, refer to page 67.
Parking lights, headlight control
Parking lights or headlights are acti‐
vated.
For additional information, refer to
Parking lights/low beams, headlight control, re‐
fer to page 92.
High-beam Assistant High-beam Assistant is switched on.
High beams are activated and off auto‐
matically as a function of the traffic sit‐
uation.
For additional information, refer to High-beam
Assistant, refer to page 94.
Cruise control The system is switched on. It maintains
the speed that was set using the con‐
trol elements on the steering wheel.
Blue lights
High beams High beams are activated.
For additional information, refer to High
beams, refer to page 68.
General lamps
Check Control At least one Check Control message is
displayed or is stored. The symbol is
shown in the display of the instrument
cluster.
Text messagesText messages in combination with a symbol
in the instrument cluster explain a Check Con‐ trol message and the meaning of the indicator
and warning lights.Seite 81DisplaysControls81
Online Edition for Part no. 01 40 2 960 891 - II/15
Page 119 of 224
Front-end collision warning
with City Braking function
The concept The ystem can help prevent accidents. If an
accident cannot be prevented, the system will
help reduce the collision speed.
The system sounds a warning before an immi‐
nent collision and actuates brakes independ‐
ently if needed.
The automatic braking intervention is done
with limited force and duration.
A camera in the area of the rearview mirror
controls the system.
The front-end collision warning is available
even if cruise control has been deactivated.
With the vehicle approaching another vehicle
intentionally the collision warning is delayed
avoiding false alarm.
General information The system warns at two levels of an imminent
danger of collision at speeds from approx.
3 mph/5 km/h. Time of warnings may vary with
the current driving situation.
Appropriate braking kicks in at speeds of up to
35 mph/60 km/h.
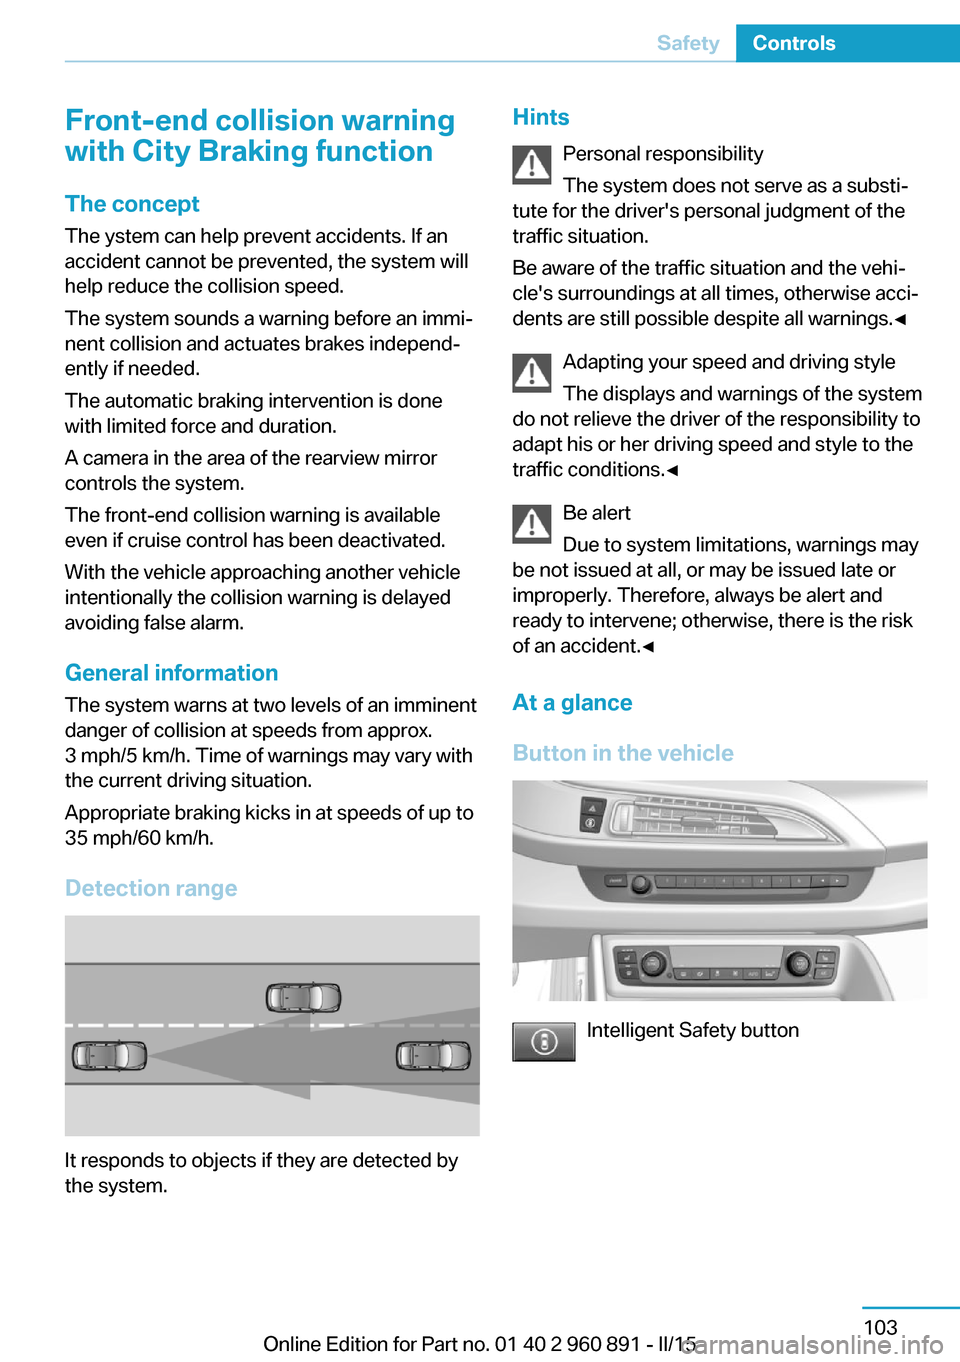
Detection range
It responds to objects if they are detected by
the system.
Hints
Personal responsibility
The system does not serve as a substi‐
tute for the driver's personal judgment of the
traffic situation.
Be aware of the traffic situation and the vehi‐
cle's surroundings at all times, otherwise acci‐
dents are still possible despite all warnings.◀
Adapting your speed and driving style
The displays and warnings of the system
do not relieve the driver of the responsibility to
adapt his or her driving speed and style to the
traffic conditions.◀
Be alert
Due to system limitations, warnings may
be not issued at all, or may be issued late or
improperly. Therefore, always be alert and ready to intervene; otherwise, there is the risk
of an accident.◀
At a glance
Button in the vehicle
Intelligent Safety button
Seite 103SafetyControls103
Online Edition for Part no. 01 40 2 960 891 - II/15
Page 126 of 224
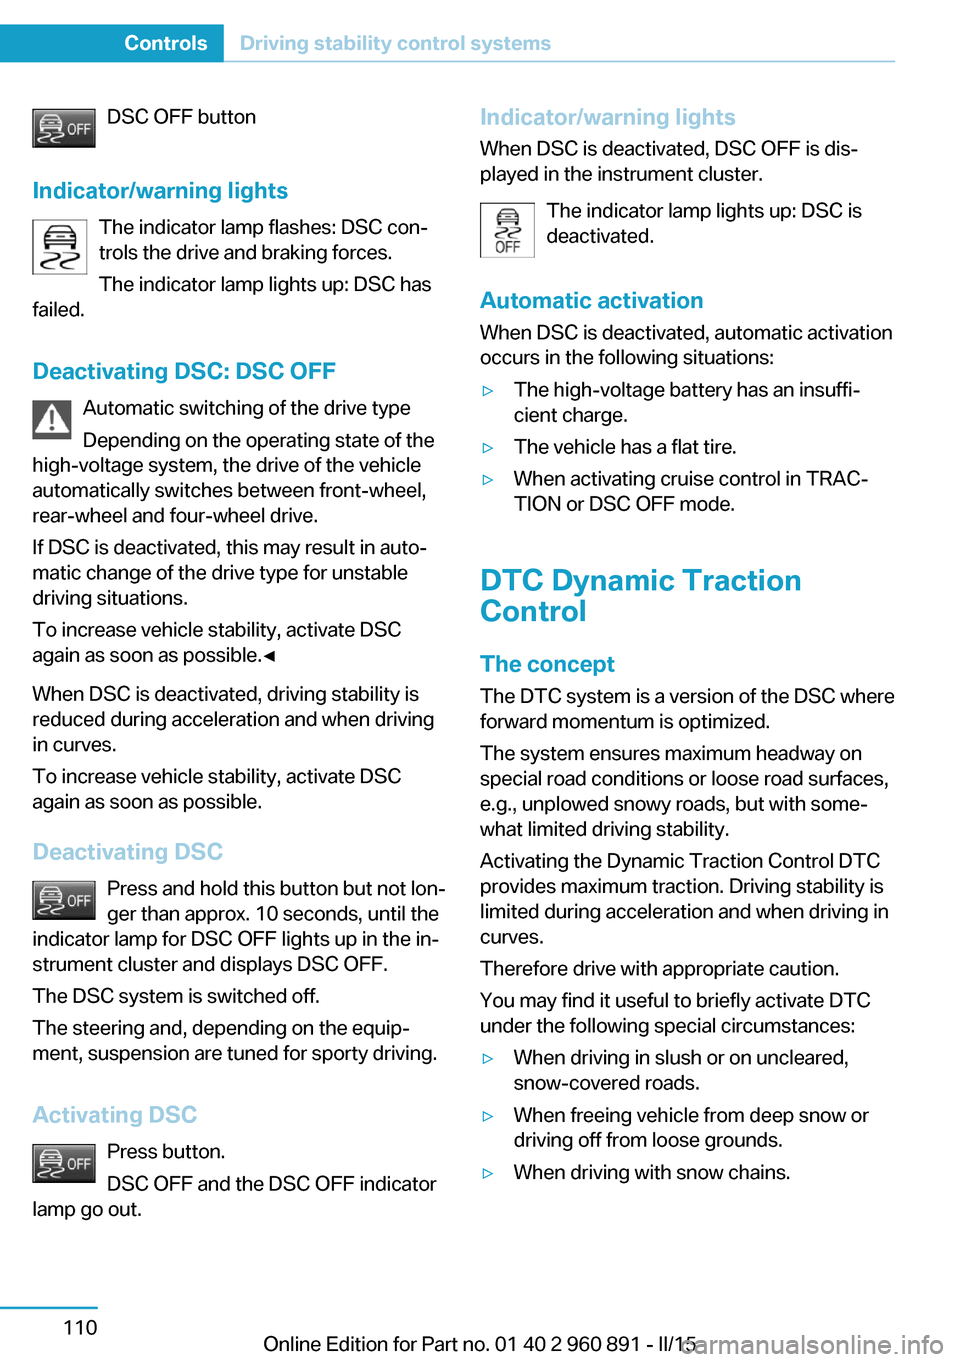
DSC OFF button
Indicator/warning lights The indicator lamp flashes: DSC con‐
trols the drive and braking forces.
The indicator lamp lights up: DSC has
failed.
Deactivating DSC: DSC OFF Automatic switching of the drive type
Depending on the operating state of the
high-voltage system, the drive of the vehicle
automatically switches between front-wheel,
rear-wheel and four-wheel drive.
If DSC is deactivated, this may result in auto‐
matic change of the drive type for unstable driving situations.
To increase vehicle stability, activate DSC
again as soon as possible.◀
When DSC is deactivated, driving stability is
reduced during acceleration and when driving
in curves.
To increase vehicle stability, activate DSC
again as soon as possible.
Deactivating DSC Press and hold this button but not lon‐
ger than approx. 10 seconds, until the
indicator lamp for DSC OFF lights up in the in‐
strument cluster and displays DSC OFF.
The DSC system is switched off.
The steering and, depending on the equip‐
ment, suspension are tuned for sporty driving.
Activating DSC Press button.
DSC OFF and the DSC OFF indicator
lamp go out.Indicator/warning lights
When DSC is deactivated, DSC OFF is dis‐
played in the instrument cluster.
The indicator lamp lights up: DSC is
deactivated.
Automatic activation When DSC is deactivated, automatic activation
occurs in the following situations:▷The high-voltage battery has an insuffi‐
cient charge.▷The vehicle has a flat tire.▷When activating cruise control in TRAC‐
TION or DSC OFF mode.
DTC Dynamic Traction
Control
The concept The DTC system is a version of the DSC where
forward momentum is optimized.
The system ensures maximum headway on
special road conditions or loose road surfaces,
e.g., unplowed snowy roads, but with some‐
what limited driving stability.
Activating the Dynamic Traction Control DTC
provides maximum traction. Driving stability is
limited during acceleration and when driving in
curves.
Therefore drive with appropriate caution.
You may find it useful to briefly activate DTC
under the following special circumstances:
▷When driving in slush or on uncleared,
snow-covered roads.▷When freeing vehicle from deep snow or
driving off from loose grounds.▷When driving with snow chains.Seite 110ControlsDriving stability control systems110
Online Edition for Part no. 01 40 2 960 891 - II/15
Page 129 of 224
Driving comfortVehicle features and options
This chapter describes all standard, country-
specific and optional features offered with the
series. It also describes features that are not
necessarily available in your car, e. g., due to
the selected options or country versions. This
also applies to safety-related functions and
systems. The respectively applicable country
provisions must be observed when using the
respective features and systems.
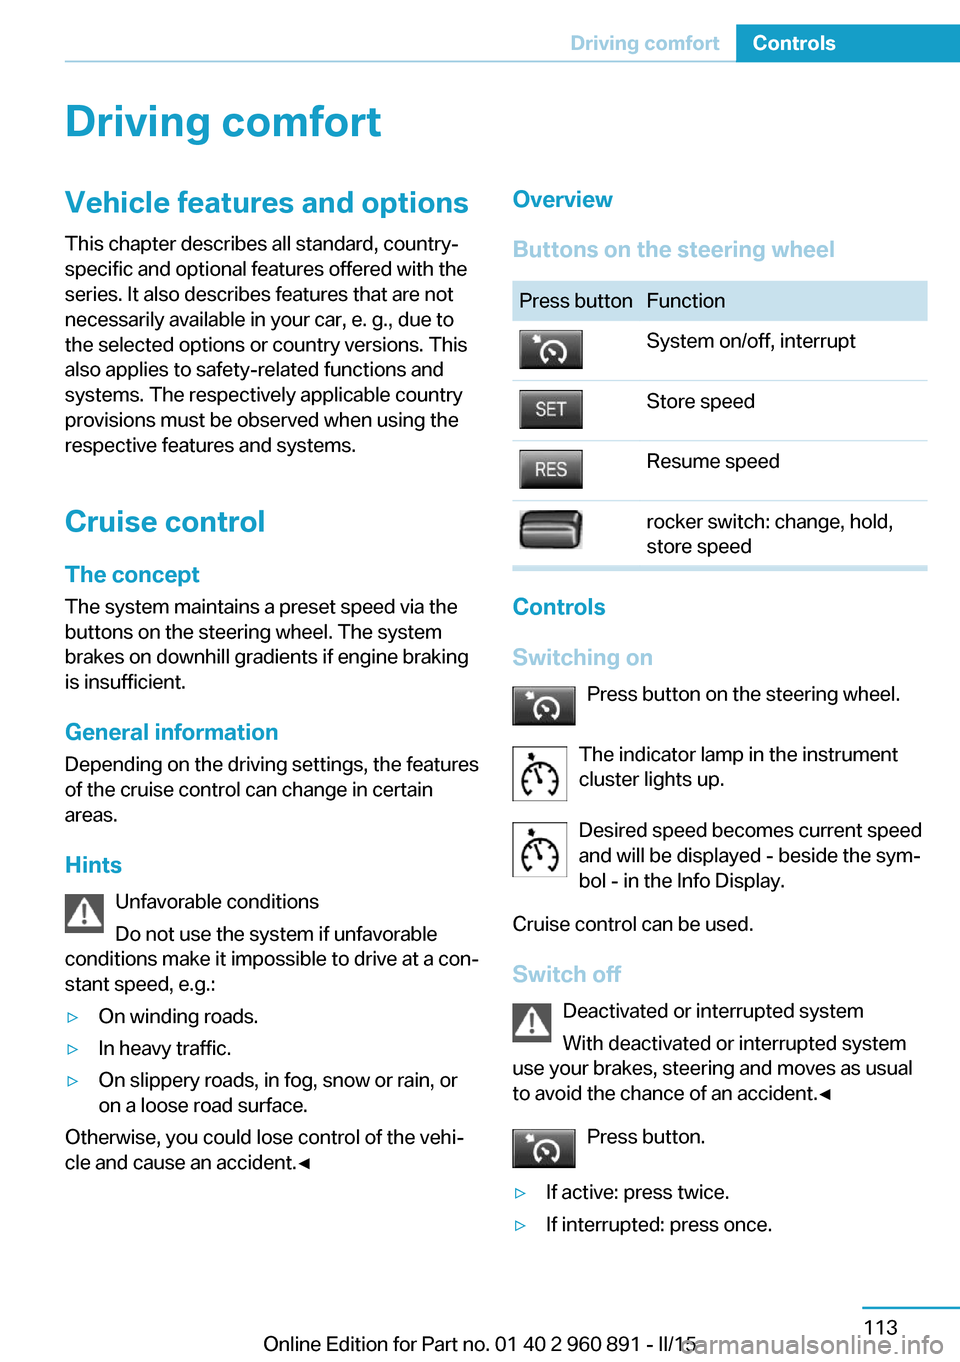
Cruise control The concept The system maintains a preset speed via the
buttons on the steering wheel. The system brakes on downhill gradients if engine braking
is insufficient.
General information
Depending on the driving settings, the features
of the cruise control can change in certain
areas.
Hints Unfavorable conditions
Do not use the system if unfavorable
conditions make it impossible to drive at a con‐
stant speed, e.g.:▷On winding roads.▷In heavy traffic.▷On slippery roads, in fog, snow or rain, or
on a loose road surface.
Otherwise, you could lose control of the vehi‐
cle and cause an accident.◀
Overview
Buttons on the steering wheelPress buttonFunctionSystem on/off, interruptStore speedResume speedrocker switch: change, hold,
store speed
Controls
Switching on Press button on the steering wheel.
The indicator lamp in the instrument
cluster lights up.
Desired speed becomes current speed
and will be displayed - beside the sym‐
bol - in the Info Display.
Cruise control can be used.
Switch off Deactivated or interrupted system
With deactivated or interrupted system
use your brakes, steering and moves as usual
to avoid the chance of an accident.◀
Press button.
▷If active: press twice.▷If interrupted: press once.Seite 113Driving comfortControls113
Online Edition for Part no. 01 40 2 960 891 - II/15
Page 130 of 224
The displays go out. The stored desired speed
is deleted.
Interrupting When active, press the button.
The system is automatically interrupted if:▷The brakes are applied.▷Selector lever position D is disengaged.▷DTC Dynamic Traction Control is activated
or DSC is deactivated.▷DSC is actively controlling stability.
Maintaining, storing, and changing the
speed
Hints Adjusting the desired speed
Modify desired speed to road conditions
and be ready to brake at all times; otherwise,
there is the risk of an accident.◀
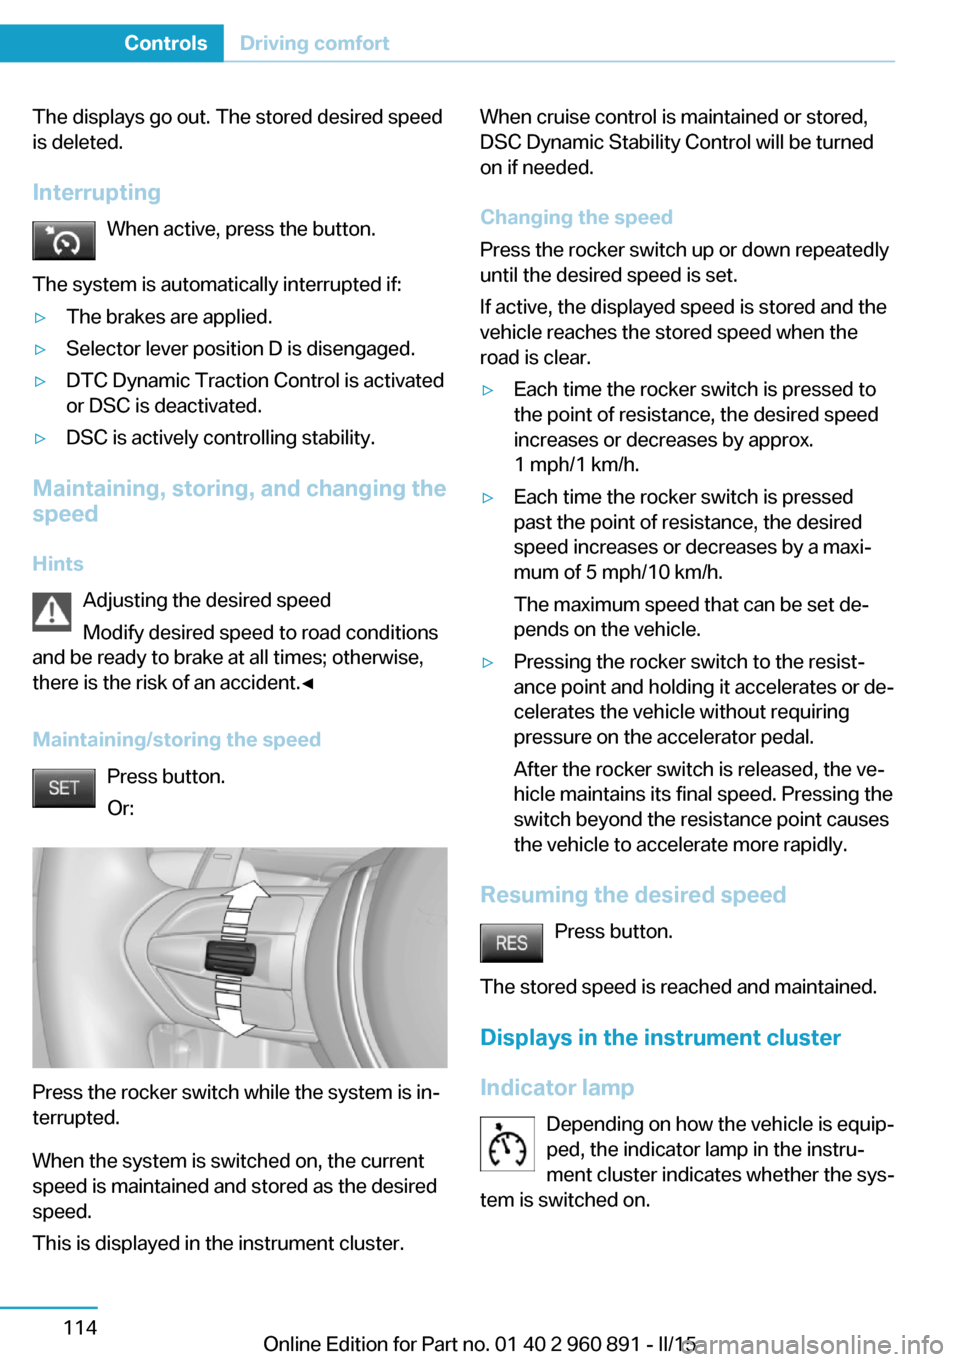
Maintaining/storing the speed Press button.
Or:
Press the rocker switch while the system is in‐
terrupted.
When the system is switched on, the current
speed is maintained and stored as the desired
speed.
This is displayed in the instrument cluster.
When cruise control is maintained or stored,
DSC Dynamic Stability Control will be turned
on if needed.
Changing the speed
Press the rocker switch up or down repeatedly
until the desired speed is set.
If active, the displayed speed is stored and the
vehicle reaches the stored speed when the
road is clear.▷Each time the rocker switch is pressed to
the point of resistance, the desired speed
increases or decreases by approx.
1 mph/1 km/h.▷Each time the rocker switch is pressed
past the point of resistance, the desired
speed increases or decreases by a maxi‐
mum of 5 mph/10 km/h.
The maximum speed that can be set de‐
pends on the vehicle.▷Pressing the rocker switch to the resist‐
ance point and holding it accelerates or de‐
celerates the vehicle without requiring
pressure on the accelerator pedal.
After the rocker switch is released, the ve‐
hicle maintains its final speed. Pressing the
switch beyond the resistance point causes
the vehicle to accelerate more rapidly.
Resuming the desired speed
Press button.
The stored speed is reached and maintained. Displays in the instrument cluster
Indicator lamp Depending on how the vehicle is equip‐
ped, the indicator lamp in the instru‐
ment cluster indicates whether the sys‐
tem is switched on.
Seite 114ControlsDriving comfort114
Online Edition for Part no. 01 40 2 960 891 - II/15
Page 215 of 224
Braking, hints 140
Breakdown assistance 183
Break-in 138
Brightness of Control Dis‐ play 90
Bulb replacement 180
Bulbs and lamps 180
Button, Start/Stop 61
Bypassing, refer to Jump- starting 184
C
California Proposition 65 Warning 8
Camera lenses, care 190
Camera, rearview cam‐ era 118
Camera, Side View 122
Camera, Top View 121
Car battery 181
Car care products 188
Care, displays 190
Care, vehicle 188
Cargo 142
Cargo area 132
Cargo cover 132
Car key, refer to Remote con‐ trol 38
Carpet, care 189
Car wash 187
Catalytic converter, refer to Hot exhaust system 140
CBS Condition Based Serv‐ ice 178
Center armrest 134
Center console 16
Central locking system 44
Central screen, refer to Con‐ trol Display 18
Changes, technical, refer to Safety 7
Changing wheels 181
Changing wheels/tires 167
CHARGE, energy recov‐ ery 66 Charging battery, see Vehicle
charging 150
Charging, refer to Charging vehicle 150
Charging, refer to Vehicle charging 150
Charging screen 76
Charging state indicator, high-voltage battery 77
Charging status, see display of the charging status 154
Charging vehicle 150
Charging vehicle, refer to Ve‐ hicle charging 150
Chassis number, see vehicle identification number 10
Check Control 79
Checking the engine oil level electronically 173
Checking the oil level elec‐ tronically 173
Children, seating position 57
Children, transporting safely 57
Child restraint fixing sys‐ tem 57
Child restraint fixing system LATCH 58
Child restraint fixing systems, mounting 57
Child seat, mounting 57
Child seats 57
Chrome parts, care 189
Cleaning displays 190
Climate control 124
Clock 83
Closing/opening via door lock 43
Closing/opening with remote control 41
Combination reel, refer to Turn signals 67
Combination switch, refer to Wiper system 68
Combustion engine, start‐ ing 63 Comfort Access 45
COMFORT program, Dy‐ namic Driving Control 111
Compressor 168
Computer, refer to On-board computer 87
Condensation on win‐ dows 127
Condensation under the vehi‐ cle 141
Condition Based Service CBS 178
Confirmation signal 47
ConnectedDrive 6
ConnectedDrive Services 6
Connecting electrical devi‐ ces 131
Contact with water, high-volt‐ age system 34
Control Display 18
Control Display, settings 89
Controller 18
Control systems, driving sta‐ bility 109
Convenient opening with the remote control 42
Coolant 177
Coolant temperature 83
Cooling function 125
Cooling, maximum 125
Cooling system 177
Corrosion on brake discs 141
Cosmetic mirror 131
Courtesy lamps during un‐ locking 41
Courtesy lamps with the vehi‐ cle locked 42
Cruise control 113
Cruising range 83
Current fuel consumption 87
D
Damage, tires 166
Data, technical 194
Date 83 Seite 199Everything from A to ZReference199
Online Edition for Part no. 01 40 2 960 891 - II/15
Page 220 of 224
QQuick charging cable, see Level 2 charging cable 152
R Radiator fluid 177
Radio 6
Radio-operated key, refer to Remote control 38
Radio ready state 61
Rain sensor 69
Rear beverage holder, rear cup holder 135
Rear bottle holder, refer to Rear cup holder 135
Rear can holder, refer to Rear Cup holder 135
Rear cup holder 135
Rear holder for bever‐ ages 135
Rearview camera 117
Rearview mirror 54
Rear window defroster 127
Recirculated-air filter 127
Recirculated-air mode 125
Recommended fuel grade 161
Recommended tire brands 167
Refueling 158
Remaining range 83
Remote control/key 38
Remote control, malfunc‐ tion 43
Remote control, univer‐ sal 129
Replacement fuse 182
Replacing wheels/tires 167
Reporting safety defects 10
RES button, see Cruise con‐ trol 113
Reserve warning, refer to Range 83 Reset, Tire Pressure Monitor
TPM 100
Retreaded tires 167
Roadside parking lights 93
RON recommended fuel grade 161
Roofliner 17
Rubber components, care 189
S
Safe braking 140
Safety 7
Safety belt reminder for driv‐ er's seat and front passen‐
ger seat 53
Safety belts 53
Safety belts, care 189
Safety of the high-voltage system 34
Safety systems, airbags 96
SAVE Battery, maintaining charging state 64
Screen, refer to Control Dis‐ play 18
Screw thread, see screw thread for tow fitting, screw
thread for tow fitting 186
Sealant 168
Seat belts, refer to Safety belts 53
Seat heating, front 52
Seating position for chil‐ dren 57
Seats 51
Selection list in instrument cluster 86
Selector lever, Steptronic Sport transmission 71
Sensors, care 190
Service and warranty 8
Service requirements, Condi‐ tion Based Service
CBS 178 Service requirements, dis‐
play 84
Services, ConnectedDrive 6
SET button, see Cruise con‐ trol 113
Settings, locking/unlock‐ ing 46
Settings, mirrors 54
Settings on Control Dis‐ play 89
Shift paddles on the steering wheel 73
Side airbags 96
Side View 122
Signaling, horn 14
Signals when unlocking 47
Silent Start, electric drive readiness 63
Sitting safely 51
Size 194
Smallest turning radius 194
Snow chains 171
Socket 131
Socket, OBD Onboard Diag‐ nostics 179
SOS button 183
Spare fuse 182
Specified engine oil types 175
Speed, average 88
Speed limit detection, on- board computer 88
Speed limiter, display 85
Speed Limit Information 85
Speed warning 88
Split screen 23
Sport program, transmis‐ sion 72
Stability control systems 109
Standard charging cable, see Level 1 charging cable 152
Standard charging, see Level 1 Charging 155
Standing air conditioning, re‐ mote control 47
Start/Stop button 61 Seite 204ReferenceEverything from A to Z204
Online Edition for Part no. 01 40 2 960 891 - II/15