bulb BMW M2 COUPE 2016 Owners Manual
[x] Cancel search | Manufacturer: BMW, Model Year: 2016, Model line: M2 COUPE, Model: BMW M2 COUPE 2016Pages: 220, PDF Size: 4.17 MB
Page 71 of 220
The turn signal flashes three times.
The function can be activated or deactivated.
On the Control Display:1."Settings"2."Lighting"3."Triple turn signal"
Settings are stored for the profile currently
used.
Signaling briefly
Press the lever to the resistance point and hold
it there for as long as you want the turn signal
to flash.
Malfunction
Unusually rapid flashing of the indicator lamp
indicates that a turn signal bulb has failed.
High beams, headlight flasher
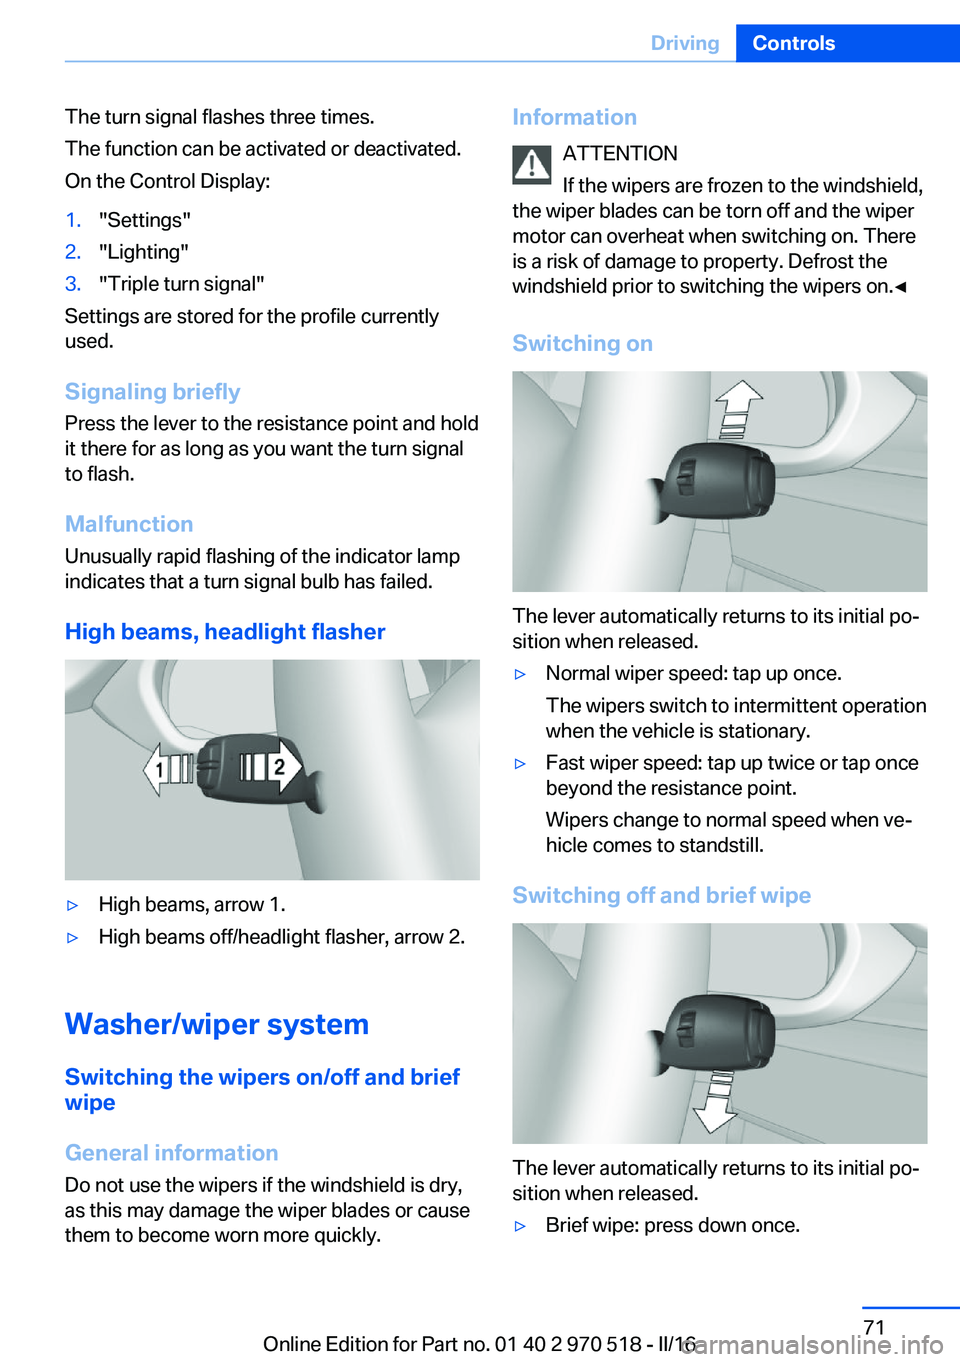
▷High beams, arrow 1.▷High beams off/headlight flasher, arrow 2.
Washer/wiper system Switching the wipers on/off and brief
wipe
General information
Do not use the wipers if the windshield is dry,
as this may damage the wiper blades or cause them to become worn more quickly.
Information
ATTENTION
If the wipers are frozen to the windshield,
the wiper blades can be torn off and the wiper
motor can overheat when switching on. There
is a risk of damage to property. Defrost the
windshield prior to switching the wipers on.◀
Switching on
The lever automatically returns to its initial po‐
sition when released.
▷Normal wiper speed: tap up once.
The wipers switch to intermittent operation
when the vehicle is stationary.▷Fast wiper speed: tap up twice or tap once
beyond the resistance point.
Wipers change to normal speed when ve‐
hicle comes to standstill.
Switching off and brief wipe
The lever automatically returns to its initial po‐
sition when released.
▷Brief wipe: press down once.Seite 71DrivingControls71
Online Edition for Part no. 01 40 2 970 518 - II/16
Page 82 of 220
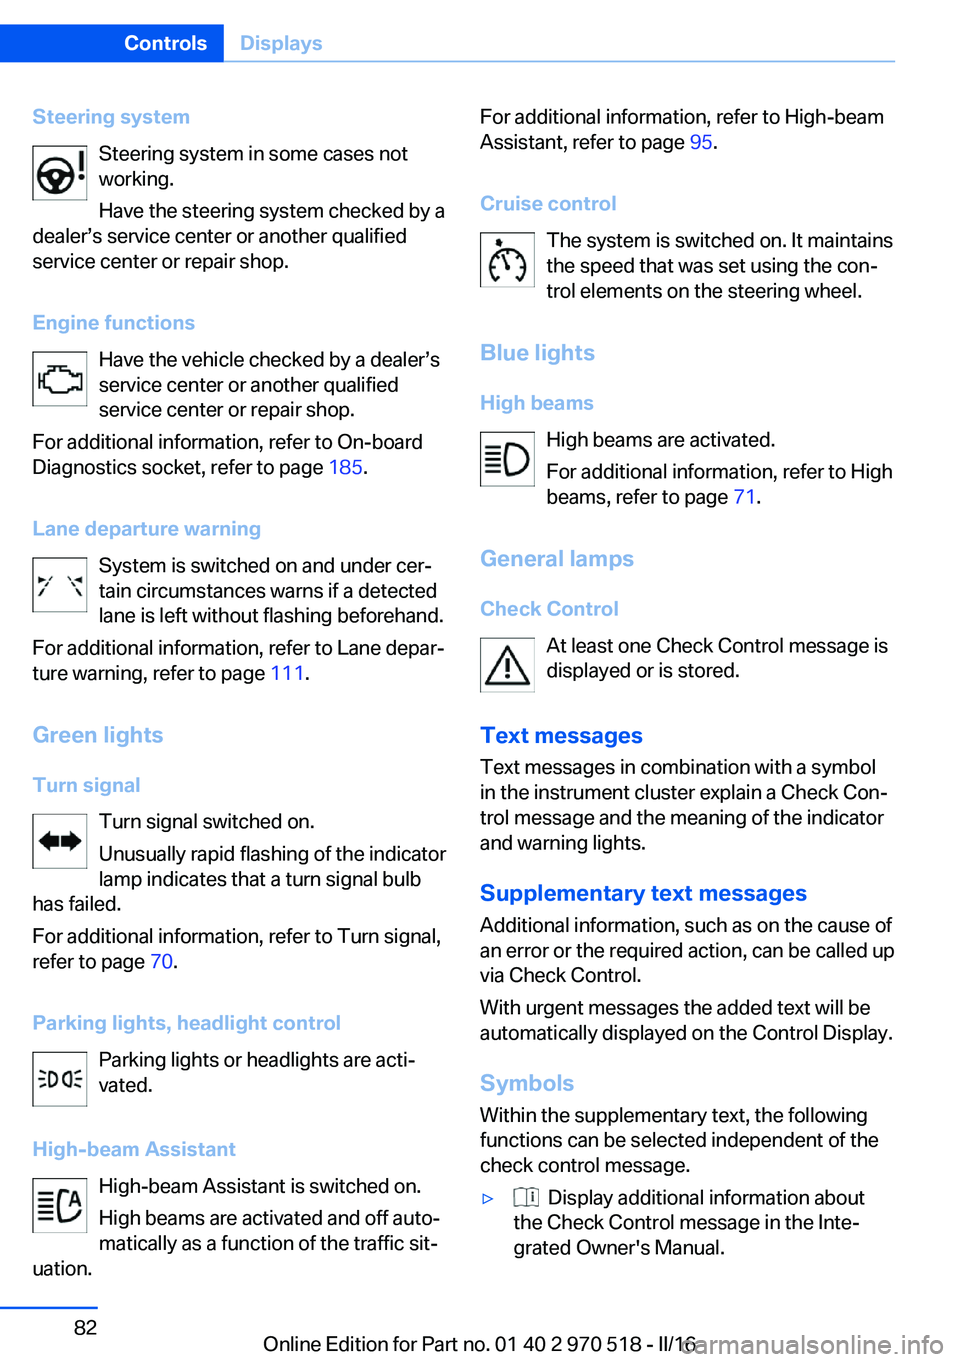
Steering systemSteering system in some cases not
working.
Have the steering system checked by a
dealer’s service center or another qualified
service center or repair shop.
Engine functions Have the vehicle checked by a dealer’s
service center or another qualified
service center or repair shop.
For additional information, refer to On-board
Diagnostics socket, refer to page 185.
Lane departure warning System is switched on and under cer‐
tain circumstances warns if a detected
lane is left without flashing beforehand.
For additional information, refer to Lane depar‐
ture warning, refer to page 111.
Green lights Turn signal Turn signal switched on.
Unusually rapid flashing of the indicator
lamp indicates that a turn signal bulb
has failed.
For additional information, refer to Turn signal,
refer to page 70.
Parking lights, headlight control Parking lights or headlights are acti‐
vated.
High-beam Assistant High-beam Assistant is switched on.
High beams are activated and off auto‐
matically as a function of the traffic sit‐
uation.For additional information, refer to High-beam
Assistant, refer to page 95.
Cruise control The system is switched on. It maintains
the speed that was set using the con‐
trol elements on the steering wheel.
Blue lights
High beams High beams are activated.
For additional information, refer to High
beams, refer to page 71.
General lamps
Check Control At least one Check Control message is
displayed or is stored.
Text messages Text messages in combination with a symbol
in the instrument cluster explain a Check Con‐
trol message and the meaning of the indicator
and warning lights.
Supplementary text messages
Additional information, such as on the cause of
an error or the required action, can be called up
via Check Control.
With urgent messages the added text will be
automatically displayed on the Control Display.
Symbols
Within the supplementary text, the following
functions can be selected independent of the
check control message.▷ Display additional information about
the Check Control message in the Inte‐
grated Owner's Manual.Seite 82ControlsDisplays82
Online Edition for Part no. 01 40 2 970 518 - II/16
Page 186 of 220
Replacing componentsVehicle features and optionsThis chapter describes all standard, country-
specific and optional features offered with the
series. It also describes features that are not
necessarily available in your car, e. g., due to
the selected options or country versions. This
also applies to safety-related functions and
systems. The respectively applicable country
provisions must be observed when using the
respective features and systems.
Onboard vehicle tool kit
The onboard vehicle tool kit is located under
the cargo floor panel.
Wiper blade replacement Information ATTENTION
If the wiper arm falls onto the windshield
without the wiper blades installed, the wind‐
shield can be damaged. There is a risk of dam‐
age to property. Secure the wiper arm when
replacing the wiper blades and do not fold
down the wipers without the wiper blades in‐
stalled.◀
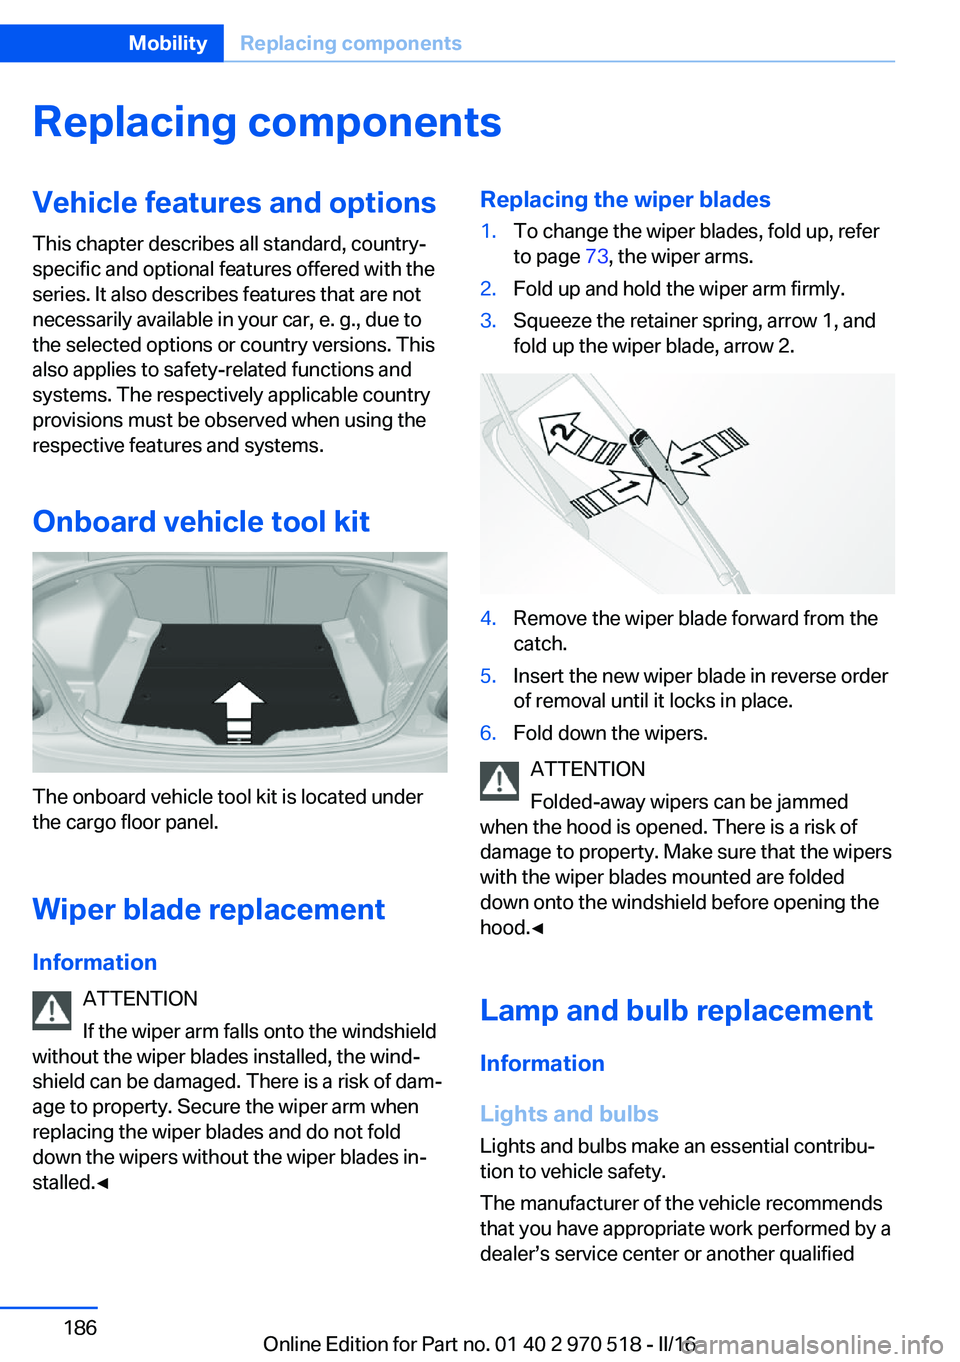
Replacing the wiper blades1.To change the wiper blades, fold up, refer
to page 73, the wiper arms.2.Fold up and hold the wiper arm firmly.3.Squeeze the retainer spring, arrow 1, and
fold up the wiper blade, arrow 2.4.Remove the wiper blade forward from the
catch.5.Insert the new wiper blade in reverse order
of removal until it locks in place.6.Fold down the wipers.
ATTENTION
Folded-away wipers can be jammed
when the hood is opened. There is a risk of
damage to property. Make sure that the wipers
with the wiper blades mounted are folded
down onto the windshield before opening the
hood.◀
Lamp and bulb replacement Information
Lights and bulbs
Lights and bulbs make an essential contribu‐
tion to vehicle safety.
The manufacturer of the vehicle recommends
that you have appropriate work performed by a
dealer’s service center or another qualified
Seite 186MobilityReplacing components186
Online Edition for Part no. 01 40 2 970 518 - II/16
Page 187 of 220
service center or repair shop if you are unfami‐
liar with it or if it has not been described here.
A spare lamp box is available from a dealer’s
service center or another qualified service cen‐
ter or repair shop.
WARNING
Bulbs can get hot during operation. Con‐
tact with the bulbs can cause burns. There is a
risk of injuries. Only change bulbs after they
have cooled off.◀
WARNING
Work on switched-on lighting systems
can cause short circuits. There is a risk of inju‐
ries or a risk of property damage. When work‐
ing on the lighting system, switch off the lamps
in question. If necessary, heed the bulb manu‐
facturer's instructions.◀
DANGER
There can be high voltage in the lighting
system. There is danger to life. The manufac‐
turer of your vehicle recommends that the
work on the lighting system including bulb re‐
placement be performed by a dealer’s service
center or another qualified service center or re‐
pair shop.◀
CAUTION
Dirty bulbs have a reduced service life.
There is a risk of property damage. Do not hold
new bulbs with your bare hands. Use a clean
cloth or something similar, or hold the bulb by
its base.◀
Light-emitting diodes (LEDs)
Some items of equipment use light-emitting
diodes installed behind a cover as a light
source.
These light-emitting diodes, which are related
to conventional lasers, are officially designated as Class 1 light-emitting diodes.WARNING
Too intensive brightness can irritate or
damage the retina of the eye. There is a a risk
of injury. Do not look directly into the head‐
lights or other light sources. Do not remove the
LED covers.◀
Headlight glass
Condensation can form on the inside of the ex‐
ternal lights in cool or humid weather. When
driving with the lights switched on, the con‐
densation evaporates after a short time. The
headlight glass does not need to be changed.
If despite driving with the lights switched on,
increasing humidity forms, e. g. water droplets
in the lamp, the manufacturer of your vehicle
recommends having it checked by a dealer’s
service center or another qualified service cen‐
ter or repair shop.
Headlight setting
The headlight adjustments can be affected by
changing lights and bulbs. After the headlight
adjustment was changed, have it checked and,
if necessary, corrected by a dealer’s service
center or another qualified service center or re‐ pair shop.
Front lights, bulb replacement
Xenon headlights
Information DANGER
There can be high voltage in the lighting
system. There is danger to life. The manufac‐
turer of your vehicle recommends that the
work on the lighting system including bulb re‐
placement be performed by a dealer’s service
center or another qualified service center or re‐
pair shop.◀
Because of the long life of these bulbs, the
likelihood of failure is very low. Switching the
lights on and off frequently shortens their life.Seite 187Replacing componentsMobility187
Online Edition for Part no. 01 40 2 970 518 - II/16
Page 188 of 220
For checking and adjusting headlamp aim,
contact a dealer’s service center or another
qualified service center or repair shop.
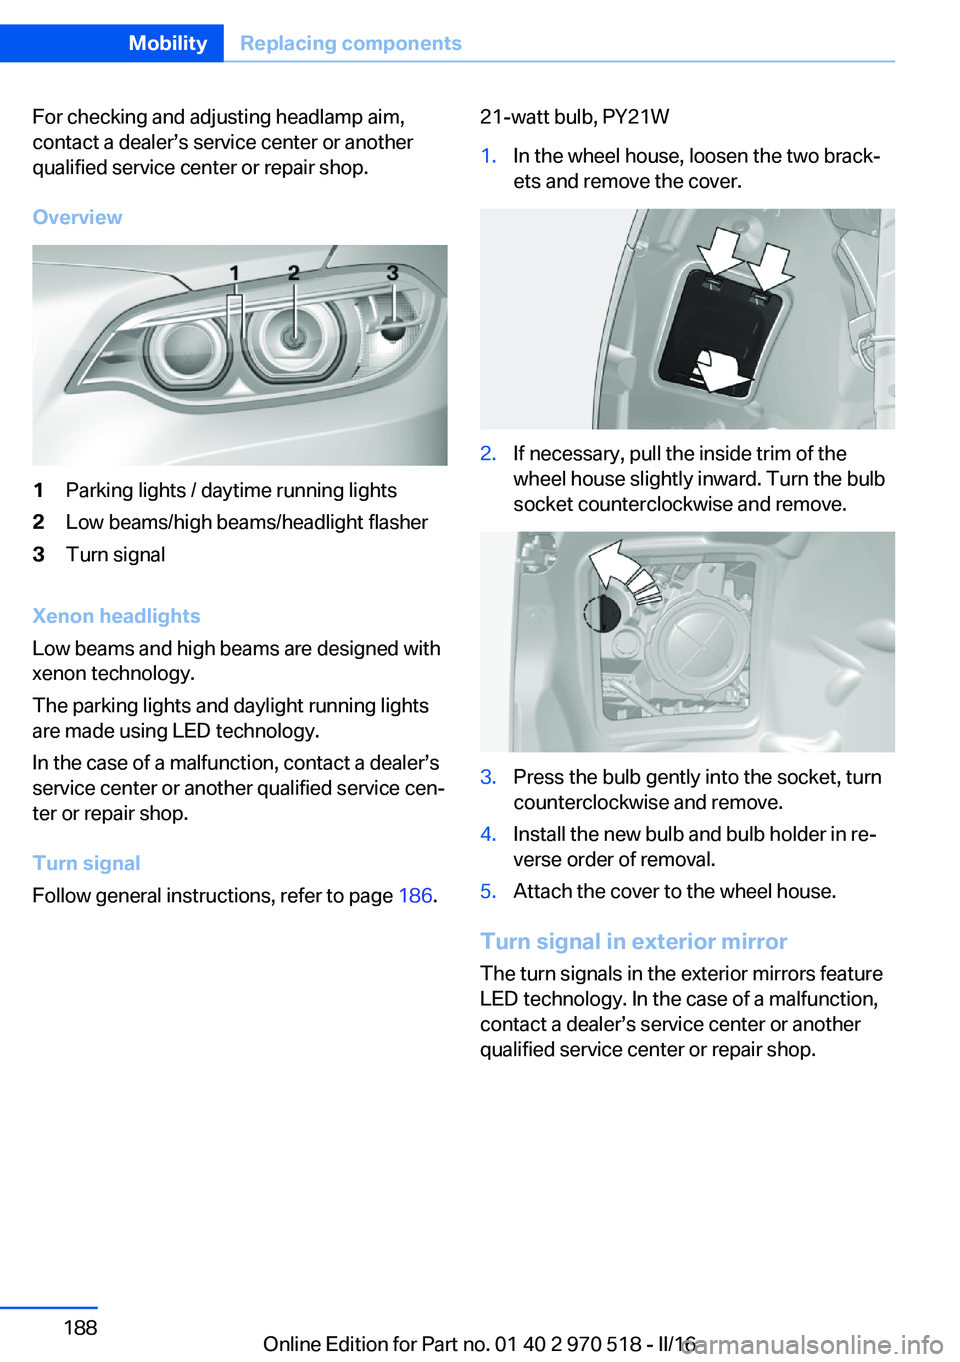
Overview1Parking lights / daytime running lights2Low beams/high beams/headlight flasher3Turn signal
Xenon headlights
Low beams and high beams are designed with
xenon technology.
The parking lights and daylight running lights
are made using LED technology.
In the case of a malfunction, contact a dealer’s
service center or another qualified service cen‐
ter or repair shop.
Turn signal
Follow general instructions, refer to page 186.
21-watt bulb, PY21W1.In the wheel house, loosen the two brack‐
ets and remove the cover.2.If necessary, pull the inside trim of the
wheel house slightly inward. Turn the bulb
socket counterclockwise and remove.3.Press the bulb gently into the socket, turn
counterclockwise and remove.4.Install the new bulb and bulb holder in re‐
verse order of removal.5.Attach the cover to the wheel house.
Turn signal in exterior mirror
The turn signals in the exterior mirrors feature
LED technology. In the case of a malfunction,
contact a dealer’s service center or another
qualified service center or repair shop.
Seite 188MobilityReplacing components188
Online Edition for Part no. 01 40 2 970 518 - II/16
Page 189 of 220
Tail lamps, bulb replacement
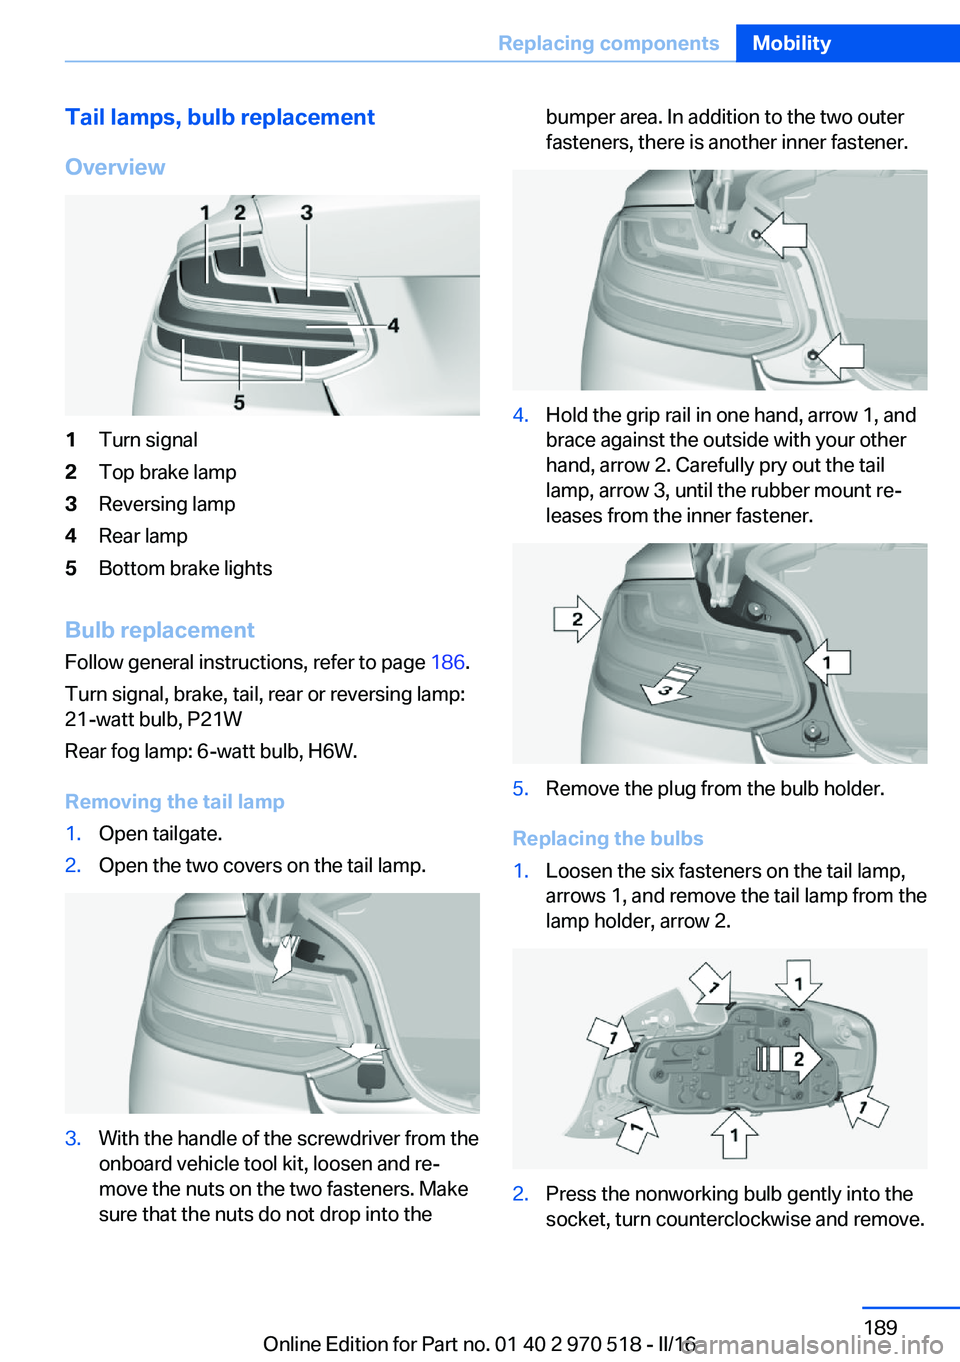
Overview1Turn signal2Top brake lamp3Reversing lamp4Rear lamp5Bottom brake lights
Bulb replacement Follow general instructions, refer to page 186.
Turn signal, brake, tail, rear or reversing lamp:
21-watt bulb, P21W
Rear fog lamp: 6-watt bulb, H6W.
Removing the tail lamp
1.Open tailgate.2.Open the two covers on the tail lamp.3.With the handle of the screwdriver from the
onboard vehicle tool kit, loosen and re‐
move the nuts on the two fasteners. Make
sure that the nuts do not drop into thebumper area. In addition to the two outer
fasteners, there is another inner fastener.4.Hold the grip rail in one hand, arrow 1, and
brace against the outside with your other
hand, arrow 2. Carefully pry out the tail
lamp, arrow 3, until the rubber mount re‐
leases from the inner fastener.5.Remove the plug from the bulb holder.
Replacing the bulbs
1.Loosen the six fasteners on the tail lamp,
arrows 1, and remove the tail lamp from the
lamp holder, arrow 2.2.Press the nonworking bulb gently into the
socket, turn counterclockwise and remove.Seite 189Replacing componentsMobility189
Online Edition for Part no. 01 40 2 970 518 - II/16
Page 190 of 220
3.Proceed in the reverse order to insert the
new bulb and attach the bulb holder to the
tail lamp. Make sure that the bulb holder
engages in all fasteners.
Installing the tail lamp
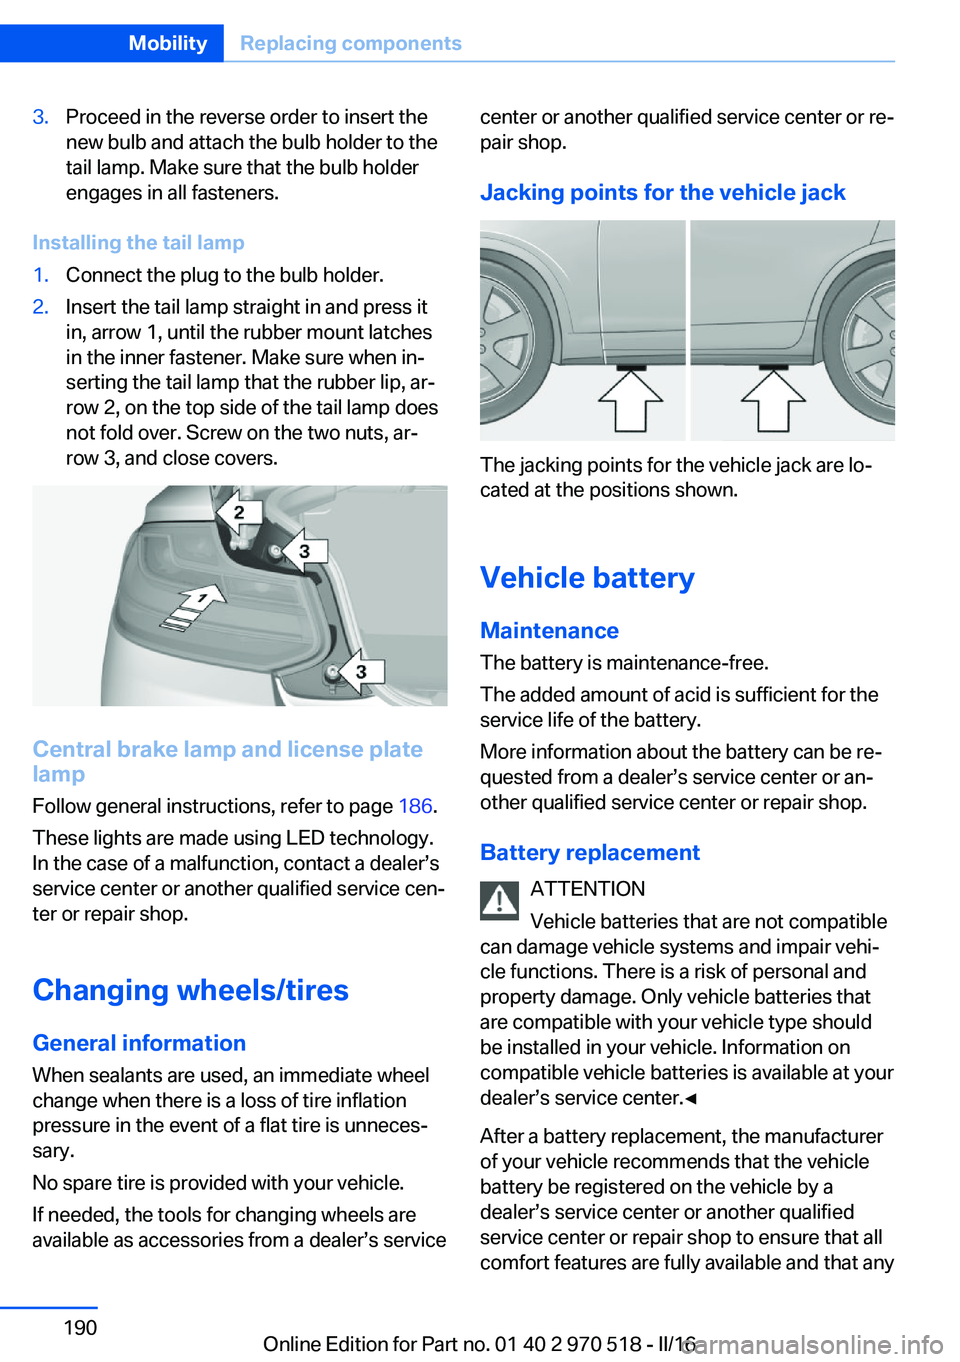
1.Connect the plug to the bulb holder.2.Insert the tail lamp straight in and press it
in, arrow 1, until the rubber mount latches
in the inner fastener. Make sure when in‐
serting the tail lamp that the rubber lip, ar‐
row 2, on the top side of the tail lamp does
not fold over. Screw on the two nuts, ar‐
row 3, and close covers.
Central brake lamp and license plate
lamp
Follow general instructions, refer to page 186.
These lights are made using LED technology.
In the case of a malfunction, contact a dealer’s
service center or another qualified service cen‐
ter or repair shop.
Changing wheels/tires General information
When sealants are used, an immediate wheel
change when there is a loss of tire inflation
pressure in the event of a flat tire is unneces‐
sary.
No spare tire is provided with your vehicle.
If needed, the tools for changing wheels are
available as accessories from a dealer’s service
center or another qualified service center or re‐
pair shop.
Jacking points for the vehicle jack
The jacking points for the vehicle jack are lo‐
cated at the positions shown.
Vehicle battery Maintenance
The battery is maintenance-free.
The added amount of acid is sufficient for the
service life of the battery.
More information about the battery can be re‐
quested from a dealer’s service center or an‐
other qualified service center or repair shop.
Battery replacement ATTENTION
Vehicle batteries that are not compatible
can damage vehicle systems and impair vehi‐
cle functions. There is a risk of personal and
property damage. Only vehicle batteries that
are compatible with your vehicle type should
be installed in your vehicle. Information on
compatible vehicle batteries is available at your
dealer’s service center.◀
After a battery replacement, the manufacturer
of your vehicle recommends that the vehicle
battery be registered on the vehicle by a
dealer’s service center or another qualified
service center or repair shop to ensure that all
comfort features are fully available and that any
Seite 190MobilityReplacing components190
Online Edition for Part no. 01 40 2 970 518 - II/16
Page 211 of 220
Breakdown assis‐tance 193, 194
Break-in 152
Brightness of Control Dis‐ play 92
Bulb replacement 186
Bulb replacement, front 187
Bulb replacement, rear 189
Bulbs and lights 186
Button, Start/Stop 65
Bypassing, see Jump-start‐ ing 194
C
California Proposition 65 Warning 8
Calling up mirror adjust‐ ment 44
Calling up seat adjust‐ ment 44
Camera lenses, care 202
Camera, rearview cam‐ era 124
Can holder, see Cup holder 145
Car battery 190
Care, displays 202
Care, vehicle 200
Cargo 156
Cargo area, enlarging 141
Cargo area, storage compart‐ ments 146
Cargo straps, securing cargo 157
Car key, see Remote con‐ trol 34
Carpet, care 202
Car wash 199
Catalytic converter, see Hot exhaust system 153
CBS Condition Based Serv‐ ice 184
Center armrest 144
Center console 16
Central locking system 40 Central screen, see Control
Display 18
Changes, technical, see Own Safety 7
Changing parts 186
Changing wheels 190
Changing wheels/tires 171
Chassis number, see Vehicle identification number 10
Check Control 80
Checking the engine oil level electronically 179
Checking the oil level elec‐ tronically 179
Children, seating position 61
Children, transporting safely 61
Child restraint fixing system LATCH 63
Child restraint system 61
Child restraint systems, mounting 62
Child seat, mounting 62
Child seats 61
Chrome parts, care 201
Cigarette lighter 138
Cleaning displays 202
Climate control 127, 129
Clock 84
Closing/opening via door lock 39
Closing/opening with remote control 37
Clothes hooks 146
Cockpit 14
Combination switch, see Turn signals 70
Combination switch, see Wiper system 71
Comfort Access 41
COMFORT program, Dy‐ namic Driving Control 118
Compartments in the doors 144
Compass 136
Compound brake 150 Compressor 173
Condensation on win‐ dows 131
Condensation under the vehi‐ cle 154
Condition Based Service CBS 184
Confirmation signal 43
ConnectedDrive 6
ConnectedDrive Services 6
Connecting electrical devi‐ ces 138
Container for washer fluid 73
Control Display 18
Control Display, settings 91
Controller 19
Control systems, driving sta‐ bility 114
Convenient opening with the remote control 38
Coolant 182
Cooling function 128, 130
Cooling, maximum 130
Cooling system 182
Cornering light 95
Corrosion on brake discs 154
Cosmetic mirror 138
Courtesy lamps during un‐ locking 38
Courtesy lamps with the vehi‐ cle locked 38
Cruise control 119
Cruise control without dis‐ tance control, see cruise
control 119
Cruising range 84
Cup holder 145
Current fuel consumption 84
D
Damage, tires 171
Data, technical 206
Date 84
Daytime running lights 95 Seite 211Everything from A to ZReference211
Online Edition for Part no. 01 40 2 970 518 - II/16
Page 214 of 220
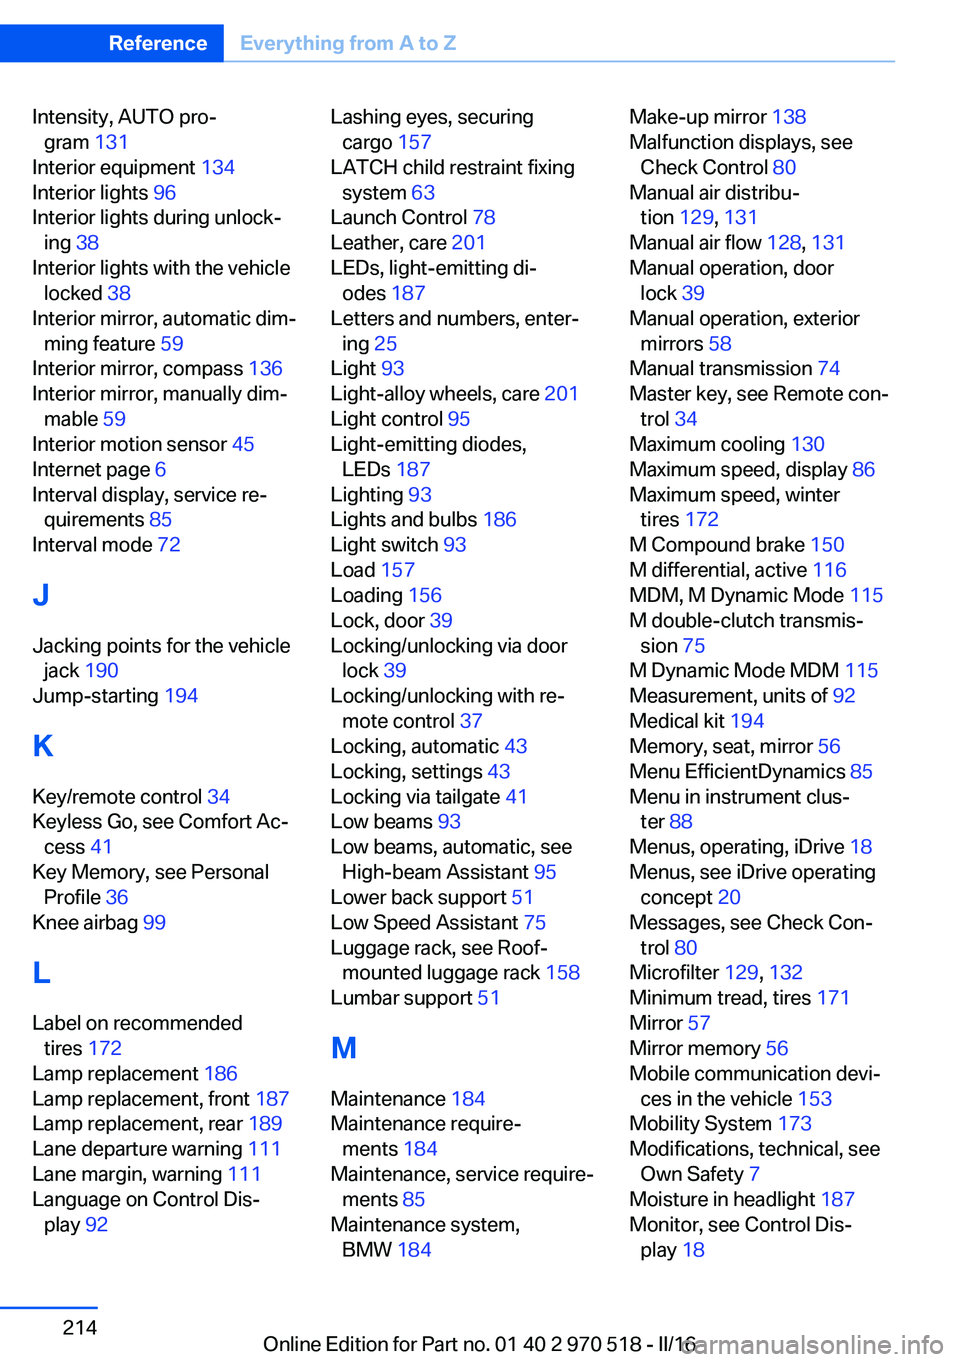
Intensity, AUTO pro‐gram 131
Interior equipment 134
Interior lights 96
Interior lights during unlock‐ ing 38
Interior lights with the vehicle locked 38
Interior mirror, automatic dim‐ ming feature 59
Interior mirror, compass 136
Interior mirror, manually dim‐ mable 59
Interior motion sensor 45
Internet page 6
Interval display, service re‐ quirements 85
Interval mode 72
J Jacking points for the vehicle jack 190
Jump-starting 194
K
Key/remote control 34
Keyless Go, see Comfort Ac‐ cess 41
Key Memory, see Personal Profile 36
Knee airbag 99
L Label on recommended tires 172
Lamp replacement 186
Lamp replacement, front 187
Lamp replacement, rear 189
Lane departure warning 111
Lane margin, warning 111
Language on Control Dis‐ play 92 Lashing eyes, securing
cargo 157
LATCH child restraint fixing system 63
Launch Control 78
Leather, care 201
LEDs, light-emitting di‐ odes 187
Letters and numbers, enter‐ ing 25
Light 93
Light-alloy wheels, care 201
Light control 95
Light-emitting diodes, LEDs 187
Lighting 93
Lights and bulbs 186
Light switch 93
Load 157
Loading 156
Lock, door 39
Locking/unlocking via door lock 39
Locking/unlocking with re‐ mote control 37
Locking, automatic 43
Locking, settings 43
Locking via tailgate 41
Low beams 93
Low beams, automatic, see High-beam Assistant 95
Lower back support 51
Low Speed Assistant 75
Luggage rack, see Roof- mounted luggage rack 158
Lumbar support 51
M
Maintenance 184
Maintenance require‐ ments 184
Maintenance, service require‐ ments 85
Maintenance system, BMW 184 Make-up mirror 138
Malfunction displays, see Check Control 80
Manual air distribu‐ tion 129, 131
Manual air flow 128, 131
Manual operation, door lock 39
Manual operation, exterior mirrors 58
Manual transmission 74
Master key, see Remote con‐ trol 34
Maximum cooling 130
Maximum speed, display 86
Maximum speed, winter tires 172
M Compound brake 150
M differential, active 116
MDM, M Dynamic Mode 115
M double-clutch transmis‐ sion 75
M Dynamic Mode MDM 115
Measurement, units of 92
Medical kit 194
Memory, seat, mirror 56
Menu EfficientDynamics 85
Menu in instrument clus‐ ter 88
Menus, operating, iDrive 18
Menus, see iDrive operating concept 20
Messages, see Check Con‐ trol 80
Microfilter 129, 132
Minimum tread, tires 171
Mirror 57
Mirror memory 56
Mobile communication devi‐ ces in the vehicle 153
Mobility System 173
Modifications, technical, see Own Safety 7
Moisture in headlight 187
Monitor, see Control Dis‐ play 18 Seite 214ReferenceEverything from A to Z214
Online Edition for Part no. 01 40 2 970 518 - II/16
Page 217 of 220

Tailgate opening 40
Tailgate via remote con‐ trol 38
Tail lamps 189
Technical changes, see Own Safety 7
Technical data 206
Technology, BMW M 150
Telephone 6
Temperature, automatic cli‐ mate control 128, 130
Temperature display for ex‐ ternal temperature 84
Temperature, engine 89
Terminal, starting aid 195
Text messages, supplemen‐ tary 82
Theft alarm system, see Alarm system 44
Thigh support 51
Through-loading system 141
Tilt alarm sensor 45
Time of arrival 90
Tire damage 171
Tire identification marks 169
Tire inflation pressure 168
Tire inflation pressure moni‐ tor, see FTM 104
Tire Pressure Monitor TPM 101
Tire repair kit, see Mobility System 173
Tires, changing 171
Tire sealant, see Mobility System 173
Tires, everything on wheels and tires 168
Tire tread 171
Tone 6
Tool 186
Total vehicle weight 207
Touchpad 21
Towing 196
Tow-starting 196
TPM Tire Pressure Moni‐ tor 101 Transmission, manual trans‐
mission 74
Transporting children safely 61
Tread, tires 171
Triple turn signal activa‐ tion 70
Trip odometer 83
Trip onboard computer 90
Trip recorder, see Trip odom‐ eter 83
Turning circle lines, rearview camera 125
Turn signals, operation 70
Turn signals, rear, bulb re‐ placement 189
U
Unintentional alarm 45
Units of measurement 92
Universal remote control 134
Unlocking/locking via door lock 39
Unlocking/locking with re‐ mote control 37
Unlocking, settings 43
Updates made after the edito‐ rial deadline 7
Upholstery care 201
USB interface, general infor‐ mation 139
USB port, see USB inter‐ face 139
V
Vanity mirror 138
Vehicle battery 190
Vehicle battery, replac‐ ing 190
Vehicle, break-in 152
Vehicle care 200
Vehicle care products 200
Vehicle features and op‐ tions 7 Vehicle identification num‐
ber 10
Vehicle jack 190
Vehicle paint 200
Vehicle position, GPS loca‐ tion 92
Vehicle storage 202
Vehicle wash 199
Ventilation 132
Ventilation, see Parked-car ventilation 132
VIN, see Vehicle identification number 10
Voice activation system 27
W Warning and indicator lamps, see Check Control 80
Warning displays, see Check Control 80
Warning messages, see Check Control 80
Warning triangle 194
Warranty 7
Washer fluid 73
Washer nozzles, wind‐ shield 73
Washer system 71
Washing, vehicle 199
Water on roads 153
Weights 207
Welcome lamps during un‐ locking 38
Welcome lights 94
Wheel cleaner 201
Wheels, changing 171
Wheels, everything on wheels and tires 168
Wheels, Flat Tire Monitor FTM 104
Wheels, Tire Pressure Moni‐ tor TPM 101
Window defroster, rear 129, 132
Windows, powered 45 Seite 217Everything from A to ZReference217
Online Edition for Part no. 01 40 2 970 518 - II/16