Start BMW M3 1994 E36 User Guide
[x] Cancel search | Manufacturer: BMW, Model Year: 1994, Model line: M3, Model: BMW M3 1994 E36Pages: 759
Page 21 of 759
If
steam
is
coming
from
the
engine
compartment
thenthere
is
With
the
engine
and
ignition
off,
check
for
loose
or
corroded
most
likely
a
burst
coolant
hose
or
a
large
leak
in
the
cooling
battery
cables
or
wires
at
the
battery
or
thealtemator
.
Discon-
system
.
To
find
the
leak,
look
for
signs
of
coolant
leakage
on
necting,
cleaning,
and
reinstalling
corroded
wires
and
connec-
hoses,
at
hose
connections,
or
on
the
radiator
.
Let
theengine
tors
may
solve
the
problem
.
Also
check
drive
belt
tension
as
cool
thoroughly,
then
add
coolant
or
water
to
fill
the
system
and
described
in
020
Maintenance
Program
.
start
the
engine
.
If
a
great
deal
of
water
or
coolant
flows
out
of
the
hole,
then
thecarshouldnot
be
driven
until
repairs
are
made
.
lf
there
is
slight
seepage,
then
it
may
be
possible
to
drive
TOWi
ng
a
short
distance,
adding
coolant
as
needed
.
The
cars
covered
by
this
manual
should
be
towed
witha
tow
truck
using
wheel
lift
or
flat
bed
equipment
.
Do
not
tow
thecar
on
all
four
wheels
except
for
very
short
distances
to
move
it
to
a
safe
place
.
If
thered
engine
oil
pressure
warning
light
illuminates,
imme-
diately
stop
thecar
and
turn
off
the
engine
.
Have
the
vehicle
A
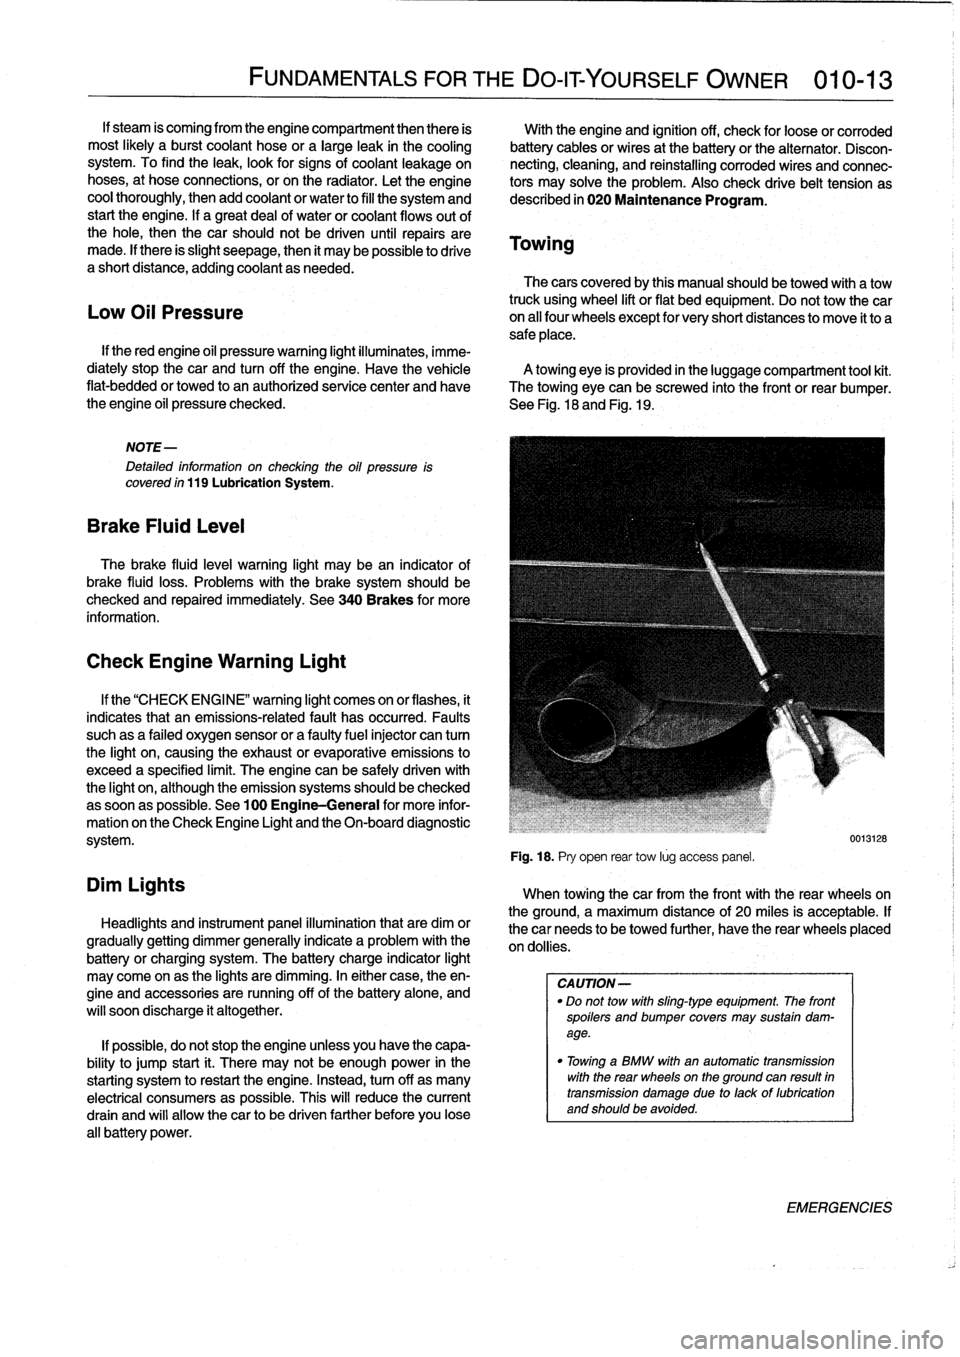
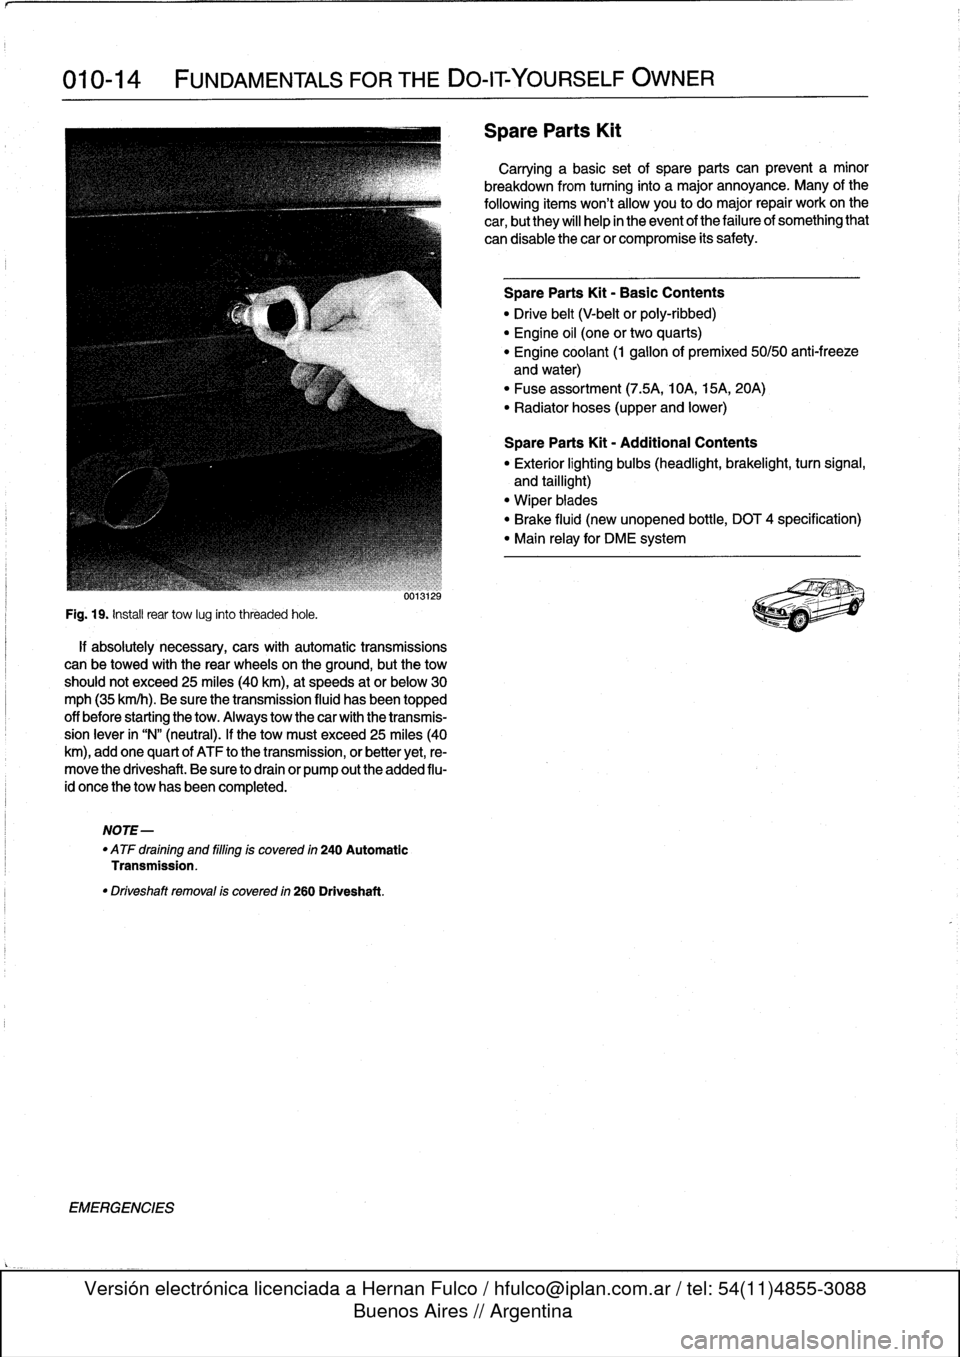
towing
eye
is
provided
in
the
luggage
compartment
tool
kit
.
flat-bedded
or
towed
to
an
authorized
service
center
and
have
The
towing
eye
can
be
screwed
into
the
front
or
rear
bumper
.
the
engine
oil
pressure
checked
.
See
Fig
.
18
and
Fig
.
19
.
Low
Oil
Pressure
NOTE-
Detafed
information
on
checking
the
oil
pressure
is
covered
ín
119
Lubrication
System
.
Brake
Fluid
Leve¡
The
brake
fluid
leve¡
warning
light
may
bean
indicator
of
brake
fluid
loss
.
Problems
with
the
brakesystem
should
be
checked
and
repaired
immediately
.
See
340Brakes
for
more
information
.
Check
Engine
Warning
Light
Dim
Lights
FUNDAMENTALS
FOR
THE
DO-IT
YOURSELF
OWNER
010-13
If
the
"CHECK
ENGI
NE"
warning
light
comes
on
or
flashes,
it
indicates
that
an
emissions-related
fault
has
occurred
.
Faults
suchas
a
failed
oxygen
sensor
or
a
faultyfuelinjector
can
tum
the
light
on,
causing
the
exhaust
or
evaporative
emissions
to
exceed
a
specified
limit
.
The
engine
can
be
safely
driven
with
the
light
on,
although
the
emission
systems
should
be
checked
assoonas
possible
.
See
100
Engine-General
for
more
infor-
mation
on
the
Check
Engine
Light
and
the
On-board
diagnostic
system
.
Headlights
and
instrument
panel
illuminationthat
are
dim
or
gradually
getting
dimmer
generally
indicate
a
problem
with
the
battery
or
charging
system
.
The
battery
charge
indicator
light
may
come
on
as
the
lights
are
dimming
.
In
either
case,
theen-
gine
and
accessories
are
running
off
of
the
battery
alone,
and
will
soon
discharge
it
altogether
.
If
possible,
do
not
stop
the
engine
unless
you
have
the
capa-
bility
to
jump
start
¡t
.
There
may
not
be
enough
power
in
the
starting
system
torestart
the
engine
.
Instead,turn
off
as
many
electrical
consumers
as
possible
.
This
will
reduce
the
current
drain
and
will
allow
thecar
to
be
driven
farther
before
you
lose
all
battery
power
.
Fig
.
18
.
Pry
open
rear
tow
lúg
access
panel
.
When
towingthecar
from
the
front
with
the
rear
wheelson
the
ground,
a
maximum
distance
of
20
miles
is
acceptable
.
If
thecar
needs
to
be
towed
further,
have
the
rear
wheels
placed
on
dollies
.
CA
UTION-
"
Do
not
tow
with
sling-type
equipment
The
front
spoilers
andbumper
covers
may
sustain
dam-
age
.
"
Towínga
BMW
with
an
automatic
transmission
with
the
rear
wheelson
the
ground
can
resuft
in
transmission
damage
due
to
lackof
lubrication
and
should
be
avoided
.
0013128
EMERGENCIES
Page 22 of 759
010-14
FUNDAMENTALS
FOR
THE
DO-ITYOURSELF
OWNER
Fig
.
19
.
Instaf
rear
tow
lug
into
threaded
hole
.
if
absolutely
necessary,
cars
with
automatic
transmissions
can
be
towed
with
the
rear
wheels
on
the
ground,
butthe
tow
should
not
exceed
25
miles
(40
km),at
speeds
at
or
below30
mph
(35
km/h)
.
Be
sure
the
transmission
fluid
hasbeen
topped
off
before
starting
the
tow
.
Always
tow
thecar
with
the
transmis-
sion
lever
in
"N"
(neutral)
.
If
the
tow
must
exceed25
miles
(40
km),
add
one
quart
of
ATF
to
the
transmission,
or
better
yet,
re-
move
the
driveshaft
.
Be
sure
to
drain
or
pump
outthe
added
flu-
id
once
the
tow
has
been
completed
.
NOTE-
"
ATF
draining
and
filling
is
covered
in
240
Automatic
Transmission
.
"
Driveshaft
removal
is
covered
in
260
Driveshaft
.
EMERGENCIES
úo1W¿b
Spare
Parts
Kit
Carrying
a
basic
set
of
spare
parts
can
prevent
a
minor
breakdown
from
turning
into
a
major
annoyance
.
Many
of
the
following
itemswon't
allow
you
todo
major
repair
workon
the
car,
but
they
will
help
in
the
event
of
the
failure
of
something
that
can
disable
thecar
or
compromise
its
safety
.
Spare
Parts
Kit
-
Basic
Contents
"
Drive
belt
(V-belt
or
poly-ribbed)
"
Engine
oil
(one
or
two
quarts)
"
Engine
coolant
(1
gallonof
premixed
50/50
anti-freeze
and
water)
"
Fuse
assortment
(7
.5A,
10A,
15A,
20A)
"
Radiator
hoses
(upper
and
lower)
Spare
Parts
Kit
-
Additional
Contents
"
Exterior
lighting
bulbs
(headlight,
brakelight,
turn
signal,
and
taillight)
"
Wiper
biades
"
Brake
fluid
(new
unopened
bottle,
DOT
4
specification)
"
Main
relay
for
DME
system
Page 24 of 759
020-2
MAINTENANCE
PROGRAM
GENERAL
The
information
given
in
this
repair
group
includes
the
routine
checks
and
maintenance
steps
that
are
both
required
by
BMW
under
the
terms
of
the
vehicle
warranty
protection
and
recom-
mended
by
BMW
to
ensure
long
and
reliable
vehicle
operation
.
GENERAL
NOTE-
Aside
from
keeping
yourcar
in
the
bestpossible
condi-
tion,
proper
maintenance
plays
a
role
in
maintaining
full
protection
under
BMWs
new-car
warranty
coverage
.
If
in
doubtabout
the
terms
and
conditions
of
yourcark
warranty,
an
authorized
BMW
dealer
should
be
able
to
explain
them
.
NOTE-
BMW
is
constantly
updating
their
recommended
main-
tenance
procedures
and
requirements
.
The
informa-
tion
contained
here
is
as
accurate
as
possible
at
the
time
of
publication
.
If
hhere
is
any
doubt
aboutwhat
pro-
cedures
apply
to
a
specific
model
or
model
year,
or
what
intervals
should
be
followed,
remember
that
an
authorized
BMW
dealer
has
the
latest
information
on
factory-recommended
maintenance
.
BMW
Service
Indicator
The
BMW
Service
Indicator
notifies
the
driver
when
mainte-
nance
is
required
.
The
service
indicator
consístsof
multiple
light
emitting
diodes
(lEDs)-typically
five
green,
one
yellow,
andone
red-as
well
as
OIL
SERVICE
and
INSPECTION
indi-
cators
.
When
the
ignition
is
tumed
on,the
green
LEDs
come
on
.
They
go
out
when
the
engine
is
started
.
After
the
Service
Indi-
cator
is
reset,
al¡
green
LEDs
will
be
illuminatedwith
the
keyon
.
As
thecar
is
driven
in
normal
use,
fewer
and
fewer
green
LEDs
will
be
illuminated
before
start-up,indicating
that
the
next
main-
tenance
interval
is
approaching
.
When
thecar
has
accumulated
sufficient
use
to
require
the
next
maintenance
interval,
the
yellow
LED
will
come
on
along
with
either
the
OIL
SERVICE
indicator
or
the
INSPECTION
in-
dicator
.
These
LEDs
will
stay
on
after
the
engine
is
started
.
If
maintenance
service
is
delayed,
thered
LED
will
also
illuminate
as
a
reminder
that
maintenance
service
is
overdue
.
An
OIL
SERVICE
interval
will
alwaysbe
followed
by
an
IN-
SPECTION
interval,
which
will
then
be
followed
byan
OIL
SER-VICE
interval,
andsoon
.
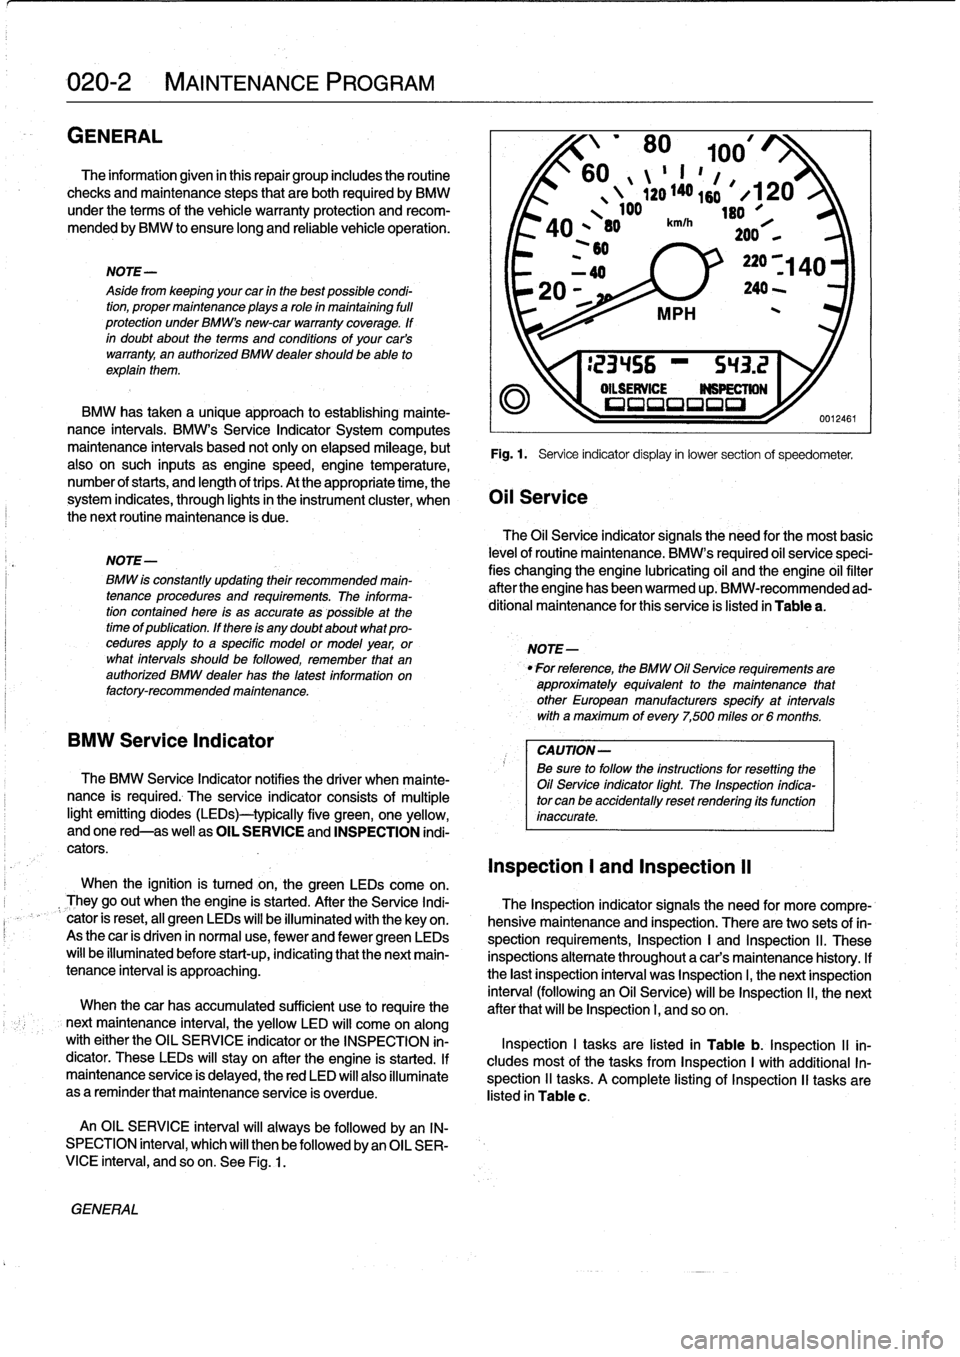
See
Fig
.
1
.
'
80
100/
60
II
"
1
,
ló
1
,
4
`20
140s
#
X120
100
leo
A
O
,
80
km/h`F
*101
200
,
,
~60
BMW
has
taken
a
unique
approach
to
establishing
mainte-
nance
intervals
.
BMW's
Service
Indicator
System
computes
maintenance
intervais
based
not
only
on
elapsed
mileage,
but
Fig
.
1
.
Service
indicator
display
in
lower
section
of
speedometer
.
also
on
such
inputs
as
enginespeed,engine
temperature,
number
of
starts,
and
length
oftrips
.
At
the
appropriate
time,
the
system
indicates,
through
lights
in
the
instrument
cluster,
when
Oil
Service
the
next
routine
maintenance
is
due
.
The
Oil
Service
indicator
signals
the
need
for
the
most
basic
levelof
routine
maintenance
.
BMW's
required
oil
service
speci-
fies
changing
the
engine
lubricating
oil
and
the
engine
oil
filter
after
the
engine
has
been
warmed
up
.
BMW-recommended
ad-
ditional
maintenance
for
this
service
is
listed
in
Table
a
.
NOTE-
For
reference,
the
BMW
Oil
Service
requirements
are
approximately
equivalent
to
the
maintenance
that
other
European
manufacturers
specify
at
intervals
with
a
maximum
of
every
7,500
miles
or6
months
.
CAUTION-
Be
sure
to
follow
the
ínstructions
forresetting
the
Oil
Service
indicator
fight
.
The
Inspection
indica-
tor
can
be
accidentally
reset
rendering
its
function
inaccurate
.
Inspection
l
and
Inspection
II
The
Inspection
indicator
signals
the
need
for
more
compre-
hensive
maintenance
and
Inspection
.
There
are
two
sets
of
in-
spection
requirements,
Inspection
I
and
Inspection
ll
.
These
inspections
alternate
throughout
a
car's
maintenance
history
.
If
the
last
Inspection
interval
was
Inspection
I,
the
next
Inspection
interval
(following
an
Oil
Service)
will
be
Inspection
ll,
the
next
after
that
will
be
Inspection
I,
and
so
on
.
Inspection
I
tasks
are
listed
in
Table
b
.
Inspection
II
in-
cludes
most
of
the
tasks
from
Inspection
I
with
additional
In-
spection
11
tasks
.
A
complete
listing
of
Inspection
II
tasks
are
listed
in
Table
c
.
Page 31 of 759
Final
Drive
Gear
Oil
BMW
recommends
using
only
a
specially
formulatedsyn-
thetic
gear
oil
that
is
available
through
an
authorized
BMW
dealer
parts
department
.
For
additional
information
on
this
¡u-
bricant
andany
other
lubricants
that
may
be
compatible,
con-
tact
an
authorized
BMW
dealer
senrice
department
.
See
331
Final
Drive
.
Brake
Fluid
Brake
fluid
absorbs
moisture
easily,
and
moisture
in
the
fluid
affects
brake
performance
and
reliability
.
This
is
why
brake
fluid
should
be
flushed
from
the
system
every
two
years
.
When
re-
placing
or
adding
brake
fluid,
use
only
new
(luid
from
previously
unopened
containers
.
Do
not
use
brake
fluid
that
has
been
bled
from
the
system,
even
ifit
is
brand
new
.
Use
only
DOT
4
brake
fluid
.
See340
Brakes
for
more
information
.
Engine
Coolant
(Anti-freeze)
BMW
recommends
coolant
that
is
a
50/50
mixture
of
distilled
water
and
phosphate/nítrate
freeanti-freeze
containing
ethyl-
ene
glycol
.
Anti-freezeraises
the
boiling
point
and
lowersthe
freezingpoint
of
the
coolant
.
It
alsocontains
additives
that
help
prevent
cooling
system
corrosion
.
Power
Steering
Fluid
The
power
steering
fluid
is
Dexron
II]®
ATF,
or
equivalent
.
The
system
is
permanently
filled
and
does
not
have
a
drain
.
Routinely
adding
ATF
is
not
required
unlessthe
system
is
leak-
i
n
g,
WARNING
-
Be
sure
to
check
the
fluid
specifications
on
the
pow-
er
steering
reservoir
to
confirm
the
fluid
type
in-
stalled
in
the
system
.
In
some
instances,
the
power
steering
system
may
be
filled
with
an
alternative
hy-
draulic
fluid
designated
CHF
7
.1
.
MAINTENANCE
PROGRAM
020-
ENGINE
OIL
SERVICE
Engine
oil
and
fiiter,
changing
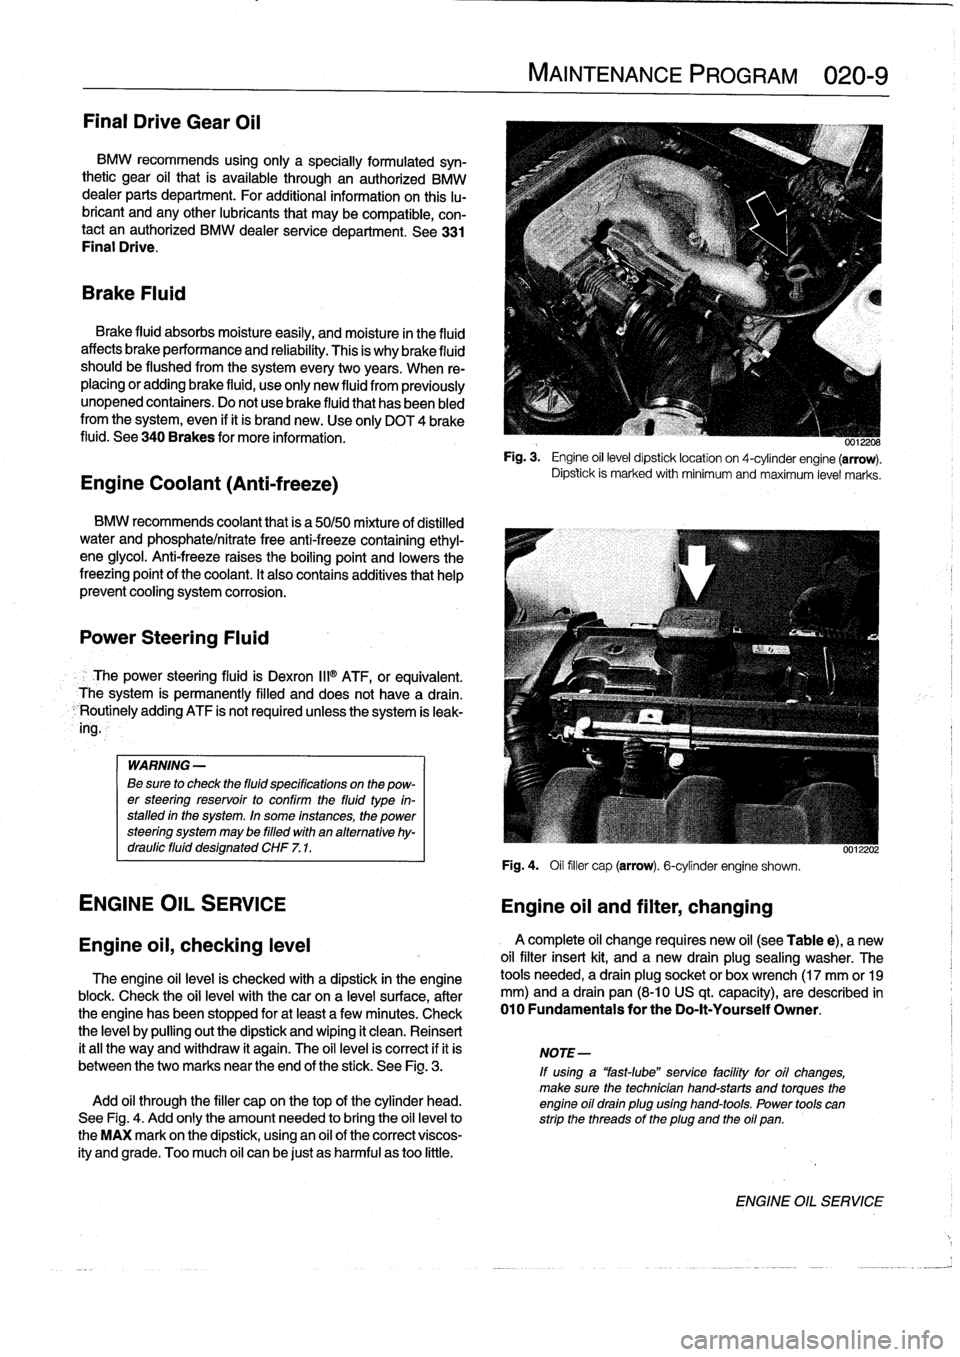
Fig
.
3
.
Engine
oil
level
dipsticklocation
on
4-cylinder
engine
(arrow)
.
Dipsfck
is
marked
with
mínimum
and
maximum
level
marks
.
Fig
.
4
.
Oil
filler
cap
(arrow)
.
6-cylinder
engine
shown
.
0012202
Engine
oii,
checking
leve¡
A
complete
oil
change
requires
new
oil
(see
Table
e),
a
new
oil
filter
insert
kit,
and
a
new
drain
plug
sealing
washer
.
The
The
engine
oil
leve]
is
checked
with
a
dipstick
in
the
engine
tools
needed,
a
drain
plug
socket
or
box
wrench
(17
mm
or19
block
.
Check
the
oii
leve¡
with
the
canon
a
level
surface,
after
mm)
and
a
drain
pan
(8-10
US
qt
.
capacity),
are
described
in
the
engine
has
been
stopped
for
atleast
a
few
minutes
.
Check
010
Fundamentals
for
the
Do-It-Yourself
Owner
.
the
leve¡
by
pulling
outthe
dipstick
and
wiping
it
clean
.
Reinsert
it
all
the
way
and
withdraw
it
again
.
The
oil
leve¡
is
correct
if
it
is
NOTE-
between
the
two
marks
near
the
end
of
the
stick
.
See
Fig
.
3
.
If
using
a
"fast-lube"
service
facility
for
oil
changes,
make
sure
the
technician
hand-starts
and
torques
the
Add
oil
through
the
filler
cap
on
thetop
of
the
cylinder
head
.
engine
oil
drain
plug
using
hand-tools
.
Power
tools
can
See
Fig
.
4
.
Add
only
the
amount
needed
to
bring
the
oil
leve¡to
strip
the
threads
of
the
plug
and
the
oil
pan
.
the
MAX
mark
on
the
dipstick,
using
an
oil
of
the
correctviscos-
ity
andgrade
.
Too
much
oil
canbe
just
as
harmful
as
too
little
.
ENGINE
OIL
SERVICE
Page 32 of 759
020-
1
0
MAINTENANCE
PROGRAM
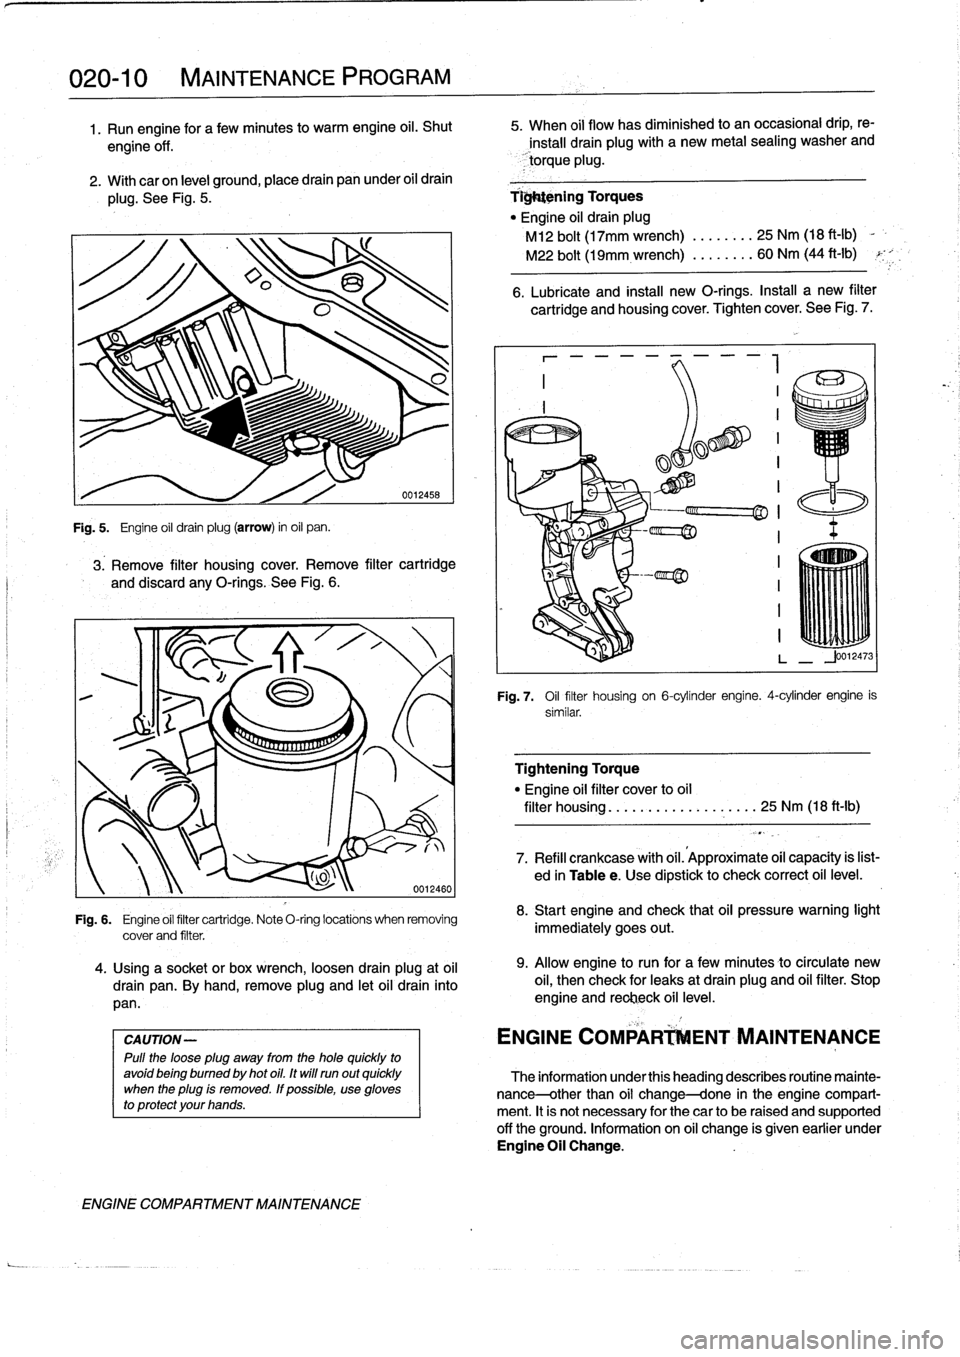
1.
Run
engine
for
afewminutes
to
warm
engine
oil
.
Shut
5
.
When
oil
flow
has
diminished
to
an
occasional
drip,
re-
engine
off
.
install
drain
plugwith
a
new
metal
sealing
washerand
torque
plug
.
2
.
With
car
on
level
ground,
place
drain
pan
under
oil
drain
plug
.
See
Fig
.
5
.
Tightening
Torques
"
Engine
oil
drain
plug
M12
bolt
(17mm
wrench)
.
...
.
..
.
25
Nm
(18
ft-Ib)
-
M22
bolt
(19mm
.
wrench)
...
.
...
.
60
Nm
(44
ft-Ib)
Fig
.
5
.
Engine
oil
drain
plug(arrow)
in
oil
pan
.
3
.
Remove
filter
housingcover
.
Remove
filter
cartridge
and
discard
any
O-rings
.
See
Fig
.
6
.
CAUTION-
Pulí
the
loose
plug
away
from
the
hole
quickly
to
avoidbeing
bumed
by
hot
oil
.
It
wíll
runout
quickly
when
the
plug
ís
removed
.
If
possible,
use
gloves
to
protect
your
hands
.
ENGINE
COMPARTMENT
MAINTENANCE
0012460
Fig
.
6
.
Engine
oil
filter
cartridge
.
Note
O-ring
locations
when
removing
cover
and
filter
.
4
.
Using
a
socket
or
box
wrench,
loosen
drain
plug
at
oil
drain
pan
.
By
hand,
remove
plug
and
letoil
drain
into
pan
.
6
.
Lubricate
and
install
new
O-rings
.
Install
a
new
filter
cartridge
and
housingcover
.
Tighten
cover
.
See
Fig
.
7
.
7
«
a~
.~~
fT~
iII~IIIi~
.
Fig
.
7
.
Oil
flter
housing
on
6-cylínder
engine
.
4-cylinder
engine
is
similar
.
Tightening
Torque
"
Engine
oil
filter
cover
to
oil
filter
housing
...................
25
Nm
(18
ft-Ib)
7
.
Refill
crankcase
with
oil
.'Approximate
oil
capacity
is
list-
ed
in
Tablee
.
Use
dipstick
to
check
correct
oil
level
.
8
.
Start
engine
and
check
that
oil
pressure
warning
light
immediately
goes
out
.
9
.
Allow
engine
to
run
for
a
few
minutes
to
círculate
new
oil,
then
check
for
leaks
at
drain
plug
and
oil
filter
.
Stop
engine
and
reclieck
oil
level
.
ENGINE
COMPAR
ENT
MAINTENANCE
The
information
underthis
heading
describes
routine
mainte-
nance-other
than
oil
change-done
in
the
engine
compart-
ment
.
It
is
not
necessary
for
the
car
to
be
raised
and
supported
off
the
ground
.
Information
on
oil
change
is
given
earlier
under
Engine
Oil
Change
.
Page 34 of 759
020-
1
2
MAINTENANCE
PROGRAM
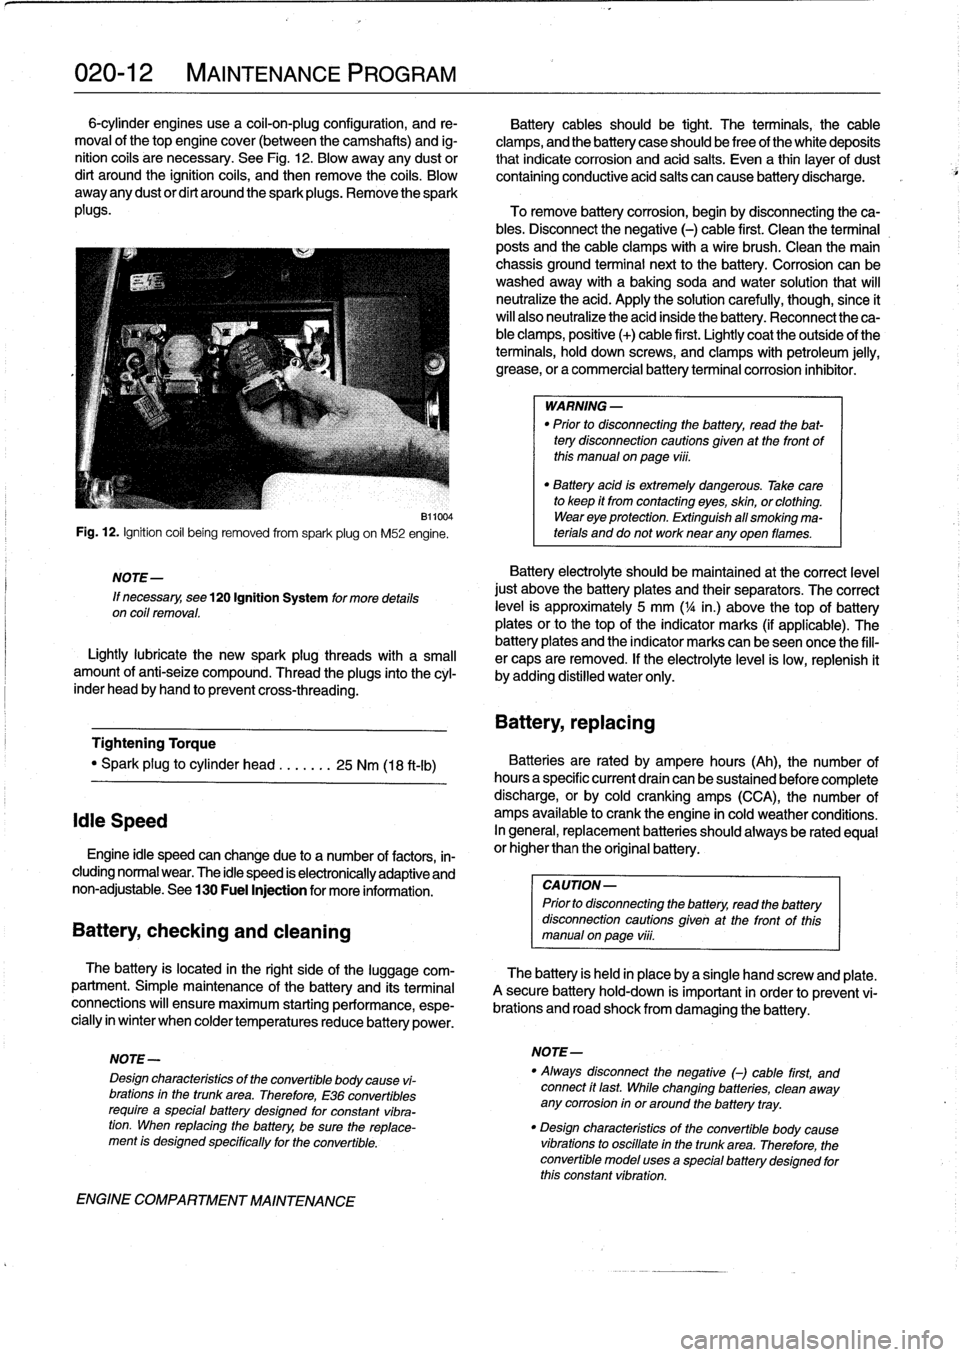
6-cylinder
engines
use
a
coil-on-plug
configuration,
and
re-
Battery
cablesshould
be
tight
.
The
terminals,
the
cable
moval
of
thetop
engine
cover
(between
the
camshafts)
and
ig-
clamps,
and
the
battery
case
should
be
freeof
the
white
deposits
nition
cofs
are
necessary
.
See
Fig
.
12
.
Blow
away
any
dust
or
that
indicate
corrosion
and
acid
salts
.
Even
a
thin
¡ayer
of
dust
dirt
around
the
ignition
coils,
and
then
remove
the
coils
.
Blow
containing
conductive
acid
salts
can
cause
battery
discharge
.
away
any
dustor
dirt
around
the
sparkplugs
.
Remove
the
spark
plugs
.
To
remove
battery
corrosion,
begin
by
disconnecting
theca-
bles
.
Disconnect
the
negative
(-)
cable
first
.
Clean
the
terminal
posts
and
the
cable
clamps
with
a
wire
brush
.
Clean
the
main
chassis
ground
terminal
next
to
the
battery
.
Corrosion
can
be
washedaway
with
a
baking
soda
and
water
solution
that
will
neutralize
the
acid
.
Apply
the
solution
carefully,
though,since
ít
will
also
neutralize
the
acid
inside
the
battery
.
Reconnect
the
ca-
ble
clamps,
positive
(+)
cable
first
.
Lightly
coat
the
outside
of
the
terminals,
hold
down
screws,
and
clamps
with
petroleum
jelly,
grease,
or
a
commercial
battery
terminal
corrosion
inhibitor
.
Fig
.
12
.
Ignition
coil
being
removed
from
spark
plug
on
M52
engine
.
NOTE-
If
necessary,
see
120
Ignition
System
for
more
details
on
coil
removal
.
B11004
Lightlylubricate
the
new
spark
plug
threads
with
a
small
amount
of
anti-seize
compound
.
Thread
the
plugs
into
the
cyl-
inder
head
byhand
to
prevent
cross-threading
.
Tightening
Torque
"
Spark
plug
to
cylinder
head
.......
25
Nm
(18
ft-ib)
Idie
Speed
Engine
¡dle
speed
canchange
due
to
a
number
of
factors,
in-
cluding
normal
wear
.
The
idle
speed
is
electronically
adaptive
and
non-adjustable
.
See
130
Fuel
Injection
for
more
information
.
Battery,
checking
and
cleaning
The
battery
is
located
in
the
right
side
of
the
luggage
com-
partment
.
Simple
maintenance
of
the
battery
and
its
terminal
connections
will
ensure
maximum
starting
performance,
espe-
cially
in
winter
when
colder
temperaturesreduce
battery
power
.
ENGINE
COMPARTMENT
MAINTENANCE
WARNING
-
"
Prior
to
disconnecting
the
battery,
read
the
bat-
tery
disconnection
cautions
given
at
the
front
of
this
manualonpage
viii
.
"
Battery
acid
is
extremely
dangerous
.
Take
care
to
keep
it
from
contacting
eyes,
skin,
or
clothing
.
Wear
eye
protection
.
Extinguish
all
smoking
ma-
terials
and
do
not
worknear
any
oyen
flames
.
Battery
electrolyte
should
be
maintained
at
the
correct
level
just
above
the
battery
plates
and
their
separators
.
The
correct
leve¡
is
approximately
5
mm
(
1
/4
in
.)
above
thetop
of
battery
plates
orto
thetop
of
the
indicator
marks
(if
applicable)
.
The
battery
plates
and
the
indicator
marks
can
beseen
once
the
fill-
er
caps
are
removed
.
If
the
electrolyte
level
is
low,
replenish
it
by
adding
distilled
water
only
.
Battery,
repiacing
Batteries
are
rated
by
ampere
hours
(Ah),
the
number
of
hoursa
specific
current
draín
can
be
sustained
before
complete
discharge,
or
by
cold
cranking
amps
(CCA),
the
number
of
amps
available
to
crank
the
engine
in
cold
weather
conditions
.
In
general,
replacement
batteries
should
alwaysbe
rated
equal
or
higherthan
the
original
battery
.
CAUTION-
Prior
to
disconnecting
the
battery,
read
the
battery
disconnection
cautions
given
at
the
front
of
thls
manual
on
page
viii
.
The
battery
is
held
in
place
bya
single
hand
screw
and
píate
.
A
secure
battery
hold-down
is
important
in
order
to
prevent
vi-
brations
and
road
shock
from
damaging
the
battery
.
NOTE-
NOTE-
"
Always
disconnect
the
negative
()
cable
first,
and
Design
characteristics
of
the
convertible
body
cause
vi-
connect
ft
last
While
changing
batteries,
clean
away
brations
in
the
trunk
area
.
Therefore,
E36
convertibles
any
corrosion
in
or
around
the
battery
tray
.
require
a
specialbattery
designed
for
constant
vibra-
tion
.
When
repiacing
the
battery,
be
sure
the
replace-
"
Design
characteristics
of
the
convertible
body
cause
ment
is
designed
specffically
for
the
convertible
.
vibrations
to
oscillate
in
the
trunk
area
.
Therefore,
the
convertible
model
uses
a
specialbattery
designed
for
this
constant
vibration
.
Page 36 of 759
020-
1
4
MAINTENANCE
PROGRAM
uu11989
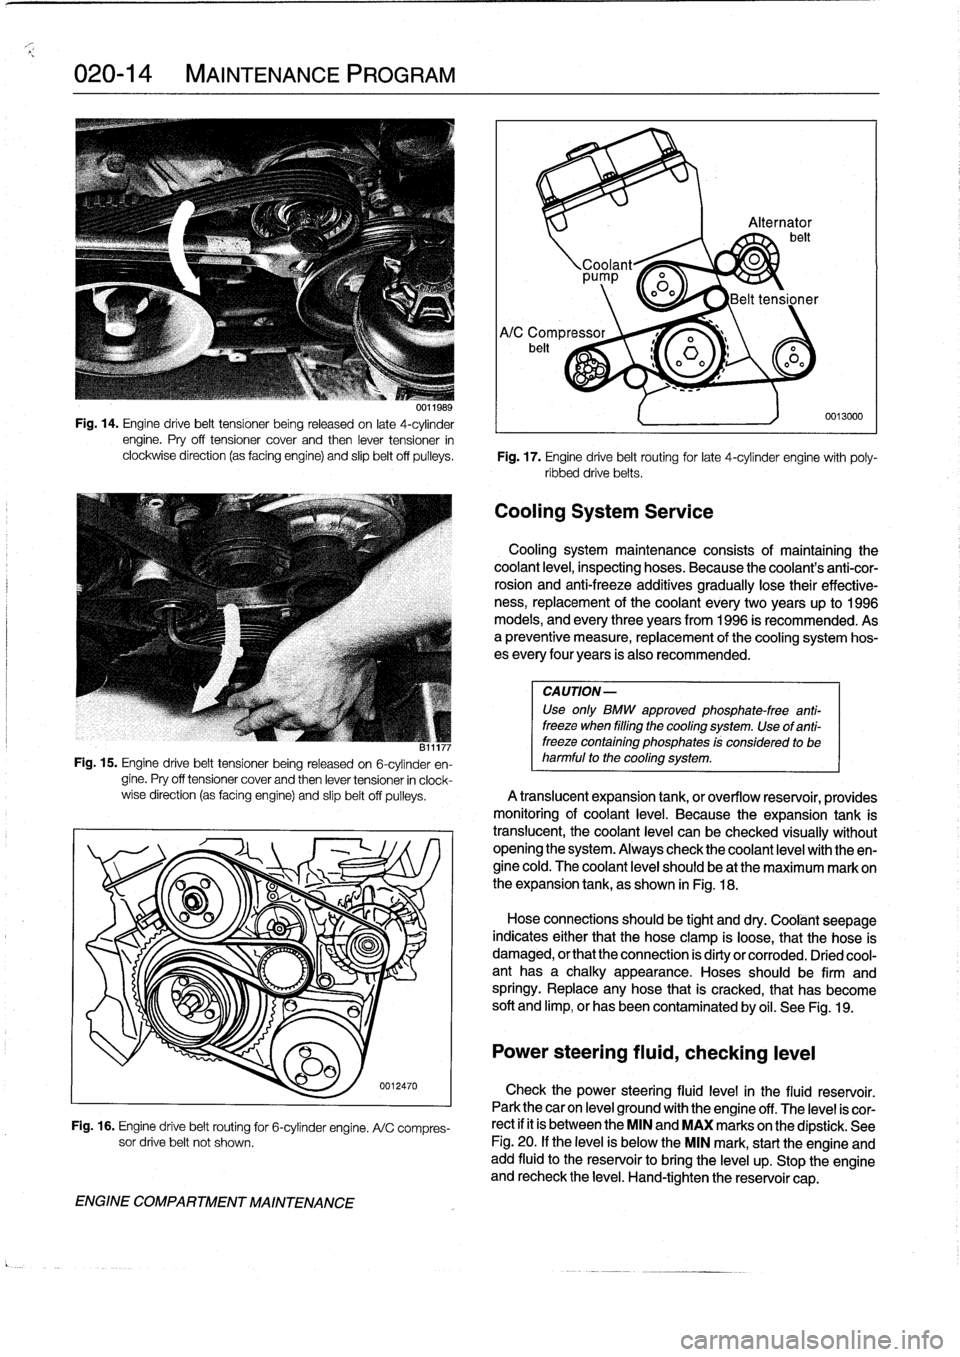
Fig
.
14
.
Engine
drive
belt
tensíoner
being
released
on
late
4-cylinder
engine
.
Pry
off
tensioner
cover
and
then
lever
tensioner
in
clockwise
direction
(as
facing
engine)
and
slip
beltoff
pulleys
.
Fig
.
17
.
Engine
drive
belt
routing
for
late
4-cylinder
engine
with
poly-
ribbed
drivebelts
.
CA
UTION-
Use
only
BMW
approved
phosphate-free
anti-
freeze
when
filling
the
cooling
system
.
Use
of
anti-
B11177
freeze
containing
phosphates
!s
considerad
to
be
Fig
.
15
.
Engine
drive
belt
tensioner
being
released
on
6-cylinder
en-
harmful
to
the
cooling
system
.
gine
.
Pry
off
tensioner
cover
and
then
lever
tensioner
in
clock-
wise
direction
(as
facing
engine)
and
slipbelt
off
pulleys
.
A
translucent
expansion
tank,
or
overflow
resenroir,
providesmonitóring
of
coolant
leve¡
.
Because
the
expansion
tank
is
translucent,
thecoolant
level
can
be
checked
visually
without
opening
the
system
.
Always
check
thecoolant
leve¡
with
theen-gine
cold
.
The
coolant
leve¡
should
be
at
the
maximum
mark
on
O
o
'~
I
the
expansion
tank,
as
shown
in
Fig
.
18
.
OO
Hose
connectionhld
b
tiht
s
soueg
an
ddry
.
Coolánt
seepage
indicates
either
that
the
hose
clamp
is
loose,
that
the
pose
is
ENGINE
COMPARTMENT
MAINTENANCE
0012470
Fig
.
16
.
Engine
drive
belt
routing
for
6-cylinder
engine
.
A/C
compres-
sor
drive
belt
not
shown
.
'92
irá
Alternator
belt
Coolant~
0
pp
o0o
Belt
tensioner
Cooling
System
Service
0013000
Cooling
system
maintenance
consists
of
maíntaining
thecoolant
leve¡,
inspecting
hoses
.
Because
the
coolant's
anti-cor-
rosion
and
anti-freeze
additives
gradually
lose
their
effective-
ness,
replacement
of
thecoolant
every
two
years
up
to
1996
models,
and
every
three
years
from
1996
is
recommended
.
Asa
preventive
measure,
replacement
of
the
cooling
system
hos-
es
every
four
years
is
also
recommended
.
damaged,
or
that
the
connection
is
dirty
or
corroded
.
Dried
cool-
ant
has
a
chalky
appearance
.
Hoses
should
be
firm
and
springy
.
Replace
any
hose
that
is
cracked,
that
has
become
soft
and
limp,
or
has
been
contaminated
by
oil
.
See
Fig
.
19
.
Power
steering
fluid,
checking
leve¡
Check
the
power
steering
fluid
level
in
the
fluid
reservoir
.
Park
thecar
on
leve¡
ground
with
the
engine
off
.
The
level
is
cor-
rect
if
it
is
between
the
MIN
and
MAX
marks
on
the
dipstick
.
See
Fig
.
20
.
If
the
leve¡
is
below
the
MIN
mark,
start
the
engine
andadd
fluid
to
the
reservoir
to
bríng
the
leve¡
up
.
Stop
the
engine
and
recheck
the
leve¡
.
Hand-tighten
the
reservoir
cap
.
Page 42 of 759
020-20
MAINTENANCE
PROGRAM
Seat
Belts
Washing
Chassis
Dirt
and
other
abrasive
particles
will
damage
seat
belt
web-
Periodic
washing
of
the
underside
of
the
car,
especially
in
bing
.
If¡t
is
necessary
to
clean
seat
belts,
use
a
mild
soap
solu-
winter,
will
help
prevent
accumulation
of
road
salt
and
rust
.
The
tion
.
Bleach
and
other
strong
cleaning
agents
may
weaken
the
besttime
to
wash
the
underside
is
just
after
the
car
has
been
belt
webbing
and
should
be
avoided
.
driven
in
wet
conditions
.
Spray
the
chassis
with
a
powerful
jet
of
water
.
Commercial
or
self-service
car
washes
may
not
be
best
WARNING-
for
this,
as
they
may
recycle
the
salt-contaminated
water
.
Do
not
clean
the
seat
belt
webbing
using
dry
clean-
ing
or
other
chemicals
.
Allow
wet
belts
to
dry
before
allowing
them
to
retract
.
Speeial
Cleaning
The
condition
of
the
belt
webbing
and
the
function
of
the
re-
tractor
mechanisms
should
be
inspected
.
See720
Seat
Belts
for
seat
belt
inspection
information
.
Exterior
Washing
The
longer
dirt
isleft
on
the
paint,
the
greater
the
risk
of
dam-
aging
the
glossy
finish,
either
by
scratching
or
by
the
chemical
effect
dirt
particles
may
have
on
the
paintedsurface
.
Do
not
wash
the
car
in
direct
sunlight
.
If
the
engine
hood
is
warm,
allow
it
to
cool
.
Beads
of
water
not
only
leavespots
when
dried
rapidly
by
the
sun
or
heat
from
the
engine,
but
also
can
act
as
small
magnifyingglasses
and
burn
spots
into
the
finish
.
Wash
thecar
with
a
mixture
of
lukewarmwater
and
a
car
wash
product
.
Rinse
using
plenty
of
clear
water
.
Wipe
the
body
dry
witha
soft
cloth
towel
or
chamois
to
prevent
water-spotting
.
Waxing
For
a
long-lasting,protective,
and
glossy
finish,
apply
a
hard
wax
after
thecar
has
been
washed
and
dried
.
Use
carnauba
or
synthetic
based
products
.
Waxing
is
not
needed
after
every
washing
.
You
can
tell
when
waxing
is
required
by
looking
at
the
finísh
when
it
is
wet
.
If
the
water
coats
the
paint
in
smooth
sheets
instead
of
forming
beads
that
rol¡
off,
a
new
coat
of
wax
is
needed
.
Wax
shouldnot
be
applied
to
black
trim
pieces,
rub-
ber,or
other
plastic
parts
.
Polishing
Use
paintpolish
only
if
the
finish
assumes
a
dull
lock
after
long
service
.
Polish
can
beused
to
remove
tar
spots
and
tar-
nish,
but
afterwards
a
coat
of
wax
should
be
applied
to
protect
the
clean
finish
.
Do
not
use
abrasive
polish
or
cleaners
on
alu-
minum
trimor
accessories
.
BODYAND
INTERIOR
MAINTENANCE
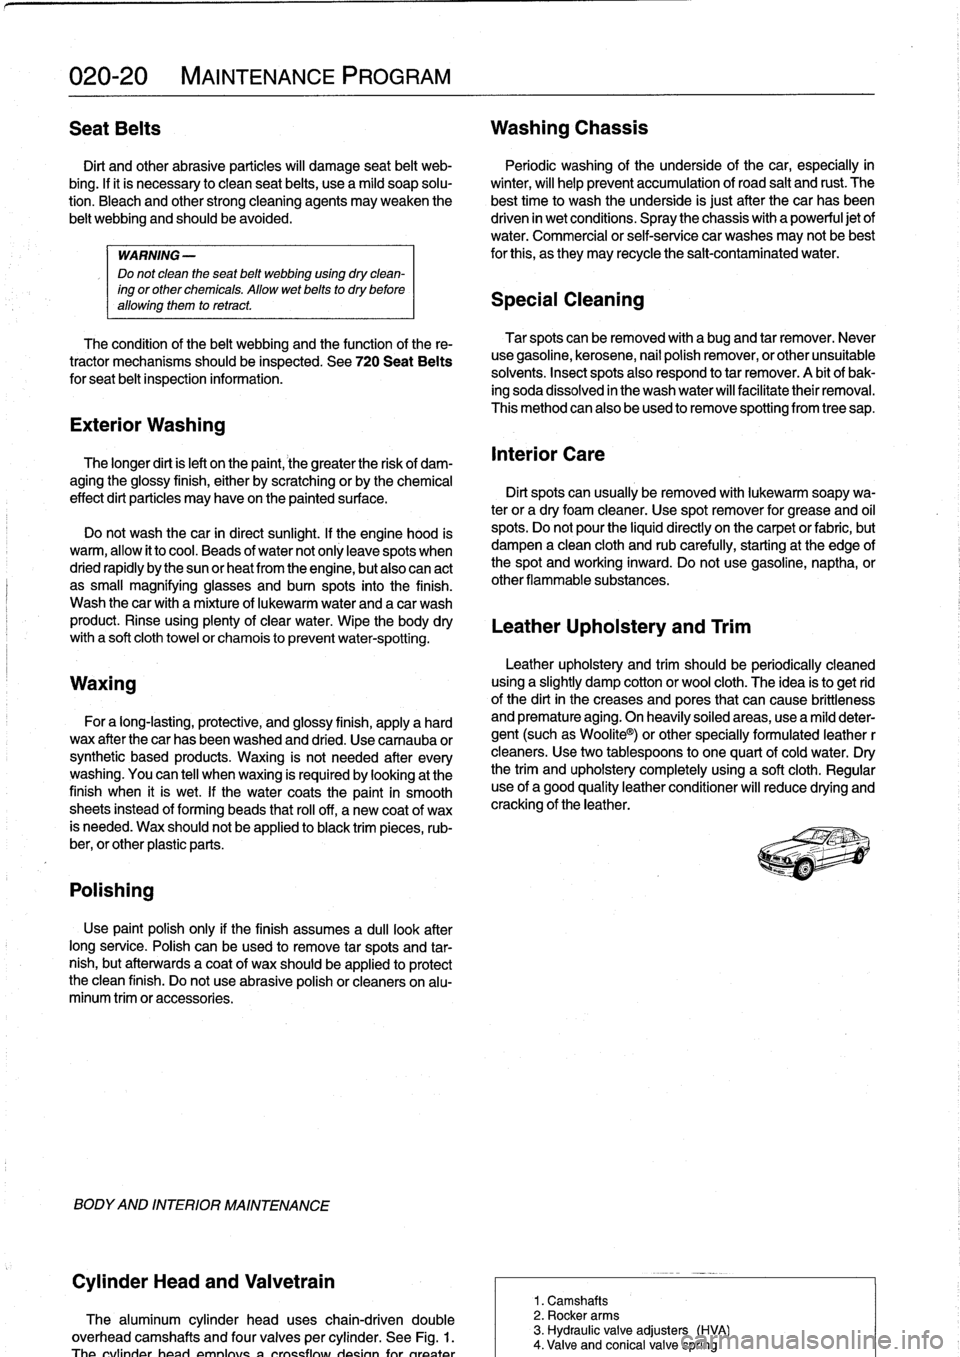
Cylinder
Head
and
Valvetrain
The
aluminum
cylinder
head
uses
chain-driven
double
overhead
camshafts
and
four
valves
per
cylinder
.
See
Fig
.
1
.
Tha
rvfinriar
hand
nmnlnve
n
ernceflnier
rineinn
fnr
nronter
Tar
spots
canbe
removed
with
a
bugand
tar
remover
.
Never
use
gasoline,
kerosene,
nail
polish
remover,
or
other
unsuitable
solvents
.
Insect
spots
also
respond
to
tar
remover
.
A
bit
of
bak-
ing
soda
dissolved
in
the
wash
water
will
facilitate
their
removal
.
This
method
can
also
beused
to
remove
spotting
from
tree
sap
.
Interior
Care
Dirt
spots
can
usually
be
removed
with
lukewarm
soapy
wa-
ter
or
a
dry
foam
cleaner
.
Use
spot
remover
for
grease
and
o¡I
spots
.
Do
not
pour
the
(quid
directly
on
the
carpetor
fabric,
but
dampen
a
clean
cloth
and
rub
carefully,starting
at
the
edge
of
the
spot
and
working
inward
.
Do
not
use
gasoline,
naptha,
or
other
flammable
substances
.
Leather
Upholstery
and
Trim
Leather
upholstery
and
trim
should
be
periodically
cleaned
using
a
slightly
damp
cotton
or
wool
cloth
.
The
idea
is
to
get
rid
of
the
dirtin
the
creases
and
pores
that
can
cause
brittleness
and
premature
aging
.
On
heavily
soiled
areas,
usea
mild
deter-
gent
(such
as
Woolite®)
or
other
specially
formulated
leather
r
cleaners
.
Use
two
tablespoons
to
one
quart
of
cold
water
.
Dry
the
trim
and
upholstery
completely
using
a
soft
cloth
.
Regular
use
of
agood
quality
leather
conditioner
will
reduce
drying
and
crackingof
the
leather
.
1
.
Camshafts
2
.
Rocker
arms
3
.
Hydraulic
valve
adjusters
(HVA)
4
.
Valve
and
conical
valve
spring
Page 47 of 759
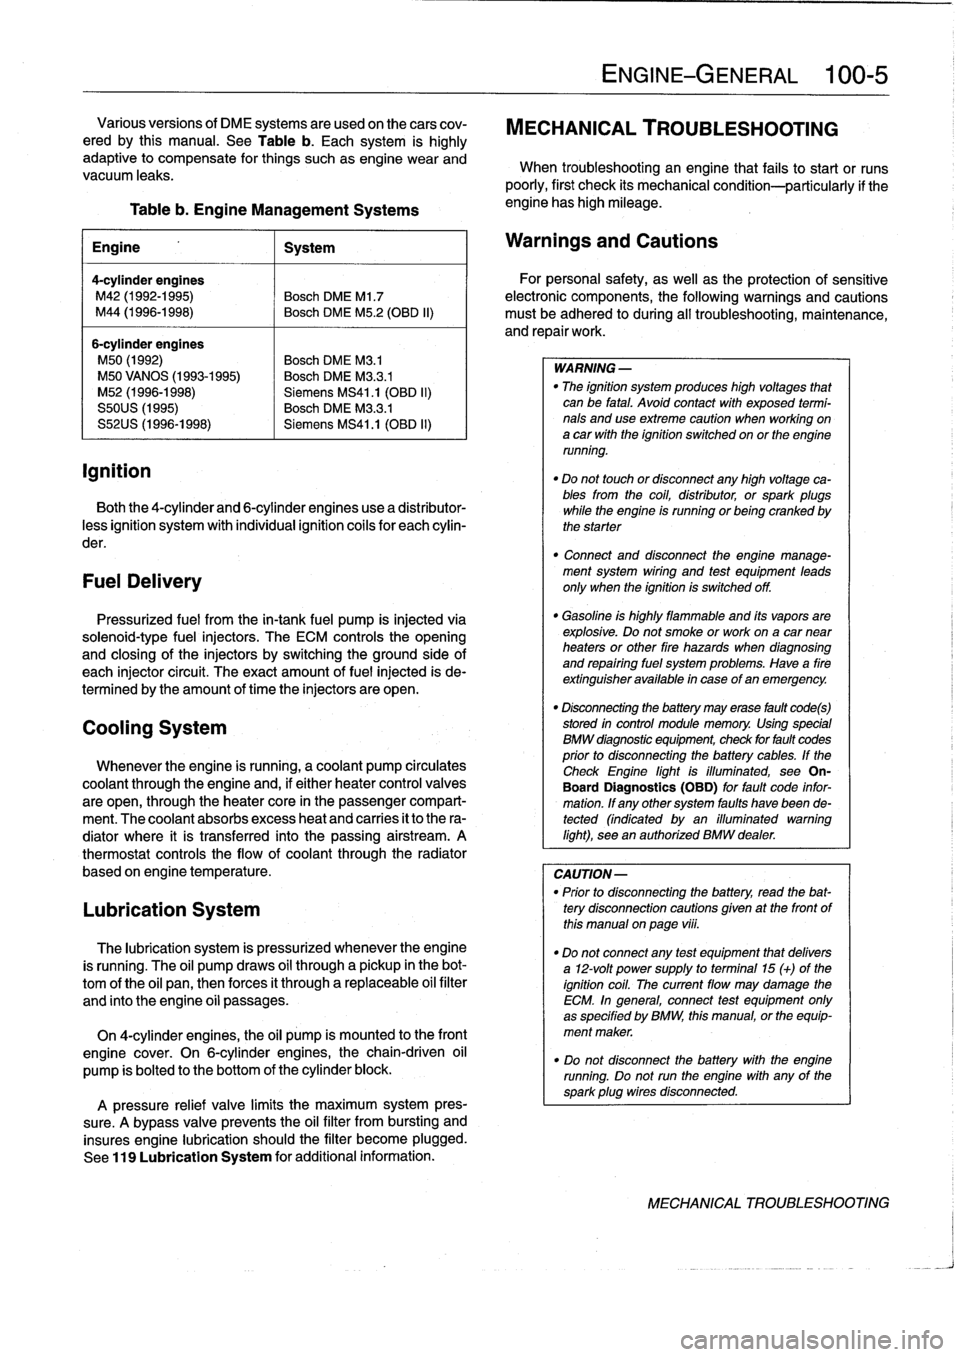
ignition
Table
b
.
Engine
Management
Systems
engine
has
high
mileage
.
Engine
1
System
4-cylinder
engines
M42
(1992-1995)
Bosch
DME
Ml
.7
M44
(1996-1998)
Bosch
DME
M5
.2
(OBD
II)
6-cylinder
engines
M50
(1992)
Bosch
DME
M3
.1
M50
VANOS
(1993-1995)
Bosch
DME
M3
.3
.1
M52
(1996-1998)
Siemens
MS41
.1
(OBD
II)
S50US
(1995)
Bosch
DME
M3
.3
.1
S52US
(1996-1998)
Siemens
MS41
.1
(OBD
II)
Both
the
4-cylinder
and
6-cylinder
engines
use
a
distributor-
less
ignition
system
with
individual
ignition
coils
for
each
cylin-
der
.
FuelDelivery
Pressurized
fuel
from
the
in-tank
fuel
pump
is
injected
via
solenoid-type
fuel
injectors
.
The
ECM
controls
the
opening
and
closing
of
the
injectors
by
switchingthe
ground
side
of
each
injector
circuit
.
The
exact
amount
of
fuel
injected
is
de-
termined
by
the
amount
of
timethe
injectors
are
open
.
Cooling
System
Whenever
the
engine
is
running,
acoolant
pump
circulates
coolant
through
the
engine
and,
if
either
heater
control
valves
are
open,
through
the
heater
core
in
the
passenger
compart-
ment
.
The
coolant
absorbs
excess
heat
and
carries
it
to
the
ra-
diator
where
it
is
transferred
into
the
passing
airstream
.
A
thermostat
controls
the
flow
of
coolant
through
the
radiator
based
on
engine
temperature
.
Lubrication
System
The
lubrication
system
is
pressurized
whenever
theengine
is
running
.
The
oil
pump
draws
oil
through
a
pickup
in
the
bot-
tom
of
the
oil
pan,thenforces
it
through
a
replaceable
oil
filter
and
finto
the
engine
oíi
passages
.
On
4-cylinder
engines,
the
oil
pump
is
mounted
to
the
front
engine
cover
.
On
6-cylinder
engines,thechain-driven
oil
pump
is
bolted
to
the
bottom
of
the
cylinder
block
.
A
pressure
relief
valve
limits
the
maximum
system
pres-
sure
.
A
bypass
valve
prevents
the
oil
filter
from
bursting
and
insures
engine
lubrication
should
the
filter
become
plugged
.
See
119
Lubrication
System
for
additional
information
.
ENGINE-GENERAL
100-
5
Various
versions
of
DME
systems
are
usedon
thecars
cov-
MECHANICAL
TROUBLESHOOTING
ered
by
this
manual
.
See
Table
b
.
Each
system
is
highly
adaptive
to
compensate
for
things
suchasengine
wear
and
When
troubleshooting
an
engine
that
fails
to
start
or
runs
vacuum
leaks
.
poorly,
first
check
its
mechanical
condition-particularly
if
the
Warnings
and
Cautions
For
personal
safety,
as
well
asthe
protection
of
sensitive
electronic
components,
the
following
warnings
and
cautions
must
be
adhered
to
during
all
troubleshooting,
maintenance,
and
repairwork
.
WARNING
-
"
The
ignition
system
produces
high
voltages
that
can
be
fatal
.
Avoid
contact
with
exposed
termi-
nals
anduse
extreme
caution
when
working
on
a
car
with
the
ignition
switched
on
or
the
engine
running
.
"
Do
not
touch
or
disconnect
any
high
voltage
ca-
bles
from
the
coil,
distributor,
orspark
plugs
while
the
engine
is
running
or
being
cranked
by
the
starter
"
Connect
and
disconnect
the
engine
manage-
ment
system
wiring
and
test
equipment
leads
only
when
the
ignition
is
switched
off
.
"
Gasoline
is
highly
flammable
and
its
vapors
are
explosive
.
Do
not
smoke
or
work
on
a
car
near
heaters
or
other
fire
hazards
when
diagnosing
and
repairing
fuel
system
problems
.
Have
a
fire
extínguisher
available
in
case
of
an
emergency
.
"
Disconnecting
the
battery
may
erase
fault
code(s)
stored
in
control
module
memory
.
Using
special
BMW
diagnosnnc
equipment,
check
for
fault
codes
prior
to
disconnecting
the
battery
cables
.
If
the
Check
Engine
lightis
illuminated,
see
On-
Board
Diagnostics
(OBD)
forfault
code
infor-
mation
.
If
any
other
system
faults
havebeen
de-tected
(indicated
byan
illuminated
warning
light),
see
an
authorized
BMW
dealer
.
CAUTION-
"
Prior
to
disconnecting
the
battery,
read
the
bat-
tery
disconnection
cautions
gíven
at
the
front
of
this
manual
on
page
viii
.
"
Do
notconnect
any
test
equipment
that
delivers
a
12-volt
power
supply
to
terminal15
(+)
of
the
ignition
coil
.
The
current
flow
may
damage
the
ECM
.
In
general,
connect
test
equipment
only
as
specified
by
BMW,
this
manual,
or
the
equip-
ment
maker
.
"
Do
not
disconnect
the
battery
with
the
engine
running
.
Do
notrunthe
engine
with
any
of
the
sparkplug
wires
disconnected
.
MECHANICAL
TROUBLESHOOTING
Page 48 of 759
100-6
ENGINE-GENERAL
Cylinder
compression,
checking
A
compression
tester
is
needed
to
make
a
compression
test
.
To
obtain
accurate
test
results,
the
battery
and
starter
must
be
capable
of
cranking
the
engine
at
250-300
rpm,
and
theen-
gine
should
be
at
normal
operating
temperature
.
Use
com-
pressed
air
to
clean
aroundthe
spark
plugs
before
removal
.
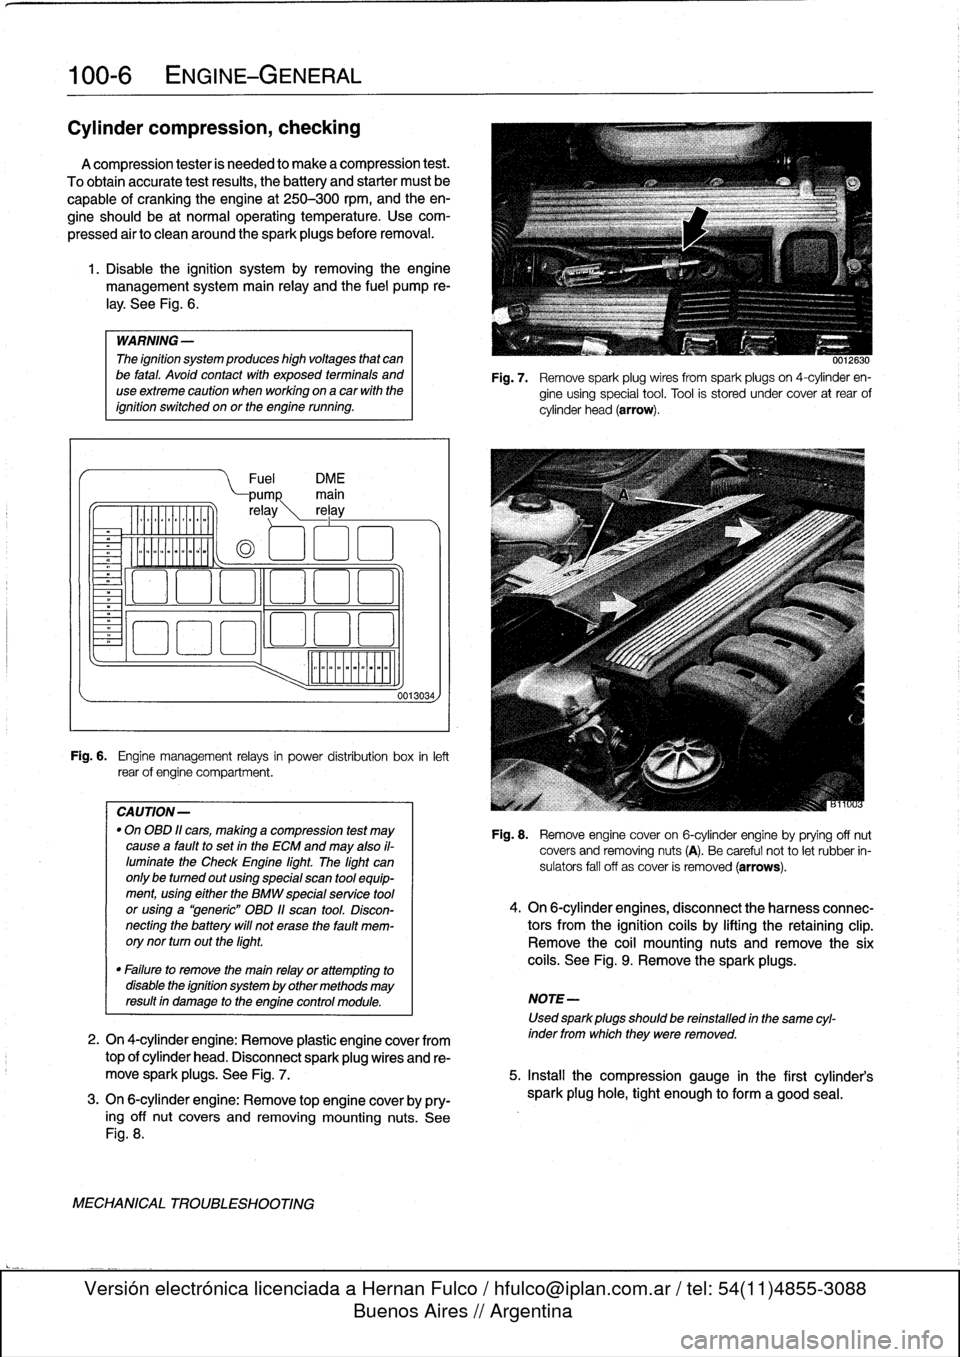
1
.
Disable
the
ignítion
system
by
removing
the
engine
management
system
main
relay
and
the
fuel
pump
re-
¡ay
.
See
Fig
.
6
.
WARNING
-
The
ignítion
system
produces
high
voltages
that
canbe
fatal
.
Avoid
contact
with
exposed
termínals
and
useextreme
caution
when
working
on
acar
wíth
the
ignítion
switched
on
or
the
engine
running
.
Fuel
DM
E
pump
main
re
ay
rel
ay
o
oa
ooa
.,
o00
oao
Fig
.
6
.
Engine
management
relays
in
power
distribution
box
inleft
rear
of
engine
compartment
.
CAUTION-
"
On
OBD
11
cars,
making
a
compression
test
may
causea
faultto
set
in
the
ECM
and
may
also
il-
luminate
the
Check
Engine
light
.
The
light
can
only
be
tumed
out
using
special
scan
tool
equip-
ment,using
eíther
the
BMW
specialservíce
tool
or
using
a
"generic"
OBD
11
scan
tool
.
Discon-
necting
the
battery
will
not
erase
the
fault
mem-
orynor
turn
outthe
light
.
0013034,
0012630
Fig
.
7
.
Remove
spark
plug
wires
from
spark
plugs
on
4-cylinder
en-
gine
using
special
tool
.
Tool
is
stored
under
cover
at
rear
of
cylinder
head
(arrow)
.
Fig
.
8
.
Remove
engine
cover
on
6-cylinder
engine
byprying
off
nut
covers
and
removing
nuts
(A)
.
Be
careful
not
to
let
rubber
in-
sulators
fall
off
as
cover
is
removed
(arrows)
.
4
.
On
6-cylinder
engines,
disconnect
the
harness
connec-
tors
from
the
ignítion
coils
by
lifting
the
retaining
clip
.
Remove
the
coil
mounting
nuts
andremove
the
six
coils
.
See
Fig
.
9
.
Remove
the
sparkplugs
.
"
Failure
to
remove
the
main
relay
or
attempting
to
disable
the
ignítion
system
by
other
methods
may
resultin
damage
to
the
engine
control
module
.
NOTE-
Used
sparkplugs
should
be
reinstalled
in
the
same
cyl-
2
.
On
4-cylinder
engine
:
Remove
plastic
engine
cover
from
inder
fromwhich
they
were
removed
.
top
of
cylinder
head
.
Disconnect
spark
plug
wires
and
re-
move
spark
plugs
.
See
Fig
.
7
.
5
.
Insta¡¡
the
compression
gauge
in
the
first
cylinder's
3
.
On
6-cylinder
engine
:
Remove
top
engine
coverby
pry-
spark
plug
hole,
tight
enough
to
form
a
good
seal
.
ing
off
nut
covers
and
removing
mounting
nuts
.
See
Fig
.
8
.
MECHANICAL
TROUBLESHOOTING