oil temperature BMW M3 1995 E36 User Guide
[x] Cancel search | Manufacturer: BMW, Model Year: 1995, Model line: M3, Model: BMW M3 1995 E36Pages: 759
Page 70 of 759
113-4
CYLINDER
HEAD
REMOVAL
AND
INSTALLATION
20
.
Disconnect
main
engine
wiring
harness
connector
.
La-
bel
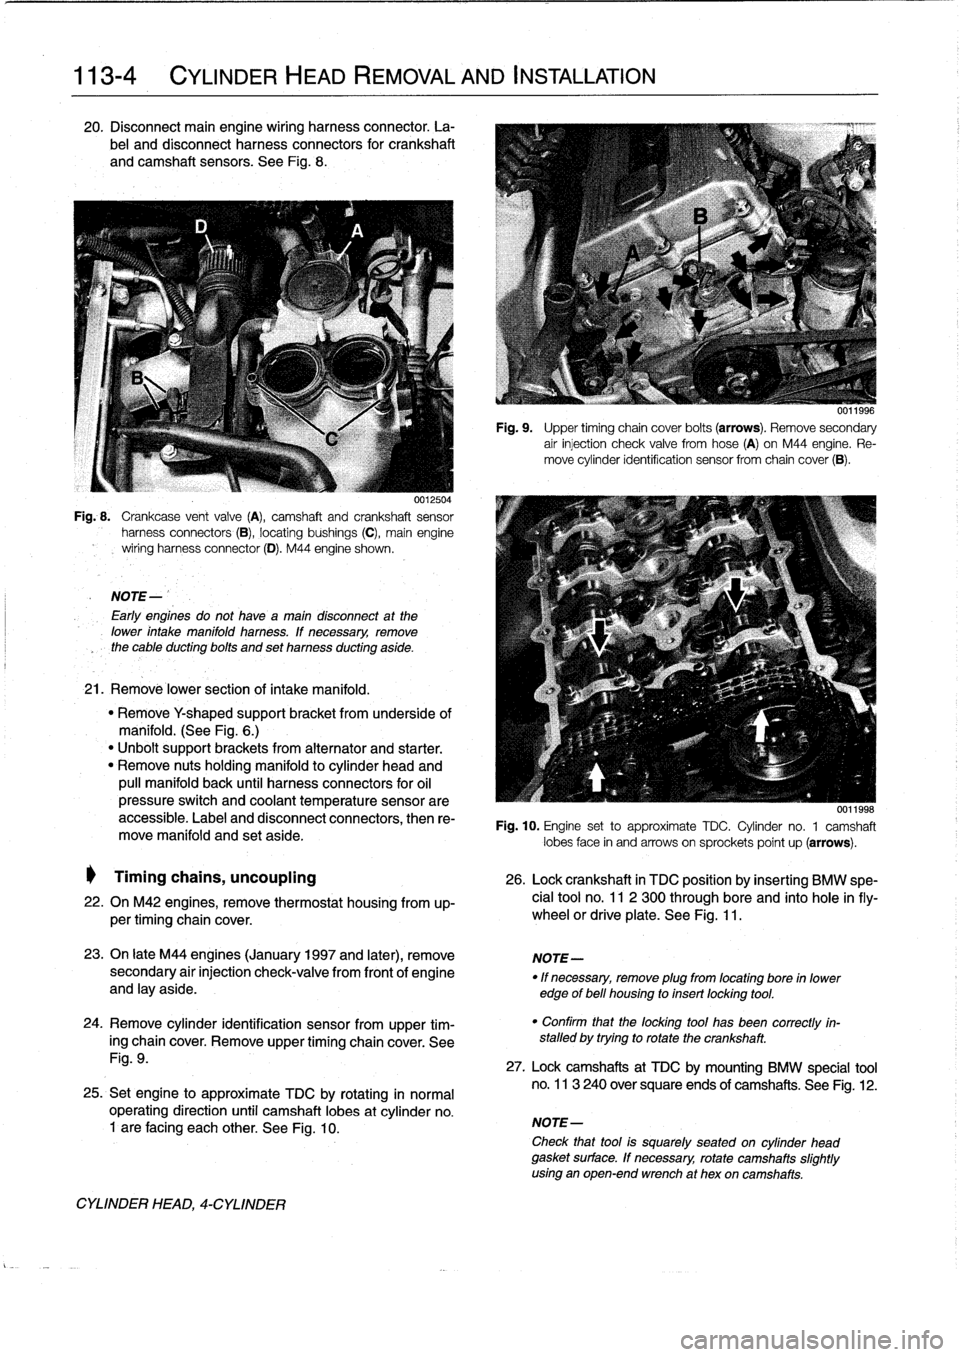
and
disconnect
harness
connectors
for
crankshaft
and
camshaft
sensors
.
See
Fig
.
8
.
0012504
Fig
..
Crankcase
vent
valve
(A),
camshaft
and
crankshaft
sensor
harness
connectors
(B),
locating
bushings
(C),
main
engine
wiring
harnessconnector
(D)
.
M44
engine
shown
.
NOTE-
Early
engines
do
not
havea
maín
disconnect
at
the
lower
intake
manifold
harness
.
lf
necessary,
remove
the
cable
ducting
bolts
and
set
harness
ducting
aside
.
21
.
Remové
lower
section
of
intake
manifold
.
"
Remove
Y
shaped
supportbracket
from
underside
of
manifold
.
(See
Fig
.
6
.)
"
Unbolt
support
brackets
from
alternator
and
starter
.
"
Remove
nuts
holding
manifold
to
cylinder
head
and
pull
manifold
back
until
harness
connectors
for
oil
pressure
switch
and
coolant
temperature
sensorare
accessible
.
Label
and
disconnect
connectors,
then
re-
move
manifold
and
set
aside
.
Timing
chains,
uncoupling
26
.
Lock
crankshaft
in
TDC
position
by
insertíng
BMW
spe-
22
.
On
M42
engines,
remove
thermostat
housing
from
up-
cial
tool
no
.
11
2
300
through
bore
and
into
hole
infly-
per
timing
chaincover
.
wheel
or
driveplate
.
See
Fig
.
11
.
23
.
On
late
M44
engines
(January
1997
and
later),
remove
NOTE-
secondary
air
injection
check-valve
from
front
of
engine
"
If
necessary,
remove
plug
from
locating
bore
in
lower
and
lay
aside
.
edge
of
bell
housing
to
insert
locking
tool
.
24
.
Remove
cylinder
identification
sensor
from
upper
tim-
ing
chaincover
.
Remove
upper
timing
chaincover
.
See
Fig
.
9
.
25
.
Set
engine
to
approximate
TDC
by
rotating
in
normal
operating
direction
until
camshaft
lobes
at
cylinder
no
.
1
are
facing
each
other
.
See
Fig
.
10
.
CYLINDER
HEAD,
4-CYLINDER
Fig
.
9
.
Upper
timing
chain
cover
bolts
(arrows)
.
Remove
secondary
air
injection
check
valve
fromhose
(A)
on
M44
engine
.
Re-
move
cylinder
identification
sensor
from
chaincover
(B)
.
0011998
Fig
.
10
.
Engine
set
to
approximate
TDC
.
Cylinder
no
.
1
camshaft
lobes
face
in
and
arrows
on
sprockets
poínt
up
(arrows)
.
"
Confirm
that
the
locking
tool
has
been
correctly
in-
stalled
by
trying
to
rotate
the
crankshaft
.
27
.
Lock
camshafts
at
TDC
by
mounting
BMW
specíal
tool
no
.
113
240
over
square
ends
of
camshafts
.
See
Fig
.
12
.
NOTE-
Check
that
tool
is
squarely
seated
on
cylinder
head
gasket
surface
.
If
necessary,
rotate
camshafts
slightly
using
an
open-end
wrench
at
hex
oncamshafts
.
Page 75 of 759
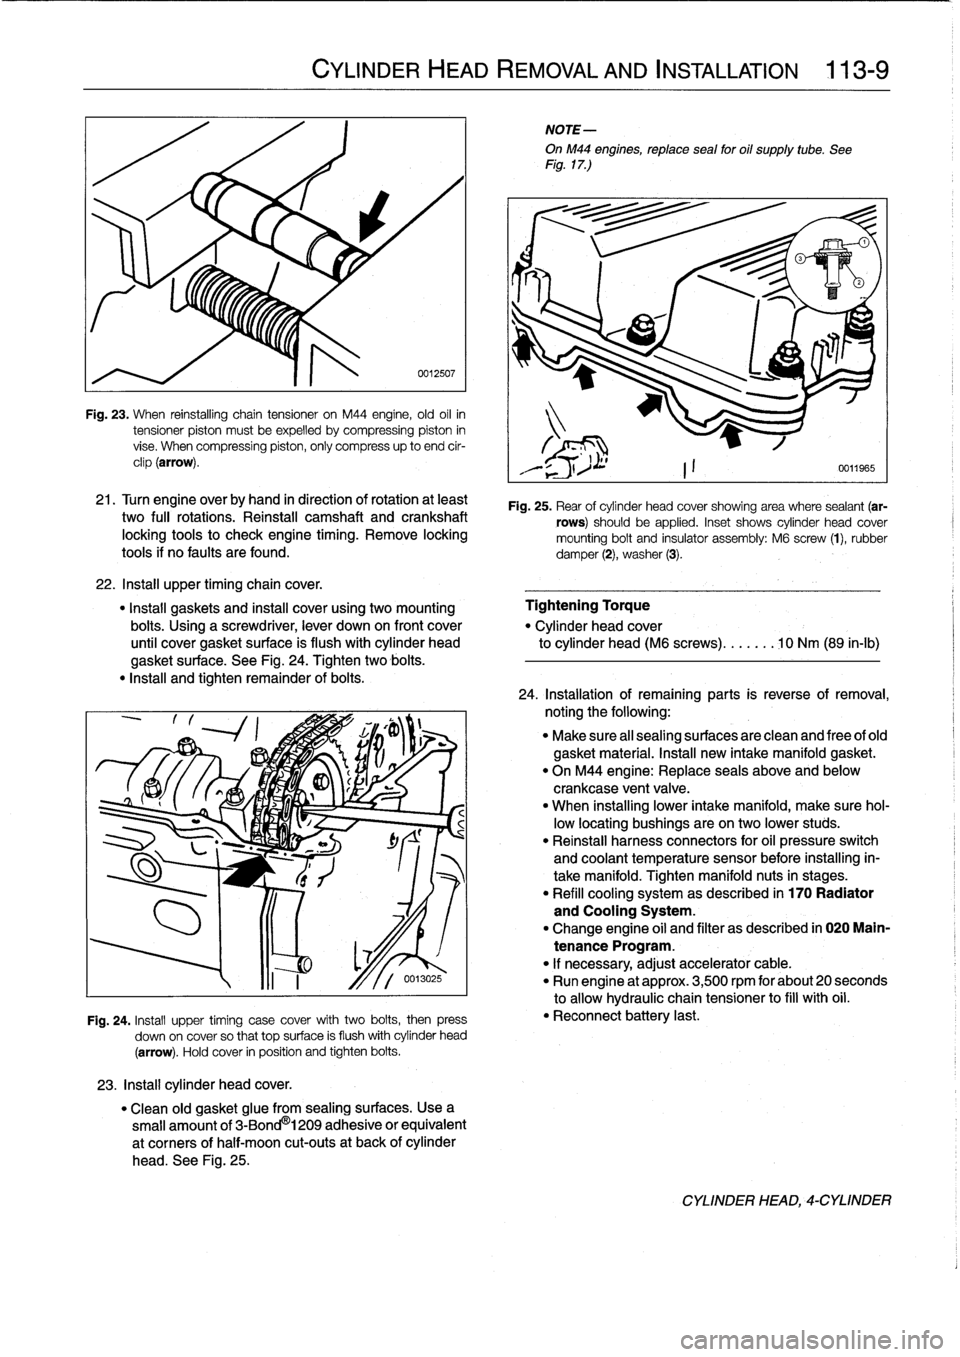
Fig
.
23
.
When
reinstalling
chain
tensioner
on
M44
engine,
old
oil
in
tensioner
piston
mustbe
expelled
bycompressing
piston
in
vise
.
When
compressing
piston,
only
compress
up
to
end
cir-
clip
(arrow)
.
21
.
Turn
engine
overby
hand
in
direction
of
rotation
at
least
two
fui¡
rotations
.
Reinstall
camshaft
and
crankshaft
locking
tools
to
check
engíne
timing
.
Remove
locking
tools
if
no
faults
are
found
.
22
.
Insta¡¡
upper
timingchain
cover
.
"
Install
gaskets
and
instan
cover
using
two
mounting
Tightening
Torque
bolts
.
Using
a
screwdriver,
lever
down
on
front
cover
"
Cylinder
head
cover
until
cover
gasket
surface
is
flush
with
cylinder
head
to
cylinder
head
(M6
screws)
.......
10
Nm
(89
in-lb)
gasket
surface
.
See
Fig
.
24
.
Tighten
two
bolis
.
"
Insta¡¡
and
tighten
remainder
of
bolis
.
23
.
Install
cylinder
head
cover
.
CYLINDER
HEAD
REMOVAL
AND
INSTALLATION
113-
9
0012507
Fig
.
24
.
Install
upper
timing
case
cover
with
two
bolis,
then
press
down
on
cover
so
that
top
surface
is
flush
withcylinder
head
(arrow)
.
Hold
cover
in
position
and
tighten
bolis
.
"
Clean
old
gasket
glue
from
sealing
surfaces
.
Usea
small
amount
of
3-Bond
®
1209
adhesive
or
equivalent
at
corners
of
half-moon
cut-outs
at
back
of
cylinder
head
.
See
Fig
.
25
.
NOTE-
OnM44
engines,
reptace
sea¡
for
oil
supply
tube
.
See
Fig
.
17
.)
Fig
.
25
.
Rear
of
cylinder
head
cover
showing
area
where
sealant
(ar-
rows)
should
be
applied
.
Inset
shows
cylinder
head
cover
mounting
bolt
and
insulator
assembly
:
M6
screw
(1),
rubber
damper
(2),
washer
(3)
.
24
.
Installation
of
remaining
parts
is
reverseofremoval,
noting
the
following
:
"
Make
sure
al¡
sealing
surfaces
are
clean
and
free
of
old
gasket
material
.
Install
new
intake
manifold
gasket
.
"
On
M44
engine
:
Replace
seals
above
and
below
crankcase
ventvalve
.
"
When
installing
lower
intake
manifold,
make
sure
hol-
low
locating
bushings
are
on
two
lower
studs
.
"
Reinstall
harness
connectors
for
oil
pressure
switch
and
coolant
temperature
sensor
before
installing
in-
take
manifold
.
Tighten
manifold
nuts
in
stages
.
"
Refill
cooling
system
as
described
in
170
Radiator
and
Cooling
System
.
"
Change
engine
oil
and
filter
as
described
in
020
Main-
tenance
Program
.
"
If
necessary,
adjust
accelerator
cable
.
"
Run
engine
at
approx
.
3,500
rpm
for
about
20
seconds
to
allow
hydraulic
chain
tensioner
to
fill
with
oil
.
"
Reconnect
battery
last
.
CYLINDER
HEAD,-CYLINDER
Page 84 of 759
113-
1
8
CYLINDER
HEAD
REMOVAL
AND
INSTALLATION
CYLINDER
HEAD,
6-CYLINDER
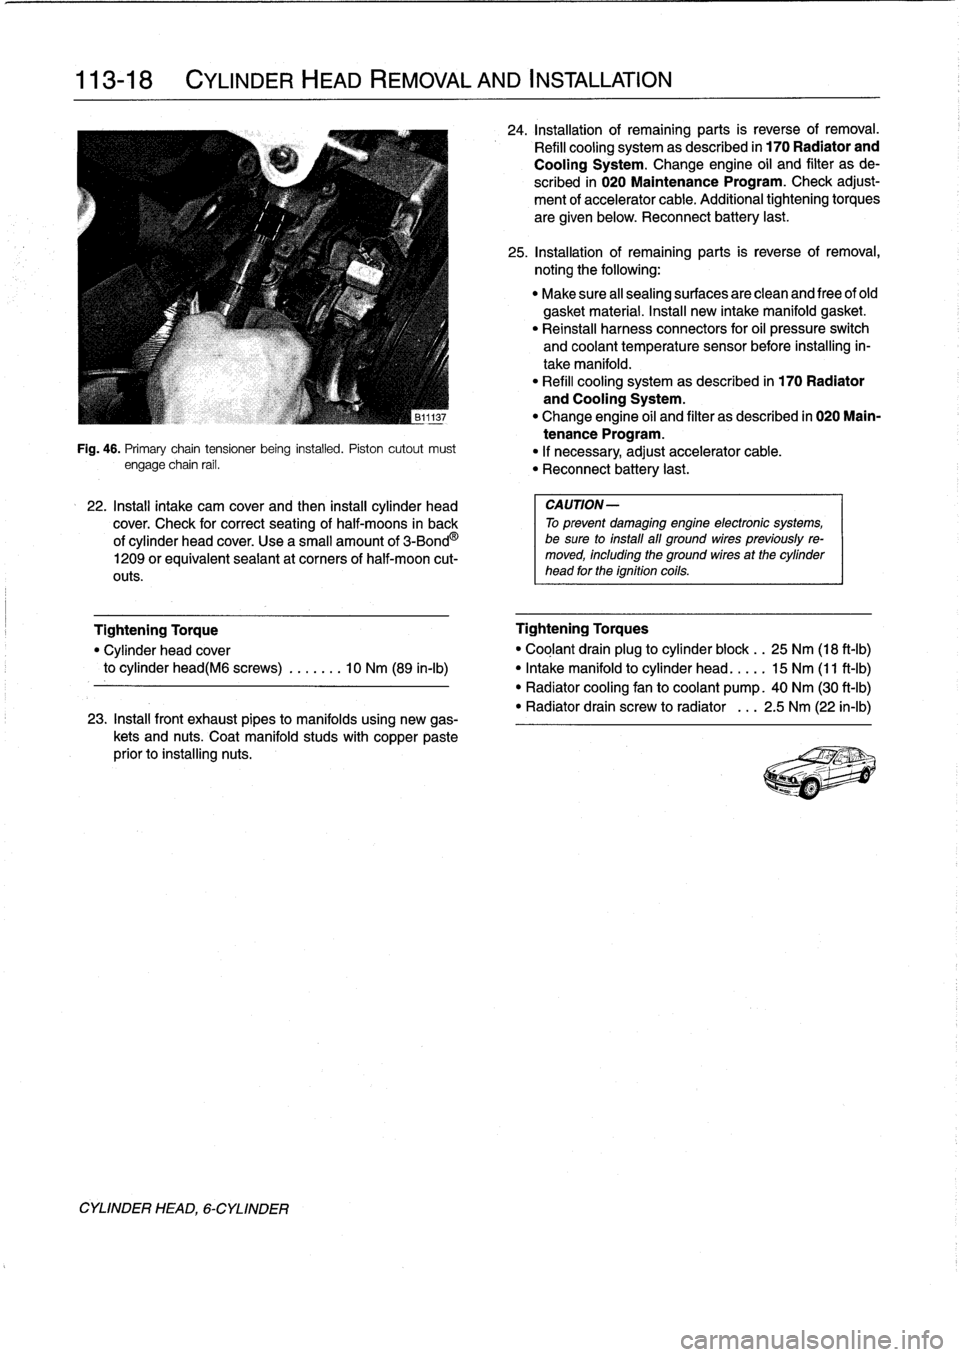
Fig
.
46
.
Primary
chaintensioner
being
installed
.
Piston
cutout
must
engage
chain
rail
.
22
.
Install
intake
cam
cover
and
then
install
cylinder
head
cover
.
Check
for
correct
seating
of
half-moons
in
back
of
cylinder
head
cover
.
Use
a
small
amount
of
3-Bond
O
1209
orequivalent
seaiant
at
corners
of
half-moon
cut-
outs
.
23
.
Install
front
exhaust
pipes
to
manifolds
using
new
gas-
kets
and
nuts
.
Coat
manifold
studs
with
copper
paste
prior
to
installing
nuts
.
24
.
Installationof
remaining
parts
is
reverse
of
removal
.
Refill
cooling
system
as
described
in
170
Radiator
and
Cooling
System
.
Change
engine
oil
and
filter
as
de
scribed
in
020
Maintenance
Program
.
Check
adjust-
ment
of
accelerator
cable
.
Additional
tightening
torques
are
given
below
.
Reconnect
battery
last
.
25
.
Installationof
remaining
parts
is
reverse
of
removal,
noting
the
following
:
"
Make
sure
all
sealing
surfaces
are
clean
and
free
of
old
gasket
material
.
Insta¡¡
new
intake
manifold
gasket
.
"
Reinstall
harness
connectors
for
oil
pressure
switch
and
coolant
temperature
sensor
before
installing
in-
take
manifold
.
"
Refill
cooling
systemas
described
in
170
Radiator
and
Cooling
System
.
"
Change
engine
oil
and
filter
as
described
in
020
Main-
tenance
Program
.
"
If
necessary,
adjust
accelerator
cable
.
"
Reconnect
battery
last
.
CAUTION-
To
prevent
damaging
engine
electronic
systems,
be
sure
to
install
all
ground
wirespreviously
re-
moved,
including
the
ground
wires
at
the
cylinder
head
for
the
ignition
coils
.
Tightening
Torque
Tightening
Torques
"
Cylinder
head
cover
"
Coglant
drain
plug
to
cylinder
block
.
.
25
Nm
(18
ft-Ib)
to
cylinder
head(M6
screws)
.
.
.....
10
Nm
(89
in-lb)
"
Intake
manifold
to
cylinder
head
.
...
.
15
Nm
(11
ft-Ib)
"
Radiator
cooling
fan
to
coolant
pump
.
40
Nm
(30
ft-Ib)
"
Radiator
drain
screw
to
radiator
.
..
2
.5
Nm
(22
in-lb)
Page 110 of 759
117-
1
4
CAMSHAFT
TIMING
CHAIN
22
.
Installation
of
remaining
parts
is
reverse
of
removal,
When
theengine
is
running,
the
piston
housing
is
supplied
noting
the
following
:
with
pressurized
engine
oil
.
At
idie,
the
solenoid
isin
the
off
"
When
installing
thermostat,
make
sure
arrow
or
vent
position
(de-energized)
and
valve
timing
is
maintained
in
the
hole
faces
up,
if
applicable
.
normal
position
:
When
the
solenoid
is
energized,
the
gear
cup
"
Refill
cooling
systemas
described
in
170
Radiator
piston
moves
forward
to
advance
the
camshaftby
a
maximum
and
Coming
System
.
of
12
.5
.
"
Install
oil
pan
as
described
in
119
Lubrication
Sys-
tem
.
"
Fill
engine
with
oil
and
install
a
new
oil
filter
as
de-
scribed
in
020
Maintenance
Program
.
"
Insta¡¡
ground
wires
at
cylinder
head
cover
mounting
studs
and
at
front
of
cylinder
head
and
thermostat
housing,
where
applicable
.
VANOS
system
operation,
testing
Tightening
Torques
There
are3
special
tools
required
to
check
VANOS
opera-
"
Coolant
drain
plugto
cylinder
block
.
.
25
Nm
(18
ft-Ib)
tion
;
an
electricaltest
lead
(BMW
special
tool
no
.
12
6
410),
an
"
Radiator
cooling
fan
to
coolant
pump
.
40
Nm
(30
ft-Ib)
air
line
fitting
(BMW
special
tool
no
.
11
3
450),
and
a
crank-
"
Radiator
drain
screw
to
radiator
...
.
2
.5
Nm
(22
in-Ib)
shaft
TDC
locking
tool
(BMW
special
tool
no
.
112
300)
.
"
Upper
timing
chaincover
to
cylinder
head
The
test
leal
is
used
to
power
the
solenoid,
simulating
the
M6
nut
...
.....
.............
..
.
10
Nm
(89
in-lb)
ground
signal
from
the
DME
control
unit
.
The
air
line
fitting
M8
bolt
.....
....
.
.
.............
22
Nm
(17
ft-Ib)
takes
the
place
of
the
oil
supply
line
fitting
to
simulate
oil
Ares-
"
VANOS
control
unit
to
cylinder
head
sure
.
The
locking
tool
positions
and
locks
the
crankshaft
at
M6
nut
.........
..
..
.
..........
10
Nm
(89
in-lb)
TDC,
cylinder
no
.
l.
M8
bolt
........
...
.............
22
Nm
(17
ft-Ib)
"
VANOS
oil
supply
pipe
to
VANOS
control
unit
1
.
Remove
alternator
cooling
air
duct
.
banjo
bolt
.......
..
..
.
..........
32
Nm
(24
ft-Ib)
VANOS
(VARIABLE
VALVE
TIMING)
3
.
Remove
top
plastic
enginecovers
.
Disconnect
ignition
coil
harness
connectors
fromcofs
.
Remove
ignition
1993
and
later
6-cylinder
engines
are
equipped
with
a
vari-
coils
.
able
valve
timing
system
called
VANOS
.
This
system
is
con-
trolled
by
the
engine
management
system
and
dynamically
4
.
Remove
cylinder
head
cover
mounting
bolts
and
re-
adjusts
intake
camshaft
timing
based
on
engine
load,
engine
move
cylinder
head
cover
.
Unclip
andremove
oil
baffle
speed
and
engine
temperature
.
cover
from
above
intake
camshaft
.
See
113
Cylinder
Head
Removal
and
installation
.
The
main
components
of
the
VANOS
system
are
the
control
unit
with
piston
housing
and
integral
spool
valve,
and
the
mod-
ified
intake
camshaft
.
See
Fig
.
35
.
VANOS
(VARIABLE
VA
LVE
TIMING)
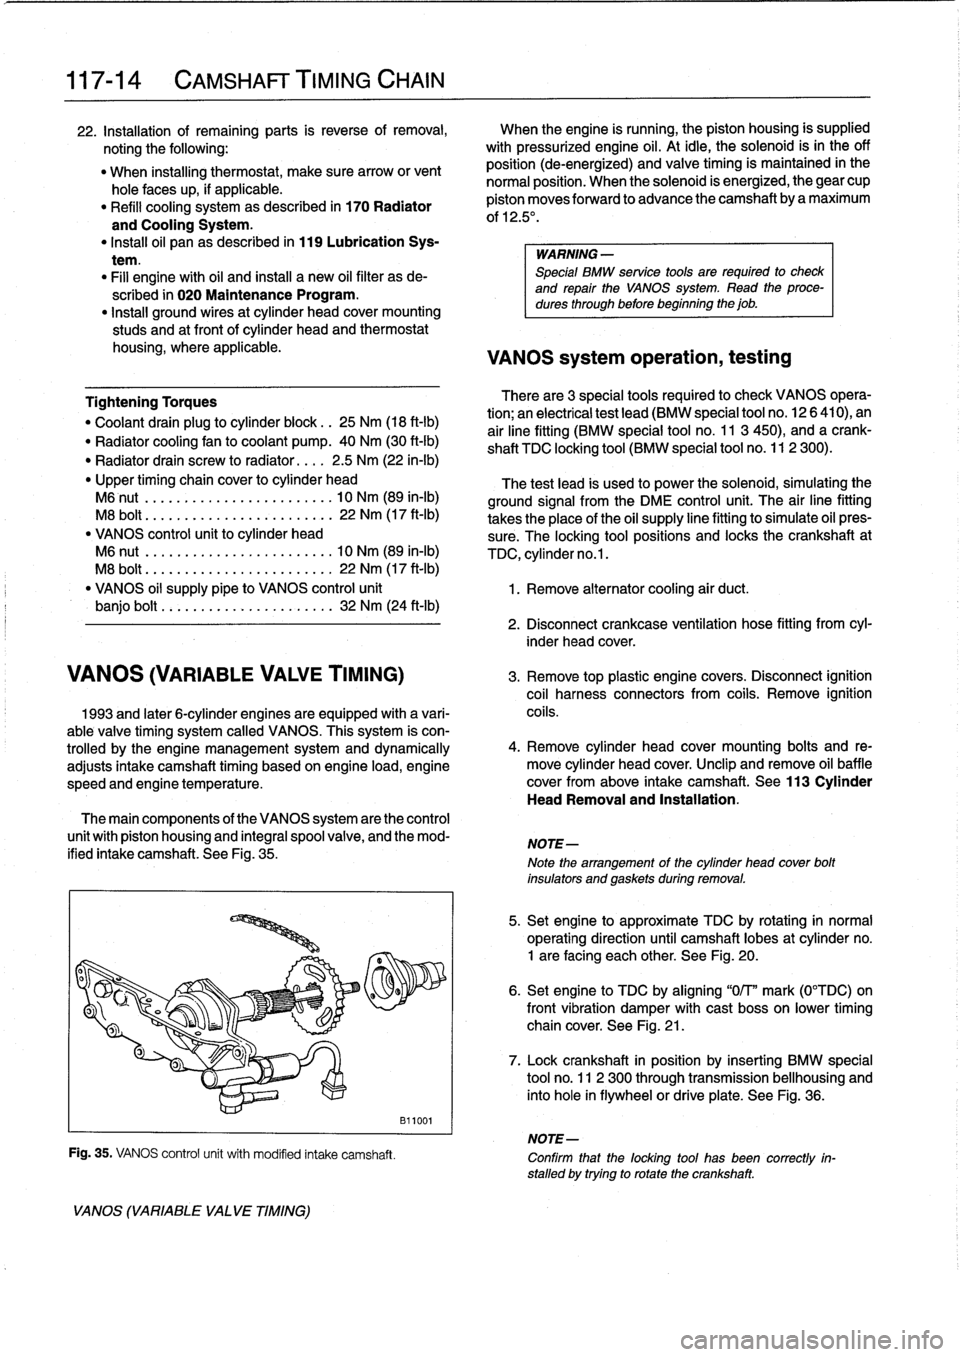
Fig
.
35
.
VANOS
control
unit
with
modified
intake
camshaft
.
B11001
WARNING
-
Special
BMW
service
tools
are
required
to
check
and
repair
the
VANOS
System
.
Read
theproce-
dures
through
before
beginning
the
job
.
2
.
Disconnect
crankcase
ventilation
hose
fitting
from
cyl-
inder
head
cover
.
NOTE-
Note
the
arrangement
of
the
cylinder
head
cover
bolt
insulators
and
gaskets
during
removal
.
5
.
Set
engine
to
approximate
TDC
by
rotating
in
normal
operating
direction
until
camshaft
lobes
at
cylinder
no
.
1
are
facing
each
other
.
See
Fig
.
20
.
6
.
Set
engine
to
TDC
by
aligning
"0/T"
mark
(0°TDC)on
front
vibration
damper
withcast
boss
on
lower
timing
chain
cover
.
See
Fig
.
21
.
7
.
Lock
crankshaft
in
position
by
inserting
BMW
special
tool
no
.
11
2
300
through
transmission
bellhousing
and
into
hole
in
flywheelor
driveplate
.
See
Fig
.
36
.
NOTE-
Confirm
that
the
locking
tool
has
been
correctly
in-
stalled
by
trying
to
rotatethe
crankshaft
.
Page 116 of 759
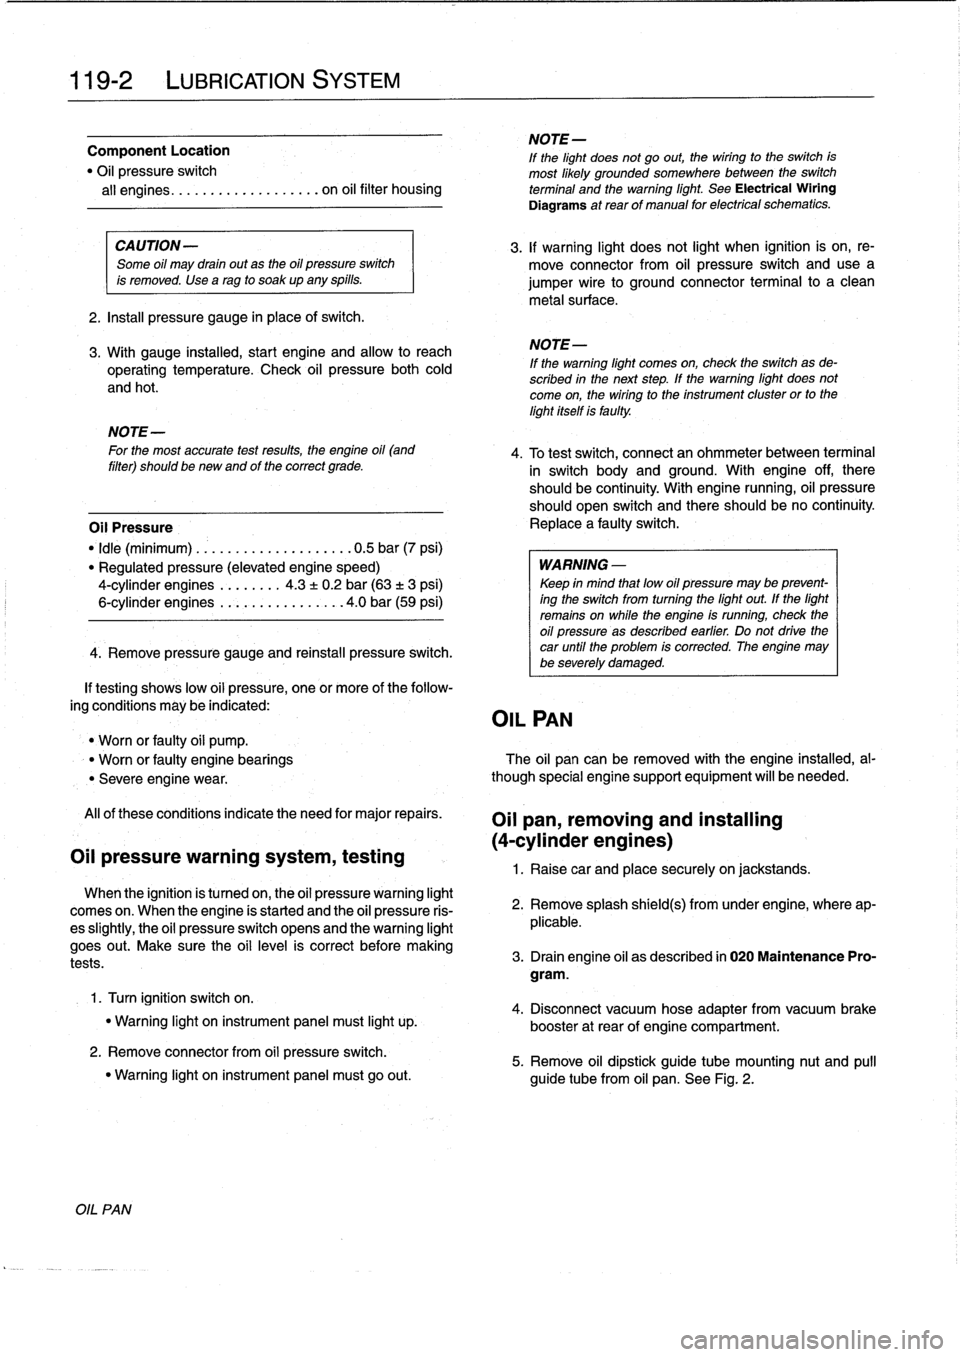
119-2
LUBRICATION
SYSTEM
NOTE-
Component
Location
If
the
light
does
not
go
out,
thewiring
to
theswitch
is"
Oil
pressure
switch
most
likely
grounded
somewhere
between
the
switch
all
engines
.......
...
.
..
......
ora
oil
filter
housing
terminal
and
the
warning
light
.
Sea
Electrical
Wiring
Diagrams
atrearof
manual
for
electrical
schematics
.
CAUTION-
Some
oil
may
drain
out
as
the
oil
pressure
switch
is
removed
.
Use
a
rag
to
soak
up
any
spills
.
2
.
Install
pressure
gauge
in
place
of
switch
.
3
.
With
gauge
instalied,
start
engine
and
allow
to
reach
operating
temperature
.
Check
oil
pressureboth
cold
and
hot
.
NOTE-
For
the
most
accurate
test
results,
the
engine
oil
(and
filter)
shouldbe
newand
of
the
correct
grade
.
Oil
Pressure
"
¡dle
(mínimum)
..
.
.
..............
.
.
0
.5
bar
(7psi)
"
Regulated
pressure
(elevated
engine
speed)
4-cylinder
engines
..
......
4
.3
±
0
.2
bar
(63
t3
psi)
6-cylinder
engines
.
.
.............
.
4
.0
bar
(59
psi)
4
.
Remove
pressure
gauge
and
reinstall
pressure
switch
.
If
testing
shows
low
oil
pressure,
one
or
more
of
the
follow-
ing
conditions
may
be
indicated
:
OIL
PAN
"
Worn
or
faulty
oii
pump
.
"
Worn
or
faulty
engine
bearings
The
oil
pancan
be
removed
with
the
engine
instalied,
al-
Severe
engine
wear
.
though
specíal
enginesupport
equipment
will
be
needed
.
Al¡
of
these
conditionsindicate
the
need
for
major
repairs
.
Oil
pressure
warning
system,
testing
When
the
ignition
is
tumed
ora,
the
oil
pressure
warning
light
comes
ora
.
When
the
engine
ís
started
and
the
oil
pressure
ris-
es
slightly,
the
oil
pressure
switch
opens
and
thewarning
light
goes
out
.
Make
sure
the
oil
leve¡
is
correct
before
making
tests
.
1
.
Turra
ignition
switch
ora
.
"
Warning
light
ora
instrument
panel
must
light
up
.
2
.
Remove
connector
from
oil
pressure
switch
.
"
Warning
light
ora
instrument
panel
must
go
out
.
OIL
PAN
3
.
If
warning
light
does
not
light
when
ignition
is
ora,
re-
move
connector
from
oil
pressure
switch
anduse
a
jumper
wire
to
ground
connector
terminal
to
a
clean
metal
surface
.
NOTE
-
If
the
warning
light
comes
ora,
check
the
switch
as
de-
scríbed
in
the
nextstep
.
If
the
warning
light
does
not
come
ora,
thewiring
to
the
instrument
cluster
or
to
the
light
itself
isfaulty
.
4
.
To
test
switch,
connect
ara
ohmmeter
between
terminal
in
switch
body
and
ground
.
With
engine
off,
these
should
be
continuity
.
With
engine
running,
oil
pressure
should
opera
switch
and
there
should
beno
continuity
Replace
a
faulty
switch
.
WARNING
-
Keep
in
mind
that
low
oil
pressure
may
be
prevent-
ing
the
switch
from
tuming
the
light
out
.
If
the
light
remains
ora
while
the
engine
is
running,
check
the
oil
pressure
asdescribed
earlier
.
Do
not
drive
the
car
until
the
problem
is
corrected
.
Theengine
may
be
severely
damaged
.
Oil
pan,
removing
and
installing
(4-cylinder
engines)
1
.
Raise
car
arad
place
securely
ora
jackstands
.
2
.
Remove
splash
shíeld(s)
from
under
engine,
where
ap-
plicable
.
3
.
Drain
engine
oil
as
described
in
020
Maintenance
Pro-
gram
.
4
.
Disconnect
vacuum
hose
adapter
from
vacuum
brake
booster
at
rear
of
engine
compartment
.
5
.
Remove
oil
dipstick
guide
tube
mounting
nut
and
pull
guide
tube
from
oil
pan
.
See
Fig
.
2
.
Page 125 of 759
GENERAL
.
........
.
...........
.
.
.
.
.
.
.
120-1
Camshaft
Position
(CMP)
Sensor
....
.
.
.
...
120-6
Disabling
Ignition
System
.
.
.
.
.....
.
.
.
.
.
.
.
120-2
Camshaft
position
(CMP)
sensor,
replacing
Warnings
and
Cautions
.
.
.
.
.
.
.....
.
.
.
.
.
.
.
120-2
(4-cylinder
engine)
..
.
.
.
.
.
.
.
.
.
.
.
.
.
.
.
...
120-6
Camshaft
position
(CMP)
sensor,
replacing
IGNITION
SYSTEM
DIAGNOSTICS
.
.
.
.
.
.
120-3
(6-cylinder
engine)
..
.
.
.
.
.
.
.
.
.
.
.
.
.
.
.
.
.
.
120-7
Basic
Troubleshooting
Principles
...
.
.
.
.
.
.
.
120-3
Knock
sensors,
replacing
.
.
...
.
.
.
.
.
.
.
.
.
.
.
.
120-7
Ignition
Firing
Order
.....
.
...
.
.
.
.....
.
.
.
.120-7
IGNITION
SYSTEM
SERVICE
.
.........
.
120-3
Checking
for
Spark
..
.
.
.
.
.
.
.
.
.
.......
.
.
.
120-3
Ignition
coil,
testing
and
replacing
(4-cylinder
engine)
.
.
.
.
.
.
.
.
.
.
.........
.
120-3
Ignition
coil,
testing
and
replacing
(6-cylinder
engine)
.........
.
..........
120-4
Crankshaft
Positionlrpm
Sensor
.......
.
...
120-5
Crankshaft
position/rpm
sensor,
testing
and
replacing
(front
mounted)
.........
.
.
.
.
.
.
120-6
Crankshaft
position/rpm
sensor,replacing
(rear
mounted)
.....
.
.....
.
.....
.
.
.
.
.
.
120-6
GENERAL
Troubleshooting
and
testing
of
the
engine
management
system
should
be
carried
out
using
the
BMW
specialized
ser
This
repair
group
covers
repair
andcomponent
replace-
vice
tester
(scan
tool)
.
ment
information
for
the
ignition
system
.
All
engines
use
a
distributorless
ignition
system
with
indívid-
ual
ignitioncoils
for
each
cylinder
.
There
is
no
distributor
cap
NOTE-
or
ignition
rotor
.
Each
coil
can
be
selectively
controlled
by
the
"
Spark
plug
replacement
is
covered
in
020
Mainte-
engine
control
module
on
a
cylinder-by-cylinder
basis
.
On
later
nance
Program
.
systems,
knock
sensors
are
used
to
monitor
and
control
igni-
"
For
fuel
related
troubleshooting
and
testing,
see
130
tion
knock
(ping)
and
adjusttiming
accordingly
.
Fuel
lnjection
.
Ignition
timing
is
electronically
controlled
and
not
adjust-
All
engines
covered
by
this
manual
use
an
advanced
en-
able
.
The
engine
control
module
(ECM)
usesengine
load,
en-
gine
management
system
.
The
engine
management
system
gine
speed,
coolant
temperature,
and
intake
air
temperature
incorporates
on-board
diagnostics,
fuel
injection,
ignition
and
as
the
basic
inputs
for
timing
control
.
Knock
detection
is
also
other
advanced
engine
control
functions
.
an
input
to
the
control
module,
where
applicable
.
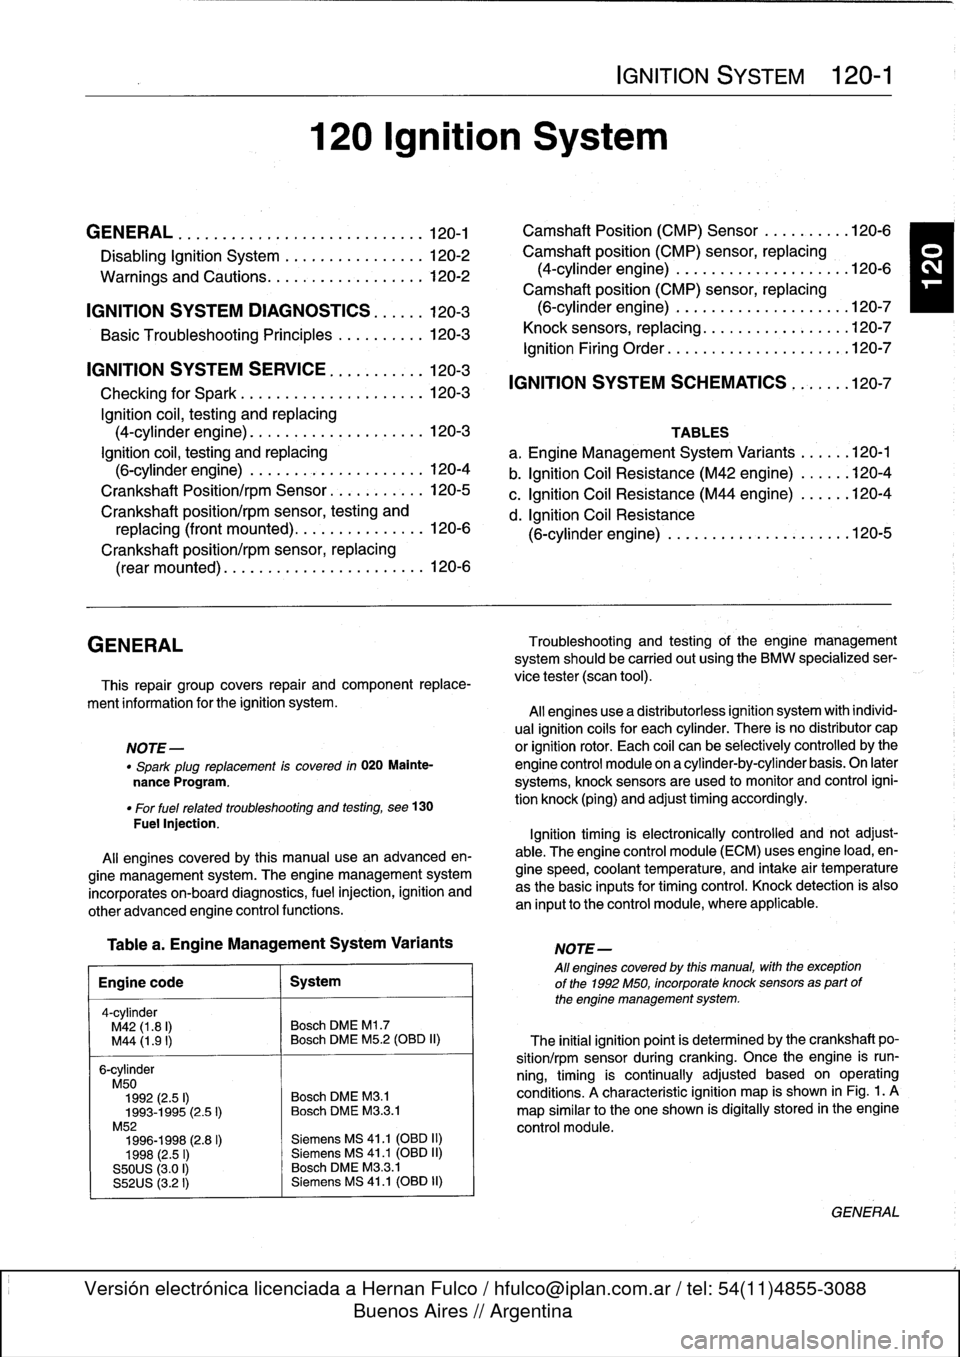
Table
a
.
Engine
Management
System
Variants
Engine
code
1
System
4-cylinder
M42
(1.8
I)
Bosch
DME
Ml
.7
M44
(1
.9
I)
Bosch
DME
M5
.2
(OBD
II)
6-cylinder
M50
1992
(2.5
I)
Bosch
DME
M8
.1
1993-1995
(2
.5
I)
Bosch
DME
M33
.1
M52
1996-1998
(2.8
I)
Siemens
MS
41
.1
(OBD
II)
1998
(2
.5
I)
Siemens
MS
41
.1
(013D
11)
S50US
(3.0
I)
Bosch
DME
M3
.3.1
S52US
(3.2
I)
Siemens
MS
41
.1
(OBD
II)
120
Ignition
System
IGNITION
SYSTEM
120-1
IGNITION
SYSTEM
SCHEMATICS
...
.
.
.
.120-7
TABLES
a
.
Engine
Management
System
Variants
......
120-1
b
.
Ignition
Coil
Resistance
(M42
engine)
......
120-4
c
.
Ignition
Coil
Resistance
(M44
engine)
......
120-4
d
.
Ignition
Coil
Resistance
(6-cylinder
engine)
..
.
.
.
.
.
.
.
.
.
.
.
.....
.
..
120-5
NOTE-
All
engines
coveredby
this
manual,
with
theexception
of
the
1992
M50,
incorporate
knocksensors
as
part
of
the
engine
management
system
.
The
initial
ignition
point
is
determined
by
the
crankshaft
po-
sition/rpm
sensor
during
cranking
.
Once
the
engine
is
run-
ning,
timing
is
continually
adjusted
based
on
operating
conditions
.
A
characteristic
ignition
map
is
shown
in
Fig
.
1
.
A
map
similar
to
the
one
shown
is
digitally
stored
in
the
engine
control
module
.
GENERAL
Page 168 of 759
130-
2
2
FUEL
INJECTION
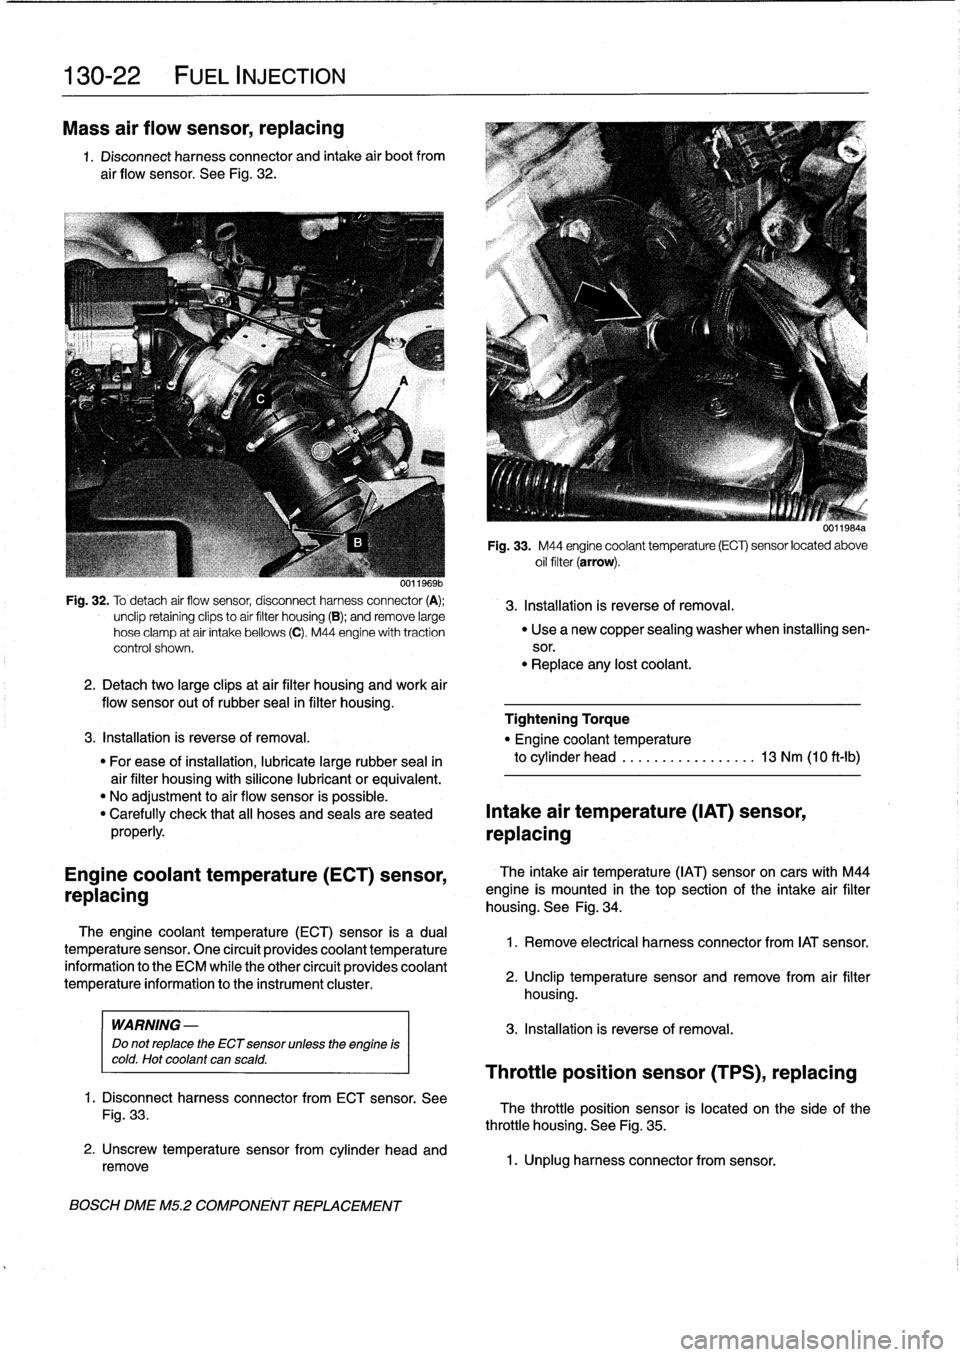
Mass
air
flow
sensor,
replacing
1
.
Disconnect
harness
connector
and
intake
air
bootfrom
air
flow
sensor
.
See
Fig
.
32
.
Fig
.
32
.
To
detach
air
flow
sensor,
disconnect
harness
connector
(A)
;
3
.
Installation
is
reverse
of
removal
.
unclip
retainíng
clips
to
aír
filter
housing
(B)
;
andremove
large
hose
clamp
at
air
intake
bellows
(C)
.
M44
engine
with
traction
"
Use
a
new
copper
sealing
washer
when
installing
sen-
control
shown
.
sor
.
"
Replace
any
lost
coolant
.
2
.
Detachtwo
large
clipsat
air
filter
housing
and
work
air
flow
sensor
out
of
rubber
seal
in
filter
housing
.
Tightening
Torque
3
.
Installation
is
reverse
of
removal
.
"
Engine
coolant
temperature
"
For
ease
of
installation,
lubricate
large
rubber
seal
in
to
cylinder
head
.............
.
..
.
13
Nm
(10
ft-Ib)
air
filter
housing
with
silicone
lubricant
or
equivalent
.
"
No
adjustment
to
air
flow
sensor
is
possible
.
"
Carefully
check
that
all
hoses
and
seals
are
seated
Intake
air
temperature
(IAT)
sensor,
properly
.
replacing
Engine
coolant
temperature
(ECT)
sensor,
replacing
The
engine
coolant
temperature
(ECT)sensor
is
a
dual
temperature
sensor
.
One
circuít
provides
coolant
temperature
information
to
the
ECM
while
the
other
circuít
provides
coolant
temperature
information
to
the
instrument
cluster
.
WARNING
-
Do
not
replace
the
ECT
sensor
unless
the
engine
is
cold
.
Hot
coolant
can
scald
.
1
.
Disconnect
harness
connector
from
ECT
sensor
.
See
Fig
.
33
.
2
.
Unscrew
temperature
sensorfrom
cylinder
head
and
remove
BOSCH
DME
M5
.2
COMPONENT
REPLACEMENT
U1111
bis4a
Fig
.
33
.
M44
engine
coolant
temperature
(ECT)
sensor
located
above
oil
filter
(arrow)
.
The
intake
air
temperature
(IAT)
sensoron
cars
with
M44
engine
is
mounted
in
thetop
section
of
the
intake
air
filter
housing
.
See
Fig
.
34
.
1
.
Remove
electrical
harness
connector
from
IAT
sensor
.
2
.
Unclip
temperature
sensor
and
remove
from
air
filter
housing
.
3
.
Installation
is
reverse
of
removal
.
Throttle
position
sensor
(TPS),
replacing
The
throttle
position
sensor
is
located
on
the
side
of
the
throttle
housing
.
See
Fig
.
35
.
1
.
Unplug
harness
connector
from
sensor
.
Page 174 of 759
130-
2
8
FUEL
INJECTION
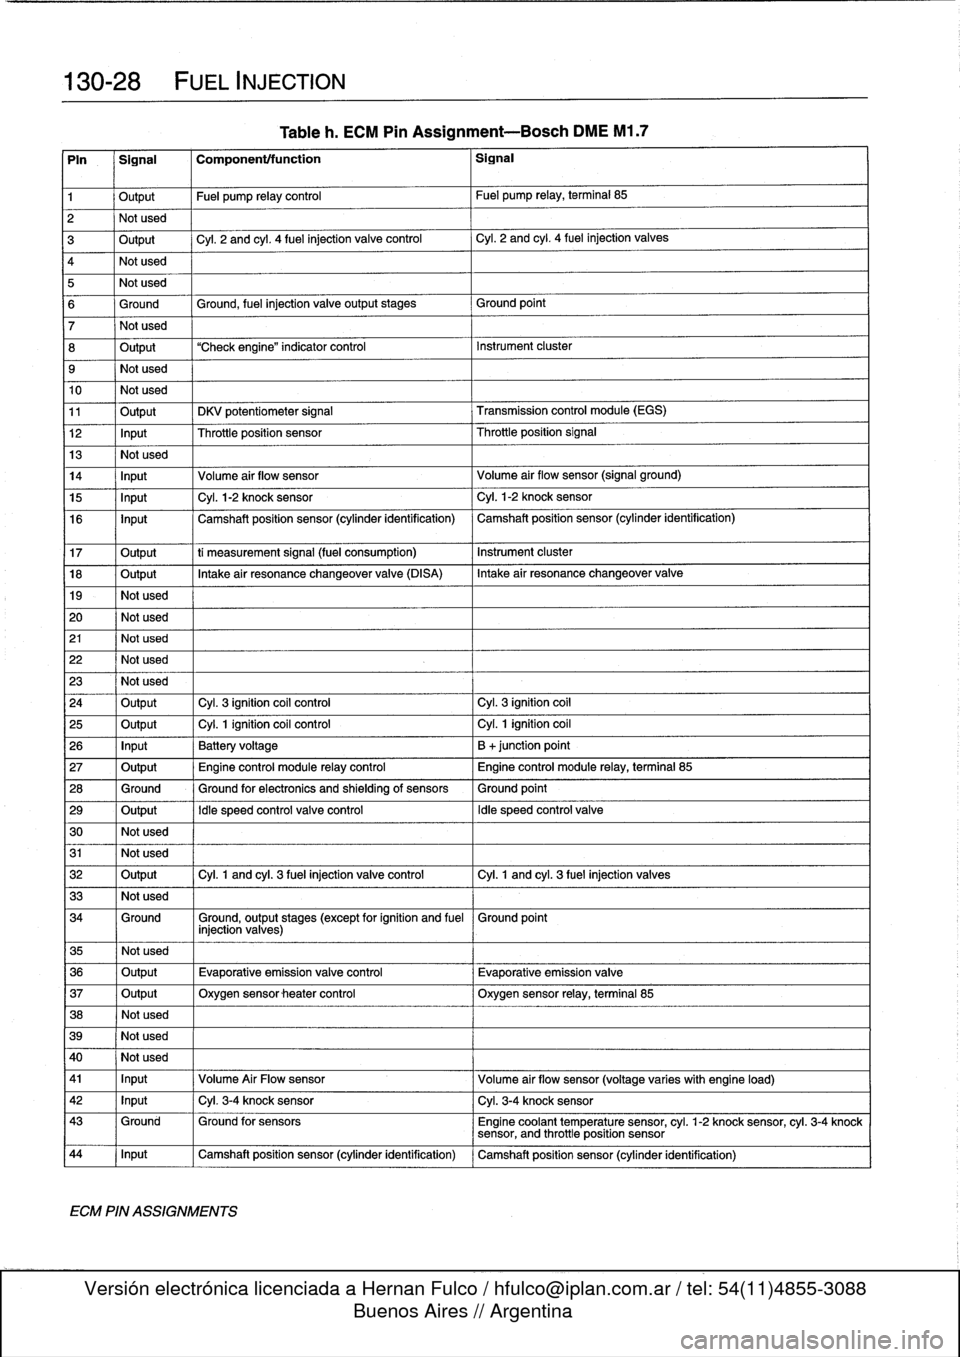
Tableh
.
ECM
Pin
Assignment-Bosch
DME
M1
.7
Pin
Signal
Componenttfunction
Signal
1
Output
Fuel
pump
relay
control
Fuel
pump
relay,
terminal
85
2
Not
used
3
Output
Cyl
.
2
and
cyl
.
4
fuel
injection
valve
control
Cyl
.
2
and
cyl
.
4
fuel
injection
valves
4
Not
used
5
Not
used
6
Ground
Ground,
fuel
injection
valveoutputstages
Ground
point
7
Not
used
8
Output
"Check
engine"
indicator
control
Instrument
cluster
9
Not
used
10
Not
used
11
Output
DKV
potentiometer
signal
Transmission
control
module
(EGS)
12
Input
Throttleposition
sensor
Throttleposition
Signal
13
Not
used
14
Input
Volume
air
flow
sensor
Volume
air
flow
sensor
(signal
ground)
15
Input
Cyl
.
1-2
knock
sensor
Cyl
.
1-2
knock
sensor
16
Input
Camshaft
position
sensor
(cylinder
identification)
Camshaft
position
sensor
(cylinder
identification)
17
Output
ti
measurement
signal
(fuel
consumption)
Instrument
cluster
18
Output
Intakeair
resonance
changeover
valve
(DISA)
Intake
air
resonance
changeover
valve
19
-
Not
used
20
Not
used
21
Not
used
22
Not
used
23
Not
used
24
Output
Cyl
.
3
ignition
coil
control
Cyl
.
3
ignition
coil
25
Output
Cyl
.
1
ignition
coil
control
Cyl
.
1
ignition
coil
26
Input
Battery
voltage
B
+junction
point
27
Output
Engine
control
module
relay
control
Engine
control
module
relay,
terminal
85
28
Ground
Ground
for
electronics
and
shielding
of
sensors
Ground
point
29
Output
Idle
speed
control
valve
control
Idle
speed
control
valve
30
Not
used
31
Not
used
32
Output
Cyl
.
1
and
cyl
.
3
fuel
injection
valve
control
Cyl
.
1
and
cyl
.
3
fuel
injection
valves
33
Not
used
34
Ground
Ground,
output
stages
(except
for
ignition
and
fuel
Ground
point
injection
valves)
35
Not
used
36
Output
Evaporative
emissionvalve
control
Evaporative
emission
valve
37
Output
Oxygen
sensor
heater
control
Oxygen
sensor
relay,
terminal
85
38
Not
used
39
Not
used
40
I
Not
used
41
I
Input
,
Volume
Air
Flow
sensor
Volume
air
flow
sensor
(voltage
varies
with
engine
load)
42
1
Input
1
Cyl
.
3-4
knock
sensor
1
Cyl
.
3-4
knock
sensor
43
Ground
Ground
for
sensors
Engine
coolant
temperature
sensor,
cyl
.
1-2
knock
sensor,
cyl
.
3-4
knock
sensor,
and
throttle
position
sensor
44
1
Input
1
Camshaft
position
sensor
(cylinder
identification)
1
Camshaft
position
sensor
(cylinder
identification)
ECM
PIN
ASSIGNMENTS
Page 175 of 759
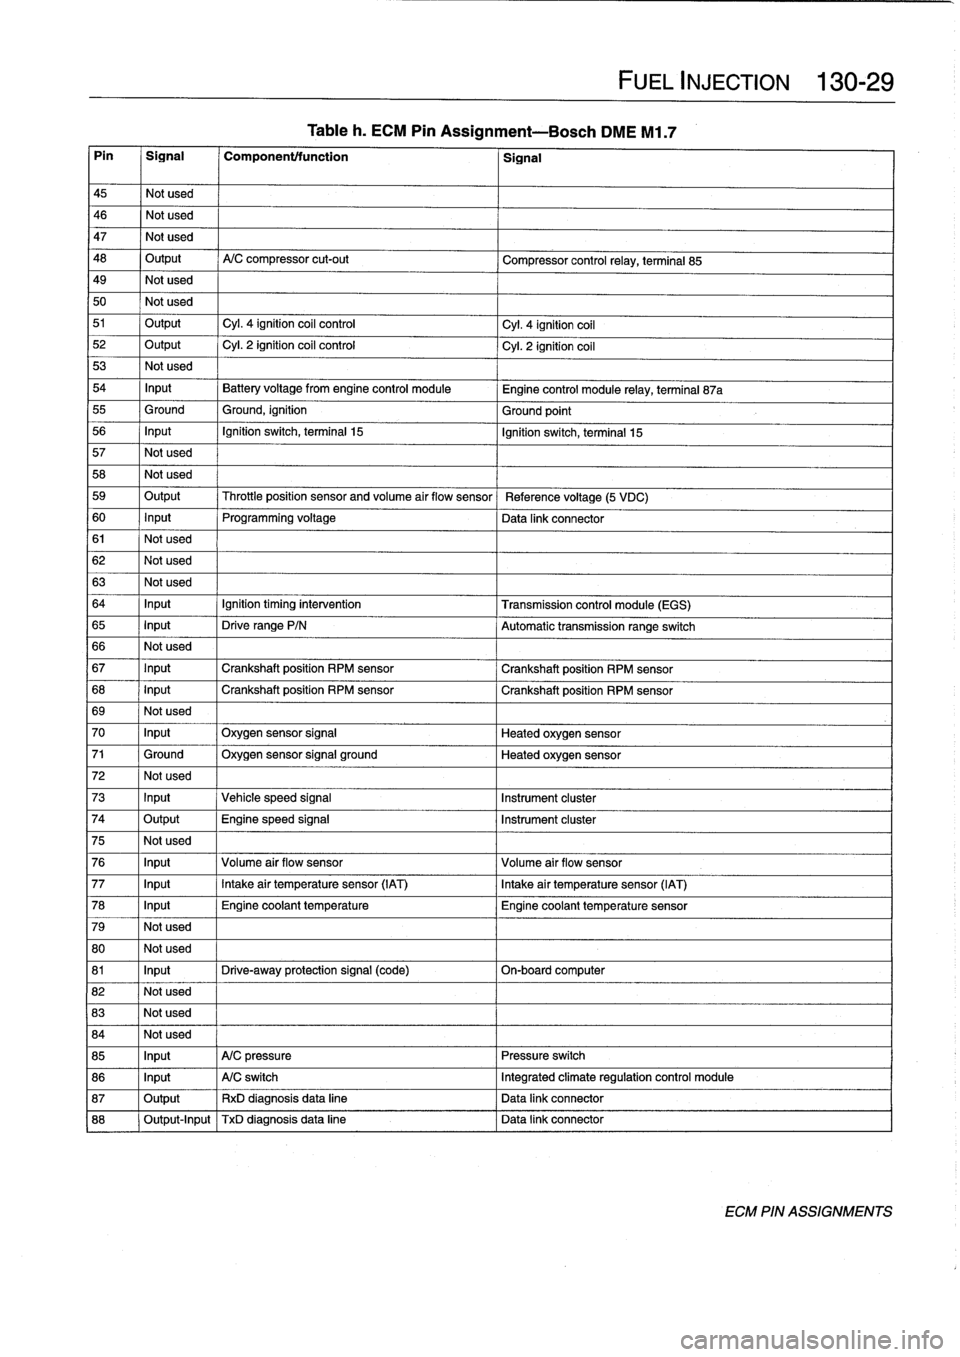
Tableh
.
ECM
Pin
Assignment--Bosch
DME
M1
.7
Pin
1
Signal
1
Component/function
1
Signal
45
Notused
46
Notused
47
Notused
48
Output
A/C
compressor
cut-out
Compressor
control
relay,
terminal
85
49
Notused
50
Notused
51
Output
Cyl
.
4
ignition
coil
control
Cyl
.
4
ignition
coil
52
Output
Cyl
.
2
ignition
coil
control
Cyl
.
2
ignition
coil
53
Not
used
54
Input
Battery
voltage
from
engine
control
module
Engine
control
module
relay,
terminal
87a
55
Ground
Ground,
ignition
Ground
point
56
Input
Ignition
switch,
terminal
15
Ignition
switch,
terminal
15
57
Notused
58
Not
used
59
Output
Throttleposition
sensor
and
volume
air
flow
sensor
Reference
voltage
(5
VDC)
60
Input
Programming
voltage
Data
link
connector
61
Notused
62
Notused
63
Notused
64
Input
Ignition
timing
intervention
Transmission
control
module
(EGS)
65
Input
Drive
range
P/N
Automatic
transmission
range
switch
66
Notused
67
Input
Crankshaft
position
RPM
sensor
Crankshaft
position
RPM
sensor
68
Input
Crankshaft
position
RPM
sensor
Crankshaft
position
RPM
sensor
69
Notused
70
Input
Oxygen
sensor
signal
Heated
oxygen
sensor
71
Ground
Oxygen
sensor
signal
ground
Heated
oxygen
sensor
72
Notused
73
Input
Vehicle
speed
signal
Instrument
cluster
74
Output
Engine
speed
signal
Instrument
cluster
75
Not
used
76
Input
Volume
air
flow
sensor
Volume
air
flow
sensor
77
Input
Intake
air
temperature
sensor
(IAT)
Intake
air
temperature
sensor
(IAT)
78
Input
Engine
coolant
temperature
Engine
coolant
temperature
sensor
79
Notused
80
Not
used
81
Input
Drive-away
protection
signal
(code)
On-boardcomputer
82
Not
used
83
Notused
84
Not
used
85
Input
A/C
pressure
Pressure
switch
86
Input
A/C
switch
Integrated
climate
regulation
control
module
87
Output
RxD
diagnosisdata
line
Data
link
connector
88
Output-Input
TxD
diagnosisdata
line
l
Data
link
connector
FUEL
INJECTION
130-
2
9
ECM
PIN
ASSIGNMENTS
Page 176 of 759
130-
3
0
FUEL
INJECTION
Pin
Signal
Component/function
Signal
ECM
PIN
ASSIGNMENTS
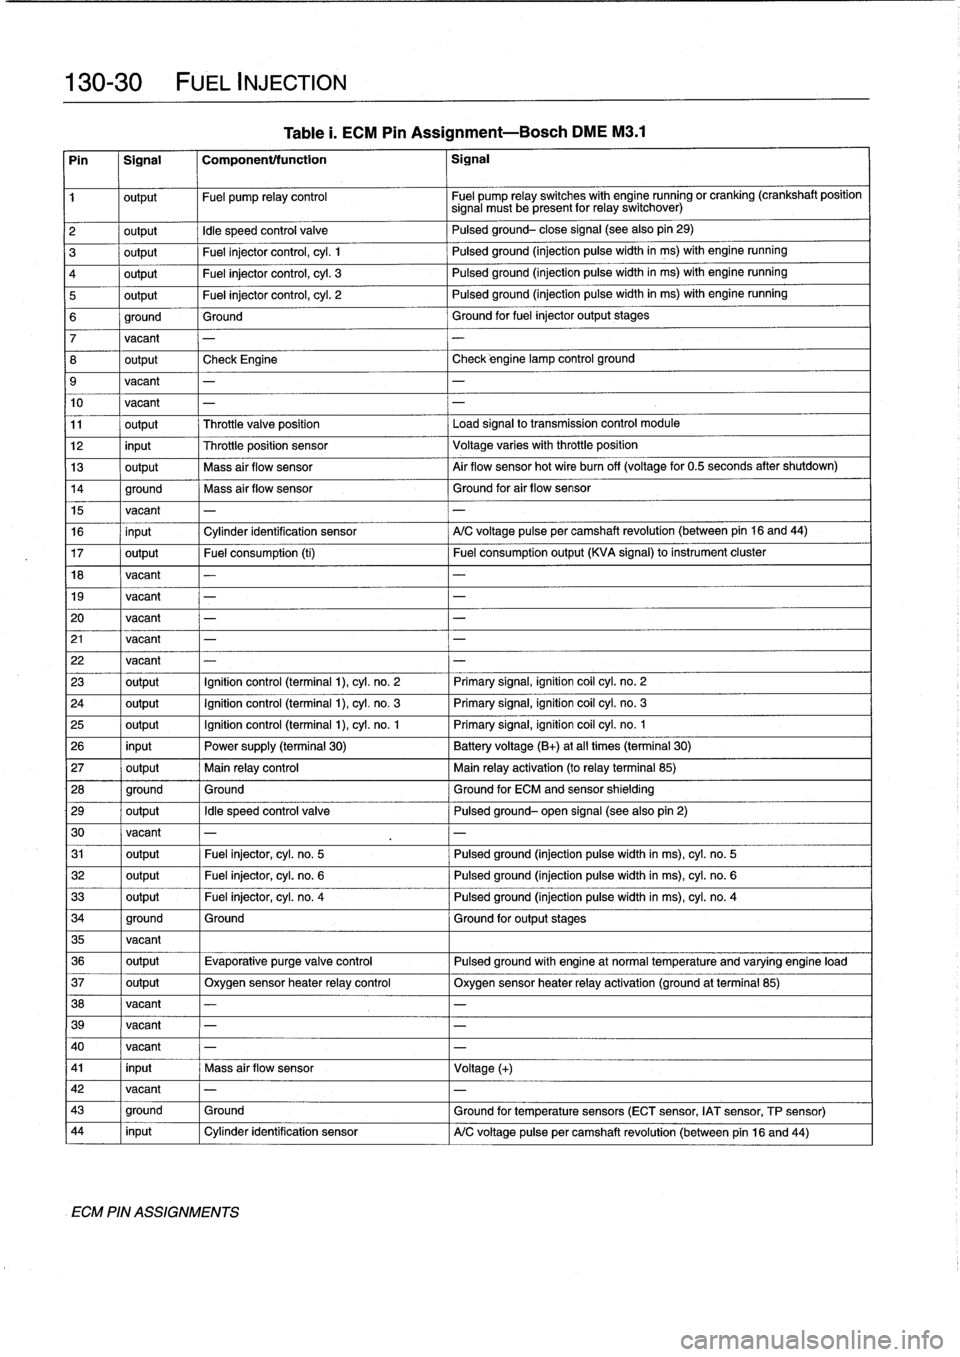
Table
1.
ECM
Pin
Assignment-Bosch
DME
M3
.1
1
output
Fuel
pump
relay
control
Fuel
pump
relay
switches
with
engine
runningor
cranking
(crankshaft
position
Signal
mustbe
present
for
relay
switchover)
2
1
output
1
Idle
speed
control
valve
1
Pulsad
ground-
close
signal
(seealsopin29)
3
output
Fuel
injectorcontrol,
cyl
.
1
Pulsedground
(injection
pulsewidth
in
ms)
with
engine
running
4
output
Fuel
injectorcontrol,
cyl
.
3
Pulsedground
(injection
pulsewidth
in
ms)
with
engine
running
5
output
Fuel
injector
control,
cyl
.
2
Pulsedground
(injection
pulse
width
in
ms)
with
enginerunning
6
ground
Ground
Ground
for
fuel
injector
output
stages
7
vacant
-
-
8
output
Check
Engine
Check
éngine
lamp
control
ground
9
vacant
-
-
10
vacant
-
-
11
output
Throttle
valve
position
Load
signal
to
transmission
control
module
12
input
Throttle
position
sensor
Voltage
varies
with
throttle
position
13
output
Mass
air
flow
sensor
Air
flow
sensor
hotwire
burn
off
(voltage
for
0
.5
seconds
after
shutdown)
14
ground
Mass
air
flow
sensor
Ground
for
air
flow
sensor
15
vacant
-
-
16
input
Cylinder
identification
sensor
A/C
voltage
pulse
per
camshaft
revolution
(between
pin
16
and
44)
17
output
Fuel
consumption
(ti)
Fuel
consumption
output
(KVA
Signal)
to
instrument
cluster
18
vacant
-
-
19
vacant
-
-
20
vacant
-
-
21vacant
-
-
22
vacant
-
-
23
output
Ignition
control
(terminal
1),
cyl
.
no
.
2
Primary
Signal,
ignition
coil
cyl
.
no
.
2
24
output
Ignition
control
(terminal
1),
cyl
.
n
o
.
3
Primary
signal,
ignition
coil
cyl
.
no
.
3
25
output
Ignition
control
(terminal
1),
cyl
.
n
o
.
1
Primary
signal,
ignitioh
coil
cyl
.
no
.
1
26
input
Power
supply
(terminal
30)
Battery
voltage
(B+)
at
al¡
times
(terminal
30)
27
output
Main
relay
control
Main
relay
activation
(to
relay
terminal
85)
28
ground
Ground
Ground
for
ECM
and
sensor
shielding
29
output
Idle
speed
control
valve
Pulsed
ground-
open
signal
(see
also
pin
2)
30
vacant
-
-
31
output
Fuel
injector,cyl
.
no
.
5
Pulsedground
(injection
pulsewidth
in
ms),
cyl
.
no
.
5
32
output
Fuel
injector,cyl
.
no
.
6
Pulsedground
(injection
pulse
width
in
ms),
cyl
.
no
.
6
33
output
Fuel
injector,cyl
.
no
.
4
Pulsedground
(injection
pulsewidth
in
ms),
cyl
.
no
.
4
34
ground
Ground
Ground
for
output
stages
35
vacant
36
output
Evaporative
purgevalve
control
Pulsed
ground
with
engine
at
normal
temperature
and
varying
engine
load
37
output
Oxygen
sensor
heater
relay
control
Oxygen
sensor
heater
relayactivation
(ground
at
terminal
85)
38
vacant
-
-
39
vacant
-
-
40
vacant
-
41
input
Mass
air
flow
sensor
Voltage
(+)
42
vacant
-
-
43
ground
Ground
Ground
for
temperatura
sensors
(ECT
sensor,
IAT
sensor,
TP
sensor)
44
input
Cylinder
identification
sensor
A/C
voltagepulseper
camshaft
revolution
(between
pin
16
and
44)