height adjustment BMW M3 1995 E36 Workshop Manual
[x] Cancel search | Manufacturer: BMW, Model Year: 1995, Model line: M3, Model: BMW M3 1995 E36Pages: 759
Page 272 of 759

320-
6
STEERING
AND
WHEEL
ALIGNMENT
Front
Toe-in
andToe
Difference
Angle
Wheel
Alignment
Specifications
Toe-in
is
the
difference
in
the
distance
between
the
front
of
Alignment
specificationsfor
the
E36
are
listed
in
Table
a
the
front
wheels
and
the
rear
of
the
front
wheels
.
It
is
adjusted
and
Table
b
.
The
specifications
only
apply
under
the
following
by
altering
the
length
of
the
outer
tie
rods
.
conditions
:
Toe-in
adjustments
should
only
be
made
on
alignment
equipment
with
the
car
in
normalloaded
position
as
described
below
under
Wheel
Alignment
Specifications
.
Toe
difference
angledetermines
the
progressively
different
pathstaken
by
the
front
wheelsas
the
car
is
turning
.
It
is
fixed
by
the
steering
gear,
but
depends
on
accurate
setting
of
the
toe-in
.
Rear
Toe-in
There
is
no
provision
for
routinerear
wheel
toe-in
adjust-
ment
.
If
any
alignment
angles
deviate
from
specifications,
carefully
inspect
the
rear
trailing
arms,
rear
suspension
sub-
frame
and
al¡
associated
bushings
and
flexible
mounts
for
wear
or
damage
.
After
replacing
any
parts
that
appear
worn
or
damaged,
re-check
thetoe
measurements
.
WHEEL
ALIGNMENT
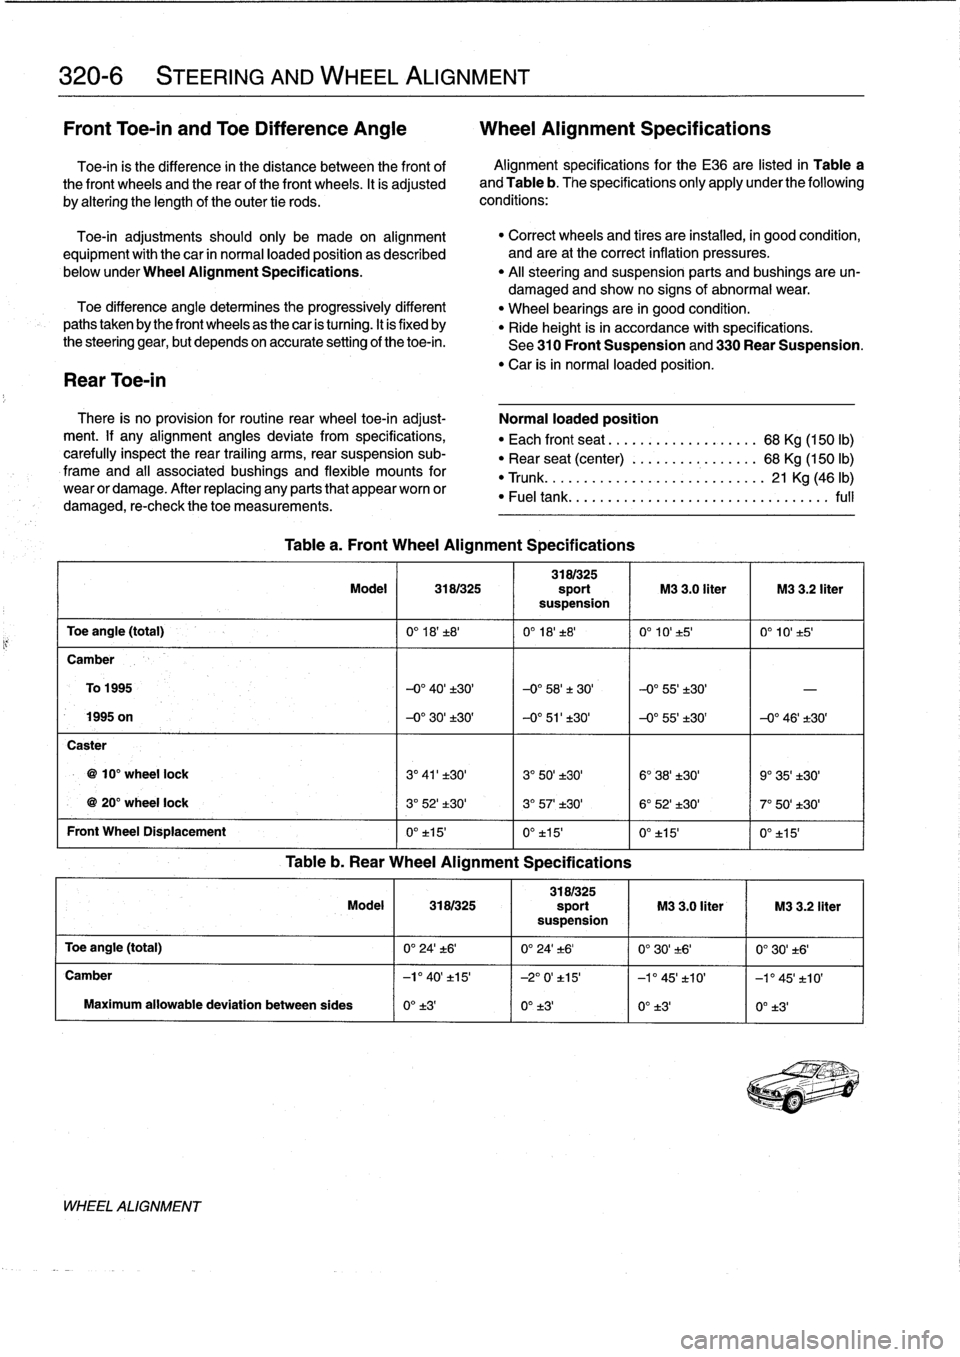
Table
a
.
Front
Wheel
Alignment
Specifications
"
Correct
wheels
and
tires
are
installed,
in
good
condition,
and
are
at
the
correct
inflation
pressures
.
"
Al¡
steering
and
suspension
parts
and
bushings
areun-
damaged
and
show
no
signs
of
abnormal
wear
.
"
Wheel
bearings
are
in
good
condition
.
"
Ride
height
is
in
accordance
with
specifications
.
See
310
Front
Suspension
and330
Rear
suspension
.
"
Car
isin
normal
loaded
position
.
Normal
loaded
position
"
Each
front
seat
.....:.............
68
Kg
(150
lb)
"
Rear
seat
(center)
................
68
Kg
(150
lb)
"
Trunk
.
.
.
..
.......................
21
Kg
(46
lb)
"
Fueltank
.
........................
...
.
..
..
full
3181325
Model
3181325
sport
M3
3
.0
liter
M3
3
.2
liter
suspension
Toe
angle
(total)
0°
18'±8'
0°
18'±8'
0°
10'
±5'
0°
10't5'
Camber
To
1995
-0°
40'±30'
-0°
58'±
30'
-0°55'±30'
-
1995
on
-0°
30'
±30'
-0°
51'±30'
-0°55'±30'
-0°
46'±30'
Caster
10°
wheel
lock
3°
41'±30'
3°
50'±30'
6°
38'±30'
9°
35'±30'
20°
wheel
lock
3°
52'±30'
3°
57'
t30'
6°
52'±30'
7°
50'±30'
Front
Wheel
Displacement
0°
t15'
0°t15'
0°
±15
0°
±15'
Table
b
.
Rear
Wheel
Alignment
Specifications
3181325
Model
3181325
sport
M3
3
.0
liter
M3
3
.2
liter
suspension
Toe
angle
(total)
0°
24't6'
0°
24'±6'
0'30'
.-t6'
0°
30't6'
Camber
-l'
40'
t15'
-2°
0'
t15'
-1
°
45'
t10'
-1'45'±10'
Maximum
allowabledeviation
between
sides
0°
±3'
0°
±3'
0°
t3'
0°
t3'
Page 328 of 759

510-
6
EXTERIOR
TRIM,
BUMPERS
Rear
bumper
impact
absorber,replacing
1
.
Remove
bumperas
described
above
.
2
.
Remove
luggage
compartment
floor
covering
.
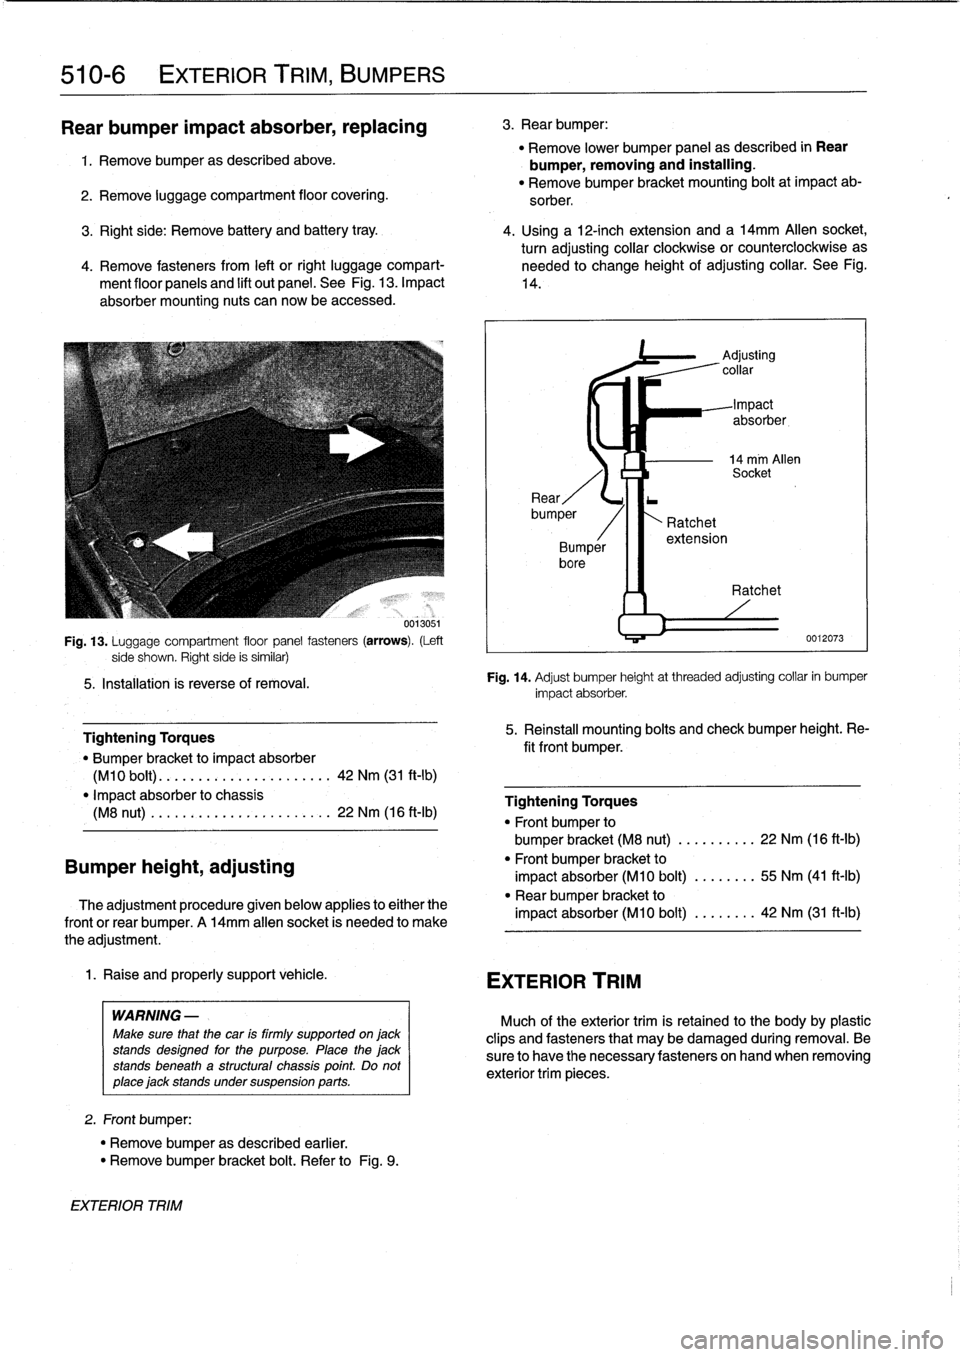
Fig
.
13
.
Luggage
compartment
floor
panel
fasteners
(arrows)
.
(Left
side
shown
.
Righf
side
is
similar)
5
.
Installation
ís
reverse
of
removal
.
Bumper
height,
adjusting
Tightening
Torques
"
Bumper
bracket
to
impact
absorber
(M10
bolt)
.
............
.
...
..
..
.
42
Nm
(31
ft-lb)
"
Impact
absorber
to
chassis
(M8
nut)
.
.
..........
.
......
.
.
.
.
22
Nm
(16
ft-Ib)
The
adjustment
procedure
given
below
applies
to
either
the
frontor
rear
bumper
.
A
14mm
allen
socket
is
needed
to
make
the
adjustment
.
1
.
Raise
and
properly
support
vehicle
.
WARNING
-
Make
sure
that
the
car
is
firmly
supported
on
jack
stands
designed
for
the
purpose
.
Place
the
jack
stands
beneath
a
structural
chassis
point
.
Do
not
place
jack
stands
under
suspension
parts
.
2
.
Front
bumper
:
"
Remove
bumper
as
described
earlier
.
"
Remove
bumper
bracket
bolt
.
Refer
to
Fig
.
9
.
EXTERIOR
TRIM
3
.
Rear
bumper
:
"
Remove
lower
bumper
panel
as
described
in
Rear
bumper,
removing
and
installing
.
"
Remove
bumper
bracket
mounting
bolt
at
impact
ab-
sorber
.
3
.
Right
side
:
Remove
battery
and
battery
tray
.
4
.
Using
a
12-inch
extension
and
a
l4mm
Allen
socket,
turn
adjusting
collar
clockwise
or
counterclockwise
as
4
.
Remove
fasteners
from
left
or
right
luggage
compart-
needed
to
change
height
of
adjusting
collar
.
See
Fig
.
ment
floor
panels
and
lift
out
panel
.
See
Fig
.
13
.
Impact
14
.
absorber
mounting
nuts
can
now
be
accessed
.
~4
EXTERIOR
TRIM
Ratchet
extension
Adjusting
collar
Impact
absorber,
14
mm
Allen
Socket
Ratchet
0012073
Fig
.
14
.
Adjust
bumper
height
at
threaded
adjusting
collar
in
bumper
impact
absorber
.
5
.
Reinstall
mounting
bolts
and
check
bumper
height
.
Re-
fit
front
bumper
.
Tightening
Torques
"
Front
bumper
to
bumper
bracket
(M8
nut)
......
.
..
.
22
Nm
(16
ft-Ib)
"
Front
bumper
bracket
to
impact
absorber
(M10
bolt)
........
55
Nm
(41
ft-Ib)
"
Rear
bumper
bracket
to
impact
absorber
(M10
bolt)
........
42
Nm
(31
ft-Ib)
Much
of
the
exteriortrim
is
retained
to
the
body
by
plasticclips
and
fasteners
that
may
be
damaged
during
removal
.
Be
sure
to
have
the
necessary
fasteners
onhand
when
removing
exterior
trim
pieces
.
Page 369 of 759

4
.
Rear
adjustment
:
Loosen
rear
adjusting
wedges
and
push
in
or
out
until
rear
of
sunroof
is
aligned
correctly
withroof-top
.
See
Fig
.
5
.
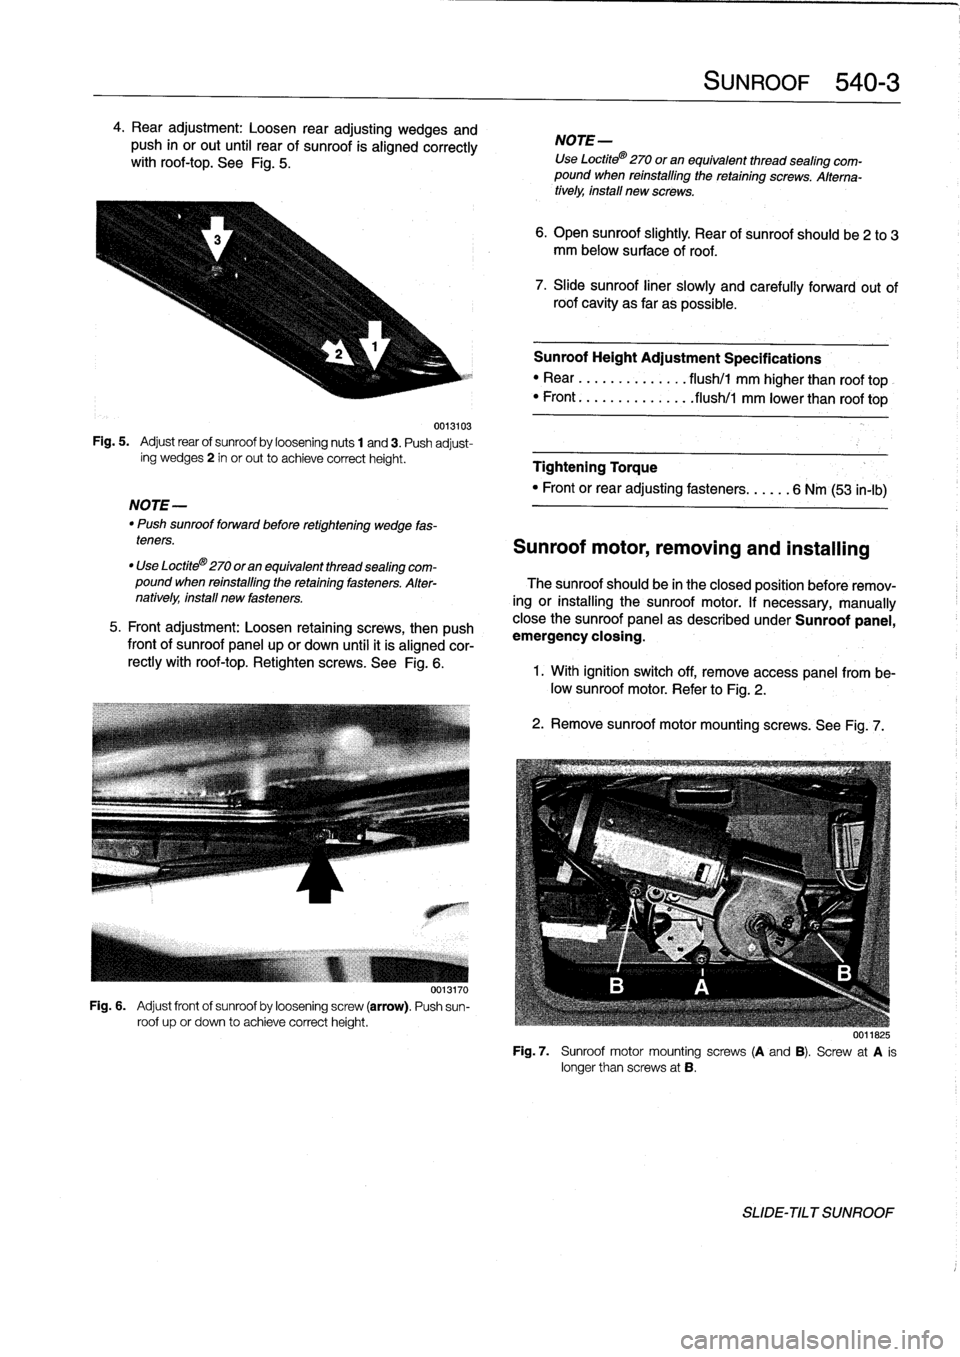
0013103
Fig
.
5
.
Adjust
rear
of
sunroof
by
loosening
nuts
1
and3
.
Push
adjust-
íng
wedges2
in
or
out
to
achieve
correctheight
.
NOTE-
"
Push
sunroofforward
before
retightening
wedge
fas-
teners
.
0013170
Fig
.
6
.
Adjust
front
of
sunroof
by
loosening
screw
(arrow)
.
Push
sun-
roof
up
or
down
to
achieve
correctheight
.
SUNROOF
540-
3
NOTE-
Use
Loctite®
270
or
an
equivalent
thread
sealing
com-
pound
when
reinstalling
theretaining
screws
.
Alterna-
tively,
install
new
screws
.
6
.
Open
sunroof
slightly
.
Rear
of
sunroofshould
be2
to
3
mm
below
surface
of
roof
.
7
.
Slide
sunroof
liner
slowly
and
carefully
forward
out
of
roof
cavity
as
far
as
possible
.
Sunroof
Height
Adjustment
Specifications
"
Rear
........
....
.
.
flush/1
mm
higher
than
roof
top
"
Front
...
..
.
....
..
.
..
flush/l
mm
lower
than
roof
top
Tightening
Torque
"
Front
orrear
adjusting
fasteners
...
...
6
Nm
(53
in-lb)
Sunroof
motor,
removing
and
installing
"
Use
Loctite®270
oran
equivalent
thread
sealing
com-
pound
when
reinstalling
the
retaining
fasteners
.
Alter-
The
sunroofshould
be
in
theclosed
posítion
before
remov-
natively,install
new
fasteners
.
ing
or
installing
the
sunroof
motor
.
If
necessary,
manually
5
.
Front
adjustment
:
Loosen
retaining
screws,
then
push
close
the
sunroof
panel
as
described
under
Sunroof
panel,
frontof
sunroof
panel
up
or
down
until
it
is
aligned
cor-
emergency
ciosing
.
rectly
with
roof-top
.
Retighten
screws
.
See
Fig
.
6
.
1
.
With
ignition
switch
off,
Rmove
access
panel
from
be-low
sunroof
motor
.
Refer
to
Fig
.
2
.
2
.
Remove
sunroof
motormountingscrews
.
See
Fig
.
7
.
0011825
Fig
.
7
.
Sunroof
motor
mountingscrews
(A
and
B)
.
Screw
at
A
is
longer
than
screws
at
B
.
SLIDE-TILT
SUNROOF