radio BMW M3 1995 E36 Workshop Manual
[x] Cancel search | Manufacturer: BMW, Model Year: 1995, Model line: M3, Model: BMW M3 1995 E36Pages: 759
Page 3 of 759
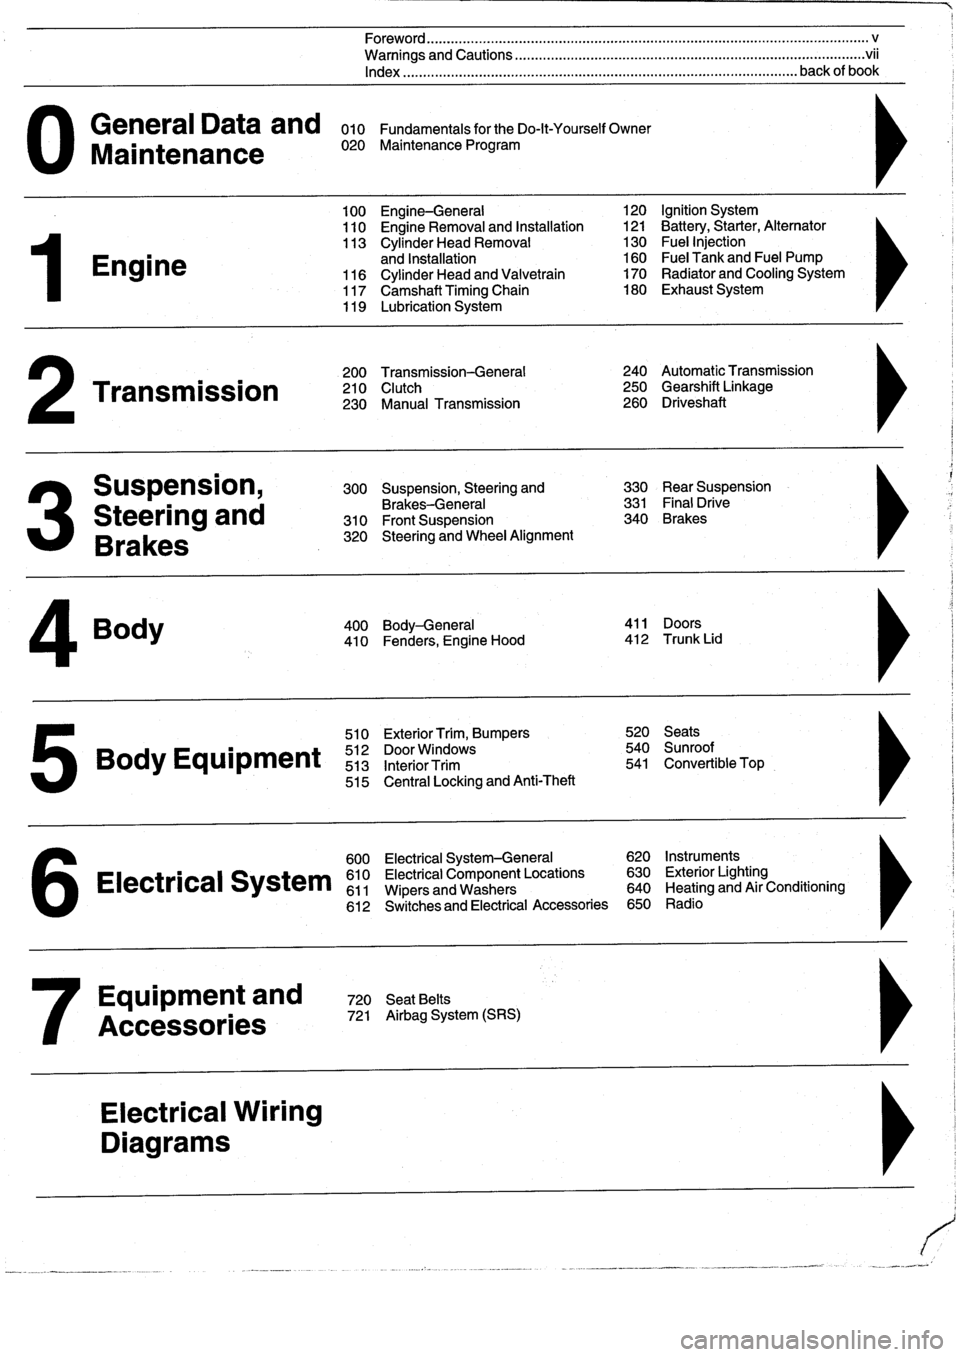
General
Data
and
010
FundamentalsfortheDo-lt-YourselfOwner
Maintenance
020
Maintenance
Program
Engine
Transmission
Suspension,
Steering
and
Brakes
4
Body
100
Engine-General
110
Engine
Removal
and
Installation
113
Cylinder
Head
Removal
and
Installation
116
Cylinder
Head
and
Valvetrain
117
Camshaft
Timing
Chain
119
Lubrication
System
200
Transmission-General
210
Clutch
230
Manual
Transmission
510
Exterior
Trim,
Bumpers
520
Seats
Bo
y
Equipment
512
DoorWTdws
540
nr
t
513
InteriorTrim
541
Convertible
Top
515
Central
Locking
and
Anti-Theft
600
Electrical
System-General
620
Instruments
Electrical
S
stem
610
Electrical
Component
Locations
630
Exterior
Lighting
611
Wipers
and
Washers
640
Heating
and
Air
Conditioning
6
612
Switches
and
Electrical
Accessories
650
Radio
Equipment
and
720
SeatBelts
Accessories
721
Airbag
System
(SRS)
Electrical
Wiring
Diagrams
Foreword
.
...
.
.
.
..................
.
.
.
.....
.
............
.
...
.
.
.
.
.
................
.
.
.
.....
.
......
.
................
.
.
.
.....
v
Warnings
and
Cautions
.....
.
...
.
.
.
.
.
..........
.
...
.
.
.
.
.
......
.
.........
.
.
.
...
.
.
.
......
.
.
.
.
.
............
.
.
.
.
.
.
.vii
Index
..............
.
.
.
.....
.
............
.
...
.
.
.
.
.
........
.
...
.
.
.
.
.
.......
.
......
.
...
.
.
.
.
.
.
.
........
.
.
.
..
back
of
book
300
Suspension,
Steering
and
330
RearSuspension
Brakes-General
331
Final
Drive
310
Front
Suspension
340
Brakes
320
Steering
and
Wheel
Alignment
400
Body-General
411
Doors
410
Fenders,
Engine
Hood
412
Trunk
Lid
120
Ignition
System
121
Battery,Starter,
Alternator
130
Fue¡
Injection
160
Fuel
Tank
and
Fuel
Pump
170
Radiator
and
Cooling
System180
Exhaust
System
240
Automatic
Transmission
250
Gearshift
Linkage
260
Driveshaft
Page 8 of 759
Please
read
these
warnings
and
cautions
before
proceeding
with
maintenance
and
repair
work
.
CAUTION-
"
See
also
Warnings
onpage
vi¡
"
Beforedoing
any
electrical
welding
on
cars
equipped
with
ABS,
disconnect
the
battery
negative
(-)
terminal
(ground
strap)
and
the
"
If
you
lack
the
skills,
tools
and
equipment,
ora
suitable
work-
ABS
control
unit
connector
.
shop
for
any
procedure
described
in
this
manual,
we
suggest
you
leave
such
repairs
to
an
authorized
BMW
dealer
or
other
qualified
"
On
cars
equipped
with
anti-theft
radios,
make
sureyou
know
the
shop
.
correct
radio
activation
code
before
disconnecting
the
battery
or
removing
the
radio
.
lf
the
wrong
code
is
entered
into
the
radio
"
BMW
is
constantly
improving
its
cars
and
sometimes
these
when
power
is
restored,
that
radio
may
lock
up
and
be
renderedchanges,
both
in
parts
and
specifications,
are
made
applicable
to
inoperable,
even
if
the
correct
code
is
thenentered
.
earlier
models
.
Therefore,
part
numbers
listed
in
this
manual
are
for
reference
only
.
Always
check
with
your
authorized
BMW
dealer
"
Always
make
sure
ignition
is
off
before
disconnecting
battery
.
parts
department
for
the
latest
information
.
"
Label
battery
cablesbefore
disconnecting
.
Onsome
models,
"
Before
starting
a
job,
make
certain
that
you
have
all
the
neces-
battery
cablesarenot
color
coded
.
sary
tools
and
parts
on
hand
.
Read
al¡
the
instructions
thoroughly,
do
not
attempt
shortcuts
.
Use
tools
appropriate
to
the
work
and
"
Disconnecting
the
battery
may
erase
fault
code(s)
stored
in
con-
use
only
replacement
parts
meeting
BMW
specifications
.
Make-
trol
module
memory
Using
special
BMW
diagnostíc
equipment,
shift
tools,
parts
and
procedures
will
not
make
good
repairs
.
check
forfault
codes
prior
to
disconnecting
the
battery
cables
.If
the
Check
Engine
light
is
illuminated,
see100
Engine-General
for
"
Use
pneumatic
and
electric
tools
only
to
loosenthreaded
parts
On-Board
Diagnostics
(OBD)
fault
code
information
.
lf
any
other
and
fasteners
.
Never
use
these
tools
to
tighten
fasteners,
espe-
system
faults
have
been
detected
(indicated
by
an
ílluminated
cially
on
light
alloy
parts
.
Always
use
a
torque
wrench
to
tighten
warning
light),
see
an
authorized
BMW
dealer
.
fasteners
to
the
tightening
torque
specification
listed
.
"
If
a
normal
or
rapid
charger
is
used
to
charge
battery,
the
battery
"Be
mindful
of
the
environment
and
ecology
.
Before
you
drain
the
mustbe
disconnected
and
removed
fromthe
vehicle
in
order
to
crankcase,
find
outthe
proper
way
to
dispose
of
the
oil
.
Do
not
avoid
damaging
paint
and
upholstery
pour
oil
onto
the
ground,
down
a
drain,
or
into
a
stream,
pond
orlake
.
Dispose
of
in
accordance
withFederal,
State
and
Local
laws
.
"Do
not
quick-chargethe
battery
(for
boost
starting)
for
longer
than
one
minute
.
Wait
at
least
one
minute
before
boosting
the
bat-
e
If
battery
power
is
lost
or
the
battery
has
been
disconnected,
the
tery
a
second
time
.
powerwindows
must
be
re-initialized
.
Both
one
touch
up/down
and
pinch-protection
will
be
inactive
until
windows
are
re-initial-
"
Connect
and
disconnect
a
battery
charger
only
with
the
battery
ized
.
See
512
Door
Windows
.
charger
switched
off
.
"
The
control
module
for
the
anti-lock
brake
system
(ABS)
cannot
withstand
temperatures
from
a
paint-drying
booth
or
aheat
lamp
in
excess
of
203°F
(95°C)
and
should
not
be
subjected
to
temper-
atures
in
excess
of
185°F
(85°C)
for
more
than
twohours
.
"
Sealed
or
"maintenance
free"
batteries
shouldbeslow-charged
only,
at
anamperage
ratethat
is
approximately
10%
of
the
bat-
tery's
ampere-hour
(Ah)
rating
.
"
Do
not
allow
battery
chargingvoltage
to
exceed
16
.5
volts
.
If
the
battery
begins
producing
gas
or
boiling
violently,
reduce
the
charg-
ing
rate
.
Boosting
a
sulfated
battery
at
a
high
charging
rate
can
cause
an
explosion
.
Page 275 of 759
Rear
shock
absorber,
removing
and
installing
1.
Raisecar
and
remove
rear
wheels
.
WARNING
-
Make
sure
that
thecar
is
firmly
supportedon
jack
stands
designed
for
the
purpose
.
Place
the
jack
stands
beneatha
structural
chassis
point
.
Do
not
place
jack
stands
undersuspension
parts
.
2
.
Remove
rear
speakers
.
See
650
Radio
.
3
.
Pryoutluggage
compartment
liner
retaining
clips
and
peel
back
liner
to
gain
access
to
upper
shock
absorber
mounting
nuts
.
See
Fig
.
3
.
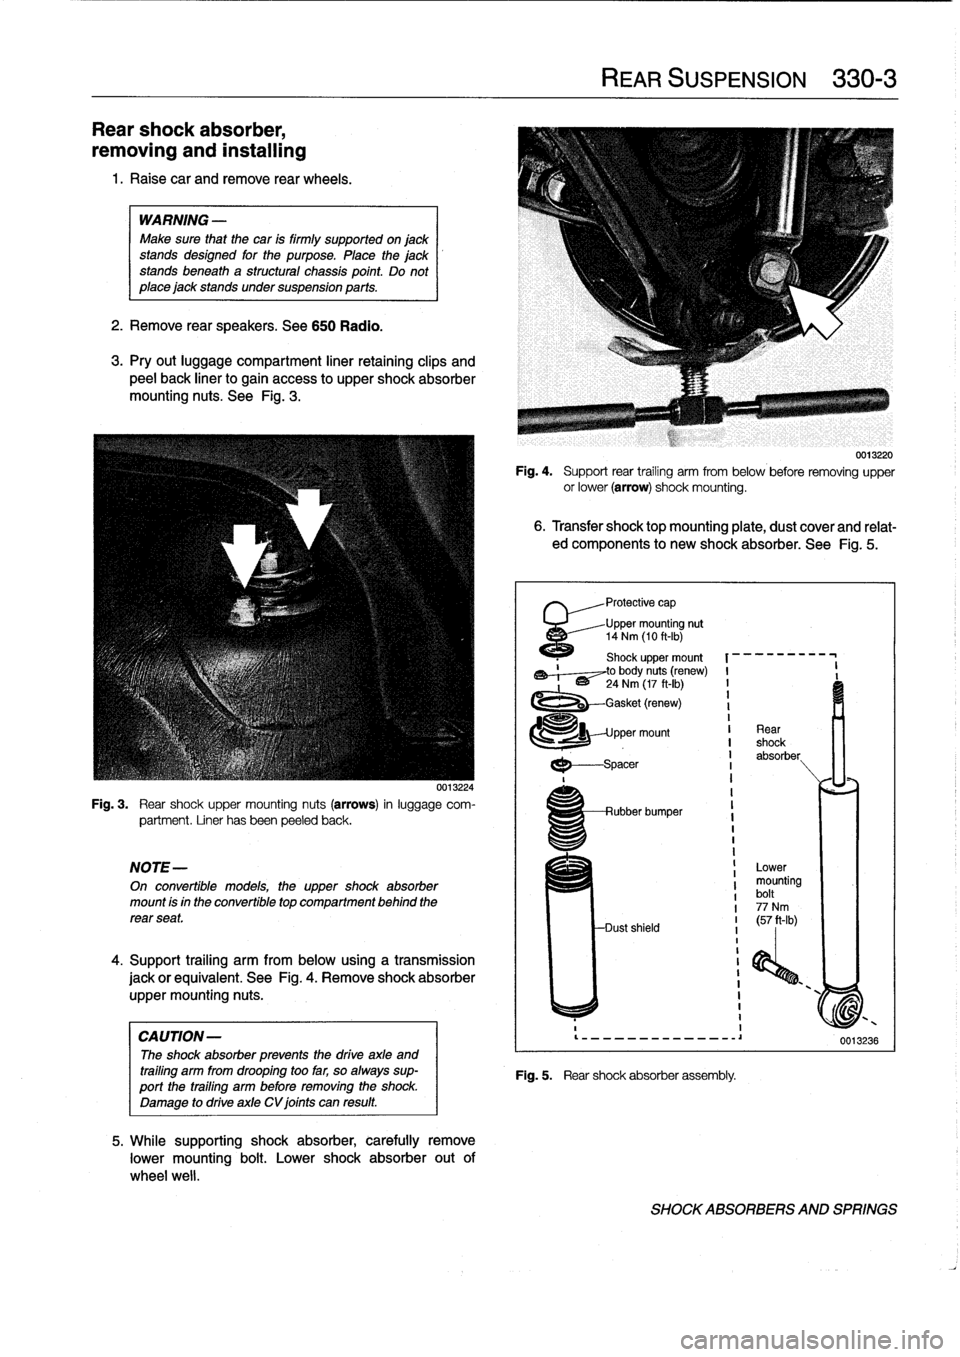
Fig
.
3
.
Rear
shock
upper
mounting
nuts
(arrows)
in
luggage
com-
partment
.
Liner
hasbeen
peeled
back
.
NOTE-
On
convertible
models,
the
uppershock
absorber
mount
is
in
the
convertible
top
compartment
behind
the
rear
seat
.
4
.
Support
trailing
arm
from
below
using
a
transmission
jack
orequivalent
.
See
Fig
.
4
.
Remove
shock
absorber
uppermounting
nuts
.
CAUTION-
The
shock
absorber
prevenís
the
drive
axle
and
trailing
arm
from
drooping
too
far,
so
always
sup-port
the
trailing
arm
before
removing
the
shock
.
Damage
to
drive
axle
CV
joints
can
result
.
0013224
5
.
While
supporting
shock
absorber,
carefully
remove
lower
mounting
bolt
.
Lower
shock
absorber
out
of
wheel
well
.
Fig
.
4
.
Support
rear
trailing
arm
from
below
before
removing
upper
or
lower
(arrow)
shock
mounting
.
6
.
Transfer
shocktopmounting
plate,
dust
coverand
relat-
ed
components
to
new
shock
absorber
.
See
Fig
.
5
.
'
Protective
cap
Upper
mounting
nut
14
Nm
(10
ft-Ib)
1120
Shock
upper
mount
,~,--~to
body
nuts
(renew)
I
-
'
~
24
Nm
(17
ft-Ib)
I
1
-Gasket
(renew)
I
1
pper
mount
I
Rear
I
shock
I
absorber
I
I
---spacer
REAR
SUSPENSION
330-
3
Rubber
bumper
Dust
shield
Fig
.
5
.
Rear
shock
absorber
assembly
.
Lower
mounting
bolt
77
Nm
I
(57
ft-Ib)
i
I
I
1
I
0013220
0013236
SHOCKABSORBERS
AND
SPRINGS
Page 318 of 759
411-
4
DOORS
6
.
Disconnect
radio
speaker
harness
connector
.
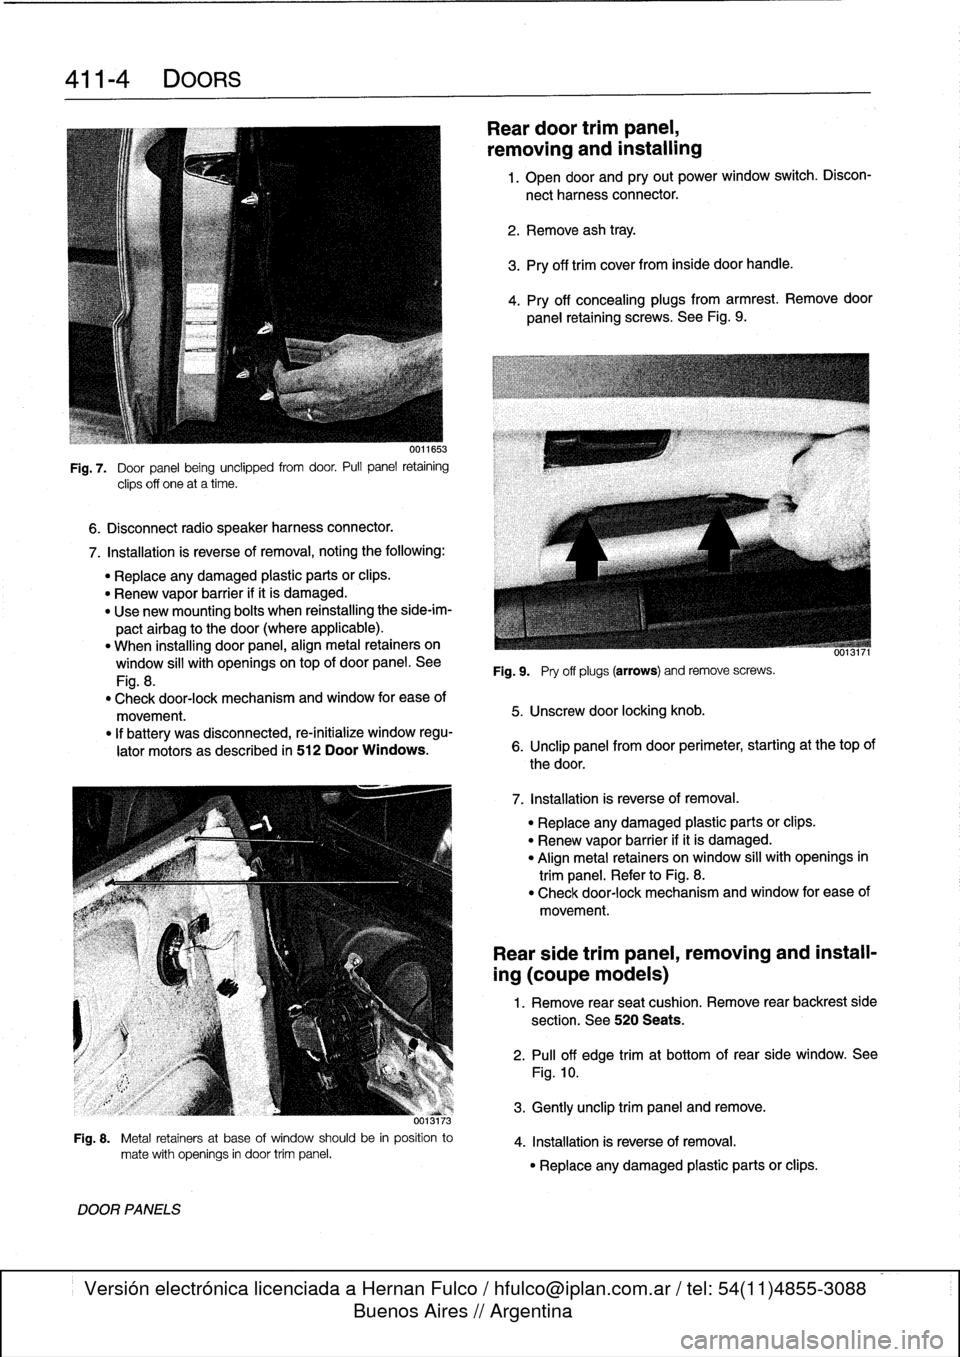
Fig
.
7
.
Door
panel
being
unclipped
from
door
.
Pull
panel
retaining
clips
off
one
at
a
time
.
7
.
Installation
is
reverse
of
removal,
noting
the
following
:
"
Replace
any
damaged
plastic
parts
orclips
.
"
Renew
vapor
barrier
ifit
is
damaged
.
"
Use
new
mounting
bolts
when
reinstalling
the
side-im-
pactairbag
to
the
door
(where
applicable)
.
"
When
installing
door
panel,
align
metal
retainers
on
window
sill
with
openingsontop
of
door
panel
.
See
Fig
.
8
.
"
Check
door-lock
mechanism
and
window
for
ease
of
movement
.
"
If
battery
was
disconnected,
re-initialize
window
regu-
lator
motors
as
described
in
512
Door
Windows
.
373
Fig
.
8
.
Metal
retainers
at
base
of
window
should
be
in
position
to
mate
with
openings
in
door
trim
panel
.
DOOR
PANELS
Reardoor
trimpanel,
removing
and
installing
1
.
Open
door
and
pry
out
power
window
switch
.
Discon-
nect
harness
connector
.
2
.
Remove
ash
tray
.
3
.
Pry
off
trim
cover
from
inside
door
handle
.
4
.
Pry
off
concealing
plugs
from
armrest
.
Remove
door
panel
retaining
screws
.
See
Fig
.
9
.
Fig
.
9
.
Pry
off
plugs
(arrows)
andremove
screws
.
5
.
Unscrew
door
locking
knob
.
6
.
Unclip
panel
from
door
perimeter,
starting
at
thetop
of
the
door
.
7
.
Installation
is
reverse
of
removal
.
"
Replace
any
damaged
plastic
parts
or
clips
.
"
Renew
vapor
barrier
ifit
is
damaged
.
"
Align
metal
retainers
on
window
sill
with
openings
in
trim
panel
.
Refer
to
Fig
.
8
.
"
Check
door-lock
mechanism
and
window
for
ease
of
movement
.
Rear
side
trim
panel,
removing
and
install-
ing
(coupe
models)
1
.
Remove
rear
seat
cushion
.
Remove
rear
backrest
side
section
.
See
520
Seats
.
2
.
Pull
off
edge
trimat
bottom
of
rear
side
window
.
See
Fig
.
10
.
3
.
Gently
unclip
trim
panel
andremove
.
4
.
Installation
is
reverse
of
removal
.
"
Replace
any
damaged
plastic
parts
or
clips
.
Page 347 of 759
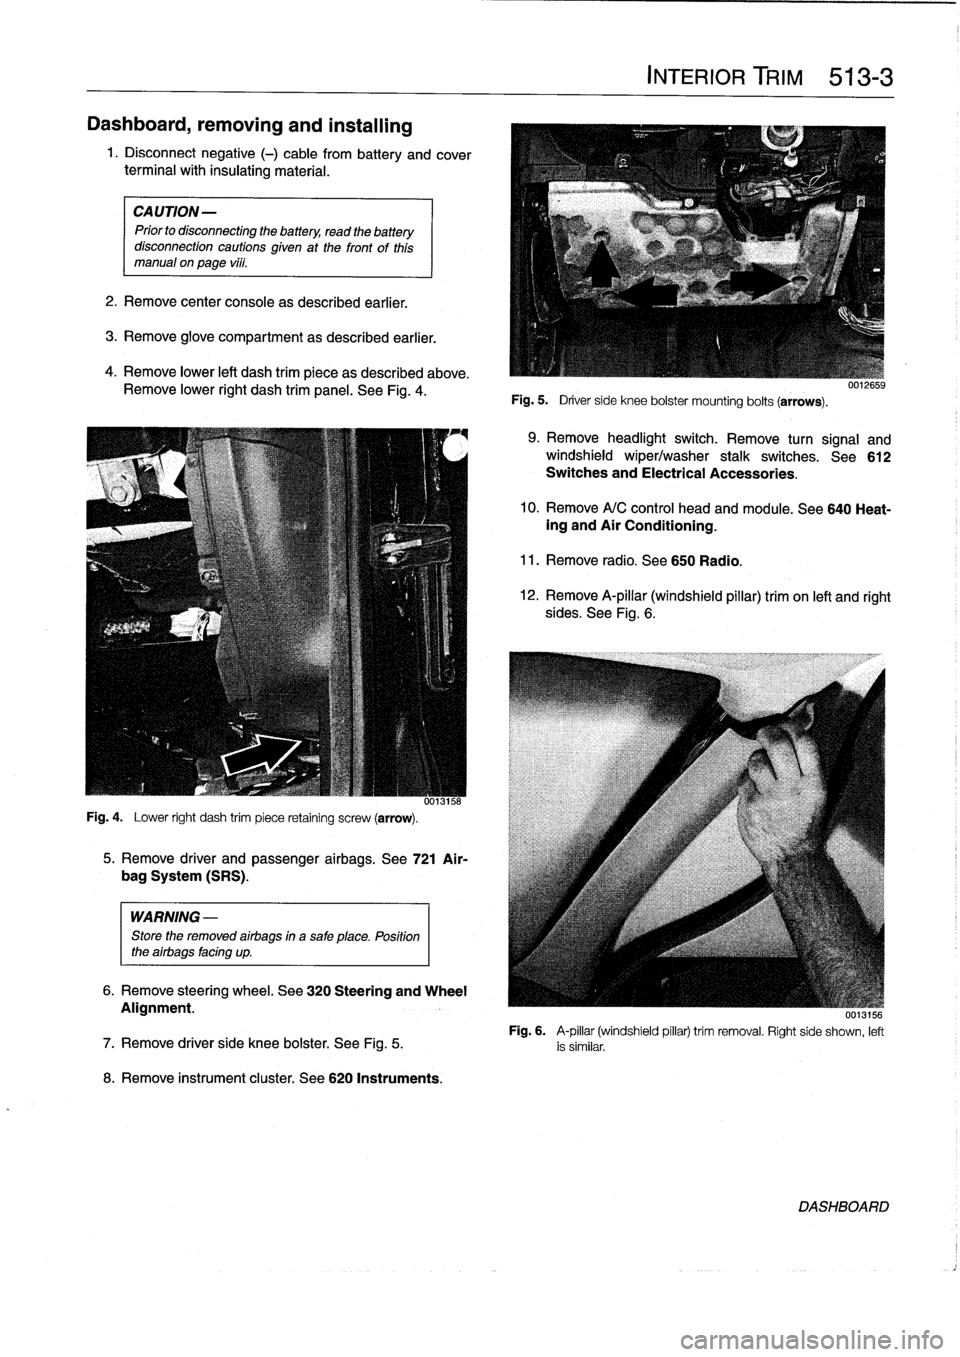
Dashboard,
removing
and
installing
1
.
Disconnect
negative
(-)
cable
from
battery
and
cover
terminal
with
insulating
material
.
CAUTION-
Prior
to
disconnectiog
the
battery,
read
the
battery
disconnection
cautionsgiven
at
the
front
of
this
manual
onpage
vi¡¡
.
2
.
Remove
center
console
as
described
earlier
.
3
.
Remove
glove
compartment
as
described
earlier
.
4
.
Remove
lower
left
dash
trim
piece
as
described
above
.
Remove
lower
right
dash
trim
panel
.
See
Fig
.
4
.
Fig
.
4
.
Lower
right
dash
trim
piece
retaining
screw
(arrow)
.
WARNING
-
Store
the
removed
airbags
in
a
safe
place
.
Position
the
airbags
facing
up
.
8
.
Remove
instrument
cluster
.
See
620
Instruments
.
5
.
Remove
driver
and
passenger
airbags
.
See
721
Air-
bag
System
(SRS)
.
6
.
Remove
steering
wheel
.
See
320
Steering
and
Wheel
Alignment
.
INTERIOR
TRIM
513-
3
Fig
.
5
.
Driver
side
knee
bolster
mounting
bolts
(arrows)
.
9
.
Remove
headlight
switch
.
Remove
turn
signal
and
windshield
wiper/washer
stalk
switches
.
See612
Switches
and
Electrical
Accessories
.
10
.
Remove
A/C
control
head
and
module
.
See
640
Heat-ing
and
Air
Conditioning
.
11
.
Remove
radio
.
See650
Radio
.
12
.
Remove
A-pillar
(windshield
pillar)
trim
on
left
and
right
sides
.
See
Fig
.
6
.
UU13156
Fig
.
6
.
A-pillar
(windshield
pillar)
trim
removal
.
Right
side
shown,
left
7
.
Remove
driver
side
knee
bolster
.
See
Fig
.
5
.
is
similar
.
DASHBOARD
Page 396 of 759
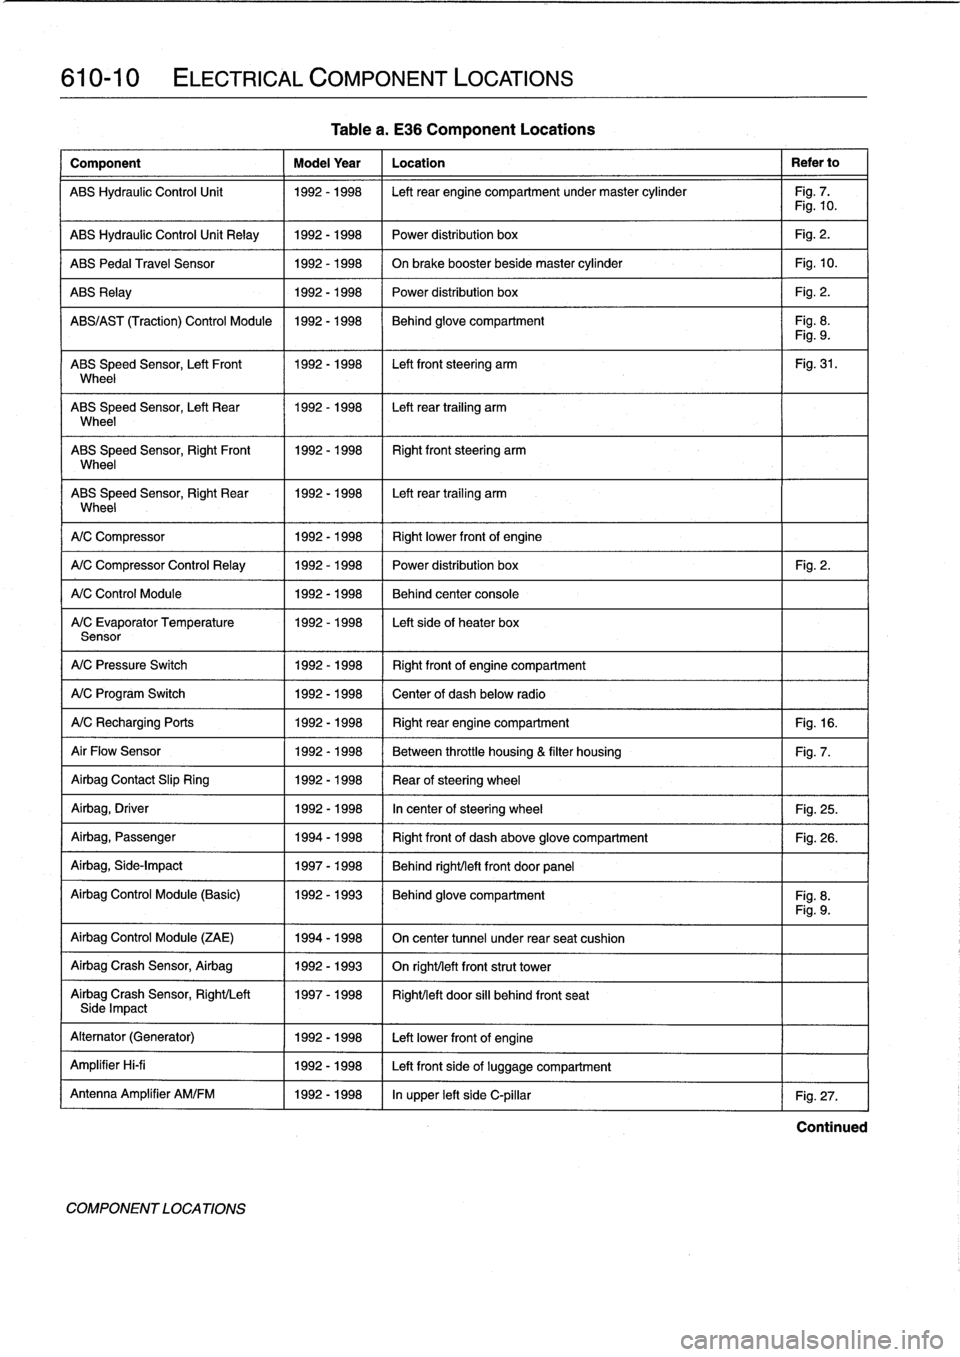
610-10
ELECTRICAL
COMPONENT
LOCATIONS
Component
Model
Year
Location
Refer
to
ABS
Hydraulic
Control
Unit
1992-1998
Left
rear
engine
compartment
undermaster
cylinder
Fig
.
7
.
Fig
.
10
.
ABS
Hydraulic
Control
Unit
Relay
1992-1998
Power
distribution
box
Fig
.
2
.
ABS
Pedal
Travel
Sensor
1992-1998
On
brake
booster
beside
master
cylinder
Fig
.
10
.
ABS
Relay
1992-1998
Power
distribution
box
Fig
.
2
.
ABS/AS
T
(Traction)
Control
Module
1992-1998
Behind
glove
compartment
Fig
.
8
.
Fig
.
9
.
ABS
Speed
Sensor,
Left
Front
1992-1998
Left
front
steering
arm
Fig
.
31
.
Wheel
ABS
Speed
Sensor,
Left
Rear
1992-1998
Left
rear
trailing
arm
Wheel
ABS
Speed
Sensor,
RightFront
11992-1998
Right
front
steering
arm
Wheel
ABS
Speed
Sensor,
Right
Rear
1992-1998
I
Left
rear
trailing
arm
Wheel
1
A/C
Compressor
1
1992-1998
(
Rightlower
frontof
engine
A/C
Compressor
Control
Relay
1
1992-1998
1992-1998
1992-1998
A/C
Control
Module
A/C
Evaporator
Temperature
Sensor
A/C
Pressure
Switch
1992-1998
Right
frontof
engine
compartment
A/C
Program
Switch
1992-1998
Center
of
dash
below
radio
A/CRecharging
Ports
1992-1998
Right
rear
engine
compartment
Fig
.
16
.
Air
Flow
Sensor
1992-1998
Between
throttle
housing
&
filter
housing
Fig
.
7
.
Airbag
Contact
Slip
Ring
1992-1998
Rear
ofsteering
wheel
Airbag,
Driver
1992-1998
In
center
of
steering
wheel
Fig
.
25
.
Airbag,
Passenger
1994-1998
Right
front
of
dash
above
glove
compartment
Fig
.
26
.
Airbag,
Side-Impact
1997-1998
Behind
right/left
front
door
panel
Airbag
Control
Module
(Basic)
1992-1993
Behind
glove
compartment
Fig
.
8
.
Fig
.
9
.
Airbag
Control
Module
(ZAE)
1994-1998
On
center
tunnel
under
rear
seat
cushion
Airbag
Crash
Sensor,
Airbag
1992-1993
On
righUleft
front
strut
tower
Airbag
Crash
Sensor,
Right/Left
1997-1998
Right/left
door
si¡¡
behind
front
seatSide
Impact
Alternator
(Generator)
1992-1998
Left
lowerfront
of
engine
Amplifier
Hi-fi
1992-1998
Left
front
side
of
luggage
compartment
Antenna
Amplifier
AM/FM
1992-1998
In
upper
left
side
C-pillar
Fig
.
27
.
COMPONENT
LOCA
TIONS
Table
a
.
E36
Component
Locations
Power
distribution
box
Fig
.
2
.
Behind
center
console
Left
sideof
heater
box
Continued
Page 402 of 759
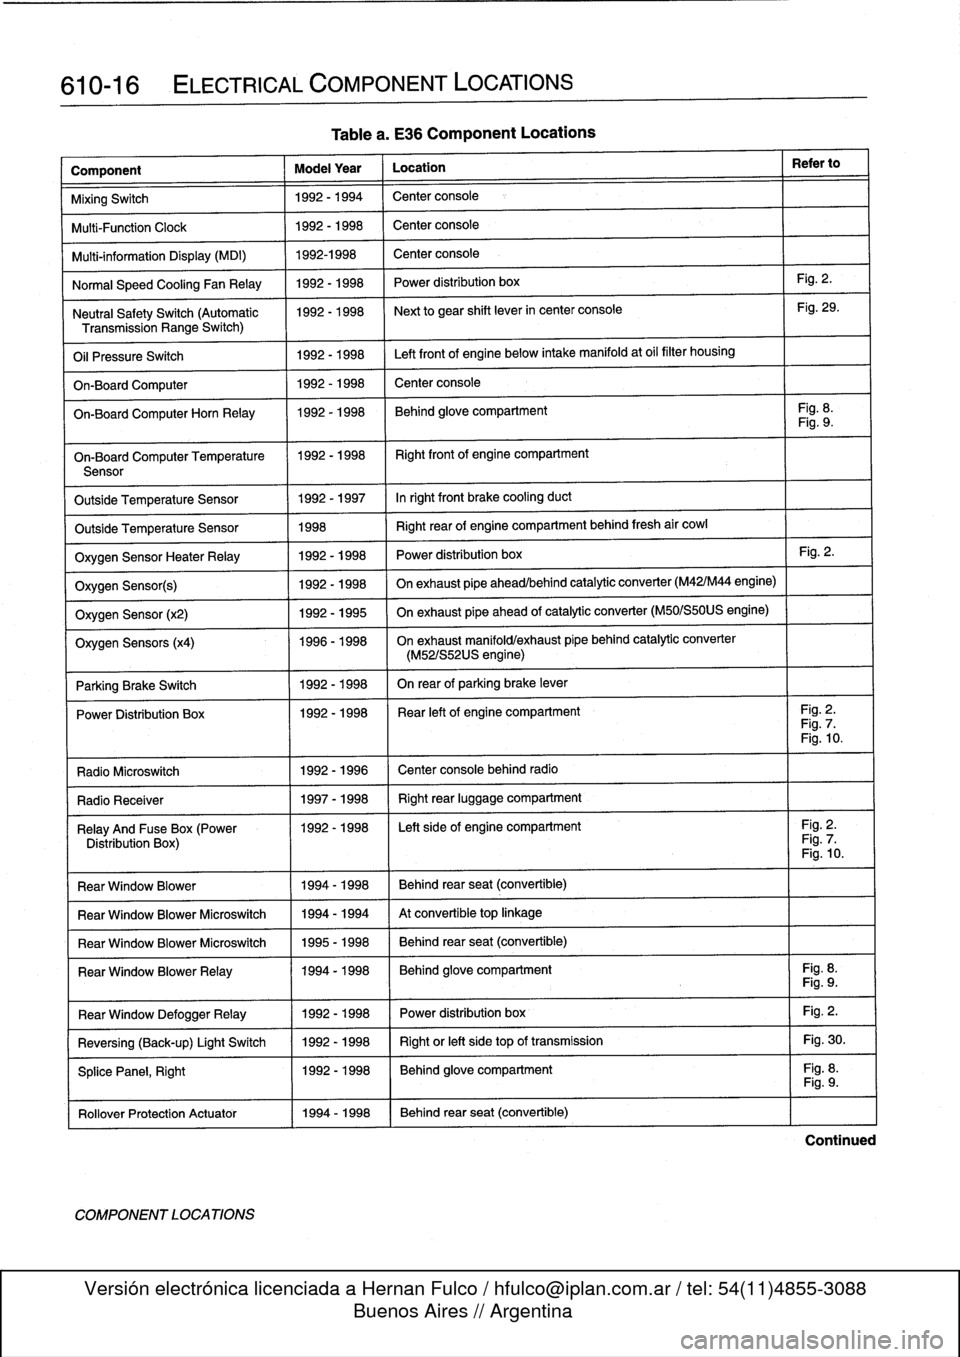
610-16
ELECTRICAL
COMPONENT
LOCATIONS
Component
Model
Year
Location
Refer
to
MixingSwitch
1992-1994
Center
console
Multi-Function
Clock
1992-1998
Center
console
Multi-information
Display
(MDI)
1992-1998
Center
console
Normal
Speed
Cooling
Fan
Relay
1992-1998
Power
distribution
box
Fig
.
2
.
Neutral
SafetySwitch
(Automatic
1992-1998
Next
to
gear
shift
lever
in
center
console
Fig
.
29
.
Transmission
Range
Switch)
Oil
Pressure
Switch
1992-1998
Left
front
of
engine
below
intake
manifold
at
oil
filter
housing
On-Board
Computer
1992-1998
Center
console
On-BoardComputerHorn
Relay
1992-1998
Behind
glove
compartment
Fig
.
8
.
Fig
.
9
.
On-Board
Computer
Temperature
11992-1998
I
Right
front
of
engine
compartment
Sensor
Outside
Temperature
Sensor
1992-1997
Inright
front
brake
cooling
duct
Outside
Temperature
Sensor
1998
Right
rear
of
engine
compartment
behind
fresh
air
cowl
Oxygen
Sensor
HeaterRelay
1992-1998
Power
distribution
box
Fig
.
2
.
Oxygen
Sensor(s)
1992-1998
On
exhaust
pipe
ahead/behind
catalytic
converter
(M42/M44
engine)
Oxygen
Sensor
(x2)
1992-1995
On
exhaust
pipe
ahead
of
catalytic
converter
(M50/S50US
engine)
Oxygen
Sensors
(x4)
1996-1998
On
exhaust
manifold/exhaust
pípe
behind
catalytic
converter
(M52/S52US
engine)
Parking
Brake
Switch
1
1992-1998
I
On
rear
of
parking
brake
lever
Power
Distribution
Box
11992-1998
I
Rear
left
of
engine
compartment
I
Fig
.
2
.
Fig
.
7
.
Fig
.
10
.
Radio
Microswitch
1992
-
1996
Center
console
behind
radio
Radio
Receíver
1
1997-1998
1
Right
rear
luggage
compartment
Relay
And
Fuse
Box
(Power
1992-1998
I
Left
side
of
engine
compartment
I
Fig
.
2
.
Distribution
Box)
Fig
.
7
.
Fig
.
10
.
Rear
Window
Blower
1994-1998
Behind
rear
seat
(convertible)
Rear
Window
Blower
Microswitch
1994-1994
At
convertible
top
linkage
Rear
Window
Blower
Microswitch
1995-1998
Behind
rear
seat
(convertible)
Rear
Window
BlowerRelay
11994-1998
Behind
glove
compartment
Fig
.
8
.
Fig
.
9
.
Fig
.
2
.
Fig
.
30
.
Fig
.
8
.
Rear
Window
DefoggerRelay
Reversing
(Back-up)
Light
Switch
SplicePanel,
Right
Rollover
Protection
Actuator
11994-1998
COMPONENT
LOCATIONS
Table
a
.
E36
Component
Locations
1992-1998
1992-1998
1992-1998
Power
distribution
box
Right
or
left
side
top
of
transmission
Behind
glove
compartment
Behind
rear
seat
(convertible)
Fig
.
9
.
Continued
Page 432 of 759
612-4
SWITCHES
AND
ELECTRICAL
ACCESSORIES
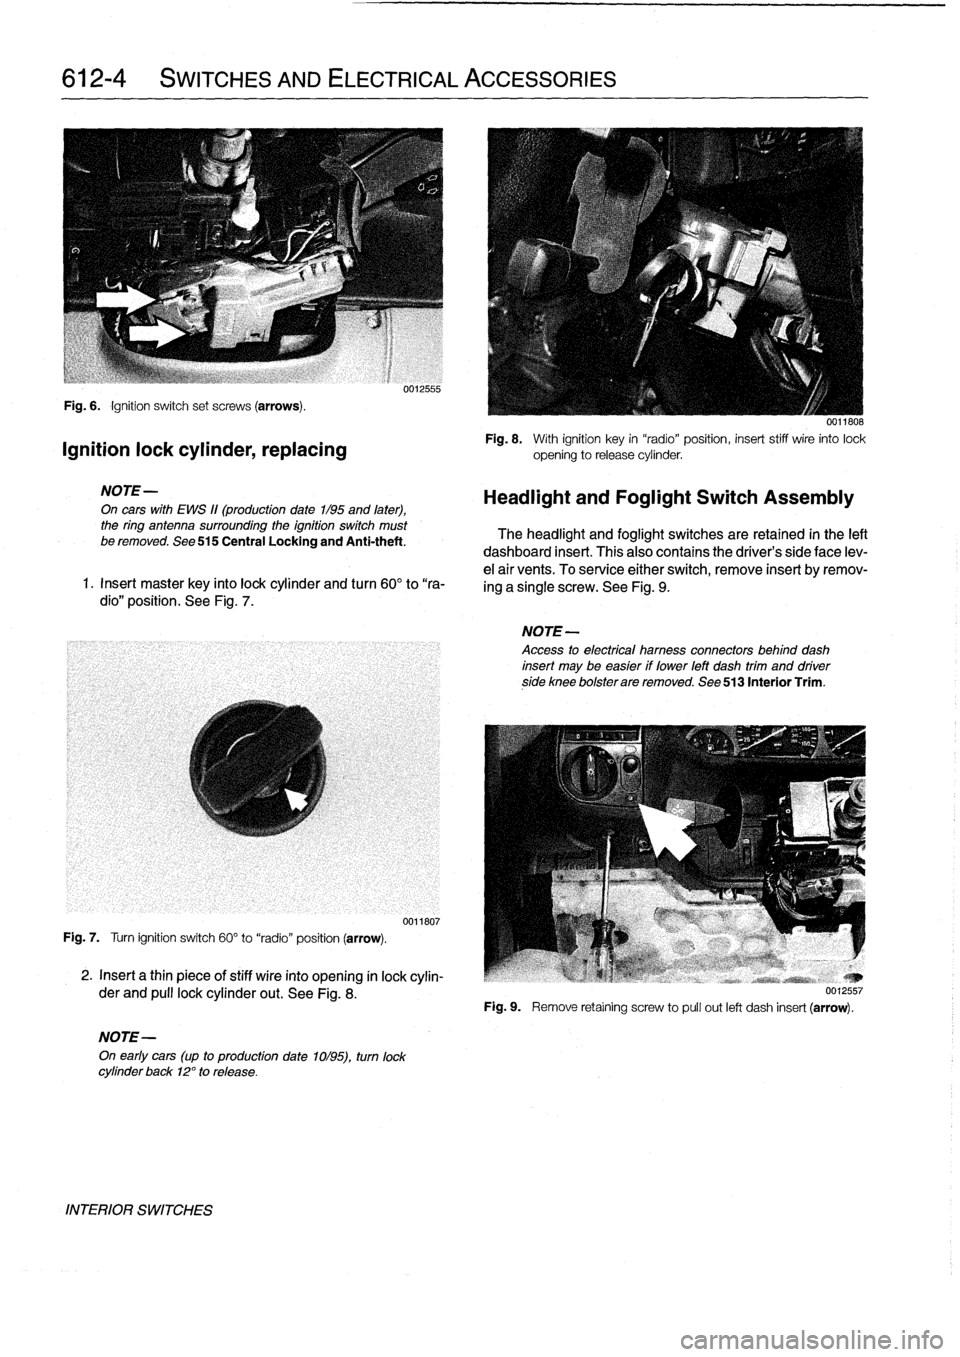
Fig
.
6
.
Ignition
switch
set
screws
(arrows)
.
Ignition
lock
cylinder,
replacing
NOTE-
On
cars
with
EWS
11(production
date
1/95
and
later),
the
ring
antenna
surrounding
the
ignition
switch
must
be
removed
.
See
515
Central
Locking
and
Anti-theft
.
1
.
Insert
master
key
finto
lock
cylinder
and
turn
60°
to
"ra-
dio"
position
.
See
Fig
.
7
.
Fig
.
7
.
Turn
ignition
switch
60°
to
"radio"
position
(arrow)
.
2
.
Insert
a
thin
piece
of
stiff
wire
into
opening
in
lock
cylin-
der
and
pull
lockcylinder
out
.
See
Fig
.
8
.
NOTE-
On
early
cars
(up
to
production
date
1ol95),
turn
lock
cylinder
back
12°
to
release
.
INTERIOR
SWITCHES
0012555
0011807
0011808
Fig
.
8
.
With
ignition
key
in
"radio"position,
insert
stiff
wire
into
lock
opening
to
release
cylinder
.
Headlight
and
Foglight
Switch
Assembly
The
headlight
and
foglight
switches
are
retained
in
the
left
dashboard
insert
.
This
alsocontains
the
driver's
side
face
lev-
e¡
air
vents
.
To
service
either
switch,
remove
insert
byremov-
ing
a
single
screw
.
See
Fig
.
9
.
NOTE-
Access
to
electrical
hamess
connectors
behind
dash
insert
may
be
easier
if
lower
left
dash
trim
and
driverside
knee
bolsterare
removed
.
See
513
Interior
Trim
.
Fig
.
9
.
Remove
retaíning
screw
to
pull
out
left
dash
insert
(arrow)
.
Page 437 of 759
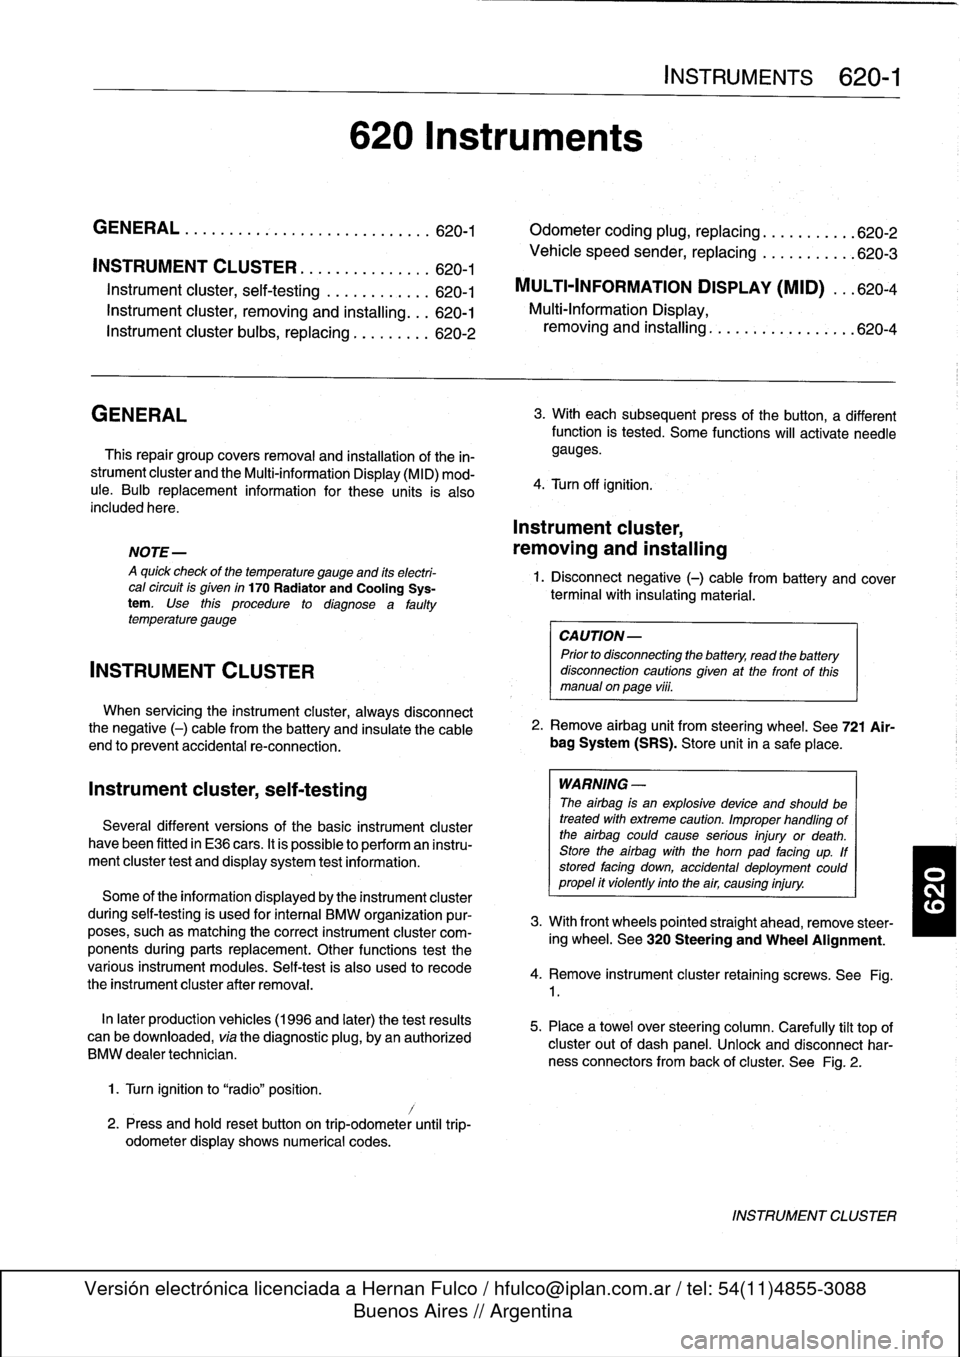
INSTRUMENT
CLUSTER
....
.
.
.
.
.
...
.
..
620-1
Instrument
cluster,
seif-testing
.
.
.......
.
..
620-1
Instrument
cluster,
removing
and
installing
...
620-1
Instrument
cluster
bulbs,
replacing
.
.
.
.
.
.
...
620-2
GENERAL
This
repair
group
covers
removal
and
installation
of
the
in-
strument
cluster
and
the
Multi-information
Display
(MID)
mod-
ule
.
Bulb
replacement
information
for
these
units
is
also
included
here
.
NOTE
-
A
quick
check
of
the
temperature
gauge
and
its
electri-
cal
circuitis
given
in
170
Radiator
and
Cooling
Sys-
tem
.
Use
this
procedure
to
diagnosea
faulty
temperature
gauge
INSTRUMENT
CLUSTER
When
servicing
the
instrument
cluster,
always
disconnect
the
negative
(-)
cable
from
the
battery
and
insulate
the
cable
end
to
prevent
accidental
re-connection
.
Instrument
cluster,
seif-testing
Severa¡
different
versions
of
the
basic
instrument
cluster
havebeen
fitted
in
E36
cars
.
It
is
possibleto
perform
an
instru-
ment
cluster
test
and
display
system
test
information
.
Some
of
the
information
displayed
by
the
instrument
cluster
during
seif-testing
is
used
for
interna¡
BMW
organizationpur-
poses,
suchasmatching
the
correct
instrument
cluster
com-
ponents
during
parts
replacement
.
Other
functions
test
the
various
instrument
modules
.
Self-test
is
also
used
to
recode
the
instrument
cluster
after
removal
.
In
later
production
vehicles
(1996
and
later)
the
test
results
canbe
downioaded,
via
the
diagnostic
plug,
byan
authorized
BMW
dealertechnician
.
1
.
Turn
ignition
to
"radio"position
.
2
.
Press
and
hold
reset
button
on
trip-odometer
untiltrip-
odometer
display
shows
numerical
codes
.
620
Instruments
4
.
Turn
off
ignition
.
Instrument
cluster,
removing
and
installing
INSTRUMENTS
620-1
GENERAL
.....
.
.
.
.
.
.
.
.
.
.........
.
....
620-1
Odometer
coding
plug,
replacing
.....
.
.
.
.
.
.
620-2
Vehicle
speed
sender,
replacing
...
.
.
.
.
.
.
.
.
620-3
MULTI-INFORMATION
DISPLAY
(MID)
.
.
.
620-4
Multi-Information
Display,
removing
and
installing
..
.
....
.
.........
620-4
3
.
With
each
subsequent
press
of
the
button,
a
different
function
is
tested
.
Some
functions
will
activate
need1e
gauges
.
1
.
Disconnect
negative
(-)
cable
from
battery
and
cover
terminal
with
insulating
material
.
CAUTION-
Prior
to
disconnectiog
the
battery,
read
the
battery
disconnection
cautionsgiven
at
the
front
of
this
manual
on
page
vi¡¡
.
2
.
Remove
airbag
unit
from
steering
wheel
.
See
721
Air-
bag
System
(SRS)
.
Store
unit
in
a
safe
place
.
WARNING
-
The
airbag
is
an
explosive
devfce
and
should
be
treated
with
extreme
caution
.
Improper
handling
of
the
airbag
could
cause
serious
injury
or
death
.
Store
the
airbag
with
the
horn
pad
facing
up
.
If
stored
facing
down,
accidental
deployment
couldpropel
it
vfolently
into
the
air,
causing
injury
.
3
.
With
front
wheels
pointed
straight
ahead,
remove
steer-
ing
wheel
.
See
320
Steering
and
Wheel
Alignment
.
4
.
Remove
instrument
cluster
retaining
screws
.
See
Fig
.
1
.
5
.
Place
a
towel
over
steering
column
.
Carefully
tilt
top
of
cluster
out
of
dash
panel
.
Unlock
and
disconnect
har-
ness
connectors
from
back
of
cluster
.
See
Fig
.
2
.
INSTRUMENT
CLUSTER
Page 456 of 759
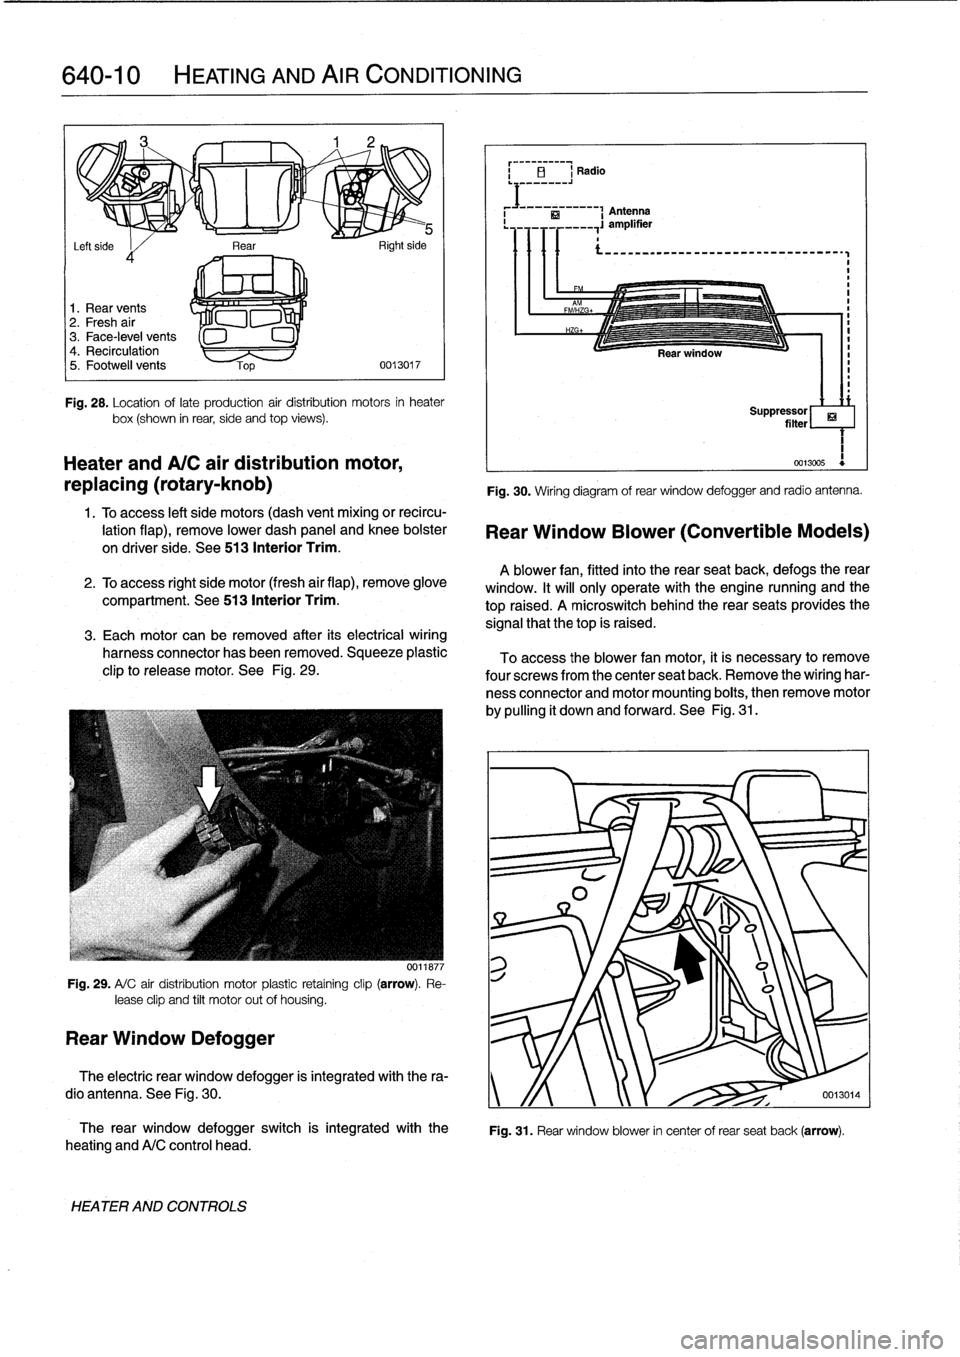
640-10
HEATING
AND
AIR
CONDITIONING
i
El
Radio
Antenna
Rear
.
,
si,-
Left
side
I
d
1
.
Rear
vents
2
.
Fresh
air
3
.
Face-level
vents
4
.
Recirculation
5
.
Footwell
vents
0013017
Fig
.
28
.
Location
oflate
production
air
distribution
motors
in
heater
box(shown
in
rear,
side
and
top
views)
.
Heater
andA/C
air
distribution
motor,
replacing
(rotary-knob)
1
.
Toaccess
left
side
motors
(dash
vent
mixing
or
recircu-
lation
flap),
remove
lower
dash
panel
and
knee
bolster
on
driver
side
.
See
513
Interior
Trim
.
2
.
To
access
right
side
motor
(fresh
air
flap),
remove
glove
compartment
.
See513
Interior
Trim
.
3
.
Each
motor
can
be
removed
after
its
electrical
wiring
harness
connector
has
been
removed
.
Squeeze
plastic
clip
to
release
motor
.
See
Fig
.
29
.
Fig
.
29
.
A/
C
air
distribution
motor
plastic
retaíning
clip
(arrow)
.
Re-
lease
clip
and
tilt
motor
out
of
housing
.
Rear
Window
Defogger
0011877
The
rear
window
defogger
switch
is
integrated
with
the
heating
andA/C
control
head
.
HEATER
AND
CONTROLS
Fig
.
30
.
Wiring
diagram
of
rear
window
defogger
and
radio
antenna
.
Rear
Window
Blower
(Convertible
Models)
A
blower
fan,
fitted
into
the
rear
seatback,
defogs
therear
window
.
It
will
only
operate
with
the
engine
nunning
and
the
top
raised
.
A
microswitch
behindthe
rear
seats
provides
the
signal
that
thetop
is
raised
.
To
access
the
blower
fan
motor,
it
is
necessary
to
remove
four
screwsfrom
the
center
seat
back
.
Remove
the
wiring
har-
ness
connector
and
motor
mounting
boits,
then
remove
motor
by
pulling
it
down
and
forward
.
See
Fig
.
31
.
ri
Suppressor
filter
1
0013005
Fig
.
31
.
Rear
window
blower
in
center
of
rear
seat
back
(arrow)
.
The
electric
rear
window
defogger
is
integrated
with
the
ra-
dio
antenna
.
See
Fig
.
30
.
y
/f
0013014