power steering BMW M3 1998 E36 User Guide
[x] Cancel search | Manufacturer: BMW, Model Year: 1998, Model line: M3, Model: BMW M3 1998 E36Pages: 759
Page 63 of 759
11
.
Draín
engine
coolant
and
Rmove
coolant
hoses
at-
tached
to
cylinder
head
.
"
Drain
engine
block
byremoving
block
drain
.
"
Disconnect
hoses
from
thermostat
housing
in
front
of
cylinder
head
.
"
Disconnect
heater
hoses
at
rear
of
engine
.
See
Fig
.
9
.
"
Drain
radiator
by
removingthreaded
plastic
plug
from
lower
left
comer
.
NOTE-
"
The
block
drain
plug
is
located
oh
the
exhaust
side
to-
wards
rear
ofengine
.
"
Remove
small
plastic
lock
clipto
pulíradiator
draín
plug
out
completely
.
NOTE-
CAUTION-
Radiatorfan
has
left
hand
threads
.
ENGINE
REMOVAL
AND
INSTALLATION
110-
5
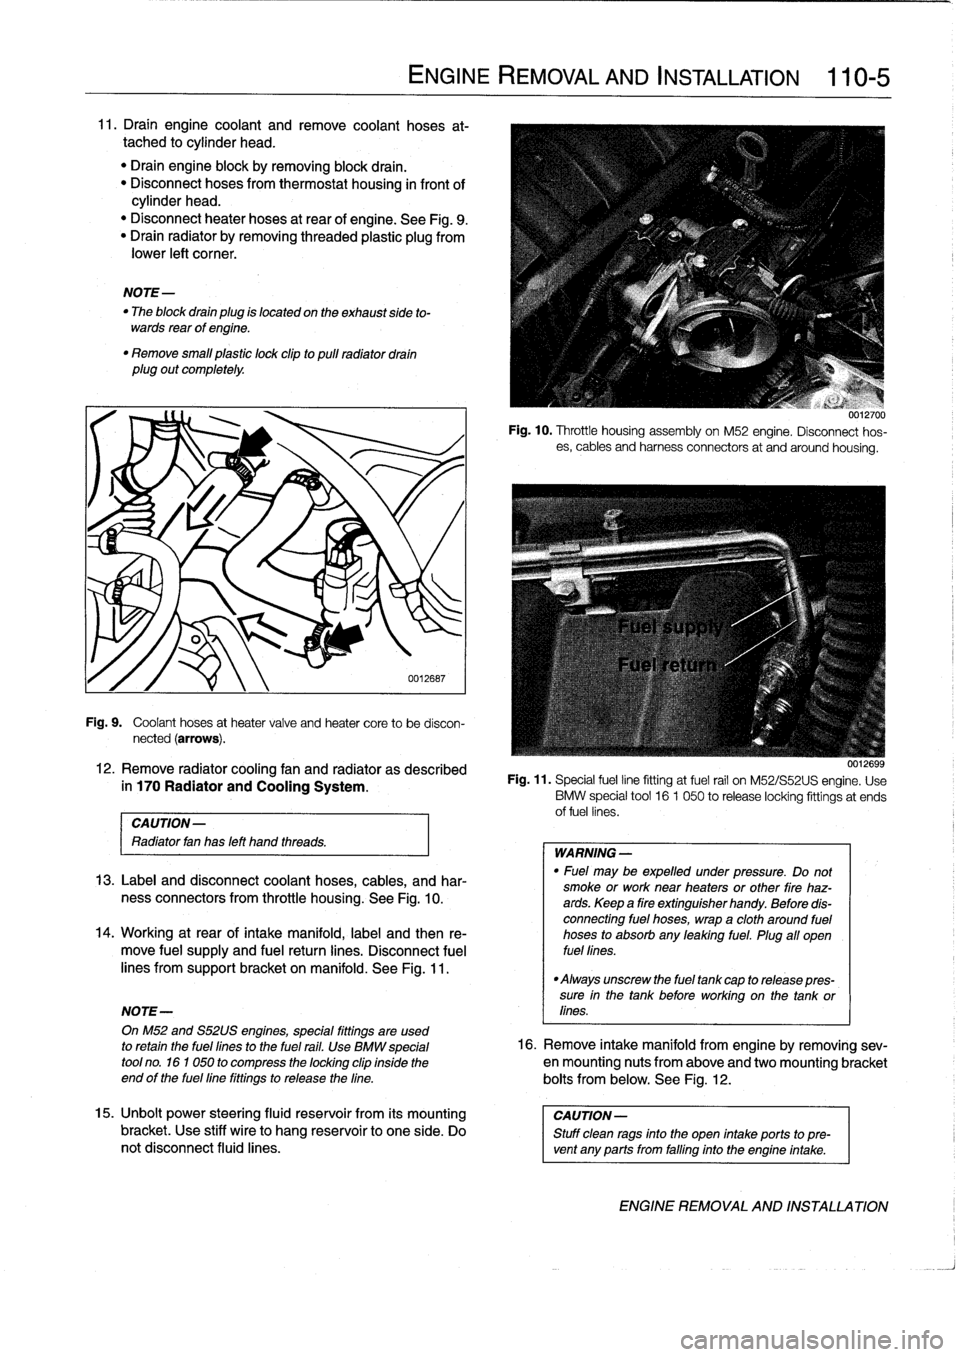
Fig
.
9
.
Coolant
hoses
at
heater
valve
and
heater
core
to
be
discon-
nected
(arrows)
.
12
.
Remove
radiator
cooling
fan
and
radiator
as
described
in
170
Radiator
and
Cooling
System
.
13
.
Label
and
disconnectcoolant
hoses,
cables,
and
har-
ness
connectors
from
throttle
housing
.
See
Fig
.
10
.
14
.
Working
atrearof
intake
manifold,
label
and
then
re-
move
fuel
supply
and
fuel
retum
lines
.
Disconnect
fuel
lines
from
support
bracket
on
manifold
.
See
Fig
.
11
.
uu12ivu
Fig
.
10
.
Throttle
housing
assemblyon
M52
engine
.
Disconnect
hos-
es,
cables
and
harness
connectors
at
and
around
housing
.
0012699
Fig
.
11
.
Special
fuelline
fitting
at
fuel
rail
on
M52/S52US
engine
.
Use
BMW
special
tool
16
1
050
to
releaselocking
fittings
at
ends
offuel
lines
.
WARNING
-
"
Fuel
may
be
expelled
under
pressure
.
Do
not
smoke
or
work
near
heaters
or
other
fire
haz-ards
.
Keep
a
fire
extinguísher
handy
.
Before
dis-
connecting
fuel
hoses,
wrapa
cloth
around
fuel
hoses
to
absorb
any
leaking
fuel
.
Plug
all
oyen
fuel
fines
.
"
Always
unscrew
the
fuel
tank
cap
to
release
pres-
sure
ín
the
tank
before
working
on
the
tank
or
lines
.
OnM52
and
S52US
engines,
special
fittings
are
used
to
retain
the
fuel
lines
to
the
fuel
rail
.
Use
BMW
special
16
.
Remove
intake
manifold
from
engine
byremoving
sev-
tool
no
.
161050
to
compress
the
locking
clip
insidethe
en
mounting
nuts
from
above
andtwo
mounting
bracket
end
of
the
fuel
line
fittings
to
release
the
fine
.
boits
from
below
.
See
Fig
.
12
.
15
.
Unbolt
power
steering
fluid
reservoir
from
its
mounting
CAllTION-
bracket
.
Use
stiff
wire
to
hang
reservoir
to
one
side
.
Do
Stuff
clean
rags
into
the
open
intake
ports
to
pre-
not
disconnect
fluid
fines
.
vent
any
parts
from
falling
into
the
engine
intake
.
ENGINE
REMOVAL
AND
INSTALLATION
Page 64 of 759
110-
6
ENGINE
REMOVAL
AND
INSTALLATION
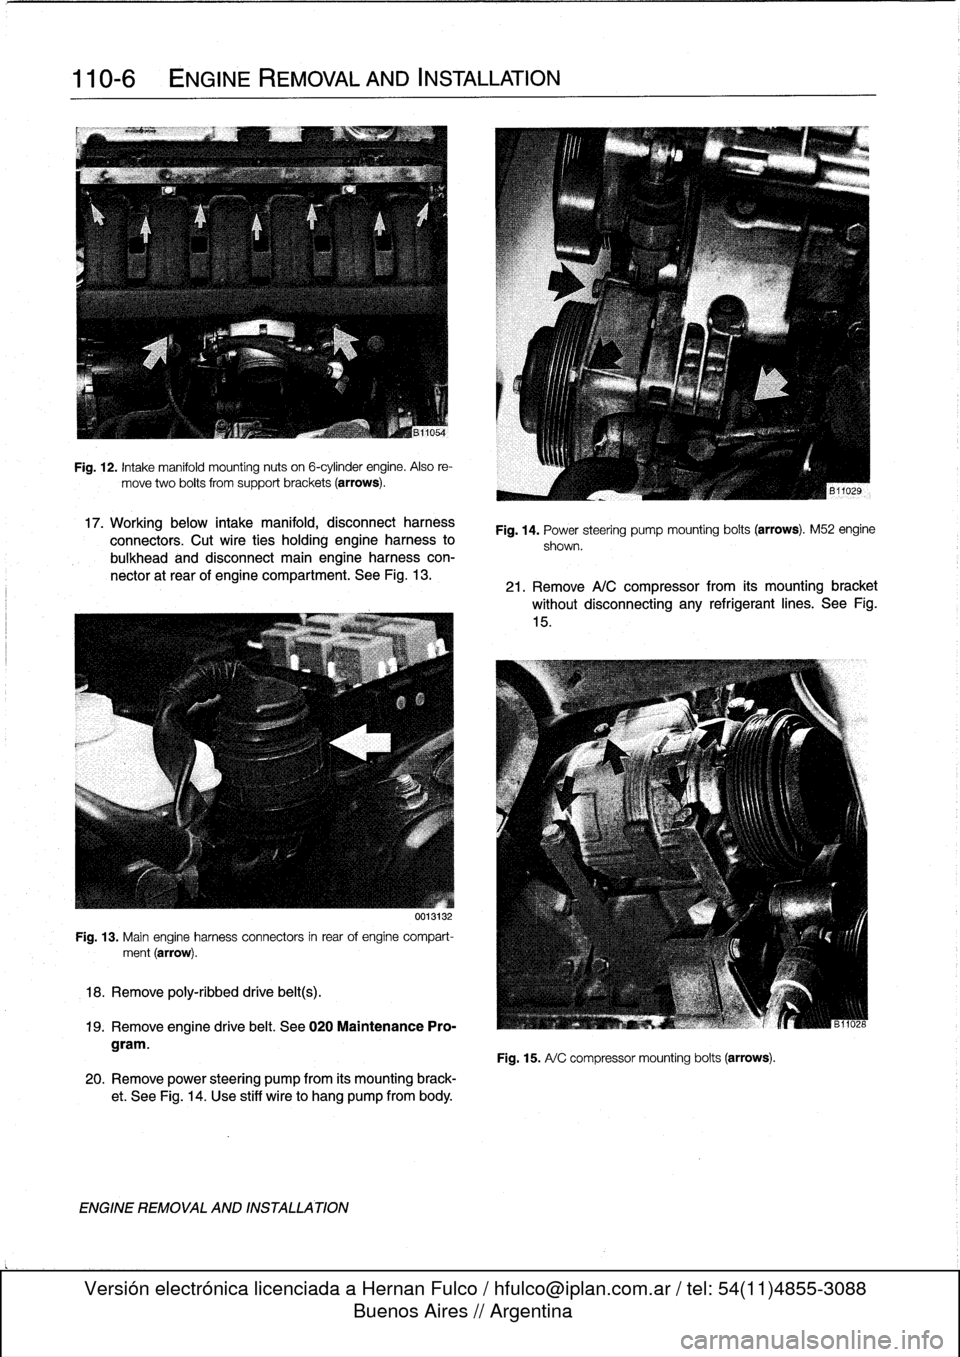
Fig
.
12
.
Intake
manifold
mounting
nuts
on
6-cylinder
engine
.
Also
re-
move
two
bolts
from
support
brackets
(arrows)
.
17
.
Working
below
intake
manifold,
disconnect
harness
connectors
.
Cut
wire
ties
holding
engine
harness
to
bulkhead
and
disconnect
main
engine
harness
con-
nector
at
rear
of
engine
compartment
.
See
Fig
.
13
.
0013132
Fig
.
13
.
Main
engine
harness
connectors
in
rear
of
engine
compart-
ment
(arrow)
.
18
.
Remove
poly-ribbed
drive
belt(s)
.
19
.
Remove
engine
drive
belt
.
See
020
Maintenance
Pro-
gram
.
20
.
Remove
power
steering
pump
from
its
mounting
brack-
et
.
See
Fig
.
14
.
Use
stiff
wire
to
hang
pump
from
body
.
ENGINE
REMOVAL
AND
INSTALLATION
Fig
.
14
.
Power
steering
pump
mounting
bolts
(arrows)
.
M52
engine
shown
.
21
.
Remove
A/C
compressor
from
its
mounting
bracket
without
disconnecting
any
refrigerantlines
.
See
Fig
.
15
.
Fig
.
15
.
A/
C
compressor
mounting
bolts
(arrows)
.
Page 117 of 759
NOTE
-
The
guide
tube
is
sealed
in
the
pan
with
an
O-ring
.
Check
that
theO-ring
comes
out
with
the
tube
.
Use
a
new
O-ring
when
installing
the
tube
.
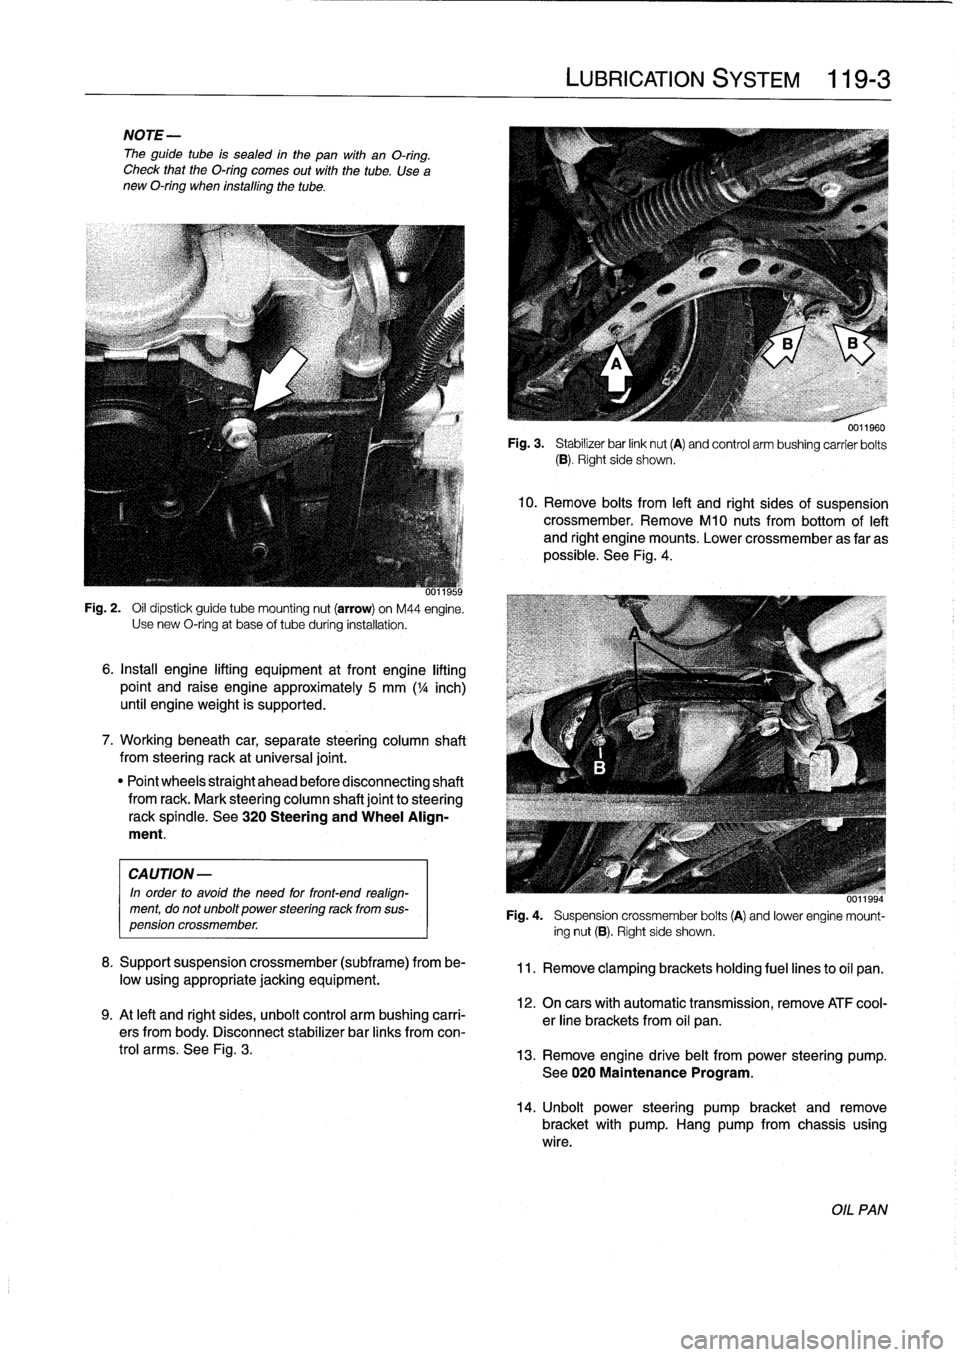
Fig
.
2
.
Oil
dipstick
guide
tube
mounting
nut
(arrow)
on
M44
engine
.
Use
new
O-ring
at
base
of
tube
during
installatidn
.
6
.
Install
engine
lifting
equipment
at
front
engine
lifting
point
and
raise
engine
approximately
5
mm
(
1
/4
inch)
until
engineweight
is
supported
.
7
.
Workingbeneath
car,
separate
steering
column
shaft
from
steeringrack
at
universal
joint
.
"
Point
wheels
straight
ahead
before
disconnecting
shaft
from
rack
.
Mark
steering
column
shaft
joint
to
steering
rackspíndle
.
See
320
Steering
and
Wheel
Align-
ment
.
CAUTION
-
In
order
to
avoíd
the
need
for
front-end
realign-
ment,
do
notunbolt
power
steering
rack
from
sus-
pension
crossmember
.
8
.
Supportsuspension
crossmember
(subframe)
from
be-
low
usingappropriate
jacking
equipment
.
9
.
At
left
and
right
sides,
unbolt
control
arm
bushing
carri-
ers
from
body
.
Disconnect
stabilizer
bar
links
fromcon-
trol
arms
.
See
Fig
.
3
.
LUBRICATION
SYSTEM
119-
3
0011960
Fig
.
3
.
Stabilizer
bar
link
nut
(A)
and
control
arm
bushing
carrier
bolts
(B)
.
Right
side
shows
.
10
.
Remove
bolts
from
left
and
right
sides
of
suspension
crossmember
.
RemoveM10
nuts
from
bottom
of
left
and
right
engine
mounts
.
Lower
crossmember
as
far
as
possible
.
See
Fig
.
4
.
uu1ibb4
Fig
.
4
.
Suspension
crossmember
bolts
(A)
and
lower
engine
mount-
ing
nut
(B)
.
Right
side
shows
.
11
.
Remove
clamping
brackets
holding
fuel
lines
to
oil
pan
.
12
.
On
cars
with
automatic
transmission,
remove
ATF
cool-
er
line
brackets
from
oil
pan
.
13
.
Remove
engine
drive
belt
from
power
steering
pump
.
See020
Maintenance
Program
.
14
.
Unbolt
power
steering
pumpbracket
andremove
bracket
with
pump
.
Hang
pump
from
chassis
using
wire
.
OIL
PAN
Page 118 of 759
119-
4
LUBRICATION
SYSTEM
15
.
Remove
oil
pan
screws
.
Lower
andremove
oil
pan
to-
ward
rear
.
Tightening
Torques
"
Control
arm
bushing
carrier
CAUTION-
to
body(M10
bolt)
...............
42
Nm
(31
ft-Ib)
'
lf
the
oil
pan
does
not
separate
easily
from
the
en-
"
Engine
mount
to
gine
cylinder
block,
make
sure
all
mounting
bolis
suspension
crossmember
(M10
nut)
.
42
Nm
(31
ft-Ib)
have
been
removed
.
If
necessary,
a
few
tapswith
"
Front
suspension
crossmember
a
rubber
mallet
shouldbreak
it
free
.
Never
pry
the
to
body
.
.
..
...
..
.
....
See
310
Front
SusPension
oil
pan
loose
.
"
Oil
pan
to
engine
block
(M6
bolt)
8
.8
grade
..
....
.
...
...
.
........
10
Nm
(89
in-lb)
16
.
Installation
is
reverse
of
removal
.
10
.9
grade
...
..
.
....
..
.
.
.
.......
12
Nm
(9
ft-Ib)
"
Thoroughly
clean
all
old
gasket
material
from
mating
"
Power
steering
pump
to
bracket
surfaces
anduse
a
new
gasket
.
(self-locking
nuts)
....
..
.
....
..
.
..
22
Nm
(16
ft-Ib)
"
Applya
small
amount
of
non-hardening
sealer
(3-
"
Power
steering
pump
bracket
to
engine
Bond
O
l209
or
equivalent)
to
oil
pan
gasket
directly
block
or
oil
pan
(self-locking
nuts)
..
.
22
Nm
(16
ft-Ib)
below
joints
for
end
cover
and
front
timing
case
cover
.
"
Stabilizer
bar
link
to
control
arm
See
Fig
.
5
.
M8
nut
.................
...
.
...
22
Nm
(17
ft-Ib)
"
When
installing
oil
pan
to
engine,
tighten
forward
M10
nut
.....................
..
42
Nm
(31
Ib-ft)
screws
first,
then
tightenrear
.
"
Steering
column
universal
joint
"
Fill
engine
with
oil
as
described
in
020
Maintenance
to
steering
rack
spindle
(M8
bolt)
....
19
Nm
(14
ft-ib)
Program
.
0011950
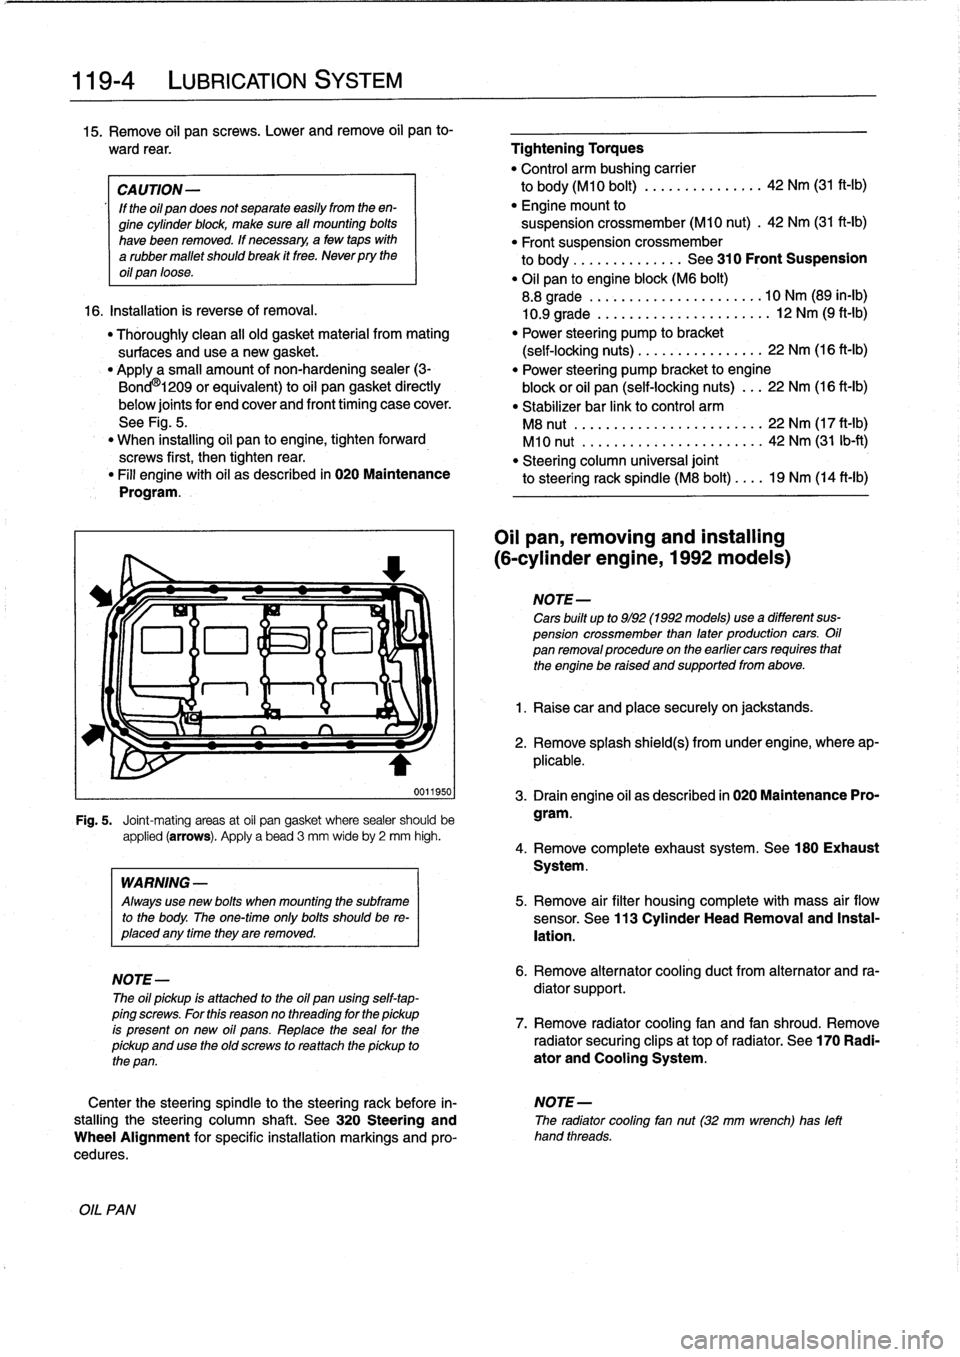
Fig
.
5
.
Joint-mating
areas
at
oil
pan
gasket
where
sealer
should
be
applied
(arrows)
.
Apply
a
bead
3
mm
wideby
2
mm
high
.
OIL
PAN
WARNING
-
Always
use
new
bolis
when
mounting
the
subframe
to
the
body
.
The
one-timeonly
bolis
shouldbe
re-
placed
any
timethey
are
removed
.
NOTE-
The
oil
pickup
is
attached
to
the
oil
pan
using
self-tap-
ping
screws
.
For
this
reasonno
threading
for
the
pickup
is
present
on
new
oil
pans
.
Replace
the
seal
for
the
pickup
and
use
the
oíd
screws
to
rea
ttach
the
pickup
to
the
pan
.
Oil
pan,
removing
and
installing
(6-cylinder
engine,
1992models)
NOTE-
Cars
built
up
to
9/92
(1992models)usea
different
sus-
pension
crossmember
than
later
production
cars
.
Oil
pan
removalprocedureon
the
earlier
cars
requires
that
the
engine
be
raised
and
supportedfrom
above
.
1
.
Raise
car
and
place
securely
on
jackstands
.
2
.
Remove
splash
shield(s)
from
under
engine,
where
ap-
plicable
.
3
.
Drain
engine
oil
as
described
in
020
Maintenance
Pro-
gram
.
4
.
Remove
complete
exhaust
system
.
See180
Exhaust
System
.
5
.
Remove
air
filter
housing
complete
with
mass
air
flow
sensor
.
See
113
Cylinder
Head
Removal
and
Instal-
lation
.
6
.
Remove
alternator
cooling
duct
from
alternator
and
ra-
diator
support
.
7
.
Remove
radiator
cooling
fan
and
fan
shroud
.
Remove
radiator
securing
clips
at
top
of
radiator
.
See
170
Radi-
ator
and
Cooling
System
.
Center
the
steering
spindle
to
the
steering
rack
before
in-
NOTE-
stalling
the
steering
column
shaft
.
See
320
Steering
and
The
radiator
cooling
fan
nut(32
mm
wrench)
has
left
Wheel
Alignment
for
specific
installation
markings
and
pro-
hand
threads
.
cedures
.
Page 119 of 759
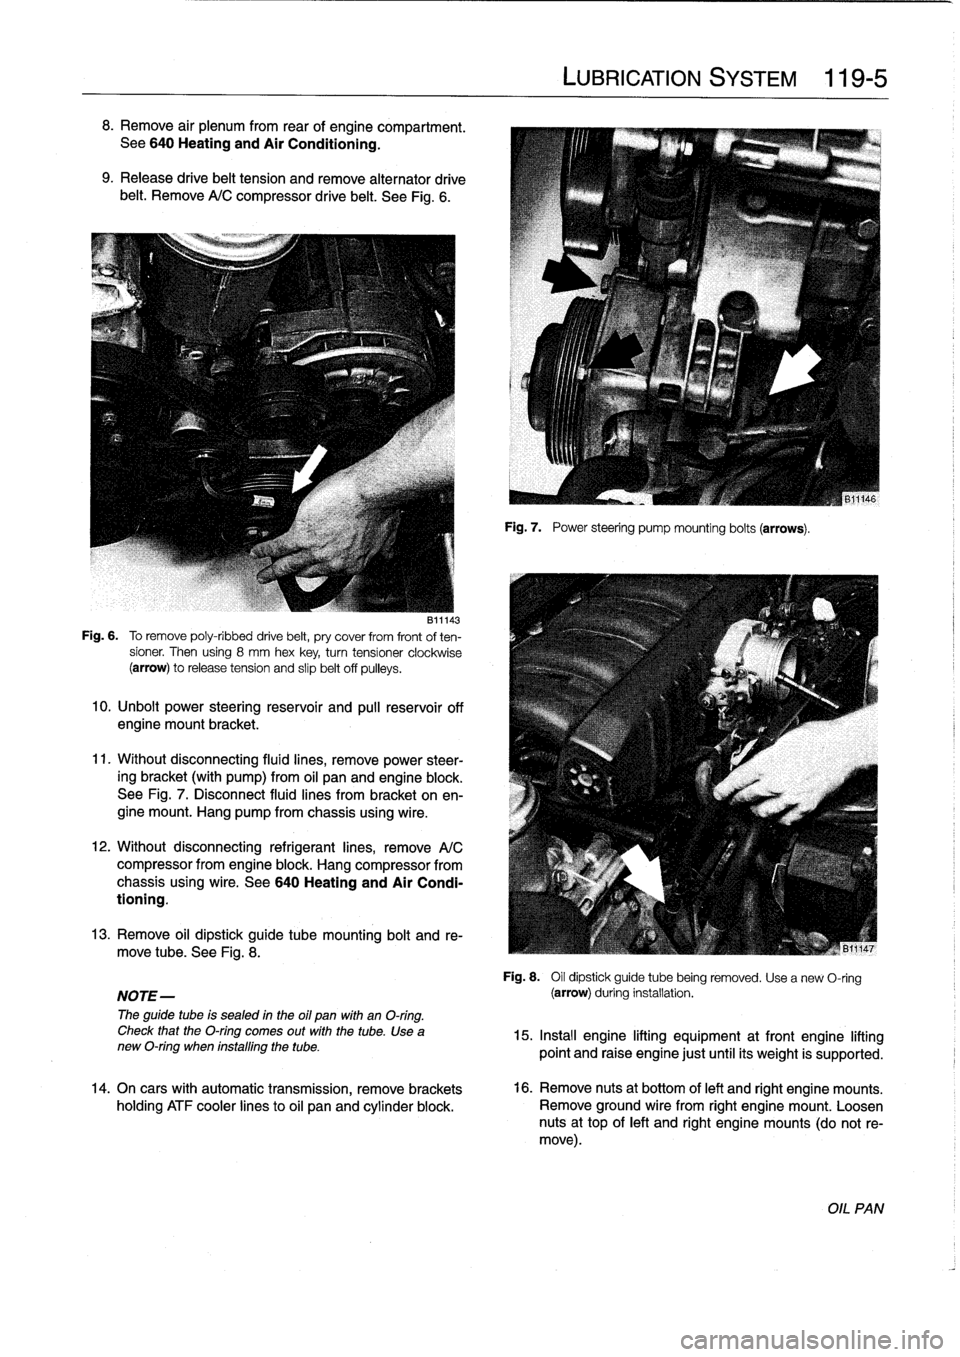
8
.
Remove
air
plenum
from
rear
of
engine
compartment
.
See
640
Heating
and
Air
Conditioning
.
9
.
Release
drive
belt
tension
and
remove
alternator
drive
belt
.
Remove
A/C
compressor
drive
belt
.
See
Fig
.
6
.
B11143
Fig
.
6
.
To
remove
poly-ribbed
drive
belt,
pry
cover
from
front
of
ten-
sioner
.
Then
using
8
mm
hex
key,
turntensioner
clockwise
(arrow)
torelease
tension
and
slip
belt
off
pulleys
.
10
.
Unbolt
power
steering
reservoir
and
pull
reservoir
off
engine
mount
bracket
.
11
.
Without
disconnecting
fluid
lines,
remove
power
steer-
ing
bracket
(with
pump)
from
oil
panand
engine
block
.
See
Fig
.
7
.
Disconnect
fluid
lines
from
bracket
on
en-
gine
mount
.
Hang
pump
from
chassis
using
wire
.
12
.
Without
disconnecting
refrigerant
lines,
remove
A/C
compressor
from
engine
block
.
Hang
compressor
from
chassis
using
wire
.
See
640
Heating
and
Air
Condi-
tioning
.
13
.
Remove
oil
dipstick
guide
tube
mounting
bolt
and
re-
move
tube
.
See
Fig
.
8
.
NOTE-
The
guide
tube
is
sealed
in
the
oil
pan
with
an
O-ring
.
Check
that
the
O-ring
comes
out
with
the
tube
.
Use
anew
O-ring
when
installing
the
tube
.
14
.
On
cars
with
automatic
transmission,
remove
brackets
holding
ATF
cooler
linesto
oil
pan
and
cylinder
block
.
LUBRICATION
SYSTEM
119-
5
Fig
.
7
.
Power
steering
pump
mounting
bolts
(arrows)
.
Fig
.
8
.
Oil
dipstick
guide
tube
being
removed
.
Usea
new
O-ring
(arrow)
during
installation
.
15
.
Insta¡¡
engine
lifting
equipment
at
front
engine
lifting
point
and
raise
engine
just
until
its
weight
is
supported
.
16
.
Remove
nuts
at
bottom
of
left
and
right
engine
mounts
.
Remove
ground
wire
from
right
engine
mount
.
1-oosen
nuts
at
top
of
left
and
right
engine
mounts
(do
not
re-
move)
.
OIL
PAN
Page 120 of 759
119-
6
LUBRICATION
SYSTEM
17
.
Raise
engine
as
much
as
possible
.
Check
carefully
for
22
.
Installation
is
reverse
of
removal
.
obstructions,
wiring
harness
clearance
and
pinched
hoses
or
lines
as
engine
is
raised
.
"
When
installing
oil
pan,
apply
a
b
d
of
non-hardening
sealing
compound
(3-Bond
1209
0
or
equivalent)
to
18
.
Remove
oil
pan
mounting
bolts
and
lower
oil
pan
to
front
and
rear
end
cover
seam
areas
on
block
.
subframe
crossmember
.
"
Position
oil
pump
pickup
tube
and
oil
pan
onto
block
and
install
pickup
tube
using
a
new
gasket
.
"
Be
sure
tab
on
gasket
faces
down
towards
intake
of
NOTE-
pickup
tube
.
If
the
oil
pan
does
not
separate
easily
from
the
engine
"
Tightenforward
oil
pan
screws
first,
then
tighten
rear
.
cylinder
block,
afew
taps
with
arubber
mallet
should
"
Fill
engine
with
oil
as
described
in
020
Maintenance
break
it
free
.
Do
not
pry
the
oil
pan
loose
.
Program
.
"
After
adding
engine
oil,
start
and
run
engine
.
Raise
en-
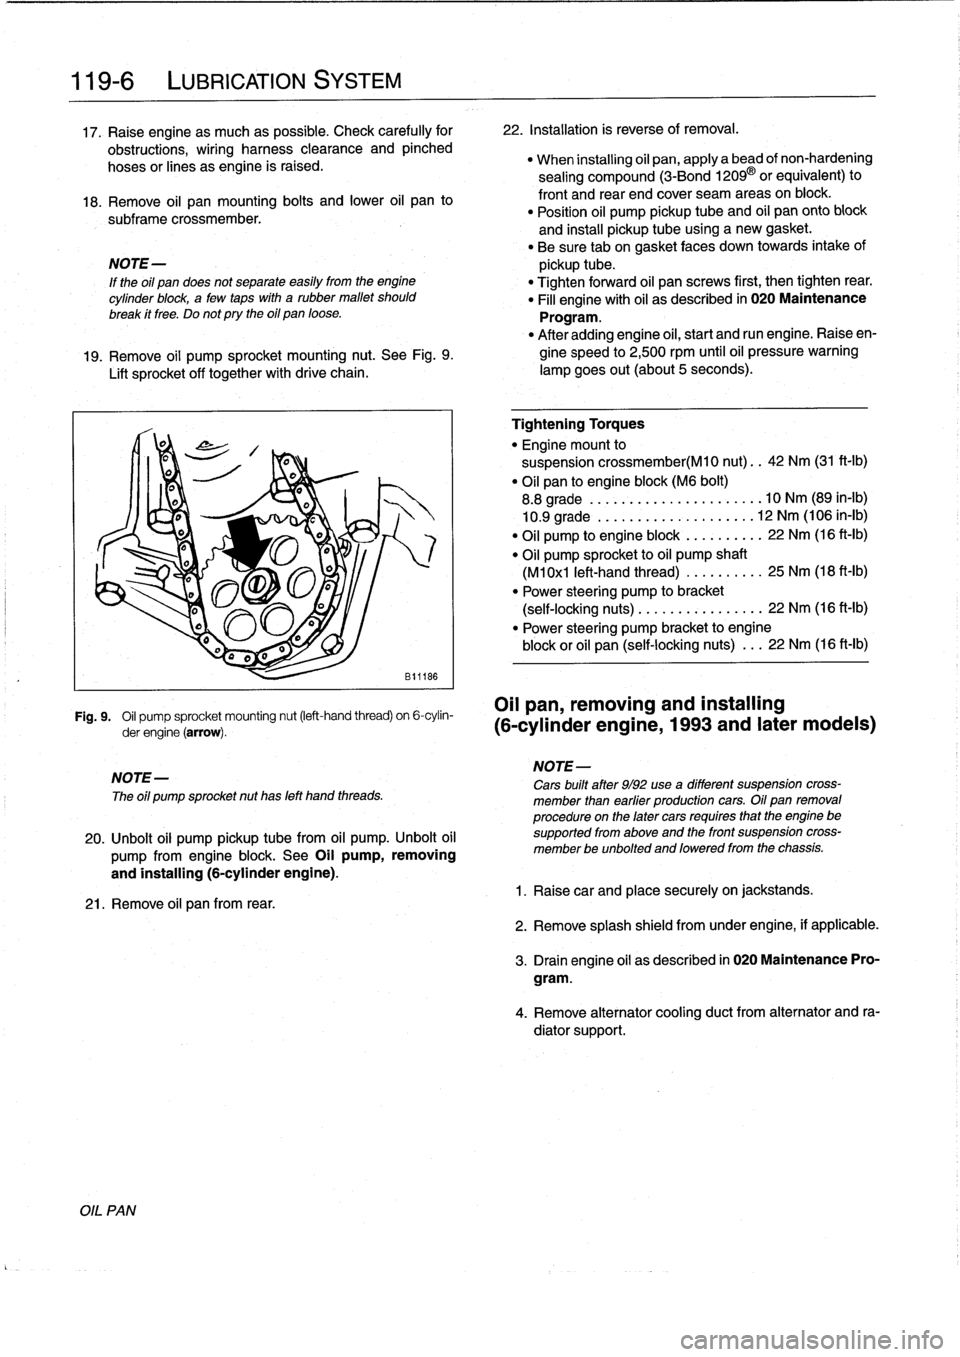
19
.
Remove
oil
pump
sprocket
mounting
nut
.
See
Fig
.
9
.
gine
speed
to
2,500
rpm
until
oil
pressure
warning
Lift
sprocket
off
together
with
drive
chain
.
lampgoes
out(about
5seconds)
.
Fig
.
9
.
Oil
pump
sprocket
mounting
nut
(left-hand
thread)
on
6-cylin-
OII
pan,
removing
and
installing
derengine(arrow)
.
(6-cylinder
engine,
1993
and
later
modeis)
NOTE-
The
oíl
pump
sprocket
nut
has
left
hand
threads
.
20
.
Unbolt
oil
pump
pickup
tubefrom
oil
pump
.
Unbolt
oil
pump
from
engine
block
.
See
Oil
pump,
removing
and
installing
(6-cylinder
engine)
.
21
.
Remove
oil
pan
from
rear
.
Tightening
Torques
"
Engine
mount
to
suspension
crossmember(M10
nut)
..
42
Nm
(31
ft-Ib)
"
Oil
pan
to
engine
block
(M6
bolt)
8
.8
grade
....
..
.
...
...
.
........
10
Nm
(89
in-lb)
10
.9
grade
.
.
..
.
..
...
.
.
.
.
.
.....
12
Nm
(106
in-lb)
"
Oil
pump
to
engine
block
.
...
...
.
..
22
Nm
(16
ft-Ib)
"
Oil
pump
sprocket
to
oil
pump
shaft
(M1
0x1
left-hand
thread)
...
..
.
.
..
.
25
Nm
(18
ft-Ib)
"
Power
steering
pump
to
bracket
(self-locking
nuts)
.....
.
....
..
.
...
22
Nm
(16
ft-lb)
"
Power
steering
pump
bracket
to
engine
block
or
oil
pan
(self-locking
nuts)
.
..
22
Nm
(16
ft-Ib)
NOTE-
Cars
built
after
9/92
use
a
different
suspension
cross-
member
¡han
earfier
productíon
cars
.
Oil
pan
removal
procedure
on
the
later
cars
requíres
that
the
engine
be
supported
from
aboye
and
the
front
suspension
cross-
member
be
unbolted
and
loweredfrom
the
chassis
.
1
.
Raisecar
and
place
securely
on
jackstands
.
2
.
Remove
splash
shield
fromunder
engine,
if
applicable
.
3
.
Drain
engine
oil
as
descríbed
in
020
Maintenance
Pro-
gram
.
4
.
Remove
alternator
cooling
duct
from
alternator
and
ra-
diator
support
.
Page 121 of 759
5
.
Remove
air
filter
housingcomplete
with
mass
air
flow
sensor
.
See113
Cylinder
HeadRemoval
and
Instal-
lation
.
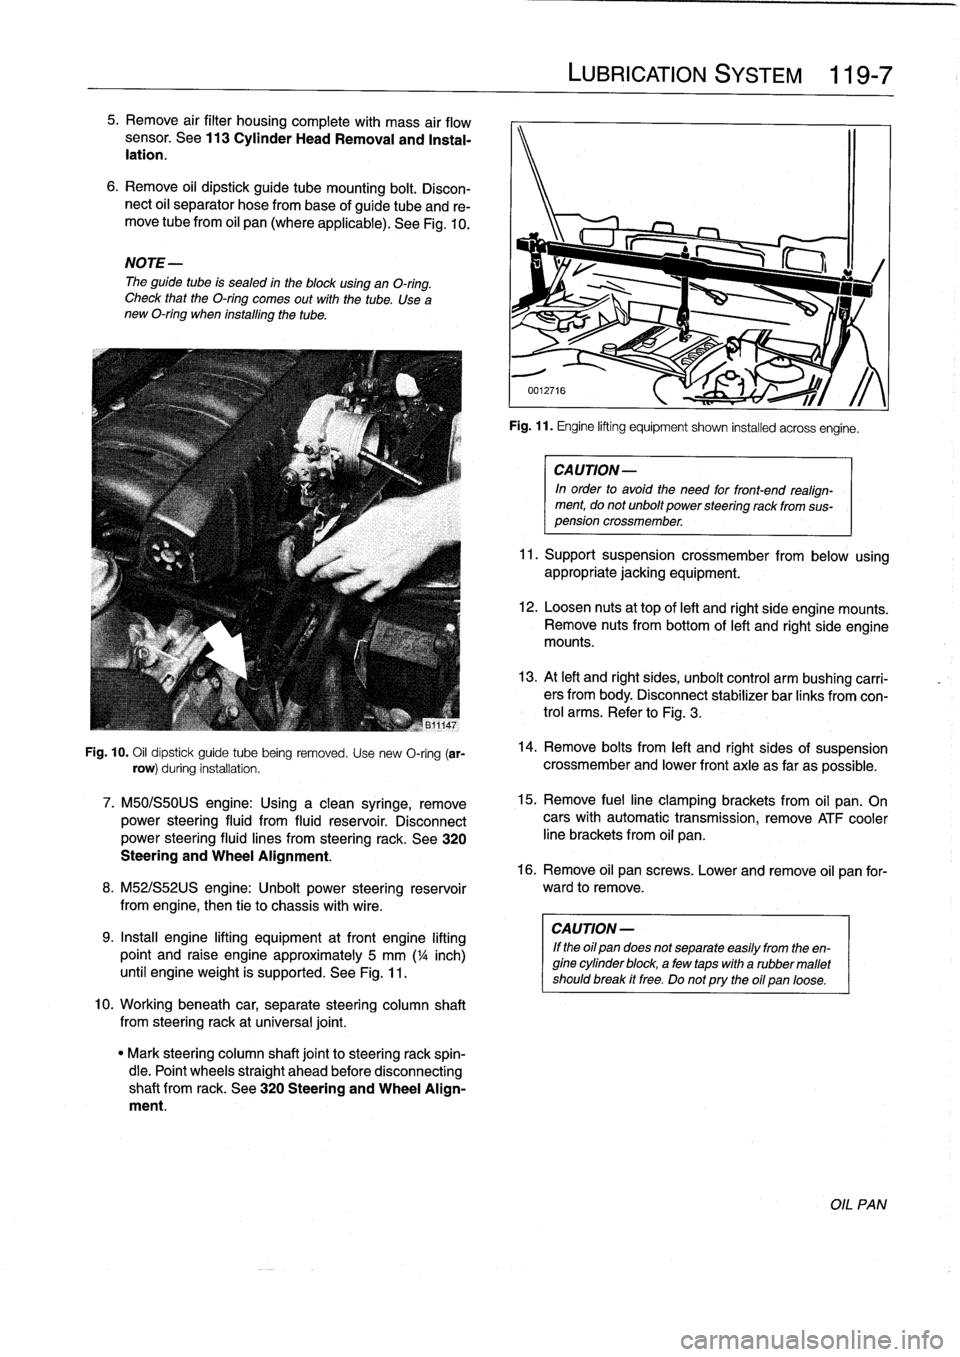
6
.
Remove
oil
dipstick
guide
tube
mounting
bolt
.
Discon-
nect
oil
separator
hose
frombase
of
guide
tube
and
re-
move
tubefrom
oil
pan
(where
applicable)
.
See
Fig
.
10
.
NOTE-
The
guide
tube
is
sealed
in
the
blockusing
an
O-ring
.
Check
that
the
O-ring
comes
out
with
the
tube
.
Use
a
new
O-ring
when
installing
the
tube
.
Fig
.
10
.
Oil
dipstick
guide
tube
being
removed
.
Use
new
O-ring
(ar-
row)
during
installation
.
7
.
M50/S50US
engine
:
Using
a
clean
syringe,
remove
power
steering
fluid
from
fluid
reservoir
.
Disconnect
power
steering
fluid
lines
from
steering
rack
.
See
320
Steering
and
Wheel
Alignment
.
8
.
M52/S52US
engine
:
Unbolt
power
steering
reservoir
from
engíne,
then
tie
to
chassis
with
wire
.
9
.
Insta¡¡
engine
lifting
equipment
atfront
engine
lifting
point
and
raise
engine
approximately
5
mm
('/a
inch)
until
engineweight
is
supported
.
See
Fig
.
11
.
10
.
Workingbeneath
car,
separate
steering
column
shaft
from
steeringrack
at
universal
joint
.
"
Mark
steering
column
shaft
jointto
steering
rack
spin-
dle
.
Point
wheels
straight
ahead
before
disconnecting
shaft
from
rack
.
See
320
Steering
and
Wheel
Align-
ment
.
LUBRICATION
SYSTEM
119
Fig
.
11
.
Engine
lifting
equipment
shown
installed
acrossengíne
.
CA
UTION-
In
order
to
avoid
the
need
for
front-end
realign-
ment,
donot
unbolt
power
steering
rack
from
sus-
pension
crossmember
.
11
.
Support
suspension
crossmember
from
below
using
appropriate
jacking
equipment
.
12
.
Loosen
nuts
at
top
of
left
and
right
side
engine
mounts
.
Remove
nuts
from
bottom
of
left
and
right
side
engine
mounts
.
13
.
At
left
and
right
sides,
unbolt
control
arm
bushíng
carri-
ers
from
body
.
Disconnect
stabilizer
bar
links
fromcon-
trol
arms
.
Refer
to
Fig
.
3
.
14
.
Remove
bolts
from
left
and
right
sides
of
suspension
crossmember
and
lower
front
axle
as
far
as
possible
.
15
.
Remove
fuelline
clamping
brackets
from
oil
pan
.
On
cars
with
automatic
transmission,
remove
ATF
cooler
line
brackets
from
oil
pan
.
16
.
Remove
oil
pan
screws
.
Lower
and
remove
oil
pan
for-
ward
to
remove
.
CA
UTION-
If
the
oil
pan
does
not
separate
easily
from
the
en-
gine
cylinder
block,
a
few
taps
with
a
rubber
mallet
shouldbreak
it
free
.
Do
notpry
the
oil
pan
loose
.
OIL
PAN
Page 122 of 759
119-
8
LUBRICATION
SYSTEM
17
.
Installation
is
reverse
of
removal
.
"
Thoroughly
clean
all
old
gasket
material
from
mating
surtaces
anduse
a
new
gasket
.
"
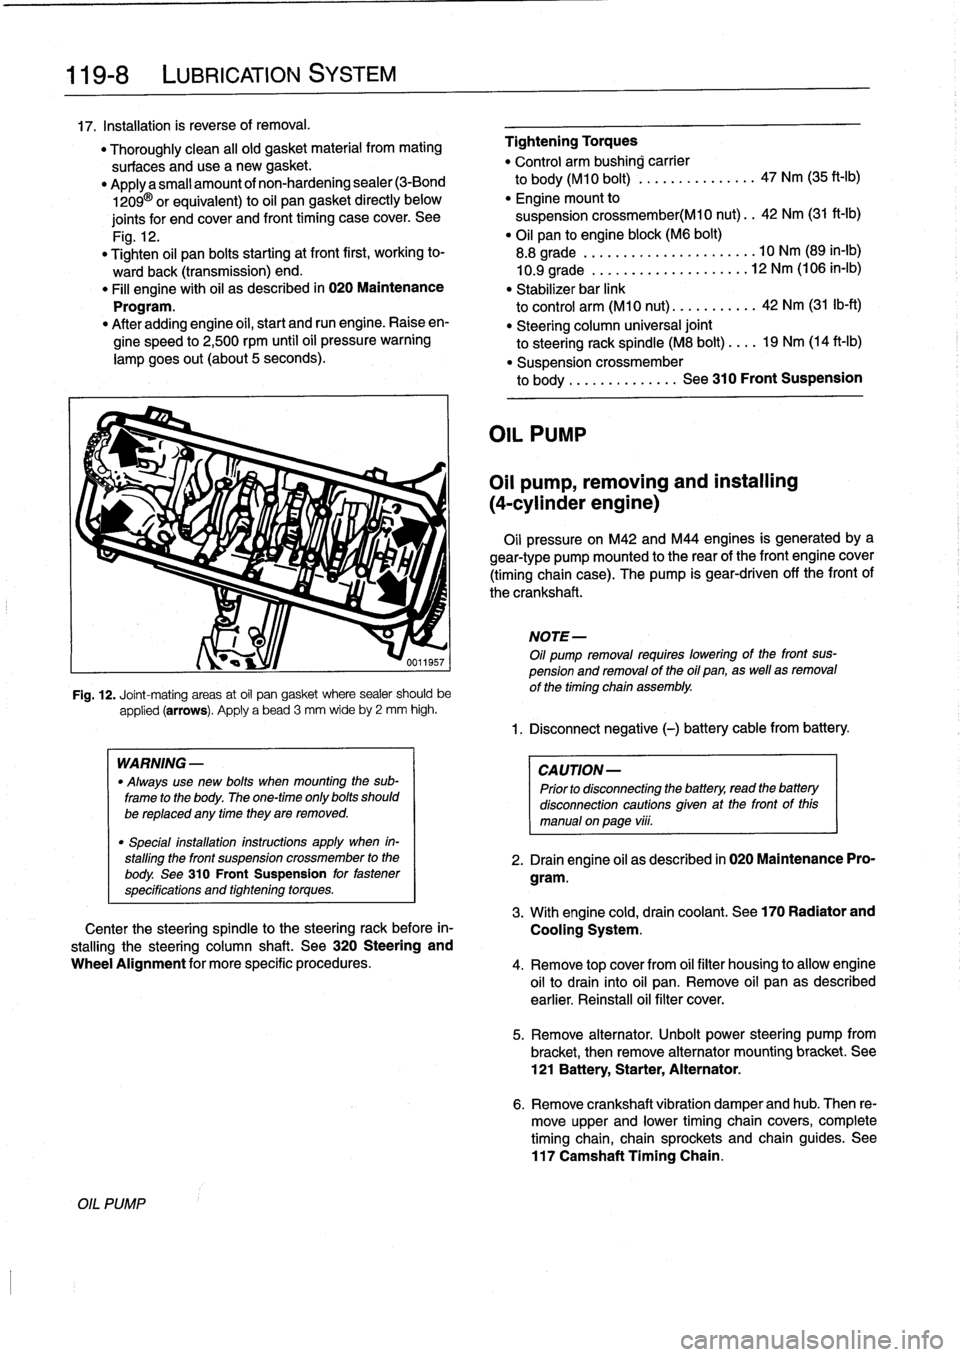
Applya
small
amount
of
non-hardening
sealer
(3-Bond
1209
0
or
equivalent)
to
oil
pan
gasket
directly
below
joints
for
and
cover
and
front
timing
case
cover
.
See
Fig
.
12
.
"
Tighten
oil
pan
bolts
starting
at
front
first,
working
to-
wardback
(transmission)
end
.
"
Fill
engine
with
oil
as
described
in
020
Maintenance
Program
.
"
After
addingengine
oil,
start
and
run
engine
.
Raiseen-
gine
speed
to
2,500
rpm
until
oíl
pressure
warning
lampgoes
out
(about
5seconds)
.
OIL
PUMP
applied
(arrows)
.
Apply
a
bead
3
mm
wideby
2
mm
high
.
WARNING
-
"
Always
use
new
bolts
when
mounting
the
sub-
frame
to
the
body
.
The
one-time
only
bolts
should
be
replaced
any
timethey
are
removed
.
"
Special
installation
instructions
apply
when
in-
stalling
the
front
suspension
crossmember
to
the
body
.
See
310
Front
Suspension
for
fastener
specifications
and
tightening
torques
.
Fig
.
12
.
Joint-mating
areas
at
oil
pan
gasket
where
sealer
should
be
Center
the
steering
spindle
to
the
steering
rack
before
in-
stalling
the
steering
column
shaft
.
See
320
Steering
and
Wheel
Alignment
for
more
specific
procedures
.
Tightening
Torques
"
Control
arm
bushing
carrier
to
body
(M10
bolt)
...............
47
Nm
(35
ft-Ib)
"
Engine
mount
to
suspension
crossmember(M10
nut)
..
42
Nm
(31
ft-Ib)
"
Oil
pan
to
engine
block
(M6
bolt)
8
.8
grade
...........
.......
....
10
Nm
(89
in-lb)
10
.9
grade
...........
..
...
...
.
12
Nm
(106
in-lb)
"
Stabilizer
bar
link
to
control
arm
(M10
nut)
.......
....
42
Nm
(31
Ib-ft)
"
Steering
column
universal
joint
to
steering
rack
spindle
(M8
bolt)
....
19
Nm
(14
ft-Ib)
"
Suspensíon
crossmember
to
body
...
...
.
...
..
.
.
See
310
Front
Suspension
OIL
PUMP
Oil
pump,
removing
and
installing
(4-cylinder
engine)
Oil
pressure
on
M42
and
M44
engines
is
generatedbya
gear-type
pump
mounted
to
the
rear
of
the
front
engine
cover
(timing
chaincase)
.
The
pump
is
gear-driven
off
the
front
of
the
crankshaft
.
NOTE-
Oil
pump
removal
requires
lowering
of
the
front
sus-
pension
and
removal
of
the
oil
pan,
as
well
asremoval
of
the
timing
chain
assembly
.
1
.
Disconnect
negative
(-)
battery
cable
from
battery
.
CAUTION-
Prior
to
disconnectiog
the
battery,
read
the
battery
disconnection
cautions
given
at
the
front
of
this
manual
on
paga
vÍii
.
2
.
Drain
engine
oil
as
described
in
020
Maintenance
Pro-
gram
.
3
.
Withengine
cold,
drain
coolant
.
See
170
Radiator
and
Cooling
System
.
4
.
Remove
top
cover
from
oil
filter
housing
to
allow
engine
oil
to
drain
into
oil
pan
.
Remove
oil
pan
as
described
earlier
.
Reinstall
oil
filter
cover
.
5
.
Remove
alternator
.
Unbolt
power
steering
pump
from
bracket,
then
remove
alternator
mountíng
bracket
.
See
121
Battery,
Starter,
Alternator
.
6
.
Remove
crankshaft
vibration
damper
andhub
.
Then
re-
move
upper
and
lower
timing
chain
covers,
complete
timingchain,
chain
sprockets
and
chain
guides
.
See
117
Camshaft
Tíming
Chain
.
Page 250 of 759
300-2
SUSPENSION,
STEERING
AND
BRAKES-GENERAL
Steering
INTEGRATED
SYSTEMS
The
steering
linkage
connects
the
rack-and-pinion
unit
through
tie
rodsto
the
steering
arms
.
The
tie
rod
ends
allow
the
wheels
to
pivot
and
react
to
suspension
travel
.
Rear
Suspension
The
rear
axle
carrier
is
the
main
mounting
point
for
the
final
drive
housing
and
the
rear
suspension
components
.
Trailing
arms
locatethe
rear
wheels
and
anchorthe
springs,
shocks
and
stabilizer
bar
.
Driveaxies
with
constant-velocity
(CV)
joints
at
both
ends
transfer
power
from
the
differential
to
the
road
wheels
.
The
differential
is
mounted
to
the
rearaxle
carrier
through
rubber
mountsand
bushings
to
hele
isolate
drivetrain
noise
and
vibration
.
Brakes
E36
cars
areequipped
with
power
disc
brakes
with
an
inte-
gral
antilock
brakes
(ABS)
.
The
parking
brake
is
a
dual-drum
system
integrated
with
the
rear
brake
rotors
.
See
Fig
.
3
.
Power
assist
is
provided
by
a
vacuum
booster
when
the
en-
gine
is
running
.
The
brakepedal
pushrod
is
connected
directly
to
the
master
cylinder,
so
failure
of
the
vacuum
booster
does
not
normally
result
in
total
brake
failure
.
0012124
Each
disc
brakeuses
a
caliper
with
a
single
hydraulic
cylin-
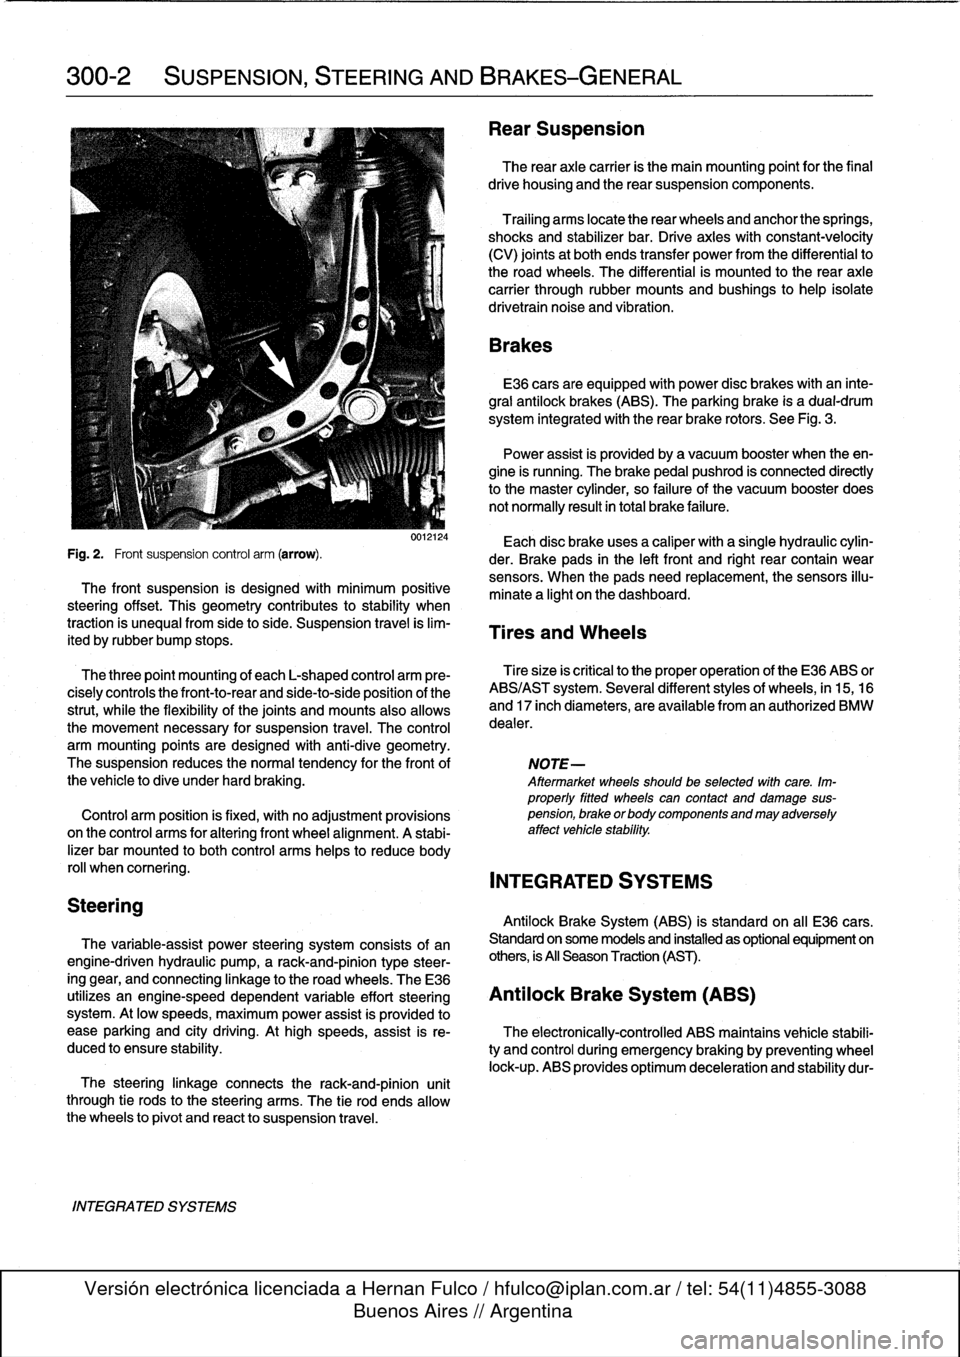
Fig
.
2
.
Front
suspension
control
arm
(arrow)
.
der
.
Brake
pads
in
the
left
front
and
right
rear
contain
wear
sensors
.
When
the
padsneed
replacement,the
sensors
illu-
The
front
suspension
is
designed
with
minimum
positive
minate
a
light
on
the
dashboard
.
steering
offset
.
This
geometry
contributes
to
stability
when
traction
is
unequalfrom
side
to
side
.
Suspension
travel
is
lim-
Tires
and
Wheels
ited
by
rubber
bump
stops
.
The
three
point
mounting
of
each
L-shaped
control
arm
ere-
Tiresize
is
critica¡
to
the
proper
operatíon
of
the
E36
ABS
or
cisely
controls
the
front-to-rear
and
side-to-side
position
of
the
ABS/AST
system
.
Severa¡
different
styles
of
wheels,
in
15,16
strut,
while
the
flexibility
of
the
joints
and
mounts
alsoallows
and
17
inch
diameters,
are
available
from
an
authorized
BMW
the
movement
necessary
for
suspension
travel
.
The
control
dealer
.
arm
mounting
points
are
designed
with
anti-dive
geometry
.
The
suspension
reduces
the
normaltendency
for
the
front
of
NOTE-
the
vehicle
to
dive
under
hard
braking
.
Aftermarket
wheelsshould
be
selected
wlth
care
.
Im-
properly
fitted
wheels
can
contact
anddamage
sus
Control
arm
position
is
fixed,
with
no
adjustment
provisions
pension,
brakeorbodycomponentsandmayadversely
on
the
control
arms
for
alter¡ng
front
wheel
al
ignment
.
A
stabi-
affect
vehicle
stability
.
lizer
bar
mounted
to
both
control
arms
heles
to
reduce
body
rol¡
whencomering
.
INTEGRATED
SYSTEMS
Antilock
Brake
System
(ABS)
is
standard
on
all
E36
cars
.
The
variable-assist
power
steering
system
consists
of
an
Standard
on
some
models
and
installed
as
optional
equipment
on
engine-driven
hydraulic
pump,
a
rack-and-pinion
type
steer-
others,
is
All
Season
Traction
(AST)
.
ing
gear,
and
connecting
linkage
to
the
road
wheels
.
TheE36
utilizes
an
engine-speed
dependent
variable
effort
steering
Antilock
Brake
System
(ABS)
system
.
At
low
speeds,
maximum
power
assist
is
provided
to
ease
parking
and
city
driving
.
Athigh
speeds,
assist
is
re-
The
electronically-controlled
ABS
maintains
vehícle
stabili
duced
to
ensure
stability
.
ty
and
control
during
emergency
braking
by
preventing
wheel
lock-up
.
ABS
provides
optimum
deceleration
and
stability
dur-
Page 253 of 759
NOTE-
The
traction
control
system
referred
to
as
AST
(all
sea-
son
traction)
may
also
be
referred
to
as
ASC
(Automat-
ic
Stability
Control)
and
ASC+T
(Automatic
Stability
Control+Traction)
.
The
AST
system
improves
traction
by
electronically
apply-
ing
the
rear
brakes
when
therear
drive
wheels
are
spinning
at
a
faster
rate
than
the
front
wheels
.
The
combined
ABS/AST
control
module,
operating
through
the
ABS
hydraulic
control
unit,
modulates
braking
force
at
therear
wheels
.
In
addition,
AST
uses
retarded
ignition
timing
and
an
auxil-iary
engine
throttle
plate
to
reduceengine
torque
and
maintain
vehicle
stability
.
The
auxiliary
throttle
plate
is
held
open
by
spring
pressure
.
The
AST
system
actívates
the
auxiliary
throttie
position
motor
(ADS)
to
cose
the
AST
throttle
as
needed
.
This
reduces
the
volume
of
engine
intake
air
.
Due
to
the
throttle
closing
very
rapidly
during
AST
operationthe
driver
cannot
increase
theengine
power
output
regardless
of
how
far
theaccelerator
pedal
is
pushed
to
the
floor
.
The
auxiliary
throttle
plate
is
placed
ahead
of
the
conven-
tional
throttle
plate
in
the
throttle
body
.
Traction
control
also
comes
into
operationduringdecelera-
tion
.
Decelerating
on
snowy
or
icy
road
surfaces
can
lead
to
rear
wheel
slip
.
If
a
rear
wheel
startsto
drag
or
lock
up
when
the
throttle
is
closed
rapidly
orduringdownshifting,the
AST
system
can
limit
the
problem
by
advancing
the
ignition
timing
.
A
switch
on
the
center
console
is
used
to
togglethe
AST
on
or
off
.
The
AST
system
is
designed
to
be
maintenance
free
.
There
are
no
adjustments
that
can
be
made
.
Repair
and
trouble-
shooting
of
the
AST
system
requires
special
test
equipment
andknowledgeand
should
be
performed
only
by
an
autho-
rized
BMW
dealer
.
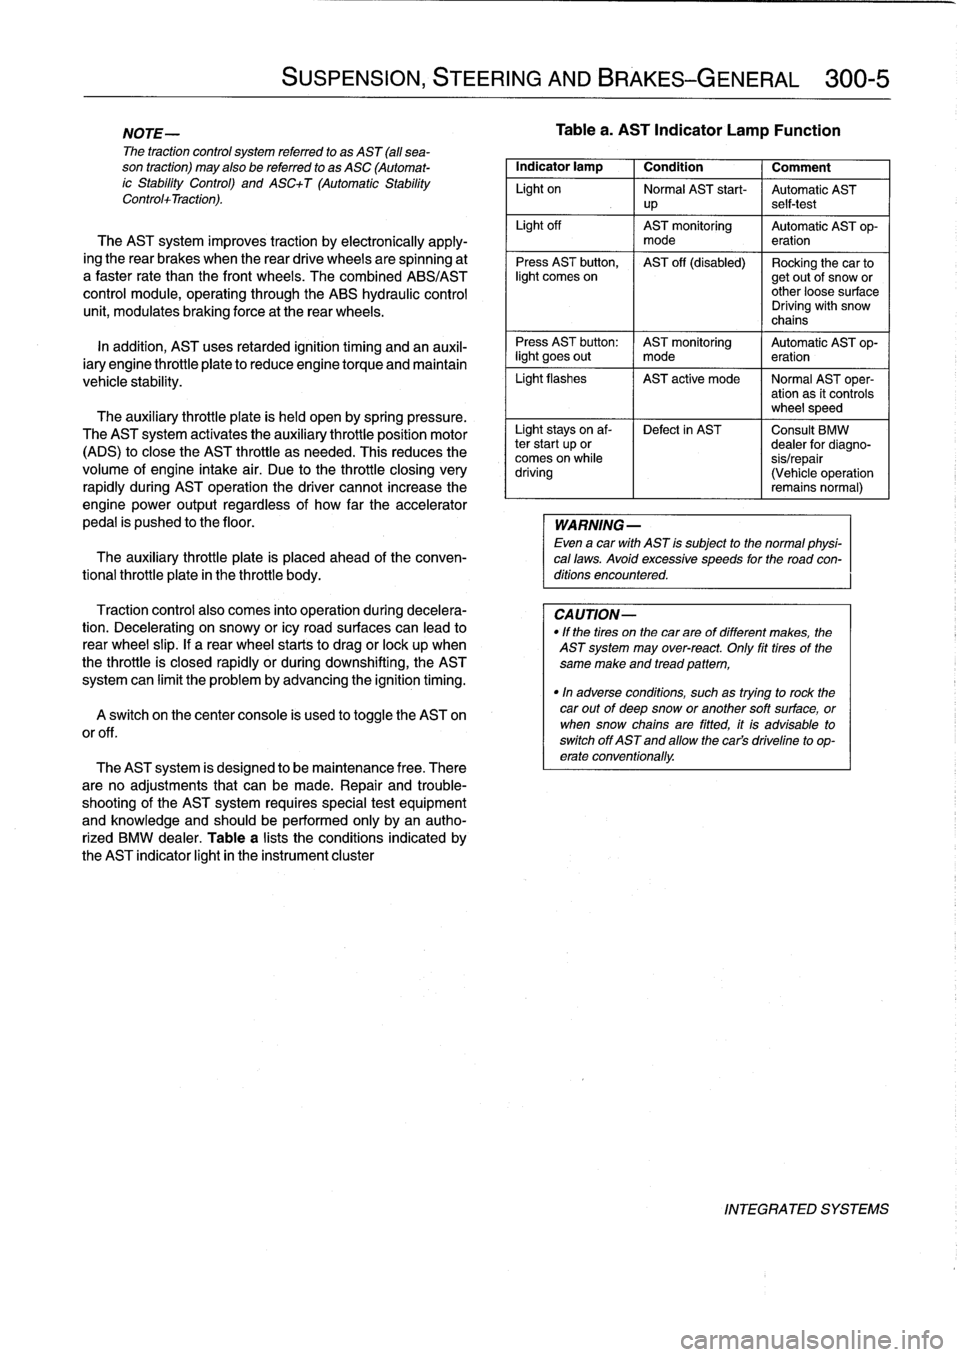
Table
a
lists
theconditions
indicated
by
the
AST
indicator
light
in
the
instrument
cluster
SUSPENSION,
STEERING
AND
BRAKES-GENERAL
300-5
Tablea
.
AST
Indicator
Lamp
Function
Indicator
lamp
1
Condition
1
Comment
Light
on
Normal
AST
start-
Automatic
AST
up
self-test
Light
off
AST
monitoring
Automatic
AST
op-
mode
eration
Press
AST
button,
AST
off
(disabled)
Rocking
the
car
tolight
comes
on
getout
of
snow
or
other
loose
surface
Driving
with
snow
chains
Press
AST
button
:
AST
monitoring
Automatic
AST
op-
light
goes
out
I
mode
eration
Light
flashes
AST
active
mode
I
Normal
AST
oper-
ation
as
it
controls
wheel
speed
Light
stays
on
af-
Defect
in
AST
Consult
BMW
ter
start
up
or
dealer
for
diagno-
comes
on
while
sis/repair
driving
(Vehicle
operation
remains
normal)
WARNING
-
Even
a
car
with
AST
is
subject
to
the
normal
physi-
cal
laws
.
Avoid
excessive
speeds
for
the
road
con-
ditions
encountered
.
CAUTION-
"
If
the
tires
on
the
carare
of
different
makes,
the
AST
system
may
over-react
.
Only
fit
tires
of
the
same
make
and
tread
pattem,
"In
adverse
conditions,
such
as
trying
to
rock
the
car
outof
deep
snow
or
another
soft
surface,
or
when
snow
chainsare
fitted,
it
is
advisable
to
switch
off
AST
and
allow
the
cars
driveline
to
op-
erate
conventionally
.
INTEGRATED
SYSTEMS